Note: You must track a case using the standard Case object type to be able to submit or distribute the report, if required.
| Field | Description |
|---|---|
| Pregnancy Conception Date | Specify the date of conception for the parent's pregnancy. Use the calendar pop-up tool or enter the date manually. |
| Pregnancy Due Date | Specify the expected due date for the parent's pregnancy. Use the calendar pop-up tool or enter the date manually. |
| Gestation Age at Onset | For a fetus report, enter the gestation period at the onset of the adverse event. The patient's Age at Onset must be less than 1.5 years for this field to appear. In the first field, enter a numeric value. In the second field, select the unit of measurement. |
| Gestation Age at Outcome | For a fetus report, select the gestation period at the outcome of the adverse event. Select the number of complete weeks and days of gestation. For example, selecting ten weeks and six days is a total of 76 days of gestation. |
| Breastfeeding | Select whether breastfeeding occurred at any time before, during, or after the exposure. |
| Timing of Exposure in Pregnancy | Select the applicable timings of exposure in the pregnancy. |
| Fetal/Infant Status | Select the status of the fetus or infant. |
| Fetal Defect | Select the option that best describes whether a fetal defect was reported. |
| Fetal Outcome | Select the option that best describes the fetal outcome. |
| Congenital Anomaly | Select the option that best describes whether a congenital anomaly was reported. |
| Sponsor Pregnancy Awareness | When the sponsor or company was made aware of the pregnancy. Select from the following options:
|
| Para/Parity | Enter the number of completed pregnancies beyond 20 weeks gestation, whether viable or nonviable. Count a multiple gestation pregnancy as a single birth. |
| Gravida/Gravidity | Enter the number of pregnancies the parent has had. Count a multiple gestation pregnancy as a single pregnancy. |
| Number of Fetuses | Enter the number of fetuses for this pregnancy. |
| Pregnancy Outcome | Select the option that best describes the outcome of the pregnancy. |
| Date of Pregnancy Outcome | Enter the date of the pregnancy outcome. |
| Delivery Method | Select the option that best describes the delivery method for this pregnancy. |
| Cesarean Type | If the Delivery Method is Cesarean section, select the type of cesarean section. |
| Field | Description |
|---|---|
| Organization | Select the organization that develops the suspect product or sponsors the study. |
| Parent Information | Vault populates a reference link to the parent Case. |
| Child Initials | Enter the child's name or initials. If the source report omits this information, use the Reason Omitted field to describe why the information is unavailable. |
| Child Name Prefix | Enter the child's name prefix or title. If the source report omits this information, use the Reason Omitted field to describe why the information is unavailable. |
| Child First Name | Enter the child's first name. If the source report omits this information, use the Reason Omitted field to describe why the information is unavailable. |
| Child Middle Name | Enter the child's middle name. If the source report omits this information, use the Reason Omitted field to describe why the information is unavailable. |
| Child Last Name | Enter the child's last name. If the source report omits this information, use the Reason Omitted field to describe why the information is unavailable. |
| Date of Birth | Enter the child's birth date. Use the Calendar pop-up tool to select a date or enter the date manually. |
| Child Age | Enter the child's age. Enter a number in the first field. Then, select the age unit of measurement from the drop-down menu. When a unit other than years is selected, the age in years (normalized) value is calculated and displayed on the Parent Information when you save the record. |
| Sex | Select the child's sex. Depending on your Admin's configuration, this field may be labeled Gender. |
| Height | Enter the child's height. In the first field, enter a number. In the second field, select the unit of measurement. |
| Weight | Enter the child's weight. In the first field, enter a numeric value. In the second field, select the unit of measurement. |
| Hospital MRN | Enter the child's medical record number with a hospital and the hospital's record number. You can enter multiple sets of record numbers in this field. |
| GP MRN | Enter the child's medical record number with a general practitioner and the general practitioner's record number. You can enter multiple sets of record numbers in this field. |
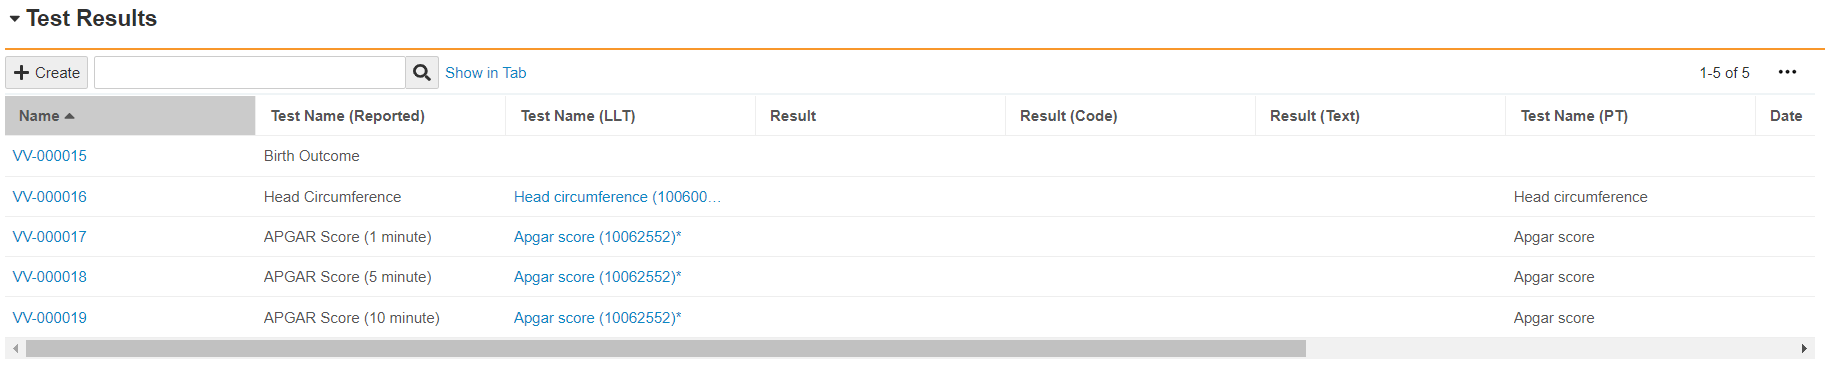
For more information on _Case Test Results_, see Case Field Reference.
## Entering Birth Outcomes
If an adverse event occurs in the fetus or child, it must be captured and reported using a standard _Case_. See [example scenarios][1] below for more information. Capture the adverse event in the child in a standard _Case_ and link the pregnancy _Case_ through the _Linked Cases_ section. For E2B transmissions, you must link the child _Case_ with a _Parent Information_ record. To do so, you must create a _Parent Information_ record.
### Add Parent Information {#add-parent-case}
For a parent-child case, use the _Parent Information_ field in the _Patient_ section of the standard _Case_ to capture E2B-compliant parent information using a _Parent Information_ type of _Case_.
1. On the _Case_ with the adverse event in the child, expand the **Patient** section.
2. In the **Parent Information** field, select the **Advanced Search** (| Field | Description |
|---|---|
| Organization | The organization that develops the suspect product or sponsors the study. Vault populates this field with the Organization from the child Case. |
| Patient Initials / ID | Enter the parent's name or initials. If the source report omits this information, use the Reason Omitted field to describe why the information is unavailable. |
| Patient Name Prefix | Enter the parent's name prefix or title. If the source report omits this information, use the Reason Omitted field to describe why the information is unavailable. |
| Patient First Name | Enter the parent's first name. If the source report omits this information, use the Reason Omitted field to describe why the information is unavailable. |
| Patient Middle Name | Enter the parent's middle name. If the source report omits this information, use the Reason Omitted field to describe why the information is unavailable. |
| Patient Last Name | Enter the parent's last name. If the source report omits this information, use the Reason Omitted field to describe why the information is unavailable. |
| Date of Birth | Enter the parent's birth date. Use the Calendar pop-up tool to select a date or enter the date manually. For Vault to export this value to E2B Transmissions, the full date is required with year, month, and day. |
| Age at Onset | Enter the parent's age at the onset of the adverse event in the child. Enter a number in the first field. Then, select the age unit of measurement from the drop-down menu. When a unit other than years is selected, the age in years (normalized) value is calculated and displayed on the Parent Information when you save the record. |
| Age at Vaccination | The parent's age at the time of being administered the primary vaccine-type product. This field is used in FDA VAERS reporting. Vault automatically calculates this field when a Case is promoted or updated. If you manually enter a value after the auto-calculation, Vault retains the manually entered value. If you manually enter a value and then edit a field used in the auto-calculation, Vault will re-calculate and override the manually entered value, assuming there is sufficient data for calculation. You can also disable auto-calculation for this field to retain the manually entered value. For more information, see Manage Auto-Calculation Override. Vault automatically calculates this field when the primary Case Product is a Vaccine-type product. The age at vaccination is calculated using the time interval between the following dates:
Note: Both date fields must be precise to at least the day to be used for auto-calculation. |
| Sex | Select the parent's sex. If the source report omits this information, use the Reason Omitted field to describe why the information is unavailable. Depending on your Admin's configuration, this field may be labeled Gender. |
| Last Menstrual Period | Enter the date when the parent, last experienced a menstrual period. This field is available only if the Sex field is set to Female. |
| Pregnancy | Use this checkbox to identify a case as a pregnancy Case for tracking and capturing pregnancy information. When you select the Pregnancy checkbox, after saving the Parent Information you can enter pregnancy information and outcomes in the available fields. |
| Pregnant at Exposure | Indicates whether the parent was pregnant at the time of vaccination or drug exposure. This field is available only if the Sex field is set to Female. This field is used in FDA VAERS reporting. If the patient was pregnant at the time of exposure, select Yes. If the source report omits this information, use the Reason Omitted field to describe why the information is unavailable. |
| Height | Enter the parent's height. In the first field, enter a number. In the second field, select the unit of measurement. |
| Weight | Enter the parent's weight. In the first field, enter a numeric value. In the second field, select the unit of measurement. |
| Race | Select the parent's race from the picklist. If the source report omits this information, use the Reason Omitted field to describe why the information is unavailable. |
| Ethnicity | Select the parent's ethnicity from the picklist. If the source report omits this information, use the Reason Omitted field to describe why the information is unavailable. |
| Medical History | Enter the parent's medical history and concurrent conditions, which could not be coded as Medical History records. If there is no medical history, you can specify None. |
| Study | The study the tracked pregnancy is associated with. This field appears when the Pregnancy checkbox is selected on the Parent Information record. Vault automatically sets the Study based on the Study associated with the child Case. Otherwise, you can manually select the Study. |
| Study Site | The study site the tracked pregnancy is associated with. This field appears when the Pregnancy checkbox is selected on the Parent Information record. Vault automatically sets the Study based on the Study Site associated with the child Case. Otherwise, you can manually select the Study Site. |
| Field | Description |
|---|---|
| Case | Vault populates a reference link to the Parent Information. |
| Condition/Procedure | Enter the reported term in the text field to code the MedDRA term. |
| Start Date | The date when the medical condition started. Use the calendar pop-up tool to select a date or enter the date manually. If the source report omits this information, use the Reason Omitted field to describe why the information is unavailable. |
| Continuing | Select Yes or No to indicate whether the medical condition is currently ongoing. If the source report omits this information, use the Reason Omitted field to describe why the information is unavailable. |
| End Date | The date when the medical condition stopped. Use the calendar pop-up tool to select a date or enter the date manually. If the source report omits this information, use the Reason Omitted field to describe why the information is unavailable. |
| Family History | Select Yes or No to indicate whether another family member experienced the same medical condition. |
| Illness at Vaccination? | Select Yes or No to indicate whether the illness, condition, or symptom was present at or about the time of vaccination. |
| Comments | Enter any additional relevant information about the medical condition. |
| Field | Description |
|---|---|
| Case | Vault populates a reference link to the Case. |
| Drug Name (Reported) | Enter the name of the product, as reported by the source. |
| WHODrug | The product code from the WHODrug dictionary. After entering the reported drug name, select Search WHODrug to automatically populate the search query. Browse and select the appropriate product code using the WHODrug search window. |
| MPID | The Medicinal Product Identifier (MPID) for the product. This field appears after coding the WHODrug product code. Vault populates this field based on the selection from the WHODrug dictionary. |
| Version | The WHODrug version for the MPID. This field appears after coding the WHODrug product code. Vault populates this field based on the selection from the WHODrug dictionary. |
| Start Date | The date and time when the product was first administered. Use the calendar pop-up tool to select a date or enter the date manually. |
| End Date | The date and time when the product was last administered. Use the calendar pop-up tool to select a date or enter the date manually. |
| Indication (LLT) | The MedDRA LLT for the product use indication. Enter the term in the text field to code the MedDRA term. |
| Reaction (LLT) | The MedDRA LLT for the reaction to the product. Enter the term in the text field to code the MedDRA term. |
| Age at Vaccination | The parent's age at the time of vaccination. Vault recalculates and updates this field any time a field used to calculate this value is updated. If you manually enter a value after the auto-calculation, Vault retains the manually entered value. If you manually enter a value and then edit a field used in the auto-calculation, Vault will re-calculate and override the manually entered value, assuming there is sufficient data for calculation. You can also disable auto-calculation for this field to retain the manually entered value. For more information, see Manage Auto-Calculation Override. Vault automatically calculates this field when the primary Case Product is a Vaccine-type product. The age at vaccination is calculated using the time interval between the following dates:
Note: Both date fields must be precise to at least the day to be used for auto-calculation. |
Note: In the following example scenarios, it is assumed that you are already tracking the pregnancy in a standard Case with no adverse event.
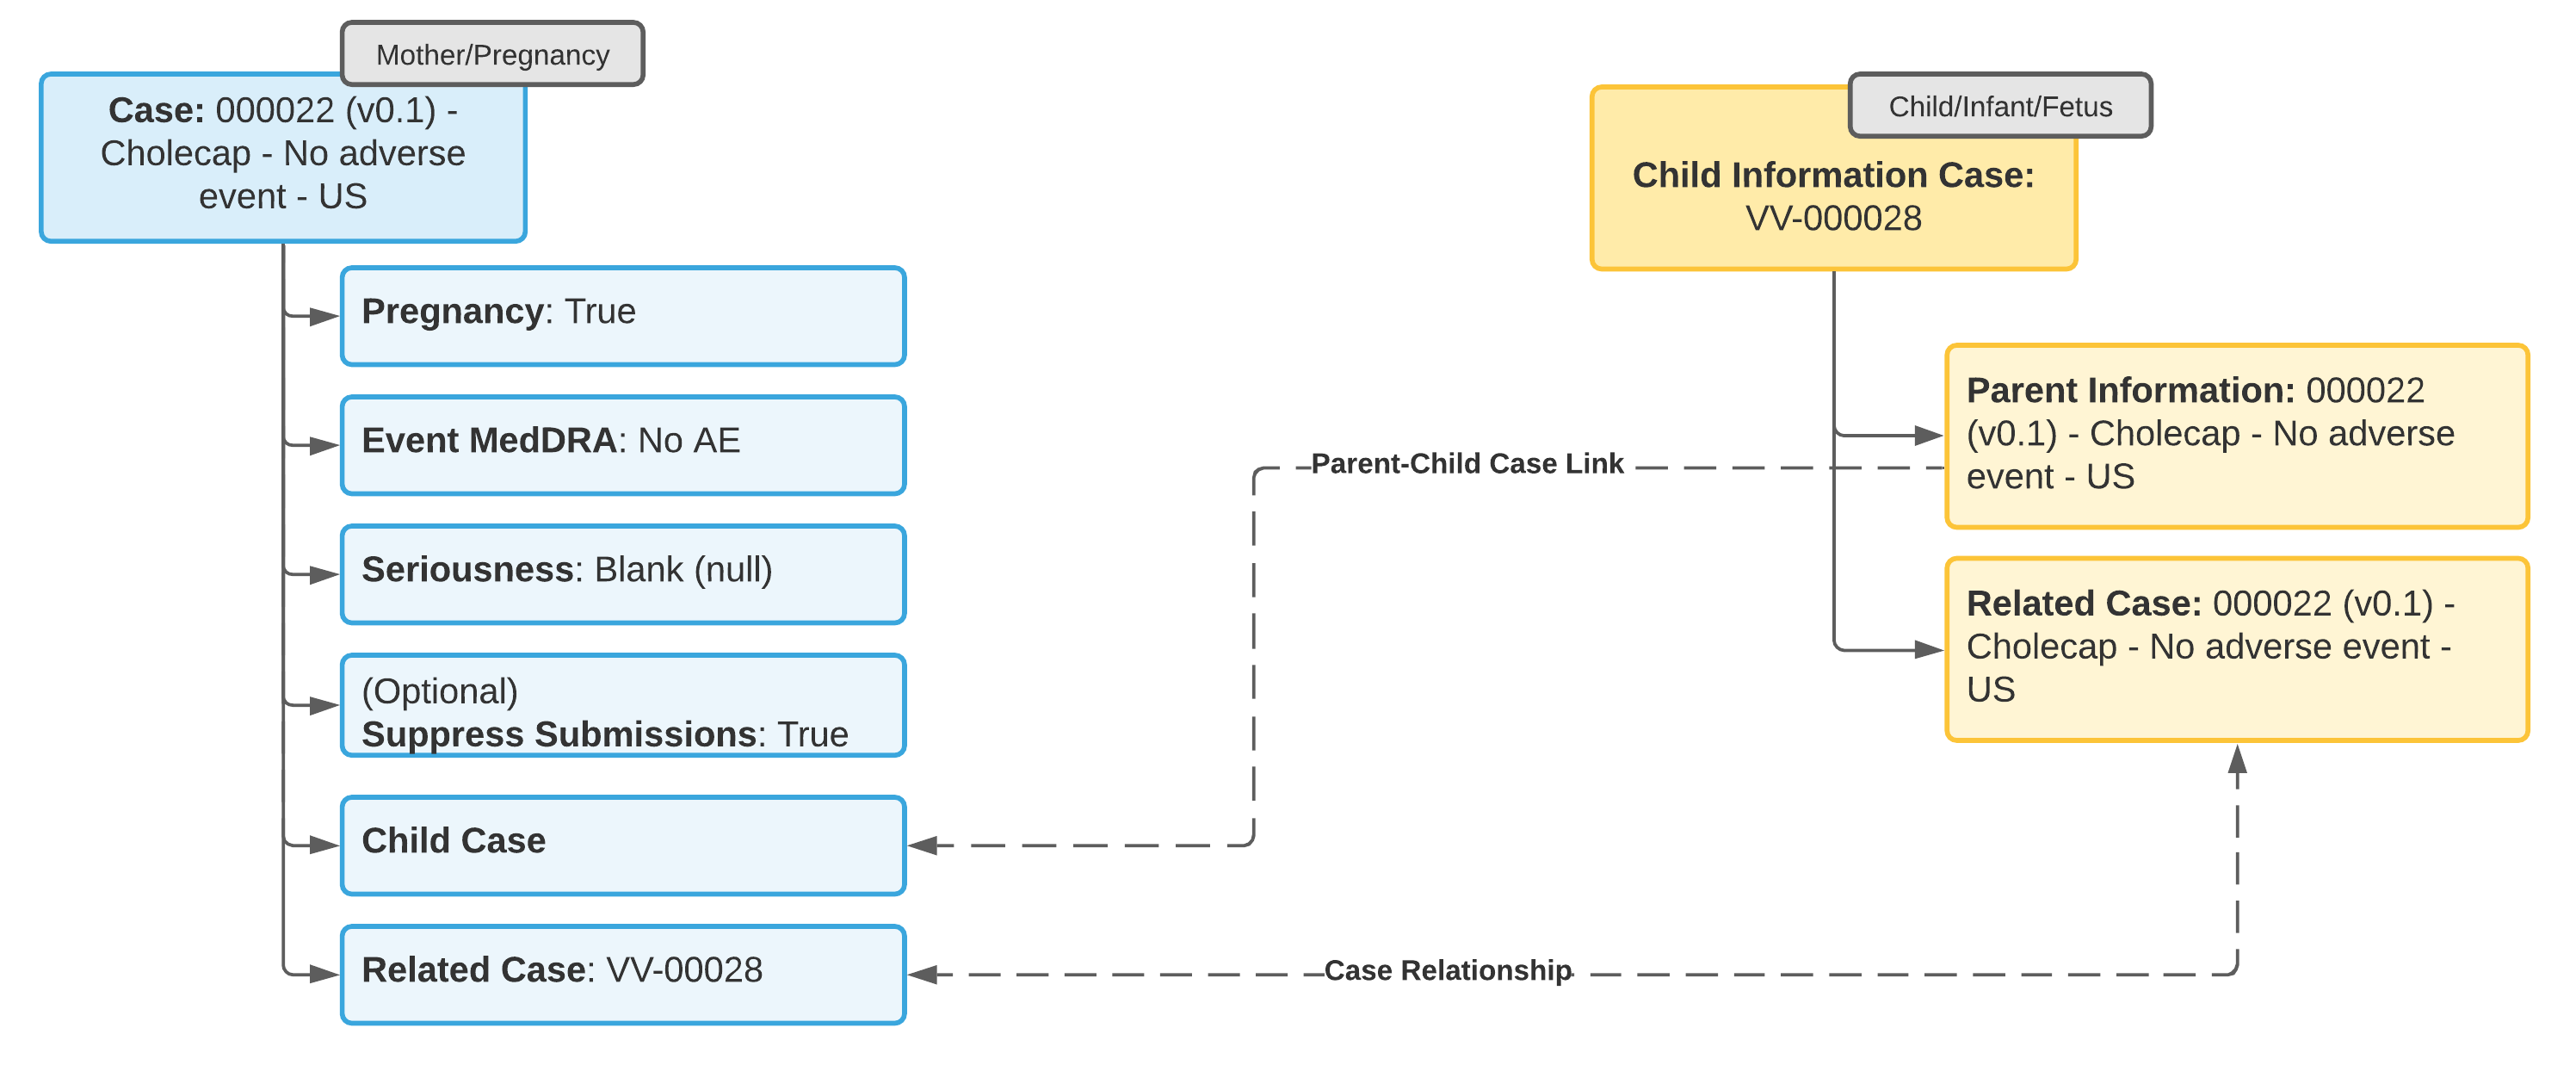 ### Example 2: Adverse Event in Mother, No Adverse Event in Child
1. Update the _Case_ for the tracked pregnancy to add information about the pregnancy outcome and the mother's adverse event.
2. From the _Case_ for the tracked pregnancy, [add _Child Information_][6]. Vault references the tracked pregnancy _Case_ in the _Parent Information_ field on the _Child Information_ record.
3. Add a reference to the _Child Information_ from the _Linked Cases_ section on the _Case_ tracking the pregnancy.
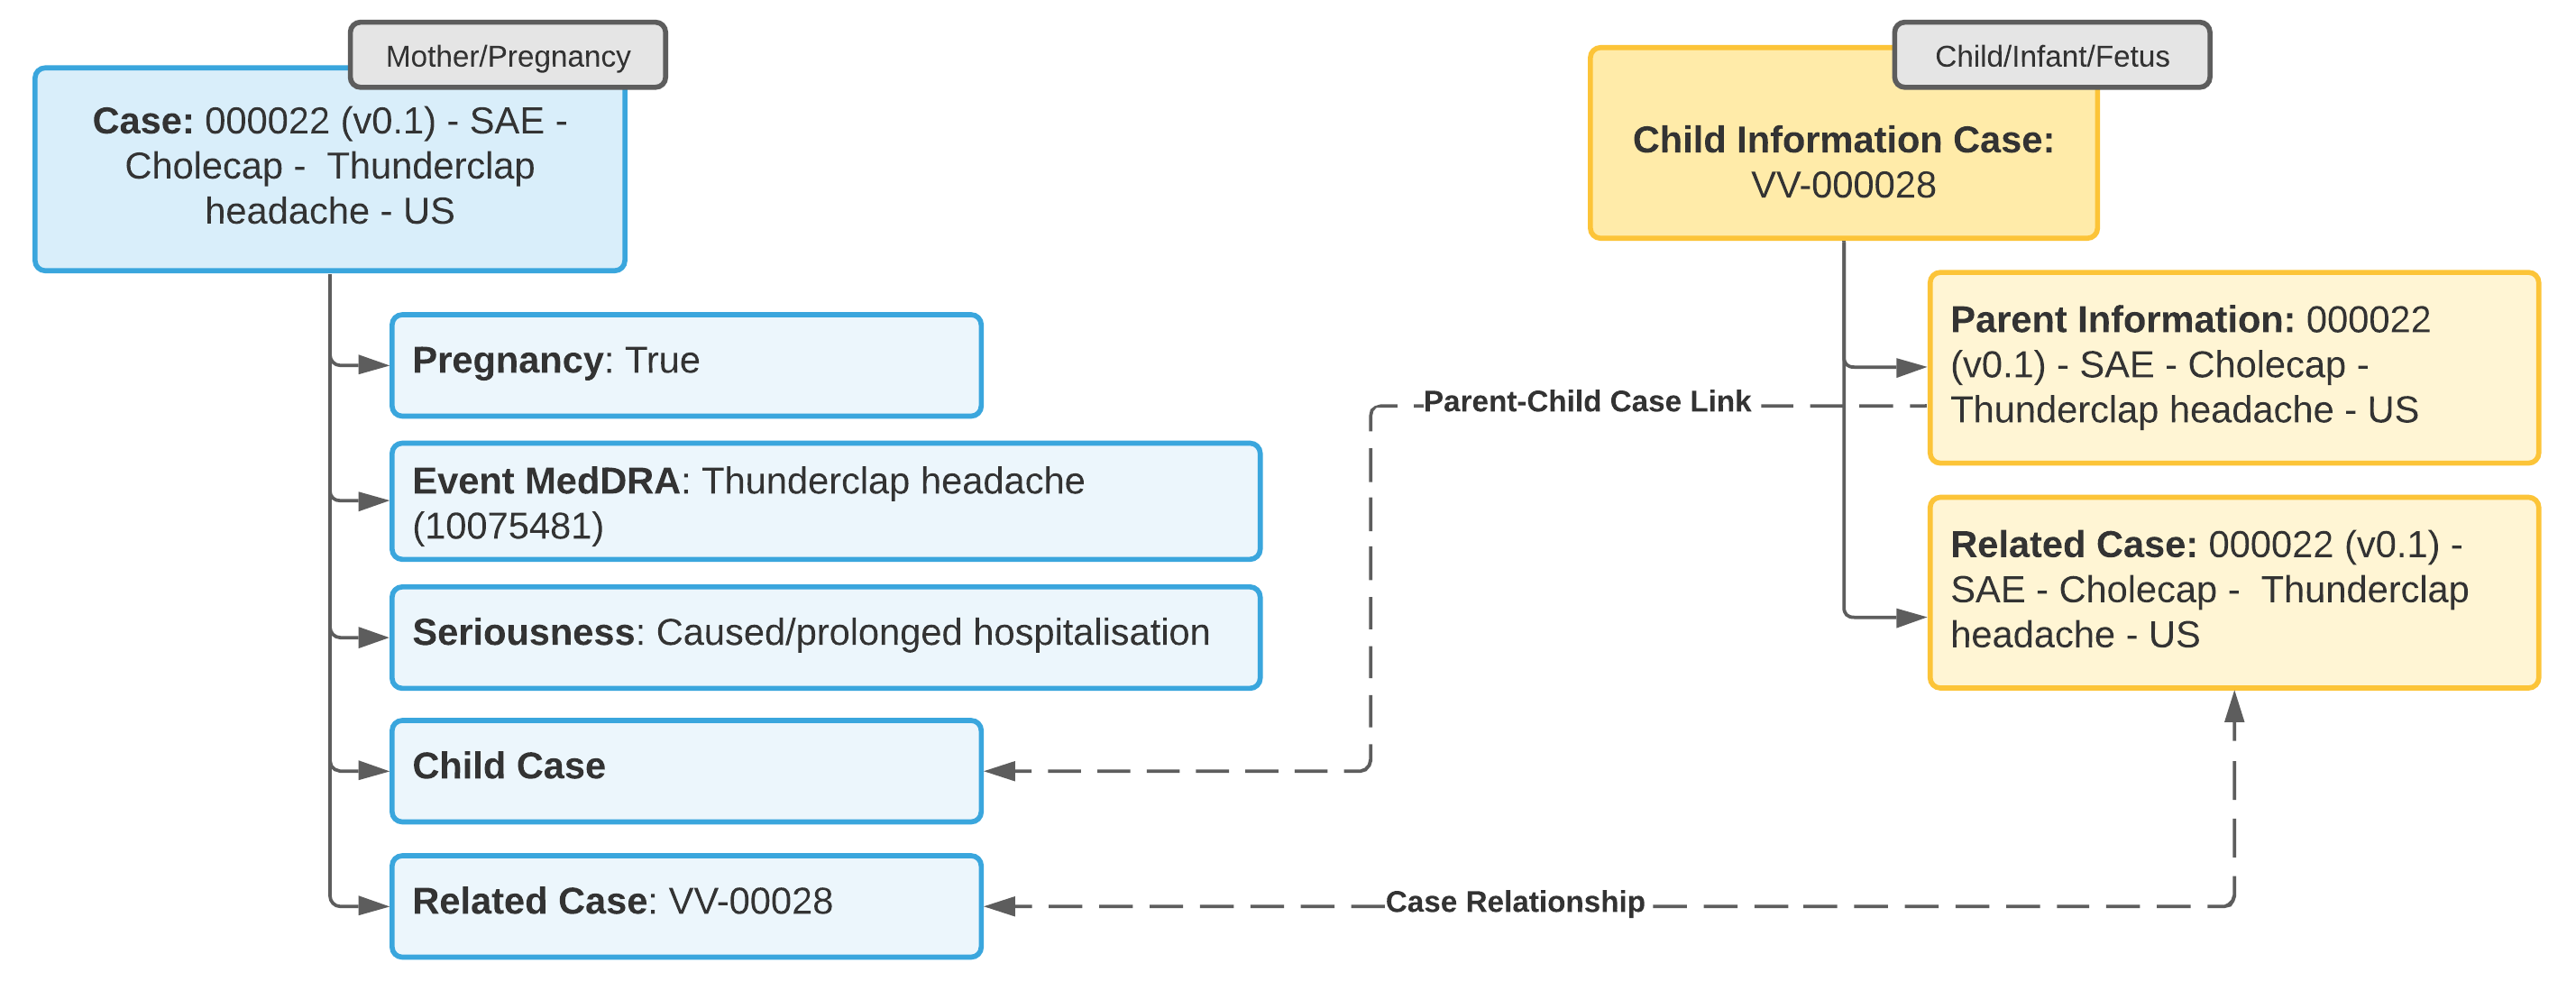
### Example 2: Adverse Event in Mother, No Adverse Event in Child
1. Update the _Case_ for the tracked pregnancy to add information about the pregnancy outcome and the mother's adverse event.
2. From the _Case_ for the tracked pregnancy, [add _Child Information_][6]. Vault references the tracked pregnancy _Case_ in the _Parent Information_ field on the _Child Information_ record.
3. Add a reference to the _Child Information_ from the _Linked Cases_ section on the _Case_ tracking the pregnancy.
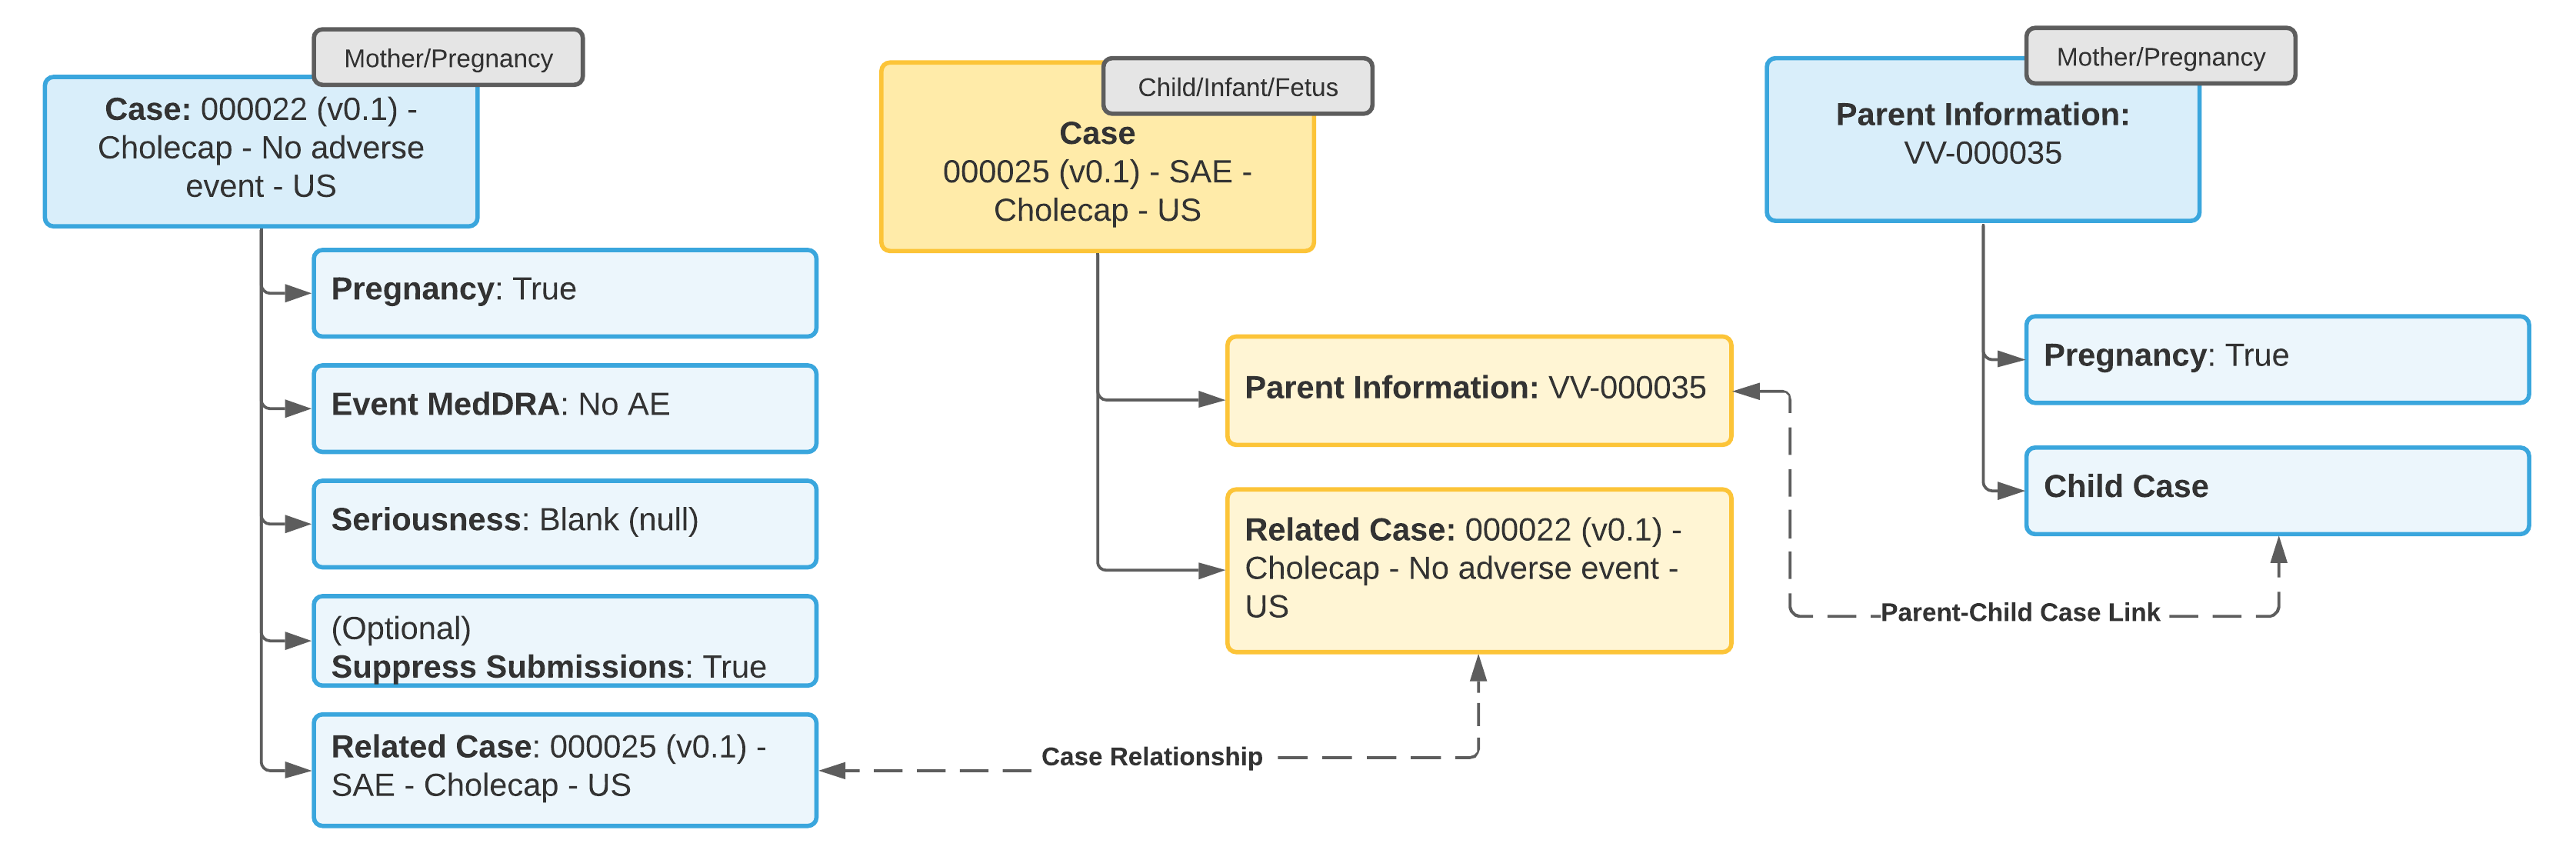
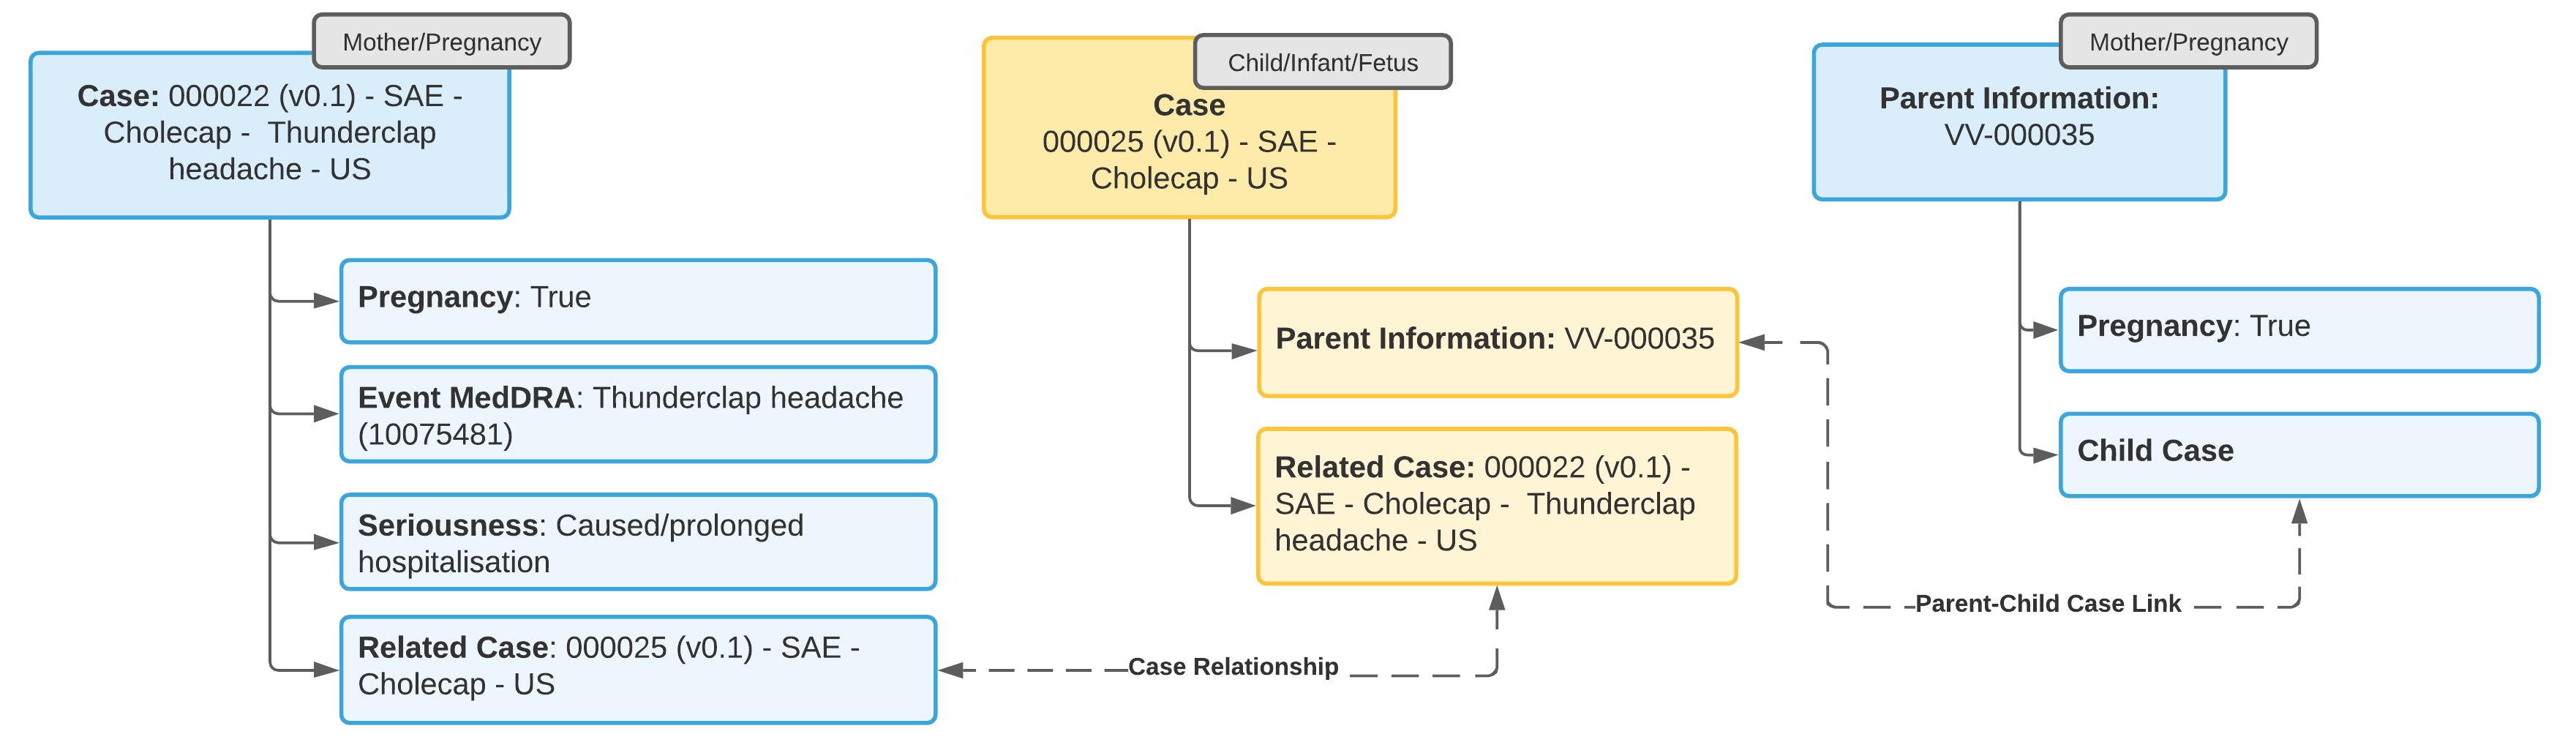
 ### Example 3: Adverse Event in Child, No Adverse Event in Mother
1. Update the _Case_ for the tracked pregnancy to add information about the pregnancy outcome.
2. Open a standard _Case_ to capture the adverse event in the child.
3. From the **Parent Information** field on the _Case_ for the child, [add _Parent Information_][7].
4. Link the _Case_ for the tracked pregnancy to the child _Case_ using a Linked Case relationship.
### Example 3: Adverse Event in Child, No Adverse Event in Mother
1. Update the _Case_ for the tracked pregnancy to add information about the pregnancy outcome.
2. Open a standard _Case_ to capture the adverse event in the child.
3. From the **Parent Information** field on the _Case_ for the child, [add _Parent Information_][7].
4. Link the _Case_ for the tracked pregnancy to the child _Case_ using a Linked Case relationship.
Note: You cannot change a regular Case object type to a Parent Information type. You must open a separate Parent Information record.
Note: The Case for the adverse event in the child must link to the parent Case in the Parent Information field for E2B-compliant transmission of data in section D.10 for E2B(R3) or B.1.10 for E2B(R2).
Note: You cannot change a regular Case object type to Parent Information type. You must open a separate Parent Information record.
Note: The Case for the adverse event in the child must link to the parent Case in the Parent Information field for E2B-compliant transmission of data in section D.10 for E2B(R3) or B.1.10 for E2B(R2).