# Manage Case Access Group Security

Vault enables you to manage access groups that control team members' ability to view and edit _Inbox Items_ and _Cases_, as well as unblinded information. To ensure Case Access Group Security provides the simplest and most effective security solutions, contact Veeva Managed Services for a consultation.

With Case Access Group Security, you assign individuals to groups and roles and have granular control over security for unblinded and personally identifiable information (PII). For each access group, you set up which _Inbox Items_ and _Cases_ are visible to the group based on such factors as region, report type, market segment, country, and organization. Users are then given a role on each group as applicable.

Some example use cases are creating access groups based on the following: 

* Origin of the _Case_, for example, EMA, MHRA, Partner
* _Product Type_, for example, Cosmetics, Drugs
* Lifecycle state, for example, users with access to specific domestic and _Localized Cases_ can only see global _Cases_ in the _Approved_ state

For managing sensitive information, Case Access Group Security enables hiding only the fields that contain unblinded information and letting all other fields be viewable and editable. This is useful in such situations as follows:

* Surfacing _Case Product_ data when doing so would not harm the integrity of the _Study_ (for example, Concomitant or Standard of Care products)
* Allowing some team members to see and edit non-sensitive fields on blinded _Products_, while sensitive fields (such as _Product_ and _Lot Number_) remain protected
* Allowing some team members to see and edit all fields on non-study _Products_ with a _Drug Role_ of _Concomitant_ or _External_


<div class="note-border alert-info">
  <div class="alert alert-info" role="alert">
    <div><i class="far fa-info-circle"></i></div>
    <div class="alert-text">
      <p><strong>Note</strong>: When using <em>Case Access Groups</em>, you cannot assign roles as part of a workflow. We recommend using <a href="#strict-inbox-item-locking">Strict Inbox Item Locking</a> or <a href="/en/gr/01170/#strict-case-locking">Strict Case Locking</a> instead.</p>
    </div>
  </div>
</div>


## Prerequisites

Consider the following prerequisites for setting up _Case Access Groups_:

* You have consulted with Veeva Managed Services about your needs and received their recommendations for _Case Access Group_ setup.
* You have <a href="/en/gr/01304/">enabled Case Access Group Security</a>.

## How Vault Matches Cases to Case Access Groups {#how-the-system-matches-cases-to-case-access-groups}

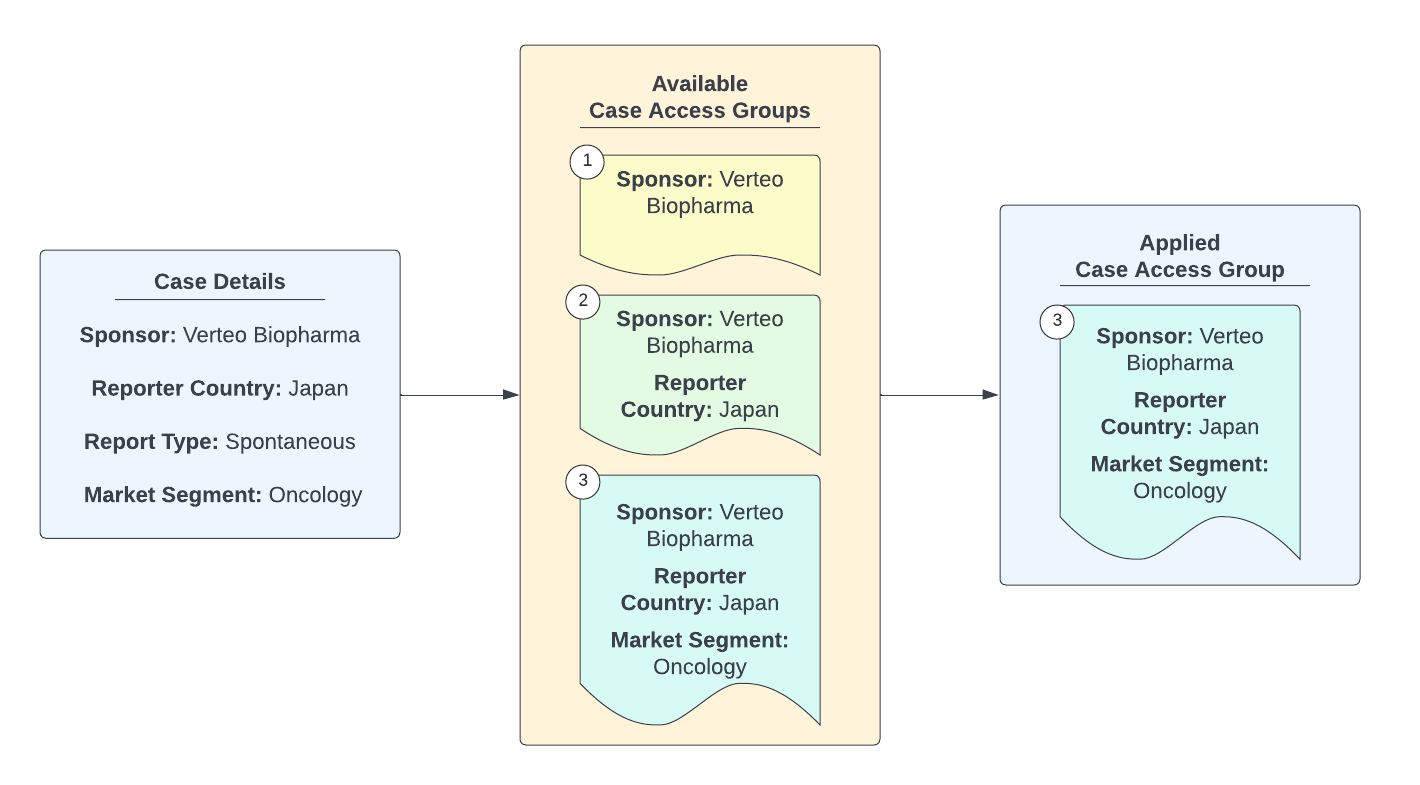
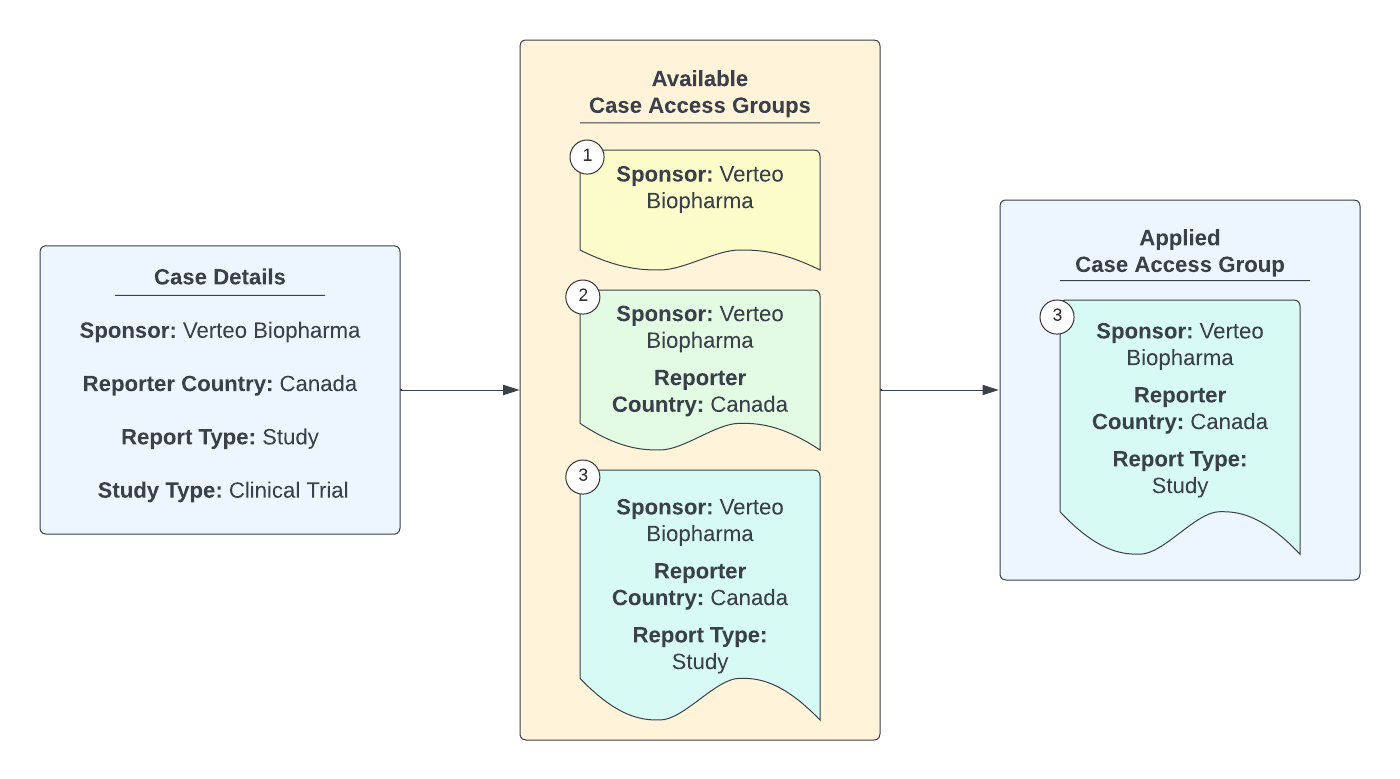
For _Inbox Items_ and _Cases_, Vault grants access to the _Case Access Group_ that is the most specific match, based on the following criteria:

* _Sponsor_
* _Country_
* _Report Type_
* _Study Type_
* _Study_
* _Origin_
* _Intake Method_ and _Format_
* _Market Segment_

For criteria that your organization doesn't need to match against, leave those fields blank. With the exception of _Market Segment_, Vault considers blank values on _Case Access Group_ records to mean _Any_ when matching _Inbox Items_ and _Cases_ to _Case Access Groups_, allowing you to set up fewer [assignment rules][7]. For _Market Segment_, the values must be an exact match, even if blank.

<div class="note-border alert-info">
  <div class="alert alert-info" role="alert">
    <div><i class="far fa-info-circle"></i></div>
    <div class="alert-text">
      <p><strong>Note</strong>: To match based on <em>Intake Type,</em> you must populate the <em>Intake Format</em> and <em>Intake Method</em> fields.</p>
    </div>
  </div>
</div>


If you have configured your Vault to display _Inbound Transmission_ records on _Inbox Items_ and _Cases_ and <a href="/en/gr/01304/#23r2">_Inbound Transmission_ layout</a> to include the _Case Access Group_ and _Case Access Group Assignment Reason_ fields, those field values provide details on which _Case Access Group_ was assigned to a _Case_ and why.

### Case Access Group Examples

See the following diagrams that illustrate Vault's selection of the most specific _Case Access Group_.

#### CASE 000001

<a href="https://platform.veevavault.help/assets/images/saf-cag-example-01.png" data-lightbox="saf-cag-example-01.png" data-title="" data-alt="Example: CASE 000001">
  <img class="docimage" src="https://platform.veevavault.help/assets/images/saf-cag-example-01.png" alt="Example: CASE 000001" style="max-width: 50%;"  />
</a>

#### CASE 000002

<a href="https://platform.veevavault.help/assets/images/saf-cag-example-02.png" data-lightbox="saf-cag-example-02.png" data-title="" data-alt="Example: CASE 000001">
  <img class="docimage" src="https://platform.veevavault.help/assets/images/saf-cag-example-02.png" alt="Example: CASE 000001" style="max-width: 50%;"  />
</a>

### Case Access Group Assignment Fields

The following table shows how Vault matches the fields on the _Case Access Group Assignment_ record to the fields on the _Inbox Item_ and _Case_.

<table>
    <thead>
        <tr>
            <th>Case Access Group Assignment Field</th>
            <th>Inbox Item</th>
            <th>Case</th>
        </tr>
    </thead>
    <tbody>
        <tr>
            <td><em>Sponsor</em><br>(<code>sponsor__v</code>)</td>
            <td><em>Organization</em><br>(<code>organization__v</code>)</td>
            <td><em>Organization</em><br>(<code>organization__v</code>)</td>
        </tr>
        <tr>
            <td><em>Report Type</em><br>(<code>report_type__v</code>)</td>
            <td><em>Report Type</em><br>(<code>report_type__v</code>)</td>
            <td><em>Report Type</em><br>(<code>report_type__v</code>)</td>
        </tr>
        <tr>
            <td><em>Country</em><br>(<code>country__v</code>)</td>
            <td><em>Country</em><br>(<code>country__v</code>)</td>
            <td><p><em>Reporter Country</em><br>(<code>reporter_country__v</code>)</p>
                <p>If the <em>Reporter Country</em> field is blank, Vault matches to <em>Event Country</em> (<code>event_country__v</code>)</p></td>
        </tr>
        <tr>
            <td><em>Study</em><br>(<code>study__v</code>)</td>
            <td><em>Study</em><br>(<code>study__v</code>)</td>
            <td><em>Study</em><br>(<code>study__v</code>)</td>
        </tr>
        <tr>
            <td><em>Study Type</em><br>(<code>study_type__v</code>)</td>
            <td><p>(<code>study__v.study_type__v</code>)</p>
            <div class="note-border alert-info">
  <div class="alert alert-info" role="alert">
    <div><i class="far fa-info-circle"></i></div>
    <div class="alert-text">
      <p><strong>Note</strong>: When the <em>Study</em> field on an <em>Inbox Item</em> is blank, but its source file has a specified <em>Study Type</em>, Vault uses the source’s <em>Study Type</em> when assigning a <em>Case Access Group</em>.</p>
    </div>
  </div>
</div>

</td>
            <td><em>Study Type</em><br>(<code>study_product_reason__v</code>)</td>
        </tr>
        <tr>
            <td><em>Origin</em><br>(<code>origin__v</code>)</td>
            <td>(<code>inbound_transmission.origin__v</code>)</td>
            <td>(<code>inbound_transmission.origin__v</code>)</td>
        </tr>
        <tr>
            <td><em>Intake Format</em><br>(<code>intake_format__v</code>)</td>
            <td><em>Intake Format</em><br>(<code>intake_format__v</code>)</td>
            <td><em>Intake Format</em><br>(<code>intake_format__v</code>)</td>
        </tr>
        <tr>
            <td><em>Intake Method</em><br>(<code>intake_method__v</code>)</td>
            <td><em>Intake Method</em><br>(<code>intake_method__v</code>)</td>
            <td><em>Intake Method</em><br>(<code>intake_method__v</code>)</td>
        </tr>
        <tr>
            <td><em>Market Segment</em><br>(<code>market_segment__v</code>)</td>
            <td><em>Market Segment</em><br>(<code>market_segment__v</code>)</td>
            <td><em>Market Segment</em><br>(<code>market_segment__v</code>)</td>
        </tr>
    </tbody>
</table>

## Application Roles and Case Access Group Security

While each user is assigned an <a href="/en/gr/69197/#assigning">application role</a> to control their access to _Case_-related data and workflows at an organization level, with _Case Access Groups_ you can control access to personally identifiable information (PII) and unblinded information at the object and field levels.

For each _Case Access Group_ a team member is assigned to, you specify their application role within that group. When they are processing _Cases_ for the associated access group, that application role determines their role on the _Case_. This enables you, for example, to give a Case Processor the ability to view unblinded information for some product types and sponsors, when they do not have access to view that information at the organization level. Follow your organization's process when assigning roles.

System-managed roles for _Case Access Groups_ include the following:

* _Viewer_
* _Editor_
* _PII Unmasked_
* _Study Unmasked_

<div class="note-border alert-info">
  <div class="alert alert-info" role="alert">
    <div><i class="far fa-info-circle"></i></div>
    <div class="alert-text">
      <p><strong>Note</strong>: When assigning access to <em>Case Product Registration</em> values, Vault considers the user’s role across both global and <em>Localized Cases</em> and grants the more permissive role. For example, if the user has the <em>Editor</em> role on <em>Localized Cases</em> and the <em>Viewer</em> role on global <em>Cases</em>, they will have the <em>Editor</em> role on <em>Case Product Registration</em> values.</p>
    </div>
  </div>
</div>


Vault maps the user's application role from the parent record to all child records. This means, for example, that if a user is a _Viewer_ on a _Case_, they will also be a _Viewer_ on all of the _Case_ child records. Their access to PII and unblinded information is also mapped to the child records.

<div class="note-border alert-info">
  <div class="alert alert-info" role="alert">
    <div><i class="far fa-info-circle"></i></div>
    <div class="alert-text">
      <p><strong>Note</strong>: Assigning users to the appropriate role is part of the consultation with Veeva Managed Services.</p>
    </div>
  </div>
</div>


### System-Provided Case Access Groups

We recommend assigning team members to your organization's custom _Case Access Groups_. However, Vault also includes system-provided groups. The following sections describes the default _Case Access Groups_, along with their access, benefits, and limitations.

#### General Access Group {#general}

* **Access**: _Inbox Items_ and _Cases_ assigned to the _General Access Group_ and with no _Case Access Group_ assignment are visible to members of this group.
* **Benefit**: This may be beneficial for organizations where all users have access to all _Cases_.
* **Limitation**: _Cases_ accessible to this group may be difficult to predict. We recommend against using this group for team members who should have limited access to _Inbox Items_ and _Cases_. This includes, for example, Sponsor users in a Contract Research Organization (CRO) Vault.

#### All Access Group {#all}

* **Access**: All _Inbox Items_ and _Cases_ are visible to members of this group. _Cases_ are never assigned to this _Case Access Group_.
* **Benefit**: Available for senior staff who should have access to all _Inbox Items_ and _Cases_.
* **Limitation**: We recommend against using this group for CROs, since it could result in an individual accessing _Cases_ across all Sponsors.

## Add Case Access Groups

Complete the following steps to add _Case Access Groups_:

1. Navigate to **Business Admin > Objects > Case Access Groups**.
2. Select **Create**.
3. In the _Details_ section, enter a **Group Name** and **API Name**.
4. Select **Save**.

### Create Case Assignment Rules {#rules}

Within a _Case Access Group_, you can create as many _Case Assignment Rules_ as needed. We recommend using the simplest configurations whenever possible. To do this:
 
1. Navigate to the applicable _Case Access Group_.
2. In the _Case Assignment Rules_ section, select **Create**.
3. In the _Create Case Access Group Assignment_ window, select a **Sponsor**.
4. (Optional) Populate the relevant [fields][8].
5. Select **Save**.

#### Case Assignment Rule Fields {#rules-fields}

<table>
    <thead>
        <tr>
            <th>Field</th>
            <th>Description</th>
        </tr>
    </thead>
    <tbody>
        <tr>
            <td><strong>Access Group</strong></td>
            <td>This is populated by Vault based on the associated <em>Case Access Group</em>.</td>
        </tr>
        <tr>
            <td><strong>Sponsor</strong></td>
            <td>Select the Organization for <em>Inbox Items</em> and <em>Cases</em> that will be accessible to the selected <em>Case Access Group</em>.</td>
        </tr>
        <tr>
            <td><strong>Report Type</strong></td>
            <td>(Optional) Select a <em>Report Type</em> from the picklist.</td>
        </tr>
        <tr>
            <td><strong>Country</strong></td>
            <td>(Optional) Select a <em>Country</em> from the picklist.</td>
        </tr>
        <tr>
            <td><strong>Origin</strong></td>
            <td>(Optional) Select the sending organization for a given case.
                <p>For example, select <strong>EMA</strong> to limit the <em>Case Access Group</em> to <em>Cases</em> downloaded from EudraVigilance.</p></td>
        </tr>
        <tr>
            <td><strong>Intake Format</strong></td>
            <td>(Optional) Select a format from the picklist.
                <div class="note-border alert-info">
  <div class="alert alert-info" role="alert">
    <div><i class="far fa-info-circle"></i></div>
    <div class="alert-text">
      <p><strong>Note</strong>: When using <em>Intake Format</em> as a matching criteria, the <em>Intake Method</em> field must also be used.</p>
    </div>
  </div>
</div>

</td>
        </tr>
        <tr>
            <td><strong>Intake Method</strong></td>
            <td>(Optional) Select a method from the picklist.
                <div class="note-border alert-info">
  <div class="alert alert-info" role="alert">
    <div><i class="far fa-info-circle"></i></div>
    <div class="alert-text">
      <p><strong>Note</strong>: When using <em>Intake Method</em> as a matching criteria, the <em>Intake Format</em> field must also be used.</p>
    </div>
  </div>
</div>

</td>
        </tr>
        <tr>
            <td><strong>Study Type</strong></td>
            <td>(Optional) Select a type from the picklist.</td>
        </tr>
        <tr>
            <td><strong>Study</strong></td>
            <td>(Optional) Select a <em>Study</em> from the dropdown list.</td>
        </tr>
        <tr>
            <td><strong>Market Segment</strong></td>
            <td>(Optional) Select the <em>Market Segment</em> associated with the <em>Study</em> for <em>Study Cases</em> or the primary <em>Product</em> for postmarket <em>Cases</em>.</td>
        </tr>
    </tbody>
</table>

### Create User Access Group Assignments {#uag-assign}

Within a _Case Access Group_, you can assign as many users to the access group as required. You can also set up a single user with multiple roles by creating multiple _User Access Group Assignment_ records. To do this: 

1. Navigate to the applicable _Case Access Group_.
2. In the _User Access Group Assignment_ section, select **Create**.
3. In the _Create User Access Group Assignment_ window, populate the relevant [fields][9].
4. Select **Save**.

#### User Access Group Assignment Fields {#uag-assign-fields}

<table>
    <thead>
        <tr>
            <th>Field</th>
            <th>Description</th>
        </tr>
    </thead>
    <tbody>
        <tr>
            <td><strong>User</strong></td>
            <td>Select a <em>User</em> from the dropdown list.</td>
        </tr>
        <tr>
            <td><strong>Role</strong></td>
            <td>Select the applicable <em>Role</em> for the user on <em>Cases</em> within the selected <em>Case Access Group</em>. Users with multiple roles will require a unique <em>User Access Group Assignment</em> record for each role.</td>
        </tr>
        <tr>
            <td><strong>User Blinded</strong></td>
            <td>Select whether the user should have access to unblinded information for <em>Cases</em> within the selected <em>Case Access Group</em>.</td>
        </tr>
        <tr>
            <td><strong>PII Access</strong></td>
            <td>Select whether the user should have access to personally identifiable information (PII) for <em>Cases</em> within the <em>Case Access Group</em>.</td>
        </tr>
        <tr>
            <td><a id="localization"></a><strong>Localization</strong></td>
            <td>Select the <em>Localization</em> for the user on <em>Cases</em> within the <em>Case Access Group</em>. Consider the following when completing this field:
                <ul>
                    <li>Entering a specific <em>Localization</em> will give the user complete access to all <em>Cases</em> in that <em>Localization</em> and read-only access to all global <em>Cases</em>.</li>
                    <li>Entering <strong>Global</strong> will give the user complete access to all global <em>Inbox Items</em> and <em>Cases</em>.</li>
                    <li>Leaving the field blank will not give the user access to any <em>Localized Cases</em>, but they will have complete access to all global <em>Inbox Items</em> and <em>Cases</em> and all <em>Cases</em> with a blank <em>Localization</em> value.</li>
                </ul></td>
        </tr>
        <tr>
            <td><strong>Country</strong></td>
            <td><p>Select a country from the picklist to limit the user's access to global <em>Cases</em> with that <em>Country</em> value only. Regardless of the <em>Country</em>, the user will have read-only access to all <em>Localized Cases</em> based on the <a href="#localization"><em>Localization</em> field</a> value.</p>
            <p>Users with an assigned country cannot access <em>Inbox Items</em>, <em>Cases</em>, or <em>Localized</em> Cases with blank <em>Country</em> fields. </p></td>
        </tr>
        <tr>
            <td><strong>Subject Information Review</strong></td>
            <td>Select whether the user should have access to subject information for <em>Cases</em> with SAEs received from the <a href="/en/gr/679350/">Safety-EDC Connection</a>.</td>
        </tr>
    </tbody>
</table>

### User Access to Transmissions {#user-access}

The _Localization_ setting on _User Access Group Assignments_ controls user access to _Inbound Transmission_ and _Transmission_ records. To grant access to _Inbound Transmission_ records, the user's _Localization_ setting must match the _Localization_ value of the _Case_ linked on the _Inbound Transmission_ record. If no _Case_ exists, Vault considers the _Localization_ field of the associated _Inbox Item_. To grant access to _Transmission_ records from within a _Localized Case_ record, the user's _Localization_ setting must match the _Localization_ value of the _Localized Case_ linked on the _Transmission_ record.

### User Access to Inbox Item Documents

After populating the _Access Group_ on the _Inbox Item_, Vault adds the applicable users to the _Sharing Settings_ for all documents linked to the _Inbox Item_ based on the _Access Group_. Users are granted: 

* _Viewer_ role 
* _Manual Assignment_ access 

When the _Access Group_ of the _Inbox Item_ is updated, Vault removes the group of users from the documents' _Sharing Settings_ and adds the new users based on the updated _Access Group_.

## Manage Case Assignment Teams {#manage-case-assignment-teams}

You can use _Case Assignment Teams_ when the _Case_ volume demands more management and _Case_ processing effort. A _Case Assignment Team_ consists of a group of users, typically with a team leader, that manages a subset of _Cases_. The subset can be based on certain _Case_ types (for example, _Study Cases_), _Country_, or localization-specific _Cases_. Or, it can simply be a division of volume. You can add multiple _Case Assignment Teams_ to a _Case Access Group_.

<div class="note-border alert-info">
  <div class="alert alert-info" role="alert">
    <div><i class="far fa-info-circle"></i></div>
    <div class="alert-text">
      <p><strong>Note</strong>: To assign a <em>Case Assignment Team</em>, an access group must first be set on the <em>Case</em>.</p>
    </div>
  </div>
</div>


After setting the [_Case Access Group_ on the _Case_][1], a user can then select a _Case Assignment Team_ within this access group after considering the intake or _Case_ processing task. Users an select from the following assignment options:

* **Team Assignment**: The team leader assigns the _Case_ to a team member.
* **Manual Assignment**: A team member assigns the _Case_ to themselves.

You can use field permissions to grant _Edit_ access for these assignment fields.

Vault locks the _Inbox Item_ or _Case_ once is assigned to a user, it is locked. For more information, see [Strict Inbox Item Locking][6] and <a href="/en/gr/01170/#strict-case-locking">Strict Case Locking</a>. 

On the **Inbox Item** and **Case** tab of the user side of your Vault, team leaders and members can filter or create a view to display only _Inbox Items_ and _Cases_ assigned to their _Case Assignment Team_ or to themselves. 

### Prerequisites

Before adding _Case Assignment Teams_, you must <a href="/en/gr/01291/">enable Case Assignment</a>. 

### Create a Case Assignment Team

To create _Case Assignment Teams_: 

1. Navigate to **Business Admin > Objects > Case Assignment Teams**.
2. Select **Create**.
3. Enter a **Name**.
4. Ensure the **Status** is `Active`.
5. Select a **Case Access Group**.
6. (Optional) Select a **Team Leader**. This user can assign team members to _Inbox Items_ and _Cases_.
7. Select **Save** to reveal additional sections.
8.  Expand the _Team Members_ section.
9.  Select **Add**. 
10. In the _Search: User_ window, select the users you want to add to add to this team. You can select multiple users at once and filter for a more specific list.
11. Select **OK**.
12. Select **Save**.

After saving the record, you can find this _Case Assignment Team_ linked in the specified _Case Access Group_ in the _Case Assignment Teams_ section. 

Vault updates the following fields based on user assignment:

* When a user is added to or removed from a _Case Assignment Team_, Vault updates the _Total Team Members_ field value in the _Team Capacity_ section. 
* Vault updates the _Team Caseload_ field value when a team member on the _Case Assignment Team_ is assigned a new _Inbox Item_ or _Case_. Vault does not update the _Team Caseload_ value when a _Case Assignment Team_ is assigned.

_Inbox Items_ and _Cases_ in a _Completed_ state (for example, _Promoted_) do not count towards the _Team Caseload_. To view and edit the _Completed_ states, go to **Admin > Security > Safety General Settings > Case Completed**. The _Completed_ states for _Inbox Item_ include _Promoted_ and _Rejected_, which you cannot edit.

The _Inbox Items_ and _Cases_ that are assigned to this team or to a member of this team are listed in the _Team Inbox Items_ and _Team Cases_ sections, respectively. You can also create _Inbox Items_ and _Cases_ by expanding these sections and selecting **Create**. These records will automatically be assigned to this _Case Assignment Team_. 

### Manage Case Access Groups for Case Assignment Teams

1. Navigate to **Business Admin > Objects > Case Access Groups > Case Access Group**. 
2. Open the applicable record.
3. Select **Edit**.
4. In the _Details_ section, select an option for the **Role Assignment Method** field:
  * **All Users in Access Group**: Grants all users in this _Case Access Group_ access to edit the _Inbox Item_ or _Case_.
  * **Users on Assigned Team**: Grants only users in the assigned _Case Assignment Team_ access to edit the _Inbox Item_ or _Case_.
5. Select **Save**.

<div class="note-border alert-info">
  <div class="alert alert-info" role="alert">
    <div><i class="far fa-info-circle"></i></div>
    <div class="alert-text">
      <p><strong>Note</strong>: You cannot modify the <em>Role Assignment Method</em> field for the <em>All Access</em> or <em>General Access groups</em>.</p>
    </div>
  </div>
</div>


### How Vault Grants Case Access

**Scenario 1: The Inbox Item or Case has an assigned Case Assignment Team**

Vault checks the _Role Assignment Method_ field value for this access group.

* If the _Role Assignment Method_ is `Users on Assigned Team`, Vault grants the following permissions:
    * Team members in the _Case Assignment Team_ have edit access and can be assigned to the _Inbox Item_ or _Case_.
    * Users in the set access group that are not assigned to any teams have edit access and can be assigned to the _Inbox Item_ or _Case_.
    * Users in this access group but not on this team are granted viewer access.
* If the _Role Assignment Method_ is `All Users in Access Group` or blank, Vault defaults to existing _Case Access Group_ security behavior.

**Scenario 2: The Inbox Item or Case has no assigned Case Assignment Team**

If the _Case Assignment Team_ field is not populated for the _Inbox Item_ or _Case_, Vault defaults to existing _Case Access Group_ security behavior. 

### Strict Inbox Item Locking {#strict-inbox-item-locking}

Similar to <a href="/en/gr/01170/#strict-case-locking">strict _Case_ locking</a>, you can prevent users from editing an _Inbox Item_ unless they are assigned to that _Inbox Item_ in the _Assigned To_ field (this field may be `Locked By User`, depending on your Admin's configuration). Once this field is populated, the _Inbox Item_ is considered locked and assigned to that user only. 

For _Case Assignment Teams_, the team leader and team members use this field for user assignment. However, you do not need to enable _Case Assignment Teams_ to use this field.

To use strict _Inbox Item_ locking, you must <a href="/en/gr/01291/#add-locked-by-user-field-to-inbox-item">add this field to the _Inbox Item_ layout</a> and <a href="/en/gr/01291/#grant-object-lifecycle-permissions">grant object lifecycle permissions</a>. 

## Assign Case Access Groups and Roles to User Records

In addition to [assigning users to _Case Access Groups_ through _Case Access Group_ records][5], you can assign users to _Case Access Groups_ through _User_ records. For each user, add as many _User Access Group Assignments_ as required. On each record, you define the user's role on _Cases_, as well as their access to unblinded and protected information and the countries they work in, if applicable. You can also set up a single user with multiple roles in a _Case Access Group_ by creating multiple _User Access Group Assignment_ records. To do this:

1. Navigate to **Business Admin > Objects > Users > [User]**.
2. In the _Case Access Group Assignment_ section, select **Create**.
3. In the _Create User Access Group Assignment_ window, populate the applicable [fields][10].
4. Select **Save**.

### User Access Group Assignment Fields {#user-access-fields}

<table>
    <thead>
        <tr>
            <th>Field</th>
            <th>Description</th>
        </tr>
    </thead>
    <tbody>
        <tr>
            <td><strong>User</strong></td>
            <td>This field is populated by Vault.</td>
        </tr>
        <tr>
            <td><strong>Access Group</strong></td>
            <td>Select a <em>Case Access Group</em> from the picklist.</td>
        </tr>
        <tr>
            <td><strong>Role</strong></td>
            <td>Select a <em>Role</em> from the picklist. This role is applied each time the user interacts with <em>Cases</em> for the <em>Case Access Group</em>.</td>
        </tr>
        <tr>
            <td><strong>User Blinded</strong></td>
            <td>Select whether the user should have access to unblinded information for <em>Cases</em> within the selected <em>Case Access Group</em>.</td>
        </tr>
        <tr>
            <td><strong>PII Access</strong></td>
            <td>Select whether the user should have access to personally identifiable information (PII) for <em>Cases</em> within the <em>Case Access Group</em>.</td>
        </tr>
        <tr>
            <td><strong>Localization</strong></td>
            <td>Select the <em>Localization</em> for the user on <em>Cases</em> within the <em>Case Access Group</em>. Consider the following when completing this field:
                <ul>
                    <li>Entering a specific <em>Localization</em> will give the user complete access to all <em>Cases</em> in that Localization and read-only access to all <em>Inbox Items</em> and global <em>Cases</em>.</li>
                    <li>Entering <code>Global</code> will give the user complete access to all global and <em>Localized Cases</em>.</li>
                    <li>Leaving the field blank will not give the user access to any <em>Localized Cases</em>, but they will have complete access to all <em>Inbox Items</em> and global <em>Cases</em>.</li>
                </ul></td>
        </tr>
        <tr>
            <td><strong>Country</strong></td>
            <td>Select a <em>Country</em> from the picklist.</td>
        </tr>
    </tbody>
</table>

<div class="note-border alert-info">
  <div class="alert alert-info" role="alert">
    <div><i class="far fa-info-circle"></i></div>
    <div class="alert-text">
      <p><strong>Note</strong>: Depending on your configuration of the <em>User</em> object, you may see the <em>Case Access Group Override</em> field. When populated, all <em>Inbox Items</em> and <em>Cases</em> created by that user are assigned to the selected <em>Case Access Group</em>. System matching logic is not used in this scenario. This is useful, for example, for a global load balancing Case Processor who may enter a <em>Case</em> that would qualify for a specific group though it should be maintained at the global level.</p>
    </div>
  </div>
</div>


## Manage Access to PII and Unblinded Information

There are multiple ways to control access to PII and unblinded information on _Inbox Items_ and _Cases_. For standard application roles, such as Data Entry and Medical Reviewer, we recommend that you configure them to hide PII and unblinded information. With _Case Access Groups_ enabled, a user can be granted additional roles that provide access to PII and unblinded information for a given _Case_.

### Mask PHI and PII on the Potential Matches Page {#phi-pii-pm}

If you have enabled the <a href="/en/gr/740208/#duplicate">_Duplicate Search Potential Matches Safety App Page_</a> and <a href="/en/gr/740208/#security-other">_Mask PHI and PII on the Potential Matches Page_</a> settings, users in applicable access groups with PII access to both the source and matched records can view <a href="/en/gr/01141/#phi-pii-mask">protected health information (PHI) and personally identifiable information (PII)</a> on the enhanced _Potential Matches_ page. For other users, Vault displays asterisks (`****`) to mask PHI and PII information on the page.

## Assign Case Access by Local PV Email

You have the option of assigning user access to _Inbox Items_ based on the sender's email address. When this feature is enabled, Vault uses the sender's email address for _Case Access Group_ assignment over the [standard assignment rules][1]. 

For more information about email intake to _Inbox Item_, see <a href="/en/gr/01133/#manual-intake-from-emails">Manual Intake from Emails</a>. 

### Prerequisites

Before using this feature, you must complete the following tasks: 
* <a href="/en/gr/01200/">Configure Email to Vault Safety Inbox Item</a>
* <a href="/en/gr/01304/">Enable Case Access Group Security</a>
* <a href="/en/gr/01385/">Enable Case Access by Local PV Email</a>

### How Vault Assigns Access Groups from Email Intake

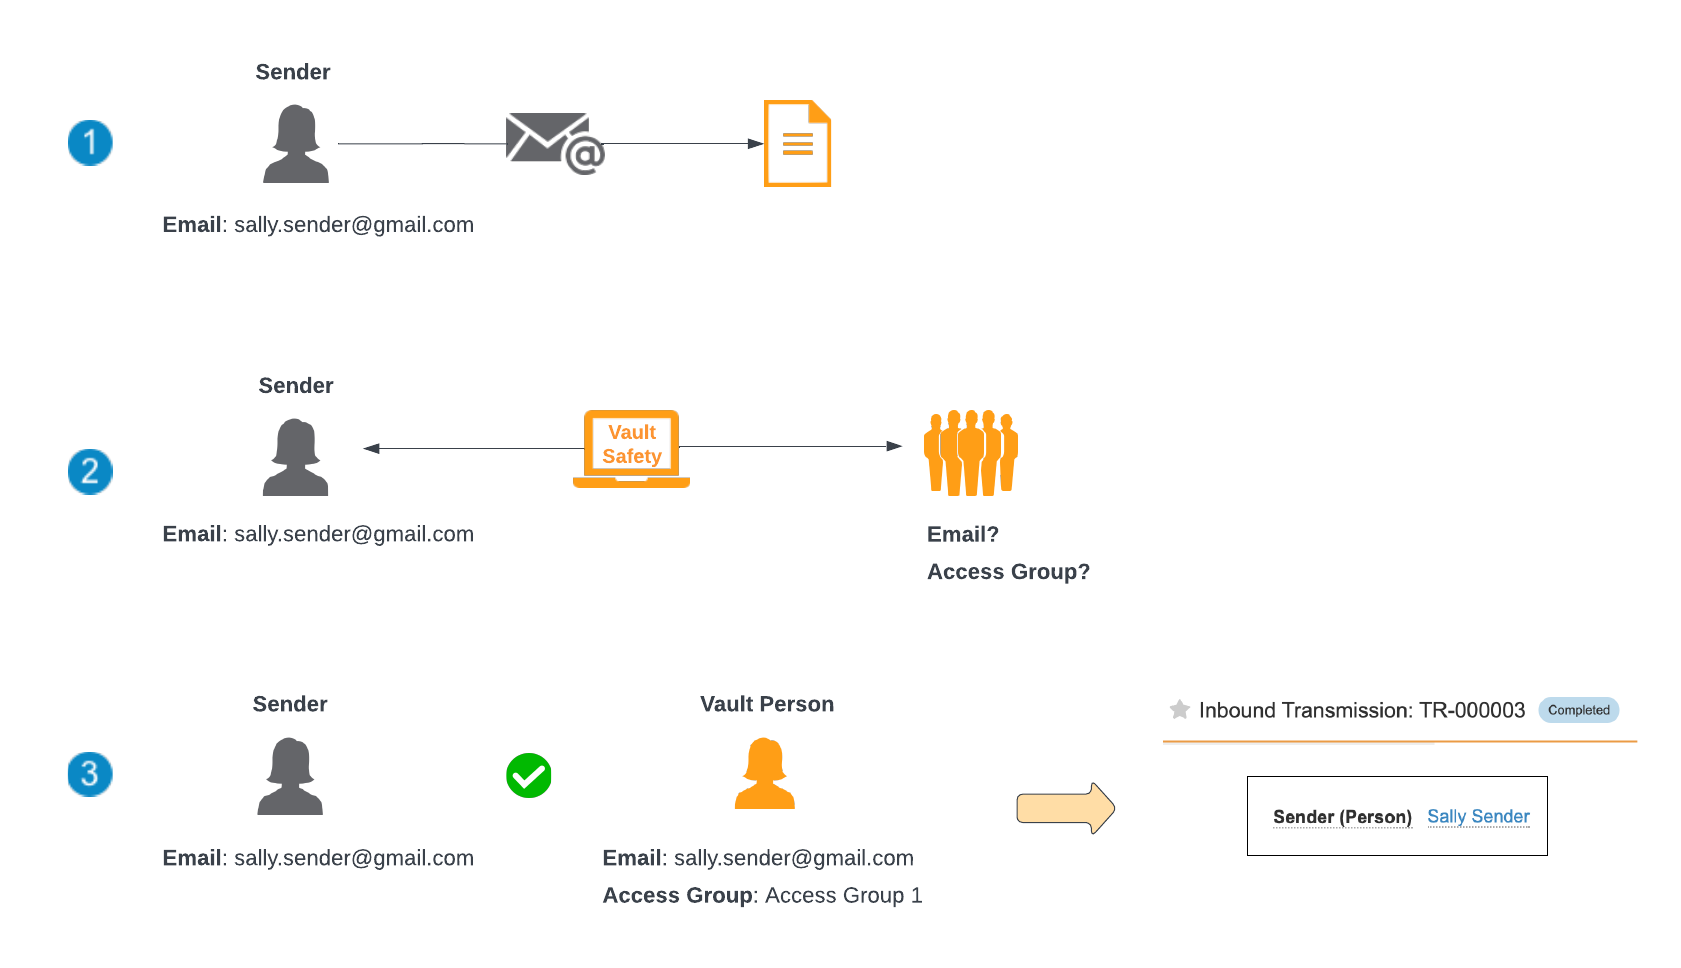
The diagrams in the following sections illustrate how Vault assigns access groups for _Inbox Items_ created from email intake. 

* [Vault sets the _Sender (Person)_ on the _Inbound Transmission_][2]
* [Vault sets the _Access Group_ field on the _Inbox Item_][3]

#### Vault Sets the Sender (Person) on the Inbound Transmission {#access-groups-email-intake-a}

<a href="https://platform.veevavault.help/assets/images/saf-access-group-email-intake-diagram-a.png" data-lightbox="saf-access-group-email-intake-diagram-a.png" data-title="Diagram A: Vault Sets the Sender (Person) on the Inbound Transmission" data-alt="access-group-email-intake-diagram-a">
  <img class="docimage" src="https://platform.veevavault.help/assets/images/saf-access-group-email-intake-diagram-a.png" alt="access-group-email-intake-diagram-a" style="max-width: 50%;"  />
</a>

1. Vault receives an _Inbox Item_ from an email.
2. Vault checks if there is a _Vault Person_ with the same email address as the sender and who belongs to an access group.
3. If a _Vault Person_ meets these criteria, Vault populates the _Sender (Person)_ field on the _Inbound Transmission_. If multiple _Vault Persons_ meet these criteria, Vault selects the record with the latest created date on the _Inbound Transmission_.

#### Vault Sets the Access Group Field on the Inbox Item {#access-groups-email-intake-b}
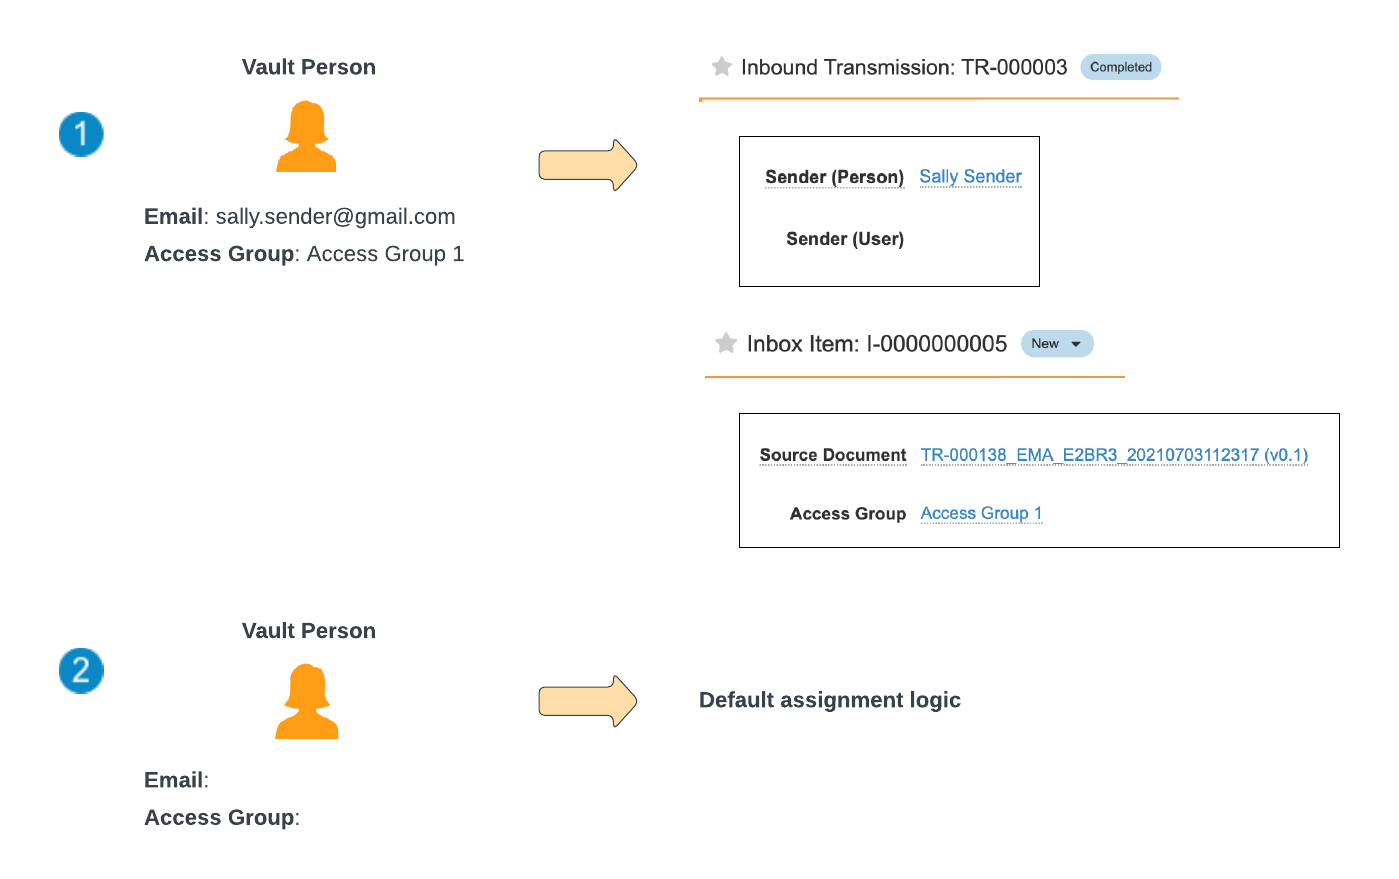
<a href="https://platform.veevavault.help/assets/images/saf-access-group-email-intake-diagram-b.png" data-lightbox="saf-access-group-email-intake-diagram-b.png" data-title="Diagram B: Vault Sets the Access Group on the Inbox Item" data-alt="access-group-email-intake-diagram-b">
  <img class="docimage" src="https://platform.veevavault.help/assets/images/saf-access-group-email-intake-diagram-b.png" alt="access-group-email-intake-diagram-b" style="max-width: 50%;"  />
</a>

1. If a _Vault Person_ was used to populate the _Sender (Person)_ on the _Inbound Transmission_, Vault uses their _Case Access Group_ value to populate the _Access Group_ value of the _Inbox Item_.
2. Otherwise, Vault uses [existing _Case Access Group_ matching logic][1] to populate the _Access Group_ value of the _Inbox Item_.

[1]: #how-vault-matches-cases-to-case-access-groups
[2]: #access-groups-email-intake-a
[3]: #access-groups-email-intake-b
[5]: #uag-assign
[6]: #strict-inbox-item-locking
[7]: #rules
[8]: #rules-fields
[9]: #uag-assign-fields
[10]: #user-access-fields