# Track a Manual Transmission

If you cannot submit an ICSR electronically using an AS2 gateway, for example if you must submit an FDA 3500A report for a study, you can record and track manual <a href="/en/gr/01264/#icsr-transmission-types">ICSR _Transmissions_</a> outside of Safety.

Vault includes a Manual Transmission workflow to track past submissions and status of ongoing submissions. This page describes the default Manual Transmission workflow. However, your organization may have a custom configuration.

<div class="note-border alert-info">
  <div class="alert alert-info" role="alert">
    <div><i class="far fa-info-circle"></i></div>
    <div class="alert-text">
      <p><strong>Note</strong>: Other than Origin and Destination, Vault Safety does automatically populate fields from the Transmission Profile on manually created Submissions or Distributions. You must populate the remaining fields (such as Message Subject and Message Body for Email Transmissions) manually in order for the system to send the Transmission successfully.</p>
    </div>
  </div>
</div>


## Prerequisites

* The _Transmission_ must be <a href="/en/gr/1022564/">created</a>, either as a _Submission_ or _Distribution_.
* To populate the sender contact details on the generated ICSR, the Sender User should have full contact and organization details on their <a href="/en/gr/01274/#add-user-contact-information">Vault Safety account</a>.


### Manual Transmission Workflow

<div class="note-border alert-info">
  <div class="alert alert-info" role="alert">
    <div><i class="far fa-info-circle"></i></div>
    <div class="alert-text">
      <p><strong>Note</strong>: This page describes the default Manual Transmission workflow. If your organization has a custom workflow, follow the recommendations in your business standard operating procedure.</p>
    </div>
  </div>
</div>


<table>
    <thead>
        <tr>
            <th>Stage</th>
            <th>Lifecycle State</th>
            <th>Description</th>
        </tr>
    </thead>
    <tbody>
        <tr>
            <td>Pending</td>
            <td>Pending</td>
            <td>Pending is the initial stage and state of the Submission record after you generate the submission document(s). The system assigns a task to review and approve the submission.</td>
        </tr>
        <tr>
            <td>Pending</td>
            <td>Ready to Submit</td>
            <td>After the Submission record and ICSR document(s) are reviewed and approved, the Submission record enters this state to indicate that it is ready for submission. The system assigns a task to manually submit the report.</td>
        </tr>
        <tr>
            <td>Accepted</td>
            <td>Complete</td>
            <td>After the task to manually submit the case is marked as complete, the Submission record enters the Accepted stage and the Complete state to indicate submission is done. </td>
        </tr>
    </tbody>
</table>


## Generate the ICSR Document for Submission

Generating the submission document starts the FDA Manual Submission workflow.

1. Go to the **Submission** record.
2. Check that the report type in the **Transmission Document Type** field is the report that you want to generate.
3. To change the report type, select **Edit**, and then choose a different report in the **Transmission Document Type** field.
4. Expand the **All Actions** menu, and then select **Generate Transmission Document(s)**.

**Result**

The system generates the case report document and adds a link to the document to the **File** field. If you do not see the file, refresh the page.

The **Submission** record enters the Pending stage. The system assigns a **Review Submission** task to the Sender User.


## Review the Submission

1. Go to the **Submission** record.
2. Review the **Details** section and ensure the details are correct.
3. To review the submission document, in the **File** field, select the document link. The document opens in the **Library**.
5. Once you have reviewed the file, return to the Submission record.
4. In the **Review Submission** task banner, select **Complete**. The **Review Submission** window appears.
5. Select **Complete**.

**Result**

The system assigns a **Submit to Regulatory Authority** task.

## Complete the Submission

Coordinate the submission outside of Vault Safety and then mark the submission as complete to finalize the submission.

### Export the Submission Document

1. Go to the **Submission** record.
2. In the **File** field, select the document link. The document opens in the **Library**.
3. Expand the **Document** menu, and then select **Source Document**.

<div class="note-border alert-info">
  <div class="alert alert-info" role="alert">
    <div><i class="far fa-info-circle"></i></div>
    <div class="alert-text">
      <p><strong>Note</strong>: The <strong>Document</strong> menu appears as <img class="inline" src="https://platform.veevavault.help/assets/images/saf-export-pdf-button.png" alt="PDF menu" style=" width: 3rem;" /> for CIOMS I and FDA 3500A reports and <img class="inline" src="https://platform.veevavault.help/assets/images/saf-download-doc.png" alt="Download Document menu" style=" width: 3rem;" /> for E2B reports.</p>
    </div>
  </div>
</div>


**Result**

The file starts downloading to your computer.

### Mark the Submission as Complete

1. Accept the **Submit to Regulatory Authority** task.
2. Beside the **Submit to Regulatory Authority** task, select **Complete**. The **Submit to Regulatory Authority** window appears.
    <a href="https://platform.veevavault.help/assets/images/saf-submit-to-regulatory-authority-window.png" data-lightbox="saf-submit-to-regulatory-authority-window.png" data-title="Submit to Regulatory Authority Window" data-alt="Submit to Regulatory Authority Window">
  <img class="docimage" src="https://platform.veevavault.help/assets/images/saf-submit-to-regulatory-authority-window.png" alt="Submit to Regulatory Authority Window" style=""  />
</a>
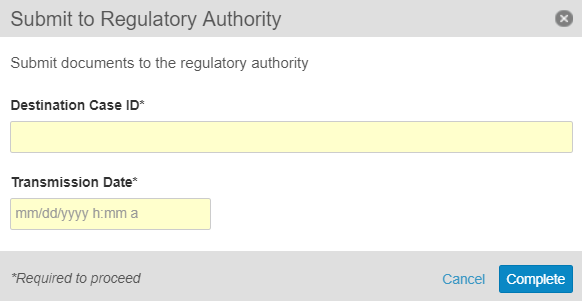
3. Under **Destination Case ID**, enter the destination identification number for the submission.
4. Under **Transmission Date**, enter the date and time when the report was submitted.
5. Select **Complete**.

**Result**

The **Submission** record moves to the **Completed** state.