Note: On the PSMF Logbook Lifecycle, ensure Edit permissions are not granted.
| Document Lifecycle | Lifecycle State | Security Settings |
|---|---|---|
| PSMF Binder Lifecycle | Draft |
|
| In Review |
|
|
| In Approval |
|
|
| Approved |
|
|
| Superseded |
|
|
| PSMF Content Lifecycle | Draft |
|
| In Authoring |
|
|
| Ready for Review |
|
|
| In Review |
|
|
| In Approval |
|
|
| Approved |
|
|
| Superseded |
|
|
| Planned |
|
|
| PSMF Generated Document Lifecycle | Generated |
|
| Final |
|
|
| Planned |
|
| Lifecycle Stage Group Label | Document Lifecycle | Stage Labels |
|---|---|---|
| PSMF Binder | PSMF Binder Lifecycle |
|
| PSMF Content | PSMF Content Lifecycle |
|
| PSMF Generated Document | PSMF Generated Document Lifecycle |
|
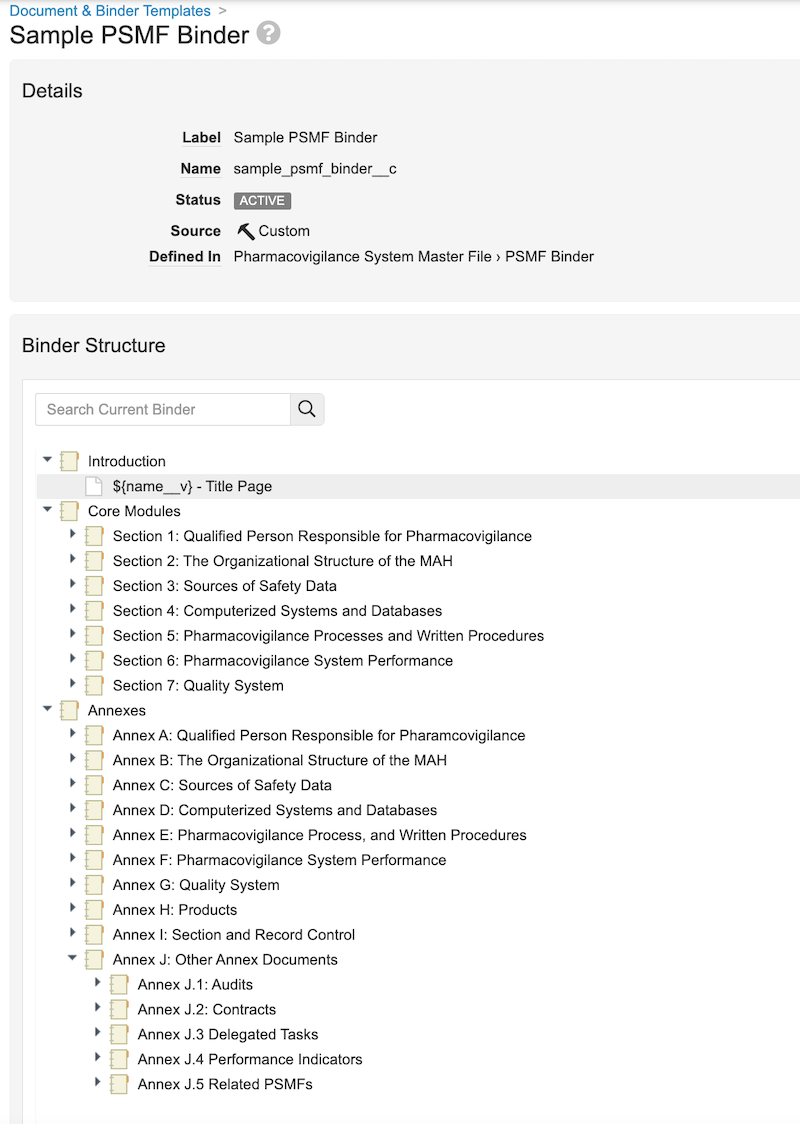
### Add the Table of Contents Document to PSMF Binder Templates {#add-the-table-of-contents-document-to-psmf-binder-templates}
To add the _Table of Contents_ document to the relevant _PSMF Binder_ templates:
1. Navigate to **Business Admin > Templates > Documents and Binders**.
2. Select the PSMF binder template to which you want to add the table of contents.
3. Add a planned document to the _Introduction_ section, populating the fields as follows, then select **OK**:
| Field | Description |
|---|---|
| Type | Select Pharmacovigilance System Master File. |
| Subtype | Select PSMF Generated Document. |
| Classification | Select PSMF Table of Contents. |
| Lifecycle | Vault populates PSMF Generated Document Lifecycle. |
| Template | Select PSMF Table of Contents Sample. |
| Planned Name | Enter ${name__v} - Table of Contents. |
| Field | Description |
|---|---|
| Name | Enter PSMF Binder Signature Page |
| Template Selection | Select Basic Template |
| Header (first field) | Enter Document Name: ${name__v} |
| Header (second field) | Enter Document ID: ${source_document_id__v} |
| Signature Block 1 | Enter ${signee_name__v}${signee_title__v} |
| Signature Block 2 | Enter ${signature_verdict__v}${signature_capacity__v}${signature_date__v} |
| Location | Select End of Document |
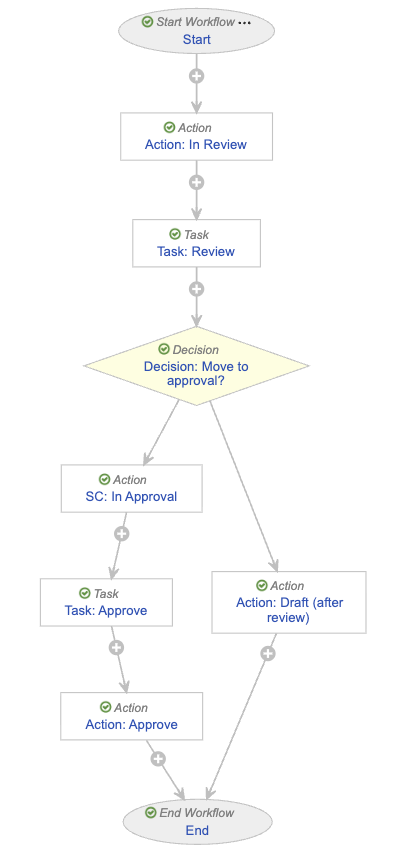 #### Configure the Start Step {#binder-wf-start}
To configure the _Start_ step:
1. In the _Workflow Steps_ section, select **Start**.
2. On the _Start_ step page, select **Edit**.
3. In the _Details_ section, populate the **Next Steps** field as follows:
* Remove the **End** step
* Select **Create Step**
* In the **Step Name** field, enter `Action: In Review`
* Select **OK**
4. In the _Start Options_ section, select **Add Control** and populate _Control 1_ as follows:
* **Control 1**: Select **Instructions**
* **Instructions**: Enter `You are starting the review for ${docName}. Please specify the reviewer and approver. Note this review is reviewing that all expected documents are present, not their content.`
5. Select **Add Control**, then populate _Control 2_ as follows:
* **Control 2**: Select **Participants**
* **Participant Label**: Enter `PSMF Reviewer`
* **Add Participants**:
* **Role allowed to participate**: Select **PSMF Office**
* Select the **Allow task instructions for these participants** checkbox
* Select the **Default users from sharing settings** checkbox
6. Select **Add Control**, then populate _Control 3_ as follows:
* **Control 3**: Select **Participants**
* **Participant Label**: Enter `PSMF Approver (QPPV)`
* **Add Participants**:
* **Role allowed to participate**: Select **PSMF Office**
* Select the **Allow task instructions for these participants** checkbox
7. Select **Add Control**, then populate _Control 4_ as follows:
* **Control 4**: Select **Date**
* **Label**: Enter `Due Date`
8. Select **Save**.
9. From the _Next Steps_ field, select **Action: In Review** to navigate to the next step.
#### Configure the In Review Action Step {#binder-wf-in-review}
To configure the _Action: In Review_ step:
1. From the _Action: In Review_ step page, select **Edit**.
2. In the _Details_ section, populate the fields as follows:
* **Type**: Select **Action**
* **Next Steps**
* Select **Create Step**
* In the _Step Name_ field, enter `Task: Review`
* Select **OK**
3. In the _Rules_ section, select **Create Rule** then populate the fields as follows:
* **Condition Type**: Select **Always**
* **perform actions**: Select **Change State**
* **Lifecycle State**: Select **In Review**
4. Select **Save**.
5. In the _Next Steps_ field, select **Task: Review** to navigate to the next step.
#### Configure the Review Task Step {#binder-wf-review}
To configure the _Task: Review_ step:
1. From the _Task: Review_ step page, select **Edit**.
2. In the _Details_ section, populate the fields as follows:
* **Type**: Select **Task**
* **Next Steps**
* Select **Create Step**
* In the **Step Name** field, enter `Decision: Move to approval?`
* Select **OK**
3. In the _General Settings_ section, populate the fields as follows:
* **Task Label**: Enter `Review PSMF Binder`
* **Assign Task To**: Select **PSMF Reviewer**
* Select **Make available to users in participant group**
* **Instructions**: Enter `Please review the PSMF Binder ${docName} to ensure all expected documents are present.`
* **Task Requirement**: Select **Required**
4. In the _Due Date_ section, populate the **Due Date** field with **Due Date** > **-** > **2**.
5. In the _Update Sharing Settings_ section, select **Add rule**, then populate the **Update Role on Event** field with **Task Assignment** > **Add** > **Reviewer**.
6. In the _Prompts_ section, select the **Prompt for Verdicts** checkbox, then select **Single Verdict: One verdict that applies to all items**.
* In the _Verdict Label_ field that appears, enter `Continue to Approval`
* Select **Add Comments**, then in the **Prompt for Comments** field, enter `Comments`
* Select **Add Verdict** and in the _Verdict Label_ field that appears, enter `Missing content, back to Draft`
* Select **Add Comments**, then in the **Prompt for Comments** field, enter `Comments`
7. In the _Notification_ section, select **Multi-document Workflow Review Task** in the **Notification Template** field.
8. Select **Save**.
9. From the _Next Steps_ field, select **Decision: Move to approval?** to navigate to the next step.
#### Configure the Move to Approval Decision Step {#binder-wf-move-to-approval}
To configure the _Decision: Move to approval?_ step:
1. From the _Decision: Move to approval?_ step page, select **Edit**.
2. In the _Type_ field, select **Decision**.
3. In the _Rules_ section, select **Create Rule** and populate the fields as follows:
* **Condition Type**: Select **All conditions are met**
* **if**: Select **Task** > **Task: Review** > **all labels equal** > **Continue to Approval**
* **then**: Select **Create Step**
* In the _Create Step_ dialog, enter `Change State: In Approval`
* Select **OK**
4. In the _then_ field of the _Else_ section, select **Create Step**.
* In the _Create Step_ dialog, enter `Action: Draft (after review)`
* Select **OK**
5. Select **Save**.
6. In the _Rules_ section, select **SC: In Approval** to navigate to the next step.
#### Configure the In Approval State Change Action Step {#binder-wf-in-approval}
To configure the _SC: In Approval_ step:
1. From the _SC: In Approval_ step page, select **Edit**.
2. In the _Details_ section, populate the fields as follows:
* **Type**: Select **Action**
* **Next Steps**:
* Select **Create Step**
* In the **Step Name** field, enter `Task: Approve`
* Select **OK**
3. In the _Rules_ section, select **Create Rule** and populate the fields as follows:
* **Condition Type**: Select **Always**
* **perform actions**: Select **Change State**
* **Lifecycle State**: Select **In Approval**
4. Select **Save**.
5. From the _Next Steps_ field, select **Task: Approve** to navigate to the next step.
#### Configure the Approve Task Step {#binder-wf-approve-task}
To configure the _Task: Approve_ step:
1. From the _Task: Approve_ step page, select **Edit**.
2. In the _Details_ section, populate the fields as follows:
* **Type**: Select **Task**
* **Next Steps**
* Select **Create Step**
* In the **Step Name** field, enter `Action: Approve`
* Select **OK**
3. In the _General Settings_ section, populate the fields as follows:
* **Task Label**: Enter `Approve PSMF`
* **Assign Task To**: Select **PSMF Approver (QPPV)**
* Select **Make available to users in participant group**
* **Instructions**: Enter `Review and approve or reject PSMF Binder ${docName}. Approval will trigger PDF Generation.`
* **Task Requirement**: Select **Required**
* **Display information about previous tasks**: Select **Task: Review**
4. In the _Due Date_ section, populate the **Due Date** field with **Due Date** > **+** > **0**.
5. In the _Update Sharing Settings_ section, select **Add rule**, then populate the **Update Role on Event** field with **Task Assignment** > **Add** > **Approver**.
6. In the _Prompts_ section, select the **Prompt for Verdicts** checkbox, then select **Single Verdict: One verdict that applies to all items**.
* In the _Verdict Label_ field that appears, enter `Approved`
* Select **Add Capacities**
* In the **Capacity Label** field, enter `Capacity` then select the **Required** checkbox
* Add the following _Capacity Values_:
* **QPPV**
* **Local QPPV**
* **Delegate QPPV**
* **QPPV Office**
* Select **Add eSignature** and populate the **Instructions** field with `You are providing a binding eSignature`
* Select **Add Verdict** and in the _Verdict Label_ field that appears, enter `Rejected, back to Draft`
* Select **Add Comments**
* In the **Prompt for Comments** field, enter `Comments`, then select the **Required** checkbox
7. In the _Notification_ section, populate the following fields:
* **Notification Template**: Select **Multi-document Workflow Approval Task**
* Select the **Include verdicts and comments from previous tasks** checkbox
* **Select Tasks**: Select **Task: Review**
8. Select **Save**.
9. From the _Next Steps_ field, select **Action: Approve** to navigate to the next step.
#### Configure the Approve Action Step {#binder-wf-approve-action}
To configure the _Action: Approve_ step:
1. From the _Action: Approve_ step page, select **Edit**.
2. In the _Details_ section, populate the fields as follows:
* **Type**: Select **Action**
* **Next Steps**: Select **End**
3. In the _Rules_ section, select **Create Rule** then populate the fields as follows:
* **Condition Type**: Select **All conditions are met**
* **if**: Select **Task** > **Task: Approve** > **all labels equal** > **Approved**
* **perform actions**: Select **Change State**
* **Lifecycle State**: Select **Approved**
4. Select **Create Rule** then populate the fields as follows:
* **Condition Type**: Select **All conditions are met**
* **if**: Select **Task** > **Task: Approve** > **at least one label equals** > **Rejected, back to Draft**
* **perform actions**: Select **Remove eSignature from items**
* **Task**: Select **Task: Approve**
* **Verdicts**: Select **Approved**
* Select **Add Action** then populate the fields as follows:
* Select **Change State**
* **Lifecycle State**: Select **Draft**
5. Select **Save**.
6. Navigate to the main page of the workflow.
#### Configure the Draft After Review Action Step {#binder-wf-draft}
To configure the _Action: Draft (after review)_ step:
1. From the _PSMF Binder Workflow_ workflow page, select the **Action: Draft (after review)** step.
2. From the _Action: Draft (after review)_ step page, select **Edit**.
3. In the _Details_ section, populate the fields as follows:
* **Type**: Select **Action**
* **Next Steps**: Select **End**
4. In the _Rules_ section, select **Create Rule** and populate the fields as follows:
* **Condition Type**: Select **Always**
* **perform actions**: Select **Change State**
* **Lifecycle State**: Select **Draft**
5. Select **Save**.
#### Activate the Workflow {#binder-wf-activate}
To activate the _PSMF Binder Workflow_:
1. Navigate to the main page of the workflow.
2. In the _Status_ field within the _Details_ section, select **Make configuration active**.
### Configure the PSMF Binder Lifecycle {#psmf-binder-lifecycle}
To configure the _PSMF Binder Lifecycle_:
* Create a user action on the _Draft_ lifecycle state as follows:
* **Condition Type**: Select **Always**
* **Allow the following actions**:
* Select **Workflow**
* Select **PSMF Binder Workflow**
* **Action Label**: Enter `Start PSMF Review & Approval`
* Create the following entry actions on the _Approved_ lifecycle state:
* **Condition Type**: Select **Always**
* **perform actions**: Add the following actions:
* **Set new major version**
* **Set previous steady state to superseded**
* **Generate PSMF PDF**
### Create PSMF Content Document Workflows {#psmf-content-workflows}
Create the following document workflows to manage the authoring, review, editing, and approval processes for PSMF documents:
* [_PSMF Content Authoring_][41]
* [_PSMF Content Review_][42]
* [_PSMF Content Approval_][43]
* [_Move to Draft (PSMF Content)_][44]
#### Configure the PSMF Content Authoring Workflow {#psmf-content-authoring-workflow}
To configure the _PSMF Content Authoring_ workflow:
1. Navigate to **Admin > Configuration > Workflows**.
2. Select **Create**.
3. In the _Create Workflow_ dialog, select **Document Workflow**, then select **Continue**.
4. On the _Create Workflow_ page, populate the fields as follows:
* **Label**: Enter `PSMF Content Authoring`
* **Document Lifecycle**: Select **PSMF Content Lifecycle**
5. Select **Save**.
6. Configure the following workflow steps:
* [_Start_][45]
* [_In Authoring_ action][46]
* [_Author_ task][47]
* [_Change State_ action][48]
* [_Authored_ notification][49]
7. [Activate the workflow][50].
#### Configure the Start Step {#binder-wf-start}
To configure the _Start_ step:
1. In the _Workflow Steps_ section, select **Start**.
2. On the _Start_ step page, select **Edit**.
3. In the _Details_ section, populate the **Next Steps** field as follows:
* Remove the **End** step
* Select **Create Step**
* In the **Step Name** field, enter `Action: In Review`
* Select **OK**
4. In the _Start Options_ section, select **Add Control** and populate _Control 1_ as follows:
* **Control 1**: Select **Instructions**
* **Instructions**: Enter `You are starting the review for ${docName}. Please specify the reviewer and approver. Note this review is reviewing that all expected documents are present, not their content.`
5. Select **Add Control**, then populate _Control 2_ as follows:
* **Control 2**: Select **Participants**
* **Participant Label**: Enter `PSMF Reviewer`
* **Add Participants**:
* **Role allowed to participate**: Select **PSMF Office**
* Select the **Allow task instructions for these participants** checkbox
* Select the **Default users from sharing settings** checkbox
6. Select **Add Control**, then populate _Control 3_ as follows:
* **Control 3**: Select **Participants**
* **Participant Label**: Enter `PSMF Approver (QPPV)`
* **Add Participants**:
* **Role allowed to participate**: Select **PSMF Office**
* Select the **Allow task instructions for these participants** checkbox
7. Select **Add Control**, then populate _Control 4_ as follows:
* **Control 4**: Select **Date**
* **Label**: Enter `Due Date`
8. Select **Save**.
9. From the _Next Steps_ field, select **Action: In Review** to navigate to the next step.
#### Configure the In Review Action Step {#binder-wf-in-review}
To configure the _Action: In Review_ step:
1. From the _Action: In Review_ step page, select **Edit**.
2. In the _Details_ section, populate the fields as follows:
* **Type**: Select **Action**
* **Next Steps**
* Select **Create Step**
* In the _Step Name_ field, enter `Task: Review`
* Select **OK**
3. In the _Rules_ section, select **Create Rule** then populate the fields as follows:
* **Condition Type**: Select **Always**
* **perform actions**: Select **Change State**
* **Lifecycle State**: Select **In Review**
4. Select **Save**.
5. In the _Next Steps_ field, select **Task: Review** to navigate to the next step.
#### Configure the Review Task Step {#binder-wf-review}
To configure the _Task: Review_ step:
1. From the _Task: Review_ step page, select **Edit**.
2. In the _Details_ section, populate the fields as follows:
* **Type**: Select **Task**
* **Next Steps**
* Select **Create Step**
* In the **Step Name** field, enter `Decision: Move to approval?`
* Select **OK**
3. In the _General Settings_ section, populate the fields as follows:
* **Task Label**: Enter `Review PSMF Binder`
* **Assign Task To**: Select **PSMF Reviewer**
* Select **Make available to users in participant group**
* **Instructions**: Enter `Please review the PSMF Binder ${docName} to ensure all expected documents are present.`
* **Task Requirement**: Select **Required**
4. In the _Due Date_ section, populate the **Due Date** field with **Due Date** > **-** > **2**.
5. In the _Update Sharing Settings_ section, select **Add rule**, then populate the **Update Role on Event** field with **Task Assignment** > **Add** > **Reviewer**.
6. In the _Prompts_ section, select the **Prompt for Verdicts** checkbox, then select **Single Verdict: One verdict that applies to all items**.
* In the _Verdict Label_ field that appears, enter `Continue to Approval`
* Select **Add Comments**, then in the **Prompt for Comments** field, enter `Comments`
* Select **Add Verdict** and in the _Verdict Label_ field that appears, enter `Missing content, back to Draft`
* Select **Add Comments**, then in the **Prompt for Comments** field, enter `Comments`
7. In the _Notification_ section, select **Multi-document Workflow Review Task** in the **Notification Template** field.
8. Select **Save**.
9. From the _Next Steps_ field, select **Decision: Move to approval?** to navigate to the next step.
#### Configure the Move to Approval Decision Step {#binder-wf-move-to-approval}
To configure the _Decision: Move to approval?_ step:
1. From the _Decision: Move to approval?_ step page, select **Edit**.
2. In the _Type_ field, select **Decision**.
3. In the _Rules_ section, select **Create Rule** and populate the fields as follows:
* **Condition Type**: Select **All conditions are met**
* **if**: Select **Task** > **Task: Review** > **all labels equal** > **Continue to Approval**
* **then**: Select **Create Step**
* In the _Create Step_ dialog, enter `Change State: In Approval`
* Select **OK**
4. In the _then_ field of the _Else_ section, select **Create Step**.
* In the _Create Step_ dialog, enter `Action: Draft (after review)`
* Select **OK**
5. Select **Save**.
6. In the _Rules_ section, select **SC: In Approval** to navigate to the next step.
#### Configure the In Approval State Change Action Step {#binder-wf-in-approval}
To configure the _SC: In Approval_ step:
1. From the _SC: In Approval_ step page, select **Edit**.
2. In the _Details_ section, populate the fields as follows:
* **Type**: Select **Action**
* **Next Steps**:
* Select **Create Step**
* In the **Step Name** field, enter `Task: Approve`
* Select **OK**
3. In the _Rules_ section, select **Create Rule** and populate the fields as follows:
* **Condition Type**: Select **Always**
* **perform actions**: Select **Change State**
* **Lifecycle State**: Select **In Approval**
4. Select **Save**.
5. From the _Next Steps_ field, select **Task: Approve** to navigate to the next step.
#### Configure the Approve Task Step {#binder-wf-approve-task}
To configure the _Task: Approve_ step:
1. From the _Task: Approve_ step page, select **Edit**.
2. In the _Details_ section, populate the fields as follows:
* **Type**: Select **Task**
* **Next Steps**
* Select **Create Step**
* In the **Step Name** field, enter `Action: Approve`
* Select **OK**
3. In the _General Settings_ section, populate the fields as follows:
* **Task Label**: Enter `Approve PSMF`
* **Assign Task To**: Select **PSMF Approver (QPPV)**
* Select **Make available to users in participant group**
* **Instructions**: Enter `Review and approve or reject PSMF Binder ${docName}. Approval will trigger PDF Generation.`
* **Task Requirement**: Select **Required**
* **Display information about previous tasks**: Select **Task: Review**
4. In the _Due Date_ section, populate the **Due Date** field with **Due Date** > **+** > **0**.
5. In the _Update Sharing Settings_ section, select **Add rule**, then populate the **Update Role on Event** field with **Task Assignment** > **Add** > **Approver**.
6. In the _Prompts_ section, select the **Prompt for Verdicts** checkbox, then select **Single Verdict: One verdict that applies to all items**.
* In the _Verdict Label_ field that appears, enter `Approved`
* Select **Add Capacities**
* In the **Capacity Label** field, enter `Capacity` then select the **Required** checkbox
* Add the following _Capacity Values_:
* **QPPV**
* **Local QPPV**
* **Delegate QPPV**
* **QPPV Office**
* Select **Add eSignature** and populate the **Instructions** field with `You are providing a binding eSignature`
* Select **Add Verdict** and in the _Verdict Label_ field that appears, enter `Rejected, back to Draft`
* Select **Add Comments**
* In the **Prompt for Comments** field, enter `Comments`, then select the **Required** checkbox
7. In the _Notification_ section, populate the following fields:
* **Notification Template**: Select **Multi-document Workflow Approval Task**
* Select the **Include verdicts and comments from previous tasks** checkbox
* **Select Tasks**: Select **Task: Review**
8. Select **Save**.
9. From the _Next Steps_ field, select **Action: Approve** to navigate to the next step.
#### Configure the Approve Action Step {#binder-wf-approve-action}
To configure the _Action: Approve_ step:
1. From the _Action: Approve_ step page, select **Edit**.
2. In the _Details_ section, populate the fields as follows:
* **Type**: Select **Action**
* **Next Steps**: Select **End**
3. In the _Rules_ section, select **Create Rule** then populate the fields as follows:
* **Condition Type**: Select **All conditions are met**
* **if**: Select **Task** > **Task: Approve** > **all labels equal** > **Approved**
* **perform actions**: Select **Change State**
* **Lifecycle State**: Select **Approved**
4. Select **Create Rule** then populate the fields as follows:
* **Condition Type**: Select **All conditions are met**
* **if**: Select **Task** > **Task: Approve** > **at least one label equals** > **Rejected, back to Draft**
* **perform actions**: Select **Remove eSignature from items**
* **Task**: Select **Task: Approve**
* **Verdicts**: Select **Approved**
* Select **Add Action** then populate the fields as follows:
* Select **Change State**
* **Lifecycle State**: Select **Draft**
5. Select **Save**.
6. Navigate to the main page of the workflow.
#### Configure the Draft After Review Action Step {#binder-wf-draft}
To configure the _Action: Draft (after review)_ step:
1. From the _PSMF Binder Workflow_ workflow page, select the **Action: Draft (after review)** step.
2. From the _Action: Draft (after review)_ step page, select **Edit**.
3. In the _Details_ section, populate the fields as follows:
* **Type**: Select **Action**
* **Next Steps**: Select **End**
4. In the _Rules_ section, select **Create Rule** and populate the fields as follows:
* **Condition Type**: Select **Always**
* **perform actions**: Select **Change State**
* **Lifecycle State**: Select **Draft**
5. Select **Save**.
#### Activate the Workflow {#binder-wf-activate}
To activate the _PSMF Binder Workflow_:
1. Navigate to the main page of the workflow.
2. In the _Status_ field within the _Details_ section, select **Make configuration active**.
### Configure the PSMF Binder Lifecycle {#psmf-binder-lifecycle}
To configure the _PSMF Binder Lifecycle_:
* Create a user action on the _Draft_ lifecycle state as follows:
* **Condition Type**: Select **Always**
* **Allow the following actions**:
* Select **Workflow**
* Select **PSMF Binder Workflow**
* **Action Label**: Enter `Start PSMF Review & Approval`
* Create the following entry actions on the _Approved_ lifecycle state:
* **Condition Type**: Select **Always**
* **perform actions**: Add the following actions:
* **Set new major version**
* **Set previous steady state to superseded**
* **Generate PSMF PDF**
### Create PSMF Content Document Workflows {#psmf-content-workflows}
Create the following document workflows to manage the authoring, review, editing, and approval processes for PSMF documents:
* [_PSMF Content Authoring_][41]
* [_PSMF Content Review_][42]
* [_PSMF Content Approval_][43]
* [_Move to Draft (PSMF Content)_][44]
#### Configure the PSMF Content Authoring Workflow {#psmf-content-authoring-workflow}
To configure the _PSMF Content Authoring_ workflow:
1. Navigate to **Admin > Configuration > Workflows**.
2. Select **Create**.
3. In the _Create Workflow_ dialog, select **Document Workflow**, then select **Continue**.
4. On the _Create Workflow_ page, populate the fields as follows:
* **Label**: Enter `PSMF Content Authoring`
* **Document Lifecycle**: Select **PSMF Content Lifecycle**
5. Select **Save**.
6. Configure the following workflow steps:
* [_Start_][45]
* [_In Authoring_ action][46]
* [_Author_ task][47]
* [_Change State_ action][48]
* [_Authored_ notification][49]
7. [Activate the workflow][50].
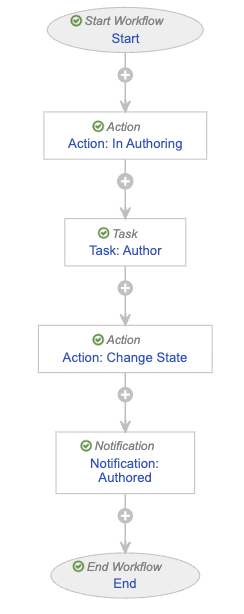 ##### Configure the Start Step {#psmf-content-authoring-wf-start}
To configure the _Start_ step:
1. In the _Workflow Steps_ section, select **Start**.
2. On the _Start_ step page, select **Edit**.
3. In the _Details_ section, populate the **Next Steps** field as follows:
* Remove the **End** step
* Select **Create Step**
* In the **Step Name** field, enter `Action: In Authoring`
* Select **OK**
4. In the _Start Options_ section, select **Add Control** and populate _Control 1_ as follows:
* **Control 1**: Select **Instructions**
* **Instructions**: Enter `Please select this document's authors.`
5. Select **Add Control**, then populate _Control 2_ as follows:
* **Control 2**: Select **Participants**
* **Participant Label**: Enter `Authors`
* **Add Participants**: Select the **Allow task instructions for these participants** checkbox
6. Select **Add Control**, then populate _Control 3_ as follows:
* **Control 3**: Select **Date**
* **Label**: Enter `Due Date`
7. Select **Save**.
8. From the _Next Steps_ field, select **Action: In Authoring** to navigate to the next step.
##### Configure the In Authoring Action Step {#psmf-content-authoring-wf-authoring}
To configure the _Action: In Authoring_ step:
1. From the _Action: In Authoring_ step page, select **Edit**.
2. In the _Details_ section, populate the fields as follows:
* **Type**: Select **Action**
* **Next Steps**
* Select **Create Step**
* In the _Step Name_ field, enter `Task: Author`
* Select **OK**
3. In the _Rules_ section, select **Create Rule** then populate the fields as follows:
* **Condition Type**: Select **Always**
* **perform actions**: Select **Change State**
* **Lifecycle State**: Select **In Authoring**
4. Select **Save**.
5. In the _Next Steps_ field, select **Task: Author** to navigate to the next step.
##### Configure the Author Task Step {#psmf-content-authoring-wf-author}
To configure the _Task: Author_ step:
1. From the _Task: Author_ step page, select **Edit**.
2. In the _Details_ section, populate the fields as follows:
* **Type**: Select **Task**
* **Next Steps**
* Select **Create Step**
* In the **Step Name** field, enter `Action: Change State`
* Select **OK**
3. In the _General Settings_ section, populate the fields as follows:
* **Task Label**: Enter `Author Document`
* **Assign Task To**: Select **Authors**
* Select **Assign to all users in participant group**
* **Instructions**: Enter `Please author document content and PSMF Logbook comment.`
* **Task Requirement**: Select **Required**
4. In the _Due Date_ section, populate the **Due Date** field with **Due Date** > **+** > **0**.
5. In the _Update Sharing Settings_ section, add the following rules:
* **Task Assignment** > **Add** > **Editor**
* **Task Completion** > **Remove** > **Editor**
* **Task Cancellation** > **Remove** > **Editor**
* **Task Reassignment From** > **Remove** > **Editor**
6. In the _Prompts_ section, select the **Prompt for Verdicts** checkbox, then select **Multiple Verdicts: One verdict for each item**.
* In the _Verdict Label_ field that appears, enter `Ready for Review`
* Select **Add Verdict** and in the _Verdict Label_ field that appears, enter `Changes Required`
* Select **Add Comments**, then in the **Prompt for Comments** field, enter `Comments`
7. In the _Notification_ section, select **Multi-document Workflow Authoring Task** in the **Notification Template** field.
8. Select **Save**.
9. From the _Next Steps_ field, select **Action: Change State** to navigate to the next step.
##### Configure the Change State Action Step {#psmf-content-authoring-wf-change-state}
To configure the _Action: Change State_ step:
1. From the _Action: Change State_ step page, select **Edit**.
2. In the _Details_ section, populate the fields as follows:
* **Type**: Select **Action**
* **Next Steps**:
* Select **Create Step**
* In the **Step Name** field, enter `Notification: Authored`
* Select **OK**
3. In the _Rules_ section, select **Create Rule** and populate the fields as follows:
* **Condition Type**: Select **All conditions are met**
* **if**: Select **Task** > **Task: Author** > **at least one label equals** > **Changes Required**
* **perform actions**: Select **Change State**
* **Lifecycle State**: Select **Draft**
4. Select **Create Rule** and populate the fields as follows:
* **Condition Type**: Select **All conditions are met**
* **if**: Select **Task** > **Task: Author** > **all labels equal** > **Ready for Review**
* **perform actions**: Select **Change State**
* **Lifecycle State**: Select **Ready for Review**
5. Select **Save**.
6. From the _Next Steps_ field, select **Notification: Authored** to navigate to the next step.
##### Configure the Authored Notification Step {#psmf-content-authoring-wf-authored}
To configure the _Notification: Authored_ step:
1. From the _Notification: Authored_ step page, select **Edit**.
2. In the _Details_ section, populate the fields as follows:
* **Type**: Select **Notification**
* **Next Steps**: Select **End**
3. In the _Notification Options_ section, populate the fields as follows:
* **Notification Template**: Select **Multi-document Workflow Authored**
* **Recipient**: Select **Workflow Owner**
* Select the **Include verdicts and comments from previous tasks** checkbox
* **Select Tasks**: Select **Task: Author**
4. Select **Save**.
##### Activate the Workflow {#psmf-content-authoring-wf-activate}
To activate the _PSMF Content Authoring_ workflow:
1. Navigate to the main page of the workflow.
2. In the _Status_ field within the _Details_ section, select **Make configuration active**.
#### Configure the PSMF Content Review Workflow {#psmf-content-review-workflow}
To configure the _PSMF Content Review_ workflow:
1. Navigate to **Admin > Configuration > Workflows**.
2. Select **Create**.
3. In the _Create Workflow_ dialog, select **Document Workflow**, then select **Continue**.
4. On the _Create Workflow_ page, populate the fields as follows:
* **Label**: Enter `PSMF Content Review`
* **Document Lifecycle**: Select **PSMF Content Lifecycle**
5. Select **Save**.
6. Configure the following workflow steps:
* [_Start_][51]
* [_In Review_ state change][52]
* [_Review_ task][53]
* [_Draft_ decision][54]
* [_Draft_ state change][55]
* [_Rejected_ notification][56]
* [_In Approval_ state change][57]
* [_Reviewed_ notification][58]
7. [Activate the workflow][59].
##### Configure the Start Step {#psmf-content-authoring-wf-start}
To configure the _Start_ step:
1. In the _Workflow Steps_ section, select **Start**.
2. On the _Start_ step page, select **Edit**.
3. In the _Details_ section, populate the **Next Steps** field as follows:
* Remove the **End** step
* Select **Create Step**
* In the **Step Name** field, enter `Action: In Authoring`
* Select **OK**
4. In the _Start Options_ section, select **Add Control** and populate _Control 1_ as follows:
* **Control 1**: Select **Instructions**
* **Instructions**: Enter `Please select this document's authors.`
5. Select **Add Control**, then populate _Control 2_ as follows:
* **Control 2**: Select **Participants**
* **Participant Label**: Enter `Authors`
* **Add Participants**: Select the **Allow task instructions for these participants** checkbox
6. Select **Add Control**, then populate _Control 3_ as follows:
* **Control 3**: Select **Date**
* **Label**: Enter `Due Date`
7. Select **Save**.
8. From the _Next Steps_ field, select **Action: In Authoring** to navigate to the next step.
##### Configure the In Authoring Action Step {#psmf-content-authoring-wf-authoring}
To configure the _Action: In Authoring_ step:
1. From the _Action: In Authoring_ step page, select **Edit**.
2. In the _Details_ section, populate the fields as follows:
* **Type**: Select **Action**
* **Next Steps**
* Select **Create Step**
* In the _Step Name_ field, enter `Task: Author`
* Select **OK**
3. In the _Rules_ section, select **Create Rule** then populate the fields as follows:
* **Condition Type**: Select **Always**
* **perform actions**: Select **Change State**
* **Lifecycle State**: Select **In Authoring**
4. Select **Save**.
5. In the _Next Steps_ field, select **Task: Author** to navigate to the next step.
##### Configure the Author Task Step {#psmf-content-authoring-wf-author}
To configure the _Task: Author_ step:
1. From the _Task: Author_ step page, select **Edit**.
2. In the _Details_ section, populate the fields as follows:
* **Type**: Select **Task**
* **Next Steps**
* Select **Create Step**
* In the **Step Name** field, enter `Action: Change State`
* Select **OK**
3. In the _General Settings_ section, populate the fields as follows:
* **Task Label**: Enter `Author Document`
* **Assign Task To**: Select **Authors**
* Select **Assign to all users in participant group**
* **Instructions**: Enter `Please author document content and PSMF Logbook comment.`
* **Task Requirement**: Select **Required**
4. In the _Due Date_ section, populate the **Due Date** field with **Due Date** > **+** > **0**.
5. In the _Update Sharing Settings_ section, add the following rules:
* **Task Assignment** > **Add** > **Editor**
* **Task Completion** > **Remove** > **Editor**
* **Task Cancellation** > **Remove** > **Editor**
* **Task Reassignment From** > **Remove** > **Editor**
6. In the _Prompts_ section, select the **Prompt for Verdicts** checkbox, then select **Multiple Verdicts: One verdict for each item**.
* In the _Verdict Label_ field that appears, enter `Ready for Review`
* Select **Add Verdict** and in the _Verdict Label_ field that appears, enter `Changes Required`
* Select **Add Comments**, then in the **Prompt for Comments** field, enter `Comments`
7. In the _Notification_ section, select **Multi-document Workflow Authoring Task** in the **Notification Template** field.
8. Select **Save**.
9. From the _Next Steps_ field, select **Action: Change State** to navigate to the next step.
##### Configure the Change State Action Step {#psmf-content-authoring-wf-change-state}
To configure the _Action: Change State_ step:
1. From the _Action: Change State_ step page, select **Edit**.
2. In the _Details_ section, populate the fields as follows:
* **Type**: Select **Action**
* **Next Steps**:
* Select **Create Step**
* In the **Step Name** field, enter `Notification: Authored`
* Select **OK**
3. In the _Rules_ section, select **Create Rule** and populate the fields as follows:
* **Condition Type**: Select **All conditions are met**
* **if**: Select **Task** > **Task: Author** > **at least one label equals** > **Changes Required**
* **perform actions**: Select **Change State**
* **Lifecycle State**: Select **Draft**
4. Select **Create Rule** and populate the fields as follows:
* **Condition Type**: Select **All conditions are met**
* **if**: Select **Task** > **Task: Author** > **all labels equal** > **Ready for Review**
* **perform actions**: Select **Change State**
* **Lifecycle State**: Select **Ready for Review**
5. Select **Save**.
6. From the _Next Steps_ field, select **Notification: Authored** to navigate to the next step.
##### Configure the Authored Notification Step {#psmf-content-authoring-wf-authored}
To configure the _Notification: Authored_ step:
1. From the _Notification: Authored_ step page, select **Edit**.
2. In the _Details_ section, populate the fields as follows:
* **Type**: Select **Notification**
* **Next Steps**: Select **End**
3. In the _Notification Options_ section, populate the fields as follows:
* **Notification Template**: Select **Multi-document Workflow Authored**
* **Recipient**: Select **Workflow Owner**
* Select the **Include verdicts and comments from previous tasks** checkbox
* **Select Tasks**: Select **Task: Author**
4. Select **Save**.
##### Activate the Workflow {#psmf-content-authoring-wf-activate}
To activate the _PSMF Content Authoring_ workflow:
1. Navigate to the main page of the workflow.
2. In the _Status_ field within the _Details_ section, select **Make configuration active**.
#### Configure the PSMF Content Review Workflow {#psmf-content-review-workflow}
To configure the _PSMF Content Review_ workflow:
1. Navigate to **Admin > Configuration > Workflows**.
2. Select **Create**.
3. In the _Create Workflow_ dialog, select **Document Workflow**, then select **Continue**.
4. On the _Create Workflow_ page, populate the fields as follows:
* **Label**: Enter `PSMF Content Review`
* **Document Lifecycle**: Select **PSMF Content Lifecycle**
5. Select **Save**.
6. Configure the following workflow steps:
* [_Start_][51]
* [_In Review_ state change][52]
* [_Review_ task][53]
* [_Draft_ decision][54]
* [_Draft_ state change][55]
* [_Rejected_ notification][56]
* [_In Approval_ state change][57]
* [_Reviewed_ notification][58]
7. [Activate the workflow][59].
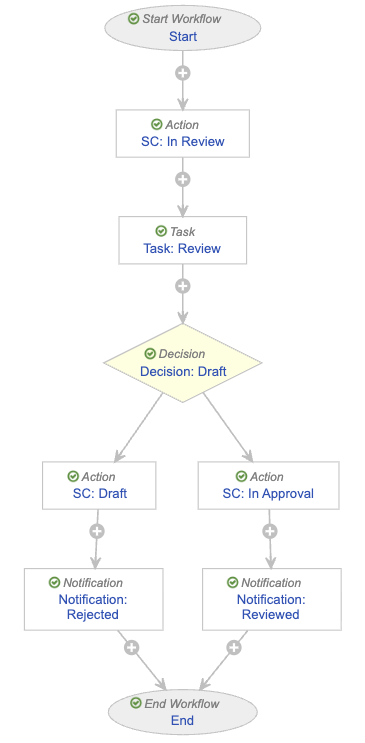 ##### Configure the Start Step {#psmf-content-review-wf-start}
To configure the _Start_ step:
1. In the _Workflow Steps_ section, select **Start**.
2. On the _Start_ step page, select **Edit**.
3. In the _Details_ section, populate the **Next Steps** field as follows:
* Remove the **End** step
* Select **Create Step**
* In the **Step Name** field, enter `SC: In Review`
* Select **OK**
4. In the _Start Options_ section, select **Add Control** and populate _Control 1_ as follows:
* **Control 1**: Select **Instructions**
* **Instructions**: Enter `You are starting document review. This means no additional edits are required. Please select reviewers and due date.`
5. Select **Add Control**, then populate _Control 2_ as follows:
* **Control 2**: Select **Participants**
* **Participant Label**: Enter `Reviewers`
* **Add Participants**: Select the **Allow task instructions for these participants** checkbox
6. Select **Add Control**, then populate _Control 3_ as follows:
* **Control 3**: Select **Date**
* **Label**: Enter `Due Date`
7. Select **Save**.
8. From the _Next Steps_ field, select **SC: In Review** to navigate to the next step.
##### Configure the In Review State Change Action Step {#psmf-content-review-wf-in-review}
To configure the _SC: In Review_ step:
1. From the _SC: In Review_ step page, select **Edit**.
2. In the _Details_ section, populate the fields as follows:
* **Type**: Select **Action**
* **Next Steps**:
* Select **Create Step**
* In the **Step Name** field, enter `Task: Review`
* Select **OK**
3. In the _Rules_ section, select **Create Rule** and populate the fields as follows:
* **Condition Type**: Select **Always**
* **perform actions**: Select **Change State**
* **Lifecycle State**: Select **In Review**
4. Select **Save**.
5. From the _Next Steps_ field, select **Task: Review** to navigate to the next step.
##### Configure the Review Task Step {#psmf-content-review-wf-review}
To configure the _Task: Review_ step:
1. From the _Task: Review_ step page, select **Edit**.
2. In the _Details_ section, populate the fields as follows:
* **Type**: Select **Task**
* **Next Steps**
* Select **Create Step**
* In the **Step Name** field, enter `Decision: Draft`
* Select **OK**
3. In the _General Settings_ section, populate the fields as follows:
* **Task Label**: Enter `Review PSMF Document(s)`
* **Assign Task To**: Select **Reviewers**
* Select **Assign to all users in participant group**
* **Instructions**: Enter `Review content and logbook comment for completeness and correctness`
* **Task Requirement**: Select **Required**
4. In the _Due Date_ section, populate the **Due Date** field with **Due Date** > **-** > **3**.
5. In the _Update Sharing Settings_ section, add the following rules:
* **Task Assignment** > **Add** > **Reviewer**
* **Task Cancellation** > **Remove** > **Reviewer**
* **Task Reassignment From** > **Remove** > **Reviewer**
6. In the _Prompts_ section, select the **Prompt for Verdicts** checkbox, then select **Multiple Verdicts: One verdict for each item**.
* In the _Verdict Label_ field that appears, enter `Ready for Approval`
* Select **Add Verdict** and in the _Verdict Label_ field that appears, enter `Rejected`
* Select **Add Comments**, then in the **Prompt for Comments** field, enter `Reason` and select the **Required** checkbox
7. In the _Notification_ section, select **Multi-document Workflow Review Task** in the **Notification Template** field.
8. Select **Save**.
9. From the _Next Steps_ field, select **Decision: Draft** to navigate to the next step.
##### Configure the Draft Decision Step {#psmf-content-review-wf-draft-decision}
To configure the _Decision: Draft_ step:
1. From the _Decision: Draft_ step page, select **Edit**.
2. In the _Type_ field, select **Decision**.
3. In the _Rules_ section, select **Create Rule** and populate the fields as follows:
* **Condition Type**: Select **All conditions are met**
* **if**: Select **Task** > **Task: Review** > **at least one label equals** > **Rejected**
* **then**: Select **Create Step**
* In the _Create Step_ dialog, enter `SC: Draft`
* Select **OK**
4. In the _then_ field of the _Else_ section, select **Create Step**.
* In the _Create Step_ dialog, enter `SC: In Approval`
* Select **OK**
5. Select **Save**.
6. In the _Rules_ section, select **SC: Draft** to navigate to the next step.
##### Configure the Draft State Change Action Step {#psmf-content-review-wf-draft}
To configure the _SC: Draft_ step:
1. From the _SC: Draft_ step page, select **Edit**.
2. In the _Details_ section, populate the fields as follows:
* **Type**: Select **Action**
* **Next Steps**:
* Select **Create Step**
* In the **Step Name** field, enter `Notification: Rejected`
* Select **OK**
3. In the _Rules_ section, select **Create Rule** and populate the fields as follows:
* **Condition Type**: Select **Always**
* **perform actions**: Select **Change State**
* **Lifecycle State**: Select **Draft**
4. Select **Save**.
5. From the _Next Steps_ field, select **Notification: Rejected** to navigate to the next step.
##### Configure the Rejected Notification Step {#psmf-content-review-wf-rejected}
To configure the _Notification: Rejected_ step:
1. From the _Notification: Rejected_ step page, select **Edit**.
2. In the _Details_ section, populate the fields as follows:
* **Type**: Select **Notification**
* **Next Steps**: Select **End**
3. In the _Notification Options_ section, populate the fields as follows:
* **Notification Template**: Select **Multi-document Workflow Rejected**
* **Recipient**: Select **Workflow Owner**
* Select the **Include verdicts and comments from previous tasks** checkbox
* **Select Tasks**: Select **Task: Review**
4. Select **Save**.
5. Navigate to the main page of the workflow.
##### Configure the In Approval State Change Action Step {#psmf-content-review-wf-in-approval}
To configure the _SC: In Approval_ step:
1. From the _PSMF Content Review_ workflow page, select the **SC: In Approval** step.
2. From the _SC: In Approval_ step page, select **Edit**.
3. In the _Details_ section, populate the fields as follows:
* **Type**: Select **Action**
* **Next Steps**:
* Select **Create Step**
* In the **Step Name** field, enter `Notification: Reviewed`
* Select **OK**
4. In the _Rules_ section, select **Create Rule** and populate the fields as follows:
* **Condition Type**: Select **All conditions are met**
* **if**: Select **Task** > **Task: Review** > **all labels equal** > **Ready for Approval**
* **then**: Select **Change State**
* **Lifecycle State**: Select **Ready for Approval**
5. Select **Save**.
6. From the _Next Steps_ field, select **Notification: Reviewed** to navigate to the next step.
##### Configure the Reviewed Notification Step {#psmf-content-review-wf-reviewed}
To configure the _Notification: Reviewed_ step:
1. From the _Notification: Reviewed_ step page, select **Edit**.
2. In the _Details_ section, populate the fields as follows:
* **Type**: Select **Notification**
* **Next Steps**: Select **End**
3. In the _Notification Options_ section, populate the fields as follows:
* **Notification Template**: Select **Multi-document Workflow Reviewed**
* **Recipient**: Select **Workflow Owner**
* Select the **Include verdicts and comments from previous tasks** checkbox
* **Select Tasks**: Select **Task: Review**
4. Select **Save**.
##### Activate the Workflow {#psmf-content-review-wf-activate}
To activate the _PSMF Content Review_ workflow:
1. Navigate to the main page of the workflow.
2. In the _Status_ field within the _Details_ section, select **Make configuration active**.
#### Configure the PSMF Content Approval Workflow {#psmf-content-approval-workflow}
To configure the _PSMF Content Approval_ workflow:
1. Navigate to **Admin > Configuration > Workflows**.
2. Select **Create**.
3. In the _Create Workflow_ dialog, select **Document Workflow**, then select **Continue**.
4. On the _Create Workflow_ page, populate the fields as follows:
* **Label**: Enter `PSMF Content Approval`
* **Document Lifecycle**: Select **PSMF Content Lifecycle**
5. Select **Save**.
6. Configure the following workflow steps:
* [_Start_][60]
* [_In Approval_ state change][61]
* [_Approve_ task][62]
* [_Approved_ action][63]
* [_Approved_ notification][64]
7. [Activate the workflow][65].
##### Configure the Start Step {#psmf-content-review-wf-start}
To configure the _Start_ step:
1. In the _Workflow Steps_ section, select **Start**.
2. On the _Start_ step page, select **Edit**.
3. In the _Details_ section, populate the **Next Steps** field as follows:
* Remove the **End** step
* Select **Create Step**
* In the **Step Name** field, enter `SC: In Review`
* Select **OK**
4. In the _Start Options_ section, select **Add Control** and populate _Control 1_ as follows:
* **Control 1**: Select **Instructions**
* **Instructions**: Enter `You are starting document review. This means no additional edits are required. Please select reviewers and due date.`
5. Select **Add Control**, then populate _Control 2_ as follows:
* **Control 2**: Select **Participants**
* **Participant Label**: Enter `Reviewers`
* **Add Participants**: Select the **Allow task instructions for these participants** checkbox
6. Select **Add Control**, then populate _Control 3_ as follows:
* **Control 3**: Select **Date**
* **Label**: Enter `Due Date`
7. Select **Save**.
8. From the _Next Steps_ field, select **SC: In Review** to navigate to the next step.
##### Configure the In Review State Change Action Step {#psmf-content-review-wf-in-review}
To configure the _SC: In Review_ step:
1. From the _SC: In Review_ step page, select **Edit**.
2. In the _Details_ section, populate the fields as follows:
* **Type**: Select **Action**
* **Next Steps**:
* Select **Create Step**
* In the **Step Name** field, enter `Task: Review`
* Select **OK**
3. In the _Rules_ section, select **Create Rule** and populate the fields as follows:
* **Condition Type**: Select **Always**
* **perform actions**: Select **Change State**
* **Lifecycle State**: Select **In Review**
4. Select **Save**.
5. From the _Next Steps_ field, select **Task: Review** to navigate to the next step.
##### Configure the Review Task Step {#psmf-content-review-wf-review}
To configure the _Task: Review_ step:
1. From the _Task: Review_ step page, select **Edit**.
2. In the _Details_ section, populate the fields as follows:
* **Type**: Select **Task**
* **Next Steps**
* Select **Create Step**
* In the **Step Name** field, enter `Decision: Draft`
* Select **OK**
3. In the _General Settings_ section, populate the fields as follows:
* **Task Label**: Enter `Review PSMF Document(s)`
* **Assign Task To**: Select **Reviewers**
* Select **Assign to all users in participant group**
* **Instructions**: Enter `Review content and logbook comment for completeness and correctness`
* **Task Requirement**: Select **Required**
4. In the _Due Date_ section, populate the **Due Date** field with **Due Date** > **-** > **3**.
5. In the _Update Sharing Settings_ section, add the following rules:
* **Task Assignment** > **Add** > **Reviewer**
* **Task Cancellation** > **Remove** > **Reviewer**
* **Task Reassignment From** > **Remove** > **Reviewer**
6. In the _Prompts_ section, select the **Prompt for Verdicts** checkbox, then select **Multiple Verdicts: One verdict for each item**.
* In the _Verdict Label_ field that appears, enter `Ready for Approval`
* Select **Add Verdict** and in the _Verdict Label_ field that appears, enter `Rejected`
* Select **Add Comments**, then in the **Prompt for Comments** field, enter `Reason` and select the **Required** checkbox
7. In the _Notification_ section, select **Multi-document Workflow Review Task** in the **Notification Template** field.
8. Select **Save**.
9. From the _Next Steps_ field, select **Decision: Draft** to navigate to the next step.
##### Configure the Draft Decision Step {#psmf-content-review-wf-draft-decision}
To configure the _Decision: Draft_ step:
1. From the _Decision: Draft_ step page, select **Edit**.
2. In the _Type_ field, select **Decision**.
3. In the _Rules_ section, select **Create Rule** and populate the fields as follows:
* **Condition Type**: Select **All conditions are met**
* **if**: Select **Task** > **Task: Review** > **at least one label equals** > **Rejected**
* **then**: Select **Create Step**
* In the _Create Step_ dialog, enter `SC: Draft`
* Select **OK**
4. In the _then_ field of the _Else_ section, select **Create Step**.
* In the _Create Step_ dialog, enter `SC: In Approval`
* Select **OK**
5. Select **Save**.
6. In the _Rules_ section, select **SC: Draft** to navigate to the next step.
##### Configure the Draft State Change Action Step {#psmf-content-review-wf-draft}
To configure the _SC: Draft_ step:
1. From the _SC: Draft_ step page, select **Edit**.
2. In the _Details_ section, populate the fields as follows:
* **Type**: Select **Action**
* **Next Steps**:
* Select **Create Step**
* In the **Step Name** field, enter `Notification: Rejected`
* Select **OK**
3. In the _Rules_ section, select **Create Rule** and populate the fields as follows:
* **Condition Type**: Select **Always**
* **perform actions**: Select **Change State**
* **Lifecycle State**: Select **Draft**
4. Select **Save**.
5. From the _Next Steps_ field, select **Notification: Rejected** to navigate to the next step.
##### Configure the Rejected Notification Step {#psmf-content-review-wf-rejected}
To configure the _Notification: Rejected_ step:
1. From the _Notification: Rejected_ step page, select **Edit**.
2. In the _Details_ section, populate the fields as follows:
* **Type**: Select **Notification**
* **Next Steps**: Select **End**
3. In the _Notification Options_ section, populate the fields as follows:
* **Notification Template**: Select **Multi-document Workflow Rejected**
* **Recipient**: Select **Workflow Owner**
* Select the **Include verdicts and comments from previous tasks** checkbox
* **Select Tasks**: Select **Task: Review**
4. Select **Save**.
5. Navigate to the main page of the workflow.
##### Configure the In Approval State Change Action Step {#psmf-content-review-wf-in-approval}
To configure the _SC: In Approval_ step:
1. From the _PSMF Content Review_ workflow page, select the **SC: In Approval** step.
2. From the _SC: In Approval_ step page, select **Edit**.
3. In the _Details_ section, populate the fields as follows:
* **Type**: Select **Action**
* **Next Steps**:
* Select **Create Step**
* In the **Step Name** field, enter `Notification: Reviewed`
* Select **OK**
4. In the _Rules_ section, select **Create Rule** and populate the fields as follows:
* **Condition Type**: Select **All conditions are met**
* **if**: Select **Task** > **Task: Review** > **all labels equal** > **Ready for Approval**
* **then**: Select **Change State**
* **Lifecycle State**: Select **Ready for Approval**
5. Select **Save**.
6. From the _Next Steps_ field, select **Notification: Reviewed** to navigate to the next step.
##### Configure the Reviewed Notification Step {#psmf-content-review-wf-reviewed}
To configure the _Notification: Reviewed_ step:
1. From the _Notification: Reviewed_ step page, select **Edit**.
2. In the _Details_ section, populate the fields as follows:
* **Type**: Select **Notification**
* **Next Steps**: Select **End**
3. In the _Notification Options_ section, populate the fields as follows:
* **Notification Template**: Select **Multi-document Workflow Reviewed**
* **Recipient**: Select **Workflow Owner**
* Select the **Include verdicts and comments from previous tasks** checkbox
* **Select Tasks**: Select **Task: Review**
4. Select **Save**.
##### Activate the Workflow {#psmf-content-review-wf-activate}
To activate the _PSMF Content Review_ workflow:
1. Navigate to the main page of the workflow.
2. In the _Status_ field within the _Details_ section, select **Make configuration active**.
#### Configure the PSMF Content Approval Workflow {#psmf-content-approval-workflow}
To configure the _PSMF Content Approval_ workflow:
1. Navigate to **Admin > Configuration > Workflows**.
2. Select **Create**.
3. In the _Create Workflow_ dialog, select **Document Workflow**, then select **Continue**.
4. On the _Create Workflow_ page, populate the fields as follows:
* **Label**: Enter `PSMF Content Approval`
* **Document Lifecycle**: Select **PSMF Content Lifecycle**
5. Select **Save**.
6. Configure the following workflow steps:
* [_Start_][60]
* [_In Approval_ state change][61]
* [_Approve_ task][62]
* [_Approved_ action][63]
* [_Approved_ notification][64]
7. [Activate the workflow][65].
 ##### Configure the Start Step {#psmf-content-approval-wf-start}
To configure the _Start_ step:
1. In the _Workflow Steps_ section, select **Start**.
2. On the _Start_ step page, select **Edit**.
3. In the _Details_ section, populate the **Next Steps** field as follows:
* Remove the **End** step
* Select **Create Step**
* In the **Step Name** field, enter `SC: In Approval`
* Select **OK**
4. In the _Start Options_ section, select **Add Control** and populate _Control 1_ as follows:
* **Control 1**: Select **Instructions**
* **Instructions**: Enter `You are starting document approval. This means no additional edits are required.`
5. Select **Add Control**, then populate _Control 2_ as follows:
* **Control 2**: Select **Participants**
* **Participant Label**: Enter `Approver`
* **Add Participants**: Select the **Allow task instructions for these participants** checkbox
6. Select **Add Control**, then populate _Control 3_ as follows:
* **Control 3**: Select **Date**
* **Label**: Enter `Due Date`
7. Select **Save**.
8. From the _Next Steps_ field, select **SC: In Approval** to navigate to the next step.
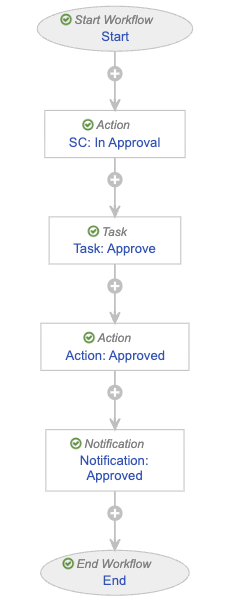
##### Configure the In Approval State Change Action Step {#psmf-content-approval-wf-in-approval}
To configure the _SC: In Approval_ step:
1. From the _SC: In Approval_ step page, select **Edit**.
2. In the _Details_ section, populate the fields as follows:
* **Type**: Select **Action**
* **Next Steps**:
* Select **Create Step**
* In the **Step Name** field, enter `Task: Approve`
* Select **OK**
3. In the _Rules_ section, select **Create Rule** and populate the fields as follows:
* **Condition Type**: Select **Always**
* **perform actions**: Select **Change State**
* **Lifecycle State**: Select **In Approval**
4. Select **Save**.
5. From the _Next Steps_ field, select **Task: Approve** to navigate to the next step.
##### Configure the Approve Task Step {#psmf-content-approval-wf-approve}
To configure the _Task: Approve_ step:
1. From the _Task: Approve_ step page, select **Edit**.
2. In the _Details_ section, populate the fields as follows:
* **Type**: Select **Task**
* **Next Steps**
* Select **Create Step**
* In the **Step Name** field, enter `Action: Approved`
* Select **OK**
* **Tags**
* Select **Create Tag**
* In the **Label** field, enter `Approval`
* Select **Save**
3. In the _General Settings_ section, populate the fields as follows:
* **Task Label**: Enter `Approve`
* **Assign Task To**: Select **Approver**
* Select **Assign to all users in participant group**
* **Instructions**: Enter `Please review and approve PSMF content documents. This includes reviewing logbook comment`
* **Task Requirement**: Select **Required**
4. In the _Due Date_ section, populate the **Due Date** field with **Due Date** > **+** > **0**.
5. In the _Update Sharing Settings_ section, add the following rules:
* **Task Assignment** > **Add** > **Approver**
* **Task Cancellation** > **Remove** > **Approver**
* **Task Reassignment From** > **Remove** > **Approver**
6. In the _Prompts_ section, select the **Prompt for Verdicts** checkbox, then select **Multiple Verdicts: One verdict for each item**.
* In the _Verdict Label_ field that appears, enter `Approved`
* Select **Add Capacities**
* In the **Capacity Label** field, enter `Capacity` then select the **Required** checkbox
* Add the following _Capacity Values_:
* **Document Owner**
* **Delegate Document Owner**
* **QPPV**
* **QPPV Office**
* Select **Add eSignature** and populate the **Instructions** field with `You are providing a compliant eSignature`
* Select **Add Verdict**
* In the _Verdict Label_ field that appears, enter `Rejected, back to Draft`
* Select the **Short-circuit tasks with the configured tags.** checkbox
* Select **At least one item has this verdict**
* In the **Tags** field, select **Approval**
* Select **Add Comments**, then in the **Prompt for Comments** field, enter `Reason` and select the **Required** checkbox
7. In the _Notification_ section, select **Multi-document Workflow Approval Task** in the **Notification Template** field.
8. Select **Save**.
9. From the _Next Steps_ field, select **Action: Approved** to navigate to the next step.
##### Configure the Approved Action Step {#psmf-content-approval-wf-approved}
To configure the _Action: Approved_ step:
1. From the _Action: Approved_ step page, select **Edit**.
2. In the _Details_ section, populate the fields as follows:
* **Type**: Select **Action**
* **Next Steps**:
* Select **Create Step**
* In the **Step Name** field, enter `Notification: Approved`
* Select **OK**
3. In the _Rules_ section, select **Create Rule** and populate the fields as follows:
* **Condition Type**: Select **All conditions are met**
* **if**: Select **Task** > **Task: Approve** > **all labels equal** > **Approved**
* **perform actions**: Select **Change State**
* **Lifecycle State**: Select **Approved**
4. Select **Create Rule** and populate the fields as follows:
* **Condition Type**: Select **All conditions are met**
* **if**: Select **Task** > **Task: Approve** > **at least one label equals** > **Rejected, back to Draft**
* **perform actions**: Select **Remove eSignature from items**
* **Task**: Select **Task: Approve**
* **Verdicts**: Select **Approved**
* Select **Add Action** then populate the fields as follows:
* Select **Change State**
* **Lifecycle State**: Select **Draft**
5. Select **Save**.
6. From the _Next Steps_ field, select **Notification: Approved** to navigate to the next step.
##### Configure the Approved Notification Step {#psmf-content-approval-wf-approved-notification}
To configure the _Notification: Approved_ step:
1. From the _Notification: Approved_ step page, select **Edit**.
2. In the _Details_ section, populate the fields as follows:
* **Type**: Select **Notification**
* **Next Steps**: Select **End**
3. In the _Notification Options_ section, populate the fields as follows:
* **Notification Template**: Select **Multi-document Workflow Approval**
* **Recipient**: Select **Workflow Owner**
* Select the **Include verdicts and comments from previous tasks** checkbox
* **Select Tasks**: Select **Task: Approve**
4. Select **Save**.
##### Activate the Workflow {#psmf-content-approval-wf-activate}
To activate the _PSMF Content Approval_ workflow:
1. Navigate to the main page of the workflow.
2. In the _Status_ field within the _Details_ section, select **Make configuration active**.
#### Configure the Move to Draft (PSMF Content) Workflow {#psmf-content-move-to-draft-workflow}
To configure the _Move to Draft (PSMF Content)_ workflow:
1. Navigate to **Admin > Configuration > Workflows**.
2. Select **Create**.
3. In the _Create Workflow_ dialog, select **Document Workflow**, then select **Continue**.
4. On the _Create Workflow_ page, populate the fields as follows:
* **Label**: Enter `Move to Draft (PSMF Content)`
* **Document Lifecycle**: Select **PSMF Content Lifecycle**
5. Select **Save**.
6. Configure the following workflow steps:
* [_Start_][66]
* [_Draft_ state change][67]
7. [Activate the workflow][68].
##### Configure the Start Step {#psmf-content-approval-wf-start}
To configure the _Start_ step:
1. In the _Workflow Steps_ section, select **Start**.
2. On the _Start_ step page, select **Edit**.
3. In the _Details_ section, populate the **Next Steps** field as follows:
* Remove the **End** step
* Select **Create Step**
* In the **Step Name** field, enter `SC: In Approval`
* Select **OK**
4. In the _Start Options_ section, select **Add Control** and populate _Control 1_ as follows:
* **Control 1**: Select **Instructions**
* **Instructions**: Enter `You are starting document approval. This means no additional edits are required.`
5. Select **Add Control**, then populate _Control 2_ as follows:
* **Control 2**: Select **Participants**
* **Participant Label**: Enter `Approver`
* **Add Participants**: Select the **Allow task instructions for these participants** checkbox
6. Select **Add Control**, then populate _Control 3_ as follows:
* **Control 3**: Select **Date**
* **Label**: Enter `Due Date`
7. Select **Save**.
8. From the _Next Steps_ field, select **SC: In Approval** to navigate to the next step.
##### Configure the In Approval State Change Action Step {#psmf-content-approval-wf-in-approval}
To configure the _SC: In Approval_ step:
1. From the _SC: In Approval_ step page, select **Edit**.
2. In the _Details_ section, populate the fields as follows:
* **Type**: Select **Action**
* **Next Steps**:
* Select **Create Step**
* In the **Step Name** field, enter `Task: Approve`
* Select **OK**
3. In the _Rules_ section, select **Create Rule** and populate the fields as follows:
* **Condition Type**: Select **Always**
* **perform actions**: Select **Change State**
* **Lifecycle State**: Select **In Approval**
4. Select **Save**.
5. From the _Next Steps_ field, select **Task: Approve** to navigate to the next step.
##### Configure the Approve Task Step {#psmf-content-approval-wf-approve}
To configure the _Task: Approve_ step:
1. From the _Task: Approve_ step page, select **Edit**.
2. In the _Details_ section, populate the fields as follows:
* **Type**: Select **Task**
* **Next Steps**
* Select **Create Step**
* In the **Step Name** field, enter `Action: Approved`
* Select **OK**
* **Tags**
* Select **Create Tag**
* In the **Label** field, enter `Approval`
* Select **Save**
3. In the _General Settings_ section, populate the fields as follows:
* **Task Label**: Enter `Approve`
* **Assign Task To**: Select **Approver**
* Select **Assign to all users in participant group**
* **Instructions**: Enter `Please review and approve PSMF content documents. This includes reviewing logbook comment`
* **Task Requirement**: Select **Required**
4. In the _Due Date_ section, populate the **Due Date** field with **Due Date** > **+** > **0**.
5. In the _Update Sharing Settings_ section, add the following rules:
* **Task Assignment** > **Add** > **Approver**
* **Task Cancellation** > **Remove** > **Approver**
* **Task Reassignment From** > **Remove** > **Approver**
6. In the _Prompts_ section, select the **Prompt for Verdicts** checkbox, then select **Multiple Verdicts: One verdict for each item**.
* In the _Verdict Label_ field that appears, enter `Approved`
* Select **Add Capacities**
* In the **Capacity Label** field, enter `Capacity` then select the **Required** checkbox
* Add the following _Capacity Values_:
* **Document Owner**
* **Delegate Document Owner**
* **QPPV**
* **QPPV Office**
* Select **Add eSignature** and populate the **Instructions** field with `You are providing a compliant eSignature`
* Select **Add Verdict**
* In the _Verdict Label_ field that appears, enter `Rejected, back to Draft`
* Select the **Short-circuit tasks with the configured tags.** checkbox
* Select **At least one item has this verdict**
* In the **Tags** field, select **Approval**
* Select **Add Comments**, then in the **Prompt for Comments** field, enter `Reason` and select the **Required** checkbox
7. In the _Notification_ section, select **Multi-document Workflow Approval Task** in the **Notification Template** field.
8. Select **Save**.
9. From the _Next Steps_ field, select **Action: Approved** to navigate to the next step.
##### Configure the Approved Action Step {#psmf-content-approval-wf-approved}
To configure the _Action: Approved_ step:
1. From the _Action: Approved_ step page, select **Edit**.
2. In the _Details_ section, populate the fields as follows:
* **Type**: Select **Action**
* **Next Steps**:
* Select **Create Step**
* In the **Step Name** field, enter `Notification: Approved`
* Select **OK**
3. In the _Rules_ section, select **Create Rule** and populate the fields as follows:
* **Condition Type**: Select **All conditions are met**
* **if**: Select **Task** > **Task: Approve** > **all labels equal** > **Approved**
* **perform actions**: Select **Change State**
* **Lifecycle State**: Select **Approved**
4. Select **Create Rule** and populate the fields as follows:
* **Condition Type**: Select **All conditions are met**
* **if**: Select **Task** > **Task: Approve** > **at least one label equals** > **Rejected, back to Draft**
* **perform actions**: Select **Remove eSignature from items**
* **Task**: Select **Task: Approve**
* **Verdicts**: Select **Approved**
* Select **Add Action** then populate the fields as follows:
* Select **Change State**
* **Lifecycle State**: Select **Draft**
5. Select **Save**.
6. From the _Next Steps_ field, select **Notification: Approved** to navigate to the next step.
##### Configure the Approved Notification Step {#psmf-content-approval-wf-approved-notification}
To configure the _Notification: Approved_ step:
1. From the _Notification: Approved_ step page, select **Edit**.
2. In the _Details_ section, populate the fields as follows:
* **Type**: Select **Notification**
* **Next Steps**: Select **End**
3. In the _Notification Options_ section, populate the fields as follows:
* **Notification Template**: Select **Multi-document Workflow Approval**
* **Recipient**: Select **Workflow Owner**
* Select the **Include verdicts and comments from previous tasks** checkbox
* **Select Tasks**: Select **Task: Approve**
4. Select **Save**.
##### Activate the Workflow {#psmf-content-approval-wf-activate}
To activate the _PSMF Content Approval_ workflow:
1. Navigate to the main page of the workflow.
2. In the _Status_ field within the _Details_ section, select **Make configuration active**.
#### Configure the Move to Draft (PSMF Content) Workflow {#psmf-content-move-to-draft-workflow}
To configure the _Move to Draft (PSMF Content)_ workflow:
1. Navigate to **Admin > Configuration > Workflows**.
2. Select **Create**.
3. In the _Create Workflow_ dialog, select **Document Workflow**, then select **Continue**.
4. On the _Create Workflow_ page, populate the fields as follows:
* **Label**: Enter `Move to Draft (PSMF Content)`
* **Document Lifecycle**: Select **PSMF Content Lifecycle**
5. Select **Save**.
6. Configure the following workflow steps:
* [_Start_][66]
* [_Draft_ state change][67]
7. [Activate the workflow][68].
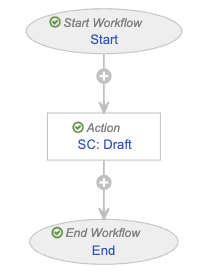 ##### Configure the Start Step {#psmf-content-move-to-draft-wf-start}
To configure the _Start_ step:
1. In the _Workflow Steps_ section, select **Start**.
2. On the _Start_ step page, select **Edit**.
3. In the _Details_ section, populate the **Next Steps** field as follows:
* Remove the **End** step
* Select **Create Step**
* In the **Step Name** field, enter `SC: Draft`
* Select **OK**
4. Select **Save**.
5. From the _Next Steps_ field, select **SC: Draft** to navigate to the next step.
##### Configure the Draft State Change Action Step {#psmf-content-move-to-draft-wf-draft}
To configure the _SC: Draft_ step:
1. From the _SC: Draft_ step page, select **Edit**.
2. In the _Details_ section, populate the fields as follows:
* **Type**: Select **Action**
* **Next Steps**: Select **End**
3. In the _Rules_ section, select **Create Rule** and populate the fields as follows:
* **Condition Type**: Select **Always**
* **perform actions**: Select **Change State**
* **Lifecycle State**: Select **Draft**
4. Select **Save**.
##### Activate the Workflow {#psmf-content-move-to-draft-wf-activate}
To activate the _Move to Draft (PSMF Content)_ workflow:
1. Navigate to the main page of the workflow.
2. In the _Status_ field within the _Details_ section, select **Make configuration active**.
### Configure the PSMF Content Lifecycle {#psmf-content-lifecycle}
To allow users to initiate workflows on _PSMF Content_ documents, add user actions on the _PSMF Content Lifecycle_ as follows:
##### Configure the Start Step {#psmf-content-move-to-draft-wf-start}
To configure the _Start_ step:
1. In the _Workflow Steps_ section, select **Start**.
2. On the _Start_ step page, select **Edit**.
3. In the _Details_ section, populate the **Next Steps** field as follows:
* Remove the **End** step
* Select **Create Step**
* In the **Step Name** field, enter `SC: Draft`
* Select **OK**
4. Select **Save**.
5. From the _Next Steps_ field, select **SC: Draft** to navigate to the next step.
##### Configure the Draft State Change Action Step {#psmf-content-move-to-draft-wf-draft}
To configure the _SC: Draft_ step:
1. From the _SC: Draft_ step page, select **Edit**.
2. In the _Details_ section, populate the fields as follows:
* **Type**: Select **Action**
* **Next Steps**: Select **End**
3. In the _Rules_ section, select **Create Rule** and populate the fields as follows:
* **Condition Type**: Select **Always**
* **perform actions**: Select **Change State**
* **Lifecycle State**: Select **Draft**
4. Select **Save**.
##### Activate the Workflow {#psmf-content-move-to-draft-wf-activate}
To activate the _Move to Draft (PSMF Content)_ workflow:
1. Navigate to the main page of the workflow.
2. In the _Status_ field within the _Details_ section, select **Make configuration active**.
### Configure the PSMF Content Lifecycle {#psmf-content-lifecycle}
To allow users to initiate workflows on _PSMF Content_ documents, add user actions on the _PSMF Content Lifecycle_ as follows:
| Lifecycle State | Action Conditions |
|---|---|
| Planned |
|
| Draft |
|
| Ready for Review |
|
| Ready for Approval |
|
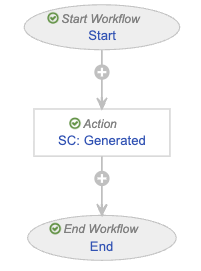 ##### Configure the Start Step {#move-to-generated-wf-start}
To configure the _Start_ step:
1. In the _Workflow Steps_ section, select **Start**.
2. On the _Start_ step page, select **Edit**.
3. In the _Details_ section, populate the **Next Steps** field as follows:
* Remove the **End** step
* Select **Create Step**
* In the **Step Name** field, enter `SC: Generated`
* Select **OK**
4. Select **Save**.
5. From the _Next Steps_ field, select **SC: Generated** to navigate to the next step.
##### Configure the Generated State Change Action Step {#move-to-generated-wf-generated}
To configure the _SC: Generated_ step:
1. From the _SC: Generated_ step page, select **Edit**.
2. In the _Details_ section, populate the fields as follows:
* **Type**: Select **Action**
* **Next Steps**: Select **End**
3. In the _Rules_ section, select **Create Rule** and populate the fields as follows:
* **Condition Type**: Select **Always**
* **perform actions**: Select **Change State**
* **Lifecycle State**: Select **Generated**
4. Select **Save**.
##### Activate the Workflow {#move-to-generated-wf-activate}
To activate the _Move to Generated_ workflow:
1. Navigate to the main page of the workflow.
2. In the _Status_ field within the _Details_ section, select **Make configuration active**.
#### Configure the Finalize Generated PSMF Document Workflow {#finalize-generated-psmf-document-workflow}
To configure the _Finalize Generated PSMF Document_ workflow:
1. Navigate to **Admin > Configuration > Workflows**.
2. Select **Create**.
3. In the _Create Workflow_ dialog, select **Document Workflow**, then select **Continue**.
4. On the _Create Workflow_ page, populate the fields as follows:
* **Label**: Enter `Finalize Generated PSMF Document`
* **Document Lifecycle**: Select **PSMF Generated Document Lifecycle**
5. Select **Save**.
6. Configure the following workflow steps:
* [_Start_][75]
* [_Final_ state change][76]
7. [Activate the workflow][77].
##### Configure the Start Step {#move-to-generated-wf-start}
To configure the _Start_ step:
1. In the _Workflow Steps_ section, select **Start**.
2. On the _Start_ step page, select **Edit**.
3. In the _Details_ section, populate the **Next Steps** field as follows:
* Remove the **End** step
* Select **Create Step**
* In the **Step Name** field, enter `SC: Generated`
* Select **OK**
4. Select **Save**.
5. From the _Next Steps_ field, select **SC: Generated** to navigate to the next step.
##### Configure the Generated State Change Action Step {#move-to-generated-wf-generated}
To configure the _SC: Generated_ step:
1. From the _SC: Generated_ step page, select **Edit**.
2. In the _Details_ section, populate the fields as follows:
* **Type**: Select **Action**
* **Next Steps**: Select **End**
3. In the _Rules_ section, select **Create Rule** and populate the fields as follows:
* **Condition Type**: Select **Always**
* **perform actions**: Select **Change State**
* **Lifecycle State**: Select **Generated**
4. Select **Save**.
##### Activate the Workflow {#move-to-generated-wf-activate}
To activate the _Move to Generated_ workflow:
1. Navigate to the main page of the workflow.
2. In the _Status_ field within the _Details_ section, select **Make configuration active**.
#### Configure the Finalize Generated PSMF Document Workflow {#finalize-generated-psmf-document-workflow}
To configure the _Finalize Generated PSMF Document_ workflow:
1. Navigate to **Admin > Configuration > Workflows**.
2. Select **Create**.
3. In the _Create Workflow_ dialog, select **Document Workflow**, then select **Continue**.
4. On the _Create Workflow_ page, populate the fields as follows:
* **Label**: Enter `Finalize Generated PSMF Document`
* **Document Lifecycle**: Select **PSMF Generated Document Lifecycle**
5. Select **Save**.
6. Configure the following workflow steps:
* [_Start_][75]
* [_Final_ state change][76]
7. [Activate the workflow][77].
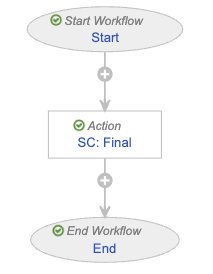 ##### Configure the Start Step {#finalize-generated-psmf-document-wf-start}
To configure the _Start_ step:
1. In the _Workflow Steps_ section, select **Start**.
2. On the _Start_ step page, select **Edit**.
3. In the _Details_ section, populate the **Next Steps** field as follows:
* Remove the **End** step
* Select **Create Step**
* In the **Step Name** field, enter `SC: Final`
* Select **OK**
4. In the _Start Options_ section, select **Add Control** and populate _Control 1_ as follows:
* **Control 1**: Select **Instructions**
* **Instructions**: Enter `This will finalize the document`
5. Select **Save**.
6. From the _Next Steps_ field, select **SC: Final** to navigate to the next step.
##### Configure the Final State Change Action Step {#finalize-generated-psmf-document-wf-final}
To configure the _SC: Final_ step:
1. From the _SC: Final_ step page, select **Edit**.
2. In the _Details_ section, populate the fields as follows:
* **Type**: Select **Action**
* **Next Steps**: Select **End**
3. In the _Rules_ section, select **Create Rule** and populate the fields as follows:
* **Condition Type**: Select **Always**
* **perform actions**: Select **Change State**
* **Lifecycle State**: Select **Final**
4. Select **Save**.
##### Activate the Workflow {#finalize-generated-psmf-document-wf-activate}
To activate the _Finalize Generated PSMF Document_ workflow:
1. Navigate to the main page of the workflow.
2. In the _Status_ field within the _Details_ section, select **Make configuration active**.
#### Configure the Approve PSMF Generated Document Workflow {#approve-psmf-generated-document-workflow}
To configure the _Approve PSMF Generated Document_ workflow:
1. Navigate to **Admin > Configuration > Workflows**.
2. Select **Create**.
3. In the _Create Workflow_ dialog, select **Document Workflow**, then select **Continue**.
4. On the _Create Workflow_ page, populate the fields as follows:
* **Label**: Enter `Approve PSMF Generated Document`
* **Document Lifecycle**: Select **PSMF Generated Document Lifecycle**
5. Select **Save**.
6. Configure the following workflow steps:
* [_Start_][78]
* [_Update Sharing Settings_][79]
* [_Approve_ task][80]
* [_Approved?_ state change][81]
7. [Activate the workflow][82].
##### Configure the Start Step {#finalize-generated-psmf-document-wf-start}
To configure the _Start_ step:
1. In the _Workflow Steps_ section, select **Start**.
2. On the _Start_ step page, select **Edit**.
3. In the _Details_ section, populate the **Next Steps** field as follows:
* Remove the **End** step
* Select **Create Step**
* In the **Step Name** field, enter `SC: Final`
* Select **OK**
4. In the _Start Options_ section, select **Add Control** and populate _Control 1_ as follows:
* **Control 1**: Select **Instructions**
* **Instructions**: Enter `This will finalize the document`
5. Select **Save**.
6. From the _Next Steps_ field, select **SC: Final** to navigate to the next step.
##### Configure the Final State Change Action Step {#finalize-generated-psmf-document-wf-final}
To configure the _SC: Final_ step:
1. From the _SC: Final_ step page, select **Edit**.
2. In the _Details_ section, populate the fields as follows:
* **Type**: Select **Action**
* **Next Steps**: Select **End**
3. In the _Rules_ section, select **Create Rule** and populate the fields as follows:
* **Condition Type**: Select **Always**
* **perform actions**: Select **Change State**
* **Lifecycle State**: Select **Final**
4. Select **Save**.
##### Activate the Workflow {#finalize-generated-psmf-document-wf-activate}
To activate the _Finalize Generated PSMF Document_ workflow:
1. Navigate to the main page of the workflow.
2. In the _Status_ field within the _Details_ section, select **Make configuration active**.
#### Configure the Approve PSMF Generated Document Workflow {#approve-psmf-generated-document-workflow}
To configure the _Approve PSMF Generated Document_ workflow:
1. Navigate to **Admin > Configuration > Workflows**.
2. Select **Create**.
3. In the _Create Workflow_ dialog, select **Document Workflow**, then select **Continue**.
4. On the _Create Workflow_ page, populate the fields as follows:
* **Label**: Enter `Approve PSMF Generated Document`
* **Document Lifecycle**: Select **PSMF Generated Document Lifecycle**
5. Select **Save**.
6. Configure the following workflow steps:
* [_Start_][78]
* [_Update Sharing Settings_][79]
* [_Approve_ task][80]
* [_Approved?_ state change][81]
7. [Activate the workflow][82].
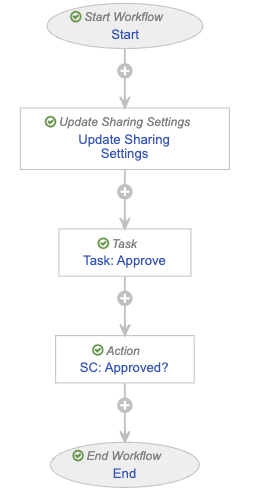 ##### Configure the Start Step {#approve-psmf-generated-document-wf-start}
To configure the _Start_ step:
1. In the _Workflow Steps_ section, select **Start**.
2. On the _Start_ step page, select **Edit**.
3. In the _Details_ section, populate the **Next Steps** field as follows:
* Remove the **End** step
* Select **Create Step**
* In the **Step Name** field, enter `Update Sharing Settings`
* Select **OK**
4. In the _Start Options_ section, select **Add Control** and populate _Control 1_ as follows:
* **Control 1**: Select **Instructions**
* **Instructions**: Enter `This starts a review of generated PSMF documents. Please select the approver and due date`
5. Select **Add Control**, then populate _Control 2_ as follows:
* **Control 2**: Select **Participants**
* **Participant Label**: Enter `Approver`
* **Add Participants**:
* **Role allowed to participate**: Select **PSMF Office**
* Select the **Allow task instructions for these participants** checkbox
* Select the **Default users from sharing settings** checkbox
6. Select **Add Control**, then populate _Control 3_ as follows:
* **Control 3**: Select **Date**
* **Label**: Enter `Due Date`
7. Select **Save**.
8. From the _Next Steps_ field, select **Update Sharing Settings** to navigate to the next step.
##### Configure the Update Sharing Settings Step {#approve-psmf-generated-document-wf-sharing-settings}
To configure the _Update Sharing Settings_ step:
1. From the _Update Sharing Settings_ step page, select **Edit**.
2. In the _Details_ section, populate the fields as follows:
* **Type**: Select **Update Sharing Settings**
* **Next Steps**
* Select **Create Step**
* In the **Step Name** field, enter `Task: Approve`
* Select **OK**
3. In the _Update Sharing Settings Options_ section, populate the fields as follows:
* **Workflow Participants**: Select **Approver**
* **Action**: Select **Add**
* **Roles**: Select **Approver**
4. Select **Save**.
5. From the _Next Steps_ field, select **Task: Approve** to navigate to the next step.
##### Configure the Approve Task Step {#approve-psmf-generated-document-wf-approve}
To configure the _Task: Approve_ step:
1. From the _Task: Approve_ step page, select **Edit**.
2. In the _Details_ section, populate the fields as follows:
* **Type**: Select **Task**
* **Next Steps**
* Select **Create Step**
* In the **Step Name** field, enter `SC: Approved?`
* Select **OK**
3. In the _General Settings_ section, populate the fields as follows:
* **Task Label**: Enter `Approve Generated Document`
* **Assign Task To**: Select **Approver**
* Select **Make available to users in participant group**
* **Instructions**: Enter `Please review and approve or reject ${docName}`
* **Task Requirement**: Select **Required**
4. In the _Due Date_ section, populate the **Due Date** field with **Due Date** > **+** > **0**.
5. In the _Prompts_ section, select the **Prompt for Verdicts** checkbox, then select **Multiple Verdicts: One verdict for each item**.
* In the _Verdict Label_ field that appears, enter `Approved`
* Select **Add Verdict**
* In the _Verdict Label_ field that appears, enter `Rejected`
* Select **Add Comments**, then in the **Prompt for Comments** field, enter `Reason` and select the **Required** checkbox
6. In the _Notification_ section, select **Multi-document Workflow Approval Task** in the **Notification Template** field.
7. Select **Save**.
8. From the _Next Steps_ field, select **SC: Approved?** to navigate to the next step.
##### Configure the Approved State Change Action Step {#approve-psmf-generated-document-wf-approved}
To configure the _SC: Approved?_ step:
1. From the _SC: Approved?_ step page, select **Edit**.
2. In the _Details_ section, populate the fields as follows:
* **Type**: Select **Action**
* **Next Steps**: Select **End**
3. In the _Rules_ section, select **Create Rule** and populate the fields as follows:
* **Condition Type**: Select **All conditions are met**
* **if**: Select **Task** > **Task: Approve** > **all labels equal** > **Approved**
* **perform actions**: Select **Change State**
* **Lifecycle State**: Select **Final**
4. Select **Create Rule** then populate the fields as follows:
* **Condition Type**: Select **All conditions are met**
* **if**: Select **Task** > **Task: Approve** > **at least one label equals** > **Rejected**
* **perform actions**
* Select **Change State**
* **Lifecycle State**: Select **Rejected**
5. Select **Save**.
##### Activate the Workflow {#approve-psmf-generated-document-wf-activate}
To activate the _Approve PSMF Generated Document_ workflow:
1. Navigate to the main page of the workflow.
2. In the _Status_ field within the _Details_ section, select **Make configuration active**.
### Configure the PSMF Generated Document Lifecycle {#psmf-generated-document-lifecycle}
Add user actions on the _PSMF Generated Document Lifecycle_ as follows:
##### Configure the Start Step {#approve-psmf-generated-document-wf-start}
To configure the _Start_ step:
1. In the _Workflow Steps_ section, select **Start**.
2. On the _Start_ step page, select **Edit**.
3. In the _Details_ section, populate the **Next Steps** field as follows:
* Remove the **End** step
* Select **Create Step**
* In the **Step Name** field, enter `Update Sharing Settings`
* Select **OK**
4. In the _Start Options_ section, select **Add Control** and populate _Control 1_ as follows:
* **Control 1**: Select **Instructions**
* **Instructions**: Enter `This starts a review of generated PSMF documents. Please select the approver and due date`
5. Select **Add Control**, then populate _Control 2_ as follows:
* **Control 2**: Select **Participants**
* **Participant Label**: Enter `Approver`
* **Add Participants**:
* **Role allowed to participate**: Select **PSMF Office**
* Select the **Allow task instructions for these participants** checkbox
* Select the **Default users from sharing settings** checkbox
6. Select **Add Control**, then populate _Control 3_ as follows:
* **Control 3**: Select **Date**
* **Label**: Enter `Due Date`
7. Select **Save**.
8. From the _Next Steps_ field, select **Update Sharing Settings** to navigate to the next step.
##### Configure the Update Sharing Settings Step {#approve-psmf-generated-document-wf-sharing-settings}
To configure the _Update Sharing Settings_ step:
1. From the _Update Sharing Settings_ step page, select **Edit**.
2. In the _Details_ section, populate the fields as follows:
* **Type**: Select **Update Sharing Settings**
* **Next Steps**
* Select **Create Step**
* In the **Step Name** field, enter `Task: Approve`
* Select **OK**
3. In the _Update Sharing Settings Options_ section, populate the fields as follows:
* **Workflow Participants**: Select **Approver**
* **Action**: Select **Add**
* **Roles**: Select **Approver**
4. Select **Save**.
5. From the _Next Steps_ field, select **Task: Approve** to navigate to the next step.
##### Configure the Approve Task Step {#approve-psmf-generated-document-wf-approve}
To configure the _Task: Approve_ step:
1. From the _Task: Approve_ step page, select **Edit**.
2. In the _Details_ section, populate the fields as follows:
* **Type**: Select **Task**
* **Next Steps**
* Select **Create Step**
* In the **Step Name** field, enter `SC: Approved?`
* Select **OK**
3. In the _General Settings_ section, populate the fields as follows:
* **Task Label**: Enter `Approve Generated Document`
* **Assign Task To**: Select **Approver**
* Select **Make available to users in participant group**
* **Instructions**: Enter `Please review and approve or reject ${docName}`
* **Task Requirement**: Select **Required**
4. In the _Due Date_ section, populate the **Due Date** field with **Due Date** > **+** > **0**.
5. In the _Prompts_ section, select the **Prompt for Verdicts** checkbox, then select **Multiple Verdicts: One verdict for each item**.
* In the _Verdict Label_ field that appears, enter `Approved`
* Select **Add Verdict**
* In the _Verdict Label_ field that appears, enter `Rejected`
* Select **Add Comments**, then in the **Prompt for Comments** field, enter `Reason` and select the **Required** checkbox
6. In the _Notification_ section, select **Multi-document Workflow Approval Task** in the **Notification Template** field.
7. Select **Save**.
8. From the _Next Steps_ field, select **SC: Approved?** to navigate to the next step.
##### Configure the Approved State Change Action Step {#approve-psmf-generated-document-wf-approved}
To configure the _SC: Approved?_ step:
1. From the _SC: Approved?_ step page, select **Edit**.
2. In the _Details_ section, populate the fields as follows:
* **Type**: Select **Action**
* **Next Steps**: Select **End**
3. In the _Rules_ section, select **Create Rule** and populate the fields as follows:
* **Condition Type**: Select **All conditions are met**
* **if**: Select **Task** > **Task: Approve** > **all labels equal** > **Approved**
* **perform actions**: Select **Change State**
* **Lifecycle State**: Select **Final**
4. Select **Create Rule** then populate the fields as follows:
* **Condition Type**: Select **All conditions are met**
* **if**: Select **Task** > **Task: Approve** > **at least one label equals** > **Rejected**
* **perform actions**
* Select **Change State**
* **Lifecycle State**: Select **Rejected**
5. Select **Save**.
##### Activate the Workflow {#approve-psmf-generated-document-wf-activate}
To activate the _Approve PSMF Generated Document_ workflow:
1. Navigate to the main page of the workflow.
2. In the _Status_ field within the _Details_ section, select **Make configuration active**.
### Configure the PSMF Generated Document Lifecycle {#psmf-generated-document-lifecycle}
Add user actions on the _PSMF Generated Document Lifecycle_ as follows:
| Lifecycle State | Action Conditions |
|---|---|
| Planned |
|
| Generated |
|
|
Note: Before deleting existing templates, document types, and lifecycles, ensure that you first reclassify your content to the new document types.
| Field | Description |
|---|---|
| Type | Select Pharmacovigilance System Master File. |
| Subtype | Select PSMF Generated Document. |
| Classification | Select PSMF Logbook. |
| Lifecycle | Vault populates the PSMF Generated Document Lifecycle. |
| Template | Select the template of your choice or select None. |
| Planned Name | Enter ${name__v} - Logbook. |
| Field | Description |
|---|---|
| Type | Select Pharmacovigilance System Master File. |
| Subtype | Select PSMF Generated Document. |
| Classification | Select PSMF eSignature Page. |
| Lifecycle | Vault populates the PSMF Generated Document Lifecycle. |
| Template | Select the template of your choice or select None. |
| Planned Name | Enter ${name__v} - eSignature. |