# Enable Document State Automation for PVA
With the 25R2 release, SafetyDocs introduces two new actions to the _PV Agreement_ object, allowing Vault to update certain documents to your Vault's steady or obsolete state type to match the state of their linked _PV Agreement_. This allows your PVA documents to automatically transition states in accordance with their related _PV Agreement_'s state, reducing the manual effort required to maintain your PVA documentation in Vault.
After you have enabled this feature, see Manage Pharmacovigilance Agreements for more information.
## Prerequisites
To configure this feature, you must first enable PVA Management.
## Overview
To configure Document State Automation for PVA:
- [Configure the _Amendment Workflow_ on the _PV Agreement_ object][1]
- [Configure actions on the _PV Agreement Lifecycle_][6]
## Configure the Amendment Workflow {#configure-amendment-workflow}
To configure the _Amendment Workflow_:
1. Navigate to **Admin > Configuration > Workflows**.
2. Select **Create**.
3. In the _Create Workflow_ dialog, select **Object Workflow**, then select **Continue**.
4. On the _Create Workflow_ page, populate the fields as follows:
- **Label**: Enter `Amendment Workflow`
- **Lifecycle**: Select **PV Agreement Lifecycle**
- In the _Options > General_ section, select the following checkboxes:
- **Use workflow for single object record**
- **Workflow cancellation comment**
5. Select **Save**.
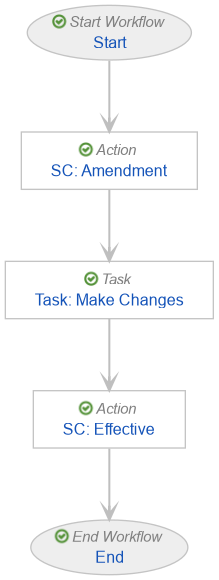
6. Configure the following:
- [Amendment state change action step][2]
- [Make Changes task step][3]
- [Effective state change action step][4]
7. [Activate the workflow][5].
 ### Configure the Amendment Action Step {#configure-amendment-step}
To configure the Amendment state change action step:
1. In the _Workflow Steps_ section, under the _Start_ step, select **Create Step**.
2. In the **Label** field, enter `SC: Amendment`, then select **Save**.
3. In the _Details_ section, populate the fields as follows:
- **Type**: Select **Action**
- **Next Steps**:
- Select **Create Step**
- In the **Step Name** field, enter `Task: Make Changes`
- Select **OK**
- Remove the **End** step
4. In the _Rules_ section, select **Create Rule** and complete the fields as follows:
- **Condition Type**: Select **Always**
- **perform actions**: Select **Change State**
- **Lifecycle State**: Select **Amendment**
5. Select **Save**.
6. In the _Next Steps_ field, select **Task: Make Changes** to navigate to the next step.
### Configure the Make Changes Task Step {#configure-make-changes-step}
To configure the Make Changes task step:
1. From the _Task: Make Changes_ step page, select **Edit**.
2. In the _Details_ section, populate the fields as follows:
- **Type**: Select **Task**
- Select **Create Step**
- In the **Step Name** field, enter `SC: Effective`
- Select **OK**
3. In the _Task Options_ section, complete the fields as follows:
- **Task Label**: Enter `Coordinate Changes`
- **Assign Task To**: Select **Workflow Owner**
- **Instructions**: Enter `Please coordinate all necessary changes as part of this amendment.`
- **Task Requirement**: Select **Required**
4. Select **Save**.
5. In the _Next Steps_ field, select **SC: Effective** to navigate to the next step.
### Configure the Effective Action Step {#configure-effective-step}
To configure the Effective state change action step:
1. From the _SC: Effective_ step page, select **Edit**.
2. In the _Details_ section, populate the fields as follows:
- **Type**: Select **Action**
- **Next Steps**: Select **End**
3. In the _Rules_ section, select **Create Rule** and complete the fields as follows:
- **Condition Type**: Select **Always**
- **perform actions**: Select **Change State**
- **Lifecycle State**: Select **Effective**
4. Select **Save**.
### Activate the Workflow {#activate-workflow}
To activate the _Amendment Workflow_:
1. Navigate back to the main page of the workflow.
2. In the _Details_ section under the _Status_ field, select **Make configuration active**.
## Configure the PV Agreement Lifecycle {#configure-pv-agreement-lifecycle}
To configure the _PV Agreement Lifecycle_:
1. Navigate to **Admin > Configuration > Object Lifecycles > PV Agreement Lifecycle**.
2. In the _States_ section, select **Effective**.
3. Create an entry action as follows:
- **Condition Type**: Select **Always**
- **perform actions**: Select **Make Agreement Documents Effective**
4. Select **Save**.
5. In the _User Actions_ section, select **Edit**.
6. Under the existing _Closeout PVA_ user action, select **Add Action** and populate the fields as follows:
- Select **Workflow**
- Select **Amendment Workflow**
- Enter `Start Amendment`
7. Drag the _Start Amendment_ rule above the _Closeout PVA_ rule.
8. Select **Save**.
9. Navigate back to the _PV Agreement Lifecycle_.
10. In the _States_ section, select **Terminated**.
11. Create an entry action as follows:
- **Condition Type**: Select **Always**
- **perform actions**: Select **Make Agreement Documents Terminated**
12. Select **Save**.
[1]: #configure-amendment-workflow
[2]: #configure-amendment-step
[3]: #configure-make-changes-step
[4]: #configure-effective-step
[5]: #activate-workflow
[6]: #configure-pv-agreement-lifecycle
### Configure the Amendment Action Step {#configure-amendment-step}
To configure the Amendment state change action step:
1. In the _Workflow Steps_ section, under the _Start_ step, select **Create Step**.
2. In the **Label** field, enter `SC: Amendment`, then select **Save**.
3. In the _Details_ section, populate the fields as follows:
- **Type**: Select **Action**
- **Next Steps**:
- Select **Create Step**
- In the **Step Name** field, enter `Task: Make Changes`
- Select **OK**
- Remove the **End** step
4. In the _Rules_ section, select **Create Rule** and complete the fields as follows:
- **Condition Type**: Select **Always**
- **perform actions**: Select **Change State**
- **Lifecycle State**: Select **Amendment**
5. Select **Save**.
6. In the _Next Steps_ field, select **Task: Make Changes** to navigate to the next step.
### Configure the Make Changes Task Step {#configure-make-changes-step}
To configure the Make Changes task step:
1. From the _Task: Make Changes_ step page, select **Edit**.
2. In the _Details_ section, populate the fields as follows:
- **Type**: Select **Task**
- Select **Create Step**
- In the **Step Name** field, enter `SC: Effective`
- Select **OK**
3. In the _Task Options_ section, complete the fields as follows:
- **Task Label**: Enter `Coordinate Changes`
- **Assign Task To**: Select **Workflow Owner**
- **Instructions**: Enter `Please coordinate all necessary changes as part of this amendment.`
- **Task Requirement**: Select **Required**
4. Select **Save**.
5. In the _Next Steps_ field, select **SC: Effective** to navigate to the next step.
### Configure the Effective Action Step {#configure-effective-step}
To configure the Effective state change action step:
1. From the _SC: Effective_ step page, select **Edit**.
2. In the _Details_ section, populate the fields as follows:
- **Type**: Select **Action**
- **Next Steps**: Select **End**
3. In the _Rules_ section, select **Create Rule** and complete the fields as follows:
- **Condition Type**: Select **Always**
- **perform actions**: Select **Change State**
- **Lifecycle State**: Select **Effective**
4. Select **Save**.
### Activate the Workflow {#activate-workflow}
To activate the _Amendment Workflow_:
1. Navigate back to the main page of the workflow.
2. In the _Details_ section under the _Status_ field, select **Make configuration active**.
## Configure the PV Agreement Lifecycle {#configure-pv-agreement-lifecycle}
To configure the _PV Agreement Lifecycle_:
1. Navigate to **Admin > Configuration > Object Lifecycles > PV Agreement Lifecycle**.
2. In the _States_ section, select **Effective**.
3. Create an entry action as follows:
- **Condition Type**: Select **Always**
- **perform actions**: Select **Make Agreement Documents Effective**
4. Select **Save**.
5. In the _User Actions_ section, select **Edit**.
6. Under the existing _Closeout PVA_ user action, select **Add Action** and populate the fields as follows:
- Select **Workflow**
- Select **Amendment Workflow**
- Enter `Start Amendment`
7. Drag the _Start Amendment_ rule above the _Closeout PVA_ rule.
8. Select **Save**.
9. Navigate back to the _PV Agreement Lifecycle_.
10. In the _States_ section, select **Terminated**.
11. Create an entry action as follows:
- **Condition Type**: Select **Always**
- **perform actions**: Select **Make Agreement Documents Terminated**
12. Select **Save**.
[1]: #configure-amendment-workflow
[2]: #configure-amendment-step
[3]: #configure-make-changes-step
[4]: #configure-effective-step
[5]: #activate-workflow
[6]: #configure-pv-agreement-lifecycle