About the Feature
Case Access Group Security significantly simplifies security around access to Cases and unblinded information on Cases. With this feature, you have more granular control over Case-level access based on such factors as sponsor, report type, country, market segment, and more.
With Case Access Group Security enabled, you set limits for the following areas:
- Which Cases are accessible to team members, along with the role they have on those Cases
- Which team members can see and edit sensitive fields on unblinded Products
- When to apply protection to certain open Study and non-Study Products on blind-protected Cases
- Which Case Product Drug Roles, such as Concomitant, are exempt from blind protection
- Which Study Product Roles, such as Standard of Care, are exempt from blind protection
Note Case Access Group Security is an alternative to DAC on Inbox Items and Cases. Before configuring Case Access Group Security, DAC must be turned off.
When you complete configuration, Manage Case Access Group Security describes how to use this feature.
23R2 Update: Simplified Case Access Group Security Setup
In 23R2, setting up Case Access Groups is made even simpler. Optimized matching logic and the addition of a Country field on User Access Group Assignment records make the setup more flexible and reduce the administrative burden of creating many Case Access Group Assignment records. See the (23R2) enablement instructions to configure your Vault for the updated feature.
Note The optimized matching logic considers blank values to mean “Any” when matching Inbox Items and Cases to a Case Access Group. To take advantage of this update, you may need to update your Case Access Group assignment rules. We recommend consulting with Veeva Managed Services before making these updates.
Overview of Enablement Steps
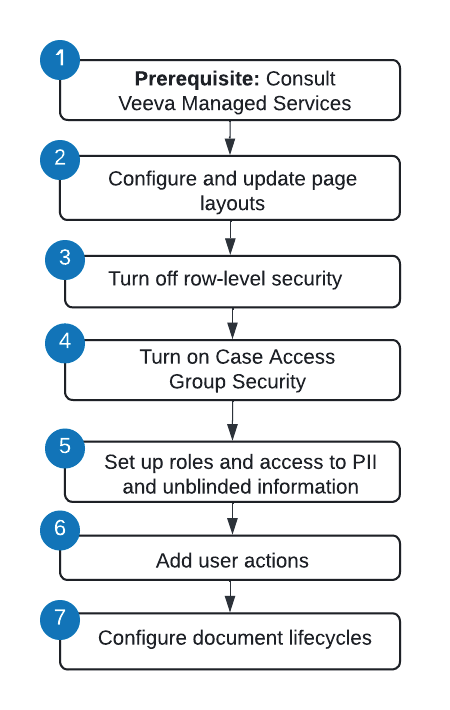
Prerequisite
Before configuring Case Access Group Security in your Vault, contact Veeva Managed Services. Based on your organization’s needs, our team will work with you to design the simplest and most effective security solution. At a high level, we will consult with you on the following:
- Configuring Case Access Groups based on your business processes and use cases
- This includes identifying how many groups are required and their settings.
- Defining the rules for which Cases are assigned to each group
- Identifying specific object- and field-level permissions that can be managed through Atomic Security for personally identifiable information (PII) and unblinded information
- Assigning individual team members to Case Access Groups based on roles and localization
- This includes managing appropriate access to PII and unblinded information within set lifecycle states.
Configure and Update Page Layouts
To manage Case Access Group Security, you must configure the following page layouts:
- Case Access Group
- User Access Assignment
- Case Access Group Assignment
- Market Segment
In addition, you must update the following page layouts:
- Inbox Item
- Case
- Localized Case
- User
- Product
- Study
- Case Number
The required page layout update includes adding some or all of the following fields:
- Access Group: Displays the matching Case Access Group for Inbox Items.
- Intake Format: Displays the format the Inbox Item was created from, such as an E2B file.
- Intake Method: Displays the method of intake for the Inbox Item, such as email.
- Marget Segment: Displays the market segment associated with the study for Study Cases or the primary Product for postmarket Cases.
The specific updates for each page layout are described in the following sections.
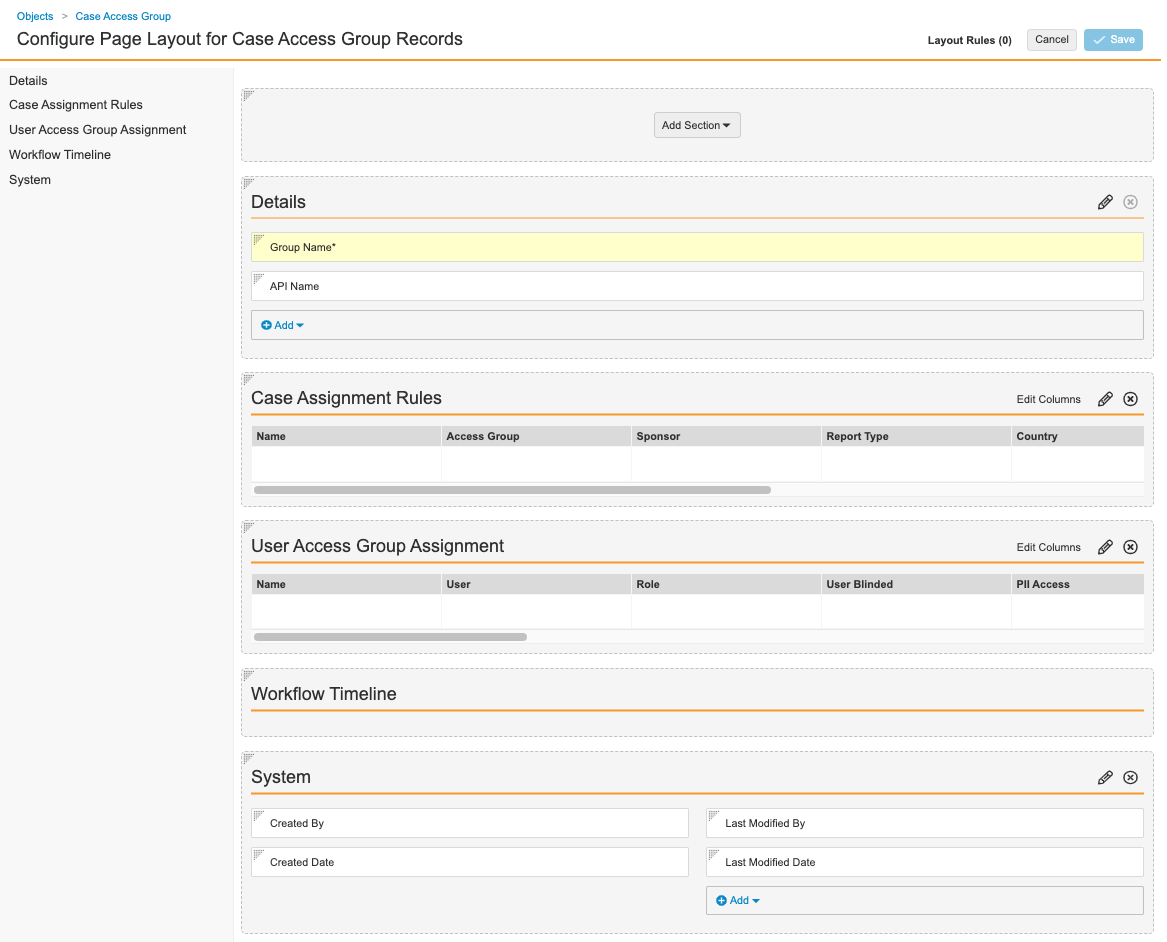
Configure the Case Access Group Page Layout
Complete the following steps to configure the Case Access Group page layout:
- Go to Admin > Configuration > Objects > Case Access Group > Page Layouts.
- Select Case Access Group Detail Page Layout.
- Configure the Details section with the following fields:
- Group Name
- API Name
- Add the Case Access Group Assignment related object.
- Section Label: Case Assignment Rules
- Section Name:
access_group__c
- Add the User Access Group Assignment related object.
- Section Label: User Access Group Assignment
- Section Name:
user_access_group_assignment__c
- Add a Detail Form section.
- Section Label: System
- Section Name:
details1__c - Section Layout: Detail Form - Two Columns
- Configure the System section with the following fields:
- Created By
- Created Date
- Last Modified By
- Last Modified Date
- (Optional) To rearrange sections, drag and drop.
- Select Save.
Configure the User Access Group Assignment Page Layout
Complete the following steps to configure the User Access Group Assignment page layout:
- Go to Admin > Configuration > Objects > User Access Group Assignment > Page Layouts.
- Select User Access Group Assignment Detail Page Layout.
- Configure the Details section as shown below.
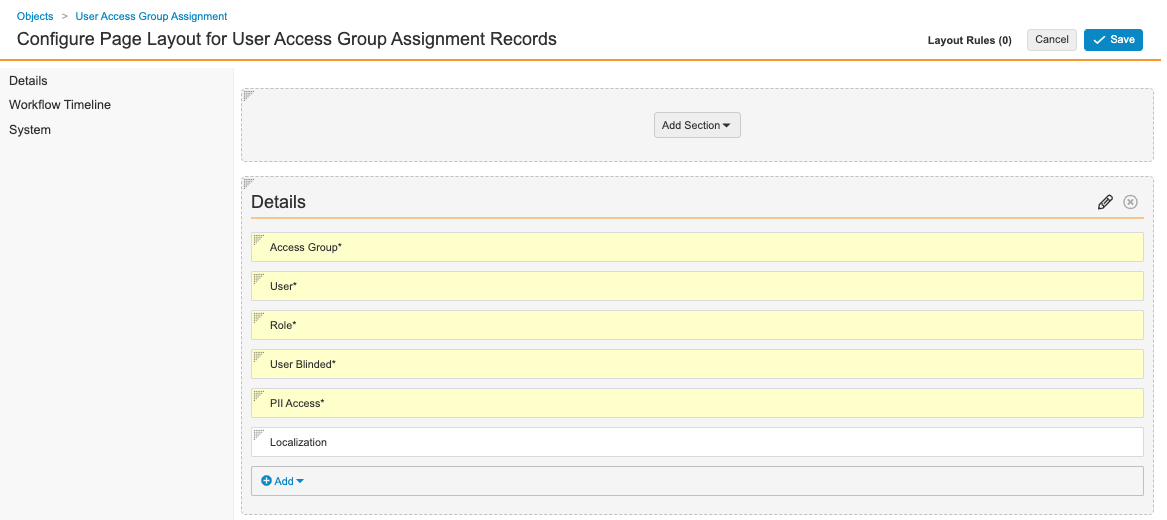
User Access Group Assignment Details Fields - Add a Detail Form section.
- Section Label: System
- Section Name:
details1__c - Section Layout: Detail Form - Two Columns
- Configure the System section with the following fields:
- Created By
- Created Date
- Last Modified By
- Last Modified Date
- (Optional) To rearrange sections, drag and drop.
- Select Save.
Configure the Case Access Group Assignment Page Layout
Complete the following steps to configure the Case Access Group Assignment page layout:
- Go to Admin > Configuration > Objects > Case Access Group Assignment > Page Layouts.
- Select Case Access Group Assignment Detail Page Layout.
- Configure the Details section as shown below.

Case Access Group Assignment Details Fields - Add a Detail Form section.
- Section Label: System
- Section Name:
details1__c - Section Layout: Detail Form - Two Columns
- Configure the System section with the following fields:
- Created By
- Created Date
- Last Modified By
- Last Modified Date
- (Optional) To rearrange sections, drag and drop.
- Select Save.
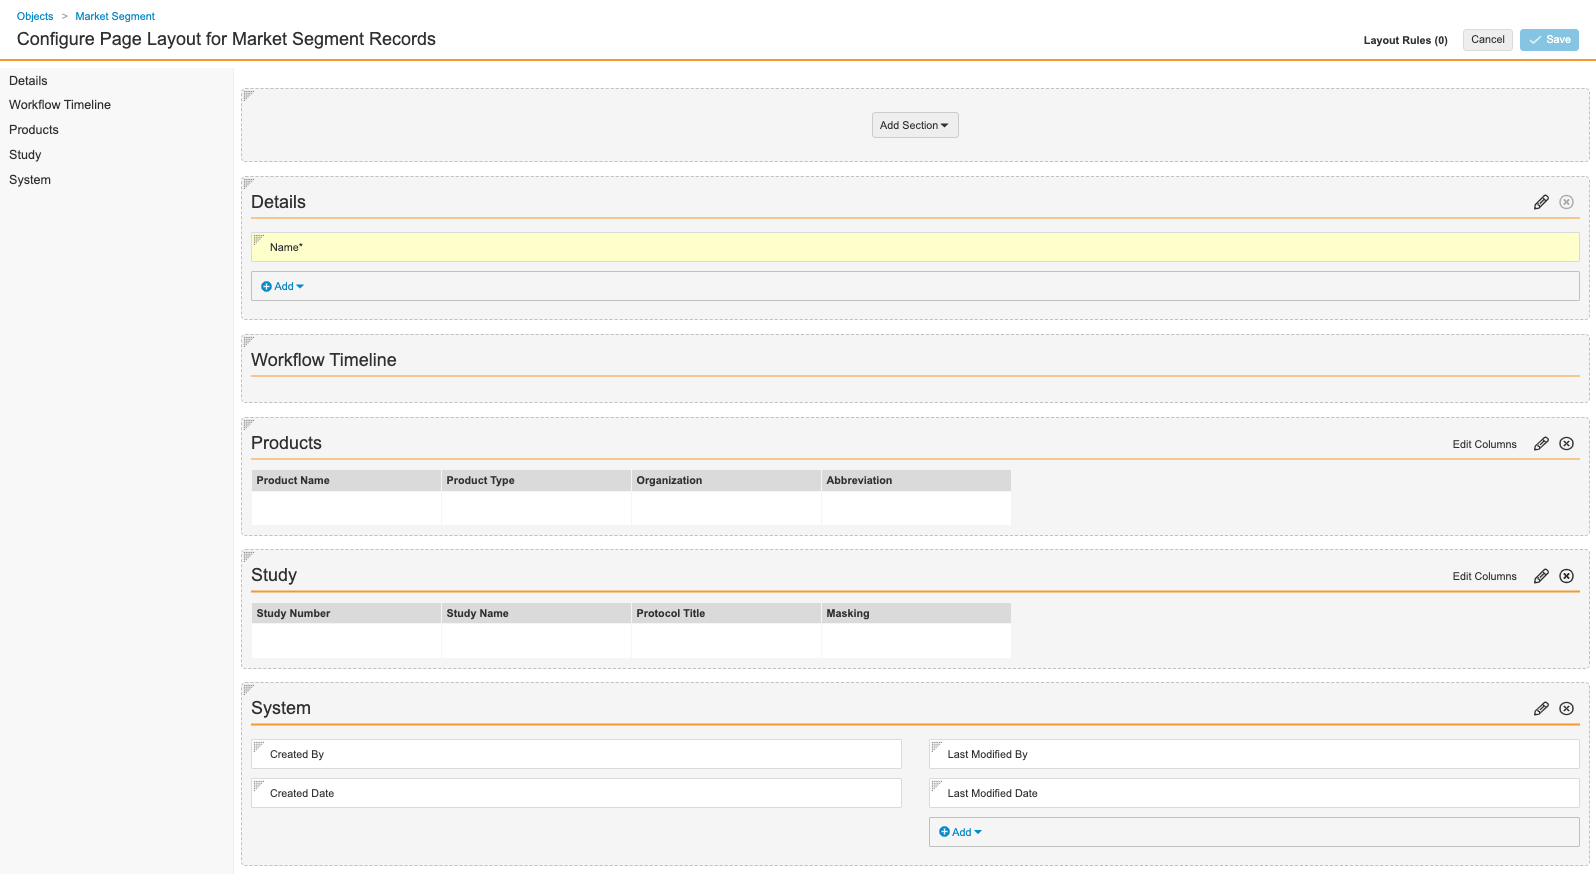
Configure the Market Segment Page Layout
Complete the following steps to configure the Market Segment page layout:
- Go to Admin > Configuration > Objects > Market Segment > Page Layouts.
- Select Market Segment Detail Page Layout.
- Configure the Details section as shown below.
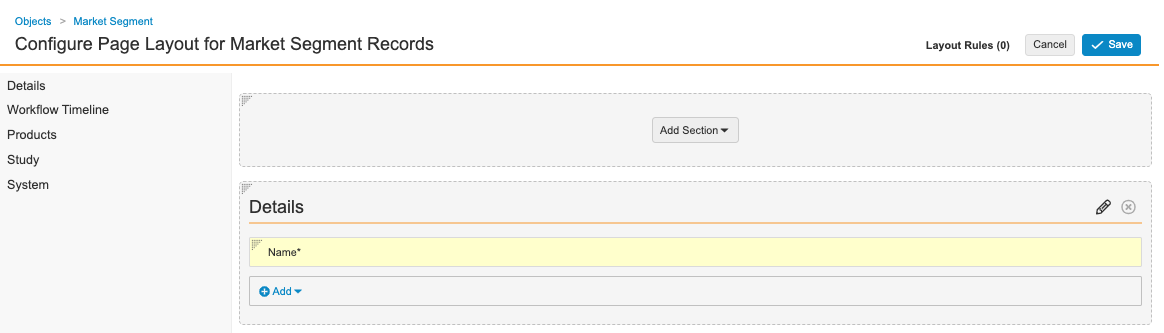
Market Segment Details Fields - Add the Product related object.
- Section Label: Product
- Section Name:
products__c
- In the Product section, select Edit Columns to configure the fields as shown below.

Market Segment Products Fields - In the Study section, select Edit Columns to configure the fields as shown below.

Market Segment Study Fields - Add a Detail Form section.
- Section Label: System
- Section Name:
details1__c - Section Layout: Detail Form - Two Columns
- Configure the System section with the following fields:
- Created By
- Created Date
- Last Modified By
- Last Modified Date
- (Optional) To rearrange sections, drag and drop.
- Select Save.
Update the Inbox Item Page Layout
Complete the following steps to update the Inbox Item page layout:
- Go to Admin > Configuration > Objects > Inbox Item > Page Layouts.
- Select Inbox Item Detail Page Layout.
- In the Case Validity and Source section, add the following fields, as shown below:
- Access Group
- Intake Format
- Intake Method
- Market Segment
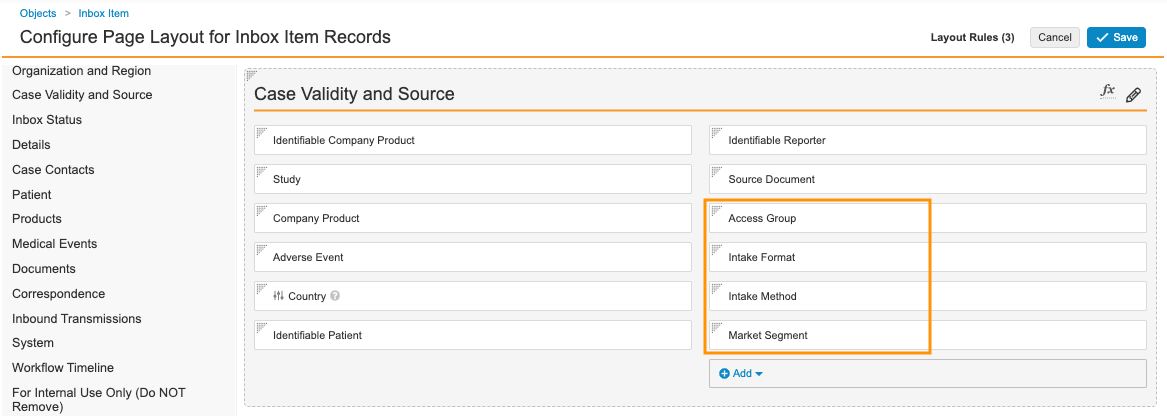
Inbox Item Case Validity and Source Fields - Select Save.
Update the Case Page Layout
Complete the following steps to update the Case page layout:
- Go to Admin > Configuration > Objects > Case > Page Layouts.
- Select Case Page Layout.
- In the Details section, add the following fields, as shown below:
- Access Group
- Intake Format
- Intake Method
- Market Segment
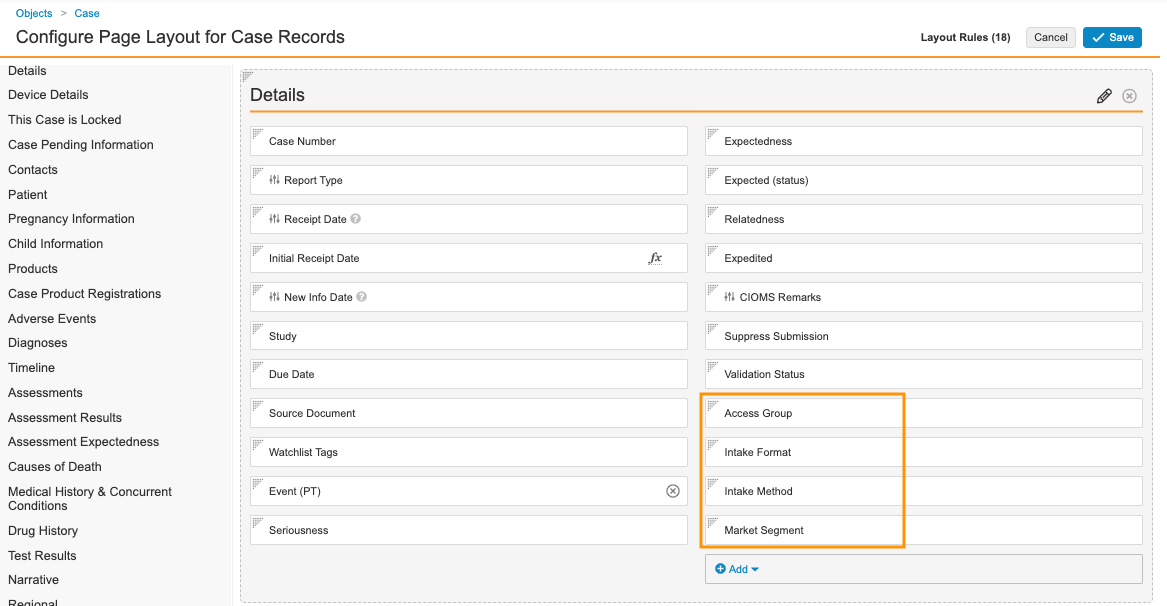
Case Details Fields - Select Save.
Update the Localized Case Page Layout
Complete the following steps to update the Localized Case page layout:
- Go to Admin > Configuration > Objects > Localized Case > Page Layouts.
- Select Localized Case Detail Page Layout.
- In the Details section, add the Access Group field.
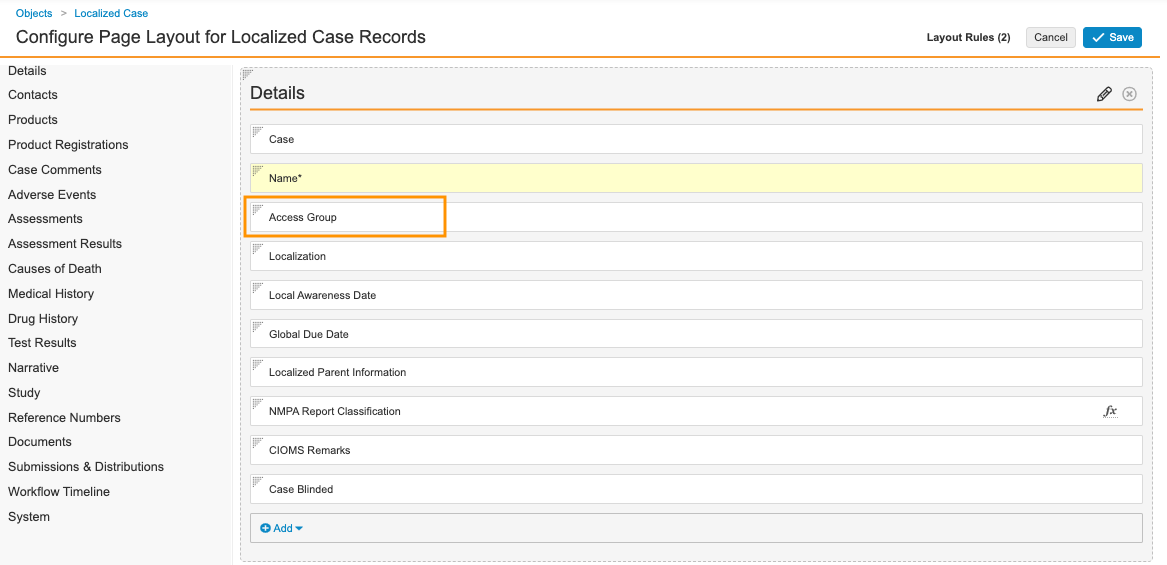
Localized Case Details Fields - Select Save.
Update the Case Number Page Layout
Complete the following steps to update the Case Number page layout:
- Go to Admin > Configuration > Objects > Case Number > Page Layouts.
- Select Case Number Detail Page Layout.
- In the Details section, add the Access Group field.
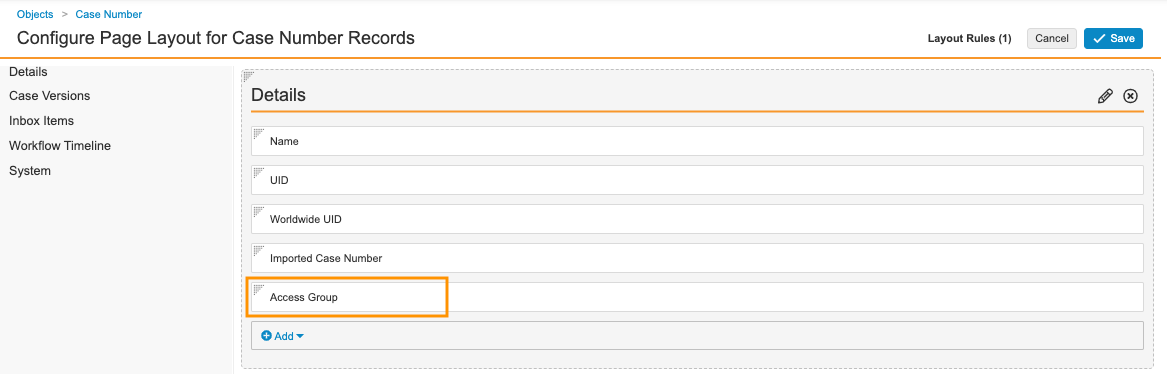
Case Number Details Fields - Select Save.
Update the Product Page Layouts
Complete the following steps to update Product page layouts:
Note This change must be applied to all Product page layouts.
- Go to Admin > Configuration > Objects > Product > Page Layouts.
- Select a page layout.
- In the Details section, add the Market Segment field.
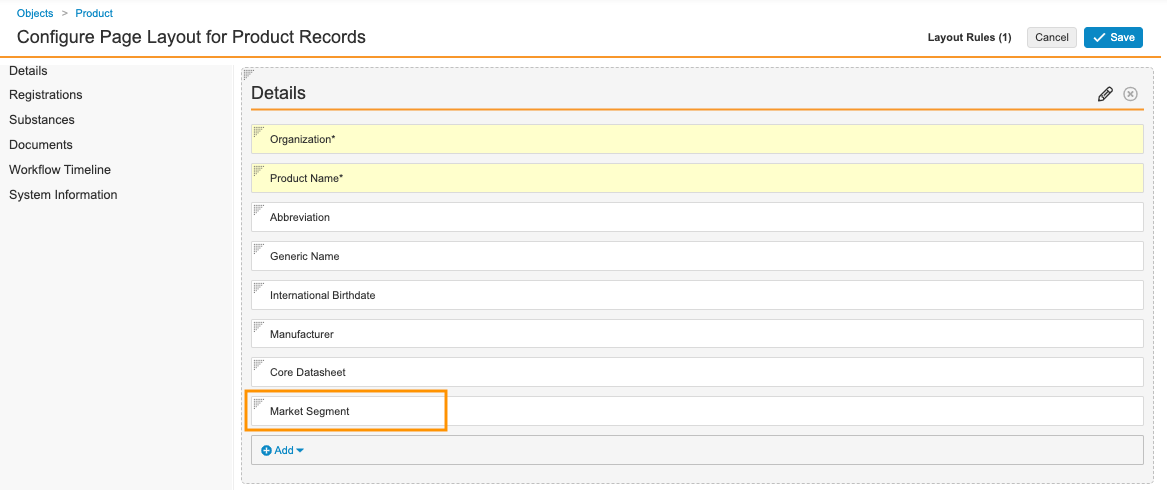
Sample Product Details Fields - Select Save.
Update the Study Page Layout
Complete the following steps to update the Study page layout:
- Go to Admin > Configuration > Objects > Study > Page Layouts.
- Select Study Detail Page Layout.
- In the Details section, add the Market Segment field.
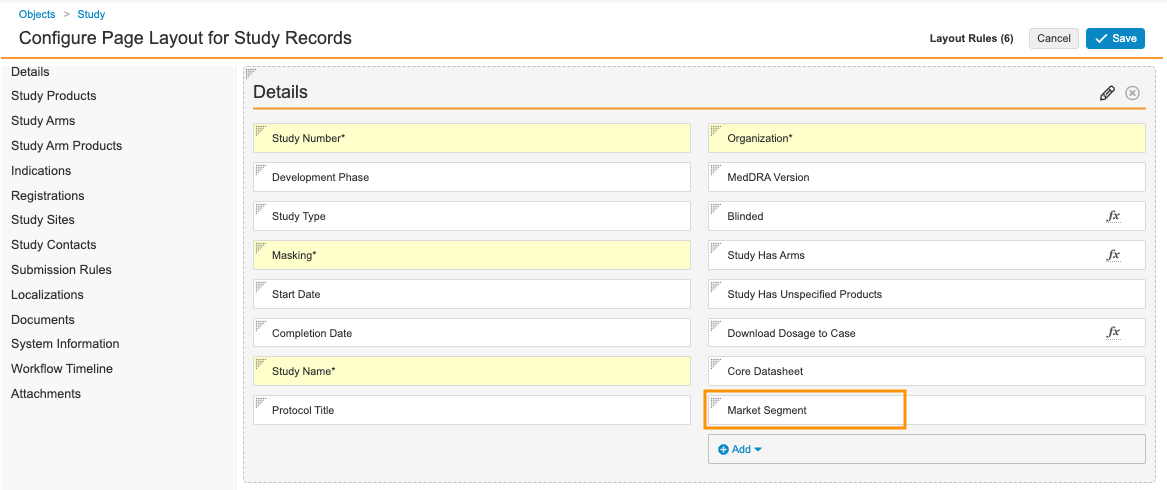
Sample Study Details Fields - Select Save.
Update the User Page Layout
For a convenient way to assign individuals to Case Access Groups, add the User Access Group Assignment section to the User page layout.
- Go to Admin > Configuration > Objects > User > Page Layouts.
- Select User Detail Page Layout.
- Add the User Access Group Assignment related object section.
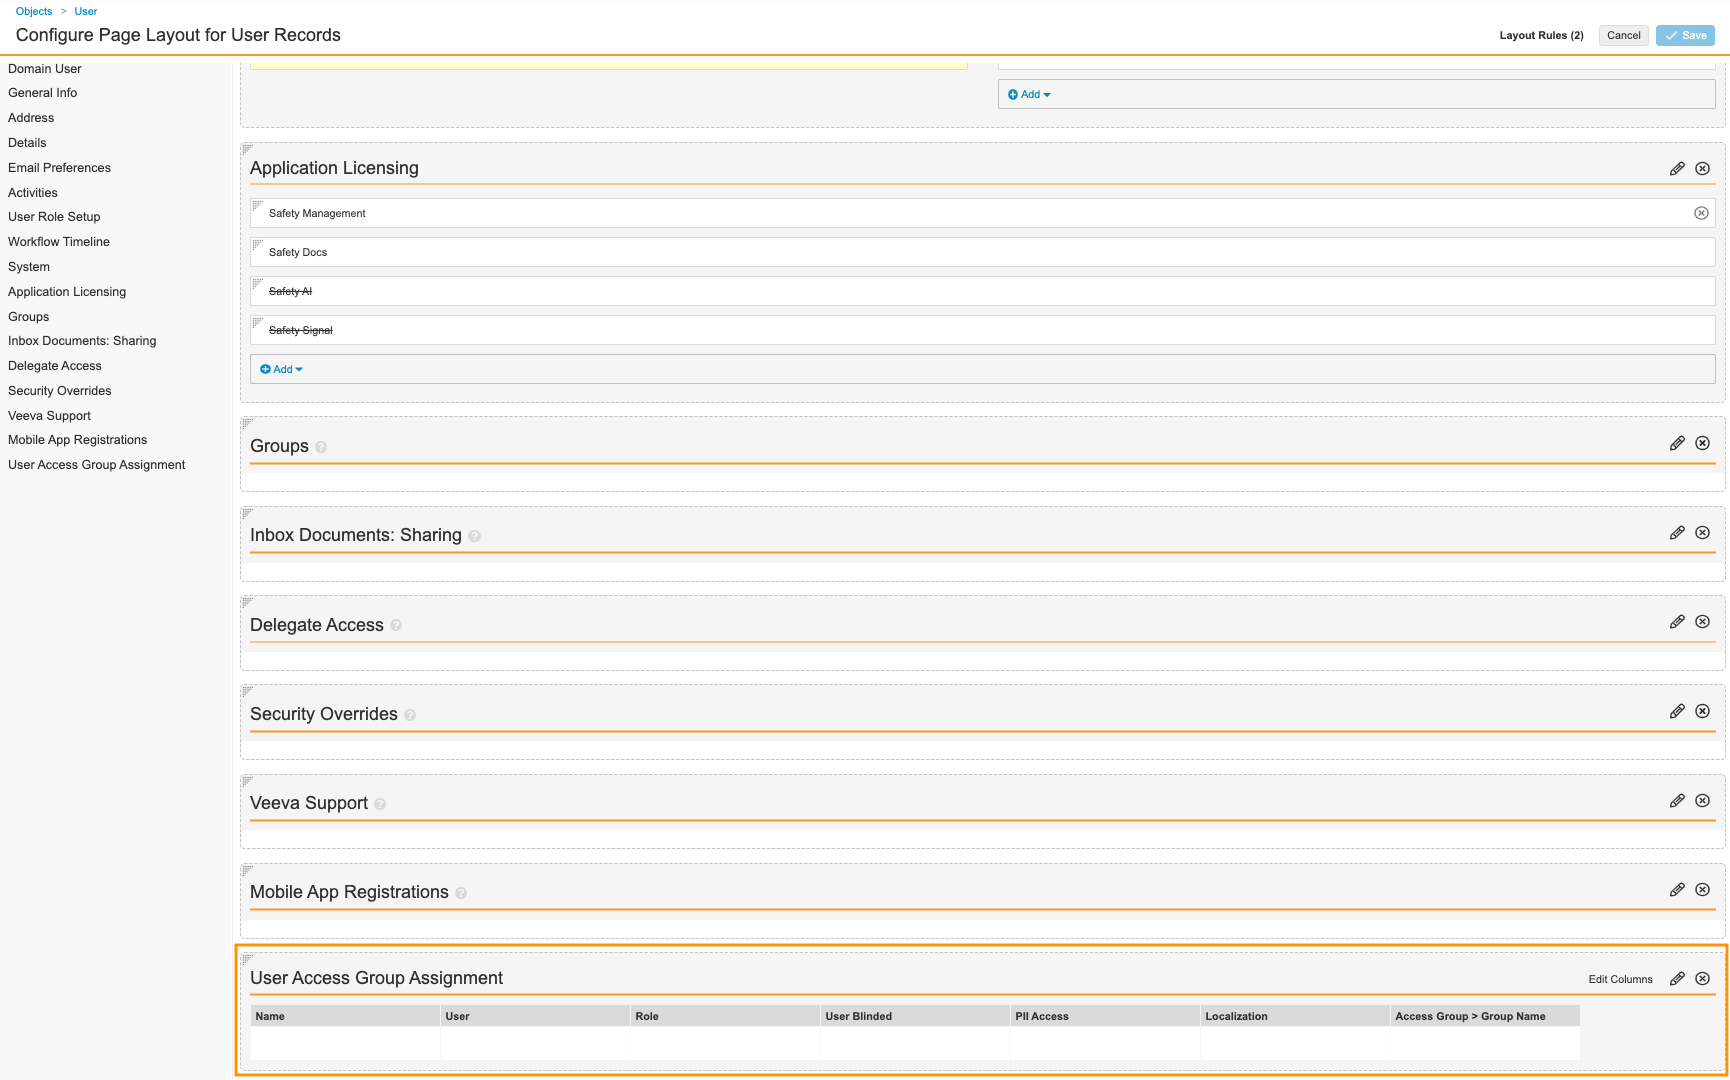
User Access Group Assignment Section - (Optional) To rearrange sections, drag and drop.
- Select Save.
Turn Off Row-Level Security
Turning off row-level security on Inbox Items and Cases includes removing all Sharing Rules and turning off Custom Sharing Rules and Matching Sharing Rules on all Inbox Item, Case, Localized Case, User, and Person objects. You can use the following checklist to track your progress.
Case (case_version__v)
Case Adverse Event (case_adverse_event__v)
Case Assessment (case_assessment__v)
Case Assessment Expectedness (case_assessment_expectedness__v)
Case Assessment Result (case_assessment_result__v)
Case Cause of Death (case_cause_of_death__v)
Case Contact (case_contact__v)
Case Diagnosis (case_diagnosis__v)
Case Drug History (case_drug_history__v)
Case Drug History Substance (case_drug_history_substance__v)
Case Identifier (case_identifier__v)
Case Medical History (case_medical_history__v)
Case Number (case_number__v)
Case Product (case_product__v)
Case Product Device Code (case_product_device_code__v)
Case Product Dosage (case_product_dosage__v)
Case Product Indication (case_product_indication__v)
Case Product Registration (case_product_registration__v)
Case Product Substance (case_product_substance__v)
Case Relationship (case_relationship__v)
Case Study Registration (case_study_registration__v)
Case Test Result (case_test_result__v)
Inbox Item (inbox_item__v)
Localized Case (localized_case__v)
Localized Case Adverse Event (localized_case_adverse_event__v)
Localized Case Assessment (localized_case_assessment__v)
Localized Case Assessment Result (localized_case_assessment_result__v)
Localized Case Cause of Death (localized_case_cause_of_death__v)
Localized Case Comment (localized_case_comment__v)
Localized Case Contact (localized_case_contact__v)
Localized Case Document (localized_case_document__v)
Localized Case Drug History (localized_case_drug_history__v)
Localized Case Identifier (localized_case_identifier__v)
Localized Case Medical History (localized_case_medical_history__v)
Localized Case Product (localized_case_product__v)
Localized Case Product Device Code (localized_case_product_device_code__v)
Localized Case Product Dosage (localized_case_product_dosage__v)
Localized Case Product Indication (localized_case_product_indication__v)
Localized Case Product Substance (localized_case_product_substance__v)
Localized Case Test Result (localized_case_test_result__v)
Localized Case Translation (localized_case_translation__v)
Person (person__sys)
Transmission (transmission__v)
Transmission Message (transmission_message__v)
User (user__sys)
Remove Sharing Rules
To remove Sharing Rules on an object, complete the following steps:
- Go to Admin > Configuration > Objects > [object] > Sharing Rules.
- Select the first Sharing Rule in the list.
- Select Delete.
- On the Deleting “[object]” dialog, select Continue.
- Repeat steps 2–4 until all of the Sharing Rules are deleted.
Tip When all Sharing Rules have been deleted for an object, turn off its Custom Sharing Rules and Matching Sharing Rules before moving on to delete the Sharing Rules of the next object.
Turn Off Custom Sharing Rules and Matching Sharing Rules
Note You must delete every Sharing Rule for an object before you can turn off its Custom Sharing Rules and Matching Sharing Rules.
To remove Custom Sharing Rules and Matching Sharing Rules on an object, complete the following steps:
- Go to Admin > Configuration > Objects > [object] > Details.
- Select Edit.
- In the Options section, clear the Enable Custom Sharing Rules and Enable Matching Sharing Rules checkboxes.
- Select Save.
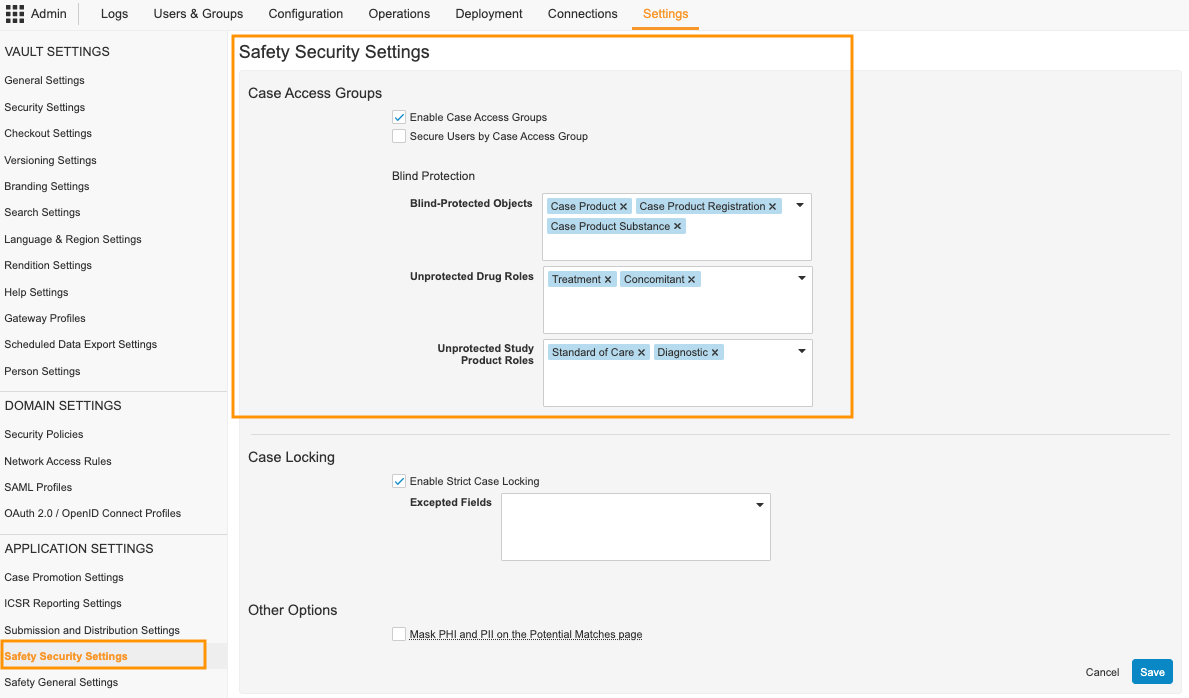
Turn On Case Access Group Security
Complete the following steps to turn on the Case Access Group Security feature in your Vault:
- Go to Admin > Settings > Safety Security Settings.
- Select Edit.
- In the Case Access Groups section, select the Enable Case Access Groups checkbox.
- (Optional) To limit the visibility of Vault users to each other by Case Access Group, select the Secure Users by Case Access Group checkbox.
Note We recommend enabling this option in Contract Research Organization (CRO) Vaults. This ensures users can see only other users in the same Case Access Group. When not enabled, users can see all other users in the same Vault.
- (Optional) In the Blind-Protected Objects field, select additional blind-protected objects.
- By default, Case Product, Case Product Registration, and Case Product Substance are selected and cannot be removed.
- (Optional) In the Unprotected Drug Roles field, select drug roles that do not require information to be blind-protected.
- (Optional) In the Unprotected Study Product Roles field, select roles that do not require information to be blind-protected.
- Select Save.
Update Object Lifecycle Roles and Atomic Security
For all applicable Case and Case child object lifecycles, you must grant no permissions to the following roles:
- PII Unmasked
- Study Unmasked
In addition, you must configure the Atomic Security for PII and Blinded information.
Grant No Permissions
To grant no permissions to a role for an object lifecycle, complete the following steps:
- Go to Admin > Configuration > Object Lifecycles > [object lifecycle].
- In the Roles section, select Edit.
- For the PII Unmasked and Study Unmasked roles, clear all checkboxes for all states to grant no permissions.
- Select Save.
Update Atomic Security for PII
Atomic Security for PII must be set for every state in the lifecycle for every field that includes sensitive information. Our recommended set of fields is outlined in the following list, but you should apply the changes to all fields that fall under your organization’s definition of PII.
| Object Lifecycle | Field |
|---|---|
| Case Lifecycle ( case_processing_lifecycle__v) |
|
| Case Adverse Event Lifecycle ( case_adverse_event_lifecycle__v) |
|
| Case Cause of Death Lifecycle ( case_cause_of_death_lifecycle__v) |
|
| Case Contact Lifecycle ( case_contact_lifecycle__v) |
|
| Case Diagnosis Lifecycle ( case_diagnosis_lifecycle__v) |
|
| Case Drug History Lifecycle ( case_drug_history_lifecycle__v) |
|
| Case Medical History Lifecycle ( case_medical_history_lifecycle__v) |
|
| Case Product Lifecycle ( case_product_lifecycle__v) |
|
| Case Product Dosage Lifecycle ( case_product_dosage_lifecycle__v) |
|
| Case Product Indication Lifecycle ( case_product_indication_lifecycle__v) |
|
| Case Test Result Lifecycle ( case_test_result_lifecycle__v) |
|
| Localized Case Lifecycle ( localized_case_lifecycle__v) |
|
| Localized Case Contact Lifecycle ( localized_case_contact_lifecycle__v) |
|
| Localized Case Cause of Death Lifecycle ( localized_case_cause_of_death_lifecycle__v) |
|
| Localized Case Medical History Lifecycle ( localized_case_medical_history_lifecycle__v) |
|
| Localized Case Product Indication ( localized_case_product_indication__v) |
|
| Localized Case Test Result Lifecycle ( localized_case_test_result_lifecycle__v) |
|
Updating Atomic Security for PII
For each state of the object lifecycle, complete the following steps to update Atomic Security for PII:
- Go to Admin > Configuration > Object Lifecycles > [object lifecycle].
- In the States section, select a state.
- In the Atomic Security: Fields section, select Edit.
- On the Atomic Security: Fields page, select Role Override.
- Select the Plus (
 ) icon next to the PII Unmasked role.
 - Select OK.
- For the applicable fields, configure the following Atomic Security settings:
- Default: Hide
- PII Unmasked: Edit
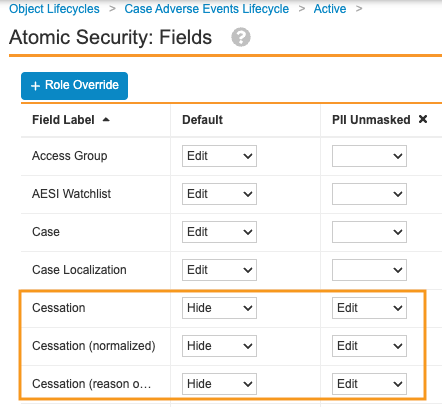
Sample Case Adverse Events Lifecycle Atomic Security Settings - Select Save.
Adjust Atomic Security for Blinded Information
Atomic Security for blinded information must be set for every state in the lifecycle for every field that includes sensitive information. Our recommended set of fields is outlined in the following list, but you should apply the changes to all fields that fall under your organization’s definition of information that should be blinded.
| Object Lifecycle | Field |
|---|---|
| Case Assessment Lifecycle ( case_assessment_lifecycle__v) |
|
| Case Assessment Expectedness Lifecycle ( case_assessment_expectedness_lifecycle__v) |
|
| Case Assessment Result Lifecycle ( case_assessment_result_lifecycle__v) |
|
| Case Product Lifecycle ( case_product_lifecycle__v) |
|
| Case Product Dosage Lifecycle ( case_product_dosage_lifecycle__v) |
|
| Case Product Substance Lifecycle ( case_product_substance_lifecycle__v) |
|
| Localized Case Product Lifecycle ( localized_case_product_lifecycle__v) |
|
| Localized Case Assessment Lifecycle ( localized_case_assessment_lifecycle__v) |
|
| Localized Case Product Substance Lifecycle ( localized_case_product_substance_lifecycle__v) |
|
Updating Atomic Security for Blinded Information
For each state of the object lifecycle, complete the following steps to update Atomic Security for blinded information:
- Go to Admin > Configuration > Object Lifecycles > [object lifecycle].
- In the States section, select a state.
- In the Atomic Security: Fields section, select Edit.
- On the Atomic Security: Fields page, select Role Override.
- Select the Plus () icon next to the Study Unmasked role.
- Select OK.
- For the applicable fields, configure the following Atomic Security settings:
- Default: Hide
- Study Unmasked: Edit
Sample Case Assessment Expectedness Lifecycle Atomic Security Settings - Select Save.
Update the User Role Setup Object
Complete the following steps to add the Case Access Group field to the User Role Setup object:
- Go to Admin > Configuration > Objects > User Role Setup > Fields.
- Select Create.
- In the Step 1: Select the field type section, select Object.
- In the Step 2: Choose label and name for the field section, in the Label field, enter “Case Access Group”.
- In the Step 3: Set the options section, complete the following steps:
- In the Object picklist, select Case Access Group.
- Select the Display in default lists and hovercards checkbox.
- Select Save.
Update the Matching Sharing Rules on Document Lifecycles
You must update the Matching Sharing Rules on all standard and custom roles for the following document lifecycles:
- AER Lifecycle
- Case Generated Document Lifecycle
- Case Source Lifecycle
- Narrative Lifecycle
- Go to Admin > Configuration > Document Lifecycles > [document lifecycle] > Roles.
- Select a custom role.
- On the Sharing Rules tab, select a role.
- Select Edit.
- In the Rule Criteria section, complete the following steps:
- Clear the Organization (organization__v) checkbox.
- Select the Case Access Group (case_access_group__v) checkbox.
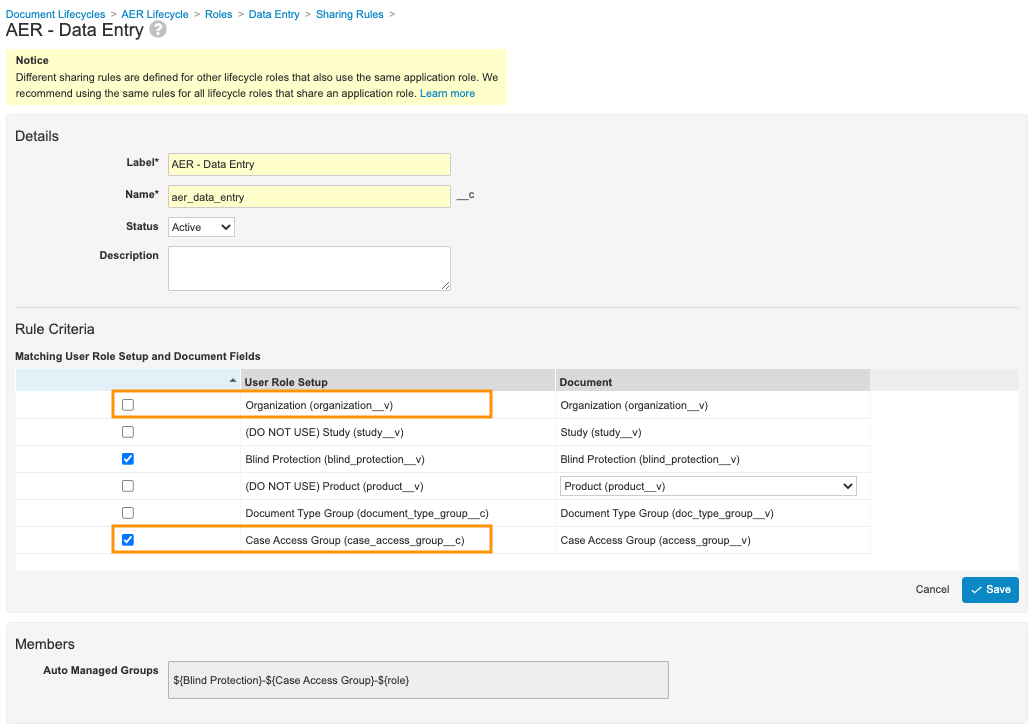
Sample AER - Data Entry Matching Sharing Rules Settings - Select Save.
(Optional) Add and Configure Calculate Access Group User Actions
When Case Access Group details are edited, the Access Group assignments on existing Inbox Items and Cases may need to be updated. The update can be triggered through the Calculate Inbox Item Access Group and Calculate Case Access Group actions. Adding these actions impacts the following objects and object lifecycles:
- Inbox Item
- Inbox Item Lifecycle
- Case
- Case Lifecycle
Note The recalculation requires significant system resources. If you configure this action, we recommend that it is used only when there’s a major change to Case Access Group configuration. Case Access Group assignments are always calculated by the system when the Inbox Item is created and when the Case is promoted.
Add the Calculate Inbox Item Access Group Action to Inbox Items
To add the Calculate Inbox Item Access Group action to the Inbox Item object, complete the following steps:
- Go to Admin > Configuration > Objects > Inbox Item > Actions.
- Select Create.
- In the Create Action window, select Calculate Inbox Item Access Group from the picklist and then select Continue.
- (Optional) On the Create Action page, in the Description field, enter “Evaluate the assigned Case Access Group and update the Inbox Item if needed.”
- Select Save.
Add the Calculate Inbox Item Access Group Action to the Inbox Item Lifecycle
To add the Calculate Inbox Item Access Group action to the Inbox Item object lifecycle, complete the following steps:
- Go to Admin > Configuration > Object Lifecycles > Inbox Item Lifecycle.
- In the States section, select a state. We recommend adding the action to the New and Active states.
- In the User Actions section, select Edit.
- Add an action with the following setup:
- Always
- Calculate Inbox Item Access Group
- Action Label: Calculate Inbox Item Access Group
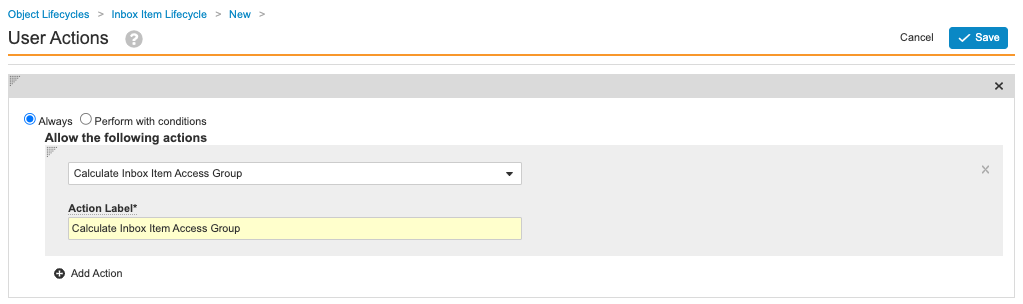
Calculate Inbox Item Access Group User Action - Select Save.
Add the Calculate Case Access Group Action to Cases
To add the Calculate Case Access Group action to the Case object, complete the following steps:
- Go to Admin > Configuration > Objects > Case > Actions.
- Select Create.
- In the Create Action window, select Calculate Case Access Group from the picklist and then select Continue.
- (Optional) On the Create Action page, in the Description field, enter “Evaluate the assigned Case Access Group and update the Case if needed.”
- Select Save.
Add the Calculate Case Access Group Action to the Case Object Lifecycle
To add the Calculate Case Access Group action to the Case object lifecycle, complete the following steps:
- Go to Admin > Configuration > Object Lifecycles > Case Lifecycle.
- In the States section, select a state. We recommend adding the action to the Triage and Data Entry states.
- In the User Actions section, select Edit.
- Add an action with the following setup:
- Always
- Calculate Case Access Group
- Action Label: Calculate Case Access Group
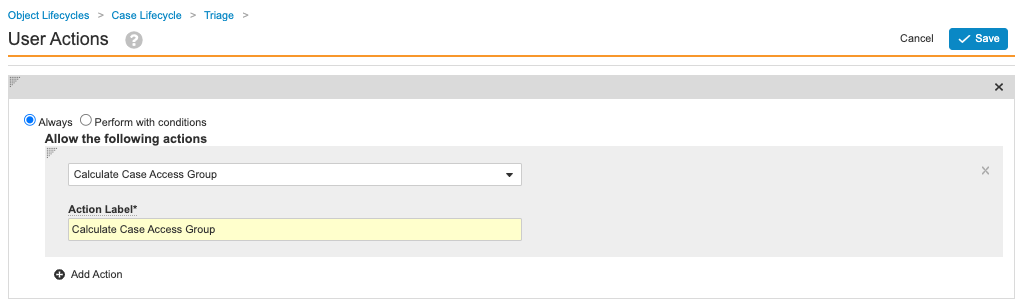
Calculate Case Access Group User Action - Select Save.
(23R2) Configure Simplified Case Access Group Security Setup
The following section describes how to configure your Vault for assigning users to Case Access Groups based on country.
In addition, if you have configured your Vault to display Transmission records, you can include the Case Access Group and Case Access Group Assignment Reason on the Inbound Transmission record.
Finally, you can set up User records with the Case Access Group Override field. When populated with a Case Access Group, the system assigns all Inbox Items and Cases created by that user to that Case Access Group instead of running the matching logic. This is useful, for example, for a global load balancing Case Processor who may enter a Case that would qualify for a specific group though it should be maintained at the global level.
Note Before performing the following steps, you must complete all of the configuration listed above this section.
Update the User Access Group Assignment Page Layout
Complete the following steps to add the Country field to User Access Group Assignment records.
- Go to Admin > Configuration > Objects > User Access Group Assignment > Page Layouts.
- Select User Access Group Assignment Detail Page Layout.
- In the Details section, add the Country field.
- Select Save.
Update the Inbound Transmission Page Layout
Complete the following steps to add the Case Access Group and Case Access Group Assignment Reason fields to Inbound Transmission records.
- Go to Admin > Configuration > Objects > Transmission > Page Layouts.
- Select Inbound Transmission Detail Page Layout.
- In the System section, add the following fields:
- Case Access Group
- Case Access Group Assignment Reason
- Select Save.
Update the User Page Layout
Complete the following steps to add the Case Access Group Override field to User records.
- Go to Admin > Configuration > Objects > User > Page Layouts.
- Select User Detail Page Layout.
- In the section of your choosing, add the Case Access Group Override field.
- Select Save.