About the Feature
Support for new Name Part fields was added in 21R2. Follow the configuration steps below to enable this feature within your Vault.
Add Name Part fields to Case Product Page Layouts
- In the Admin area, go to Configuration > Objects > Case Product.
- On the Page Layouts tab, select Case Product Detail Page Layout.
- In the Registration section, add the following fields:
- Container Name Part
- Device Name Part
- Form Name Part
- Invented Name Part
- Scientific Name Part
- Strength Name Part
- Trademark Name Part
- Intended Use Name
- Select Save.
- On the Page Layouts tab, repeat step 3 for any custom page layouts you have.
Update the Case Drug History Object
Add Name Part Fields to Case Drug History Page Layout
- Go to Configuration > Objects > Case Drug History.
- On the Page Layouts tab, select Case Drug History Detail Page Layout.
- Select Detail Form from Add Section.
- Complete the Add Detail Section form with the following fields:
- Section Label: Name Parts
- Section Name: name_parts__c
- Select Done.
- Add the following fields to the Name Parts section:
- Container Name Part
- Device Name Part
- Form Name Part
- Invented Name Part
- Scientific Name Part
- Strength Name Part
- Trademark Name Part
- Intended Use Name
- Select Save.
Add a Related Object Section to Case Drug History
- On the Case Drug History Detail Page Layout, select Related Object from the Add Section drop-down menu.
- Complete the Add Related Object Section form with the following details:
- Related Object: Case Drug History Substance
- Section Label: Case Drug History Substance
- Section Name: case_drug_history_substance__c
We recommend displaying the following columns for this section:
- Case
- Case Drug History
- Strength (Number)
- Strength (Unit)
- Substance Name
- TermID
- TermID Version
- Select Done.
- Select Save.
Update the Case Drug History Substance Lifecycle
Add Roles to Case Drug History Substance Lifecycle
- Go to Configuration > Object Lifecycle > Case Drug History Substance Lifecycle.
- In the Roles section, select
 .
. - Select
 to add the following roles:
- Data Entry
- Distribution Manager
- Head of Safety
- Intake
- Medical Coder
- Medical Reviewer
- Quality Controller (QC)
- Safety Operations
- Safety Writer
- Translator
- Select OK.
Permission Sets
Configure role permissions on the Case Drug History Substance Lifecycle by selecting Edit in the Roles section.
- Select the Read permission checkbox for all roles in all Case Drug History Substance lifecycle states.
- Select the Edit and Delete permission checkboxes for the Active state for the following roles:
- Data Entry
- Editor
- Head of Safety
- Medical Coder
- Medical Reviewer
- Owner
- Quality Controller (QC)
- Select the Edit and Delete permission checkboxes for the Inactive state for the following roles:
- Editor
- Owner
- Select Save.
Update the Case Drug History Substance Object
Enable Secure Relationship Option for Case Drug History Substance Fields
- In the Fields tab on the Case Drug History Substance object, select Case Drug History.
- Select the Secure relationship checkbox and Save.
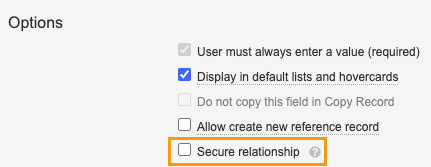
Secure Relationship Enablement on Case Drug History Substance - Go to the Fields tab, select Case, and repeat step 2.
Add Sharing Rules to Case Drug History Substance
- Go to the Details tab and select Edit.
- Select the Enable Matching Sharing Rules checkbox.
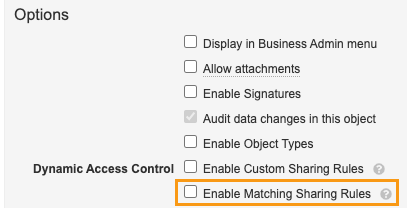
Enable Matching Sharing Rules on Case Drug History Substance - In the Sharing Rules tab, select Create.
- Complete the following fields using the image below for all the sharing rules displayed:
- Label: Enter the sharing rule label.
- Name: This field should populate automatically.
- Role: Select a role from the picklist.
- Under Rule Criteria, select the checkbox beside Organization (organization__v).
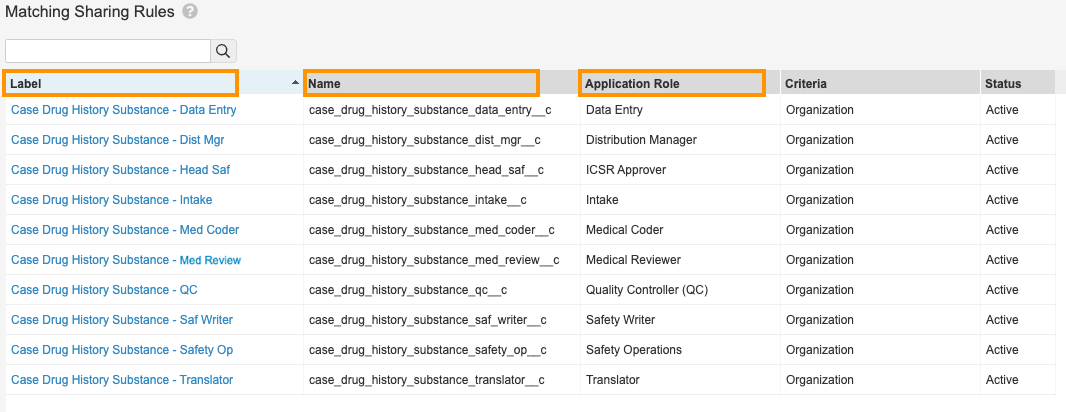
New Case Drug History Substance Sharing Rules 
Sharing Rules Rule Criteria for Case Drug History Substance
Update Entry Actions for Case Lifecycle States
Add the Change State to Locked Entry Action on Approved State
- Go to Configuration > Object Lifecycles > Case Lifecycle.
- Select the Approved state to open it.
- Select Edit from the Entry Actions section, then select Add Action.
- Complete the following fields:
- Select Change related object lifecycle state from the drop-down menu.
- Related Object: Case Drug History Substance
- Role: Select a role from the picklist.
- Change State To: Locked
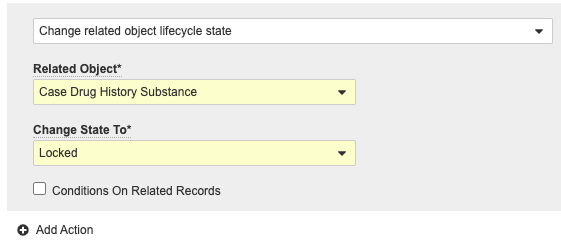
New Case Approved State Entry Action - Select Save.
Add the Change State to Closed Entry Action on Closed State
- Select the Closed state on the Case Lifecycle.
- Select Edit from the Entry Actions section, then select Add Action.
- Complete the following fields:
- Select Change related object lifecycle state from the drop-down menu.
- Related Object: Case Drug History Substance
- Change State To: Closed
- Select Save.
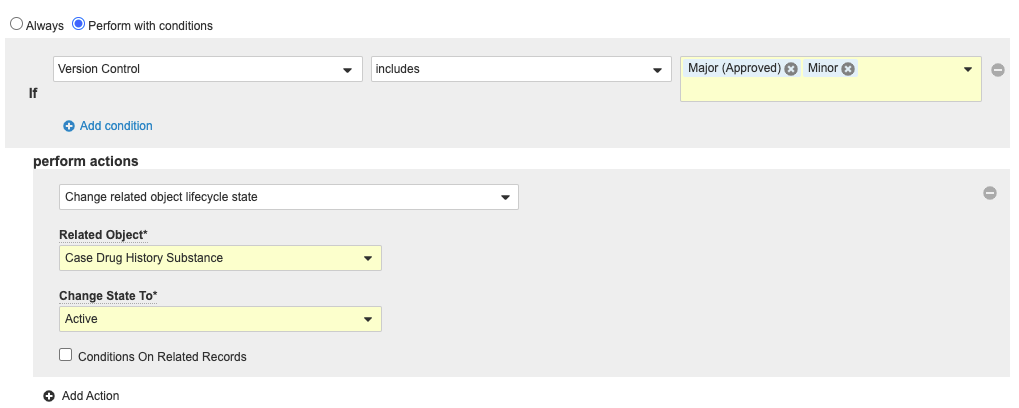
Add the Change State to Active Entry Action on Revision State
- Select the Revision state on the Case Lifecycle.
- Select Edit from the Entry Actions section, then select Create Entry Action at the bottom of the page.
- Select Perform with Conditions.
- Beside If, select Version Control in the first drop-down menu.
- Select Include in the second drop-down menu.
- Select Major (Approved) and Minor in the third drop-down menu.
- Under perform actions, complete the fields:
- Select Change related object lifecycle state from the drop-down menu.
- Related Object: Case Drug History Substance
- Change State To: Active
- Select Save.
Update Permission Sets for Case Drug History Substance Object
We recommend updating certain permission sets with the configurations below for this feature.
In the Admin area, go to Users & Groups > Permission Sets. Use the following table to update the permission sets for the Case Drug History Substance object.
| Permission Set | Object Permission | Object Field Permission | |
|---|---|---|---|
| Case Distribution Manager | Read | Read | |
| Case Entry Actions | Read, Create, Edit, Delete | Read Edit (on all standard fields excluding Case) |
|
| Case Intake Actions | Read | Read | |
| Case Review Actions | Read | Read | |
| Case Translation Actions | Read | Read | |
| Safety Operations Actions | Read | Read | |
| Safety Writer | Read | Read | |
| Submission Actions | Read | Read |
When necessary, update any applicable permission sets with Read, Create, Edit, and Delete permissions for the Case Drug History Substance object.