About the Feature
Support for Email Distributions was added in 20R3. Vaults created in 20R3 or later include this functionality by default, while vaults created in 20R2 or earlier must have the configuration upgrades described on this page to enable this feature.
Once you enable this feature, the following pages provide more information on how to set up and use Email Distributions:
Mandatory Configuration
The following configuration is required to enable email distributions.
Activate the Template Document Type
Go to Configuration > Document Types and make the Template (template__v) document type active.
Add the Email Profile Page Layout
- In Admin, go to Configuration > Objects > Transmission Profile.
- On the Page Layouts tab, open the Email Profile Detail Page Layout. If this layout does not exist, create a new layout with this name for the Transmission Profile object type.
- Update the Details section to match the following fields:
- Name
- Organization
- Origin
- Origin ID
- Destination
- Destination ID
- Format
- Cover Letter Template
- Sender User
- Message Subject
- Message Body
- Update the System section to match the following fields:
- Created By
- Created Date
- Modified By
- Modified Date
- Lifecycle State
- Status
- Add a Workflow Timeline section to the page.
- Add an Email Destination Related Object section with the following details:
- Related Object: Email Destination
- Section Label: Email Recipients
- Creation Option: Create record in pop-up dialog
- Columns:
- Name
- Destination Person
- Recipient Type > Recipient.Name
- Recipient.Email
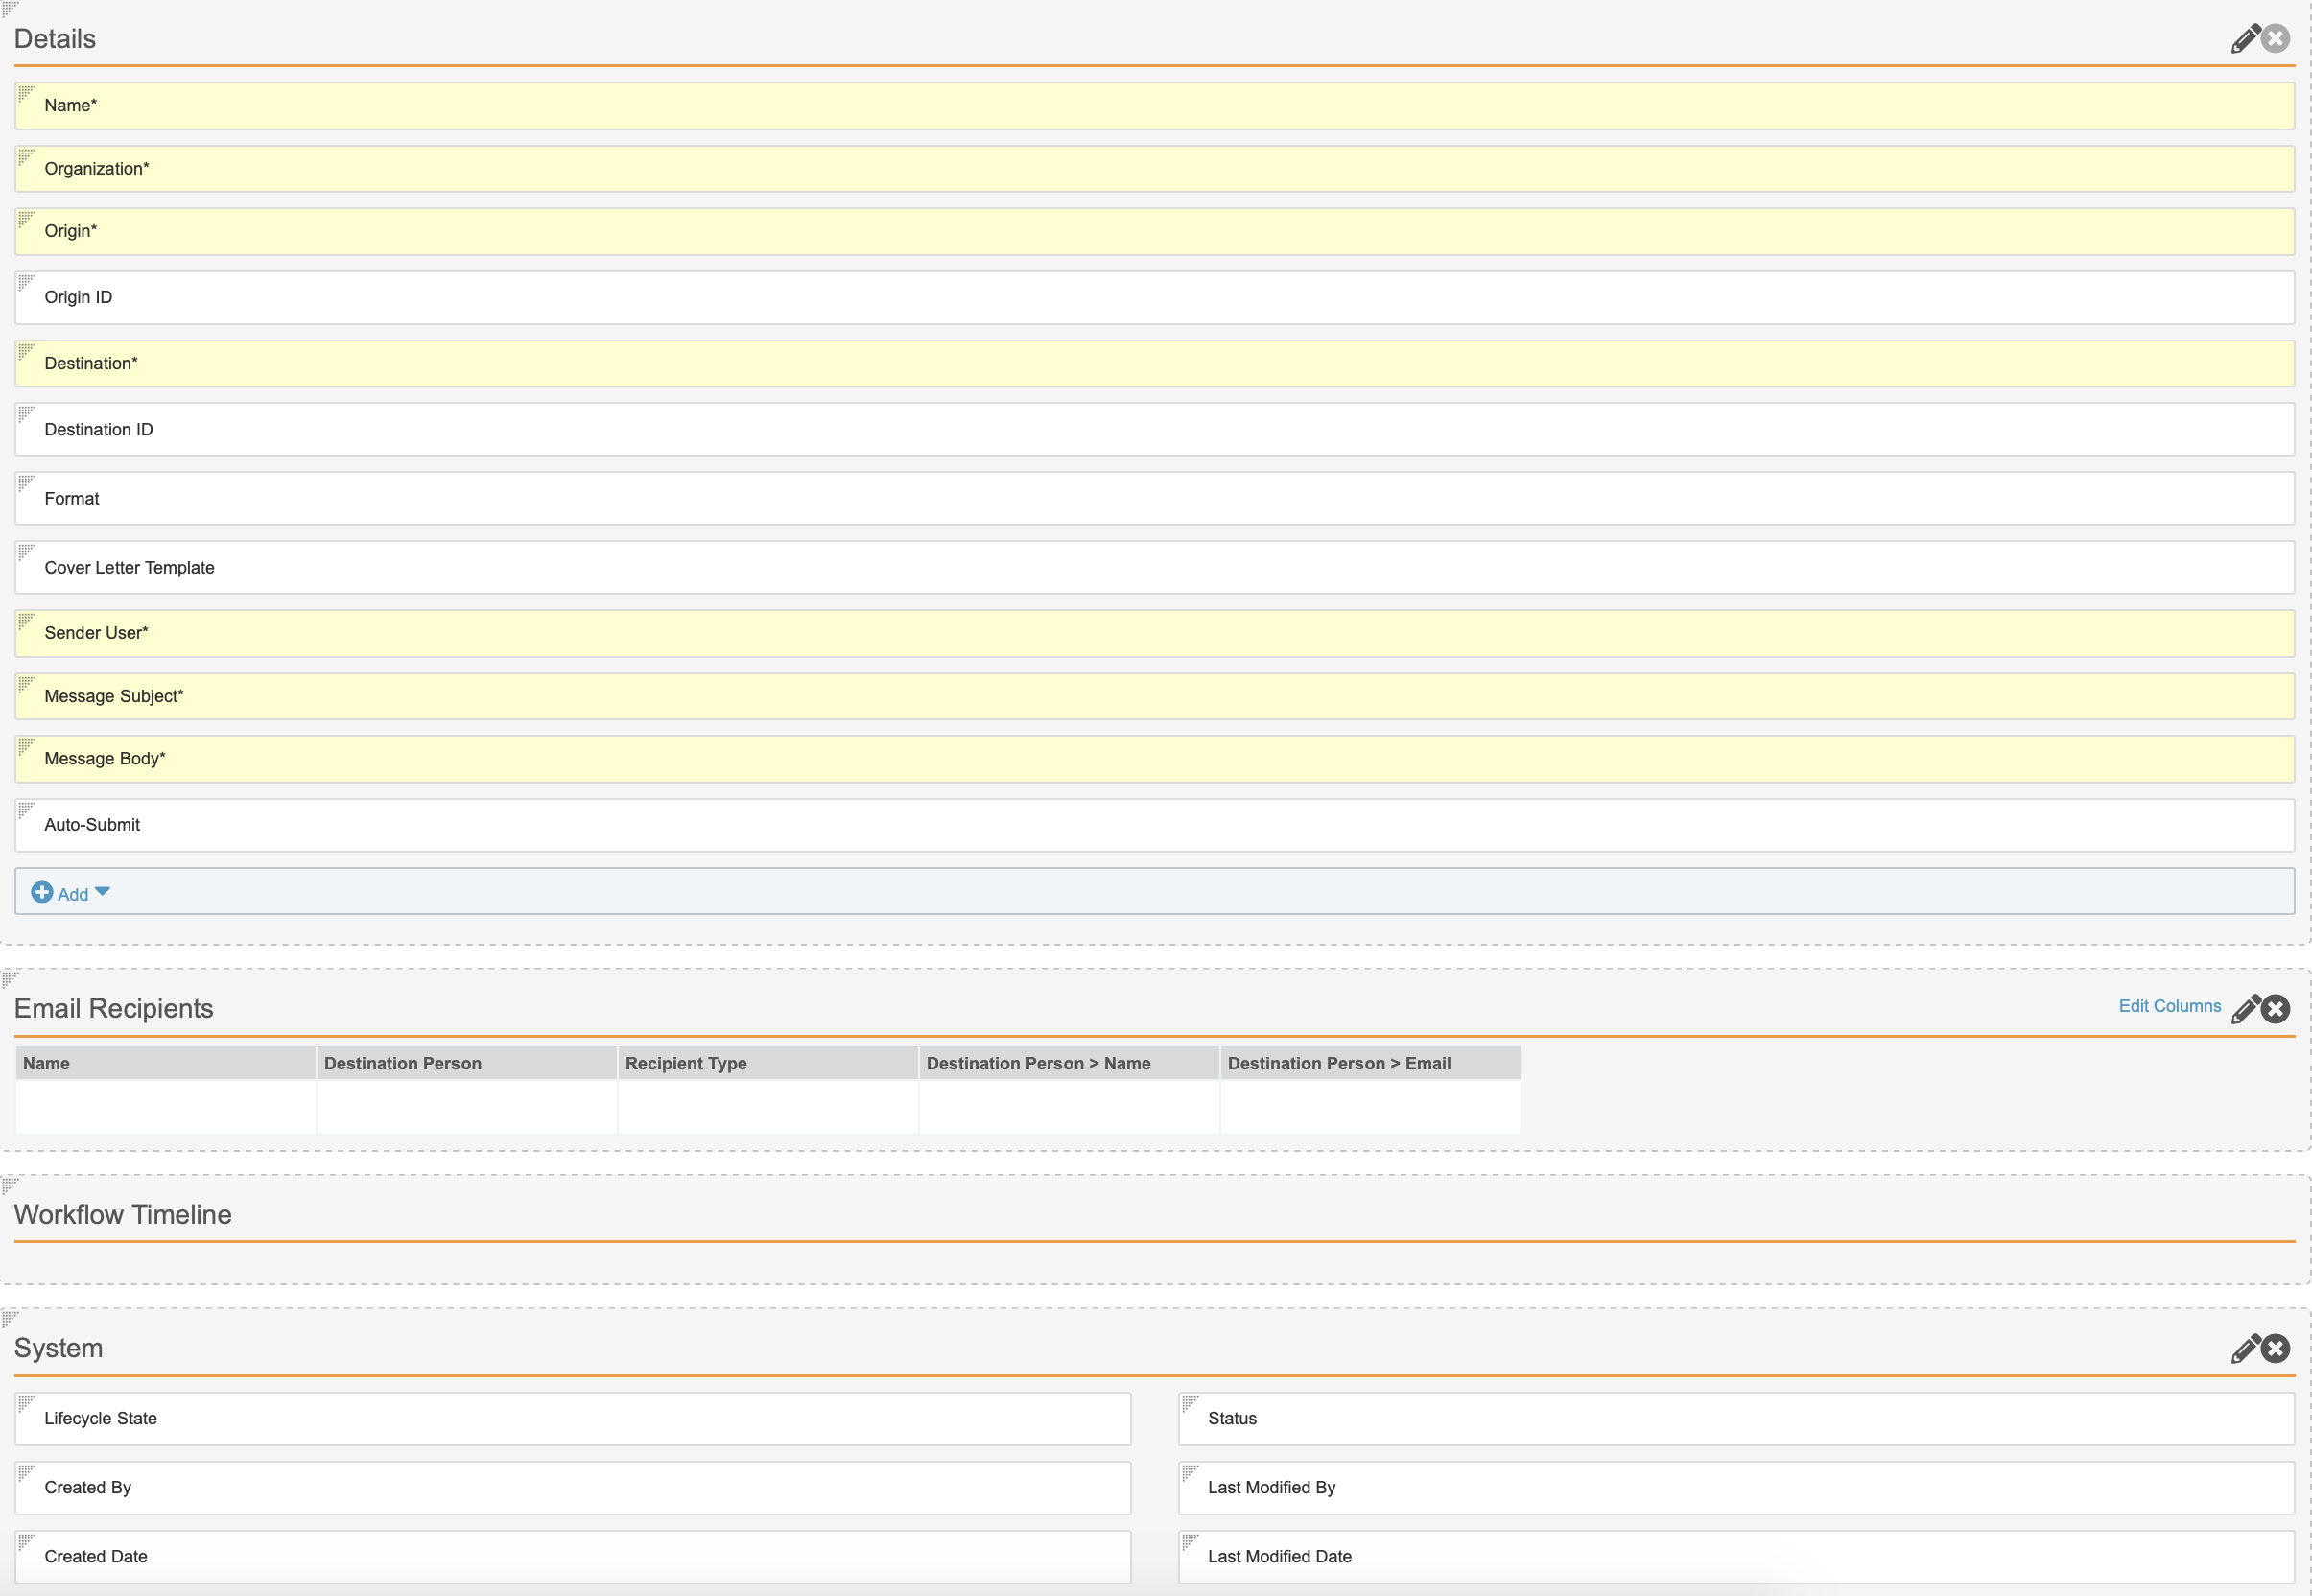
Result
The Email Profile Page Layout has been created. The page layout will match the following screenshot:
Update the Distribution Page Layout
- In Admin, go to Configuration > Objects > Transmission.
- On the Page Layouts tab, open the Distribution Detail Page Layout.
- In the Details section, add the following fields:
- Message Subject
- Message Body
- Edit the Transmission Message Related Object section with the following details:
- Related Object: Transmission Message
- Section Label: Transmission Messages
- Creation Option: Prevent record creation
- Filter Related List: Message Type - is not equal to - Email Event
- Add a Transmission Message Related Object section with the following details:
- Related Object: Transmission Message
- Section Label: Email Events
- Creation Option: Prevent record creation
- Columns:
- Name
- Recipient
- Event Type
- Event Time
- Filter Related List: Message Type - equals - Email Event
- Create a new Layout Rule on the Transmission Object with the following details:
- Label: Hide Email Information
- Hide the following Page Layout Items:
- Type: Fields
- Type: Section
Values: Message Body, Message Subject, Cover Letter, Cover Letter (Unbound)
Values: Email Events
- Enter the following expression for IF This layout expression is TRUE:
transmission_profile_type__cr.name__v != ‘Email Profile’
Update the Submission Page Layout
- In Admin, go to Configuration > Objects > Transmission.
- On the Page Layouts tab, open the Submission Detail Page Layout.
- In the Details section, add the following fields:
- Message Subject
- Message Body
- Edit the Transmission Message Related Object section with the following details:
- Related Object: Transmission Message
- Section Label: Transmission Messages
- Creation Option: Prevent record creation
- Filter Related List: Message Type - is not equal to - Email Event
- Add a Transmission Message Related Object section with the following details:
- Related Object: Transmission Message
- Section Label: Email Events
- Creation Option: Prevent record creation
- Columns:
- Name
- Recipient
- Event Type
- Event Time
- Filter Related List: Message Type - equals - Email Event
- Create a new Layout Rule on the Transmission Object with the following details:
- Label: Hide Email Information
- Hide the following Page Layout Items:
- Type: Fields
- Type: Section
Values: Message Body, Message Subject, Cover Letter, Cover Letter (Unbound)
Values: Email Events
- Enter the following expression for IF This layout expression is TRUE:
transmission_profile_type__cr.name__v != ‘Email Profile’
Add the Email Event Page Layout
- In Admin, go to Configuration > Objects > Transmission Message.
- On the Page Layouts tab, open the Email Event Detail Page Layout for the Object Type Email Event
- Update the Details section to match the following fields:
- Name
- Transmission
- Recipient
- Event Time
- Event Type
- Message ID
- Body
- Add a Workflow Timeline section to the page.
- Update the System section to match the following fields:
- Created By
- Created Date
- Organization
- Last Modified By
- Last Modified Date
- Lifecycle State
Add the Send Email Transmission Action to Submissions and Distributions
- In Admin, go to Configuration > Objects > Transmission.
- Open the Actions tab, and then select Create.
- In the Create Action window, select the Send Email Transmission action, and then select Continue.
- On the Create Action page that appears, select Save.
- Return to the Transmission object page, and open the Object Types tab.
- In the upper left corner beside the Action menu, select Actions.
- Expand the Action menu, and then select Edit Object Type Actions.
- Ensure that the Submission and Distribution object types have access to the action, and deselect all other object types.
Note Add any role-based execute overrides as necessary.
Add the Send Email Transmission User Action to the Transmission Lifecycle
- In Admin, go to Configuration > Object Lifecycles > Transmission Lifecycle Open the Ready State and add a new User Action.
- Select Perform with conditions.
- Select Transmission Profile Type> equals > Email Profile.
- Under Allow the following actions:
- Select Send Email Transmission
- Enter “Send Email Transmission” under Action Label
Note Add any role based execute overrides as necessary.
Modify the Submit to Gateway Entry Action on Transmission Lifecycle
- In Admin, go to Configuration > Object Lifecycles > Transmission Lifecycle Open the Ready for Submission state.
- Select Edit under Entry Actions.
- Modify the Rule for the action Submit to Gateway:
- Select Perform with conditions
- Select Submission Method > is not equal to > FDA Manual
- Select Add condition
- Select Transmission Profile Type > includes > AS2 Gateway, Partner Exchange Profile, and System Gateway
- Under Perform actions, select Submit to Gateway.
Add Ready to the Pending Group for Transmissions
- In Admin, go to Configuration > Object Lifecycle Stage Groups > Distribution Stages > Pending.
- Select Add.
- Select
 next to the Ready state.
 - Select OK.
- In Admin, go to Configuration > Object Lifecycle Stage Groups > Submission Stages > Pending.
- Select Add.
- Select next to the Ready state.
- Select OK.
Permission Sets
Manage permission sets from Configuration > Users & Groups > Permission Sets.
Add Read Access to Objects in Permission Sets
Configure Read permissions for the objects and object types for permission sets using the table below:
| Permission Set | Email Destination | Person > Email Person | Transmission Profile (All) | Transmission Message > Email Event |
|---|---|---|---|---|
| Case Distribution Actions | ||||
| Case Entry Actions | ||||
| Case Review Actions | ||||
| Safety Operations Actions | ||||
| Submission Actions |
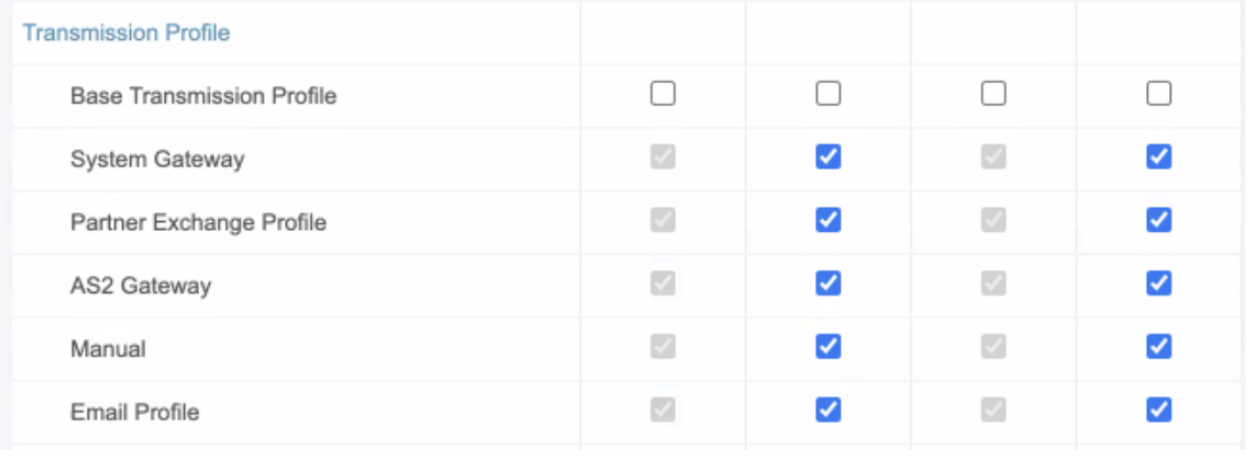
Add Access to Transmission Profile in Administration Actions
Configure permissions for the Administration Actions permission set to match the following image:
Optional Configuration
Auto-submissions
You can use auto-submissions with email distributions. You must first enable auto-submissions.
Security and Workflows
Ensure that the appropriate user roles are granted permissions on the new types of transmission messages and transmission profiles.
Groups for Document Creation
We recommend that you add a new User Managed Group for users who should be able to create new templates. You may choose to include certain security profiles such as Vault Owner, System Administrator, etc. You may then modify which groups have Create Document Permission on each doctype in the Security Tab of the Edit Doctype Details Box.