About Inbox Items
This page provides instructions for vaults originally deployed before the 21R2 release (August 2021) to update your vault configuration to use Inbox Items. The steps required to enable this application depend on the Vault Safety template version your vault was deployed from.
Vaults deployed from version 20R3 (December 2020) or later have some configuration already. Follow the appropriate steps to enable this feature, depending on your vault:
In addition to the basic configuration on this page, some Inbox Item template configurations were released to improve usability. We recommend following the instructions in this section:
Once you have completed the configuration steps on this page and enabled Inbox Items, follow the instructions outlined in Next Steps for additional Inbox Item configurations.
Configuration Checks for All Vaults
Verify that your vault has the basic Inbox Item configurations described in the following sections:
Navigation Tabs for Inbox Items
Update the primary navigation bar in your vault to add the new Inbox tab.
Rename the AER Inbox Tab
In the Admin area, go to Configuration > Tabs.
- Open the Inbox tab with the name "inbox_aer__c".
- Change the Label to "AER Inbox".
- Save the page.
Add an Inbox Item Tab
Your vault may already have an Inbox Item tab in the inactive state.
- Go to Configuration > Tabs.
- Perform one of the following actions, as appropriate:
- If there is an Inbox tab with the name inbox_item__c:
- Open the Inbox tab.
- Change the Status to Active.
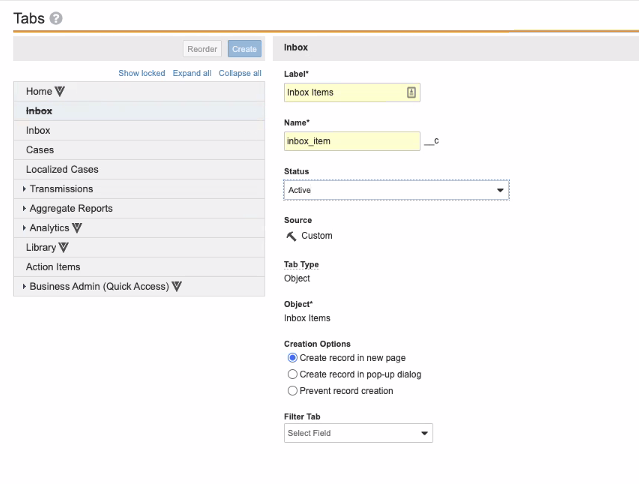
- If an Inbox tab with the name inbox_item__c does not exist, create a tab with the following settings:
- Label: Inbox
- Name: inbox_item__c
- Tab Type: Object
- Object: Inbox Item
- Creation Options: Create record in new page
- If there is an Inbox tab with the name inbox_item__c:
(Optional) Deactivate AER Creation for Manual Intake
If your organization will no longer use AERs to manually intake new cases, you can deactivate the AER Create button.
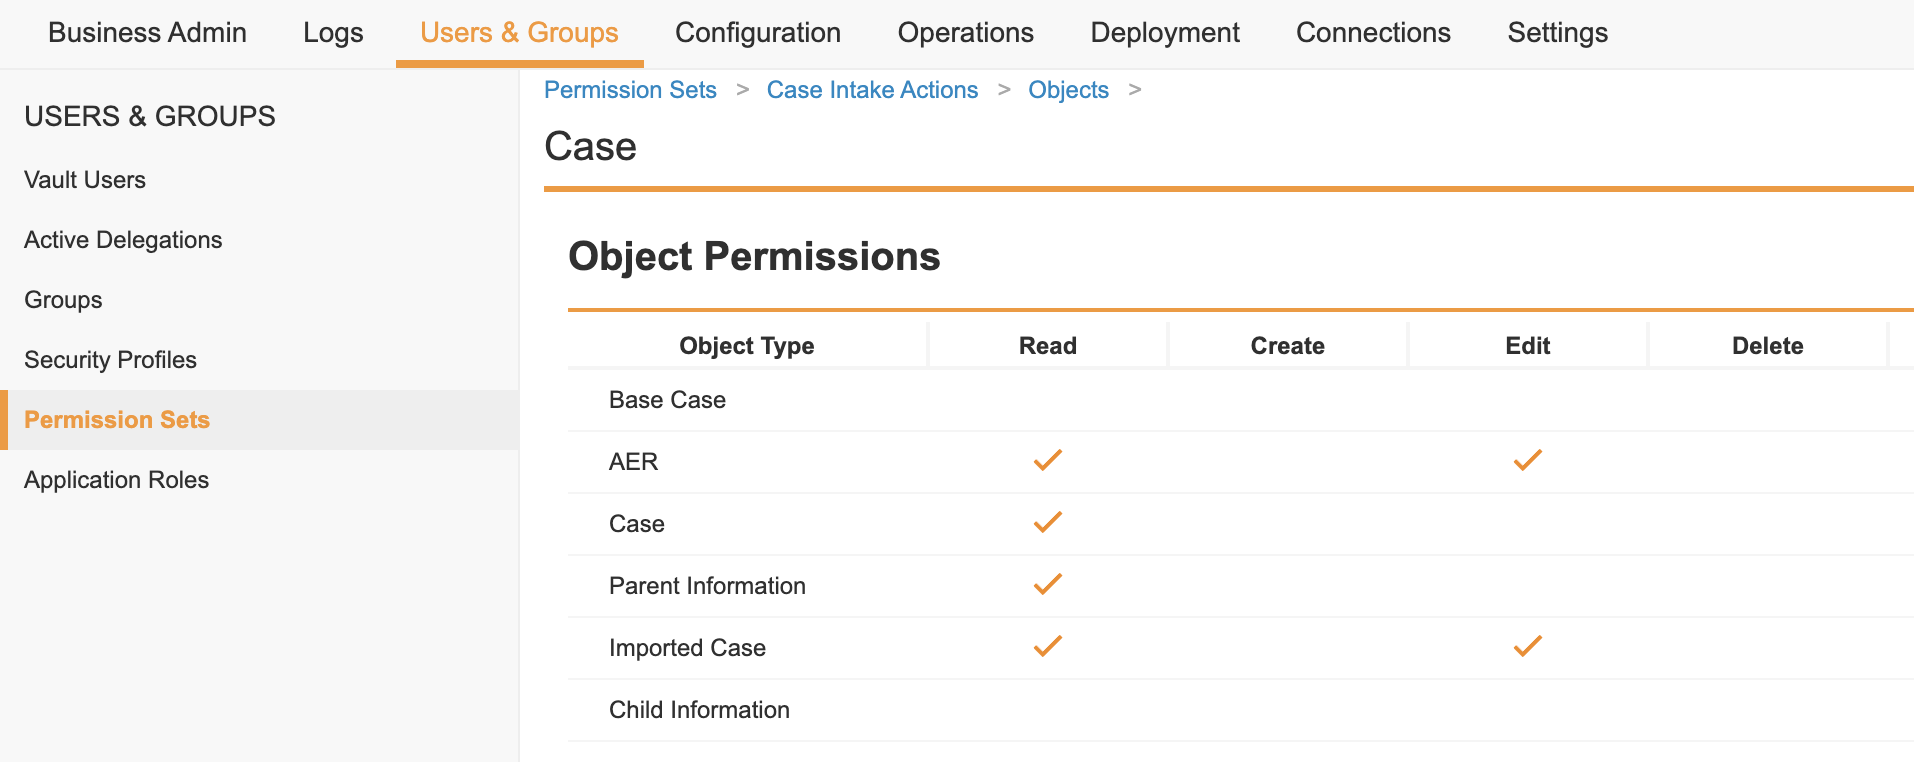
- Go to Users & Groups > Permission Sets > Case Intake Actions, go to the Object tab.
- Select the Case Object Permission.
- Deselect the permission to Create the AER object type.
- Save the page.
Inbox Item Page Layout
Go to Configuration > Objects > Inbox Item > Page Layouts, and then open the Inbox Item Detail Page Layout.
Ensure the Inbox Item Detail Page Layout matches the settings and order described in the following table:
| Section | Settings | Fields/Columns |
|---|---|---|
| Case Validity and Source |
|
|
| Organization and Region |
|
|
| Inbox Status |
|
|
| Details |
|
|
| Case Contacts |
|
|
| Patient |
|
|
| Products |
|
|
| Medical Events |
|
|
| Documents |
|
|
| Inbound Transmissions |
|
|
| System |
|
|
| Workflow Timeline | Default Settings | |
| For Internal Use Only (Do NOT Remove) | Default Settings |
Vaults Deployed in 20R3 or 21R1
The following sections describe how to configure vaults deployed in 20R3 or 21R1 to make Inbox Items available.
Permission Sets
On the Users & Groups > Permission Sets page, configure the following Object Permissions:
- Enable the permission to Read the Inbox Item object for the following permission sets:
- Case Entry Actions
- Case Review Actions
- Enable the permission to Read, Create, Edit, and Delete the Inbox Item object on the following permission set:
- Case Intake Actions
- On the Case Intake Actions permission set, enable the permission to Edit the New Info Date field in the Inbox Item object.
Add Sharing Rules to the Inbox Item Object Lifecycle
- Go to Configuration > Objects > Inbox Item.
- Select Edit from the Details tab.
- Select Enable Matching Sharing Rules.
- Select Create from the Sharing Rules tab.
- Create the following sharing rules:
Label Name Role Rule Criteria Inbox Item - Data Entry inbox_item__c Data Entry Organization Inbox Item - Intake inbox_item_intake__c Intake Organization Inbox Item - Head of Safety inbox_head_of_safety__c ICSR Approver Organization Inbox Item - Medical Reviewer inbox_item_medical_reviewer__c Medical Reviewer Organization Inbox Item - Safety Operations inbox_item_safety_operations__c Safety Operations Organization - Select Save.
Vaults Deployed in 20R2 or Earlier
The following sections describe how to configure vaults deployed in 20R2 or earlier to make Inbox Items available.
Configure the Inbox Item Object
In the Admin area, go to Configuration > Objects > Inbox Item. You must update the Inbox Item Page Layout, add layout rules, add VQL constraints to the Organization field, and add sharing rules to the Inbox Item Object Lifecycle.
Add Page Layout Rules
Add the following layout rules to the Inbox Item Detail Page Layout:
| Rule Label | HIDE THE FOLLOWING PAGE LAYOUT ITEMS | IF THIS LAYOUT RULE EXPRESSION IS TRUE |
|---|---|---|
| Hide Case Validity (Manual Creation) |
|
isBlank(global_id__sys) |
Add Organization VQL Criteria
- In Configuration > Objects > Inbox Item, open the Fields tab.
- Open the Organization field.
- Select Edit.
- In the Criteria VQL field, enter the following:
object_type__vr.name__v = 'Sponsor'
Add Sharing Rules to the Inbox Item Object Lifecycle
- Open the Details tab and select Edit.
- Select Enable Matching Sharing Rules.
- Select Create from the Sharing Rules tab.
- Create the following sharing rules:
Label Name Role Rule Criteria Inbox Item - Data Entry inbox_item__c Data Entry Organization Inbox Item - Intake inbox_item_intake__c Intake Organization Inbox Item - Head of Safety inbox_head_of_safety__c ICSR Approver Organization Inbox Item - Medical Reviewer inbox_item_medical_reviewer__c Medical Reviewer Organization Inbox Item - Safety Operations inbox_item_safety_operations__c Safety Operations Organization - Select Save.
Add Inbox Item User Actions
- Go to Configuration > Object Lifecycles.
- Open the Inbox Item Lifecycle.
- Add the following User Action rules to the Missing Information state:
- Start Verification:
- Rule Option: Always
- Action: Change State to
- State: Verification
- Action Label: Start Verification
- Reject:
- Rule Option: Always
- Action: Change State to
- State: Rejected
- Action Label: Reject
- Start Verification:
- Add the following User Action rules to the New state:
- Awaiting more information:
- Rule Option: Always
- Action: Change State to
- State: Missing Information
- Action Label: Awaiting more information
- Reject:
- Rule Option: Always
- Action: Change State to
- State: Rejected
- Action Label: Reject
- Create Case: Configure two conditional user actions as shown in the following images:
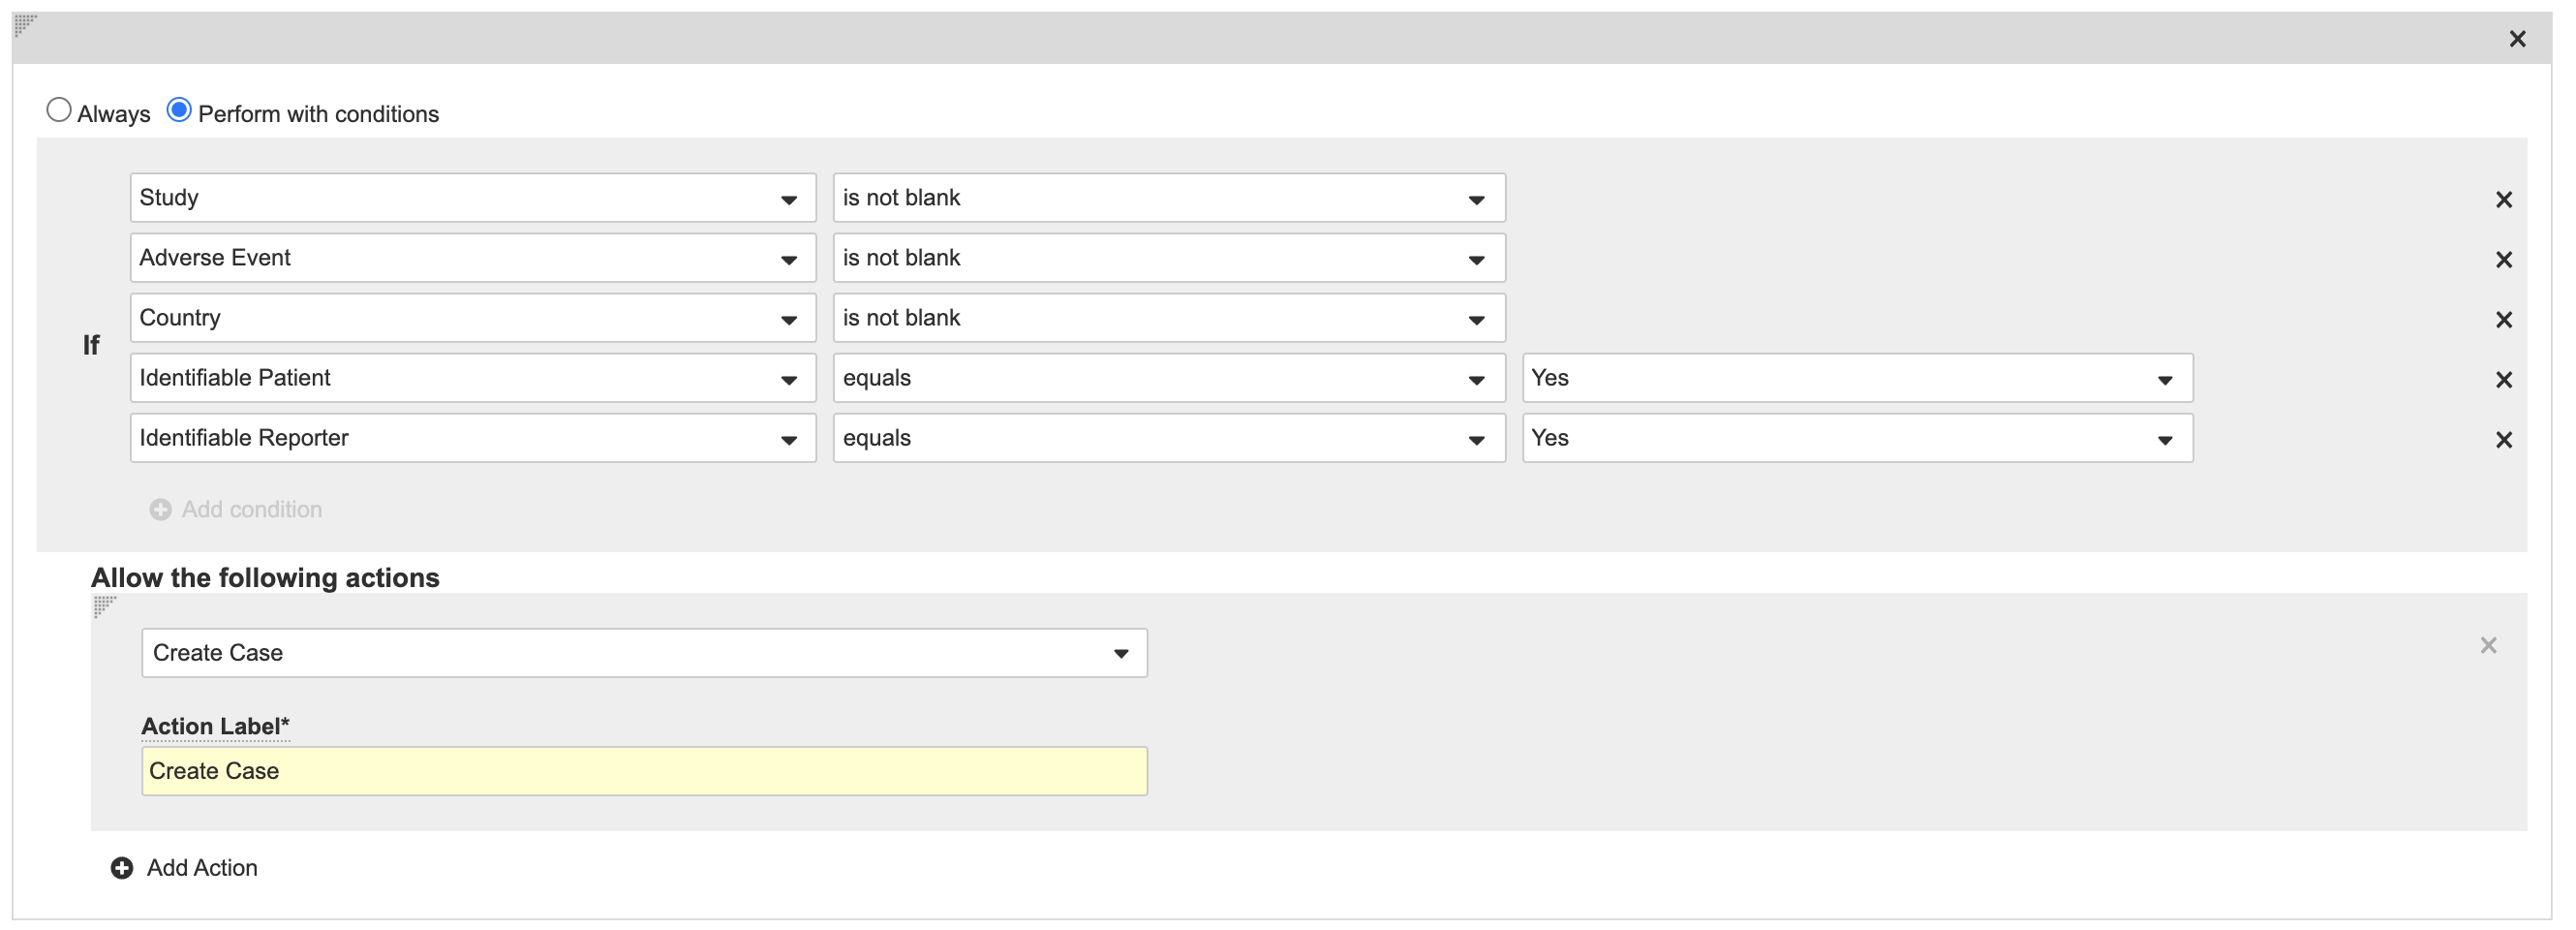
Create Case User Action (1) 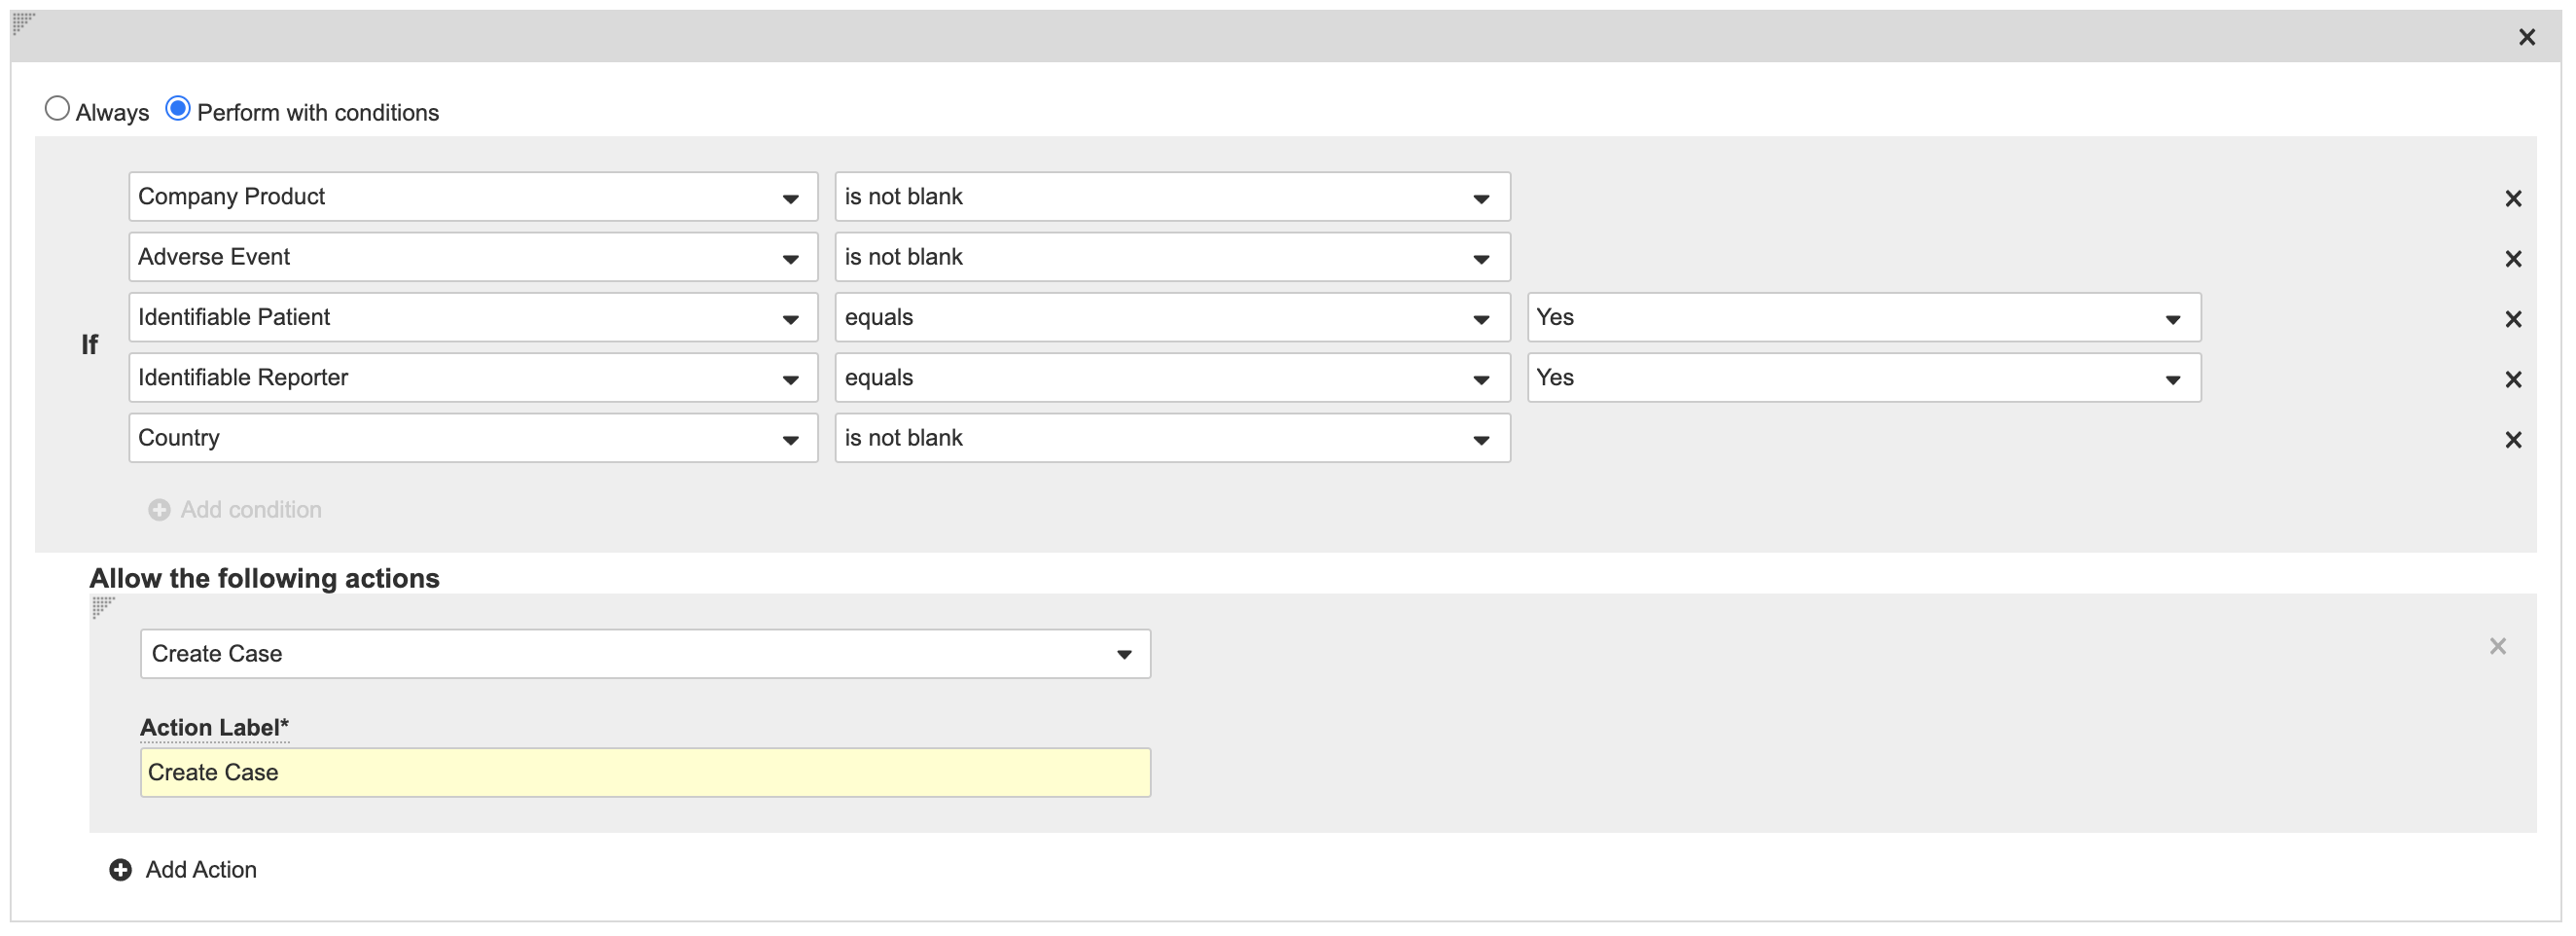
Create Case User Action (2)
- Awaiting more information:
- Add the following User Action rules to the Verification state:
- Awaiting more information:
- Rule Option: Always
- Action: Change State to
- State: Missing Information
- Action Label: Awaiting more information
- Reject:
- Rule Option: Always
- Action: Change State to
- State: Rejected
- Action Label: Reject
- Promote to case: Configure two conditional user actions as shown in the following images:
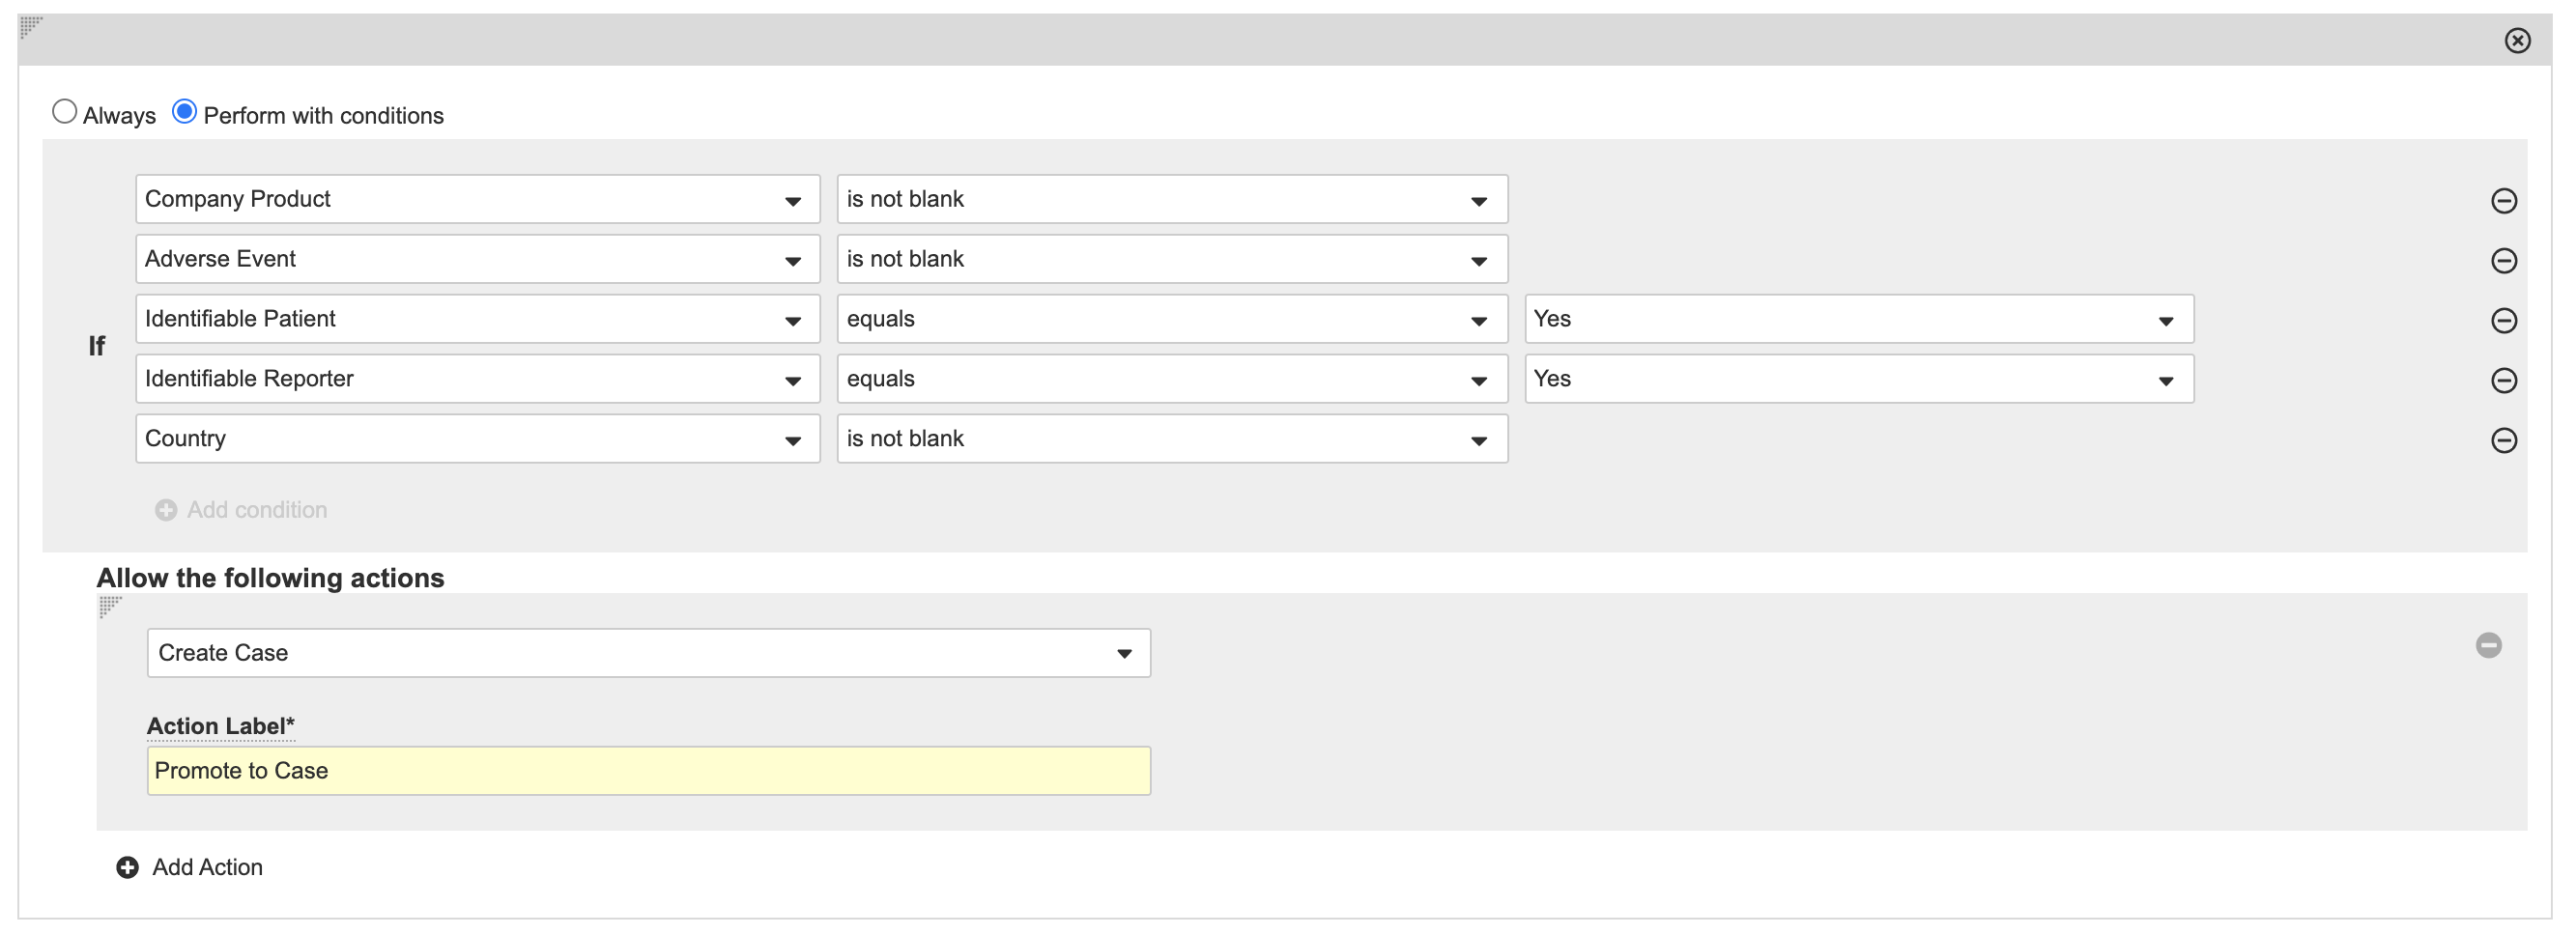
Promote to Case User Action (1) 
Promote to Case User Action (2)
- Awaiting more information:
Permission Sets
On the Users & Groups > Permission Sets page, configure the following Object Permissions:
- Enable the permission to Read the Inbox Item object for the following permission sets:
- Case Entry Actions
- Case Review Actions
- Enable the permission to Read, Create, Edit, and Delete the Inbox Item object on the following permission set:
- Case Intake Actions
- On the Case Intake Actions permission set, enable the permission to Edit the New Info Date field in the Inbox Item object.
Template Revision Configurations to Improve Usability
With every release, we recommend a set of vault configuration changes to improve general usability. These are known as template revisions.
In addition to the configuration described on this page, the following template configuration updates are recommended for all vaults deployed before the respective release to improve Inbox Item usability. For example, vaults deployed after 22R1 will have the Create New Inbox Item Field and User Action configuration by default.
(22R1) Create a New Inbox Item Field and User Action
The Promote to Case action is displayed twice for some cases that include a Study Case with a non-study Company Product or a Study with Unspecified Products.
Create a new Inbox Item field and update user actions for the Inbox Item lifecycle.
Update the Inbox Item Object With the Identifiable Company Product Field
In the Admin area > Configuration > Objects > Inbox Item, follow the instructions below to create the Identifiable Company Product field and add it to the Inbox Item page layout:
- In the Inbox Item object, go to the Fields tab.
- Create the Identifiable Company Product field with the following information:
- Step 1: Formula
- Step 2:
- Label: Identifiable Company Product
- Name:
identifiable_company_product__c
- Step 3:
- Status: Active
- Return Type: Yes/No
- Help Content: Is the suspect company product identified in the Details (Study) or in the Products section?
- Step 4: Set Formula Expression to
Or(
not(isBlank(company_product__vr.name__v)),
And(study__vr.study_has_unspecified_products__v != true,
not(isBlank(study__vr.name__v)))
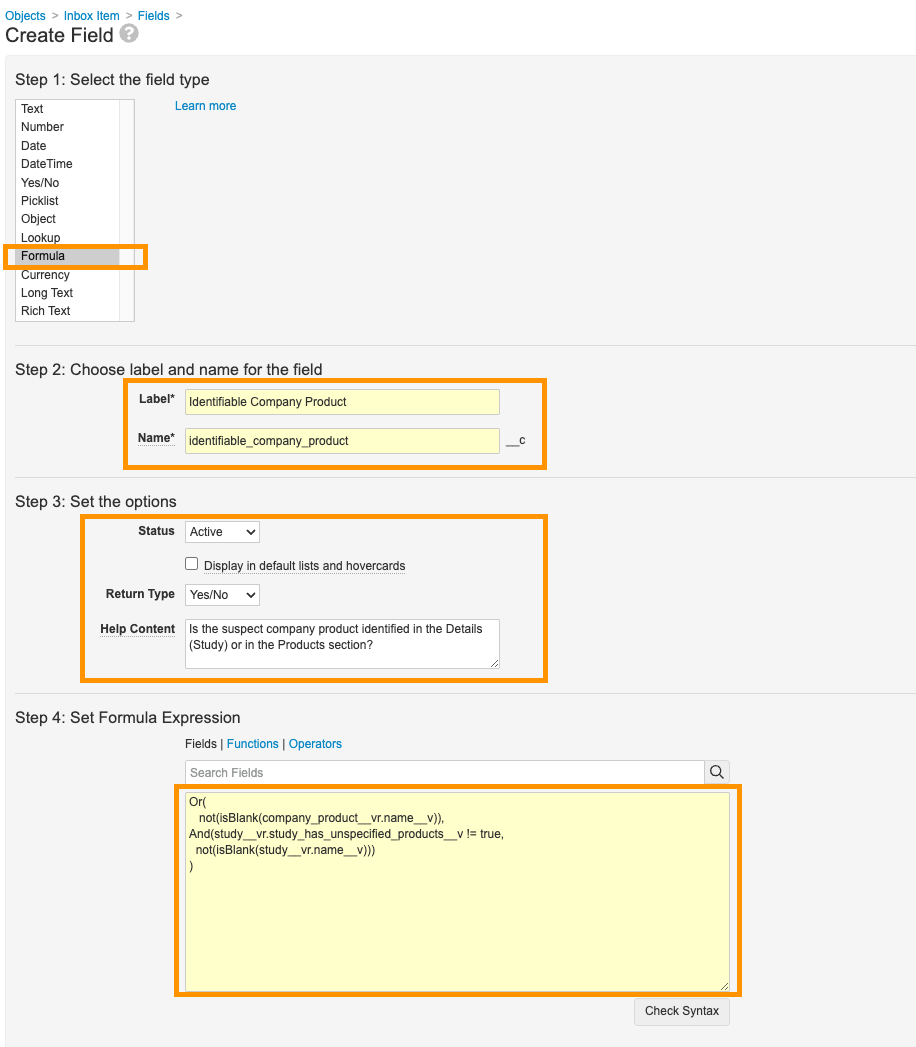
Create Identifiable Company Product
- Save the page.
- Go to the Page Layouts tab and select Inbox Item Detail Page Layout.
- Add the Identifiable Company Product field to the Case Validity and Source section.
Update the Promote to Case User Action for the Inbox Item Lifecycle
In Configuration > Object Lifecycles > Inbox Item Lifecycle, configure a new Promote to Case user action with conditions for the New state:
- In the Inbox Item Lifecycle, go to the New state.
- In the User Actions section, delete both the Promote to Case user actions.
- Select Create Rule.
- Complete the information using the following image:
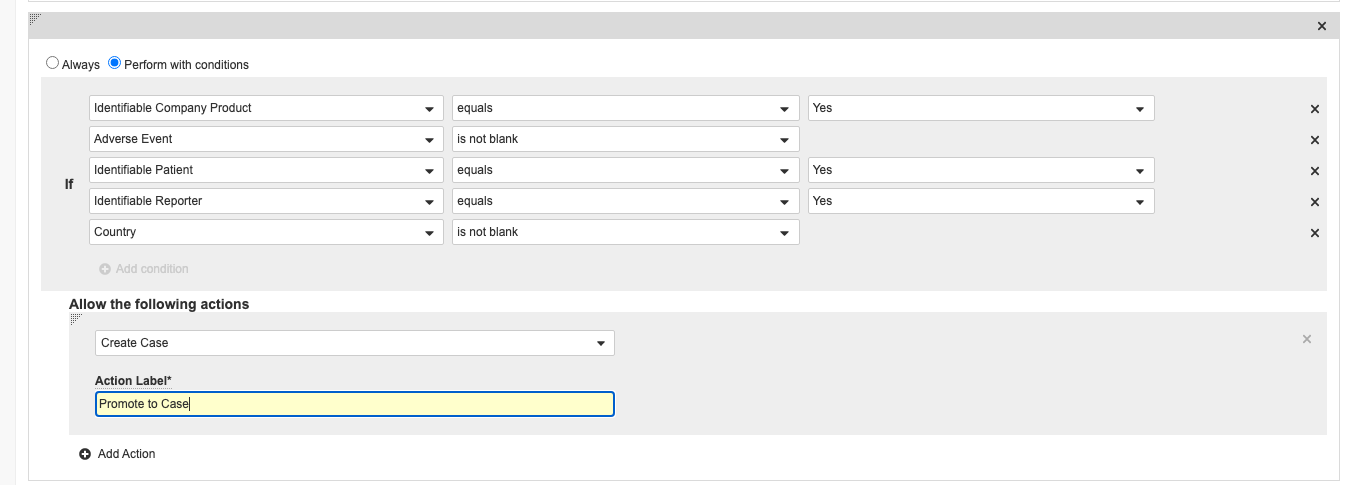
New Promote to Case User Action
(22R1) Update the Inbox Item Study Field
Perform the following configuration to show only studies with arms in the Study dropdown field in the Inbox Item grid view:
- In the Admin area, go to Configuration > Objects > Inbox Item.
- Go to the Fields tab and select Study.
- Edit the Criteria VQL field to match the following:
organization__v = {{this.organization__v}} - Save the page.
(21R1) Grant Delete Permissions for Intake Role
Add permissions to allow intake users to delete Inbox Items. This change allows Intake users to delete sections/records (for example, Product) on Inbox Items in the Verification state.
Note Inbox Item records cannot be deleted, even with these permissions.
Update Case Intake Actions Permission Set
- Go to Users & Groups > Permission Sets.
- Open the Case Intake Actions permission set.
- Open the Objects tab.
- Select Edit.
- Beside Inbox Item, select the Delete checkbox.
- Select Save.
Update Inbox Item Lifecycle Security
- Go to Configuration > Object Lifecycles.
- Open the Inbox Item Lifecycle.
- Under Roles, expand Intake.
- Select Edit.
- Beside Verification, select the Delete checkbox.
- Select Save.
Next Steps
Vaults created in 20R3 or earlier require additional configuration to access more Inbox Item capabilities.
Follow the instructions outlined in these articles to enable: