About the Feature
Support for PADER tabulations was first added in 19R3. Further enhancements were added in 21R1, 22R3, and 23R1. This page provides instructions to upgrade your vault’s configuration to make PADER reports available to users.
Once you enable this feature, Create PADER Aggregate Reports describes how to create and generate PADER reports and tabulations.
Add a PADER Navigation Tab
Vaults originally deployed from the 20R2 or later release template will have an inactive PADER navigation tab already. For vaults deployed in an earlier release, you must add the PADER tab.
Activate the PADER Tab (For Vaults Deployed in 20R2 or Later)
The PADER navigation tab is included by default in the Vault Safety 20R2 template in the Inactive state. You must make this tab active for users to access it.
In Admin, go to Configuration > User Interface > Tabs, and then under Aggregate Reports, change the Status of the PADER sub-tab to Active.
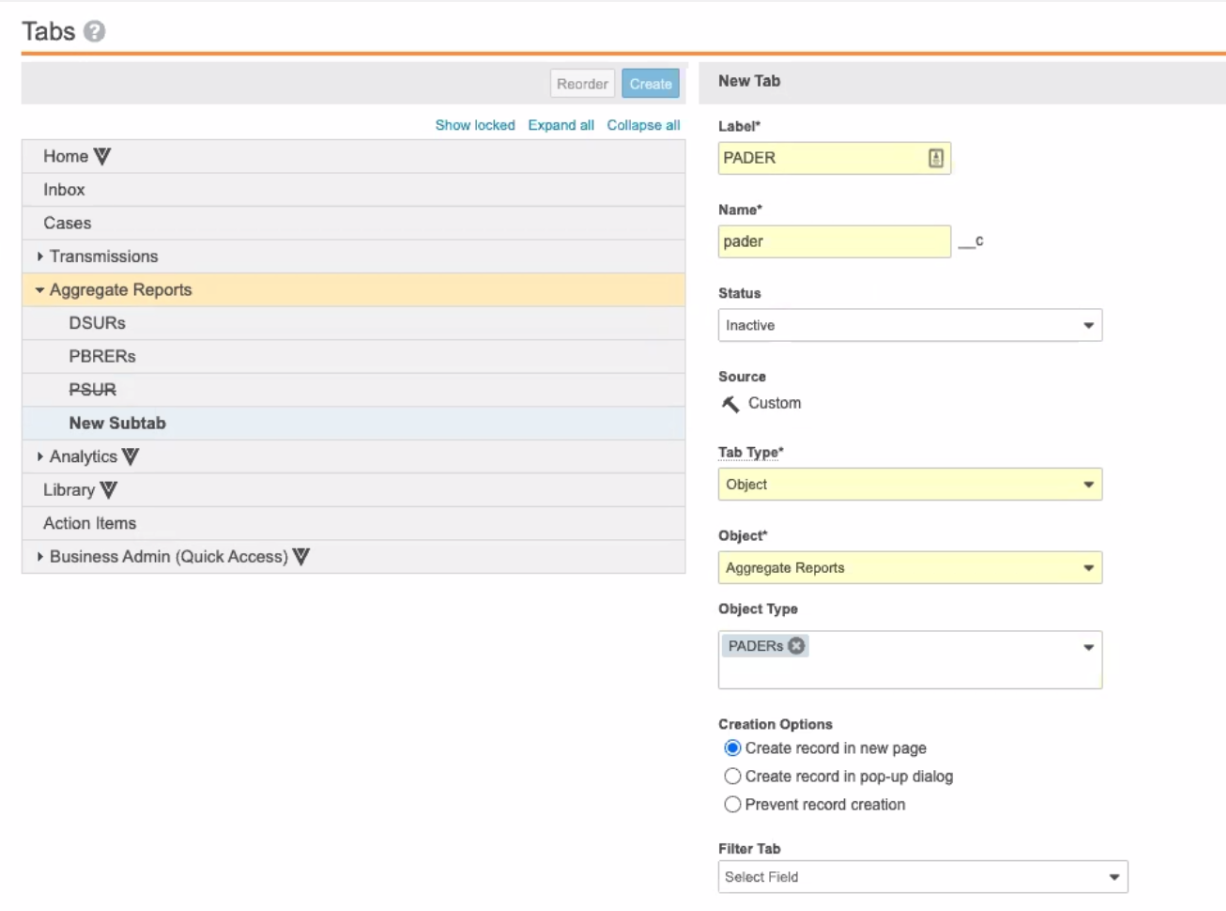
Add a New PADER Tab (For Vaults Deployed in 20R1 or Earlier)
To enable PADER in a vault originally deployed in 20R1 or earlier, an administrator must add a navigation tab for PADER.
In Admin, go to Configuration > Vault Navigation > Tabs, and add a PADER sub-tab under Aggregate Reports:
Update User Permissions to Access PADER
An administrator must update permission sets for users who need access to view and create PADER reports. Vaults originally deployed after 20R2 may have these permissions already.
The permission sets that you need to update depend on your vault’s configuration, but typically you would grant the Safety Writer and Administration Actions permission sets the following access:
- Add access to the PADER navigation tab for each relevant permission set.
- Add access to the PADER object type for each relevant permission set.
New in 23R1: Updated PADER and Appendices Templates
In Vault Safety 23R1, PADER templates have been updated for the following report tabulations:
- 15 Day and Non-15 Day Summary Reports
- Summary of ADR from Postmarketing Sources
- Interval Line Listings
- Appendix: Non-Primary Suspect Product Report
Support Enablement
Before completing the configuration steps described on this page, contact Veeva Support to enable this feature in your Vault.
In Vaults originally deployed before 23R1, add the new columns supported by these templates as follows:
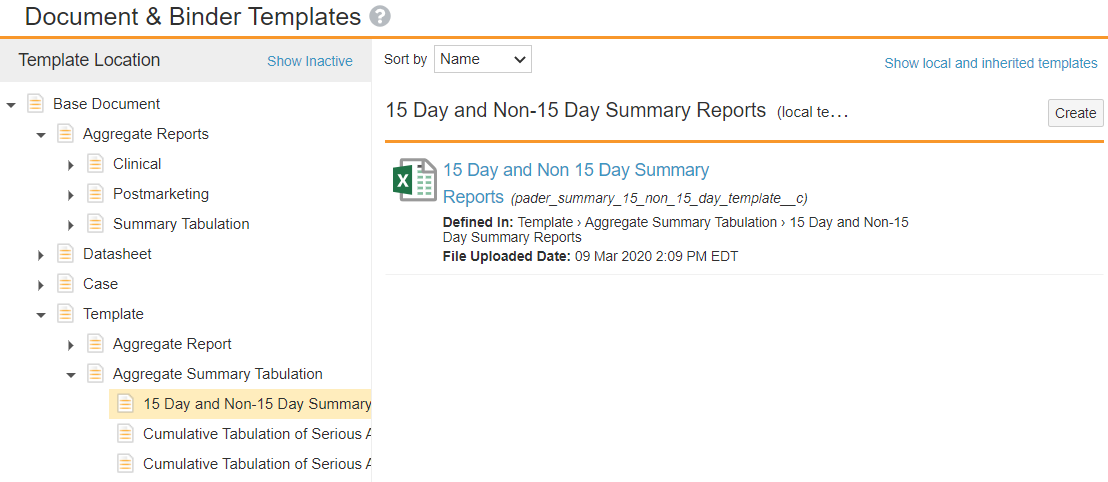
Replace PADER 15 Day and Non-15 Day Reports Template
- Go to Business Admin > Templates > Documents & Binders > Template > Aggregate Summary Tabulation.
- Select 15 Day and Non-15 Day Summary Reports.
- Select the 15 Day and Non 15 Day Summary Reports template.
- On the details page, select Edit.
- Under More Information, select Upload File and upload the following updated template file:
15 Day and Non 15 Day Summary Reports - Select Save.
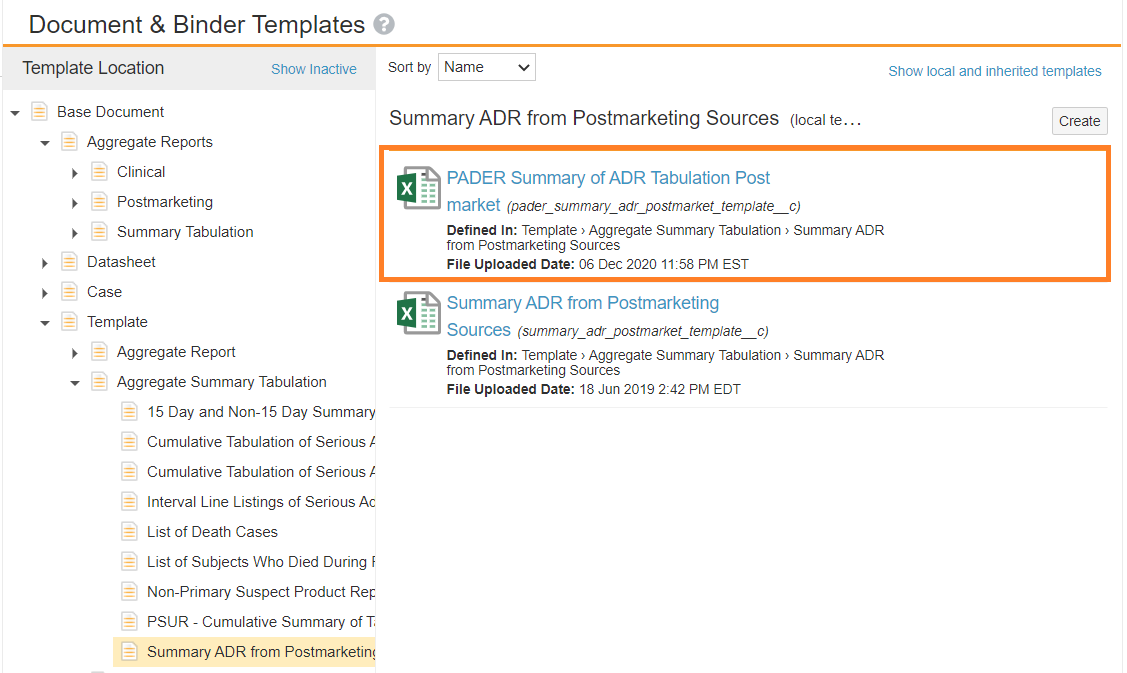
Replace PADER Summary Tabulation of ADRs from Postmarket Template
- Go to Business Admin > Documents & Binders > Template > Aggregate Summary Tabulation.
- Select Summary ADR from Postmarketing Sources.
- Select the PADER Summary of ADR Tabulation Post market template.
- On the details page, select Edit.
- Under More Information, select Upload File and upload the following updated template file:
PADER Summary of ADR Tabulation Post market - Select Save.
Replace PADER Interval Line Listings Template
- Go to Business Admin > Documents & Binders > Template > Aggregate Summary Tabulation.
- Select Interval Line Listings of Serious Adverse Reactions.
- Select the PADER Interval Line Listings Template.
- On the details page, select Edit.
- Under More Information, select Upload File and upload the following updated template file:
PADER Interval Line Listings Template - Select Save.
Replace Appendix: Non-Primary Suspect Product Report Template
- Go to Business Admin > Documents & Binders > Template > Aggregate Summary Tabulation.
- Select Non-Primary Suspect Product Report.
- Select the Non-Primary Suspect Product Report template.
- On the details page, select Edit.
- Under More Information, select Upload File and upload the following updated template file:
Non-Primary Suspect Product Report - Select Save.
New in 21R1: Update Completed State Entry Action for Transmission Lifecycle
Starting in 21R1, for PADER reports to run properly, Transmissions must have a Transmission Date. Add the following Entry Action to ensure the Transmission Date is always populated.
- Go to Admin > Configuration.
- Go to Object Lifecycles > Transmission Lifecycle, and then open the Completed state.
- In the Completed state, add the following Entry Action:
If Transmission Date is blank
Update Record Field
Fields: Transmission Date
Set to value:Now()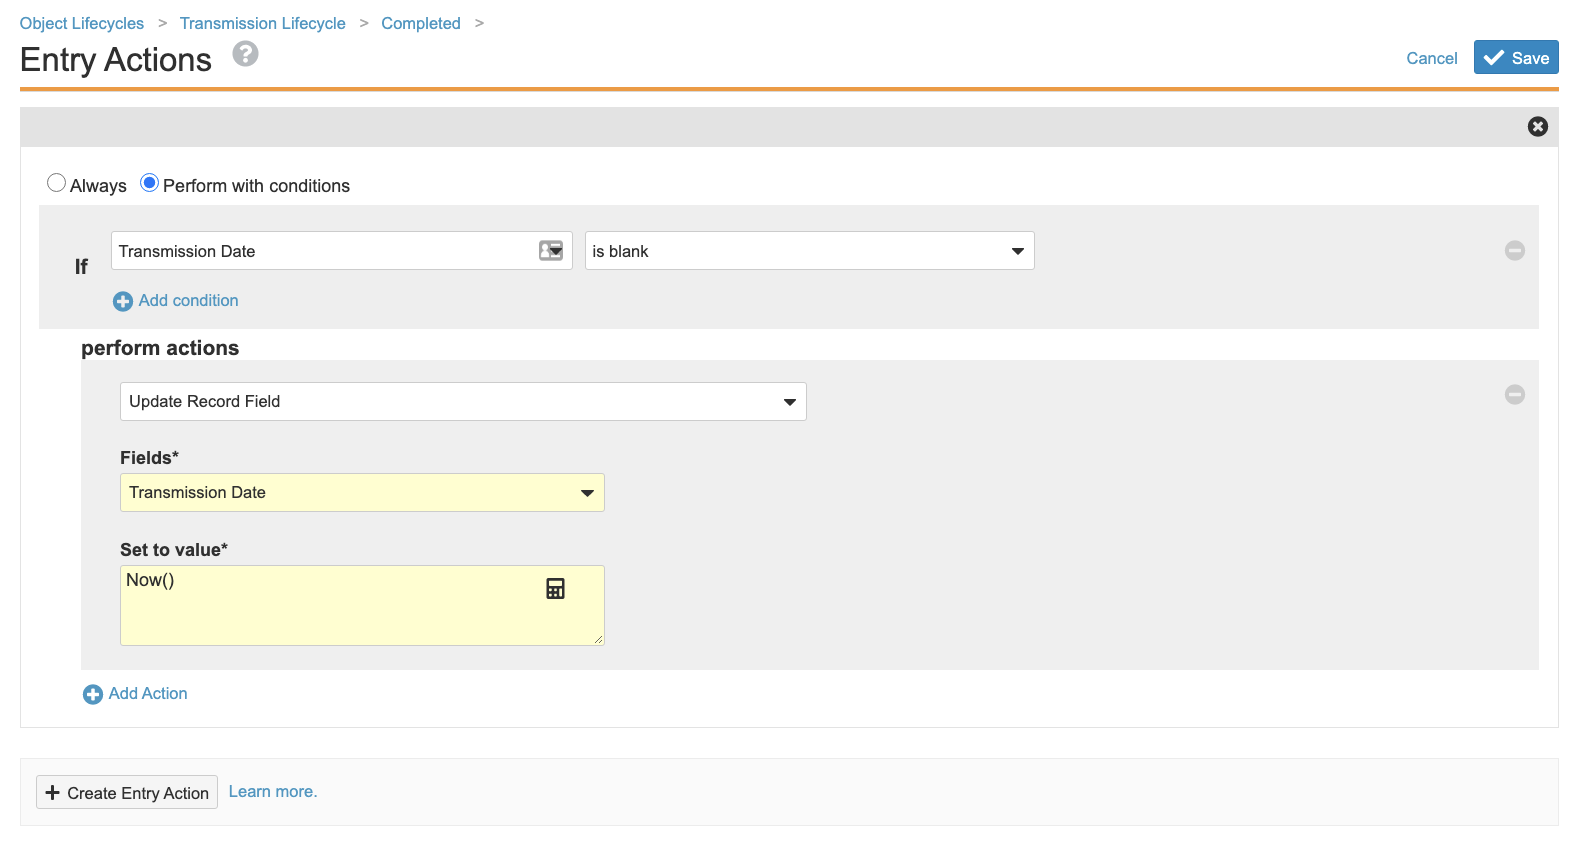
Completed State Entry Action for Transmission Lifecycle
New in 21R1: Updated PADER Report Templates
In Vault Safety 21R1, PADER templates have been updated for the following report tabulations:
- Summary Tabulation of ADRs from Postmarket
- 15 Day and Non-15 Day Summary Reports
In vaults originally deployed before 21R1, administrators must update these templates.
Replace PADER Summary Tabulation of ADRs from Postmarket Template
- Go to Business Admin > Documents & Binders > Template > Aggregate Summary Tabulation.
- Select Summary ADR from Postmarketing Sources.
- Select the PADER Summary of ADR Tabulation Post market template.
PADER Summary of ADR Tabulation Document Template - On the PADER Summary of ADR Tabulation Post market details page, select Edit.
- Under More Information, select Upload File and upload the following updated template file:
PADER Summary of ADR Tabulation Post market - Select Save.
Replace PADER 15 Day and Non-15 Day Reports Template
- Go to Business Admin > Documents & Binders > Template > Aggregate Summary Tabulation.
- Select 15 Day and Non-15 Day Summary Reports.
- Select the 15 Day and Non 15 Day Summary Reports template.
PADER 15 Day and Non-15 Day Summary Reports Document Template - On the 15 Day and Non 15 Day Summary Reports details page, select Edit.
- Under More Information, select Upload File and upload the following updated template file:
15 Day and Non 15 Day Summary Reports - Select Save.
New in 21R1: Upload PADER Appendices Report Templates
Vault Safety supports the following PADER appendices:
- Non-Primary Suspect Product Report
- List of Death Cases
For vaults created in 21R1 or later, these appendices are available for PADER reports by default. For vaults originally deployed in 20R3 or earlier, an administrator must configure the corresponding report templates to make these appendices available.
Document Types for the Appendix Non-Primary Suspect Product Report template and Appendix List of Death Cases template will already be available in your vault. To access them, go to Configuration, then Document Types > Base Document > Template > Aggregate Summary Tabulation.
Upload Template: Appendix Non-Primary Suspect Product Report
- Go to Business Admin > Documents & Binders > Template > Aggregate Summary Tabulation.
- Select Create > Document Template.
- Specify the following details for the template document:
- Type: Select Basic Document Template.
- Label: Enter
Non-Primary Suspect Product Report. - Name: This field should be automatically updated. Ensure the name has been updated to
nonprimary_suspect_product_report__c.
Note The template name must match the Document Type Template name or the report will not generate from the template.
- Status: Ensure this field is set to Active.
- Under More Information, upload the Non-Primary Suspect Product Report template. Download the following file, and then attach it as the template document:
Appendix: Non-Primary Suspect Product Report - Select Save.
The template for Appendix Non-Primary Suspect Product Report has been added to your vault.
Upload Template: Appendix List of Death Cases
- Go to Business Admin > Documents & Binders > Template > Aggregate Summary Tabulation.
- Select Create > Document Template.
- Specify the following details for the template document:
- Type: Select Basic Document Template.
- Label: Enter
List of Death Cases. - Name: This field should be automatically updated. Ensure the name has been updated to
list_of_death_cases__c.
Note The template name must match the Document Type Template name or the report will not generate from the template.
- Status: Ensure this field is set to Active.
- Under More Information, upload the List of Subjects Who Died During the Reporting Period template. Download the following file, and then attach it as the template document:
Appendix: List of Death Cases - Select Save.
Result
The template for Appendix: List of Death Cases has been added to your vault.
Add Documents to Generate Field to Aggregate Report Page Layout
The Documents to Generate field must be on the Aggregate Report Detail Page Layout to allow users to generate the Appendix List of Death Cases. The Appendix Non-Primary Suspect Product Report is generated by default for PADER reports generated after 21R1.
Go to Configuration > Objects > Aggregate Report > Aggregate Report Detail Page Layout, and ensure the Documents to Generate field is on the layout.
If you must add the field, ensure to update the appropriate Permission Sets to grant access to Edit this field.
Add Local Expedited Field to Submission Page Layout
The Local Expedited Criteria (case_expedited__v) field is used to generate PADER reports. Ensure this field is displayed on the Submission page layout.
Go to Configuration > Objects > Transmission > Page Layouts > Submission Detail Page Layout, and ensure the Local Expedited Criteria field is on the layout.