About the Feature
Vault SafetyDocs can now automatically generate a Pharmacovigilance System Master File (PSMF) logbook when merging to a PSMF PDF. Vault SafetyDocs will generate a placeholder logbook entry for each major version of a PSMF Document. This feature also includes dedicated PSMF doctypes and lifecycles that will be built upon in future releases.
See Manage PSMF Binders and Logbooks for more information.
23R3 Update: Add Planned Documents to PSMF Binder Templates
With the 23R3 release, PSMF logbooks and eSignature pages are only automatically generated if documents with the PSMF Logbook or PSMF eSignature classifications have been uploaded. This update allows users to customize these documents in their PSMF binders using the Generate PSMF Documents from Vault Reports feature.
You must add planned documents for the PSMF Logbook and PSMF eSignature pages to the PSMF Binder template. Complete the following steps to add the planned documents:
- Go to Business Admin > Templates > Documents & Binders.
- Expand Pharmacovigilance System Master File > PSMF Binder, and then select a binder template to which you want to add the documents.
- In the Binder Structure section, select Edit.
- Expand the Annexes section and from the All Actions (
 ) menu for Annex I: Section and Record Control, select Planned Document.
 - Complete the fields on the Planned Document Details window as follows and then select OK.
Field Description Type Select Pharmacovigilance System Master File. Subtype Select PSMF Generated Document. Classification Select PSMF Logbook. Lifecycle The system populates this field with the PSMF Generated Document Lifecycle. Template Select the template of your choice or select None. Planned Name Enter "${name__v} - Logbook". - From the All Actions () menu for Annexes, select Planned Document.
- Complete the fields on the Planned Document Details window as follows and then select OK.
Field Description Type Select Pharmacovigilance System Master File. Subtype Select PSMF Generated Document. Classification Select PSMF eSignature Page. Lifecycle The system populates this field with the PSMF Generated Document Lifecycle. Template Select the template of your choice or select None. Planned Name Enter "${name__v} - eSignature".
23R1 Update: PSMF Table of Contents Template
With the 23R1 release, Vault SafetyDocs can now automatically generate a table of contents for PSMF Binders when merging to PDF. The table of contents in the merged PDF includes links to the first page of every document within it.
To use the table of contents, you must complete the following steps:
- Download the Vault Safety
.docxtable of contents template - Upload the
.docxtable of contents template to your Vault with the following document type classification:- Pharmacovigilance System Master File > PSMF Generated Document > PSMF Table of Contents
- Add or update the Table of Contents document in your global and local PSMF binders.
- Add the Table of Contents document to your PSMF binder templates. To complete this step, follow the instructions below.
For more information about this feature, see PSMF Table of Contents.
Overview of Enablement Steps
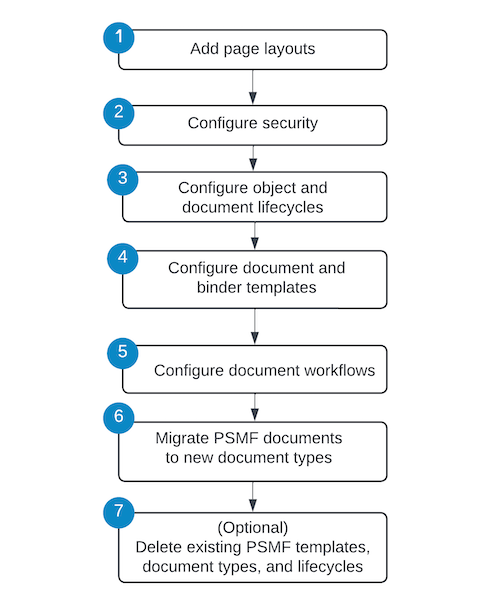
Add Page Layouts
Configure the page layouts for PSMF Logbook and PSMF Logbook Entry.
Configure the PSMF Logbook Page Layout
- Go to Configuration > Objects > PSMF Logbook > Page Layouts.
- On the PSMF Logbook Detail Page Layout, configure the Details and System sections and the Logbook Entries Related Object as shown below.
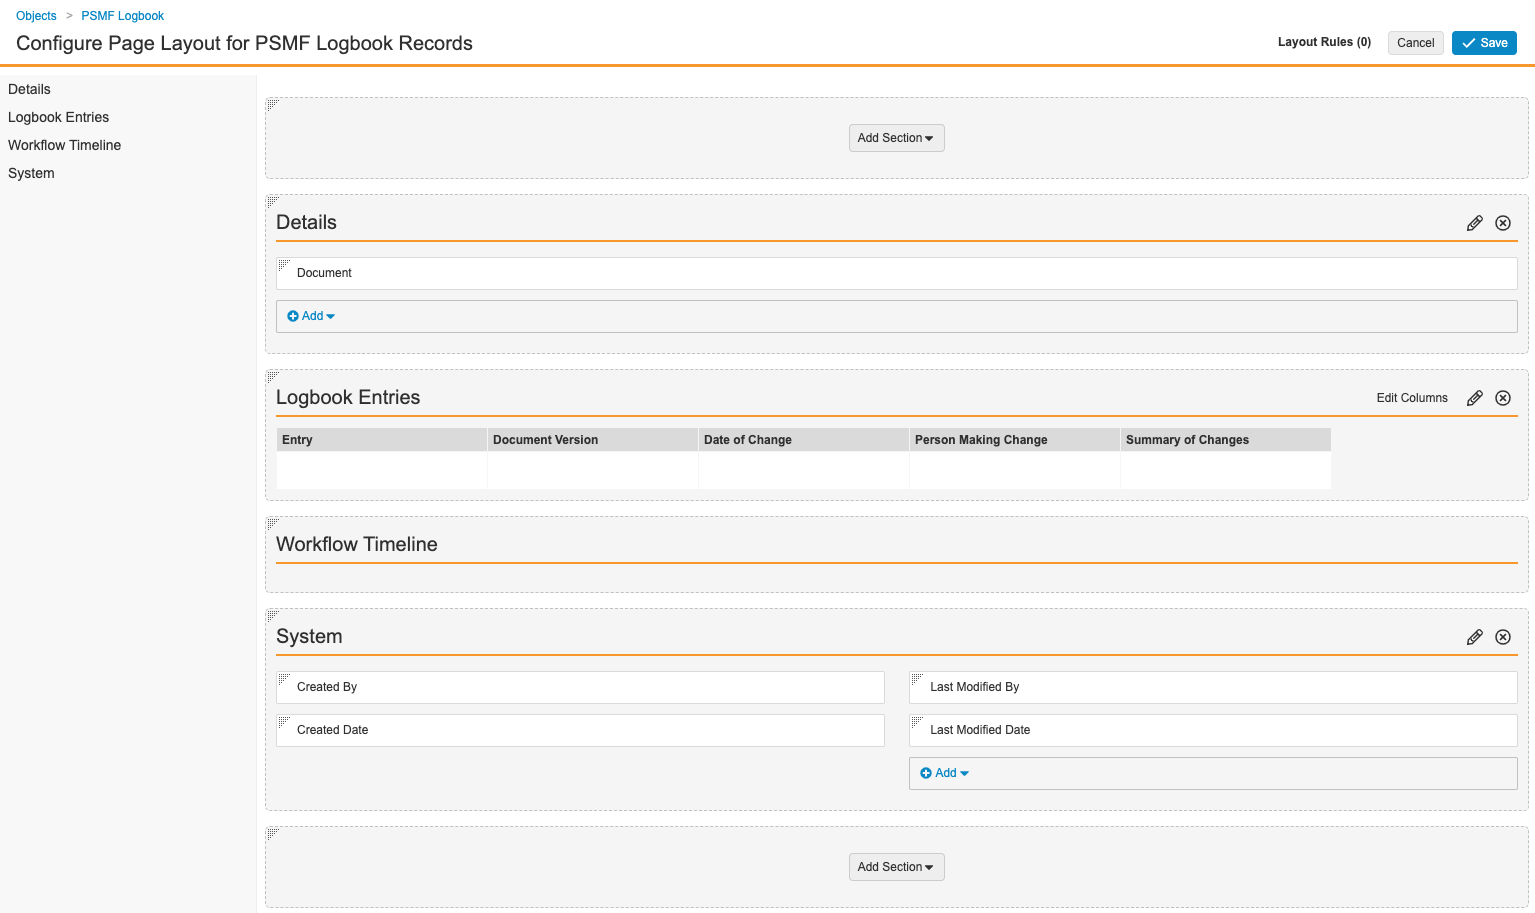
PSMF Logbook Page Layout - On the Logbook Entries Related Object, select Edit (
 ).
). - In the Creation Option field, select Prevent record creation, and then select Done.
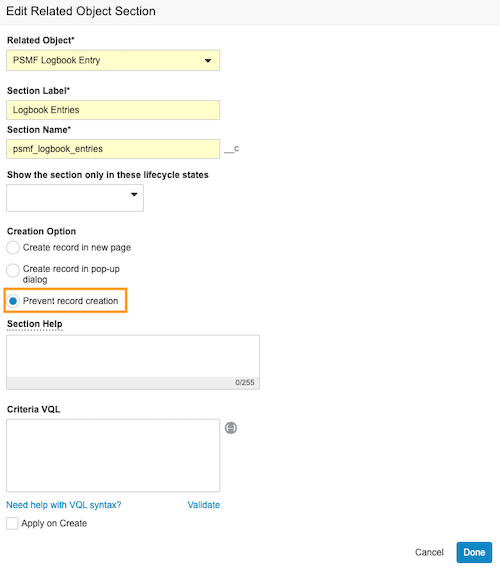
Prevent Record Creation - Select Save.
Configure the PSMF Logbook Entry Page Layout
- In Admin, go to Configuration > Objects > PSMF Logbook Entry > Page Layouts.
- On the PSMF Logbook Entry Detail Page Layout, configure the Details, Summary of Changes, and System sections as shown below.
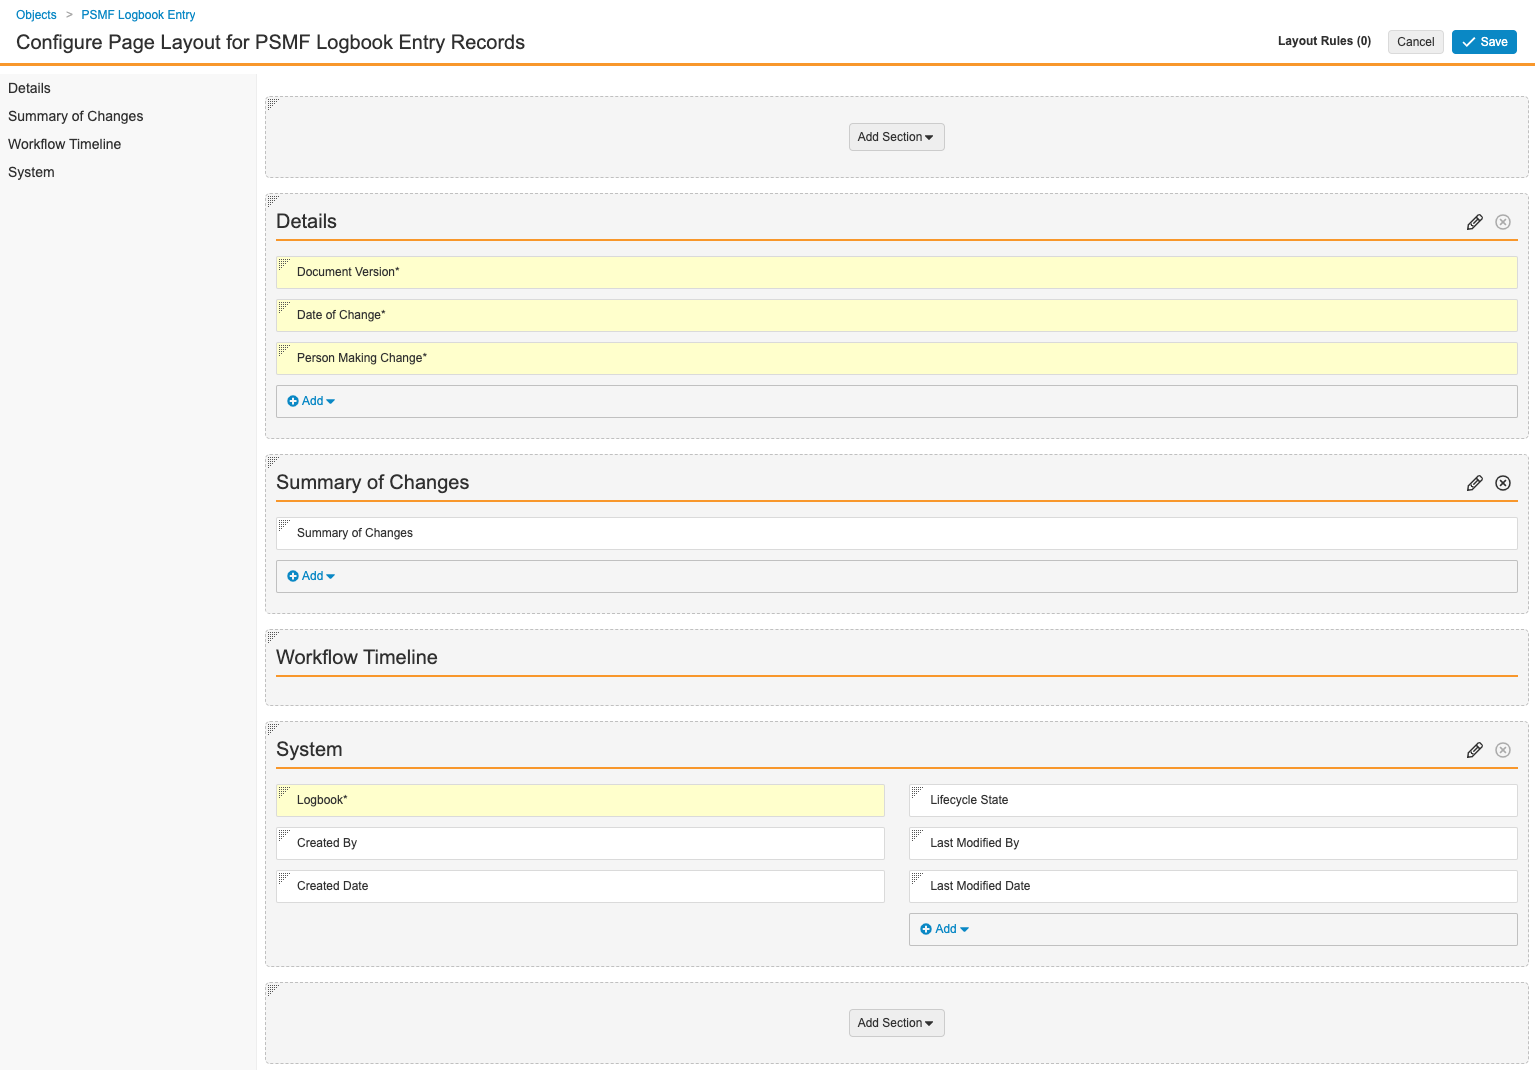
PSMF Logbook Entry Page Layout - Select Save.
Configure Security
You will need to add security settings to grant access to the new PSMF features. Use the following settings as a starting point, but configure access according to your business process.
Add the PSMF Office Application Role
- In Admin, go to Users & Groups > Application Roles.
- Select Create.
- On the Create Application Role page, enter the following details:
- Label: PSMF Office
- Name:
psmf_office__c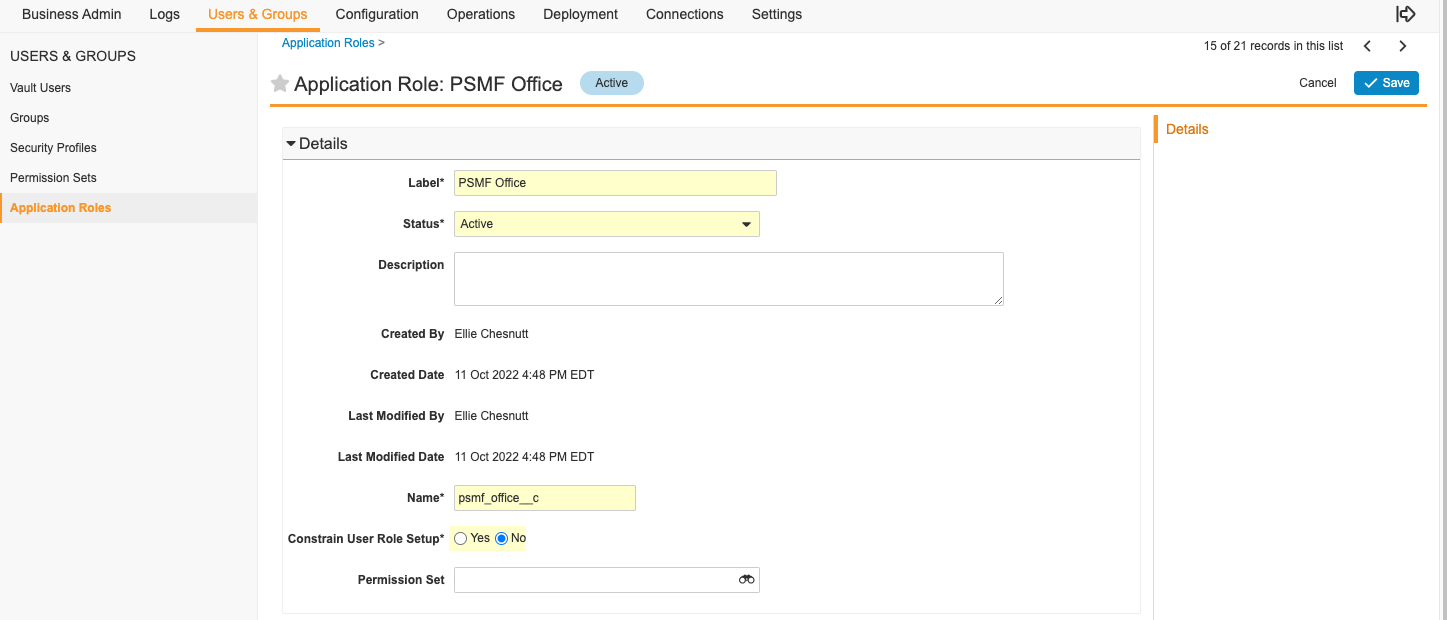
PSMF Office Application Role
- Select Save.
Add the PSMF Permission Set
- In Admin, go to Users & Groups > Permission Sets.
- Select Create.
- In the Name field, enter "PSMF".
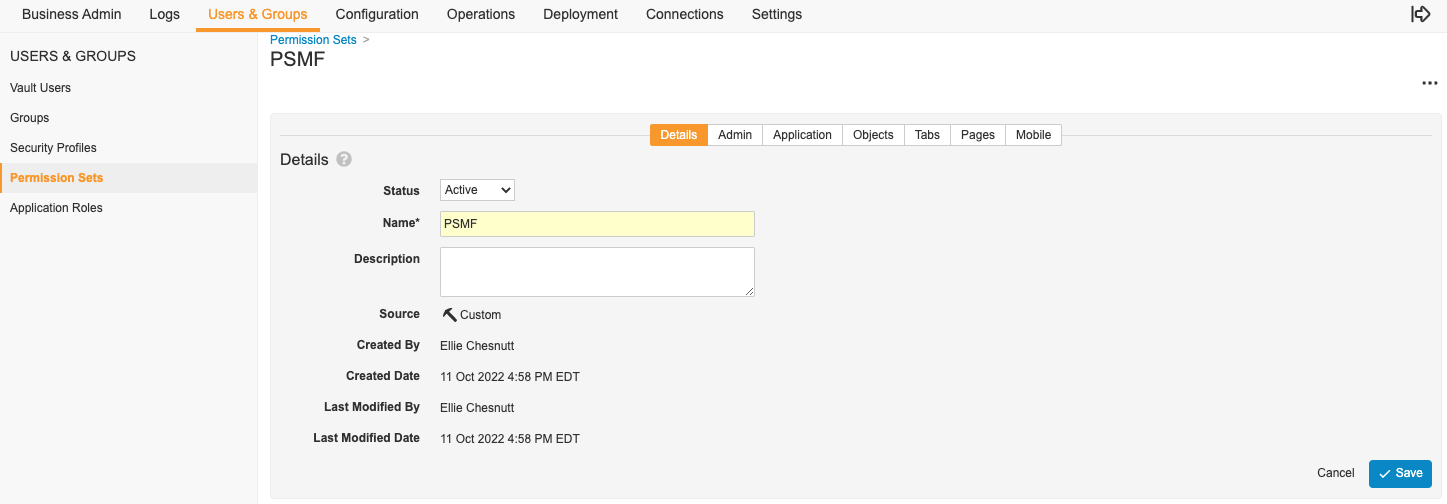
PSMF Permission Set - Select Save.
Grant Permissions
Ensure your permissions sets are granted the appropriate level of access to applications, objects, and tabs according to your organization’s process.
- To manage application-level permissions, go to Users & Groups > Permission Sets > [Permission Set] > Application.
- Grant the following permissions under Vault Actions:
- Dashboards and Reports > Read Reports and Dashboards
- Workflow > All Workflow
- Document > Download Document
- Document > Download Rendition
- Document > Download Non-Protected Rendition
- User > View User Information
- User > View User Profile
- Search > User Filters
- Views > Share Views
- Audit Trail > View
- Create Button > Show Create Button
- To manage object-level permissions, go to the Objects tab in your Permission Set and grant the following permissions:
Fields Object Recommended Access - Country
- Document Lifecycle Stage Label
- Document Lifecycle State-Stage
- Document Type Detail
- Document Type Group
- Document Type Group Detail
- Language
- Locale
- Object Lifecycle Stage Label
- Object Lifecycle State-Stage
- Organization
All Read - Person
- PSMF Logbook
- PSMF Logbook Entry
All Read, Create, and Edit - To manage tab-level permissions, go to the Tabs tab in your Permission Set and grant the following View permissions:
- Home
- Library
- PSMF > PSMF Binders
- PSMF > PSMF Logbook
Configure Document Type Permissions
- In Admin, go to Configuration > Document Types.
- Select Pharmacovigilance System Master File (pharmacovigilance_system_master_file__v), and then in the Actions () menu, select Edit Details.
- On the Security tab, in the Create Document Permission and Create Binder Permission fields, add “All Internal Users”.
- Select Save.
Configure Document Type Group Permissions
- Go to Admin, and then select Configuration > Objects > Document Type Group.
- On the Details tab, select the Display in Business Admin menu checkbox.
- Go to Business Admin, and in Document Type Groups select Create.
- In the Name field, enter “PSMF Documents” and then Save.
- Go to Admin, and then select Configuration > Document Types.
- Select Pharmacovigilance System Master File (pharmacovigilance_system_master_file__v), and then in the Actions () menu, select Edit Details.
- On the General tab, in the Document Type Groups field, select PSMF Documents.
Update User Role Setup Object
- In Admin, go to Configuration > Objects > User Role Setup > Fields.
- Select Create.
- In the Step 1: Select the field type section, select Object.
- In the Step 2: Choose label and name for the field section, in the Label field, enter “Document Type Group”.
- In the Step 3: Set the options section, complete the following steps:
- In the Object picklist, select Document Type Group.
- Select the Display in default lists and hovercards checkbox.
- Select Save.
Configure Object and Document Lifecycles
Use the following steps to configure Object and Document Lifecycles.
Configure Object Lifecycles
Object Lifecycles are managed through Admin > Configuration > Object Lifecycles > [Lifecycle].
Note On the PSMF Logbook Lifecycle, ensure Edit permissions are not granted.
Update the PSMF Logbook Entry Lifecycle
- In Admin, go to Configuration > Object Lifecycles > PSMF Logbook Entry Lifecycle.
- In the Roles, complete the following actions:
- Add the PSMF Office role.
- Configure the PSMF Office role so that Edit is only enabled in the Draft state.
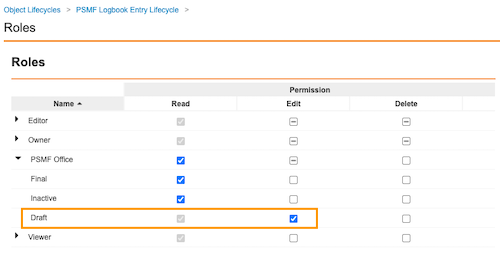
PSMF Office Role Edit Permission
Configure Document Lifecycles
The following table provides an overview of the required Document Lifecycle configuration.
| Configuration | Document Lifecycle |
|---|---|
| Add “PSMF Office Role” and enable Dynamic Access Control and matching rules |
|
| Add permissions to roles based on the lifecycle state |
|
| Manifest eSignatures |
|
| Add Lifecycle Stage Groups |
|
Add “PSMF Office Role” and Enable Dynamic Access Control and Matching Rules
Complete the following steps for each Document Lifecycle in the table above.
- In Admin, go to Configuration > Document Lifecycles > [Lifecycle] > Roles.
- Select Create.
- In the Label field, enter "PSMF Office Role".
- In the Application Role field, select PSMF Office.
- In the Options section, select the Enable Dynamic Access Control checkbox.
On the Confirm Modify window, select Continue. - On the Sharing Rules tab, select Create to configure a PSMF Binder - Doctype Group matching rule as shown in the screenshot below.
- In the Auto Managed Groups field, enter
${Document Type Group}-${role}.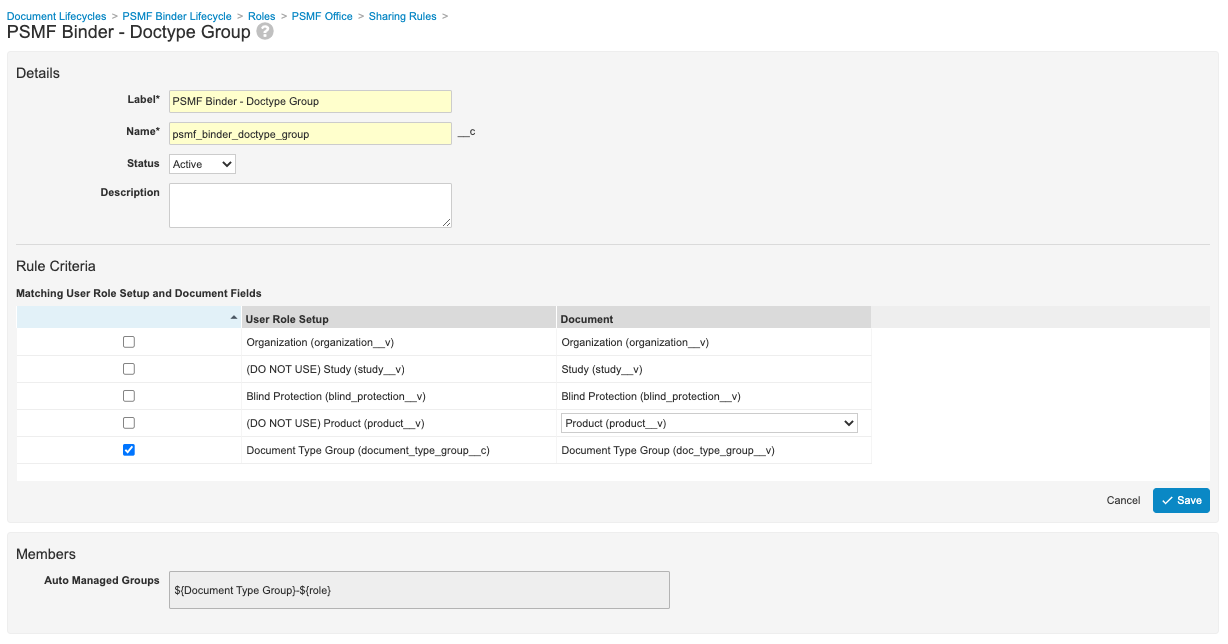
PSMF Office Matching Rules
- In the Auto Managed Groups field, enter
- Select Save.
Add Permissions to Roles Based on the Lifecycle State
Follow your organization’s rules to set up permissions appropriate for each role and lifecycle state pair. Complete the following steps for each Document Lifecycle in the table above.
- In Admin, go to Configuration > Document Lifecycles > [Lifecycle] > States.
- For each State, go to the Security Settings tab.
- Select Edit. Each permission/role intersection becomes an editable checkbox.
- Set or clear checkboxes to modify the permissions assigned to each role.
- Select Save.
Manifest eSignatures
To associate the eSignature page with the PSMF Binder Lifecycle Document Lifecycle, go to Admin > Configuration > Document Lifecycles > [Lifecycle] > eSignature Pages.
For more information, see Configuring Document Lifecycles to Manifest eSignatures.
Add Lifecycle Stage Groups
The following table provides an option for configuring Lifecycle Stage Groups, Document Lifecycles, and Stages. Set up your Lifecycle Stage Groups according to your organization’s process.
| Lifecycle Stage Group | Document Lifecycle | Stages |
|---|---|---|
| PSMF Binder | PSMF Binder Lifecycle |
|
| PSMF Content | PSMF Content Lifecycle |
|
| PSMF Generated Document | PSMF Generated Document Lifecycle |
|
- In Admin, go to Configuration > Lifecycle Stage Groups.
- Select Create.
- In the Select Lifecycle Stage Group Type field, select Document Stage Group, and then select Continue.
- In the Stage Group Label field, enter the name of the applicable Lifecycle Stage Group.
- In the Document Lifecycle picklist, select the applicable Document Lifecycle.
- Select Save.
- In the Stages section, create Stage Labels.
Configure Document and Binder Templates
The following configuration can be used if you intend to use Controlled Document Template in your Vault.
Add Document Templates
- In Admin, go to Configuration > Document Types.
- Select Template, and then in the Actions () menu, select Add Child to add the “PSMF Template”.
- Select PSMF Template, and then in the Actions () menu, select Add Child to add the “PSMF Core Template” and the “PSMF Annex Template”.
Set Up Document and Binder Templates
Set up the PSMF Document and Binder Templates based on your organization’s requirements. Go to Business Admin > Documents & Binders > Create, and then select either Document Template or Binder Template.
For more information on creating basic and controlled document templates, see Managing Document Templates.
A Sample PSMF Binder template may come preconfigured in your Vault. You can use this template as a guide to create your PSMF binder templates.
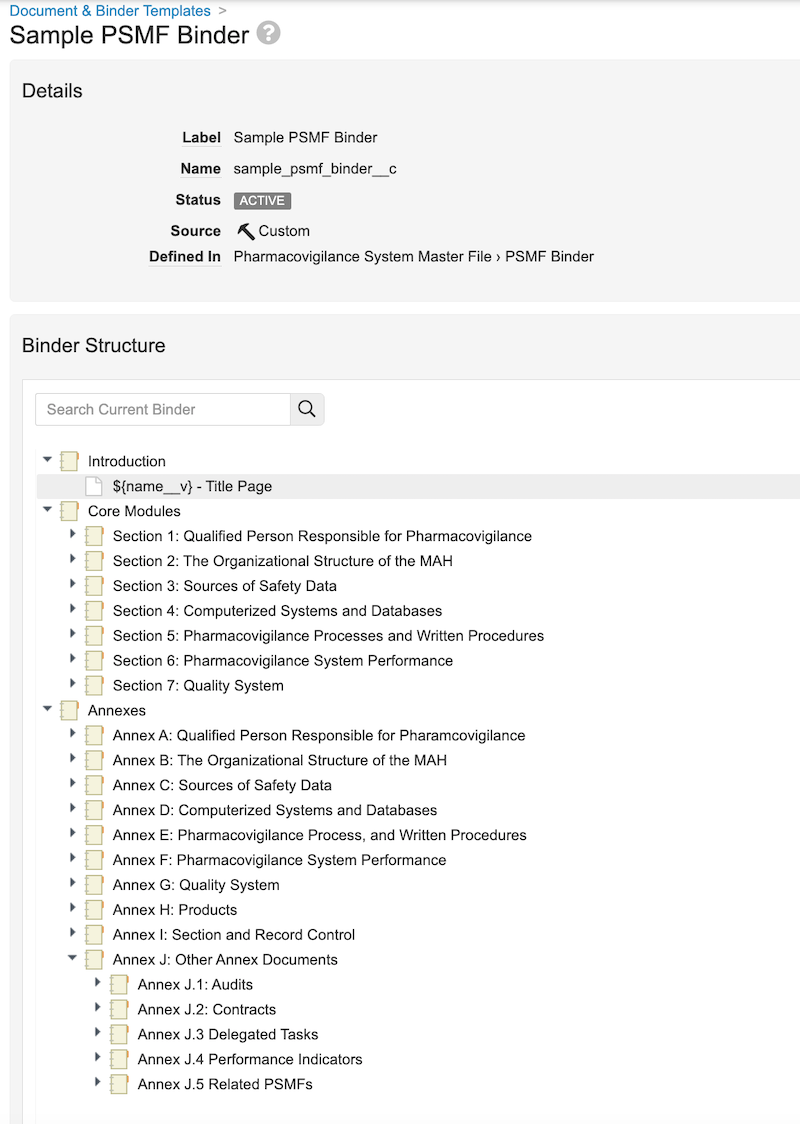
Add the Table of Contents Document to PSMF Binder Templates
- In Business Admin, go to Templates > Documents and Binders.
- Select the PSMF binder template to which you want to add the table of contents.
- In the Binder Structure section, select Edit.
- In the Introduction section, go to the All Actions menu (
 ) and select Planned Document.
 - Complete the fields on the Planned Document Details window as follows and then select OK
Field Description Type Select Pharmacovigilance System Master File. Subtype Select PSMF Generated Document. Classification Select PSMF Table of Contents. Lifecycle The system populates this field with the PSMF Generated Document Lifecycle. Template Select PSMF_TableOfContents. Planned Name Enter "${name__v} - Table of Contents".
Configure the PSMF Binder Signature Page
Add a PSMF Binder Signature Page, and then add the draft overlay to the PSMF Content Lifecycle.
Create a PSMF Binder Signature Template
- In Business Admin, go to Signature & Cover Pages.
- Select Create Signature Page Template.
- Configure the signature page per your organization’s requirements, or refer to the following sample:

Sample PSMF Binder Template
| Field | Optional Setting |
|---|---|
| Name | PSMF Binder Signature Page |
| Header (first field) | Document Name: ${name__v} |
| Header (second field) | Document ID: ${source_document_id__v} |
| Signature Block 1 | ${signee_name__v} ${signee_title__v} |
| Signature Block 2 | ${signature_verdict__v} ${signature_capacity__v} ${signature_date__v} |
| Location | End of Document |
Apply the PSMF Binder Signature Overlay to PSMF Content Lifecycle
- In Admin, go to Configuration > Document Lifecycles > PSMF Content Lifecycle > Overlays.
- Select Edit.
- With Apply one template to all documents selected, in the Use template field, select PSMF Binder Signature Page.
- Select Save.
Configure Binder and Document Workflows and Lifecycles
Ensure your Document Workflows are set up according to your organization’s process. See Vault Help for more information about Document Workflows.
The following sections provide sample workflows to highlight some available PSMF Document Workflow options.
Create the PSMF Binder Workflow and Configure the PSMF Binder Lifecycle
Set up a Document Workflow for managing the review and approval process for PSMF binders.
- In Admin, go to Configuration > Workflows.
- Select Create, and then select Document Workflow.
- In the Label field, enter “PSMF Binder Workflow”.
- In the Document Lifecycle field, enter PSMF Binder Lifecycle.
- Configure the Workflow as shown below.
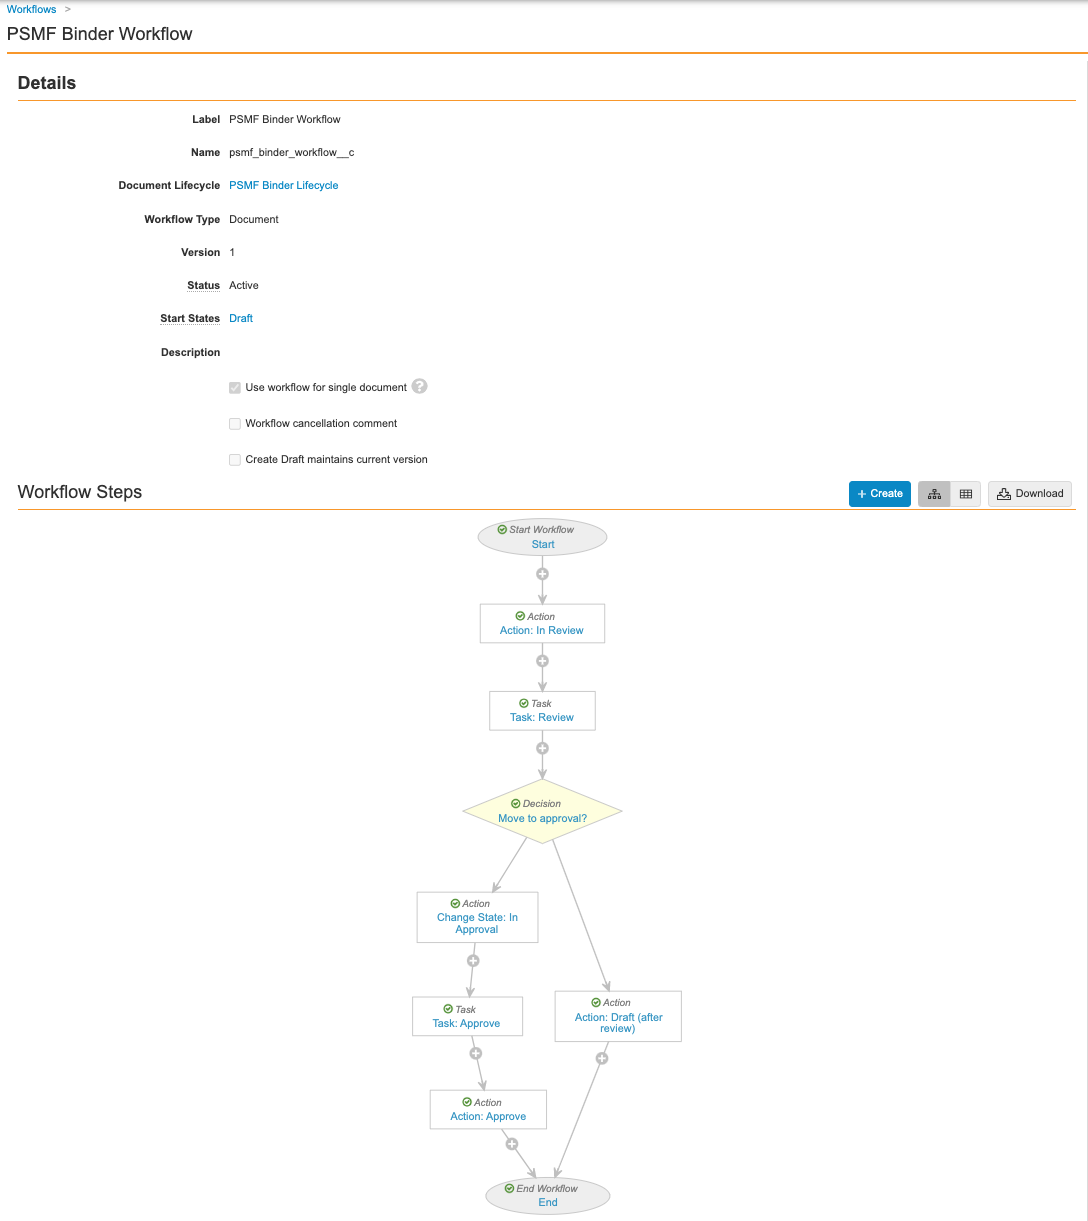
Sample PSMF Binder Workflow - In Admin, go to Configuration > Document Lifecycles > PSMF Binder Lifecycle > States.
- Complete the following setup for the States in the table below:
State Tab Description Draft User Actions - Always: Start the PSMF Binder Workflow
- Action Label: Start PSMF Approval
Approved Entry Actions Always: - Set new major version
- Set previous steady state to superseded
- Generate PSMF PDF
Create the PSMF Content Workflows and Configure the PSMF Content Lifecycle
Set up three Document Workflows to manage the review, editing, and approval processes for PSMF documents.
- In Admin, go to Configuration > Workflows to add the following Document Workflows:
- Move to Draft (PSMF Content)
- PSMF Content Review and Approval
- PSMF Content Editing
- In the Document Lifecycle field of each workflow, enter PSMF Content Lifecycle.
- Configure the Workflows as shown below.
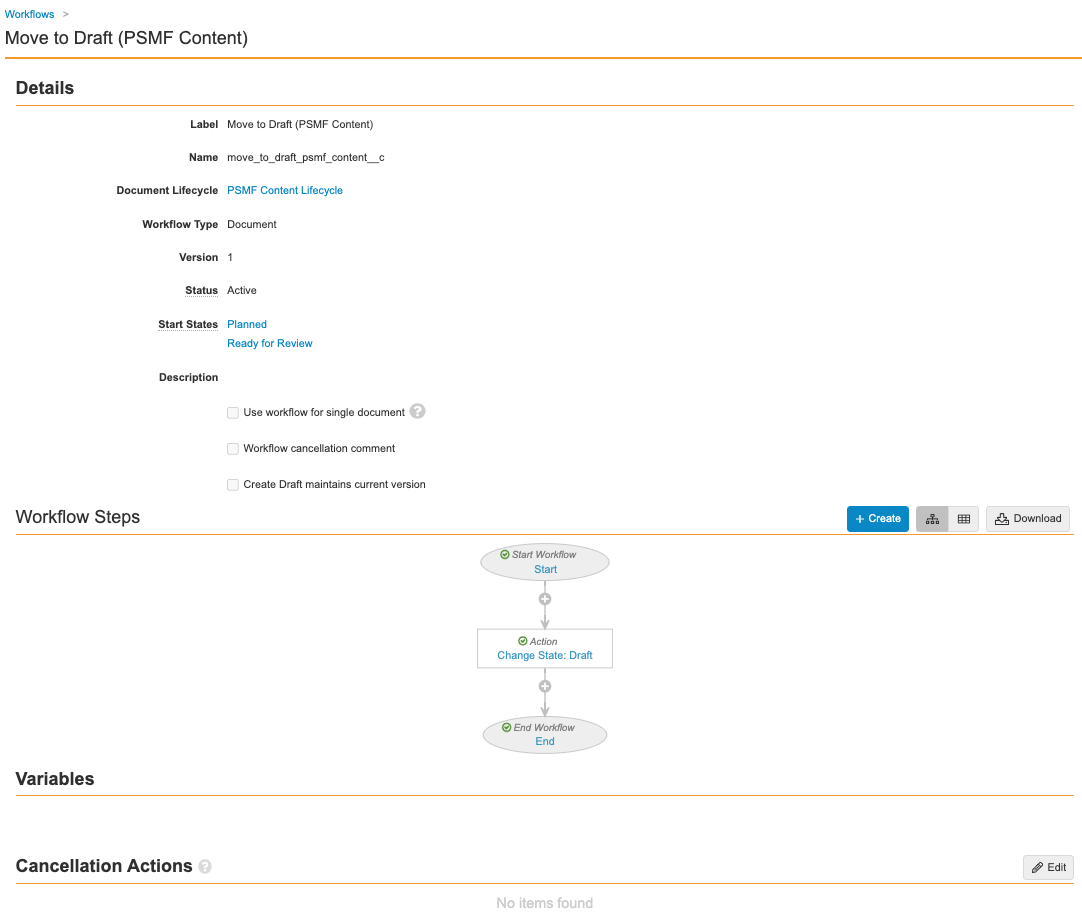
Sample Move to Draft (PSMF Content) Workflow 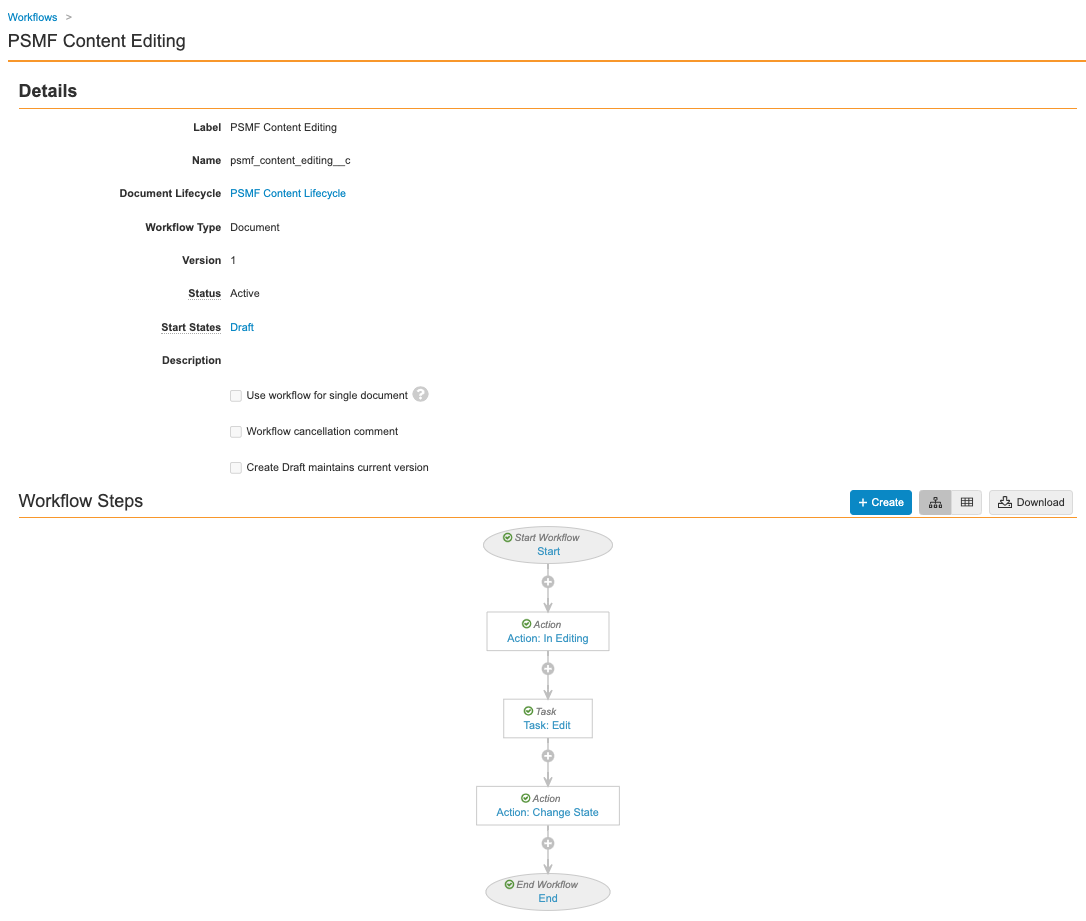
Sample PSMF Content Editing Workflow 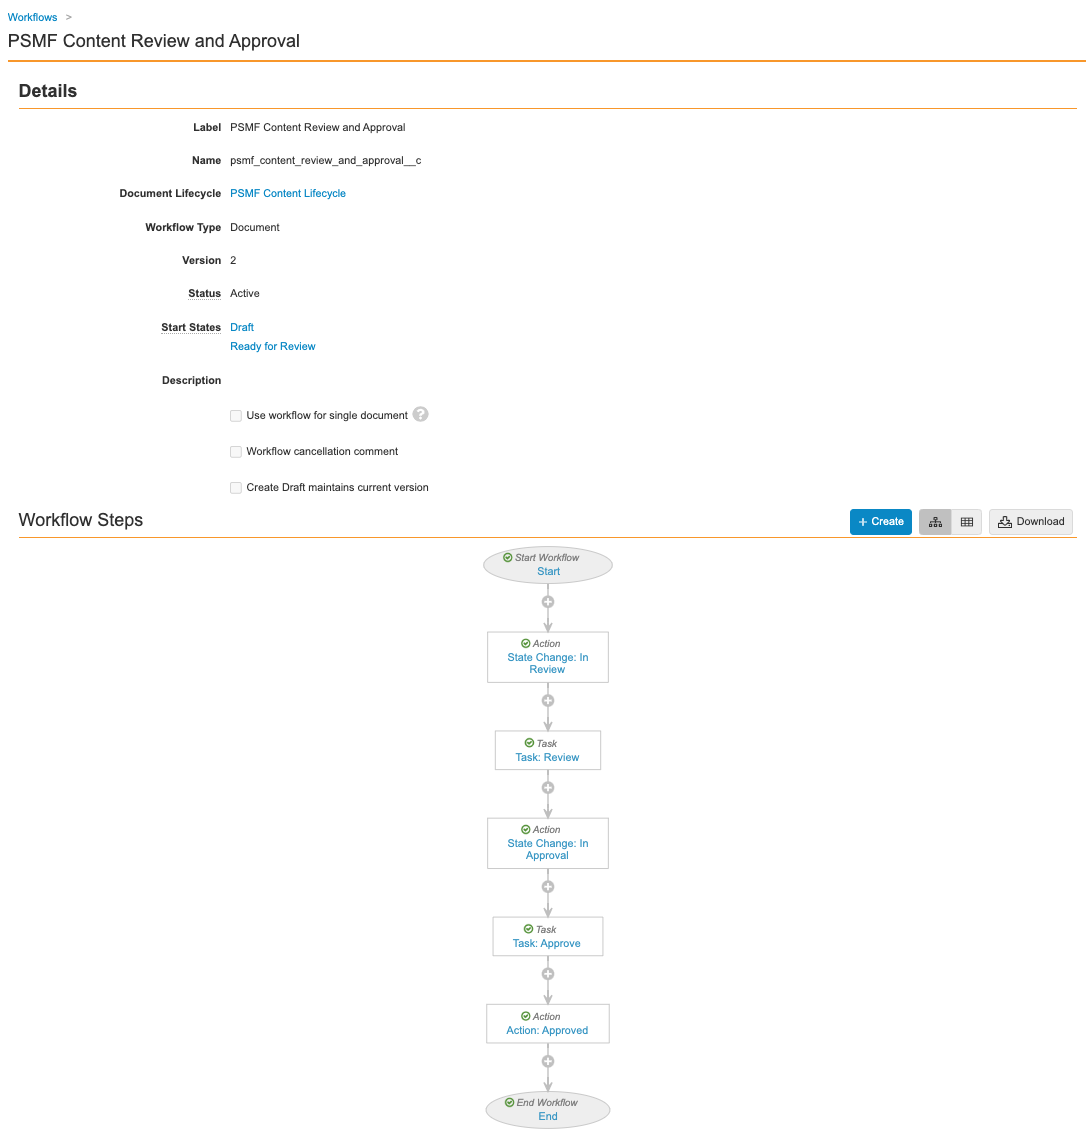
Sample PSMF Content Review and Approval Workflow - In Admin, go to Configuration > Document Lifecycles > PSMF Content Lifecycle > States.
- Complete the following setup for the States in the table below:
State Tab Description Planned User Actions - Always: Start the Move to Draft (PSMF Content) Workflow
- Action Label: Move to Draft
Draft User Actions - Always: Start the PSMF Content Review and Approval Workflow
- Action Label: Start Review & Approval
Draft User Actions - Always: Start the PSMF Content Editing Workflow
- Action Label: Send for Authoring
Ready for Review User Actions - Always: Start the PSMF Content Review and Approval Workflow
- Action Label: Start Review & Approval
Ready for Review User Actions - Always: Start the Move to Draft (PSMF Content) Workflow
- Action Label: Move to Draft
Create the PSMF Generated Workflows and Configure the PSMF Generated Document Lifecycle
Set up three Document Workflows to manage the PSMF PDF generation process.
- In Admin, go to Configuration > Workflows to add the following Document Workflows:
- Move to Generated
- Finalize Generated PSMF Document
- Approve Generated PSMF Document
- In the Document Lifecycle field of each workflow, enter PSMF Generated Lifecycle.
- Configure the Workflows as shown below.
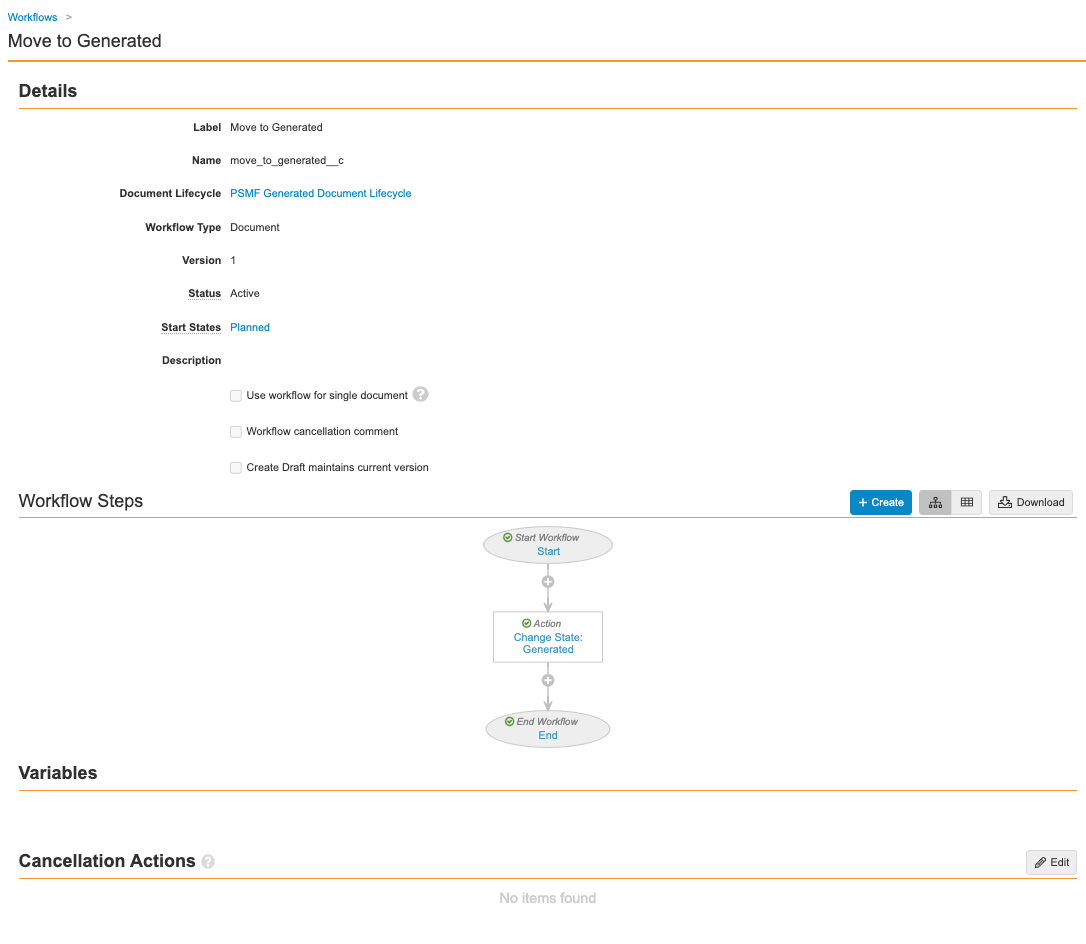
Sample Move to Generated Workflow 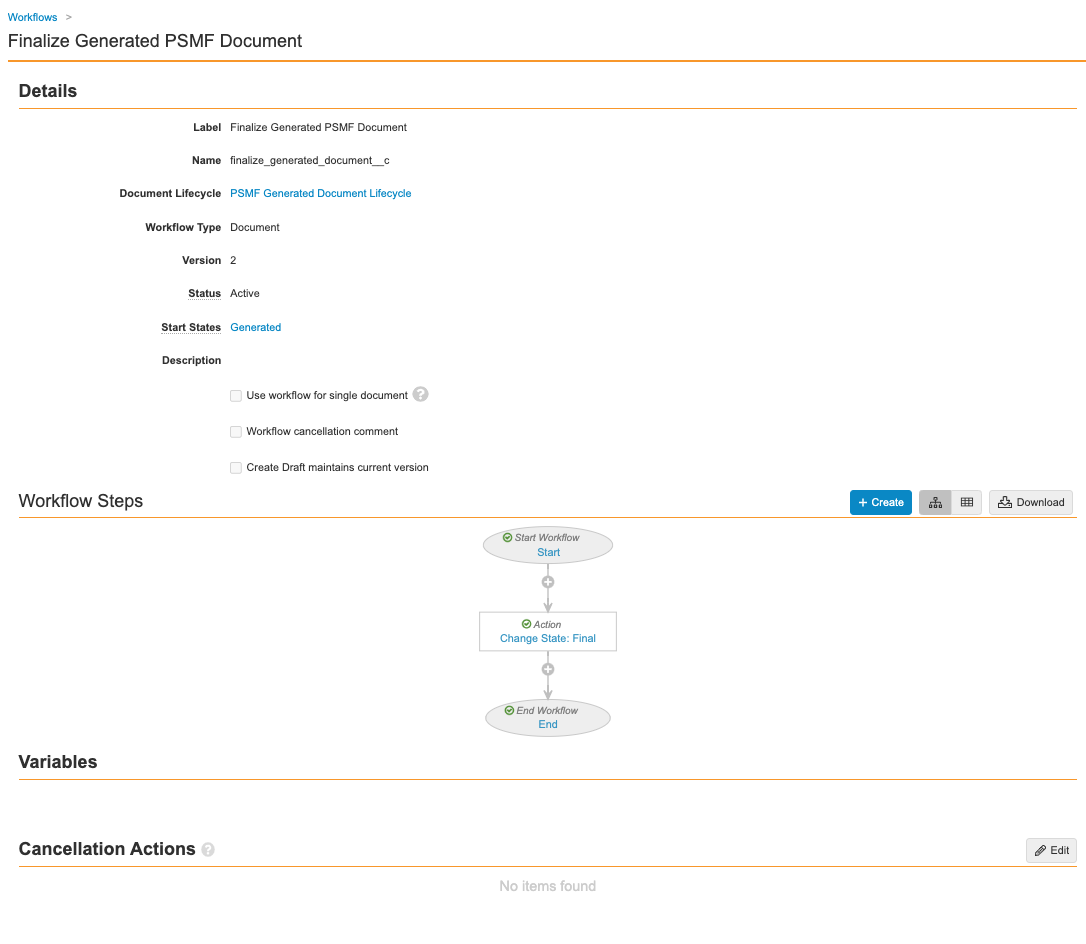
Sample Finalize Generated PSMF Document Workflow 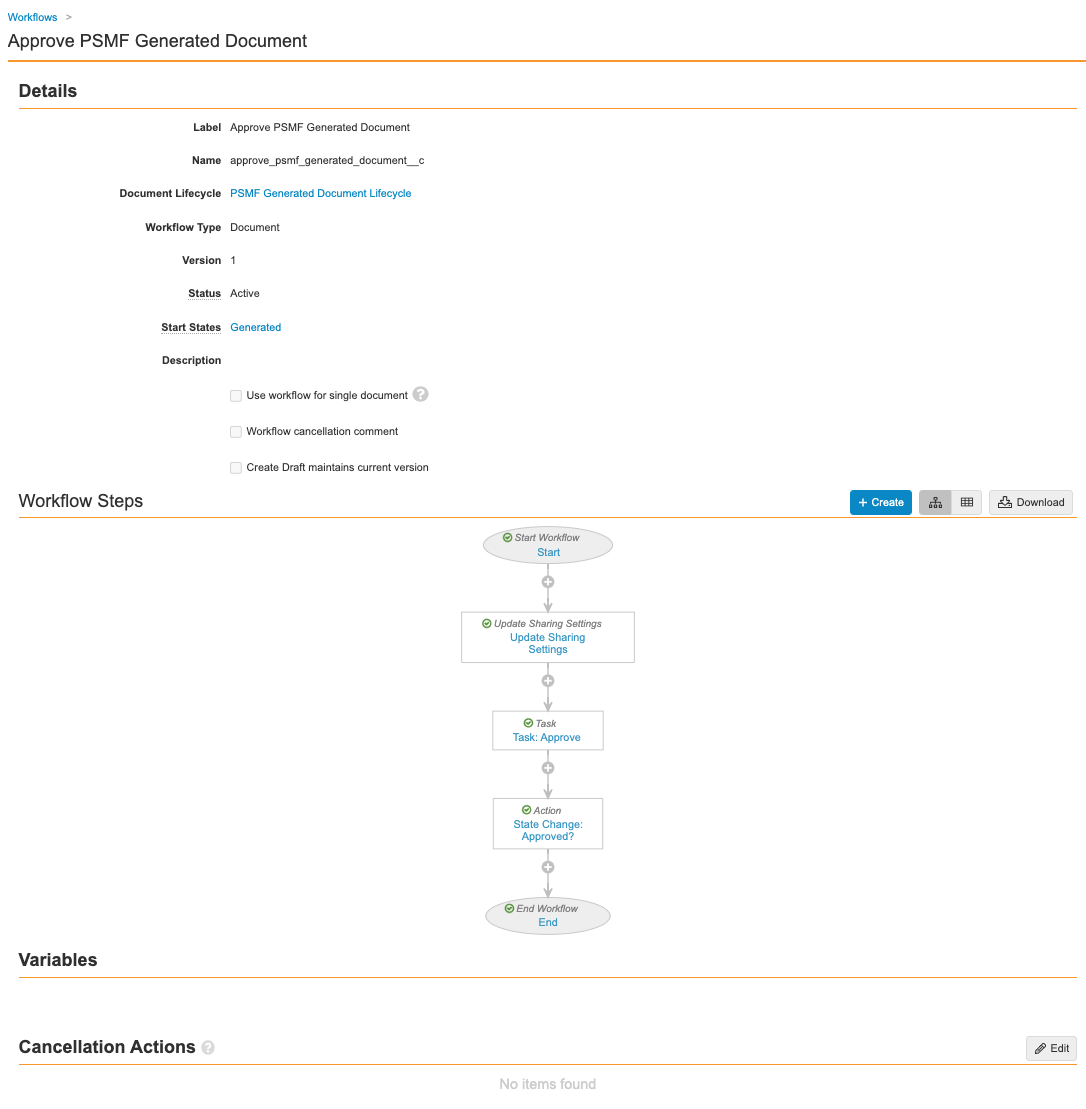
Sample Approve Generated PSMF Document Workflow - In Admin, go to Configuration > Document Lifecycles > PSMF Generated Lifecycle > States.
- Complete the following setup for the States in the table below:
State Tab Description Planned User Actions - Always: Start the Move to Generated Workflow
- Action Label: Move to Generated
Generated User Actions Configure two actions as shown in screenshot below 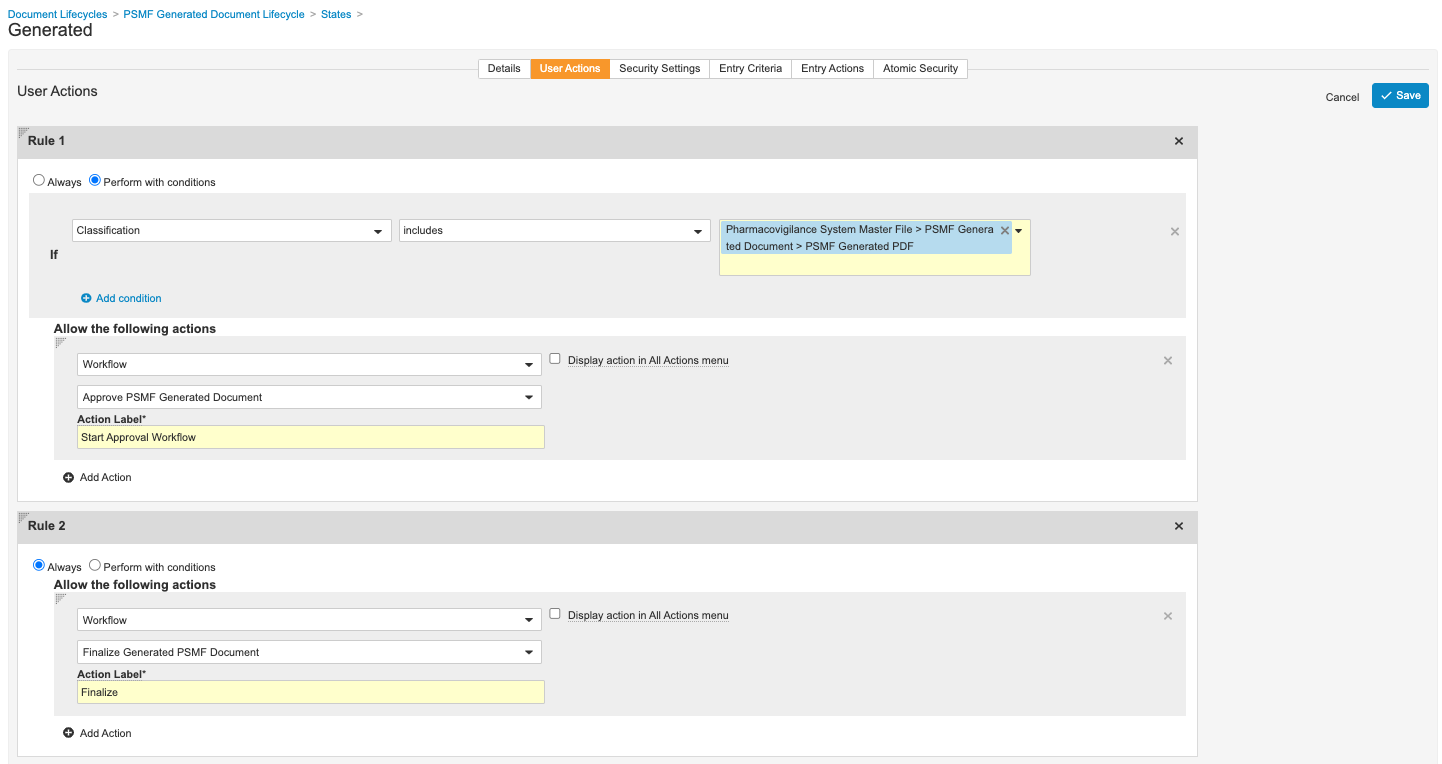
Sample PSMF Generated Document Lifecycle User Actions
Migrate PSMF Documents to New Document Types
To support easy reuse of content, Vault SafetyDocs includes the following new dedicated PSMF document types:
- Pharmacovigilance System Master File > PSMF Binder > PSMF Global Binder
- Pharmacovigilance System Master File > PSMF Binder > PSMF Local Binder
- Pharmacovigilance System Master File > PSMF Content > PSMF Title Page
- Pharmacovigilance System Master File > PSMF Content > PSMF Core Document
- Pharmacovigilance System Master File > PSMF Content > PSMF Annex
- Pharmacovigilance System Master File > PSMF Generated Document > PSMF Table of Contents
- Pharmacovigilance System Master File > PSMF Generated Document > PSMF Logbook
- Pharmacovigilance System Master File > PSMF Generated Document > PSMF ESignature
- Pharmacovigilance System Master File > PSMF Generated Document > Generated PSMF
Document type is the combination of the type, subtype, and classification fields on a document. Use the Reclassify option to update the document type of your existing PSMF documents.
For more information, see Reclassifying Documents.
(Optional) Delete Existing PSMF Templates, Document Types, and Document Lifecycles
To transition to the new PSMF functionality, deleting your existing configuration is recommended.
Note Before deleting existing templates, document types, and lifecycles, ensure that you first migrate your content to the new document types.
Delete Document and Binder Templates for Pharmacovigilance System Master File (PSMF) Structure
- In Business Admin, go to Document & Binders.
- Delete or disable all document and binder templates under Pharmacovigilance System Master File (PSMF) Structure.

Delete PSMF Document and Binder Templates
Delete the Pharmacovigilance System Master File (PSMF) Structure Document Type
- In Admin, go to Configuration > Document Types.
- Select Pharmacovigilance System Master File (PSMF) Structure (psmf_structure__c), and then in the Actions () menu select Delete.
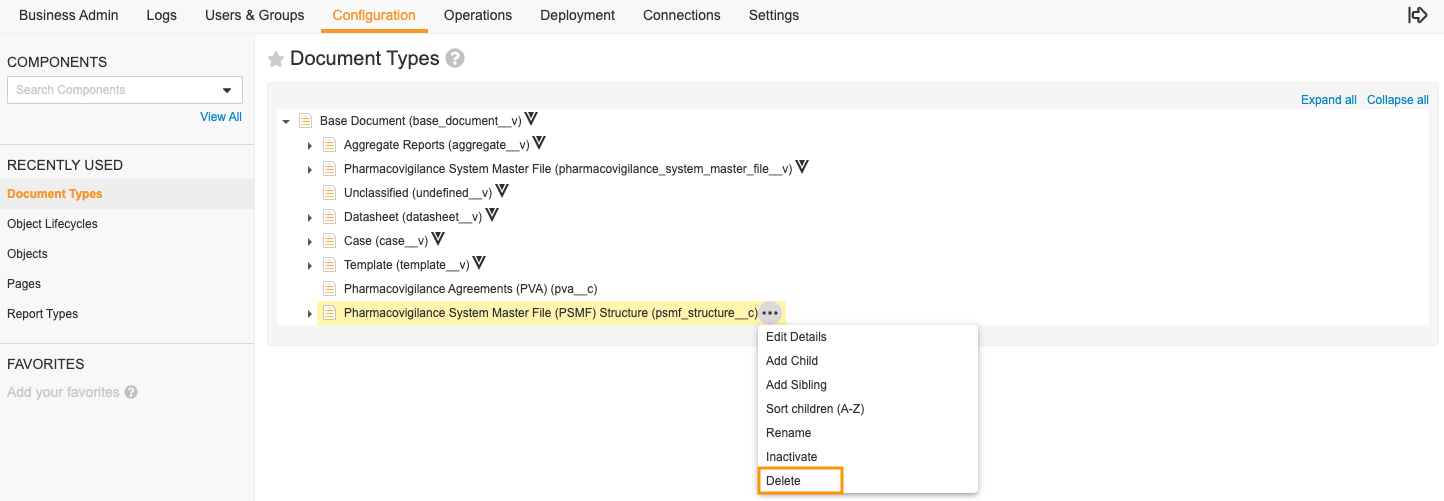
Delete PSMF Structure Document Type
Result
The Pharmacovigilance System Master File (PSMF) Structure Document Type and its child records are deleted.
Delete the PSMF Document Lifecycle
- Go to Configuration > Document Lifecycles > PSMF Lifecycle.
- Select Delete.
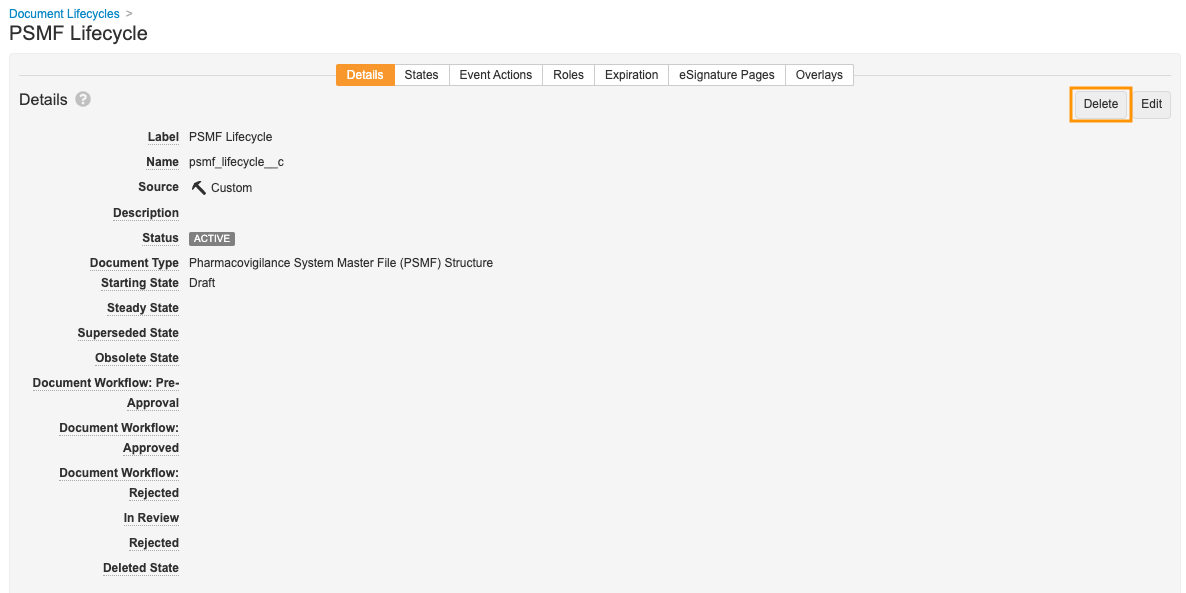
Delete PSMF Lifecycle Document Lifecycle