Using overlays, you can dynamically apply information to a viewable rendition when users download it from Vault. Overlays only appear on downloaded renditions and do not affect source files. They are associated with a specific lifecycle state, which lets you use this feature to indicate the current document status, even when the document is downloaded and printed. This functionality is important when companies need to ensure that expired or draft documents are clearly marked as such.
Using standard overlay templates, information can appear in the header, footer, and/or diagonally across the page. You can use tokens to insert information from specific document fields or details when setting up a standard overlays. For example, the ${status} token would resolve to the lifecycle state of the document at the time Vault generates the overlay.
You can modify the header, watermark, and footer text appearance using the available rich-text formatting tools.
Note: Vault does not apply overlays for manually uploaded renditions for PDFs with security.
Accessing Overlay Management
Administration options are available in Business Admin > Templates > Overlays. By default, users with any Admin security profile can access this page and modify overlays. However, only Admins with the Document Lifecycles: Edit permission can associate an overlay template with a lifecycle state.
How to Create Overlays
To create an overlay template:
- Navigate to Business Admin > Templates > Overlays and click Create Overlay Template.
- Enter a name for the overlay. This value only appears in the Admin area.
- Optional: Enter and format text, tokens, and logos for the Header. The header appears at the top of the downloaded rendition.
- Optional: Enter and format text and tokens for the Watermark. The watermark appears diagonally across the center of the downloaded rendition.
- Optional: Enter format text, tokens, and logos for the Footer. The footer appears at the bottom of the downloaded rendition.
- Optional: Enter margin values in points in the Header Margin and Footer Margin fields.
- Optional: Select the Allow download without Overlay checkbox to allow downloads if Vault fails to apply the overlay.
- Optional: Select the Match page to nearest Overlay Override paper size checkbox to enable an overlay page size tolerance.
- Optional: Click Download Preview before saving to download a PDF preview of the overlay using the current formatting. Vault translates any tokens into user-friendly labels in the preview.
- Click Save.
- Vault creates the overlay as the default overlay format and displays it in the Overlay Formats section.
- Optional: Click Edit on the overlay template page to edit the Name, Allow download without Overlay setting, and Match page to nearest Overlay Override paper size setting.
- Optional: Click Edit in the default overlay format row in the Overlay Formats section to edit the Header, Watermark, Footer, Header Margin, and Footer Margin of the default overlay format.
- Optional: Click + Create in the Overlay Formats section to create an overlay format override.
- Navigate to Admin > Configuration > Document Lifecycles > [Lifecycle] > Overlays and configure the conditions that will manifest the overlay. Once conditions are configured, the impacted lifecycle appears in the template’s Used In details.
Users see the overlay the next time they download a viewable rendition for a document when its overlay conditions are met.
Template Content Formatting
Note: With 25R1, the template editor includes rich-text tools that allow you to easily apply formatting and images to your overlay and signature page templates. You can no longer create new XFA-based templates to apply formatting to your overlay or signature page templates, but your documents can continue using existing XFA-based templates.
The template editor, available for overlay templates and signature page templates, provides rich-text tools that allow you to modify the template’s font type, size, color, and style, as well as the text alignment and wrapping. The rich-text editor also allows you to insert logos, field tokens, and tables. The available tools depend on the template text type (header, watermark, footer, or signature block).
To apply rich-text formatting, highlight the text to format and click the appropriate options on the toolbar. The following formatting options are available:
- Font family
- Font size (unavailable for watermarks and signature blocks)
- Bold
- Italic
- Underline
- Strikethrough
- Superscript
- Subscript
- Font color
- Text alignment (unavailable for watermarks and signature blocks)
- Clear formatting

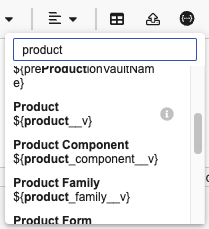
To insert a field token, click Insert Token ( ), search for the field, and select the token to add.
To add a logo, click Insert Logo (), select the logo to insert, and click Add. The available logos are based on the Primary and Secondary logos specified in Admin > Settings > Branding Settings > Document Logos. Logos are unavailable in watermarks and signature blocks.
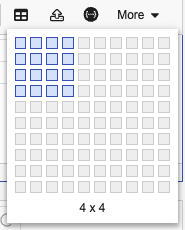
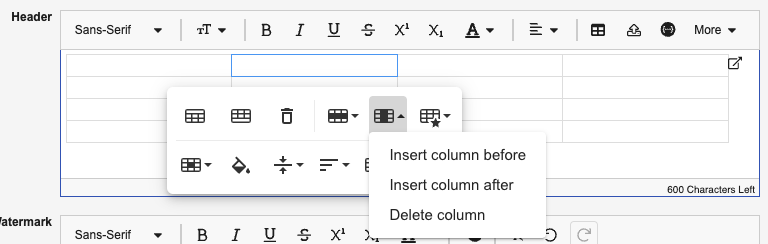
To add a table, click Insert Table () and select the dimensions of the table. To modify the table properties, select a table cell and click the appropriate options from the pop-up toolbar (such as text alignment, background color, insert row and column, and so on). Tables are unavailable in watermarks.
How to Edit Overlay Templates
To edit the name and options of an overlay template, open the overlay template and click Edit. Edit the necessary information and click Save to save the changes.
To edit the content and formatting of an overlay template or overlay format, select Edit from the Actions menu of the overlay row. Edit the content and format the text as needed and click Save to save the changes.
Previewing Overlay Templates
You can click Download Preview to download a PDF preview of your overlay with three example pages using the size and orientation specified in the template. Vault translates any tokens into user-friendly labels in the preview. Download Preview is available in the following areas:
- Click Download Preview while creating or editing an overlay.
- Click the download preview () icon on an overlay row in the Overlay Formats section while viewing saved overlay template details.
- Click Download Preview while viewing saved formatting details for a specific overlay format.
How to Delete Overlay Templates
Deleting an overlay template or overlay format removes it permanently from the Vault. Before deleting an overlay template, you must change the associated lifecycle state to not use the template.
To delete an overlay template, navigate to the Overlays page, hover over the overlay template, and click Delete (). Click Continue in the confirmation dialog to confirm that you want to delete the overlay template.
To delete an overlay format, open the overlay template and select Delete from the Actions menu on the overlay format row. Click Continue in the confirmation dialog to confirm that you want to delete the overlay format.
About Character Limits
When using tokens in the standard overlay header, footer, or diagonal watermark, keep in mind that these areas have maximum character limits. Consider the maximum length of the fields related to each token. Vault truncates the text after it reaches the maximum, so you may notice that some details are not visible when the tokens resolve.
The character limit for headers and footers is 600 characters, and if text exceeds a single line it wraps onto a second line. The character limit for watermarks is 80 characters and the text does not wrap.
Displaying the Current Time on Overlays
If necessary, you can use the currentTime__v token on your overlay template to display the current time when Vault generates the rendition. This can be helpful if multiple downloads may occur on the same date. This token displays the current time and the time zone based on the downloading user’s locale settings. You can use the current time token and the current date token to display the date and time the rendition was downloaded.
Required Overlays
By default, Vault prevents users from downloading renditions without applied overlays in the event overlays fail to apply. To allow users to download renditions without overlays in the event the overlay fails to apply, navigate to Business Admin > Templates > Overlays and select an overlay template. Click Edit, select the Allow download without Overlay checkbox, then click Save.
File Size & Page Limitations for Overlays
Vault optimizes downloaded viewable renditions configured with basic or advanced overlays by removing duplicate fonts, images, and other elements, resulting in smaller PDF files.
Upon downloading, Vault may not apply overlays to files exceeding 100 MB or 1000 pages.
Document Margins
Vault applies overlay headers and footers or left and right margins according to the margin sizes defined in the associated overlay format. By default, these margins are 54 points (.75 inches). When creating or editing an overlay format, you can enter custom margin sizes in points up to a maximum size of half of the document’s height (for headers and footers) or width (for left and right margins).
Overlay Formats
Overlay format overrides allow you to create overrides to the default overlay format which controls the specific fonts, styles, layout, images, and Vault fields captured when the template is rendered on a document.
Overlay formats are specific to page dimensions, orientations, and placements for the header and footer or left and right margins. When Vault applies an overlay, it looks for overlay format overrides first and applies them to any pages in the document that match the page specifications. If no matching overlay format overrides are found, Vault applies the default overlay format. Vault applies this logic to each individual page within a viewable rendition, so some pages may use overlay format overrides, while others may use the default overlay format.
For example, your overlay template’s setup includes two overlay formats: a default overlay format for 8.5”x11” portrait pages and an overlay format override for 8.5”x11” landscape pages. Your document includes several pages with each of these specifications, as well as several 5”x5” pages of graphs. Vault applies the default overlay format to the 8.5”x11” portrait pages, the overlay format override to the 8.5”x11” landscape pages, and the default overlay format to the 5”x5” pages because there are no overlay format overrides for 5”x5” pages.
Overlay format overrides are complex to render and make it slower to prepare the viewable rendition for download. If download times are a concern on your Vault, we recommend using only default overlay formats instead.
How to Create Overlay Format Overrides
To create an overlay format override:
- On the overlay template page, click + Create in the Overlay Formats section.
- In the Create New Overlay Format dialog, select the Paper Size.
- Select Portrait or Landscape for the Orientation.
- Select Header/Footer or Left/Right Margin for the Placement.
- Click Continue.
- On the Create Standard Overlay Format page, enter the Name of the overlay format override.
- Optional: Enter and format text, tokens, and logos for the Header or Left Margin.
- Optional: Enter and format text and tokens for the Watermark. The watermark appears diagonally across the center of the downloaded rendition.
- Optional: Enter format text, tokens, and logos for the Footer or Right Margin.
- Optional: Enter margin values in points in the Header Margin and Footer Margin or Left Margin and Right Margin fields.
- Click Save. Vault displays the new overlay format override in the Overlay Formats section of the overlay template page.
Configuring an Overlay Page Size Tolerance
When configured, Vault applies overlays to documents within 0.5” of the specified height or width of the overlay. If no matching overlay template overrides within the 0.5” page tolerance are found, Vault applies the standard overlay template.
For example, your overlay template setup includes a default overlay format for 8.5”x11” portrait pages and an overlay format override for 8.5”x11” landscape pages. Your document includes several 8.5”x11” portrait pages, several 9”x11” landscape pages, and one 8”x8” page. Vault applies the default overlay format to the 8.5”x11” portrait pages, the overlay format override to the 9”x11” landscape pages (because 9”x11” is within the 0.5” overlay page size tolerance for the overlay format override), and the default overlay format to the 8”x8” page (because there are no matching overlay formats within the 0.5” overlay page size tolerance).
To configure page size tolerances for overlays, navigate to Business Admin > Templates > Overlays and select an overlay template. Click Edit and set the Match page to nearest Overlay Override to paper size checkbox, then click Save.
Note: Vault does not scale overlays. As a result, Vault may cut off content in the top right area of an overlay. We recommend relocating any content in the margins on overlay overrides to prevent this from occurring.
Guidelines for XFA PDF Overlay Template Override Files
Note: With 25R1, you can no longer create new XFA-based templates to apply formatting to your overlay or signature page templates, but your documents can continue using existing XFA-based templates.
When creating XFA PDF files to use as overlay template overrides:
- You must use the Text Field type to add a Vault field, regardless of the field’s type in your Vault. For example, include the document name by inserting a text field labeled
name__v. Vault will not accept templates with text field names that do not match document field names in your Vault. - To include images, such as your company logo, add them as image objects. Image field objects are not supported within Vault. Image objects must be flagged to embed the image in the PDF.
- Vault can support up to 150 mapped fields in the overlay override file.
- Be mindful of the wrapping and truncation options that you’re using. Overlays can only be a single page. If the overlay resolves to more than one page, Vault discards the second page, so any details that wrap onto a second page will be lost.
Here are a few suggestions to help ensure your template looks professional and functions as expected:
- Use a custom Adobe object style to keep fonts, font sizes and weights consistent.
- Define which elements can be resized, split across pages, hyphenated, among others.
Disabling Overlays for Specific Documents
Organizations sometimes need to import documents which already have overlays applied. Vault provides the Disable Vault Overlays shared field, which allows you to skip overlays for specific documents. To use this functionality, an Admin must apply the Disable Vault Overlays fields to any document types which require the option to skip overlays. Users can then set the field to Yes on individual documents to disable overlays. If the field is set to No or is blank, Vault applies overlays to the document as usual. When creating a new draft version of a document, the value of this field in the new draft will always default to No.
You cannot disable overlays on content that Vault creates, including eSignature pages and generated 2253 forms.
Enabling Overlays & Signature Pages in the External Viewer
You can configure overlays and signature pages to be displayed in viewable renditions downloaded from the external viewer used in areas such as the Approved Viewer and Approved Email (Veeva Commercial), Public Content Distribution (Veeva Commercial), Safety Distribution (Veeva Safety), and more. If the setting is enabled, both configured overlays and signature pages are applied.
To enable overlays and signature pages in the external viewer, navigate to Admin > Settings > General Settings and select the Download with Overlays and Signature pages in External Viewer checkbox in the Documents section.
This setting does not apply to viewable renditions downloaded from Send as Link emails or notifications.
Enabling Overlays & Signature Pages During Bulk Export
To include overlays and signature pages in viewable renditions when exporting documents in bulk, navigate to Admin > Settings > General Settings and select the Export Viewable Renditions with Overlays and Signature Pages checkbox in the Documents section.