# Enable Exclusion of Obsolete Documents from the PSMF PDF

Learn how to make recommended updates to your Vault's configuration to exclude obsolete documents from the PSMF PDF.

## About the Feature

With the 24R1 release, SafetyDocs excludes obsolete PSMF documents with the **PSMF Content** and **PSMF Generated Document** subtypes from the generated PSMF PDF. For more information, see <a href="/en/lr/01277/#manually-generate-a-psmf-pdf">Manage PSMF Binders and Logbooks</a>.

To support this feature, we recommend making the configuration updates described on this page.

## Configure Settings on the PSMF Content Lifecycle
Navigate to **Admin > Configuration > Document Lifecycles > PSMF Content Lifecycle** and complete the following procedures.

### Add the In Obsoletion State

To add a new state to the **PSMF Content Lifecycle**:

1. On the **States** tab, select **Create**.
2. In the **Label** field, enter `In Obsoletion`.
3. Select the **Do not execute entry actions for workflow cancel state** checkbox.
4. Select **Save**.

### Add Security Settings to the In Obsoletion State 

To grant permissions to different roles in the **In Obsoletion** state:

1. On the **States** tab, select **In Obsoletion**.
2. On the **Security Settings** tab, select **Edit**.
3. Configure the settings as follows then select **Save**:
<table>
    <thead>
        <tr>
            <th>Role</th>
            <th>Permissions</th>
        </tr>
    </thead>
    <tbody>
        <tr>
            <td><em>Owner</em></td>
            <td>
                <ul>
                    <li><em>View Document</em></li>
                    <li><em>View Content</em></li>
                    <li><em>Edit Fields</em></li>
                    <li><em>Edit Sharing Settings</em></li>
                    <li><em>Download Source</em></li>
                    <li><em>Change Owner</em></li>
                </ul>
            </td>
        </tr>
        <tr>
            <td><em>Coordinator</em></td>
            <td>
                <ul>
                    <li><em>View Document</em></li>
                    <li><em>View Content</em></li>
                </ul>
            </td>
        </tr>
        <tr>
            <td><em>Editor</em></td>
            <td>
                <ul>
                    <li><em>View Document</em></li>
                    <li><em>View Content</em></li>
                </ul>
            </td>
        </tr>
        <tr>
            <td><em>Reviewer</em></td>
            <td>
                <ul>
                    <li><em>View Document</em></li>
                    <li><em>View Content</em></li>
                </ul>
            </td>
        </tr>
        <tr>
            <td><em>Approver</em></td>
            <td>
                <ul>
                    <li><em>View Document</em></li>
                    <li><em>View Content</em></li>
                    <li><em>Edit Fields</em></li>
                </ul>
            </td>
        </tr>
        <tr>
            <td><em>PSMF Office</em></td>
            <td>
                <ul>
                    <li><em>View Document</em></li>
                    <li><em>View Content</em></li>
                    <li><em>Edit Fields</em></li>
                    <li><em>Edit Sharing Settings</em></li>
                    <li><em>Download Source</em></li>
                    <li><em>Change Owner</em></li>
                </ul>
            </td>
        </tr>
    </tbody>
 </table>

## Configure the PSMF Content Obsoletion Workflow

To create the PSMF Content Obsoletion workflow:

1. Navigate to **Admin > Configuration > Workflows**.
2. Select **Create** and then select **Document Workflow**.
3. On the **Create Workflow** page, complete the fields as follows then select **Save**:
    * **Label**: Enter `PSMF Content Obsoletion`
    * **Document Lifecycle**: Select **PSMF Content Lifecycle**
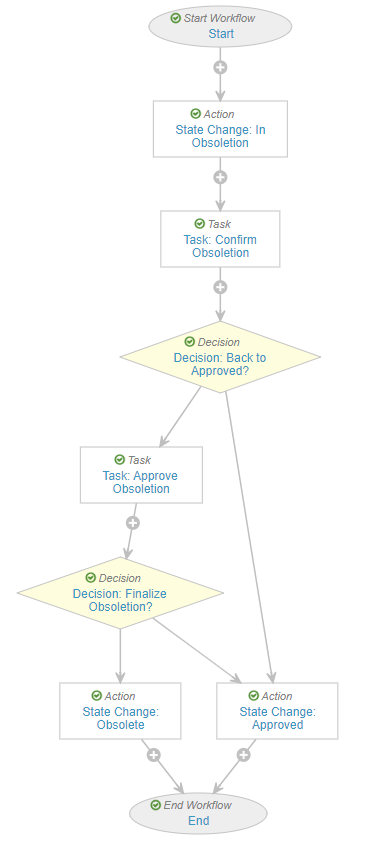
4. Configure the workflow according to your organization's requirements and business processes. The image below and the sections that follow are a general guide for creating this workflow:<br>

<a href="https://platform.veevavault.help/assets/images/saf-24r1-in-obsoletion-workflow.png" data-lightbox="saf-24r1-in-obsoletion-workflow.png" data-title="PSMF Content Obsoletion Workflow" data-alt="PSMF Content Obsoletion Workflow">
  <img class="docimage" src="https://platform.veevavault.help/assets/images/saf-24r1-in-obsoletion-workflow.png" alt="PSMF Content Obsoletion Workflow" style="max-width: 70%;"  />
</a>

### Start Step

To configure the **Start** step:

1. In the **Workflow Steps** section, select **Start**.
2. Select **Edit**.
3. In the **Start Options** section, select **Create Rule** and complete the fields as follows:
    * **Control 1**: Select **Participants**
    * **Participant Label**: Enter `PSMF Office`
    * **Add Participants**: Select **Use Role as Participants**
    * **Role allowed to participate**: Select **PSMF Office**
4. Select **Save**.

### State Change: In Obsoletion Step

To configure the **State Change: In Obsoletion** step:

1. In the **Workflow Steps** section, select **State Change: In Obsoletion**.
2. Select **Edit**.
3. In the **Rules** section, select **Create Rule** and create the following rule:
    * **Always** > perform actions > **Change State**
    * Lifecycle State: **In Obsoletion**
4. Select **Save**.

### Task: Confirm Obsoletion Step

To configure the **Task: Confirm Obsoletion** step:

1. In the **General Settings** section, complete the fields as follows:
    * **Task Label**: Enter `Confirm Obsoletion`.
    * **Assign Task To**: Select **Workflow Owner**.
    * **Instructions**: Enter a description of the task asking the assignee to confirm that they want the document to be made obsolete, and remind them to enter a comment about the obsoletion in the associated Logbook.
    * **Task Requirement**: Select **Required**.
2. In the **Due Date** section, enter **Workflow Start Date + 7 Days**.
3. In the **Prompts** section, select the **Prompt for Verdicts** checkbox and then select **Multiple Verdicts: One verdict for each item**.
4. In the **Verdicts** section, create verdicts as follows then select **Save**:
<br>
<table>
    <thead>
        <tr>
            <th>Role</th>
            <th>Permissions</th>
        </tr>
    </thead>
    <tbody>
        <tr>
            <td><em>Verdict 1</em></td>
            <td>
                <ul>
                    <li><strong>Verdict Label</strong>: Enter <code>Confirm Obsoletion</code>.</li>
                    <li>Select <strong>Add Comments</strong> and enter a prompt to add a reason for obsoletion.</li>
                    <li>Select <strong>Required</strong>.</li>
                </ul>
            </td>
        </tr>
        <tr>
            <td><em>Verdict 2</em></td>
            <td>
                <ul>
                    <li><strong>Verdict Label</strong>: Enter <code>Cancel, Back to Approved</code>.</li>
                </ul>
            </td>
        </tr>
    </tbody>
</table>

### Decision: Back to Approved? Step

To configure the **Decision: Back to Approved?** step:

1. In the **Rules** section, select **Create Rule** and create the following rule:
    * **If** > Task > Task: Confirm Obsoletion > all labels equal > Confirm Obsoletion
    * **Then > Create Step > Label**: `Task: Approve Obsoletion`
    * **Else > then > Create Step > Label**: `State Change: Approved`
2. Select **Save**.

### Task: Approve Obsoletion Step

To configure the **Task: Approve Obsoletion** step:

1. In the **General Settings** section, complete the fields as follows:
    * **Task Label**: Enter `Approve Obsoletion`.
    * **Assign Task To**: Select **PSMF Office**.
    * Select **Make available to users in participant group**.
    * **Instructions**: Enter a description of the task asking the assignee to approve the document's obsoletion, and remind them that completing this task will complete obsoletion and move any associated Logbook comments to the **Final** state.
    * **Task Requirement**: Select **Required**.
    * **Display information about previous tasks**: Select **Task: Confirm Obsoletion**.
2. In the **Due Date** section, enter **Workflow Start Date + 7 Days**.
3. In the **Prompts** section, select the **Prompt for Verdicts** checkbox and then select **Multiple Verdicts: One verdict for each item**.
4. In the **Verdicts** section, create verdicts as follows and select **Save**:
<br>
<table>
    <thead>
        <tr>
            <th>Role</th>
            <th>Permissions</th>
        </tr>
    </thead>
    <tbody>
        <tr>
            <td><em>Verdict 1</em></td>
            <td>
                <ul>
                    <li><strong>Verdict Label</strong>: Enter <code>Confirmed, Obsolete Document</code></li>
                </ul>
            </td>
        </tr>
        <tr>
            <td><em>Verdict 2</em></td>
            <td>
                <ul>
                    <li><strong>Verdict Label</strong>: Enter <code>Cancel, Back to Approved</code></li>
                </ul>
            </td>
        </tr>
    </tbody>
</table>

### Decision: Finalize Obsoletion? Step

To configure the **Decision: Finalize Obsoletion?** step:

1. In the **Rules** section, select **Create Rule** and create the following rule:
    * **If** > Task > Task: Approve Obsoletion > all labels equal > Confirmed, Obsolete Document
    * **Then** > State Change: Obsolete
    * **Else** > then > State Change: Approved
2. Select **Save**.

## Add a User Action on the PSMF Content Lifecycle

To configure an action that can be used to trigger the **PSMF Content Obsoletion Workflow** when a document enters the _Approved_ state:

1. Navigate to **Admin > Configuration > Document Lifecycles > PSMF Content Lifecycle**.
2. On the **States** tab, select **Approved**.
3. On the **User Actions** tab, select **Edit** and then select **Create Rule** to create the following rule:
    * **Always** > Workflow > PSMF Content Obsoletion
    * **Action Label**: `Start Obsoletion`
4. Select **Save**.