# Manage PSMF Binders and Logbooks

SafetyDocs enables you to easily manage PSMF documents by allowing you to:

* [Upload][1] PSMF documents to your _Library_ for use across one or more _PSMF Binders_
* [Author, review, and approve PSMF documents][19]
* Create global and local [_PSMF Binders_][5], allowing Vault to update the _Binder_ when any of its documents change
* [Review and approve _PSMF Binders_][6]
* Generate [PSMF PDFs][7] from approved _PSMF Binders_
* Track changes in a [_PSMF Logbook_][8] 

### Prerequisites

To use this feature, your Admin must enable:

* <a href="/en/lr/01307/">PSMF Automatic Logbook Generation</a>
* <a href="/en/lr/658732/">PSMF Document Deletion</a>
* <a href="/en/lr/679490/">Exclusion of Obsolete Documents from the PSMF PDF</a>
* <a href="/en/lr/714077/">PSMF Version Binding Validation</a>
* <a href="/en/lr/714076/">Order PSMF Logbook by Section/Annex</a>
* <a href="/en/lr/1086400/">PSMF Request Management</a>

## Upload PSMF Documents {#upload-psmf-documents}

<a href="/en/lr/15085/#upload">Upload PSMF documents</a> to your _Library_ using one of the following dedicated PSMF document types:

* _Pharmacovigilance System Master File > PSMF Binder > PSMF Global Binder_
* _Pharmacovigilance System Master File > PSMF Binder > PSMF Local Binder_
* _Pharmacovigilance System Master File > PSMF Content > PSMF Title Page_
* _Pharmacovigilance System Master File > PSMF Content > PSMF Core Document_
* _Pharmacovigilance System Master File > PSMF Content > PSMF Annex_
* _Pharmacovigilance System Master File > PSMF Generated Document > PSMF Table of Contents_
* _Pharmacovigilance System Master File > PSMF Generated Document > PSMF Logbook_
* _Pharmacovigilance System Master File > PSMF Generated Document > PSMF eSignature_
* _Pharmacovigilance System Master File > PSMF Generated Document > PSMF Generated PDF_
* _Pharmacovigilance System Master File > PSMF Generated Document > PSMF Generated Report_

Once you have uploaded a _PSMF Binder_ or _PSMF Content_ document, you can <a href="/en/lr/01241/#include-in-reviews">include it in a periodic review</a> to ensure its content is regularly updated.

 <div class="note-border alert-info">
  <div class="alert alert-info" role="alert">
    <div><i class="far fa-info-circle"></i></div>
    <div class="alert-text">
      <p><strong>Note</strong>: If a <em>PSMF Request</em> includes a document in its <a href="/en/lr/1087971/#documents-section"><em>PSMF Document(s) for Submission</em> section</a>, Vault populates the document’s <em>PSMF Request</em> field with that <em>PSMF Request</em>.</p>
    </div>
  </div>
</div>


Depending on your <a href="/en/lr/1007277/">Admin's configuration</a>, Vault can <a href="/en/lr/01242/#automated-activity-creation">monitor and detect</a> when a _PSMF Generated PDF_ document moves into the _Final_ state and create a series of PVA obligation-related object records to allow you to take the necessary steps to address the related PSMF event.

<a id="generate-logbook-entry-on-draft"></a>Depending on your <a href="/en/lr/01307/#r262-prevent-automatic-psmf-logbook-generation">Admin's configuration</a>, the value you select for the _Generate Logbook Entry on Draft_ field determines whether Vault creates a placeholder [_PSMF Logbook Entry_][14] when a document is created or upversioned.

## Working with PSMF Documents {#working-with-psmf-documents}

You can use the following workflows to draft and finalize the necessary content updates for your _PSMF Content_ documents:

1. [Author your PSMF document updates][2].
2. [Start the PSMF document review][20].
3. [Review the PSMF document][21].
4. [Approve the PSMF document][22].

### Author a PSMF Document {#author-psmf-documents}

To start authoring a PSMF document:
1. Navigate to **PSMF > PSMF Content** and select the document that you want to author. Alternatively, you can navigate to a PSMF document from within a [_PSMF Binder_][5].
2. From the _Workflow Actions_ menu (<img class="inline" src="https://platform.veevavault.help/assets/images/saf-workflow-state-change.png" alt="Workflow-State-Button" style=" width: 2.5rem;" />), select **Start Authoring**. 
3. In the _Start Workflow_ window, enter the following information:
   * **Authors**: Select one or more users to author the document.
   * Optional: **Instructions**: Enter any instructions for the authors.
   * **Due Date**: Use the calendar to select a due date or enter the date manually.
4. Select **Start**.

Vault assigns an _Author Document_ task to the selected authors and updates the document lifecycle state to _In Authoring_. To complete the assigned _Author Document_ task:
1. Navigate to the _Author Document_ task and make the applicable document changes.
2. Select **Complete**.
3. In the _Author Document_ dialog, select the appropriate _Verdict_, then select **Complete**.

Once complete, Vault updates the document lifecycle state to _Ready for Review_.

 <div class="note-border alert-info">
  <div class="alert alert-info" role="alert">
    <div><i class="far fa-info-circle"></i></div>
    <div class="alert-text">
      <p><strong>Note</strong>: Depending on your Admin’s configuration, the document may require <a href="/en/lr/01277/#logbook-panel"><em>PSMF Logbook Entries</em></a> meet the following criteria before you can complete the authoring task:</p>
<ul>
  <li>All <em>PSMF Logbook Entries</em> must have a <em>Summary of Changes</em> value.</li>
  <li>If the document is part of an active <a href="/en/lr/01277/#working-with-psmf-documents">PSMF document workflow</a> and is at version 1.1 or greater, the document must have a <em>PSMF Logbook Entry</em> from each contributor with an open or complete workflow task associated with the document.</li>
</ul>
    </div>
  </div>
</div>


#### Add Link Annotations {#add-link-annotations}

During authoring, authors can add <a href="/en/lr/15303/">link annotations</a> to create links to other documents within a _PSMF Binder_ or to specific locations in a document, such as when linking content in a core document to reference data in annexes.

<a id="resolve-link-annotations"></a>When [manually][7] or [automatically][10]  generating a PSMF PDF from a _PSMF Binder_, Vault ignores links to Vault documents outside of the _PSMF Binder_ and resolves only links to other documents within the _PSMF Binder_. This prevents non-Vault-user readers from encountering links to documents in the Vault _Library_ that they may not have permissions to view.

<div class="note-border alert-info">
  <div class="alert alert-info" role="alert">
    <div><i class="far fa-info-circle"></i></div>
    <div class="alert-text">
      <p><strong>Note</strong>: Link annotations that reference older versions of a PSMF document will result in an error when generating PSMF PDFs. Ensure that link annotations are always referencing the latest version of a PSMF document.</p>
    </div>
  </div>
</div>


### Start the PSMF Document Review {#start-document-review}
To initiate the review of a PSMF document:

1. For the document that you want to review, select the **Workflow State Change** menu (<img class="inline" src="https://platform.veevavault.help/assets/images/saf-workflow-state-change.png" alt="Workflow-State-Button" style=" width: 2rem;" />), then select **Start Review**.
2. On the **Start Workflow** window, select options in the following fields:
    * **Reviewers**
    * **Due Date**
    * Optional: Enter any instructions
3. Select **Start**.

Vault updates the document lifecycle state to _In Review_ and assigns a _Review PSMF Document(s)_ task to the selected reviewers.

### Review the PSMF Document {#review}

After reviewing the PSMF document, use the following steps to indicate your verdict and move the document to the next stage of the workflow:

1. From within the document or on the **My Tasks** page, select **Complete**.
2. On the **Review PSMF Document(s)** page, select from the following options:
  * **No changes needed, ready for approval**
  * **Changes needed, back to draft**
3. Select **Complete**.

**Result**

If the verdict entered was **No changes needed, ready for approval**, the document lifecycle state becomes **In Approval**, and an **Approve** task is assigned to the selected approvers. If the verdict entered was **Changes needed, back to draft**, the document lifecycle returns to **Draft** so the required changes can be made.

### Approve the PSMF Document {#approve}

After reviewing the PSMF document, use the following steps to indicate your verdict and move the document to the next stage of the workflow:

1. From within the document or on the **My Tasks** page, select **Complete**.
2. On the **Approve** page, select from the following options:
  * **Approved**
  * **Rejected, back to Draft**
3. Complete the fields as follows: 
  * In the **Capacity** field, select the capacity in which you are rendering a verdict.
  * In the **User Name** and **Password** fields, enter your Vault login credentials to enter your <a href="/en/lr/972/#how-to-provide-esignatures">eSignature</a>.
4. Select **Complete**.

**Result**

If the verdict entered was **Approved**, the document lifecycle state becomes **Approved**. In the associated PSMF Logbook, the state becomes **Final** and the **Summary of Changes** section can no longer be edited. If the verdict entered was **Rejected, back to draft**, the document lifecycle returns to **Draft** so the required changes can be made.

## Working with PSMF Binders {#psmf-binders}
_PSMF Binders_ allow you to organize PSMF documents in a flexible <a href="/en/lr/4386/">binder</a> structure, as well as to [combine the documents into a single PDF][7].

### Create a PSMF Binder {#create-binder}
To create a _PSMF Binder_:
1. Navigate to **PSMF > PSMF Binders**.
2. <a href="/en/lr/15089/">Create the binder</a>, ideally from a template<sup>1</sup>, selecting one of the following document types when prompted:
   * _Pharmacovigilance System Master File > PSMF Binder > PSMF Global Binder_
   * _Pharmacovigilance System Master File > PSMF Binder > PSMF Local Binder_
3. Optional: <a href="/en/lr/01237/#adding-binder-content">Add and arrange binder content</a>. 
4. Select **Done Editing**.
 
 <div class="note-border alert-info">
  <div class="alert alert-info" role="alert">
    <div><i class="far fa-info-circle"></i></div>
    <div class="alert-text">
      <p><strong>Note</strong>: 1. Depending on your <a href="/en/lr/01307/">Admin’s configuration</a>, if you create a <em>PSMF Binder</em> from a recommended template, Vault can include a <em>PSMF Table of Contents</em> and a <em>PSMF Logbook</em>-classified document in your <em>PSMF Binder</em>. These placeholder documents allow Vault to generate a <a href="/en/lr/01277/#psmf-table-of-contents">table of contents</a> and <a href="/en/lr/01277/#psmf-logbook">logbook</a> when <a href="/en/lr/01277/#manually-generate-a-psmf-pdf">merging to a PSMF PDF</a>.</p>
    </div>
  </div>
</div>


Vault creates the _PSMF Binder_ in the _Draft_ state.

### Create a Draft of an Existing PSMF Binder {#create-draft-binder}

To create a draft of an existing _PSMF Binder_:

1. From the _All PSMF Binders_ page, select the _PSMF Binder_ for which you want to create a draft.
2. From the **All Actions** menu, select **Create Draft**.

Vault generates a draft of the selected _PSMF Binder_ including all details except for the [_PSMF Table of Contents_][11]. Vault selects the latest version of each document within the binder to include in this draft.

## Review and Approve PSMF Binders {#review-approve-binders}

Before review and approval, Vault verifies that all _PSMF Content_-type documents in your <a href="/en/lr/15089/">_PSMF Binder_</a> are bound to a state associated with the _Steady_ or _Obsolete_ state types, excluding automatically generated documents such as the [_PSMF Logbook_][8] or [_PSMF Table of Contents_][11]. If documents in the _PSMF Binder_ do not meet these conditions, the _PSMF Binder_ cannot be moved to the _Approved_ state. This ensures that no draft documents are included in your PSMF PDF, and that approval is not blocked by obsolete or auto-generated documents.

### Start the PSMF Binder Review

To initiate the review of a _PSMF Binder_:

1. From the _Workflow Actions_ menu (<img class="inline" src="https://platform.veevavault.help/assets/images/saf-workflow-state-change.png" alt="Workflow-State-Button" style=" width: 2.5rem;" />), select **Start PSMF Review & Approval**.
2. In the _Start Workflow_ window, select options in the following fields:
  * **PSMF Reviewer**
  * **PSMF Approver (QPPV)**
  * **Due Date**
3. Optional: Enter instructions for the reviewers and approvers.
4. Select **Start**.

Vault updates the _PSMF Binder_ lifecycle state to _In Review_, and assigns a _Review PSMF Binder_ task to the selected reviewers. Vault selects the latest steady state version of each document within the _PSMF Binder_ for this review.

### Review the PSMF Binder

After reviewing the _PSMF Binder_, indicate your review verdict:

1. From within the _PSMF Binder_ or on the _My Tasks_ page, select **Complete**.
2. In the _Review PSMF_ dialog, select from the following verdicts:
  * _Continue to approval_
  * _Missing content, back to draft_
3. Select **Complete**.

If the verdict entered was _Continue to approval_, Vault updates the _PSMF Binder_ lifecycle state to _In Approval_, and assigns an _Approve PSMF_ task to the selected approvers. Vault selects the latest steady state version of each document within the _PSMF Binder_ for this approval.

If the verdict entered was _Missing content, back to draft_, Vault updates the _PSMF Binder_ lifecycle state to _Draft_ so the required changes can be made.

### Approve the PSMF Binder

After indicating a review verdict, indicate an approval verdict:

1. From within the _PSMF Binder_ or on the _My Tasks_ page, select **Complete**.
2. In the **Approve PSMF** dialog, select from the following verdicts:
    * _Approved_
    * _Rejected, back to Draft_
3. Complete the following fields: 
    * **Capacity**: Select the capacity in which you are rendering a verdict.
    * **User Name** and **Password**: Enter your Vault login credentials to enter your <a href="/en/lr/972/#how-to-provide-esignatures">eSignature</a>.
4. Select **Complete**.

<a id="result-approve-psmf-binder"></a>If the verdict entered was _Approved_, Vault updates the _PSMF Binder_ lifecycle state to _Approved_. Vault generates a PDF of the full _PSMF Binder_ contents, resolving all [link annotations to other locations in the _PSMF Binder_][9] as intra-document links. To access the PDF, select the **Relationships** icon on the Doc Info pane and expand the **Generated PSMF** section.

If the verdict entered was _Rejected, back to draft_, Vault updates the _PSMF Binder_ lifecycle state to _Draft_ so the required changes can be made.

## PSMF Logbook {#psmf-logbook}
To provide a detailed record of changes made to PSMF documents, Vault includes PSMF logbook functionality:
* The [_PSMF Logbook_ document panel][14] displays a list of _PSMF Logbook Entries_, or change records, for a given major version of a document
* If you add a _PSMF Logbook_ placeholder document to a [_PSMF Binder_][5], when [manually][7] or [automatically][10] generating a PSMF PDF for the binder, Vault aggregates all steady-state _PSMF Logbooks_ across all of its _PSMF Content_ documents and:
    * Creates a _PSMF Logbook_ Excel report document<sup>1</sup> and uploads it to your _Library_, replacing the placeholder _PSMF Logbook_ document in the binder
    * Uses this _PSMF Logbook_ document to populate a logbook in the generated PDF
* You can [preview the _PSMF Logbook_][18] for a given _PSMF Binder_ at any time 

 <div class="note-border alert-info">
  <div class="alert alert-info" role="alert">
    <div><i class="far fa-info-circle"></i></div>
    <div class="alert-text">
      <p><strong>Note</strong>: 1. Depending on your <a href="/en/lr/714076/">Admin’s configuration</a>, Vault orders <em>PSMF Logbook Entries</em> in the <em>PSMF Logbook</em> document by descending date of entry or by the order of PSMF sections and annexes.</p>
    </div>
  </div>
</div>


### PSMF Logbook Panel {#logbook-panel}
When accessing a _PSMF Content_ document, the _PSMF Logbook_ <a href="/en/lr/9753/#doc-info-panels">panel</a> contains a list of _PSMF Logbook Entries_ detailing changes made to that document. Whenever you create or upversion a _PSMF Content_ document to a new major version, Vault creates a placeholder _PSMF Logbook Entry_<sup>1</sup> and populates the _Date of Change_ and _Person Making Change_ [fields][16].

 <div class="note-border alert-info">
  <div class="alert alert-info" role="alert">
    <div><i class="far fa-info-circle"></i></div>
    <div class="alert-text">
      <p><strong>Note</strong>: 1. If the document has a <a href="/en/lr/01277/#generate-logbook-entry-on-draft"><em>Generate Logbook Entry on Draft</em></a> value of <em>No</em>, Vault does not create a placeholder <em>PSMF Logbook Entry</em>.</p>
    </div>
  </div>
</div>


Depending on your permissions, you can [add][15], [edit, or delete][17] _PSMF Logbook Entries_ on a _PSMF Content_ document as needed.

#### Navigate the PSMF Logbook Panel {#navigate-logbook-panel}
Within the _PSMF Logbook_ panel, Vault displays up to 10 _PSMF Logbook Entries_ per page. If a document contains more than 10 entries, select the  **Next** (<img class="inline" src="https://platform.veevavault.help/assets/images/saf-next-icon.png" alt="next icon" style="" />) and **Previous** (<img class="inline" src="https://platform.veevavault.help/assets/images/saf-previous-icon.png" alt="previous icon" style="" />) icons to navigate between pages.

To search through the _PSMF Logbook Entries_ on a document, select the search bar then enter a search term and select **Search** (<img class="inline" src="https://platform.veevavault.help/assets/images/saf-execute-search.png" alt="search button" style="" />) icon, or select **Enter** on your keyboard. Vault returns all _PSMF Logbook Entries_ that contain the exact specified term in the _Person Making Change_ or _Summary of Changes_ fields.

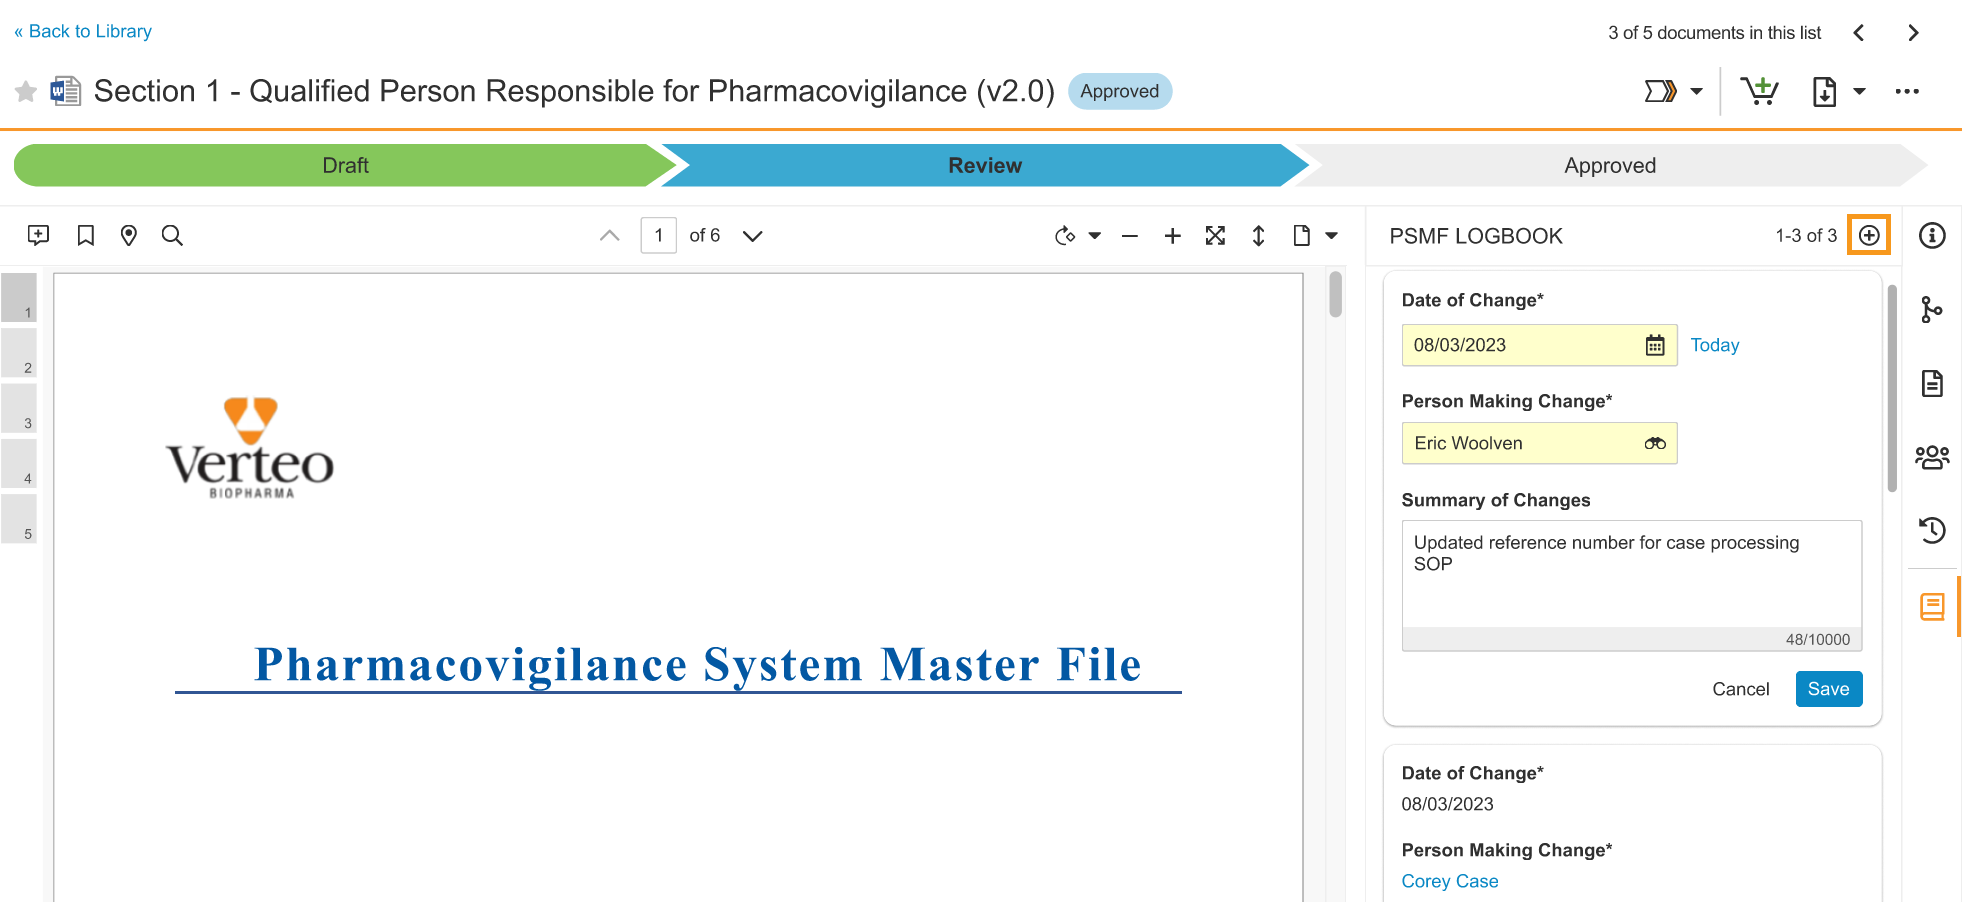
#### Add a PSMF Logbook Entry {#add-psmf-logbook-entry}
To manually add a _PSMF Logbook Entry_ to a _PSMF Content_ document:
1. Navigate to the _PSMF Content_ document.
2. From the <a href="/en/lr/9753/">Doc Info pane</a>, select the **PSMF Logbook** (<img class="inline" src="https://platform.veevavault.help/assets/images/safetydocs-icon-psmf-logbook.png" alt="PSMF Logbook Icon" style="" />) icon to open the _PSMF Logbook_ panel.
3. Select the **Add Logbook Entry** (**+**) icon.
4. Complete the applicable [fields][16], then select **Save**.

<div class="note-border alert-info">
  <div class="alert alert-info" role="alert">
    <div><i class="far fa-info-circle"></i></div>
    <div class="alert-text">
      <p><strong>Note</strong>: You cannot add <em>PSMF Logbook Entries</em> to documents in the <em>Approved</em> state.</p>
    </div>
  </div>
</div>


<a href="https://platform.veevavault.help/assets/images/saf-psmf-logbook-multiple-entries.png" data-lightbox="saf-psmf-logbook-multiple-entries.png" data-title="Select the Plus icon to add a new logbook entry" data-alt="Select the Plus icon to add a new logbook entry">
  <img class="docimage" src="https://platform.veevavault.help/assets/images/saf-psmf-logbook-multiple-entries.png" alt="Select the Plus icon to add a new logbook entry" style="max-width: 70%;"  />
</a>

##### PSMF Logbook Entry Fields {#logbook-entry-fields}
The following fields may be available:

<table>
      <thead>
          <tr>
              <th>Field</th>
              <th>Description</th>
          </tr>
      </thead>
      <tbody>
          <tr>
              <td><em>Date of Change</em></td>
              <td>When Vault creates a <em>PSMF Logbook Entry</em>, this field defaults to the current date. To change it, use the calendar to select the date or enter the date manually.</td>
          </tr>
          <tr>
              <td><em>Person Making Change</em></td>
              <td>When Vault creates a <em>PSMF Logbook Entry</em>, this field defaults to the document <em>Owner</em>. When <a href="/en/lr/01277/#add-psmf-logbook-entry">manually creating</a> a <em>PSMF Logbook Entry</em>, Vault populates the current user. To change it, select a user from the picklist or select the <strong>Advanced Search</strong> icon to use filters and refine your search.</td>
          </tr>
          <tr>
              <td><em>Summary of Changes</em></td>
              <td>When Vault creates a <em>PSMF Logbook Entry</em>, this field is left blank. Enter a description of the changes made to the document.</td>
          </tr>
      </tbody>
  </table>

#### Edit and Delete PSMF Logbook Entries {#edit-delete-logbook-entry}

Depending on your permissions, you can edit and delete _PSMF Logbook Entries_ on a _PSMF Content_ document:

* To edit a _PSMF Logbook Entry_, select the **Edit** (<img class="inline" src="https://platform.veevavault.help/assets/images/saf-edit-icon.png" alt="edit-icon" style="" />) icon.
* To delete a _PSMF Logbook Entry_, select the **Delete** (<img class="inline" src="https://platform.veevavault.help/assets/images/saf-delete-trash-icon.png" alt="saf-delete-trash-icon" style="" />) icon. To retain an audit trail, you cannot delete a _PSMF Logbook Entry_ if it is the only _PSMF Logbook Entry_ for the document version.

Depending on your Admin's configuration, you may be able to edit or delete only _PSMF Logbook Entries_ for which you are the user referenced in the _Person Making Change_ field. If you have the _PSMF Office Manager_ role, you may be able to edit any _PSMF Logbook Entries_.

<div class="note-border alert-info">
  <div class="alert alert-info" role="alert">
    <div><i class="far fa-info-circle"></i></div>
    <div class="alert-text">
      <p><strong>Note</strong>: When you delete a <em>PSMF Content</em> document, Vault also deletes the corresponding <em>PSMF Logbook</em> and any associated <em>PSMF Logbook Entries</em>.</p>
    </div>
  </div>
</div>


### Preview the PSMF Logbook {#preview}
To preview the _PSMF Logbook_ for a _PSMF Binder_:

1. On the **Analytics** tab, select **Reports**.
2. Select **PSMF Binder Logbook**.
3. In the **Binder > Binder Name** field, select the PSMF Binder you want to preview, and then select **Continue**.

## PSMF Table of Contents {#psmf-table-of-contents}

Depending on your Admin's configuration, when generating a _PSMF Binder_, Vault can create and merge a table of contents into the final PSMF PDF. The table of contents lists documents within the _PSMF Binder_ using either the document's _Name_ or _Title_ value. Each row in the table of contents links to the first page of the document.

 <div class="note-border alert-info">
  <div class="alert alert-info" role="alert">
    <div><i class="far fa-info-circle"></i></div>
    <div class="alert-text">
      <p><strong>Note</strong>: To generate a <em>PSMF Table of Contents</em> document, your <em>PSMF Binder</em> must include a document with the <em>Pharmacovigilance System Master File &gt; PSMF Generated Document &gt; PSMF Table of Contents</em> classification created from <a href="/en/lr/01307/#23r1-update-psmf-table-of-contents-template">your Admin’s table of contents template</a>.</p>
    </div>
  </div>
</div>


When generating the table of contents, Vault:
* Generates a line in the _PSMF Table of Contents_ document for each document in the _PSMF Binder_
* Creates a new major version of the _PSMF Table of Contents_ and sets it to a steady state

## eSignature Page

If the binder includes a document with the PSMF eSignature classification, Vault uses it to generate an eSignature page leveraging the eSignature template configured in your Vault. This page is included in the generated PSMF PDF.

<div class="note-border alert-info">
  <div class="alert alert-info" role="alert">
    <div><i class="far fa-info-circle"></i></div>
    <div class="alert-text">
      <p><strong>Note</strong>: Each binder can have only one document of the type Pharmacovigilance System Master File &gt; PSMF Generated Document &gt; PSMF eSignature.</p>
    </div>
  </div>
</div>


Ensure that your Admin has set up a planned document for an eSignature page in your PSMF Binder template. For more information, see <a href="/en/lr/01307/#23r3-update-add-planned-documents-to-psmf-binder-templates">Add Planned Documents to PSMF Binder Templates</a>.

## Manually Generate a PSMF PDF {#manually-generate-a-psmf-pdf}

To manually generate a PSMF PDF:
1. [Create a new _PSMF Binder_][13] or [create a draft of an existing _PSMF Binder_][12].
2. [Review and approve the _PSMF Binder_][6].
3. Select **Generate PSMF PDF**.
4. Optional: To download the _PSMF PDF_:
   1. Navigate to **PSMF > Generated PSMFs**.
   2. Select the relevant _PSMF Generated PDF_.
   3. <a href="/en/lr/36402/#download">Download the document</a> as a source file or a PDF.

Vault generates the PSMF PDF, with all pages (including the generated [_PSMF Table of Contents_][11]), numbered in continuous Arabic numerals, and all [link annotations to other locations in the PSMF PDF][9] resolved as intra-document links. The PSMF PDF excludes obsolete documents with the _PSMF Content_ and _PSMF Generated Document_ subtypes, but includes the [_PSMF Logbooks_ and _PSMF Logbook Entries_][8] associated with these documents for record-keeping purposes. If Vault cannot generate a PSMF PDF, Vault sends a notification with details on how to address any errors.

[1]: #upload-psmf-documents
[2]: #author-psmf-documents
[3]: #add-link-annotations
[5]: #psmf-binders
[6]: #review-approve-binders
[7]: #manually-generate-a-psmf-pdf
[8]: #psmf-logbook
[9]: #resolve-link-annotations
[10]: #result-approve-psmf-binder
[11]: #psmf-table-of-contents
[12]: #create-draft-binder
[13]: #create-binder
[14]: #logbook-panel
[15]: #add-psmf-logbook-entry
[16]: #logbook-entry-fields
[17]: #edit-delete-logbook-entry
[18]: #preview
[19]: #working-with-psmf-documents
[20]: #start-document-review
[21]: #review
[22]: #approve