With the 22R3 release, SafetyDocs can generate a Pharmacovigilance System Master File (PSMF) logbook when merging a PSMF Binder to a PDF. Vault populates the logbook based on the PSMF Logbook Entries for each major version of a PSMF document in the PSMF Binder.
Updates
We have added the following updates to this feature:
- Generate Draft PSMF PDF: With the 26R2 release, SafetyDocs introduces the Generate Draft PSMF PDF action, allowing users to produce a draft PDF of a PSMF Binder at any point during the authoring process. To configure your Vault for this feature, see Configure Generate Draft PSMF PDF.
- Prevent Automatic PSMF Logbook Generation: With the 26R2 release, SafetyDocs can prevent the automatic creation of PSMF Logbook Entries whenever a new PSMF document is created or upversioned. To configure your Vault for this feature, see Configure Prevent Automatic PSMF Logbook Generation.
- PSMF: Display Document Title in PDF Table of Contents: With the 26R1 release, SafetyDocs introduces the ability to display document Titles, instead of Names, in PSMF Table of Contents. To configure your Vault for this feature, update the PSMF Table of Contents Label Field setting to Title.
- Increase PSMF Logbook Record Limit: With the 26R1 release, SafetyDocs supports up to 50 PSMF Logbook Entries per major version of a PSMF document. Contact your Veeva Representative to change this limit.
- PSMF Logbook Governance: With the 26R1 release, SafetyDocs introduces the ability to enforce strict PSMF document governance by allowing you to configure PSMF Logbook Entries such that:
- Only the user specified in the Person Making Change field can edit or delete a PSMF Logbook Entry
- When a PSMF document is part of an active PSMF document workflow and is at version 1.1 or greater, users can only move the document to a steady state if it has a PSMF Logbook Entry from each workflow contributor with an open or complete task associated with the document
You can make one or both of these configurations, depending on your business requirements. To configure your Vault for this feature, see Configure PSMF Logbook Governance.
- Add Planned Documents to PSMF Binder Templates: With the 23R3 release, PSMF logbooks and eSignature pages are only automatically generated if documents with the PSMF Logbook or PSMF eSignature classifications have been uploaded. This update allows users to customize these documents in their PSMF binders using the Generate PSMF Documents from Vault Reports feature. To configure your Vault for this feature, see Configure Add Planned Documents to PSMF Binder Templates.
- PSMF Table of Contents Template: With the 23R1 release, SafetyDocs can generate a table of contents for PSMF Binders when merging to PDF. The table of contents in the merged PDF includes links to the first page of every document within it. To configure your Vault for this feature, see Configure PSMF Table of Contents Template.
Overview
To configure this feature in your Vault:
- Update object layouts
- Configure security
- Configure object and document lifecycles
- Configure document and binder templates
- Configure document and binder workflows and lifecycles
- Reclassify PSMF documents using new document types
- Optional: Delete existing templates, document types, and document lifecycles
Update Object Layouts
To configure object layouts, complete the following for the PSMF Logbook and PSMF Logbook Entry objects:
- Copy the standard layout and ensure it is active.
- Set the new custom layout as the default.
- Delete any other existing custom layouts.
Configure Security
You will need to add security settings to grant access to the new PSMF features. Use the following settings as a starting point, but configure access according to your business process:
- Add the PSMF Office application role
- Configure custom PSMF permission sets
- Create a PSMF document type group
- Configure document type permissions
- Update the User Role Setup object fields
Add the PSMF Office Application Role
To add the PSMF Office application role:
- Navigate to Admin > Users & Groups > Application Roles.
- Select Create.
- On the Create Application Role page, enter the following details:
- Label: Select PSMF Office
- Name: Enter
psmf_office__c
- Select Save.
Configure Custom PSMF Permission Sets
To configure custom PSMF permission sets:
- Copy the standard PSMF Coordination Actions and PSMF Contributor Actions permission sets. For each permission set, in the Name field, enter
[Permission Set]_custom, where[Permission Set]is the name of the permission set. - To manage tab-level permissions for each permission set, grant View permissions for the following tabs:
- Home
- Library
- PSMF
- PSMF Binders
- PSMF Logbook
- Periodic Document Reviews
- PSMF Generated Documents
Create a PSMF Document Type Group
To create a PSMF Document Type Group:
- Navigate to Admin > Configuration > Objects > Document Type Group.
- Select Edit.
- In the Options section, select the Display in Business Admin checkbox.
- Navigate to Business Admin > Objects > Document Type Groups.
- Select Create.
- On the Create Document Type Group page, in the Name field, enter
PSMF Documents, then select Save.
Configure Document Type Permissions
To configure document type permissions:
- Navigate to Admin > Configuration > Document Types.
- On the Pharmacovigilance System Master File (pharmacovigilance_system_master_file__v) document type, select the Actions menu, then select Edit Details.
- In the Edit Details dialog, in the Document Type Groups field, add the PSMF Documents group.
- Navigate to the Security tab.
- In the Create Document Permission and Create Binder Permission fields, add the All Internal Users group.
- Select Save.
Update User Role Setup Object Fields
To update the User Role Setup object fields:
- Navigate to Admin > Configuration > Objects > User Role Setup > Fields.
- Select Create.
- In the Step 1 section, select Object.
- In the Step 2 section, in the Label field, enter
Document Type Group. - In the Step 3 section, complete the following:
- In the Object field, select Document Type Group
- Select the Display in default lists and hovercards checkbox
- Select Save.
Configure Object and Document Lifecycles
To configure object and document lifecycles:
Update the PSMF Logbook Entry Lifecycle
To update the PSMF Logbook Entry Lifecycle:
- Add the PSMF Office role.
- Edit role permissions such that the Edit permission is available only on the Draft lifecycle state.
Note: On the PSMF Logbook Lifecycle, ensure Edit permissions are not granted.
Configure Document Lifecycles
To configure document lifecycles:
- Add the PSMF Office role
- Update document lifecycle state security settings
- Create document lifecycle stage groups
- Apply a universal eSignature page template to the PSMF Binder Lifecycle
Add the PSMF Office Role
Add the PSMF Office role to the following document lifecycles:
- PSMF Binder Lifecycle
- PSMF Content Lifecycle
- PSMF Generated Document Lifecycle
To add the PSMF Office role:
- Navigate to Admin > Configuration > Document Lifecycles > [Lifecycle] > Roles.
- Select Create.
- In the Label field, enter
PSMF Office Role. - In the Application Role field, select PSMF Office.
- In the Options section, select the Enable Dynamic Access Control checkbox. In the Confirm Modify dialog, select Continue.
- Select Save.
- Navigate to the PSMF Office Role then select the Sharing Rules tab.
- Select Create, then configure a matching rule as follows:
- Label: Enter
PSMF [Type] - Doctype Group, where[Type]is the document lifecycle type - Rule Criteria: Select the Document Type Group (document_type_group__c) checkbox
- Auto Managed Groups: Enter
${Document Type Group}-${role}
- Label: Enter
- Select Save.
Update Document Lifecycle State Security Settings
To update the PSMF Office role security settings for the applicable document lifecycles:
- Navigate to Admin > Configuration > Document Lifecycles > [Lifecycle] > States > [State] > Security Settings.
- Select Edit.
- For each of the following document lifecycles and states, select the following security settings checkboxes for the PSMF Office role, then select Save:
| Document Lifecycle | Lifecycle State | Security Settings |
|---|---|---|
| PSMF Binder Lifecycle | Draft |
|
| In Review |
|
|
| In Approval |
|
|
| Approved |
|
|
| Superseded |
|
|
| PSMF Content Lifecycle | Draft |
|
| In Authoring |
|
|
| Ready for Review |
|
|
| In Review |
|
|
| In Approval |
|
|
| Approved |
|
|
| Superseded |
|
|
| Planned |
|
|
| PSMF Generated Document Lifecycle | Generated |
|
| Final |
|
|
| Planned |
|
Create Document Lifecycle Stage Groups
Create document lifecycle stage groups and stages according to your organization’s process. We recommend the following:
| Lifecycle Stage Group Label | Document Lifecycle | Stage Labels |
|---|---|---|
| PSMF Binder | PSMF Binder Lifecycle |
|
| PSMF Content | PSMF Content Lifecycle |
|
| PSMF Generated Document | PSMF Generated Document Lifecycle |
|
Configure Document and Binder Templates
Complete the following configuration if you intend to use controlled document templates in your Vault:
- Create document and binder templates
- Add the Table of Contents document to the relevant PSMF Binder templates
- Configure the PSMF Binder signature page
Create Document and Binder Templates
To create PSMF document and binder templates:
- Create basic or controlled document templates based on your organization’s requirements.
- Create binder templates based on your organization’s requirements, using the Sample PSMF Binder template as a guide, if available in your Vault:
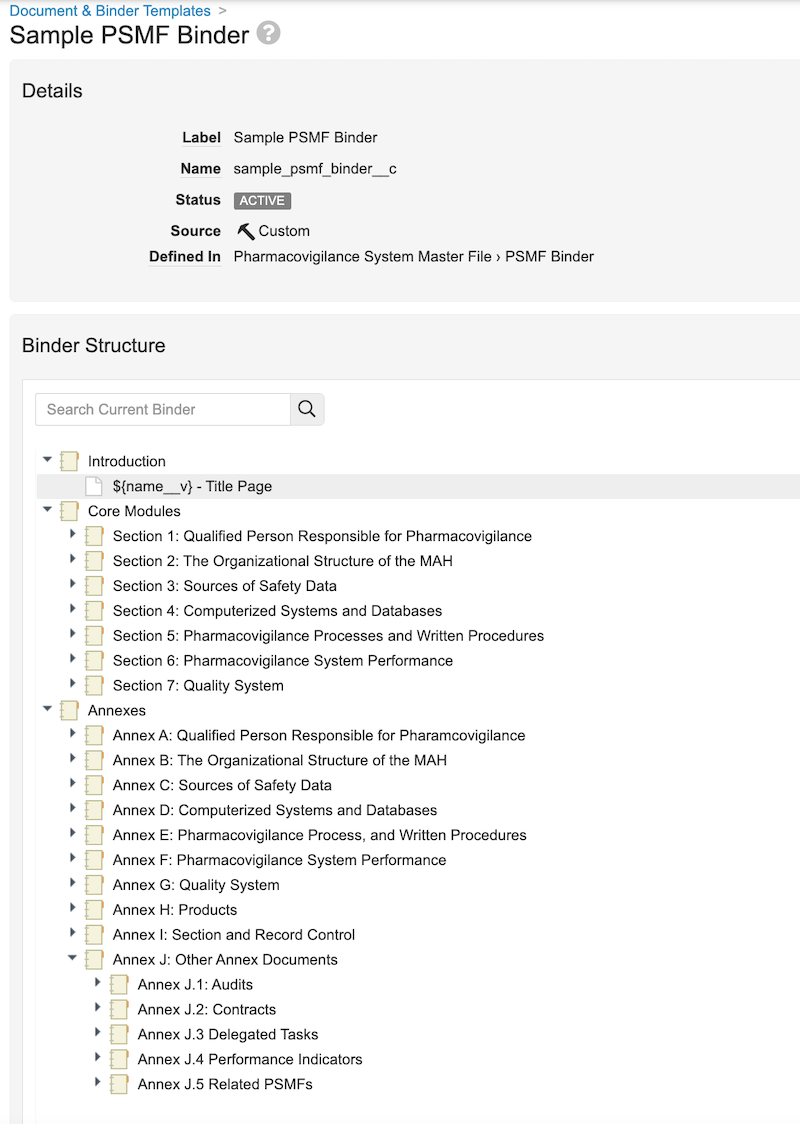
Add the Table of Contents Document to PSMF Binder Templates
To add the Table of Contents document to the relevant PSMF Binder templates:
- Navigate to Business Admin > Templates > Documents and Binders.
- Select the PSMF binder template to which you want to add the table of contents.
- Add a planned document to the Introduction section, populating the fields as follows, then select OK:
| Field | Description |
|---|---|
| Type | Select Pharmacovigilance System Master File. |
| Subtype | Select PSMF Generated Document. |
| Classification | Select PSMF Table of Contents. |
| Lifecycle | Vault populates PSMF Generated Document Lifecycle. |
| Template | Select PSMF Table of Contents Sample. |
| Planned Name | Enter ${name__v} - Table of Contents. |
Configure the PSMF Binder Signature Page
To configure the PSMF Binder signature page:
- Create a signature page template
- Apply the signature page template overlay to the PSMF Content Lifecycle
Create a PSMF Binder Signature Template
Create a signature page template and configure it per your organization’s requirements, or complete the fields as follows:
| Field | Description |
|---|---|
| Name | Enter PSMF Binder Signature Page |
| Template Selection | Select Basic Template |
| Header (first field) | Enter Document Name: ${name__v} |
| Header (second field) | Enter Document ID: ${source_document_id__v} |
| Signature Block 1 | Enter ${signee_name__v}${signee_title__v} |
| Signature Block 2 | Enter ${signature_verdict__v}${signature_capacity__v}${signature_date__v} |
| Location | Select End of Document |
Apply the Signature Page Template Overlay to PSMF Content Lifecycle
Apply the PSMF Binder Signature Page universal overlay template to the PSMF Content Lifecycle.
Configure Binder and Document Workflows and Lifecycles
Configure document workflows and lifecycles according to your organization’s process. The following sections provide sample configurations:
- Create the PSMF Binder Workflow
- Configure the PSMF Binder Lifecycle
- Create PSMF Content document workflows
- Configure the PSMF Content Lifecycle
- Create PSMF Generated Document workflows
- Configure the PSMF Generated Document Lifecycle
Create the PSMF Binder Workflow
To create a document workflow for managing the review and approval process for PSMF Binders:
- Navigate to Admin > Configuration > Workflows.
- Select Create.
- In the Create Workflow dialog, select Document Workflow, then select Continue.
- On the Create Workflow page, populate the fields as follows:
- Label: Enter
PSMF Binder Workflow - Document Lifecycle: Select PSMF Binder Lifecycle
- General: Select the Use workflow for single document checkbox
- Label: Enter
- Select Save.
- Configure the following workflow steps:
- Activate the workflow.
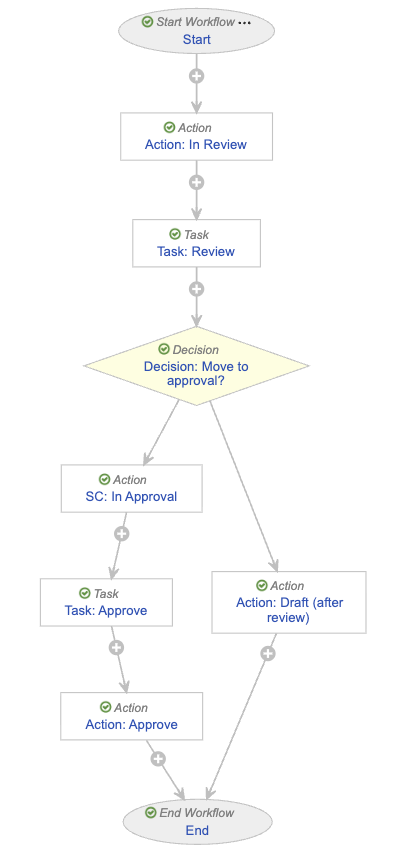
Configure the Start Step
To configure the Start step:
- In the Workflow Steps section, select Start.
- On the Start step page, select Edit.
- In the Details section, populate the Next Steps field as follows:
- Remove the End step
- Select Create Step
- In the Step Name field, enter
Action: In Review - Select OK
- In the Start Options section, select Add Control and populate Control 1 as follows:
- Control 1: Select Instructions
- Instructions: Enter
You are starting the review for ${docName}. Please specify the reviewer and approver. Note this review is reviewing that all expected documents are present, not their content.
- Instructions: Enter
- Control 1: Select Instructions
- Select Add Control, then populate Control 2 as follows:
- Control 2: Select Participants
- Participant Label: Enter
PSMF Reviewer - Add Participants:
- Role allowed to participate: Select PSMF Office
- Select the Allow task instructions for these participants checkbox
- Select the Default users from sharing settings checkbox
- Select Add Control, then populate Control 3 as follows:
- Control 3: Select Participants
- Participant Label: Enter
PSMF Approver (QPPV) - Add Participants:
- Role allowed to participate: Select PSMF Office
- Select the Allow task instructions for these participants checkbox
- Select Add Control, then populate Control 4 as follows:
- Control 4: Select Date
- Label: Enter
Due Date
- Select Save.
- From the Next Steps field, select Action: In Review to navigate to the next step.
Configure the In Review Action Step
To configure the Action: In Review step:
- From the Action: In Review step page, select Edit.
- In the Details section, populate the fields as follows:
- Type: Select Action
- Next Steps
- Select Create Step
- In the Step Name field, enter
Task: Review - Select OK
- In the Rules section, select Create Rule then populate the fields as follows:
- Condition Type: Select Always
- perform actions: Select Change State
- Lifecycle State: Select In Review
- Select Save.
- In the Next Steps field, select Task: Review to navigate to the next step.
Configure the Review Task Step
To configure the Task: Review step:
- From the Task: Review step page, select Edit.
- In the Details section, populate the fields as follows:
- Type: Select Task
- Next Steps
- Select Create Step
- In the Step Name field, enter
Decision: Move to approval? - Select OK
- In the General Settings section, populate the fields as follows:
- Task Label: Enter
Review PSMF Binder - Assign Task To: Select PSMF Reviewer
- Select Make available to users in participant group
- Instructions: Enter
Please review the PSMF Binder ${docName} to ensure all expected documents are present. - Task Requirement: Select Required
- Task Label: Enter
- In the Due Date section, populate the Due Date field with Due Date > - > 2.
- In the Update Sharing Settings section, select Add rule, then populate the Update Role on Event field with Task Assignment > Add > Reviewer.
- In the Prompts section, select the Prompt for Verdicts checkbox, then select Single Verdict: One verdict that applies to all items.
- In the Verdict Label field that appears, enter
Continue to Approval- Select Add Comments, then in the Prompt for Comments field, enter
Comments
- Select Add Comments, then in the Prompt for Comments field, enter
- Select Add Verdict and in the Verdict Label field that appears, enter
Missing content, back to Draft- Select Add Comments, then in the Prompt for Comments field, enter
Comments
- Select Add Comments, then in the Prompt for Comments field, enter
- In the Verdict Label field that appears, enter
- In the Notification section, select Multi-document Workflow Review Task in the Notification Template field.
- Select Save.
- From the Next Steps field, select Decision: Move to approval? to navigate to the next step.
Configure the Move to Approval Decision Step
To configure the Decision: Move to approval? step:
- From the Decision: Move to approval? step page, select Edit.
- In the Type field, select Decision.
- In the Rules section, select Create Rule and populate the fields as follows:
- Condition Type: Select All conditions are met
- if: Select Task > Task: Review > all labels equal > Continue to Approval
- then: Select Create Step
- In the Create Step dialog, enter
Change State: In Approval - Select OK
- In the Create Step dialog, enter
- In the then field of the Else section, select Create Step.
- In the Create Step dialog, enter
Action: Draft (after review) - Select OK
- In the Create Step dialog, enter
- Select Save.
- In the Rules section, select SC: In Approval to navigate to the next step.
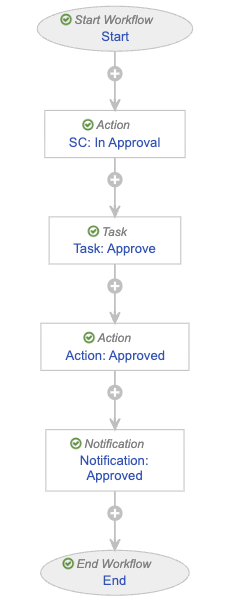
Configure the In Approval State Change Action Step
To configure the SC: In Approval step:
- From the SC: In Approval step page, select Edit.
- In the Details section, populate the fields as follows:
- Type: Select Action
- Next Steps:
- Select Create Step
- In the Step Name field, enter
Task: Approve - Select OK
- In the Rules section, select Create Rule and populate the fields as follows:
- Condition Type: Select Always
- perform actions: Select Change State
- Lifecycle State: Select In Approval
- Select Save.
- From the Next Steps field, select Task: Approve to navigate to the next step.
Configure the Approve Task Step
To configure the Task: Approve step:
- From the Task: Approve step page, select Edit.
- In the Details section, populate the fields as follows:
- Type: Select Task
- Next Steps
- Select Create Step
- In the Step Name field, enter
Action: Approve - Select OK
- In the General Settings section, populate the fields as follows:
- Task Label: Enter
Approve PSMF - Assign Task To: Select PSMF Approver (QPPV)
- Select Make available to users in participant group
- Instructions: Enter
Review and approve or reject PSMF Binder ${docName}. Approval will trigger PDF Generation. - Task Requirement: Select Required
- Display information about previous tasks: Select Task: Review
- Task Label: Enter
- In the Due Date section, populate the Due Date field with Due Date > + > 0.
- In the Update Sharing Settings section, select Add rule, then populate the Update Role on Event field with Task Assignment > Add > Approver.
- In the Prompts section, select the Prompt for Verdicts checkbox, then select Single Verdict: One verdict that applies to all items.
- In the Verdict Label field that appears, enter
Approved- Select Add Capacities
- In the Capacity Label field, enter
Capacitythen select the Required checkbox - Add the following Capacity Values:
- QPPV
- Local QPPV
- Delegate QPPV
- QPPV Office
- Select Add eSignature and populate the Instructions field with
You are providing a binding eSignature
- Select Add Verdict and in the Verdict Label field that appears, enter
Rejected, back to Draft- Select Add Comments
- In the Prompt for Comments field, enter
Comments, then select the Required checkbox
- In the Verdict Label field that appears, enter
- In the Notification section, populate the following fields:
- Notification Template: Select Multi-document Workflow Approval Task
- Select the Include verdicts and comments from previous tasks checkbox
- Select Tasks: Select Task: Review
- Select Save.
- From the Next Steps field, select Action: Approve to navigate to the next step.
Configure the Approve Action Step
To configure the Action: Approve step:
- From the Action: Approve step page, select Edit.
- In the Details section, populate the fields as follows:
- Type: Select Action
- Next Steps: Select End
- In the Rules section, select Create Rule then populate the fields as follows:
- Condition Type: Select All conditions are met
- if: Select Task > Task: Approve > all labels equal > Approved
- perform actions: Select Change State
- Lifecycle State: Select Approved
- Select Create Rule then populate the fields as follows:
- Condition Type: Select All conditions are met
- if: Select Task > Task: Approve > at least one label equals > Rejected, back to Draft
- perform actions: Select Remove eSignature from items
- Task: Select Task: Approve
- Verdicts: Select Approved
- Select Add Action then populate the fields as follows:
- Select Change State
- Lifecycle State: Select Draft
- Select Save.
- Navigate to the main page of the workflow.
Configure the Draft After Review Action Step
To configure the Action: Draft (after review) step:
- From the PSMF Binder Workflow workflow page, select the Action: Draft (after review) step.
- From the Action: Draft (after review) step page, select Edit.
- In the Details section, populate the fields as follows:
- Type: Select Action
- Next Steps: Select End
- In the Rules section, select Create Rule and populate the fields as follows:
- Condition Type: Select Always
- perform actions: Select Change State
- Lifecycle State: Select Draft
- Select Save.
Activate the Workflow
To activate the PSMF Binder Workflow:
- Navigate to the main page of the workflow.
- In the Status field within the Details section, select Make configuration active.
Configure the PSMF Binder Lifecycle
To configure the PSMF Binder Lifecycle:
- Create a user action on the Draft lifecycle state as follows:
- Condition Type: Select Always
- Allow the following actions:
- Select Workflow
- Select PSMF Binder Workflow
- Action Label: Enter
Start PSMF Review & Approval
- Create the following entry actions on the Approved lifecycle state:
- Condition Type: Select Always
- perform actions: Add the following actions:
- Set new major version
- Set previous steady state to superseded
- Generate PSMF PDF
Create PSMF Content Document Workflows
Create the following document workflows to manage the authoring, review, editing, and approval processes for PSMF documents:
Configure the PSMF Content Authoring Workflow
To configure the PSMF Content Authoring workflow:
- Navigate to Admin > Configuration > Workflows.
- Select Create.
- In the Create Workflow dialog, select Document Workflow, then select Continue.
- On the Create Workflow page, populate the fields as follows:
- Label: Enter
PSMF Content Authoring - Document Lifecycle: Select PSMF Content Lifecycle
- Label: Enter
- Select Save.
- Configure the following workflow steps:
- Activate the workflow.
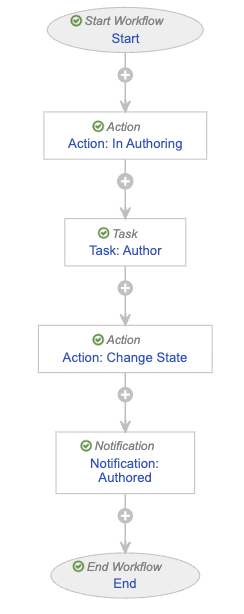
Configure the Start Step
To configure the Start step:
- In the Workflow Steps section, select Start.
- On the Start step page, select Edit.
- In the Details section, populate the Next Steps field as follows:
- Remove the End step
- Select Create Step
- In the Step Name field, enter
Action: In Authoring - Select OK
- In the Start Options section, select Add Control and populate Control 1 as follows:
- Control 1: Select Instructions
- Instructions: Enter
Please select this document's authors.
- Instructions: Enter
- Control 1: Select Instructions
- Select Add Control, then populate Control 2 as follows:
- Control 2: Select Participants
- Participant Label: Enter
Authors - Add Participants: Select the Allow task instructions for these participants checkbox
- Select Add Control, then populate Control 3 as follows:
- Control 3: Select Date
- Label: Enter
Due Date
- Select Save.
- From the Next Steps field, select Action: In Authoring to navigate to the next step.
Configure the In Authoring Action Step
To configure the Action: In Authoring step:
- From the Action: In Authoring step page, select Edit.
- In the Details section, populate the fields as follows:
- Type: Select Action
- Next Steps
- Select Create Step
- In the Step Name field, enter
Task: Author - Select OK
- In the Rules section, select Create Rule then populate the fields as follows:
- Condition Type: Select Always
- perform actions: Select Change State
- Lifecycle State: Select In Authoring
- Select Save.
- In the Next Steps field, select Task: Author to navigate to the next step.
Configure the Author Task Step
To configure the Task: Author step:
- From the Task: Author step page, select Edit.
- In the Details section, populate the fields as follows:
- Type: Select Task
- Next Steps
- Select Create Step
- In the Step Name field, enter
Action: Change State - Select OK
- In the General Settings section, populate the fields as follows:
- Task Label: Enter
Author Document - Assign Task To: Select Authors
- Select Assign to all users in participant group
- Instructions: Enter
Please author document content and PSMF Logbook comment. - Task Requirement: Select Required
- Task Label: Enter
- In the Due Date section, populate the Due Date field with Due Date > + > 0.
- In the Update Sharing Settings section, add the following rules:
- Task Assignment > Add > Editor
- Task Completion > Remove > Editor
- Task Cancellation > Remove > Editor
- Task Reassignment From > Remove > Editor
- In the Prompts section, select the Prompt for Verdicts checkbox, then select Multiple Verdicts: One verdict for each item.
- In the Verdict Label field that appears, enter
Ready for Review - Select Add Verdict and in the Verdict Label field that appears, enter
Changes Required- Select Add Comments, then in the Prompt for Comments field, enter
Comments
- Select Add Comments, then in the Prompt for Comments field, enter
- In the Verdict Label field that appears, enter
- In the Notification section, select Multi-document Workflow Authoring Task in the Notification Template field.
- Select Save.
- From the Next Steps field, select Action: Change State to navigate to the next step.
Configure the Change State Action Step
To configure the Action: Change State step:
- From the Action: Change State step page, select Edit.
- In the Details section, populate the fields as follows:
- Type: Select Action
- Next Steps:
- Select Create Step
- In the Step Name field, enter
Notification: Authored - Select OK
- In the Rules section, select Create Rule and populate the fields as follows:
- Condition Type: Select All conditions are met
- if: Select Task > Task: Author > at least one label equals > Changes Required
- perform actions: Select Change State
- Lifecycle State: Select Draft
- Select Create Rule and populate the fields as follows:
- Condition Type: Select All conditions are met
- if: Select Task > Task: Author > all labels equal > Ready for Review
- perform actions: Select Change State
- Lifecycle State: Select Ready for Review
- Select Save.
- From the Next Steps field, select Notification: Authored to navigate to the next step.
Configure the Authored Notification Step
To configure the Notification: Authored step:
- From the Notification: Authored step page, select Edit.
- In the Details section, populate the fields as follows:
- Type: Select Notification
- Next Steps: Select End
- In the Notification Options section, populate the fields as follows:
- Notification Template: Select Multi-document Workflow Authored
- Recipient: Select Workflow Owner
- Select the Include verdicts and comments from previous tasks checkbox
- Select Tasks: Select Task: Author
- Select Save.
Activate the Workflow
To activate the PSMF Content Authoring workflow:
- Navigate to the main page of the workflow.
- In the Status field within the Details section, select Make configuration active.
Configure the PSMF Content Review Workflow
To configure the PSMF Content Review workflow:
- Navigate to Admin > Configuration > Workflows.
- Select Create.
- In the Create Workflow dialog, select Document Workflow, then select Continue.
- On the Create Workflow page, populate the fields as follows:
- Label: Enter
PSMF Content Review - Document Lifecycle: Select PSMF Content Lifecycle
- Label: Enter
- Select Save.
- Configure the following workflow steps:
- Activate the workflow.
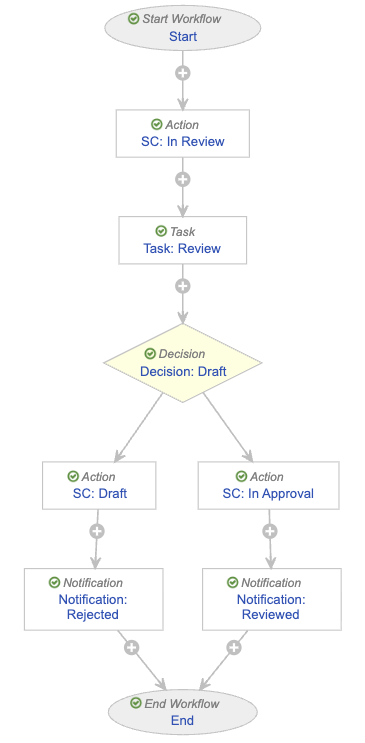
Configure the Start Step
To configure the Start step:
- In the Workflow Steps section, select Start.
- On the Start step page, select Edit.
- In the Details section, populate the Next Steps field as follows:
- Remove the End step
- Select Create Step
- In the Step Name field, enter
SC: In Review - Select OK
- In the Start Options section, select Add Control and populate Control 1 as follows:
- Control 1: Select Instructions
- Instructions: Enter
You are starting document review. This means no additional edits are required. Please select reviewers and due date.
- Instructions: Enter
- Control 1: Select Instructions
- Select Add Control, then populate Control 2 as follows:
- Control 2: Select Participants
- Participant Label: Enter
Reviewers - Add Participants: Select the Allow task instructions for these participants checkbox
- Select Add Control, then populate Control 3 as follows:
- Control 3: Select Date
- Label: Enter
Due Date
- Select Save.
- From the Next Steps field, select SC: In Review to navigate to the next step.
Configure the In Review State Change Action Step
To configure the SC: In Review step:
- From the SC: In Review step page, select Edit.
- In the Details section, populate the fields as follows:
- Type: Select Action
- Next Steps:
- Select Create Step
- In the Step Name field, enter
Task: Review - Select OK
- In the Rules section, select Create Rule and populate the fields as follows:
- Condition Type: Select Always
- perform actions: Select Change State
- Lifecycle State: Select In Review
- Select Save.
- From the Next Steps field, select Task: Review to navigate to the next step.
Configure the Review Task Step
To configure the Task: Review step:
- From the Task: Review step page, select Edit.
- In the Details section, populate the fields as follows:
- Type: Select Task
- Next Steps
- Select Create Step
- In the Step Name field, enter
Decision: Draft - Select OK
- In the General Settings section, populate the fields as follows:
- Task Label: Enter
Review PSMF Document(s) - Assign Task To: Select Reviewers
- Select Assign to all users in participant group
- Instructions: Enter
Review content and logbook comment for completeness and correctness - Task Requirement: Select Required
- Task Label: Enter
- In the Due Date section, populate the Due Date field with Due Date > - > 3.
- In the Update Sharing Settings section, add the following rules:
- Task Assignment > Add > Reviewer
- Task Cancellation > Remove > Reviewer
- Task Reassignment From > Remove > Reviewer
- In the Prompts section, select the Prompt for Verdicts checkbox, then select Multiple Verdicts: One verdict for each item.
- In the Verdict Label field that appears, enter
Ready for Approval - Select Add Verdict and in the Verdict Label field that appears, enter
Rejected- Select Add Comments, then in the Prompt for Comments field, enter
Reasonand select the Required checkbox
- Select Add Comments, then in the Prompt for Comments field, enter
- In the Verdict Label field that appears, enter
- In the Notification section, select Multi-document Workflow Review Task in the Notification Template field.
- Select Save.
- From the Next Steps field, select Decision: Draft to navigate to the next step.
Configure the Draft Decision Step
To configure the Decision: Draft step:
- From the Decision: Draft step page, select Edit.
- In the Type field, select Decision.
- In the Rules section, select Create Rule and populate the fields as follows:
- Condition Type: Select All conditions are met
- if: Select Task > Task: Review > at least one label equals > Rejected
- then: Select Create Step
- In the Create Step dialog, enter
SC: Draft - Select OK
- In the Create Step dialog, enter
- In the then field of the Else section, select Create Step.
- In the Create Step dialog, enter
SC: In Approval - Select OK
- In the Create Step dialog, enter
- Select Save.
- In the Rules section, select SC: Draft to navigate to the next step.
Configure the Draft State Change Action Step
To configure the SC: Draft step:
- From the SC: Draft step page, select Edit.
- In the Details section, populate the fields as follows:
- Type: Select Action
- Next Steps:
- Select Create Step
- In the Step Name field, enter
Notification: Rejected - Select OK
- In the Rules section, select Create Rule and populate the fields as follows:
- Condition Type: Select Always
- perform actions: Select Change State
- Lifecycle State: Select Draft
- Select Save.
- From the Next Steps field, select Notification: Rejected to navigate to the next step.
Configure the Rejected Notification Step
To configure the Notification: Rejected step:
- From the Notification: Rejected step page, select Edit.
- In the Details section, populate the fields as follows:
- Type: Select Notification
- Next Steps: Select End
- In the Notification Options section, populate the fields as follows:
- Notification Template: Select Multi-document Workflow Rejected
- Recipient: Select Workflow Owner
- Select the Include verdicts and comments from previous tasks checkbox
- Select Tasks: Select Task: Review
- Select Save.
- Navigate to the main page of the workflow.
Configure the In Approval State Change Action Step
To configure the SC: In Approval step:
- From the PSMF Content Review workflow page, select the SC: In Approval step.
- From the SC: In Approval step page, select Edit.
- In the Details section, populate the fields as follows:
- Type: Select Action
- Next Steps:
- Select Create Step
- In the Step Name field, enter
Notification: Reviewed - Select OK
- In the Rules section, select Create Rule and populate the fields as follows:
- Condition Type: Select All conditions are met
- if: Select Task > Task: Review > all labels equal > Ready for Approval
- then: Select Change State
- Lifecycle State: Select Ready for Approval
- Select Save.
- From the Next Steps field, select Notification: Reviewed to navigate to the next step.
Configure the Reviewed Notification Step
To configure the Notification: Reviewed step:
- From the Notification: Reviewed step page, select Edit.
- In the Details section, populate the fields as follows:
- Type: Select Notification
- Next Steps: Select End
- In the Notification Options section, populate the fields as follows:
- Notification Template: Select Multi-document Workflow Reviewed
- Recipient: Select Workflow Owner
- Select the Include verdicts and comments from previous tasks checkbox
- Select Tasks: Select Task: Review
- Select Save.
Activate the Workflow
To activate the PSMF Content Review workflow:
- Navigate to the main page of the workflow.
- In the Status field within the Details section, select Make configuration active.
Configure the PSMF Content Approval Workflow
To configure the PSMF Content Approval workflow:
- Navigate to Admin > Configuration > Workflows.
- Select Create.
- In the Create Workflow dialog, select Document Workflow, then select Continue.
- On the Create Workflow page, populate the fields as follows:
- Label: Enter
PSMF Content Approval - Document Lifecycle: Select PSMF Content Lifecycle
- Label: Enter
- Select Save.
- Configure the following workflow steps:
- Activate the workflow.
Configure the Start Step
To configure the Start step:
- In the Workflow Steps section, select Start.
- On the Start step page, select Edit.
- In the Details section, populate the Next Steps field as follows:
- Remove the End step
- Select Create Step
- In the Step Name field, enter
SC: In Approval - Select OK
- In the Start Options section, select Add Control and populate Control 1 as follows:
- Control 1: Select Instructions
- Instructions: Enter
You are starting document approval. This means no additional edits are required.
- Instructions: Enter
- Control 1: Select Instructions
- Select Add Control, then populate Control 2 as follows:
- Control 2: Select Participants
- Participant Label: Enter
Approver - Add Participants: Select the Allow task instructions for these participants checkbox
- Select Add Control, then populate Control 3 as follows:
- Control 3: Select Date
- Label: Enter
Due Date
- Select Save.
- From the Next Steps field, select SC: In Approval to navigate to the next step.
Configure the In Approval State Change Action Step
To configure the SC: In Approval step:
- From the SC: In Approval step page, select Edit.
- In the Details section, populate the fields as follows:
- Type: Select Action
- Next Steps:
- Select Create Step
- In the Step Name field, enter
Task: Approve - Select OK
- In the Rules section, select Create Rule and populate the fields as follows:
- Condition Type: Select Always
- perform actions: Select Change State
- Lifecycle State: Select In Approval
- Select Save.
- From the Next Steps field, select Task: Approve to navigate to the next step.
Configure the Approve Task Step
To configure the Task: Approve step:
- From the Task: Approve step page, select Edit.
- In the Details section, populate the fields as follows:
- Type: Select Task
- Next Steps
- Select Create Step
- In the Step Name field, enter
Action: Approved - Select OK
- Tags
- Select Create Tag
- In the Label field, enter
Approval - Select Save
- In the General Settings section, populate the fields as follows:
- Task Label: Enter
Approve - Assign Task To: Select Approver
- Select Assign to all users in participant group
- Instructions: Enter
Please review and approve PSMF content documents. This includes reviewing logbook comment - Task Requirement: Select Required
- Task Label: Enter
- In the Due Date section, populate the Due Date field with Due Date > + > 0.
- In the Update Sharing Settings section, add the following rules:
- Task Assignment > Add > Approver
- Task Cancellation > Remove > Approver
- Task Reassignment From > Remove > Approver
- In the Prompts section, select the Prompt for Verdicts checkbox, then select Multiple Verdicts: One verdict for each item.
- In the Verdict Label field that appears, enter
Approved- Select Add Capacities
- In the Capacity Label field, enter
Capacitythen select the Required checkbox - Add the following Capacity Values:
- Document Owner
- Delegate Document Owner
- QPPV
- QPPV Office
- Select Add eSignature and populate the Instructions field with
You are providing a compliant eSignature
- Select Add Verdict
- In the Verdict Label field that appears, enter
Rejected, back to Draft - Select the Short-circuit tasks with the configured tags. checkbox
- Select At least one item has this verdict
- In the Tags field, select Approval
- Select Add Comments, then in the Prompt for Comments field, enter
Reasonand select the Required checkbox
- In the Verdict Label field that appears, enter
- In the Verdict Label field that appears, enter
- In the Notification section, select Multi-document Workflow Approval Task in the Notification Template field.
- Select Save.
- From the Next Steps field, select Action: Approved to navigate to the next step.
Configure the Approved Action Step
To configure the Action: Approved step:
- From the Action: Approved step page, select Edit.
- In the Details section, populate the fields as follows:
- Type: Select Action
- Next Steps:
- Select Create Step
- In the Step Name field, enter
Notification: Approved - Select OK
- In the Rules section, select Create Rule and populate the fields as follows:
- Condition Type: Select All conditions are met
- if: Select Task > Task: Approve > all labels equal > Approved
- perform actions: Select Change State
- Lifecycle State: Select Approved
- Select Create Rule and populate the fields as follows:
- Condition Type: Select All conditions are met
- if: Select Task > Task: Approve > at least one label equals > Rejected, back to Draft
- perform actions: Select Remove eSignature from items
- Task: Select Task: Approve
- Verdicts: Select Approved
- Select Add Action then populate the fields as follows:
- Select Change State
- Lifecycle State: Select Draft
- Select Save.
- From the Next Steps field, select Notification: Approved to navigate to the next step.
Configure the Approved Notification Step
To configure the Notification: Approved step:
- From the Notification: Approved step page, select Edit.
- In the Details section, populate the fields as follows:
- Type: Select Notification
- Next Steps: Select End
- In the Notification Options section, populate the fields as follows:
- Notification Template: Select Multi-document Workflow Approval
- Recipient: Select Workflow Owner
- Select the Include verdicts and comments from previous tasks checkbox
- Select Tasks: Select Task: Approve
- Select Save.
Activate the Workflow
To activate the PSMF Content Approval workflow:
- Navigate to the main page of the workflow.
- In the Status field within the Details section, select Make configuration active.
Configure the Move to Draft (PSMF Content) Workflow
To configure the Move to Draft (PSMF Content) workflow:
- Navigate to Admin > Configuration > Workflows.
- Select Create.
- In the Create Workflow dialog, select Document Workflow, then select Continue.
- On the Create Workflow page, populate the fields as follows:
- Label: Enter
Move to Draft (PSMF Content) - Document Lifecycle: Select PSMF Content Lifecycle
- Label: Enter
- Select Save.
- Configure the following workflow steps:
- Activate the workflow.
Configure the Start Step
To configure the Start step:
- In the Workflow Steps section, select Start.
- On the Start step page, select Edit.
- In the Details section, populate the Next Steps field as follows:
- Remove the End step
- Select Create Step
- In the Step Name field, enter
SC: Draft - Select OK
- Select Save.
- From the Next Steps field, select SC: Draft to navigate to the next step.
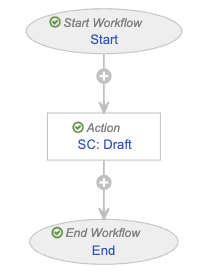
Configure the Draft State Change Action Step
To configure the SC: Draft step:
- From the SC: Draft step page, select Edit.
- In the Details section, populate the fields as follows:
- Type: Select Action
- Next Steps: Select End
- In the Rules section, select Create Rule and populate the fields as follows:
- Condition Type: Select Always
- perform actions: Select Change State
- Lifecycle State: Select Draft
- Select Save.
Activate the Workflow
To activate the Move to Draft (PSMF Content) workflow:
- Navigate to the main page of the workflow.
- In the Status field within the Details section, select Make configuration active.
Configure the PSMF Content Lifecycle
To allow users to initiate workflows on PSMF Content documents, add user actions on the PSMF Content Lifecycle as follows:
| Lifecycle State | Action Conditions |
|---|---|
| Planned |
|
| Draft |
|
| Ready for Review |
|
| Ready for Approval |
|
Create PSMF Generated Document Workflows
Create the following document workflows to manage the PSMF PDF generation process:
Configure the Move to Generated Workflow
To configure the Move to Generated workflow:
- Navigate to Admin > Configuration > Workflows.
- Select Create.
- In the Create Workflow dialog, select Document Workflow, then select Continue.
- On the Create Workflow page, populate the fields as follows:
- Label: Enter
Move to Generated - Document Lifecycle: Select PSMF Generated Document Lifecycle
- Label: Enter
- Select Save.
- Configure the following workflow steps:
- Activate the workflow.
Configure the Start Step
To configure the Start step:
- In the Workflow Steps section, select Start.
- On the Start step page, select Edit.
- In the Details section, populate the Next Steps field as follows:
- Remove the End step
- Select Create Step
- In the Step Name field, enter
SC: Generated - Select OK
- Select Save.
- From the Next Steps field, select SC: Generated to navigate to the next step.
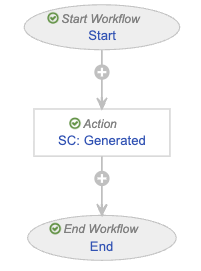
Configure the Generated State Change Action Step
To configure the SC: Generated step:
- From the SC: Generated step page, select Edit.
- In the Details section, populate the fields as follows:
- Type: Select Action
- Next Steps: Select End
- In the Rules section, select Create Rule and populate the fields as follows:
- Condition Type: Select Always
- perform actions: Select Change State
- Lifecycle State: Select Generated
- Select Save.
Activate the Workflow
To activate the Move to Generated workflow:
- Navigate to the main page of the workflow.
- In the Status field within the Details section, select Make configuration active.
Configure the Finalize Generated PSMF Document Workflow
To configure the Finalize Generated PSMF Document workflow:
- Navigate to Admin > Configuration > Workflows.
- Select Create.
- In the Create Workflow dialog, select Document Workflow, then select Continue.
- On the Create Workflow page, populate the fields as follows:
- Label: Enter
Finalize Generated PSMF Document - Document Lifecycle: Select PSMF Generated Document Lifecycle
- Label: Enter
- Select Save.
- Configure the following workflow steps:
- Activate the workflow.
Configure the Start Step
To configure the Start step:
- In the Workflow Steps section, select Start.
- On the Start step page, select Edit.
- In the Details section, populate the Next Steps field as follows:
- Remove the End step
- Select Create Step
- In the Step Name field, enter
SC: Final - Select OK
- In the Start Options section, select Add Control and populate Control 1 as follows:
- Control 1: Select Instructions
- Instructions: Enter
This will finalize the document
- Instructions: Enter
- Control 1: Select Instructions
- Select Save.
- From the Next Steps field, select SC: Final to navigate to the next step.
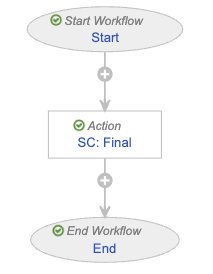
Configure the Final State Change Action Step
To configure the SC: Final step:
- From the SC: Final step page, select Edit.
- In the Details section, populate the fields as follows:
- Type: Select Action
- Next Steps: Select End
- In the Rules section, select Create Rule and populate the fields as follows:
- Condition Type: Select Always
- perform actions: Select Change State
- Lifecycle State: Select Final
- Select Save.
Activate the Workflow
To activate the Finalize Generated PSMF Document workflow:
- Navigate to the main page of the workflow.
- In the Status field within the Details section, select Make configuration active.
Configure the Approve PSMF Generated Document Workflow
To configure the Approve PSMF Generated Document workflow:
- Navigate to Admin > Configuration > Workflows.
- Select Create.
- In the Create Workflow dialog, select Document Workflow, then select Continue.
- On the Create Workflow page, populate the fields as follows:
- Label: Enter
Approve PSMF Generated Document - Document Lifecycle: Select PSMF Generated Document Lifecycle
- Label: Enter
- Select Save.
- Configure the following workflow steps:
- Activate the workflow.
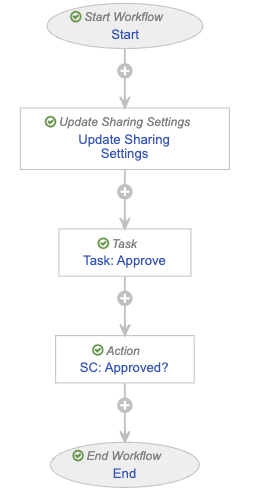
Configure the Start Step
To configure the Start step:
- In the Workflow Steps section, select Start.
- On the Start step page, select Edit.
- In the Details section, populate the Next Steps field as follows:
- Remove the End step
- Select Create Step
- In the Step Name field, enter
Update Sharing Settings - Select OK
- In the Start Options section, select Add Control and populate Control 1 as follows:
- Control 1: Select Instructions
- Instructions: Enter
This starts a review of generated PSMF documents. Please select the approver and due date
- Instructions: Enter
- Control 1: Select Instructions
- Select Add Control, then populate Control 2 as follows:
- Control 2: Select Participants
- Participant Label: Enter
Approver - Add Participants:
- Role allowed to participate: Select PSMF Office
- Select the Allow task instructions for these participants checkbox
- Select the Default users from sharing settings checkbox
- Select Add Control, then populate Control 3 as follows:
- Control 3: Select Date
- Label: Enter
Due Date
- Select Save.
- From the Next Steps field, select Update Sharing Settings to navigate to the next step.
Configure the Update Sharing Settings Step
To configure the Update Sharing Settings step:
- From the Update Sharing Settings step page, select Edit.
- In the Details section, populate the fields as follows:
- Type: Select Update Sharing Settings
- Next Steps
- Select Create Step
- In the Step Name field, enter
Task: Approve - Select OK
- In the Update Sharing Settings Options section, populate the fields as follows:
- Workflow Participants: Select Approver
- Action: Select Add
- Roles: Select Approver
- Select Save.
- From the Next Steps field, select Task: Approve to navigate to the next step.
Configure the Approve Task Step
To configure the Task: Approve step:
- From the Task: Approve step page, select Edit.
- In the Details section, populate the fields as follows:
- Type: Select Task
- Next Steps
- Select Create Step
- In the Step Name field, enter
SC: Approved? - Select OK
- In the General Settings section, populate the fields as follows:
- Task Label: Enter
Approve Generated Document - Assign Task To: Select Approver
- Select Make available to users in participant group
- Instructions: Enter
Please review and approve or reject ${docName} - Task Requirement: Select Required
- Task Label: Enter
- In the Due Date section, populate the Due Date field with Due Date > + > 0.
- In the Prompts section, select the Prompt for Verdicts checkbox, then select Multiple Verdicts: One verdict for each item.
- In the Verdict Label field that appears, enter
Approved - Select Add Verdict
- In the Verdict Label field that appears, enter
Rejected - Select Add Comments, then in the Prompt for Comments field, enter
Reasonand select the Required checkbox
- In the Verdict Label field that appears, enter
- In the Verdict Label field that appears, enter
- In the Notification section, select Multi-document Workflow Approval Task in the Notification Template field.
- Select Save.
- From the Next Steps field, select SC: Approved? to navigate to the next step.
Configure the Approved State Change Action Step
To configure the SC: Approved? step:
- From the SC: Approved? step page, select Edit.
- In the Details section, populate the fields as follows:
- Type: Select Action
- Next Steps: Select End
- In the Rules section, select Create Rule and populate the fields as follows:
- Condition Type: Select All conditions are met
- if: Select Task > Task: Approve > all labels equal > Approved
- perform actions: Select Change State
- Lifecycle State: Select Final
- Select Create Rule then populate the fields as follows:
- Condition Type: Select All conditions are met
- if: Select Task > Task: Approve > at least one label equals > Rejected
- perform actions
- Select Change State
- Lifecycle State: Select Rejected
- Select Save.
Activate the Workflow
To activate the Approve PSMF Generated Document workflow:
- Navigate to the main page of the workflow.
- In the Status field within the Details section, select Make configuration active.
Configure the PSMF Generated Document Lifecycle
Add user actions on the PSMF Generated Document Lifecycle as follows:
| Lifecycle State | Action Conditions |
|---|---|
| Planned |
|
| Generated |
|
|
Reclassify PSMF Documents Using New Document Types
Reclassify your existing PSMF documents to one of the following dedicated PSMF document types:
- Pharmacovigilance System Master File > PSMF Binder > PSMF Global Binder
- Pharmacovigilance System Master File > PSMF Binder > PSMF Local Binder
- Pharmacovigilance System Master File > PSMF Content > PSMF Title Page
- Pharmacovigilance System Master File > PSMF Content > PSMF Core Document
- Pharmacovigilance System Master File > PSMF Content > PSMF Annex
- Pharmacovigilance System Master File > PSMF Generated Document > PSMF Table of Contents
- Pharmacovigilance System Master File > PSMF Generated Document > PSMF Logbook
- Pharmacovigilance System Master File > PSMF Generated Document > PSMF eSignature
- Pharmacovigilance System Master File > PSMF Generated Document > PSMF Generated PDF
- Pharmacovigilance System Master File > PSMF Generated Document > PSMF Generated Report
(Optional) Delete Existing PSMF Templates, Document Types, and Document Lifecycles
To transition to the new PSMF functionality, we recommend deleting:
- Any document templates and binder templates under the Pharmacovigilance System Master File (PSMF) Structure classification
- The Pharmacovigilance System Master File (PSMF) Structure (psmf_structure__c) document type
- The PSMF Lifecycle document lifecycle
Note: Before deleting existing templates, document types, and lifecycles, ensure that you first reclassify your content to the new document types.
(26R2) Configure Generate Draft PSMF PDF
To configure your Vault to generate draft PSMF PDFs:
- Edit the PSMF Binder Signature Page template: Update the second line of the Header value to the following:
Document Version ID: ${global_version_id__sys} - On the relevant lifecycle states of the PSMF Binder Lifecycle document lifecycle, create a user action as follows:
- Condition Type: Select Always
- Allow the following actions: Select Generate Draft PSMF PDF
- Action Label: Enter
Generate Draft PSMF PDF
(26R2) Configure Prevent Automatic PSMF Logbook Generation
To configure your Vault to prevent the automatic creation of PSMF Logbook Entries, assign the Generate Logbook Entry on Draft shared field to the relevant PSMF document types for your business processes.
(26R1) Configure PSMF Logbook Governance
To ensure that only the user specified in the Person Making Change field can edit and delete PSMF Logbook Entries:
- Enable the Limit Logbook Comment Edits to Comment Author setting
- Optional: To override this restriction for certain PSMF managers, assign the PSMF Office Manager role to those users
To enforce the existence of at least one PSMF Logbook Entry before a user can move a PSMF document to a steady state, create an entry action on the Ready for Review state of the PSMF Content Lifecycle document lifecycle with the following settings:
- Condition Type: Select All conditions are met
- If:
- Select Major Version Number > is greater than or equal to > 1
- Select Add condition
- Select Minor Version Number > is greater than > 0
- perform actions: Select Ensure Logbook Entities are Present
(23R3) Configure Add Planned Documents to PSMF Binder Templates
To configure Add Planned Documents to PSMF Binder Templates, you must add planned documents for the PSMF Logbook and PSMF eSignature pages to the PSMF Binder template:
- Navigate to Business Admin > Templates > Documents & Binders.
- Expand Pharmacovigilance System Master File > PSMF Binder, and then select a binder template to which you want to add the documents.
- In the Binder Structure section, select Edit.
- Expand the Annexes section and from the All Actions menu for Annex I: Section and Record Control, select Planned Document.
- Complete the fields on the Planned Document Details window as follows and then select OK.
Field Description Type Select Pharmacovigilance System Master File. Subtype Select PSMF Generated Document. Classification Select PSMF Logbook. Lifecycle Vault populates the PSMF Generated Document Lifecycle. Template Select the template of your choice or select None. Planned Name Enter ${name__v} - Logbook. - From the All Actions menu for Annexes, select Planned Document.
- Complete the fields on the Planned Document Details window as follows and then select OK.
Field Description Type Select Pharmacovigilance System Master File. Subtype Select PSMF Generated Document. Classification Select PSMF eSignature Page. Lifecycle Vault populates the PSMF Generated Document Lifecycle. Template Select the template of your choice or select None. Planned Name Enter ${name__v} - eSignature.
(23R1) Configure PSMF Table of Contents Template
To configure the PSMF Table of Contents template:
- Download the Safety DOCX table of contents template.
- Upload the DOCX table of contents template to your Vault with the following document type classification: Pharmacovigilance System Master File > PSMF Generated Document > PSMF Table of Contents
- Add the table of contents document to your PSMF Binder templates.