With the 26R2 release, SafetyDocs introduces PSMF request management, allowing PSMF users to handle PSMF inquiries from end to end in one central location.
Prerequisites
Before enabling this feature in your Vault, we recommend enabling PSMF Periodic Reviews. To support multiple reviewers on PSMF Periodic Reviews created as a result of a PSMF Request, you must enable Support Multiple Reviewers During PSMF Periodic Review.
Overview
To enable this feature in your Vault:
- Assign the PSMF Request shared field to the Pharmacovigilance System Master File document type
- Update object layouts
- Configure security
- Create the PSMF Request Workflow
- Add actions to the PSMF Request Lifecycle
- Activate the PSMF Request sub-tab
Update Object Layouts
To update the PSMF Request and PSMF Periodic Review object layouts:
- Copy the standard layout and ensure the new layout is active.
- Set the copied layout as the default.
- Delete any other existing custom layouts.
To the updated PSMF Request layout, add a related document section below the Participants section as follows:
- Referencing Document Field: Select PSMF Request
- Section Label: Enter
PSMF Document(s) for Submission - Criteria VQL: Enter
type__v = 'Pharmacovigilance System Master File'
Configure Security
To configure security:
- Add the standard PSMF Office role to the PSMF Request Lifecycle object lifecycle
- Edit role permissions for the standard PSMF Office role on the PSMF Request Lifecycle
- Update the custom PSMF Coordination Actions permission set
- Configure custom sharing rules for the PSMF Request object
Note: Depending on the creation date and configuration of your Vault, it may have both a custom PSMF Office role and a standard PSMF Office Manager role. We recommend migrating your PSMF feature configuration to the standard PSMF Office Manager role and relabeling this role to PSMF Office. If you require assistance, contact your Veeva Representative.
Edit Role Permissions for the PSMF Office Role
Edit role permissions for the standard PSMF Office role on the PSMF Request Lifecycle object lifecycle as follows:
| Lifecycle State | Permissions |
|---|---|
| New |
|
| Cancelled |
|
| Completed |
|
| In PSMF Review |
|
| In Fulfillment |
|
Update the Custom PSMF Coordination Actions Permission Set
To update the custom PSMF Coordination Actions permission set, add object permissions as follows:
- To the PSMF Request object, add Read, Create, and Edit permissions
- To the PSMF Request - Person object, add Read, Create, Edit, and Delete permissions
Configure Custom Sharing Rules for the PSMF Request Object
To configure custom sharing rules for the PSMF Request object:
- Enable custom sharing rules for the PSMF Request object.
- Create a custom sharing rule labeled
PSMF Office - PSMF Requestsand in the Roles panel, add a manual assignment as follows:- Role: Select PSMF Office
- Users & Groups: Select PSMF Coordination
Create the PSMF Request Workflow
To create the PSMF Request Workflow:
- Create an object workflow, populating fields as follows:
- Label: Enter
PSMF Request Workflow - Lifecycle: Select PSMF Request Lifecycle
- Label: Enter
- Configure the following workflow steps:
- Activate the workflow.
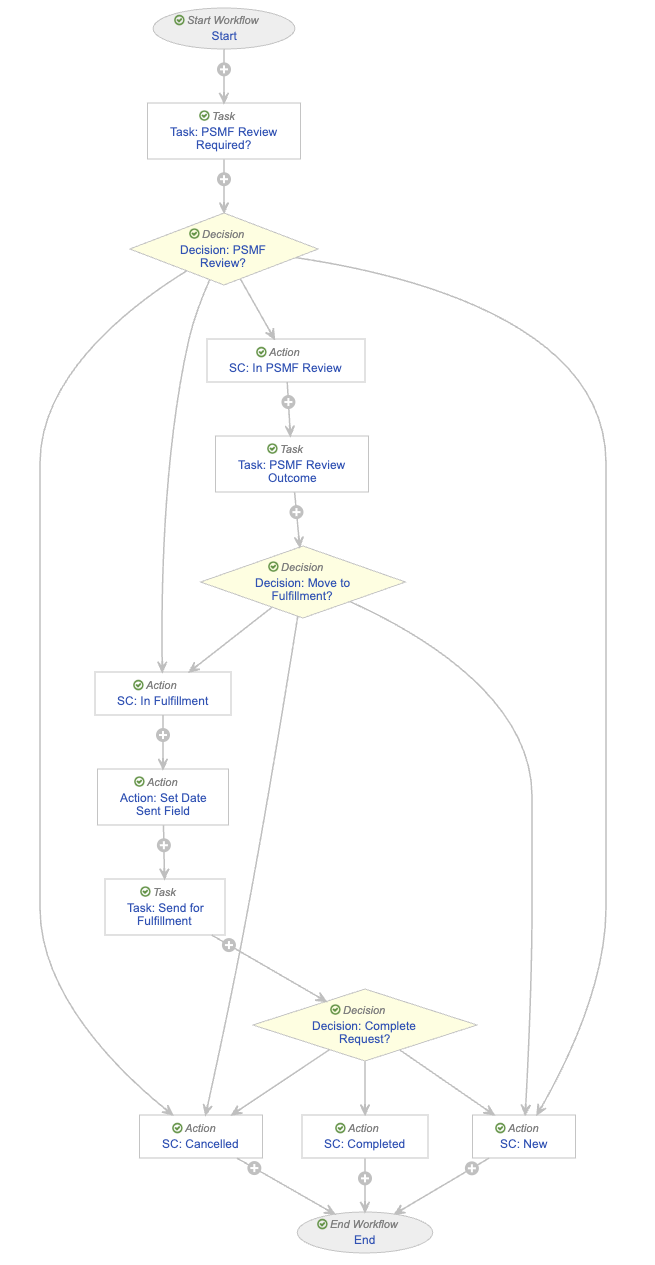
Configure the Start Step
To configure the Start step:
- Add a control as follows:
- Control 1: Select Participants
- Participant Label: Enter
PSMF Request Participants - Add Participants: Select Use custom action to define participants
- Custom Action: Select Assign PSMF Request Workflow Participants
- Participant Label: Enter
- Control 1: Select Participants
- In the Next Steps field:
- Remove the End step
- Select Create Step
- In the Create Step dialog, enter
Task: PSMF Review Required?in the Step Name field
Configure the Task: PSMF Review Required? Step
To define the Task: PSMF Review Required? task step:
- In the General Settings section, populate fields as follows:
- Task Label: Enter
PSMF Review Required? - Assign Task To: Select PSMF Request Participants
- Select Assign to all users in participant group
- Instructions: Enter
Determine if this PSMF Request requires a PSMF Ad Hoc Review. - Task Requirement: Select Required
- Task Label: Enter
- In the Prompts section, select the Prompt for Verdicts checkbox, then populate fields as follows:
- Verdict Label: Enter
PSMF Review Required - Select Add Verdict
- Verdict Label: Enter
PSMF Review Not Required - Select Add Verdict
- Verdict Label: Enter
Cancel Request- Select Add Comments, then in the Prompt for Comments field, enter
Cancel request detailsand select the Required checkbox
- Select Add Comments, then in the Prompt for Comments field, enter
- Verdict Label: Enter
- In the Details section, for Next Steps, select Create Step, then enter
Decision: PSMF Review?in the Step Name field.
Configure the Decision: PSMF Review? Step
To define the Decision: PSMF Review? decision step:
- Select Create Rule then populate the fields as follows:
- Condition Type: Select All conditions are met
- If: Select Task > Task: PSMF Review Required? > all labels equal > PSMF Review Required
- then: Select Create Step
- In the Create Step dialog, enter
SC: In PSMF Reviewin the Step Name field.
- In the Create Step dialog, enter
- then: Select Create Step
- If: Select Task > Task: PSMF Review Required? > all labels equal > PSMF Review Required
- Condition Type: Select All conditions are met
- Select Create Rule.
- In the Else Rule 2 section, populate fields as follows:
- Condition Type: Select All conditions are met
- If: Select Task > Task: PSMF Review Required? > all labels equal > PSMF Review Not Required
- then: Select Create Step
- In the Create Step dialog, enter
SC: In Fulfillmentin the Step Name field.
- In the Create Step dialog, enter
- then: Select Create Step
- If: Select Task > Task: PSMF Review Required? > all labels equal > PSMF Review Not Required
- Condition Type: Select All conditions are met
- Select Create Rule.
- In the Else Rule 3 section, populate fields as follows:
- Condition Type: Select All conditions are met
- If: Select Task > Task: PSMF Review Required? > all labels equal > Cancel Request
- then: Select Create Step
- In the Create Step dialog, enter
SC: Cancelledin the Step Name field.
- In the Create Step dialog, enter
- then: Select Create Step
- If: Select Task > Task: PSMF Review Required? > all labels equal > Cancel Request
- Condition Type: Select All conditions are met
- In the then field of the Else section, select Create Step.
- In the Create Step dialog, enter
SC: Newin the Step Name field.
- In the Create Step dialog, enter
Configure the SC: Cancelled Action Step
To define the SC: Cancelled action step:
- Create a rule as follows:
- Condition Type: Select Always
- perform actions: Select Change State
- Lifecycle State: Select Cancelled
- perform actions: Select Change State
- Condition Type: Select Always
- For Next Steps select End.
Configure the SC: In Fulfillment Action Step
To define the SC: In Fulfillment action step:
- Create a rule as follows:
- Condition Type: Select Always
- perform actions: Select Change State
- Lifecycle State: Select In Fulfillment
- perform actions: Select Change State
- Condition Type: Select Always
- For Next Steps select Create Step, then enter
Action: Set Date Sent Fieldin the Step Name field.
Configure the Action: Set Date Sent Field Step
To define the Action: Set Date Sent Field action step:
- Create a rule as follows:
- Condition Type: Select Always
- perform actions: Select Update field
- Fields: Select Date Sent for Fulfillment/Submission
- Set to value: Enter
Today()
- perform actions: Select Update field
- Condition Type: Select Always
- For Next Steps select Create Step, then enter
Task: Send for Fulfillmentin the Step Name field.
Configure the Task: Send for Fulfillment Step
To define the Task: Send for Fulfillment task step:
- In the General Settings section, populate fields as follows:
- Task Label: Enter
Send for Fulfillment - Assign Task To: Select PSMF Request Participants
- Select Assign to all users in participant group
- Instructions: Enter
Send PSMF document(s) to relevant Requester(s). Once sent, please enter the Request Completion Date, upload evidence of submission/receipt, and click the Complete button. - Task Requirement: Select Required
- Task Label: Enter
- In the Prompts section, select the Prompt for Verdicts checkbox, then populate fields as follows:
- Verdict Label: Enter
Complete - Select Add Verdict
- Verdict Label: Enter
Cancel Request
- Verdict Label: Enter
- In the Details section, for Next Steps, select Create Step, then enter
Decision: Complete Request?In the Step Name field.
Configure the Decision: Complete Request? Step
To define the Decision: Complete Request? decision step, create rules as follows:
- Select Create Rule then populate the fields as follows:
- Condition Type: Select All conditions are met
- If: Select Task > Task: Send for Fulfillment > all labels equal > Complete
- then: Select Create Step
- In the Create Step dialog, enter
SC: Completedin the Step Name field.
- In the Create Step dialog, enter
- then: Select Create Step
- If: Select Task > Task: Send for Fulfillment > all labels equal > Complete
- Condition Type: Select All conditions are met
- Select Create Rule.
- In the Else Rule 2 section, populate fields as follows:
- Condition Type: Select All conditions are met
- If: Select Task > Task: Send for Fulfillment > all labels equal > Cancel Request
- then: Select SC: Cancelled
- If: Select Task > Task: Send for Fulfillment > all labels equal > Cancel Request
- Condition Type: Select All conditions are met
- In the Else section, select SC: New for the then field.
Configure the SC: Completed Action Step
To define the SC: Completed action step:
- Create a rule as follows:
- Condition Type: Select Always
- perform actions: Select Change State
- Lifecycle State: Select Completed
- perform actions: Select Change State
- Select Add Action
- Select Update field
- Fields: Select Request Completion Date
- Set to Value: Enter
today()
- Condition Type: Select Always
- For Next Steps, select End.
Configure the SC: In PSMF Review Action Step
To define the SC: In PSMF Review action step:
- Create a rule as follows:
- Condition Type: Select Always
- perform actions: Select Change State
- Lifecycle State: Select In PSMF Review
- perform actions: Select Change State
- Condition Type: Select Always
- For Next Steps select Create Step, then enter
Task: PSMF Review Outcomein the Step Name field.
Configure the Task: PSMF Review Outcome Step
To define the Task: PSMF Review Outcome task step:
- In the General Settings section, populate fields as follows:
- Task Label: Enter
PSMF Review Outcome - Assign Task To: Select PSMF Request Participants
- Select Assign to all users in participant group
- Instructions: Enter
Detail the outcome of the PSMF Review and determine if the request is ready to be fulfilled. - Task Requirement: Select Required
- Task Label: Enter
- In the Prompts section, configure prompts as follows:
- Select the Prompt for Fields checkbox, then populate fields as follows:
- Fields: Select PSMF Changes Required
- Select the Required checkbox
- Fields: Select PSMF Changes Required
- Select the Prompt for Verdicts checkbox, then populate fields as follows:
- Verdict Label: Enter
Move to Fulfillment - Select Add Verdict
- Verdict Label: Enter
Cancel Request
- Verdict Label: Enter
- Select the Prompt for Fields checkbox, then populate fields as follows:
- In the Details section, for Next Steps, select Create Step, then enter
Decision: Move to Fulfillment?in the Step Name field.
Configure the Decision: Move to Fulfillment? Step
To define the Decision: Move to Fulfillment? decision step:
- Select Create Rule then populate the fields as follows:
- Condition Type: Select All conditions are met
- If: Select Task > Task: PSMF Review Outcome > all labels equal > Move to Fulfillment
- then: Select SC: In Fulfillment
- If: Select Task > Task: PSMF Review Outcome > all labels equal > Move to Fulfillment
- Condition Type: Select All conditions are met
- Select Create Rule.
- In the Else Rule 2 section, populate fields as follows:
- Condition Type: Select All conditions are met
- If: Select Task > Task: PSMF Review Outcome > all labels equal > Cancel Request
- then: Select SC: Cancelled
- If: Select Task > Task: PSMF Review Outcome > all labels equal > Cancel Request
- Condition Type: Select All conditions are met
- In the Else section, select SC: New for the then field.
Configure the SC: New Action Step
To define the SC: New action step:
- Create a rule as follows:
- Condition Type: Select Always
- perform actions: Select Change State
- Lifecycle State: Select New
- perform actions: Select Change State
- Condition Type: Select Always
- For Next Steps, select End.
Add Actions to the PSMF Request Lifecycle
To support the PSMF Request Workflow, add the following actions to the PSMF Request Lifecycle object lifecycle:
Add a User Action to the New State
Add a user action to the New state of the PSMF Request Lifecycle as follows:
- Condition Type: Select Always
- Allow the following actions: Select Workflow
- Select PSMF Request Workflow
- Action Label: Enter
Begin PSMF Request Workflow
Add an Entry Action to the In PSMF Review State
Add an entry action to the In PSMF Review state of the PSMF Request Lifecycle as follows:
- Condition Type: Select Always
- perform actions: Select Create Ad Hoc PSMF Review
Activate the PSMF Request Sub-Tab
To activate the PSMF Request sub-tab, navigate to the PSMF tab collection, select the PSMF Request tab, and set the Status to Active.