Learn how to connect Vault Safety to Amazon Translate for localized intake and Case Submissions.
About the Feature
The Vault Safety Auto-Translation Framework facilitates the translation of Case text fields to local languages through Amazon Translate. Admins can configure translation settings by localization, controlling which fields are translated and setting volume limits.
After completing the required configuration, see Prepare a Localized Case for details on using this feature.
Note: You can also set up the Auto-Translation Framework for Intake translation using a non-AWS translation service for custom integrations. Contact Veeva Support for more information.
23R1 Update: Local Intake Auto-Translation Framework
In Vault Safety 23R1, the Auto-Translation Framework was added for localized Inbox Item intake, whether through manual creation or importing a local Inbox Item. This feature enables translating Inbox Item text fields from reporter languages to English through Amazon Translate. See the (23R1) enablement instructions to configure your Vault for local intake translation.
For more information about using this feature, see Perform Local Language to English Intake.
Note: Automated Case Promotion and Auto-Translation Framework for Local Intake are not compatible. You can enable both features in your Vault, but each inbound Transmission Profile can use only one. If you enable both on a Transmission Profile, Vault prioritizes Case promotion and does not send translation requests.
Prerequisites
Before enabling the Vault Safety Auto-Translation Framework, your organization must have an AWS account with Amazon Translate and complete the following tasks:
- Set up an Amazon Simple Storage Service (Amazon S3) bucket
- Set up an Identity and Access Management (IAM) role and configure its event bus
- Communicate your AWS Account ID to Veeva Support
All of these steps must be completed before the feature can be used. Veeva Support will contact you when setup is complete.
Set Up an Amazon S3 Bucket
Complete the following steps to add an Amazon S3 bucket to your AWS account:
- Create an S3 bucket with a name of your choosing.
Note: The S3 bucket must be in an AWS region that supports batch translation.
- In the S3 bucket, create two folders with the following names:
- "translate_folder"
- "translate_output"
Set Up an Identity and Access Management (IAM) Role
To set up an AWS IAM role, which will be assumed by Safety, you must complete the following tasks:
Generate an External ID in Safety
In Safety, complete the following steps to generate an External ID on the Amazon Translate Connection record:
- Go to Admin > Connections > Amazon Translate Connection.
- In the All Actions menu, select Generate External ID.
Configure an IAM Role in AWS
In your AWS account, complete the following steps to configure an IAM role for Safety to assume:
- Create an IAM role with a name of your choosing.
- Add the following permission set, replacing
<Your account id>,<Your Role Name>, and<Your Bucket Name>with the applicable details:
{

               "Version": "2012-10-17",

               "Statement": [

                  {

                   "Action": "iam:PassRole",

                   "Resource": "arn:aws:iam::<Your account id>:role/<Your Role Name>",

                   "Effect": "Allow"

                  },

                  {

                     "Action": [

                       "translate:StopTextTranslationJob",

                       "translate:ListTextTranslationJobs",

                       "translate:StartTextTranslationJob",

                       "translate:TranslateText",

                       "translate:DescribeTextTranslationJob",

                       "translate:TranslateDocument"

                     ],

                     "Resource": "*",

                     "Effect": "Allow"

                   },

                   {

                     "Action": [

                       "s3:GetObject",

                       "s3:ListBucket",

                       "s3:PutObject",

                       "s3:GetBucketLocation",

                       "s3:DeleteObject",

                       "s3:DeleteBucket"

                     ],

                     "Resource": [

                       "arn:aws:s3:::<Your bucket name>",

                       "arn:aws:s3:::<Your bucket name>/*"

                     ],

                     "Effect": "Allow"

                   }

                 ]

} - Add the following trust relationships replacing
<Your generated external ID>with the Safety-generated External ID.
{

               "Version": "2012-10-17",

               "Statement": [

                  {

                   "Effect": "Allow",

                   "Principal": {

                     "Service": "translate.amazonaws.com"

                    },

                    "Action": "sts:AssumeRole"

                   },

                   {

                     "Effect": "Allow",

                     "Principal": {

                       "AWS": [

                         "arn:aws:iam::091592193973:root"

                       ]

                     },

                     "Action": "sts:AssumeRole",

                     "Condition": {

                       "StringEquals": {

                         "sts:ExternalId": <Your generated external ID>

                       }

                     }

                   }

                 ]

} - On your default event bus, create a rule to push completed translation jobs to Veeva's event bus.
- Configure the rule as described below:
- Add the following event pattern:
{

                        "source": ["aws.translate"],

                        "detail-type": ["Translate TextTranslationJob State Change"]

} - Based on the region of your Vault and the release type (General or Limited), add a target for the form using the following format:
arn:aws:events:< region >:091592193973:event-bus/< region >

- < release >-prod-Vault-Safety-Connections-Event-Bus- For example, if your Vault is in us-east-1 and in the General Release environment, your target would be as follows:
arn:aws:events:us-east-1:091592193973:event-bus/

                    us-east-1-gr-prod-Vault-Safety-Connections-Event-Bus
- For example, if your Vault is in us-east-1 and in the General Release environment, your target would be as follows:
- Add the following event pattern:
Communicate AWS Account ID to Veeva Support
Contact Veeva Support to provide your AWS Account ID. This enables us to complete the setup of your Translate Connection. You will be contacted when the feature is ready for use.
Additional Resources
To find out more about configuring AWS accounts to be accessible by third parties, see the following resources:
- Providing access to AWS accounts owned by third parties
- How to use an external ID when granting access to your AWS resources to a third party
- AWS Pricing Calculator: This calculator can be used to estimate the cost of the Amazon Translate service based on your Case volume.
Add the Translate Localized Case Action
- In Admin, go to Configuration > Objects > Localized Case > Actions.
- Select Create to add the Translate Localized Case action.
- Select Save.
Configure the Localized Case Lifecycle
Admins can set up the Localized Case lifecycle so that the translation request is sent either automatically or manually.
To update the Localized Case lifecycle, go to Admin > Configuration > Object Lifecycles > Localized Case Lifecycle.
Configure Automatic Translation Requests
To automatically send translation requests when Localized Cases are created, add the Translate Localized Case event action.
- In the Event Actions section, select Create Record.
- On the Lifecycle Event Action: Create Record page, select Edit and then Create Event Action.
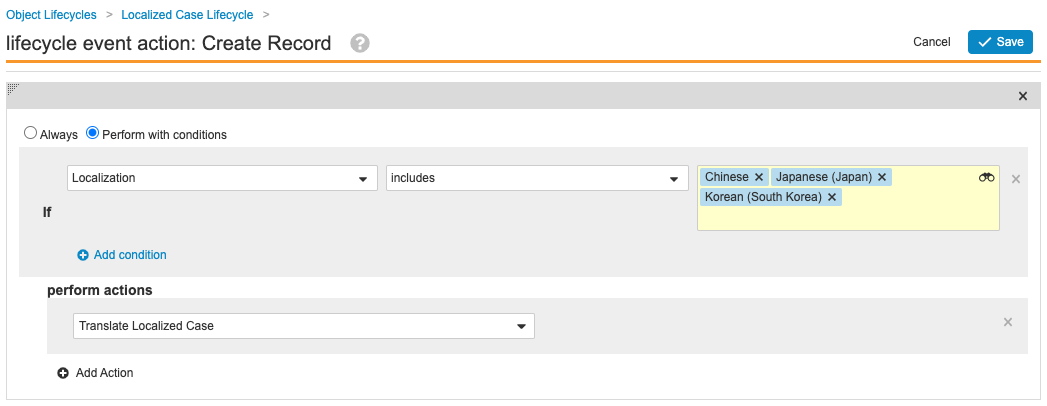
- Configure the Event Action according to your organization's process. The following examples show how to set up the Translate Localized Case action with all languages or specific languages.

- Select Save.
Configure Manual Translation Requests
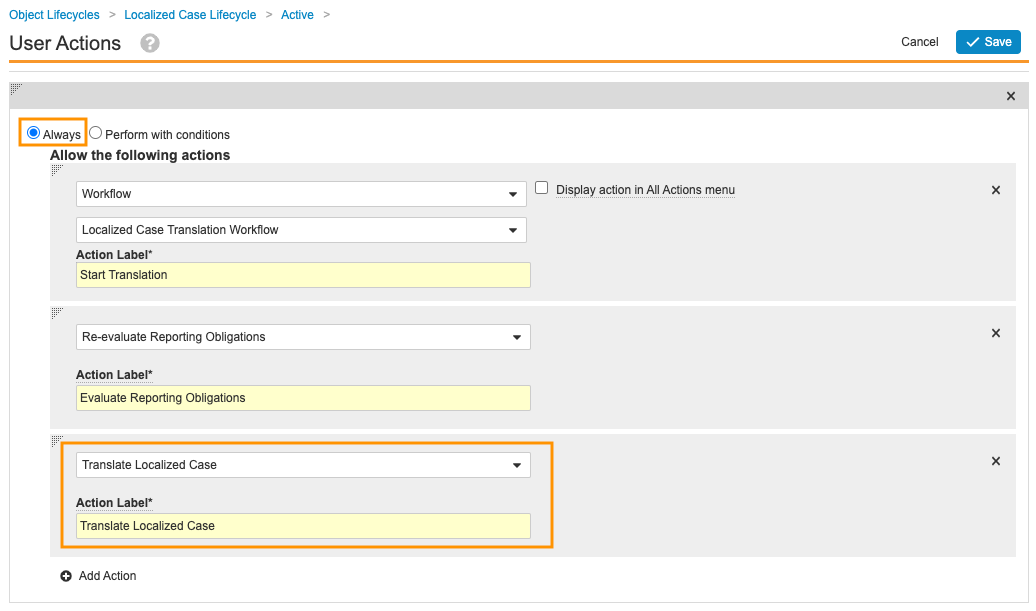
To send translation requests manually after Localized Case creation, add the Translate Localized Case user action.
Complete the following setup on the Active and Revision states of the Localized Case lifecycle.
- In the States section, select the state that you are editing.
- In the User Actions section, select Edit.
- Select the Always option, and then select Translate Localized Case from the picklist.
- In the Action Label field, enter "Translate Localized Case".
- Select Save.
Create a Translation Detail Page Layout
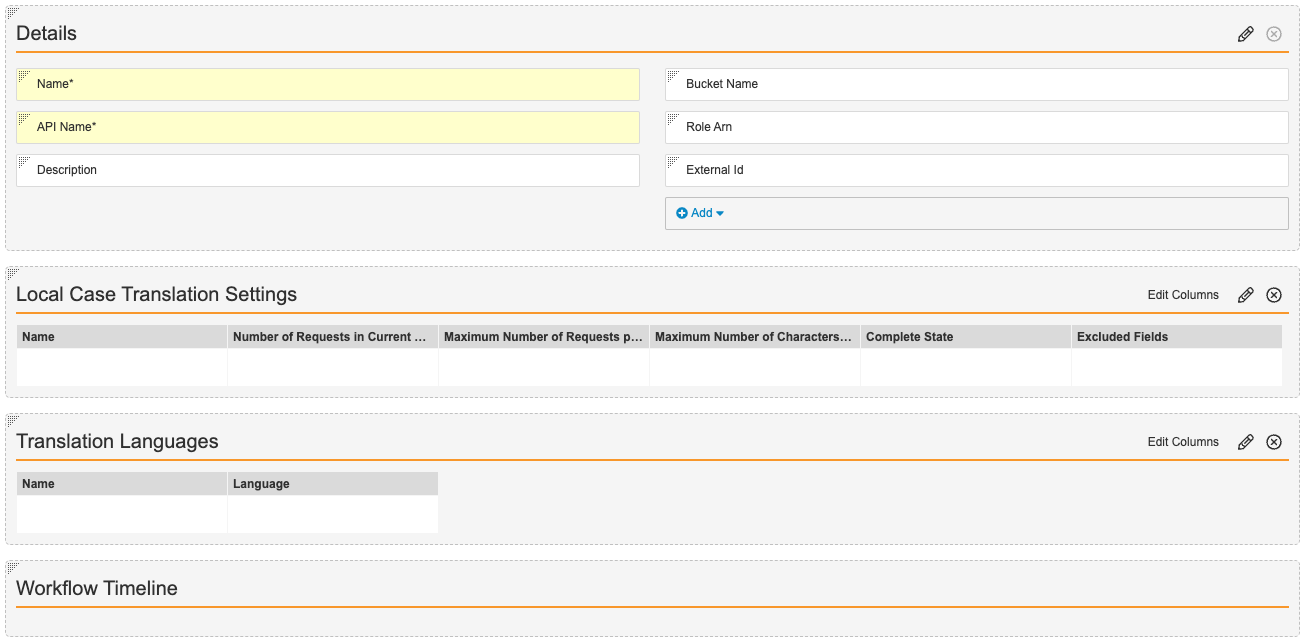
Complete the following steps to create the Translate Connection layout.
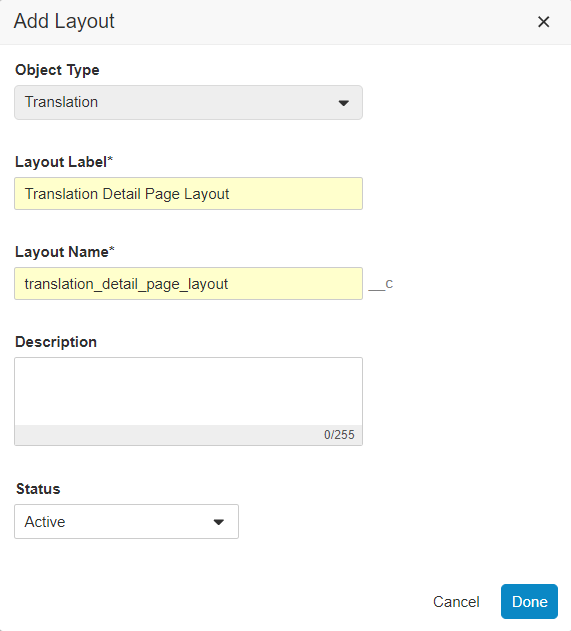
- Go to Admin > Configuration > Objects > Connection > Layouts.
- Select Create to add a Translation Detail layout.
- Configure the Details section as shown below.

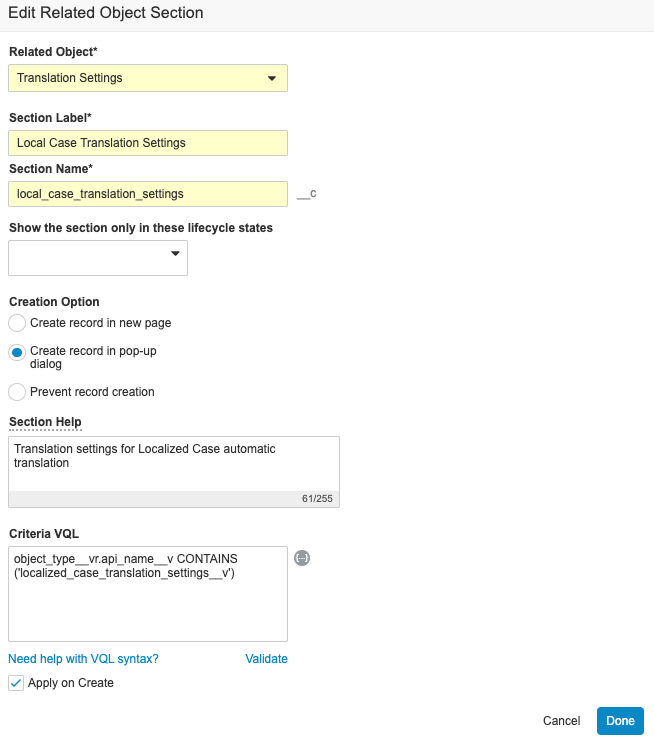
- Insert the Translation Settings related object section, and configure it as follows:
- In the Creation Option field, select Create record in pop-up dialog.
- In the Section Help field, enter "Translation settings for Localized Case automatic translation".
- In the Criteria VQL field, enter
object_type__vr.api_name__v CONTAINS

('localized_case_translation_settings__v') - Select the Apply on Create checkbox.
- In the Local Case Translation Settings section, select Edit Columns to add the following columns:
- Number of Requests in Current Month
- Maximum Number of Requests per Month
- Maximum Number of Characters per Request
- Complete State
- Excluded Fields
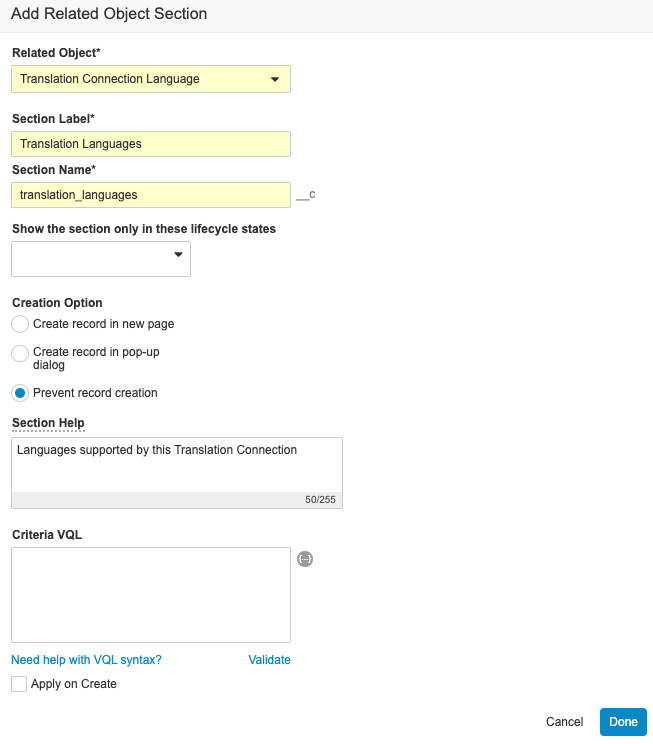
- Insert the Translate Connection Language related object section, and configure it as follows:
- In the Creation Option field, select Prevent record creation.
- In the Section Help field, enter "Languages supported by this Translate Connection".
- In the Translation Languages section, select Edit Columns to add the Language column.
Update the Translation Settings Detail Page Layout
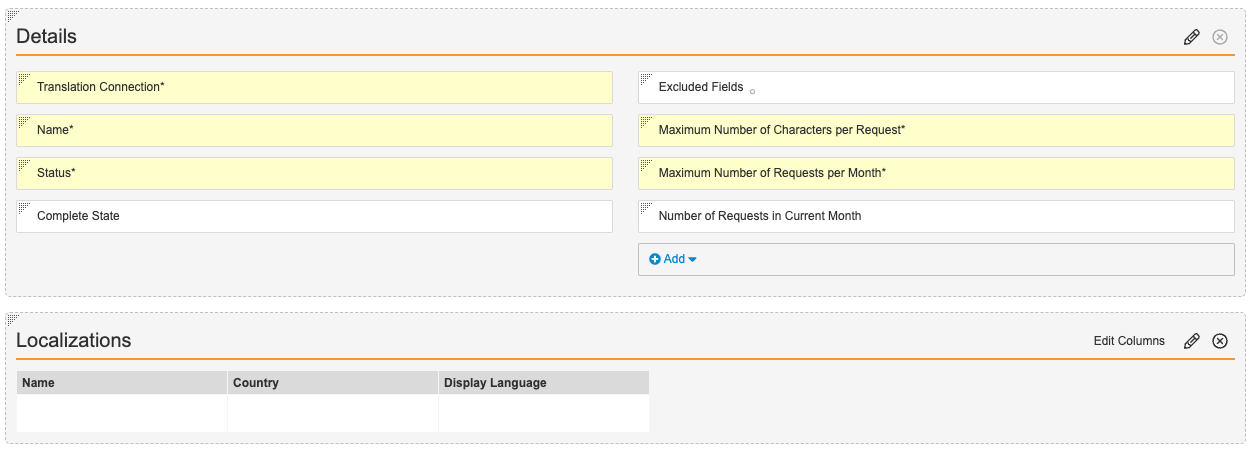
Complete the following steps to update the Translation Settings Detail Page Layout.
- Go to Admin > Configuration > Objects > Translation Settings > Layouts > Translation Settings Detail Page Layout.
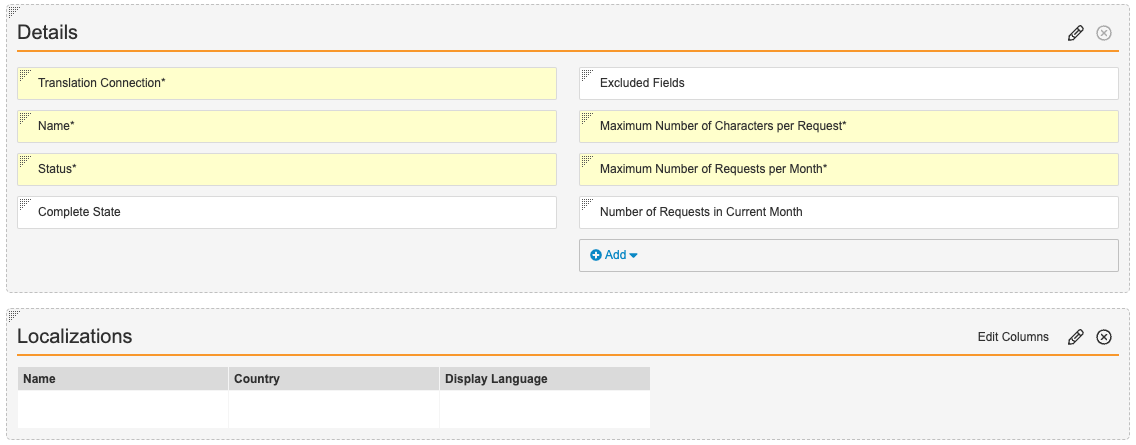
- Configure the Details section as shown below.

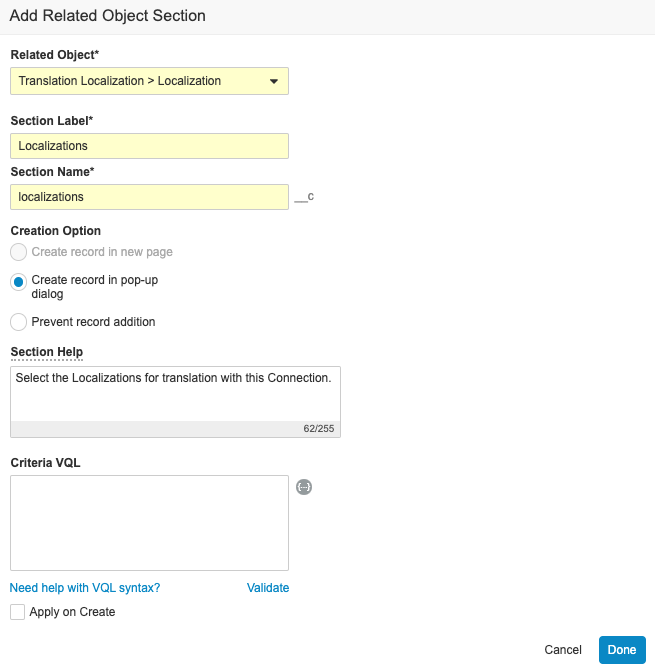
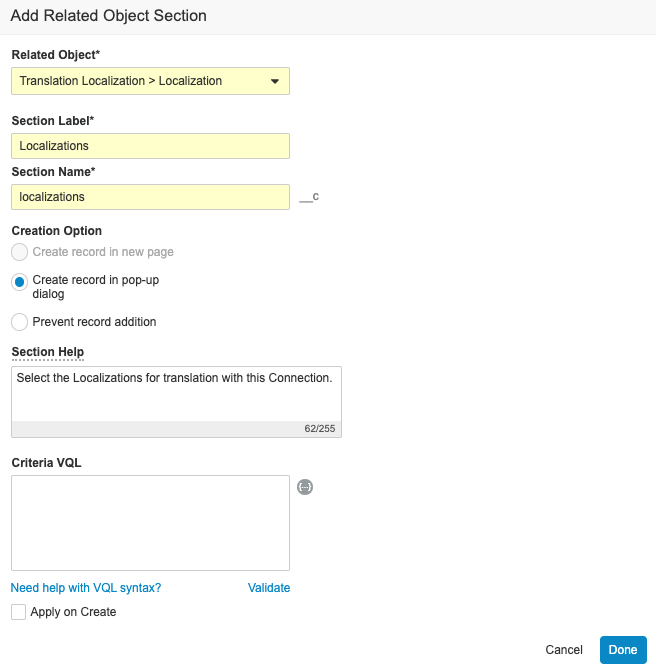
- Insert the Translation Localization > Localization related object section, and configure it as follows:
Activate the Amazon Translate Connection Settings
Complete the following steps to add the applicable AWS account settings to your Amazon Translate Connection.
- Go to Admin > Connections > Amazon Translate Connection.
- In the All Actions menu, select Edit.
- In the Bucket Name field, enter the name of the Amazon S3 Bucket created in the Set Up an Amazon S3 Bucket section.
- In the Role Arn field, enter the Arn from the IAM role created in the Set Up an Identity and Access Management (IAM) Role section.
- In the All Actions menu, select Activate Translation Connection.
(23R1) Configure the Auto-Translation Framework for Local Intake
The following sections describe how to configure your Vault for automatic translations of localized Inbox Item text fields to English.
Note: Before performing the following steps, you must complete all of the configuration listed before this section.
Add the Translate Inbox Item Action
- Go to Admin > Configuration > Objects > Inbox Item > Actions.
- Select Create to add the Translate Inbox Item action
- On the Create Action page, you can leave the default settings and select Save.
Update the Translation Detail Page Layout
Complete the following steps to insert the Intake Translation Settings section on the Translation Detail Page Layout.
- Go to Admin > Configuration > Objects > Connection > Layouts > Translation Detail Page Layout.
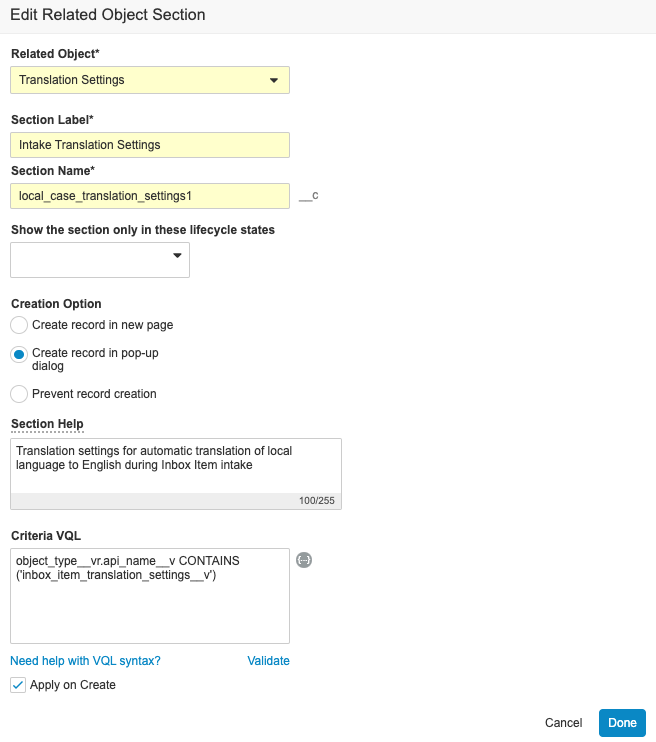
- Insert the Translation Settings related object section, and configure it as follows:
- Section Label: Intake Translation Settings
- Creation Option: Create record in pop-up dialog
- Section Help: Enter "Translation settings for automatic translation of local language to English during Inbox Item intake"
- Criteria VQL: Enter
object_type__vr.api_name__v CONTAINS ('inbox_item_translation_settings__v') - Select the Apply on Create checkbox.
- In the Intake Translation Settings section, select Edit Columns to add the following columns:
- Number of Requests in Current Month
- Maximum Number of Requests per Month
- Maximum Number of Characters per Request
- Complete State
- Excluded Fields
- Select Save.
Create the Intake Translation Settings Detail Page Layout
Complete the following steps to create the Intake Translation Settings layout.
- Go to Admin > Configuration > Objects > Translation Settings > Layouts.
- Select Create.
- On the Add Layout dialog, in the Object Type field, select Intake Translation Settings, and then select Create.
- Configure the Details section as shown below.

- Insert the Translation Localization > Localization related object section, and configure it as follows:
Configure the Inbox Item Lifecycle
Admins can configure the Inbox Item lifecycle so that translations can be requested by using the Translate Inbox Item user action.
To update the Inbox Item lifecycle, go to Admin > Configuration > Object Lifecycles > Inbox Item Lifecycle.
Add the Translate Inbox Item User Action
Complete the following steps to add the Translate Inbox Item user action.
- In the States section, select New.
- In the User Actions section, select Edit.
- Depending on your business process, such as for specific localizations on Inbox Items, select Perform with conditions or Always.
- Select Translate Inbox Item from the picklist.
- In the Action Label field, enter "Translate Inbox Item".
- Select Save.
Optional: Configure Translation Notifications
Depending on your business needs, you can configure email and notification messages for translation states. For example, you can configure your Vault to send messages when a translation successfully completes on a Localized Case. You can create new messages or use Vault’s Translation Success and Localized Case Translation Success notification templates. Optionally, configure notifications as an entry action on the Inbox Item Lifecycle and the Localized Case Lifecycle object lifecycles for the following states:
- Translation Error
- Translation Requested
- Translation Verification
Case Text Fields That Can Be Translated
Expand the following section to review which Case text fields are available for translation through a Translation Connection.
| Data | Field Labels |
|---|---|
| Case > Medical History Text | (medical_history_text__v) |
| Case > Reporter's Comments | (reporters_comments__v) |
| Case > Company Comments | (sender_comments__v) |
| Case > CIOMS Remarks | (cioms_remarks__v) |
| Case > Reporting Summary | (reporting_summary__v) |
| Case > Study Name | (study_name__v) |
| Case > Study Name (continued) | (study_name_continued__v) |
| Case Adverse Event > Event (Reported) | (event_reported__v) |
| Case Adverse Event > Hospital City | (hospital_city__v) |
| Case Adverse Event > Hospital State | (hospital_state__v) |
| Case Assessment Result > Method (Text) | (method_text__v) |
| Case Assessment Result > Result (Text) | (result_text__v) |
| Case Assessment Result > Source (Text) | (source_text__v) |
| Case Contact > Additional Information | (additional_information__v) |
| Case Contact > City | (city_value__v) |
| Case Contact > Department | (department_value__v) |
| Case Contact > Facility | (facility_name__v) |
| Case Contact > First Name | (firstname_value__v) |
| Case Contact > Last Name | (lastname_value__v) |
| Case Contact > Middle Name | (middlename_value__v) |
| Case Contact > Organization | (organization_value__v) |
| Case Contact > State / Province | (state_province_value__v) |
| Case Contact > Street | (street_value__v) |
| Case Contact > Street Line 2 | (street_line_2_value__v) |
| Case Contact > Title | (title_value__v) |
| Case Drug History > Drug (Reported) | (name_reported__v) |
| Case Drug History > Drug (Coded) | (product_name__v) |
| Case Identifier > Source | (source__v) |
| Case Medical History > Condition / Procedure (Reported) | (name_reported__v) |
| Case Medical History > Comments | (comments__v) |
| Case Product > Product (Coded) | (product_name__v) |
| Case Product > Product (Reported) | (product_reported__v) |
| Case Product > Registration Holder/Applicant | (registration_mah__v) |
| Case Product Dosage > Dose Text | (dose_text__v) |
| Case Product Dosage > Dose (Unit Text) | (dose_unit_text__v) |
| Case Product Dosage > Parent RoA Text | (parent_adminroute_text__v) |
| Case Product Dosage > Patient RoA Text | (patient_adminroute_text__v) |
| Case Product Indication > Name (Reported) | (name_reported__v) |
| Case Product Substance > Name | (name__v) |
| Case Case Test Result > Comments | (comments__v) |
| Case Case Test Result > Result (Text) | (result_text__v) |
| Case Case Test Result > Test Name (Reported) | (name_reported__v) |
| Localized Case > Additional Pregnancy Related Information | (additional_pregnancy_related_info__v) |
| Localized Case Comment > Comments Text | (comments_text__v) |
| Localized Case Document > Attachment Description | (attachment_description__v) |
| Localized Case Document > Reference Text | (reference_text__v) |
| Localized Case Product > Related Device Information | (related_device_information__v) |
Supported Amazon Translate Languages
The following Amazon Translate languages are supported.
- Afrikaans
- Albanian
- Amharic
- Arabic
- Armenian
- Azerbaijani
- Bengali
- Bosnian
- Bulgarian
- Catalan
- Chinese (Simplified)
- Croatian
- Czech
- Danish
- Dutch
- English
- Estonian
- Farsi (Persian)
- Filipino, Tagalog
- Finnish
- French
- Georgian
- German
- Greek
- Gujarati
- Haitian Creole
- Hausa
- Hebrew
- Hindi
- Hungarian
- Icelandic
- Indonesian
- Irish
- Italian
- Japanese
- Kannada
- Kazakh
- Korean
- Latvian
- Lithuanian
- Macedonian
- Malay
- Malayalam
- Maltese
- Marathi
- Mongolian
- Norwegian
- Pashto
- Polish
- Portuguese
- Punjabi
- Romanian
- Russian
- Serbian
- Sinhala
- Slovak
- Slovenian
- Somali
- Spanish
- Swahili
- Swedish
- Tamil
- Telugu
- Thai
- Turkish
- Ukrainian
- Urdu
- Uzbek
- Vietnamese
- Welsh

