With the 23R1 release, SafetyDocs supports the management of Pharmacovigilance Agreements (PVAs), sometimes known as Safety Data Exchange Agreements (SDEAs). This feature promotes regulatory compliance through centralized document storage, making it easy to review and reconcile partner obligations across agreements. In addition, contact management capabilities increase the efficiency of tracking reconciliation activities and managing follow-up agreements.
Updates
We have added the following updates to this feature:
- PVA: Defer Contact Entry: With the 26R1 release, SafetyDocs allows you to configure the Partner Contact and Sponsor Contact fields on the PVA Obligation object as optional on initial record creation, enabling users to create PVA Obligations when sponsor or partner contact information is not yet known. See Configure PVA: Defer Contact Entry to configure your Vault for this feature.
- Product Family Support for PV Agreements: With the 25R3 release, SafetyDocs introduces the ability to classify PV Agreements at the Product Family level, enabling more efficient agreement management and improving scalability across product portfolios. See Configure Product Family Support for PV Agreements to configure your Vault for this feature.
- PVA Scheduling: With the 25R1 release, SafetyDocs supports PVA Scheduling. Scheduling defines when and how often Vault creates PVA Activity records and documents for a given PVA Obligation record. This is useful in situations where a PVA has obligations with recurring activities, such as circulating a weekly summary of literature articles. For more information, see Enable PVA Scheduling.
- Pharmacovigilance Agreements Usability Improvements: With the 24R3 release, SafetyDocs displays more meaningful values when a PVA object is referenced in an object field rather than the auto-generated name for improved usability of PVA-related records. See Configure Pharmacovigilance Agreements Usability Improvements for details. In addition to the configuration updates described on this page, you must configure the PVA Activity Outbound Workflow as described in Enable PVA Document Distribution via Vault Task.
Overview
To configure this feature:
- Configure object layouts
- Configure document types
- Configure security
- Configure custom sharing rules
- Configure the PV Agreement Lifecycle object lifecycle
- Configure the PVA Lifecycle document lifecycle
- Configure object workflows
- Configure document workflows
- Configure tabs
Configure Object Layouts
Configure the following object layouts:
Configure the PVA Relationship Object Layout
To configure the PVA Relationship object layout:
- Navigate to Admin > Configuration > Objects > PVA Relationship > Layouts > Relationship Detail Page Layout.
- Select Edit.
- Configure the layout as follows:
- Ensure the Details section contains the following fields in the following order:
- Name
- Partner
- Description
- Ensure the PV Agreements section contains the following default columns in the following order:
- Name
- Agreement Title
- PVA Scope
- Agreement Effective Date
- Agreement End Date
- Agreement Owner
- Ensure there is a Workflow Timeline section
- Ensure the Details section contains the following fields in the following order:
- Select Save.
Configure the PV Agreement Object Layout
To configure the PV Agreement object layout:
- Navigate to Admin > Configuration > Objects > PV Agreement > Layouts > PV Agreement Detail Page Layout.
- Select Edit.
- Configure the layout as follows:
- Ensure the Details section contains the following fields in the following order:
- Relationship
- Agreement Title
- Agreement Effective Date
- Agreement End Date
- PVA Scope
- Agreement Owner
- Agreement Notes
- Ensure the following related object sections appear in the following order, with the specified default columns:
- Covered Products
- Product Name
- Product Type
- Abbreviation
- Covered Studies
- Study Number
- Study Name
- Protocol Title
- Study Type
- Masking
- Agreement Countries
- Name
- Code (2-letter)
- Code (3-letter)
- Agency
- Contacts
- Name
- Person
- Vault User
- Contract Party
- Communication Method
- Action Items
- Name
- Assigned To
- Agreement Contact
- Due Date
- Completion Date
- Description
- Obligations
- Name
- Obligation Category
- Clause Title
- Partner Contact
- Sponsor Contact
- Activities
- Name
- Obligation Title
- Due Date
- Completion Date
- Partner Responsible Contact
- Sponsor Responsible Contact
- Reconciliations
- Name
- Assigned To
- Obligation Name
- Activity
- Due Date
- Evaluation
- Agreement Documents
- Name
- Title
- Status
- Covered Products
- Ensure there is a Workflow Timeline section
- Ensure there is a Signatures section with the following columns:
- Name
- Signature Name
- Signature Meaning
- Signature Status
- Ensure the Details section contains the following fields in the following order:
- Select Save.
Configure Document Types
To configure document types:
- Create a Document Type Group
- Add the Document Type Group to the Pharmacovigilance Agreements document type
Create the PVA Documents Document Type Group
To create a Document Type Group:
- Navigate to Business Admin > Objects > Document Type Groups.
- Select Create.
- In the Name field, enter
PVA Documents. - Select Save.
Add the PVA Document Type Group to the PVA Document Type
To add your new Document Type Group, edit the Pharmacovigilance Agreements document type. In the General tab, select PVA Documents in the Document Type Groups field.
Configure Security
Configure security settings to grant access to the PVA management features. Use the following settings as a starting point, but configure access according to your business process:
- Create a permission set with the label
PVA Actions - Create a security profile with the label
PVA Managementand assign to it the PVA Actions permission set - Create PVA Groups
- Grant permissions on the PVA Actions permission set
Create PVA Groups
Create groups with the following labels, then add the PVA Management security profile to the Included Security Profiles field for each new group:
- PVA Users
- PVA Viewers
- PVA Consumers
Grant Permissions
To grant permissions to the PVA Actions permission set:
-
Grant Vault Actions application permissions as follows:
Vault Action Permissions Dashboards and Reports - Create Dashboards
- Delete Dashboards
- Share Dashboards
- Schedule Reports
- Read Group Membership
Workflows - Start
- Read and Understand
- eSignature
CrossLink - Create CrossLink
Viewer Administration - Manage Tags
Document - Cancel Checkout
- Download Document
- Download Rendition
User - Allow As A Delegate
- View User Information
- View User Profile
Search - User Filters
Views - Share Views
Audit Trail - View
- Grant object permissions as follows:
Objects Permissions - Application Role
- Country
- Document Stages
- Document Type Group
- Language
- Language (ISO)
- Object Stages
- Person
- Product
- Product Alias
- Product Constituent
- Product Family
- Product Registration
- Product Substance
- Study
- Study Registration
- Study Product
- Study Site
- Substance
- Substance Alias
Read - Organization
- PV Agreement
- PVA Action Item
- PVA Activity
- PVA Contact
- PVA Obligation
- PVA Reconciliation
- PVA-Country
- PVA-Product
- PVA-Study
- PVA Relationship
Create - Organization
- PV Agreement
- PVA Action Item
- PVA Activity
- PVA Contact
- PVA Obligation
- PVA Reconciliation
- PVA-Country
- PVA-Product
- PVA-Study
- PVA Relationship
Edit - PV Agreement
- PVA Action Item
- PVA Activity
- PVA Contact
- PVA Obligation
- PVA Reconciliation
- PVA-Country
- PVA-Product
- PVA-Study
- PVA Relationship
Delete - Grant View tab permissions for the following Tabs:
- Home
- Library
- PVAs
- PVA Relationships
- PV Agreements
- Open PVA Actions
- Analytics
- Reports
- Dashboards
Configure Custom Sharing Rules for PVA Objects
To configure custom sharing rules:
- Enable custom sharing rules for the following objects:
- PV Agreement
- PVA Action Item
- PVA Activity
- PVA Contact
- PVA Obligation
- PVA Reconciliation
- PVA Relationship
- For each object, create a custom sharing rule and add manual assignments as follows:
Role Users & Groups Viewer PVA Consumers Owner PVA Users Editor PVA Users Viewer PVA Viewers
Configure the PV Agreement Object Lifecycle
To configure the PV Agreement Lifecycle object lifecycle:
- Add roles
- Edit role permissions
- Configure atomic security on relationships
- Create entry criteria
- Configure a lifecycle stage group
Add Lifecycle Roles
Add the following roles to the PV Agreement Lifecycle:
- Approver
- Reviewer
- Safety Operations
Edit Role Permissions
Edit role permissions on the specified states of the PV Agreement Lifecycle as follows:
| Role | Permissions |
|---|---|
| Approver | All states: Read |
| Editor |
|
| Owner |
|
| Reviewer | All states: Read |
| Safety Operations | All states: Read |
Configure Atomic Security on Relationships
Configure atomic security on relationships on the Effective and Terminated states of the PV Agreement Lifecycle as follows:
| Lifecycle State | Relationship Label | Default |
|---|---|---|
| Effective | PVA Action Items | Edit |
| PVA Activities | Edit | |
| PVA Contacts | Read | |
| PVA Obligations | Read | |
| PVA Reconciliations | Edit | |
| PVA-Countries | Read | |
| PVA-Products | Read | |
| PVA-Studies | Read | |
| Terminated | PVA Action Items | Read |
| PVA Activities | Read | |
| PVA Contacts | Read | |
| PVA Obligations | Read | |
| PVA Reconciliations | Edit | |
| PVA-Countries | Read | |
| PVA-Products | Read | |
| PVA-Studies | Read |
Create Entry Criteria
Create entry criteria on the following states of the PV Agreement Lifecycle:
- On the Terminated state, create an entry criteria to Always validate:
- State of Related Record
- PVA Activities
- No records Include
- Received from Partner, New, In Progress
- On the Effective state, create an entry criteria to Always validate:
- Field > Agreement Effective Date > is not blank
- Field > Agreement End Date > is not blank
- Field > Agreement Owner > is not blank
- Field > PVA Scope > is not blank
Configure the PVA Lifecycle Stage Group
Create an object lifecycle stage group with the following settings:
- Stage Group Label: Enter
PVA Stages - Object Lifecycle: Select PV Agreement Lifecycle
- Object Type: Select Base PV Agreement
Then, create stages and define their states as follows:
- Create the New stage, then add the Initiated state
- Create the Pending stage, then add the following states:
- Scoping
- Drafting
- In Approval
- Create the Effective stage, then add the Effective state
- Create the Terminated stage, then add the Terminated state
Configure the PVA Lifecycle Document Lifecycle
To configure the PVA Lifecycle document lifecycle:
- Create a document lifecycle with the label PVA Lifecycle
- Create lifecycle states
- Update lifecycle state security settings
- Create entry actions on the Approved state
- Define state types
- Define allowed and default users on roles
- Add the PVA Lifecycle to the Pharmacovigilance Agreements document type
- Configure a lifecycle stage group
Create Lifecycle States
Create the following lifecycle states on the PVA Lifecycle:
- Draft
- In Review
- In Approval
- In Authoring
- Approved
- Obsolete
- Superseded
- Ready for Review
- Ready for Approval
- Planned
Update Lifecycle State Security Settings
Update document lifecycle state security settings for the following states on the PVA Lifecycle:
Update Draft State Security Settings
Update lifecycle state security settings on the Draft state of the PVA Lifecycle as follows:
| Role | Security Settings |
|---|---|
| Owner |
|
| Coordinator |
|
| Editor |
|
| Viewer |
|
| Consumer | No permissions |
| Reviewer |
|
| Approver |
|
Update In Review State Security Settings
Update lifecycle state security settings on the In Review state of the PVA Lifecycle as follows:
| Role | Security Settings |
|---|---|
| Owner |
|
| Coordinator |
|
| Editor |
|
| Viewer |
|
| Consumer | No permissions |
| Reviewer |
|
| Approver |
|
Update In Approval State Security Settings
Update lifecycle state security settings on the In Approval state of the PVA Lifecycle as follows:
| Role | Security Settings |
|---|---|
| Owner |
|
| Coordinator |
|
| Editor |
|
| Viewer |
|
| Consumer | No permissions |
| Reviewer |
|
| Approver |
|
Update Approved State Security Settings
Update lifecycle state security settings on the Approved state of the PVA Lifecycle as follows:
| Role | Security Settings |
|---|---|
| Owner |
|
| Coordinator |
|
| Editor |
|
| Viewer |
|
| Consumer |
|
| Reviewer |
|
| Approver |
|
Update Obsolete State Security Settings
Update lifecycle state security settings on the Obsolete state of the PVA Lifecycle as follows:
| Role | Security Settings |
|---|---|
| Owner |
|
| Coordinator |
|
| Editor |
|
| Viewer | No permissions |
| Consumer | No permissions |
| Reviewer | No permissions |
| Approver | No permissions |
Update Superseded State Security Settings
Update lifecycle state security settings on the Superseded state of the PVA Lifecycle as follows:
| Role | Security Settings |
|---|---|
| Owner |
|
| Coordinator |
|
| Editor |
|
| Viewer |
|
| Consumer | No permissions |
| Reviewer |
|
| Approver |
|
Update Planned State Security Settings
Update lifecycle state security settings on the Planned state of the PVA Lifecycle as follows:
| Role | Security Settings |
|---|---|
| Owner |
|
| Coordinator |
|
| Editor |
|
| Viewer | No permissions |
| Consumer | No permissions |
| Reviewer |
|
| Approver |
|
Create Entry Actions on the Approved State
Create entry actions on the Approved state of the PVA Lifecycle to Always perform the following actions:
- Set new major version
- Set previous steady state to superseded
Define Lifecycle State Types
To define state types on the PVA Lifecycle, map the previously created states to state types as follows:
| State Type | State |
|---|---|
| Starting State | Draft |
| Steady State | Approved |
| Superseded State | Superseded |
| Obsolete State | Obsolete |
| Document Workflow: Pre-Approval | Ready for Approval |
| Document Workflow: Approved | Approved |
| Document Workflow: Rejected | Draft |
| In Review | In Review |
| Rejected | Draft |
Define Allowed and Default Users for PVA Lifecycle Roles
Define allowed and default users for the specified roles on the PVA Lifecycle as follows:
| Role | Allowed User/Group | Default User |
|---|---|---|
| Consumer |
|
PVA Consumers |
| Viewer |
|
PVA Viewers |
| Editor |
|
PVA Users |
Add the PVA Lifecycle to the Pharmacovigilance Agreements Document Type
To add the PVA Lifecycle to the Pharmacovigilance Agreements Document Type:
- Navigate to Admin > Configuration > Document Types > Pharmacovigilance Agreements.
- In the Actions menu, select Edit Details.
- On the General tab, in the Available Lifecycles field, select PVA Lifecycle.
- Select Save.
Configure the PVA Document Stages Lifecycle Stage Group
Create an document lifecycle stage group with the following settings:
- Stage Group Label: Enter
PVA Document Stages - Document Lifecycle: Select PVA Lifecycle
Then, create stages and define their states as follows:
- Create the New stage, then add the following states:
- Draft
- Planned
- Create the Authoring stage, then add the following states:
- In Authoring
- Ready for Review
- Create the Review & Approval stage, then add the following states:
- In Review
- Ready for Approval
- In Approval
- Create the Approved stage, then add the Approved state
Configure Object Workflows
Configure the following PVA management object workflows. Use these steps as a starting point, but configure your workflows according to your business processes:
- Create the PVA Creation Workflow
- Create the PVA Close-Out Workflow
- Create the PVA Activity Outbound Workflow
- Create the PVA Activity Inbound Workflow
- Configure user actions on the PV Agreement Lifecycle and the PVA Activity Lifecycle
Create the PVA Creation Workflow
Create the following workflow to manage PVA creation:
- Navigate to Admin > Configuration > Workflows.
- Select Create.
- In the Create Workflow window, select Object Workflow.
- Select Continue.
- On the Create Workflow page, populate the fields as follows:
- Label: Enter
PVA Creation Workflow - Lifecycle: Select PV Agreement Lifecycle
- Label: Enter
- Select Save.
- In the Workflow Steps section, configure the workflow to include the following steps:
- Start Start step
- SC: Scoping state change action step
- Task: Search for Articles task step
- Update Sharing update sharing settings step
- Update Sharing: Approver update sharing settings step
- Task: Scope PVA task step
- SC: Drafting state change action step
- Task: Draft task step
- SC: In Approval state change action step
- Task: Approve & Effective task step
- SC: Effective state change action step
- End end step
- In the Status field, select Make configuration active.

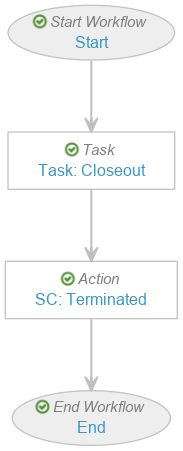
Create the PVA Close-Out Workflow
Create the following workflow to manage PVA close-out or termination:
- Navigate to Admin > Configuration > Workflows.
- Select Create.
- In the Create Workflow window, select Object Workflow.
- Select Continue.
- On the Create Workflow page, populate the fields as follows:
- Label: Enter
PVA Close-Out Workflow - Lifecycle: Select PV Agreement Lifecycle
- Label: Enter
- Select Save.
- In the Workflow Steps section, configure the workflow to include the following steps:
- Start Start step
- Task: Closeout task step
- SC: Terminated state change action step
- End end step
- In the Status field, select Make configuration active.
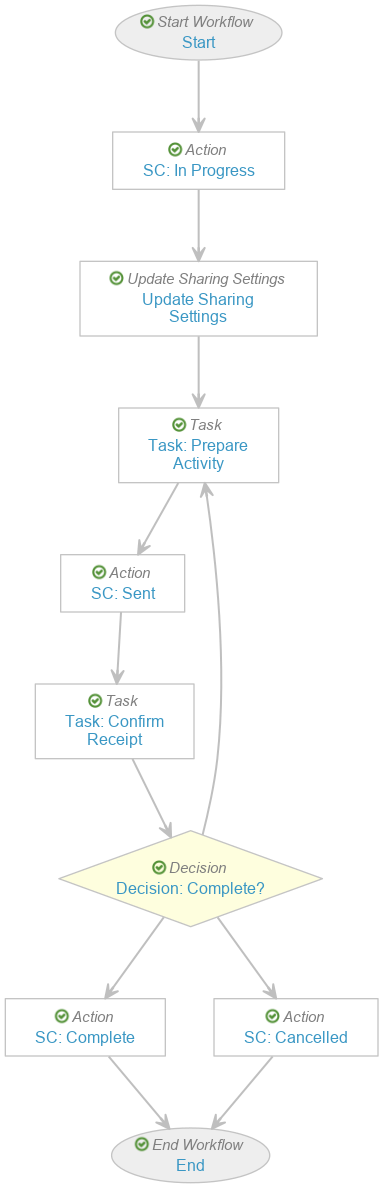
Create the PVA Activity Outbound Workflow
Create a workflow to manage PVA outbound activities (activities completed by your organization and sent to partner organizations for review):
- Navigate to Admin > Configuration > Workflows.
- Select Create.
- In the Create Workflow window, select Object Workflow.
- Select Continue.
- On the Create Workflow page, populate the fields as follows:
- Label: Enter
PVA Activity Outbound Workflow - Lifecycle: Select PVA Activity Lifecycle
- Label: Enter
- Select Save.
- In the Workflow Steps section, configure the workflow to include the following steps:
- Start Start step
- SC: In Progress state change action step
- Update Sharing Settings update sharing settings step
- Task: Prepare Activity task step
- SC: Sent state change action step
- Task: Confirm Receipt task step
- Decision: Complete? decision step
- SC: Complete state change action step
- SC: Cancelled state change action step
- End end step
- In the Status field, select Make configuration active.
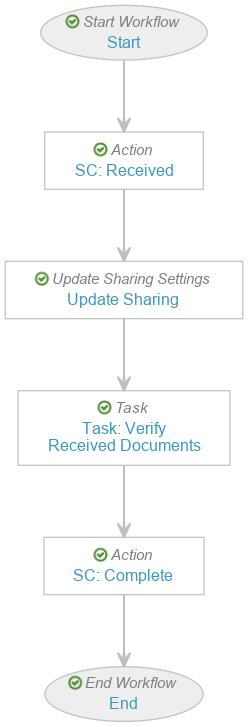
Create the PVA Activity Inbound Workflow
Create a workflow to manage PVA inbound activities (activities completed by a partner organization and sent to your organization for review):
- Navigate to Admin > Configuration > Workflows.
- Select Create.
- In the Create Workflow window, select Object Workflow.
- Select Continue.
- On the Create Workflow page, populate the fields as follows:
- Label: Enter
PVA Activity Inbound Workflow - Lifecycle: Select PVA Activity Lifecycle
- Label: Enter
- Select Save.
- In the Workflow Steps section, configure the workflow to include the following steps:
- Start Start step
- SC: Received state change action step
- Update Sharing update sharing settings step
- Task: Verify Received Documents task step
- SC: Complete state change action step
- End end step
- In the Status field, select Make configuration active.
Configure User Actions
Add user actions to the following states of the specified lifecycles:
- To the PV Agreement Lifecycle:
- Initiated state:
- Always: Start the PVA Creation Workflow
- Action Label: Enter
Start PVA Authoring
- Action Label: Enter
- Always: Start the PVA Creation Workflow
- Effective state:
- Always: Start the PVA Close-Out Workflow
- Action Label: Enter
Close out PVA
- Action Label: Enter
- Always: Start the PVA Close-Out Workflow
- Initiated state:
- To the New state of the PVA Activity Lifecycle:
- Always: Start the PVA Activity Outbound Workflow
- Action Label: Enter
Start Outbound Activity
- Action Label: Enter
- Always: Start the PVA Activity Inbound Workflow
- Action Label: Enter
Start Inbound Activity
- Action Label: Enter
- Always: Start the PVA Activity Outbound Workflow
Configure Document Workflows
Configure the following PVA management document workflows. Use these steps as a starting point, but configure your workflows according to your business processes:
- Create the PVA Authoring Workflow
- Create the PVA Review Workflow
- Create the PVA Approval Workflow
- Configure user actions on the PVA Lifecycle document lifecycle
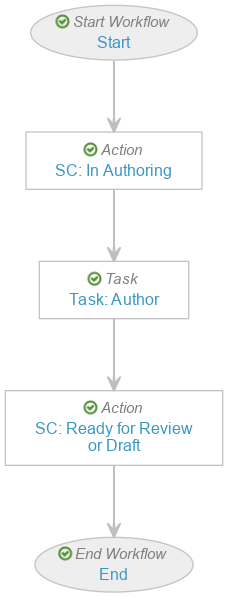
Create the PVA Authoring Workflow
To create a PVA authoring workflow:
- Navigate to Admin > Configuration > Workflows.
- Select Create.
- In the Create Workflow window, select Document Workflow.
- Select Continue.
- On the Create Workflow page, populate the fields as follows:
- Label: Enter
PVA Authoring Workflow - Lifecycle: Select PVA Lifecycle
- Label: Enter
- Select Save.
- In the Workflow Steps section, configure the workflow to include the following steps:
- Start start step
- SC: In Authoring state change action step
- Task: Author task step
- SC: Ready for Review or Draft state change action step
- End end step
- In the Status field, select Make configuration active.
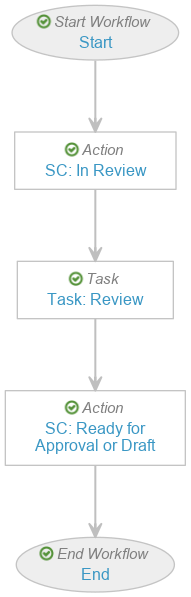
Create the PVA Review Workflow
To create a PVA review workflow:
- Navigate to Admin > Configuration > Workflows.
- Select Create.
- In the Create Workflow window, select Document Workflow.
- Select Continue.
- On the Create Workflow page, populate the fields as follows:
- Label: Enter
PVA Review Workflow - Lifecycle: Select PVA Lifecycle
- Label: Enter
- Select Save.
- In the Workflow Steps section, configure the workflow to include the following steps:
- Start start step
- SC: In Review state change action step
- Task: Review task step
- SC: Ready for Approval or Draft state change action step
- End end step
- In the Status field, select Make configuration active.
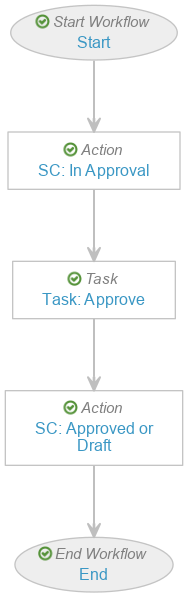
Create the PVA Approval Workflow
To create a PVA approval workflow:
- Navigate to Admin > Configuration > Workflows.
- Select Create.
- In the Create Workflow window, select Document Workflow.
- Select Continue.
- On the Create Workflow page, populate the fields as follows:
- Label: Enter
PVA Approval Workflow - Lifecycle: Select PVA Lifecycle
- Label: Enter
- Select Save.
- In the Workflow Steps section, configure the workflow to include the following steps:
- Start start step
- SC: In Approval state change action step
- Task: Approve task step, configured to include the following settings:
- In the Prompts section:
- Select the Prompt for Verdicts checkbox
- Select the Multiple Verdicts: One verdict for each item option
- In the Verdicts section, create the following verdicts:
- Approved:
- Select Add eSignature
- For Instructions, enter
Please provide an eSignature for Document Approval - Select the Manifest eSignature on document checkbox
- Reviewed, Back to Draft:
- Select Add Comments
- For Prompt for comments, enter
Comments - Select the Required checkbox
- Approved:
- In the Prompts section:
- SC: Approved or Draft state change action step
- End end step
- On the PVA Approval Workflow page, in the Status field, select Make configuration active.
Create User Actions on the PVA Lifecycle
Create user actions on the following states of the PVA Lifecycle document lifecycle:
- On the Draft state:
- Always: Start the PVA Authoring Workflow
- Action Label: Enter
Start Authoring
- Action Label: Enter
- Always: Start the PVA Review Workflow
- Action Label: Enter
Start Review
- Action Label: Enter
- Always: Start the PVA Authoring Workflow
- On the Ready for Review state:
- Always: Start the PVA Review Workflow
- Action Label: Enter
Start Review
- Action Label: Enter
- Always: Start the PVA Review Workflow
- On the Ready for Approval state:
- Always: Start the PVA Approval Workflow
- Action Label: Enter
Start Approval
- Action Label: Enter
- Always: Start the PVA Approval Workflow
Manage Tabs
For easy user access to PVA management features:
- Set the tab status to Active for the following tabs:
- PVA Relationships
- PV Agreements
- Open PVA Action
- Create an active PVAs tab collection and add the following tabs:
- Home
- PVAs
- Library
- Analytics
(26R1) Configure PVA: Defer Contact Entry
To configure the Partner Contact and Sponsor Contact fields on the PVA Obligation object as optional during initial PVA Obligation creation:
- Navigate to Admin > Configuration > Objects > PVA Obligation > Fields.
- Select the relevant field.
- Select Edit.
- Under the Options section, clear the User must always enter a value (required) attribute.
- Select Save.
(25R3) Configure Product Family Support for PV Agreements
To allow users to classify PV Agreements at the Product Family level, you can copy the standard PV Agreement Detail Page object layout, set the copied layout as the default, and delete any other existing custom PV Agreement layouts. Alternatively, you can update the applicable PV Agreement object layouts to:
- Remove the Covered Products section
- Insert the Covered Product Families related object section below the Details section:
- Related Object: Select PVA-Product Family > Product Family
- Section Label: Enter
Covered Product Families - Creation Options: Select Create record in pop-up dialog
- Edit the default columns to display the following fields:
- Name
- Generic Name
- Therapeutic Area
(24R3) Configure Pharmacovigilance Agreements Usability Improvements
To display meaningful values for PVA-related object references in records, you must update your custom object layouts to include the applicable control fields. Alternatively, you can copy the standard layouts and replace the custom layout versions in your Vault.
Update Object Layout Fields
Update the following object layouts by replacing the listed fields with the control field versions with the Slider ( ) icon in each object layout’s Details section:
| Object | Field to Remove | Control Field to Add |
|---|---|---|
| PVA Action Item | Agreement Contact | Agreement Contact |
| PV Agreement | PV Agreement | |
| Related PVA Activity | Related Activity | |
| Related PVA Obligation | PVA Obligation | |
| PVA Activity | Partner Responsible Contact | Partner Responsible Contact |
| PV Agreement | PV Agreement | |
| PVA Obligation | Related Obligation | |
| Sponsor Responsible User | Sponsor Responsible User | |
| PVA Contact | PV Agreement | PV Agreement |
| PVA Document Distribution Event | PVA Activity | Activity |
| Recipient | Recipient | |
| PVA Document for Distribution | PVA Activity | Activity |
| PVA Obligation | Partner Contact | Partner Contact |
| Sponsor Contact | Sponsor Contact | |
| PVA Reconciliation | Activity | Activity |
| Obligation | Obligation |
Edit Object Layout Default Columns
Edit the default columns for the following object layout sections to include the applicable control fields and make any additional changes for your business processes as needed:
| Object | Section | Fields to Add |
|---|---|---|
| PV Agreement | Contacts | PV Agreement |
| Action Items |
|
|
|
|
|
|
|
|
| PVA Reconciliations |
|
|
| PVA Action Item | Document Distribution Events |
|
| Documents for Distribution | Activity | |
| PVA Activity | Related Action Items |
|
| Document Distribution Events |
|
|
| Documents for Distribution | Activity | |
| PVA Obligation |
|
|
| Action Items |
|
|
| Reconciliations |
|