Learn how to update your Vault’s configuration to enable localized submissions and language translation support.
About the Feature
Support for Localized Submissions was first added in 20R3. Vaults originally deployed in 20R3 or later include some of the required configurations by default.
However, additional changes to the Veeva Safety template were introduced in 21R2 to address data model issues with localized objects introduced in 20R3. Throughout this article, sections are prepended with (21R2) to identify configuration added in 21R2.
Vaults deployed from 21R2 and later already have the necessary configuration for this feature.
(Optional) Navigation
Optionally, add a Localized Cases navigation tab:
- In Admin, go to Configuration > Tabs.
- Select Create.
- Create the Localized Cases tab with the following details:
- Label: Localized Cases
- Tab Type: Object
- Object: Localized Cases
- Creation Options: Prevent record creation
- Select Save.
Configure the Localized Country Object
The following configurations are required for enabling localized submissions.
Insert the Localized Country Section on the Country Layout
- In Admin, go to Configuration > Objects > Country.
- On the Layouts tab, open the Country Detail Page Layout.
- Insert a Related Object section.
- Complete the Add Related Object form with the following details:
- Related Object: Localized Country
- Create Option: Prevent Record Creation
- Select Edit Columns from the Localized Country related object section.
- Add the following columns:
- Name
- Localization
- Select Done.
- Select Save.
Hide the Localized Country Object in Business Admin
- In Admin, go to Configuration > Objects > Localized Country.
- Select Edit.
- De-select Display in Business Admin Menu.
- Select Save.
Configure the Localized Organization Object
Insert the Localized Organization Section on Organization Layouts
- In Admin, go to Configuration > Objects > Organization > Layouts.
- Insert the Localized Organization related object section on the following layouts:
- CRO Detail Page Layout
- Ethics Committee Detail Page Layout
- Organization Detail Page Layout
- Partner Detail Page Layout
- Site Detail Page Layout
- Sponsor Detail Page Layout
- Vendor Detail Page Layout
- Complete the Add Related Object form with the following details:
- Related Object: Localized Organization
- Create Option: Create record in new page
- Select Edit Columns from the Localized Organization related object section.
- Add the following columns:
- Name
- Localization
- Official Name
- Select Done.
- Select Save.
Hide the Localized Organization Object in Business Admin
- In Admin, go to Configuration > Objects > Localized Organization.
- Select Edit.
- De-select Display in Business Admin Menu.
- Select Save.
Update the Agency Layout
- In Admin, go to Configuration > Objects > Organization.
- On the Layouts tab, open the Agency Detail Page Layout. If this layout does not exist, create a new layout for the Agency object type.
- Add the Localization field to the Details section.
- Insert a Related Object section.
- Complete the Add Related Object form with the following details:
- Related Object: Localized Organization
- Create Option: Prevent Record Creation
- Select Edit Columns from the Localized Organization related object section.
- Add the following columns:
- Name
- Localization
- Official Name
- Select Done.
- Select Save.
Configure the Controlled Vocabulary Object
Insert the Localized Controlled Vocabulary section on the Controlled Vocabulary layout:
- In Admin, go to Configuration > Objects > Controlled Vocabulary.
- On the Layouts tab, open the Base Controlled Vocabulary Records Page Layout.
- Insert the Localized Controlled Vocabulary related object section.
- Select Edit Columns from the Localized Controlled Vocabulary related object section.
- Add the Localization column.
- Select Done.
- Select Save.
Configure the Dose Form Object
Insert the Localized Dose Form section on the Dose Form layout:
- In Admin, go to Configuration > Objects > Dose Form.
- On the Layouts tab, open the Dose Form Detail Page Layout.
- Insert a Related Object section.
- Complete the Add Related Object form with the following details:
- Related Object: Localized Dose Form
- Create Option: Prevent Record Creation
- Select Edit Columns from the Localized Dose Form related object section.
- Add the following columns:
- Name
- Localization
- Select Done.
- Select Save.
Configure the Study Object
Insert the Localized Study section on the Study layout:
- In Admin, go to Configuration > Objects > Study.
- On the Layouts tab, open the Study Detail Page Layout.
- Insert a Related Object section.
- Complete the Add Related Object form with the following details:
- Related Object: Localized Study
- Create Option: Create record in new page
- Select Edit Columns from the Localized Study related object section.
- Add the following columns:
- Name
- Localization
- Study Name
- Select Done.
- Select Save.
(21R2) Configure the Localized Case Contact Object
Update the Localized Case Contact Layout
- In Admin, go to Configuration > Objects > Localized Case Contact.
- On the Layouts tab, open the Localized Case Contact Detail Page Layout.
- Edit the Details section to match the following configuration in this order:
- Case
- Localized Case
- Title
- First Name
- Middle Name
- Last Name
- Organization
- Department
- Facility Name
- Insert a Detail Form section.
- Complete the Add Detail form with the following details:
- Section Label: Address
- Select Done.
- Add the following fields to the Address Detail section:
- Street
- Street Line 2
- City
- State / Province
- Contact Country
- Select Save.
(Optional) Update the Localized Study Name Field
- In Admin, go to Configuration > Objects > Localized Study > Fields > Name.
- Select Edit.
- Select System manages field value (read-only).
- Enter “VV-{######}” in the Value Format field.
- Select Save.
(21R2) Configure the Case Object
Add a Localized Case column to the Case layout:
- In Admin, go to Configuration > Objects > Case > Layouts > Case Page Layout.
- In the Submissions & Distributions related object section, add a column for Localized Case.
Configure the Localized Case Object
(Optional) Enable Display in Lists and Hovercards for Fields
- In Admin, go to Configuration > Objects > Localized Case > Fields.
- Select Case.
- Select Edit.
- Select the checkbox beside display in lists and hovercards.
- Select Save.
- Go to Configuration > Objects > Localized Case > Fields > Organization.
- Select Edit.
- Select the checkbox beside display in lists and hovercards.
- Select Save.
(21R2) Configure the Localized Case Layout
Go to Configuration > Objects > Localized Case > Layouts and configure the Localized Case Detail Page Layout. See the following for detailed instructions for each section on the layout:
Details Section
The Details section should include the following fields:
- Case
- Name (Required)
- Localization
- Local Awareness Date
- Global Due Date
- Localized Parent Information
- NMPA Report Classification
This field should be added once local fields for NMPA have been enabled in your Vault. - CIOMS Remarks
Contacts Section
The layout should have a Contacts related object section with the following settings:
| Related Object | Section Label | Creation Option | Columns |
|---|---|---|---|
| Localized Case Contact | Contacts | Prevent record creation |
|
Products Section
The layout should have a Products related object section with the following settings:
| Related Object | Section Label | Creation Option | Columns |
|---|---|---|---|
| Localized Case Product | Products | Prevent record creation |
|
Product Registrations Section
Once Japanese Localization Fields have been enabled in your Vault, the layout should have a Product Registrations related object section with the following settings:
| Related Object | Section Label | Creation Option | Columns |
|---|---|---|---|
| Case Product Registration | Product Registration | Create record in new page |
|
Case Comments Section
Once Japanese Localization Fields have been enabled in your Vault, the layout should have a Case Comments related object section with the following settings:
| Related Object | Section Label | Creation Option | Columns |
|---|---|---|---|
| Localized Case Comment | Product Registration | Create record in new page |
|
Adverse Events Section
The layout should have a Adverse Events related object section with the following settings:
| Related Object | Section Label | Creation Option | Columns |
|---|---|---|---|
| Localized Case Adverse Event | Adverse Events | Prevent record creation |
|
Assessments Section
The layout should have a Assessments related object section with the following settings:
| Related Object | Section Label | Creation Option | Columns |
|---|---|---|---|
| Localized Case Assessment | Assessments | Prevent record creation |
|
Assessment Results Section
The layout should have a Assessment Results related object section with the following settings:
| Related Object | Section Label | Creation Option | Columns |
|---|---|---|---|
| Localized Case Assessment Result | Assessment Results | Prevent record creation |
|
Causes of Death Section
The layout should have a Causes of Death related object section with the following settings:
| Related Object | Section Label | Creation Option | Columns |
|---|---|---|---|
| Localized Case Cause of Death | Causes of Death | Prevent record creation |
|
Medical History Section
The layout should have a Medical History related object section with the following settings:
| Related Object | Section Label | Creation Option | Columns |
|---|---|---|---|
| Localized Case Medical History | Medical History | Prevent record creation |
|
Drug History Section
The layout should have a Drug History related object section with the following settings:
| Related Object | Section Label | Creation Option | Columns |
|---|---|---|---|
| Localized Case Drug History | Drug History | Prevent record creation |
|
Test Results Section
The layout should have a Test Results related object section with the following settings:
| Related Object | Section Label | Creation Option | Columns |
|---|---|---|---|
| Localized Case Test Result | Test Results | Prevent record creation |
|
Narrative Section
The Narrative section should include the following fields:
- Case Narrative
- Narrative Preview
- Medical History Text
- Reporter’s Comments
- Company Comments
- Additional Pregnancy Related Information
This field should be added once local fields for NMPA have been enabled in your Vault.
Study Section
The Study section should include the following fields:
- Study Name
- Study Name (Continued)
- Reporting Summary
- Study Type
- MFDS Other Study Type
This field should be added once local fields for MFDS have been enabled in your Vault.
Reference Numbers Section
The layout should have a Reference Numbers related object section with the following settings:
| Related Object | Section Label | Creation Option | Columns |
|---|---|---|---|
| Localized Case Identifier | Reference Numbers | Prevent record creation |
|
Submissions & Distributions Section
The layout should have a Submissions & Distributions related object section with the following settings:
| Related Object | Section Label | Creation Option | Columns |
|---|---|---|---|
| Transmission | Submissions & Distributions | Prevent record creation |
|
(21R2) Localized Case Product
In Admin, go to Configuration > Objects > Localized Case Product > Layouts > Localized Case Product Detail Page Layout and configure the following sections on the layout:
Details Section
- Localized Case
- Case Product
- Product (Reported)
- Product (Coded)
- Local MPID
- Registration Holder/Applicant
- Related Device Information
This field should be added once local fields for NMPA have been enabled in your Vault. - Other Additional Information
Dosages Section
The layout should have a Dosages related object section with the following settings:
| Related Object | Section Label | Creation Option | Columns |
|---|---|---|---|
| Localized Case Product Dosage | Dosages | Prevent record creation |
|
Indications Section
The layout should have an Indications related object section with the following settings:
| Related Object | Section Label | Creation Option | Columns |
|---|---|---|---|
| Localized Case Product Indication | Indications | Prevent record creation |
|
Substances Section
The layout should have an Substances related object section with the following settings:
| Related Object | Section Label | Creation Option | Columns |
|---|---|---|---|
| Localized Case Product Substance | Substances | Prevent record creation |
|
(21R2) Configure the Localized Case Assessment Object
Configure the Localized Case Assessment layout:
- In Admin, go to Configuration > Objects > Localized Case Assessment > Layouts > Localized Case Assessment Detail Page Layout.
- Insert a Related Objects section.
- Complete the Add Related Object form with the following details:
- Related Object: Localized Case Assessment Result
- Section Label: Assessment Results
- Create Option: Prevent Record Creation
- Select Done.
(21R2) Configure the Transmission Object
Add the Localization lookup Field
- In Admin, go to Configuration > Objects > Transmission > Fields.
- Select Create.
- Create the field with the following details:
- Field Type: Lookup
- Label: Localization
- Lookup Relationship: Localized Case
- Lookup Source Field: Localization
- Select Save.
- Go to Transmission > Object Types.
- On the Fields view, select Edit.
- Ensure the Localization lookup field is selected for the Submission object type.
Add the Hide Localized Case layout rule to the Transmission Layout
- In Admin, go to Configuration > Objects > Transmission > Layouts > Submission Detail Page Layout > Layout Rules.
- Select Create.
- Create a Layout Rule with the following properties:
- Label: Hide Localized Case
- Hide the Following Page Layout Items:
- Type: Fields
- Values: Localized Case, Localization
- IF this Layout Rule Expression is TRUE:
isblank(localized_case__vr.name__v)
- Select Save.
(21R2) Configure the Case Product Registration Object
Secure the Case Product Registration Relationship to the Localized Case object:
- In Admin, go to Configuration > Objects > Case Product Registration > Fields > Localized Case.
- Select Edit.
- Select Secure Relationship.
- Select Save.
(21R2) All Localized Objects (Non-Case)
If your Vault’s localization object details layout has a system-related field in the Details section and it is not a Case child-object, insert the System Information section and move those fields to that section.
Verify this configuration is done on the following objects:
- Localization
- Localized Controlled Vocabulary
- Localized Country
- Localized Dose Form
- Localized Organization
- Localized Product
- Localized Route of Administration
- Localized Study
- Localized Substance
- Localized Transmission
- Localized Unit of Measurement
(Optional) Insert the System Information Section
- In Admin, go to Configuration > Objects > [Localized Object] > Layouts > [Localized Object] Detail Page Layout.
- Insert a Detail Form section.
- Complete the section with the following properties:
- Section Label: System Information
- Detail Form - Two Columns
- Select Done.
- Move any system-related fields to this section.
- Complete the section with the following properties:
- Status
- Created By
- Created Date
- Last Modified By
- Last Modified Data
(Optional) Remove Fields from the Details Section
If any of the following fields are in the Details section of any of the Localized Objects Detail Page Layouts, remove them from the section using the “x” next to the field:
- Lifecycle
- Lifecycle State
- Lifecycle Stage
- Lifecycle State Stage ID
(21R2) All Localized Case Child-Objects
Certain Localized Case child object layouts may contain system-related fields in the Details section.
Verify this configuration is done on the following objects:
- Localized Case Cause of Death
- Localized Case Contact
- Localized Case Identifier
- Localized Case Product Substance
(Optional) Insert the System Information Section
- In Admin, go to Configuration > Objects > [Localized Object] > Layouts > [Localized Object] Detail Page Layout.
- Insert a Detail Form section.
- Complete the section with the following properties:
- Section Label: System Information
- Detail Form - Two Columns
- Select Done.
- Move any system-related fields to this section, including:
- Status
- Created By
- Created Date
- Last Modified By
- Last Modified Data
(Optional) Remove Fields from the Details Section
If any of these fields appear in the Details section, move them to the System Information Section:
- Name
- Status
- Created By
- Created Date
- Last Modified By
- Last Modified Data
- Lifecycle
- Lifecycle State
- Lifecycle Stage
- Lifecycle State Stage ID
Object Lifecycles and Workflows
(21R2) Updates to Approved State in Localized Case Lifecycle
(Optional) Rename the Approved State
The 21R2 release includes a new standard Approved state for the Localized Case Lifecycle. The previously used Approved (approved_state__c) state can be relabelled and repurposed as a Revision state.
- In Admin, go to Configuration > Object Lifecycles > Localized Case Lifecycle.
- Select Approved (approved_state__c) from the States section. Ensure to select the custom (
__c) state, not the standard (__v) Approved state. - Select Edit from the Details section.
- Enter “Revision” in the State Label field.
- Select Save.
Configure the Approved State in the Localized Workflows
- In Admin, go to Configuration > Workflows.
- Open the following workflows for editing:
- Localized Case Workflow
- Localized Case Translation Workflow
- Select State Change: Approved.
- Select Edit.
- Under State Change Options, change the Next State field to the standard Approved (
approved__v) state. - Select Save.
(21R2) Configure the Localized Case Close Workflow
Create the Localized Case Close Workflow
- In Admin, go to Configuration > Workflows.
- Select Create.
- Select Object Workflow from the drop-down menu.
- Select Continue.
- Create the workflow with the following details:
- Label: Localized Case Workflow
- Lifecycle: Localized Case Translation Workflow
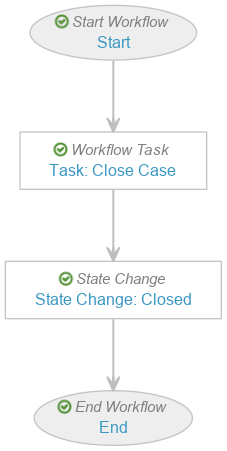
- Create the workflow with the following steps:
- Workflow Task: Task: Case Close
- State Change: State Change: Closed
- Select Save.
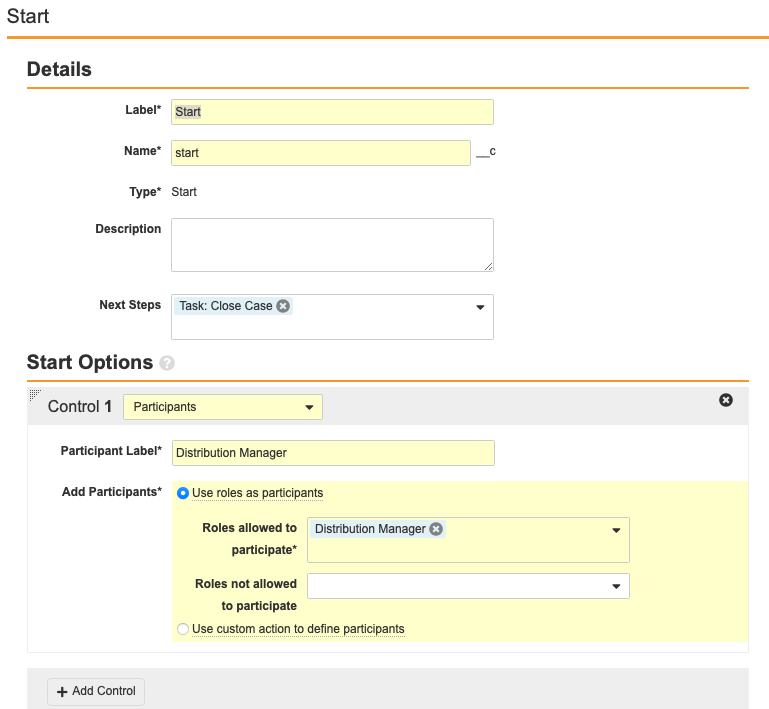
Configure the Start Workflow: Start Workflow Step
- Add the Start step.
- Select Add Control.
- Configure the Start Options with the following properties:
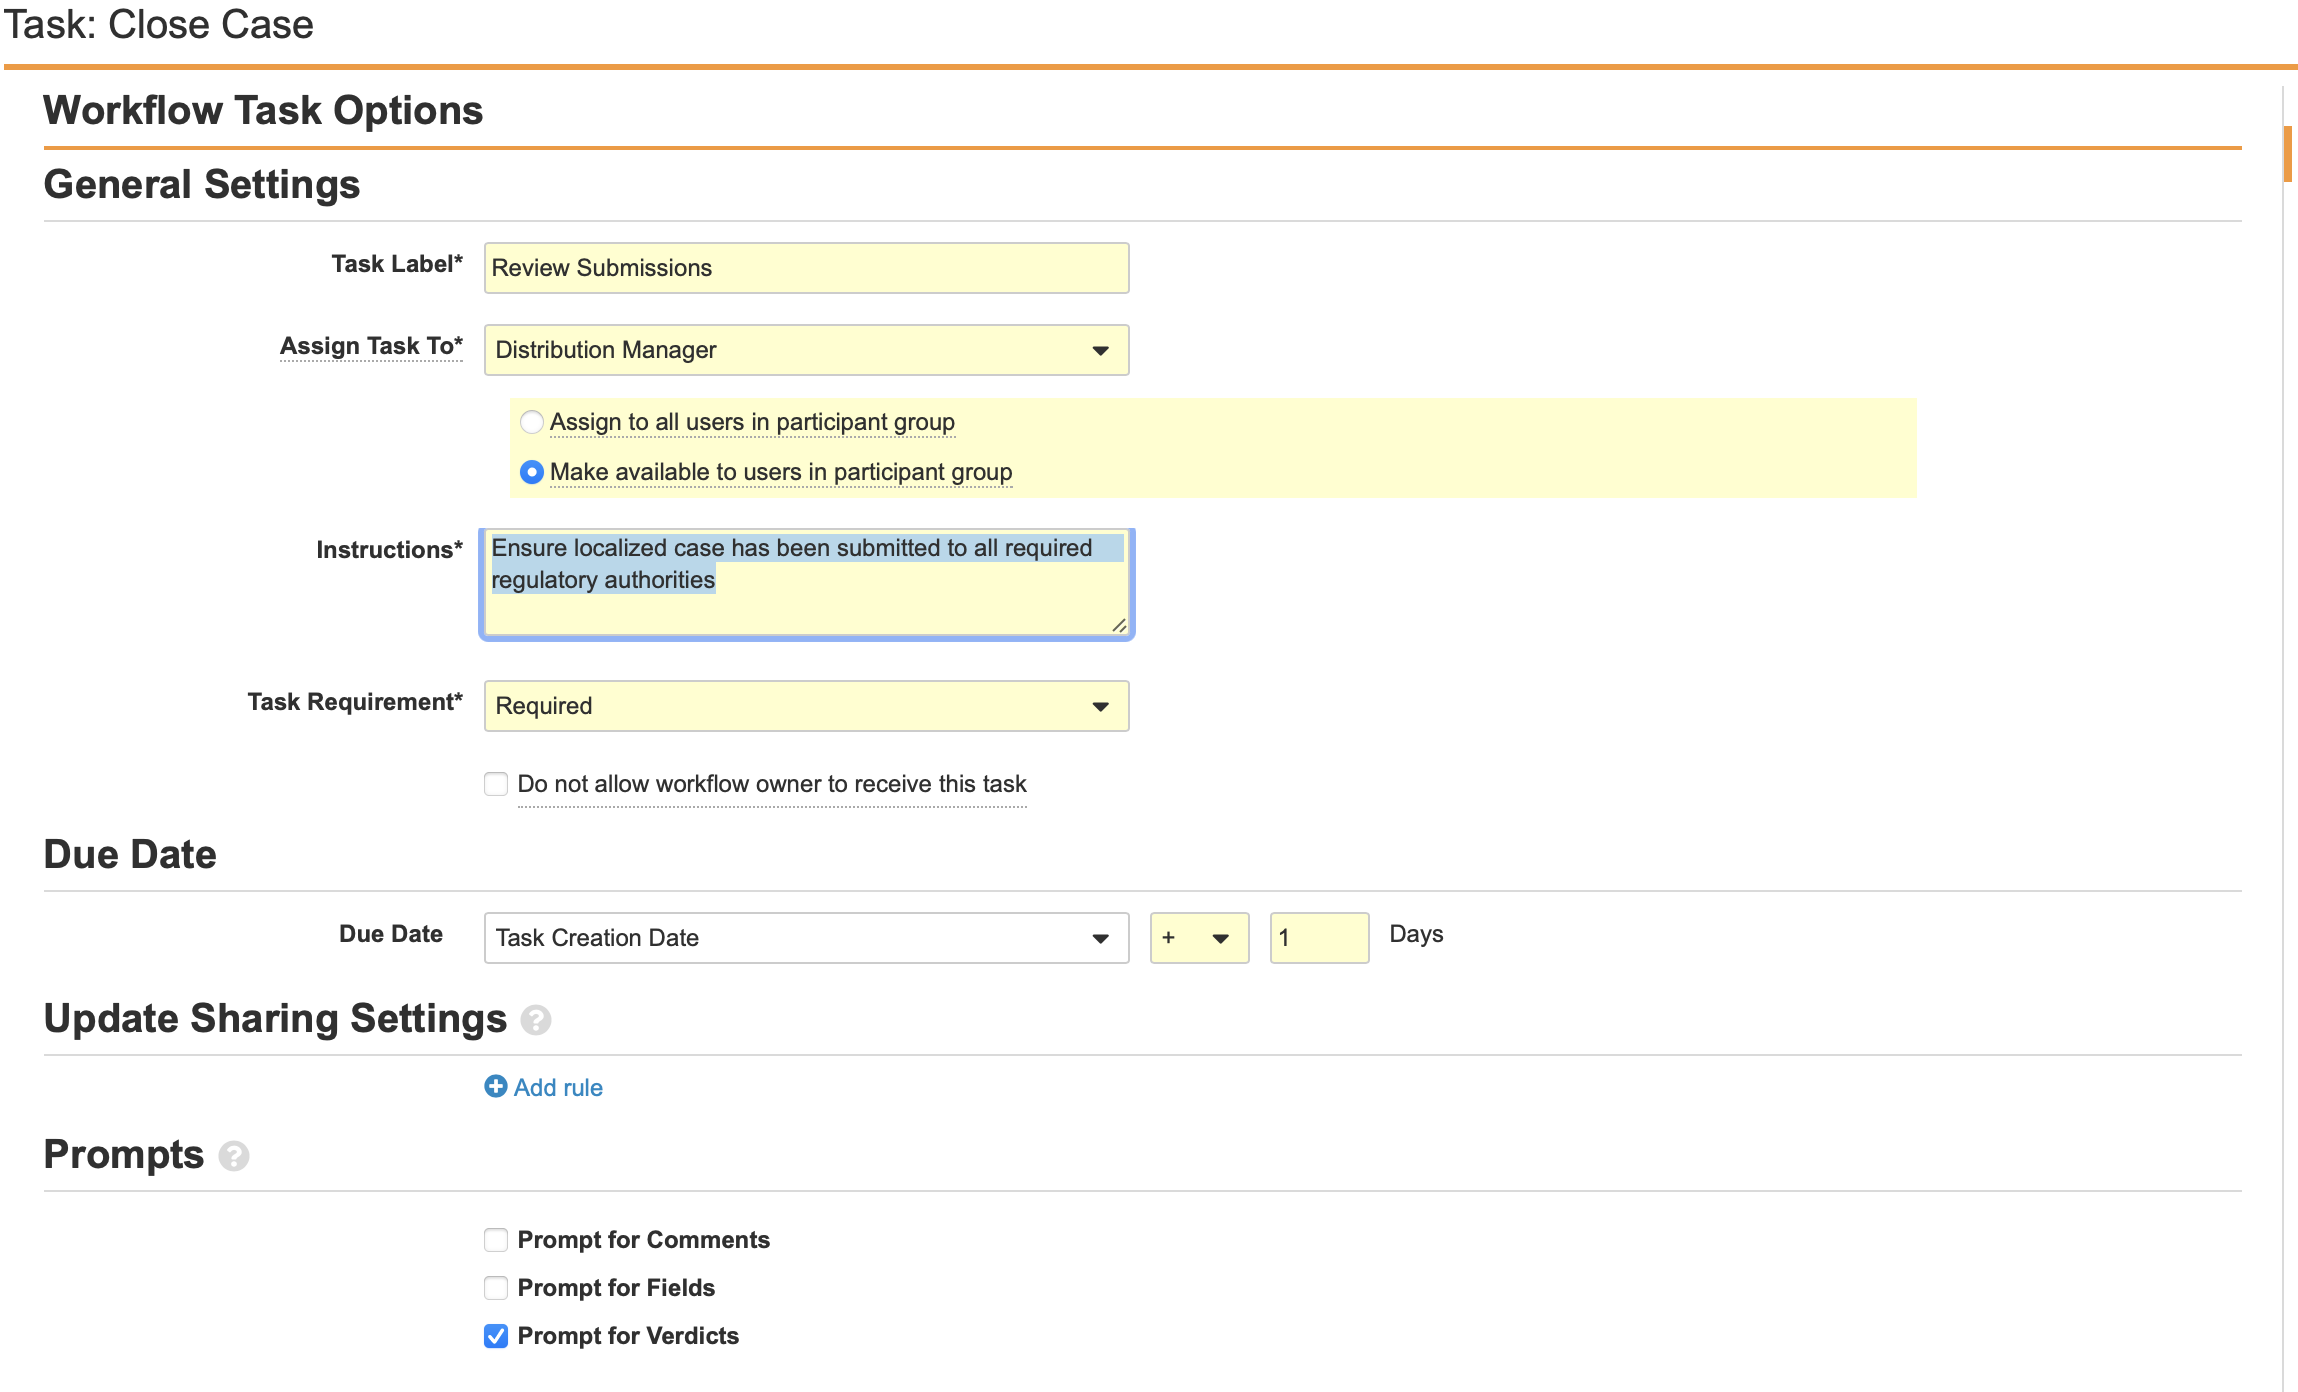
Configure the Task: Case Close Workflow Step
- Add a Workflow Task after the Start step, labelled Task: Case Close in the Localized Case Close Workflow.
- Configure the General Settings with the following properties:
- Task Label: Review Submissions
- Assign Task To: Distribution Manager
- Make available to users in participant group
- Instructions: “Ensure localized case has been submitted to all required regulatory authorities.”
- Task Requirement: Required
- Configure the Due Date:
- Task Creation Date: + 1 Days
- Select Prompt for Verdicts from the Prompts section.
- Configure the Verdicts section with the following properties:
Configure the Localized Case Translation Workflow
The following configuration was originally provided in the 20R3 template:
Create the Localized Case Translation Workflow
- In Admin, go to Configuration > Workflows.
- Select Create.
- Select Object Workflow from the drop-down menu.
- Select Continue.
- Create the workflow with the following details:
- Label: Localized Case Translation
- Lifecycle: Localized Case
- Create the workflow with the following steps:
- Workflow Task: Task: Case Close
- State Change: State Change: Closed
- Select Save.

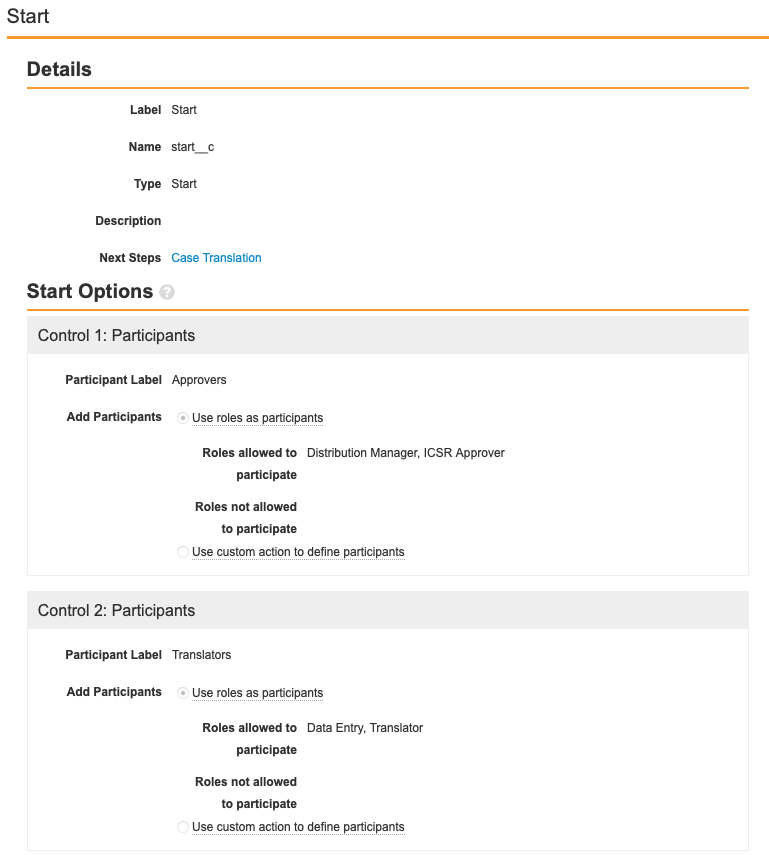
Configure the Start Workflow: Start Workflow Step
- Add the Start Step.
- Select Add Control.
- Configure the Start Options with the following properties:
- Control 1: Participants
- Participation Label: Distribution Manager
- Add Participants: Use roles as participants
- Roles allowed to participate: Distribution Manager, ICSR Approver
- Control 2: Participants
- Participation Label: Translators
- Add Participants: Use roles as participants
- Roles allowed to participate: Data Entry, Translator
- Control 1: Participants
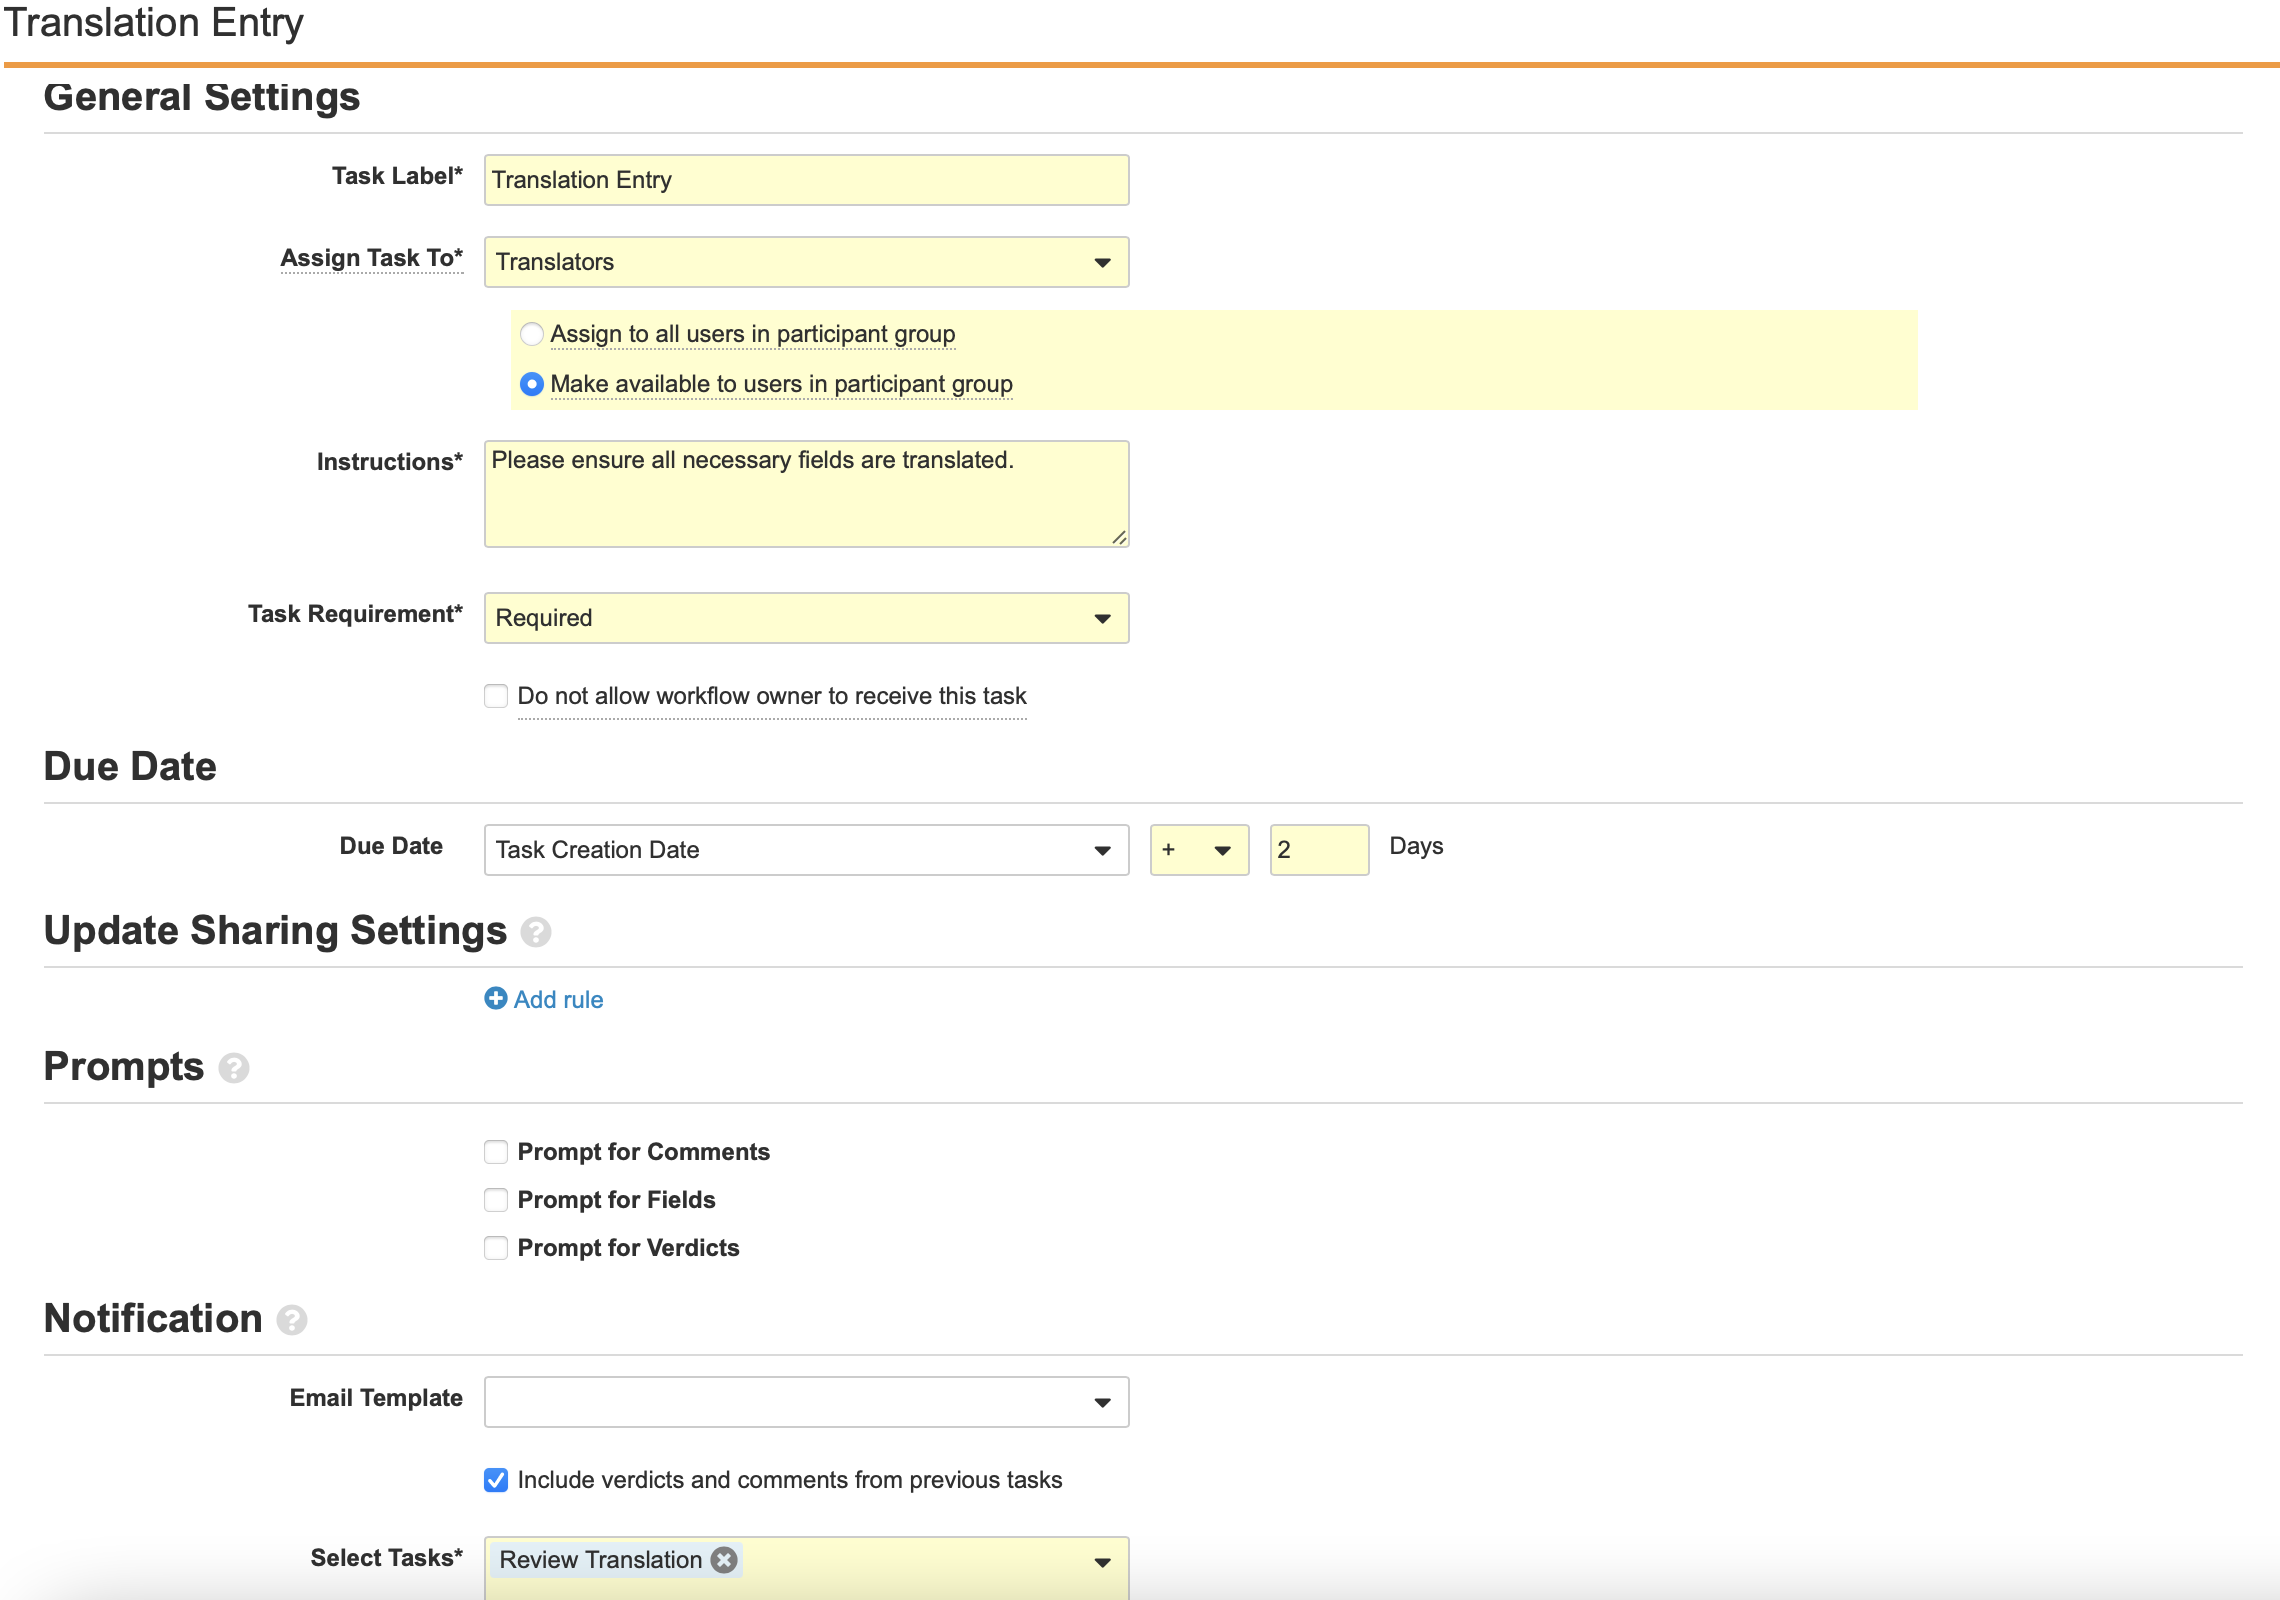
Configure the Task: Translation Entry Workflow Step
- Add a Workflow Task after the State Change: Case Translation step, labelled Task: Translation Entry in the Localized Case Translation Workflow.
- Configure the General Settings with the following properties:
- Task Label: Translation Entry
- Assign Task To: Translators
- Make available to users in participant group
- Instructions: “Please ensure all necessary fields are translated.”
- Task Requirement: Required
- Configure the Due Date:
- Task Creation Date: + 2 Days
- Select Include verdicts and comments from previous tasks from the Notifications section.
- Select Review Translation from the Select Tasks drop-down menu.
- Select Save.
Configure the Task: Review Translation Workflow Step
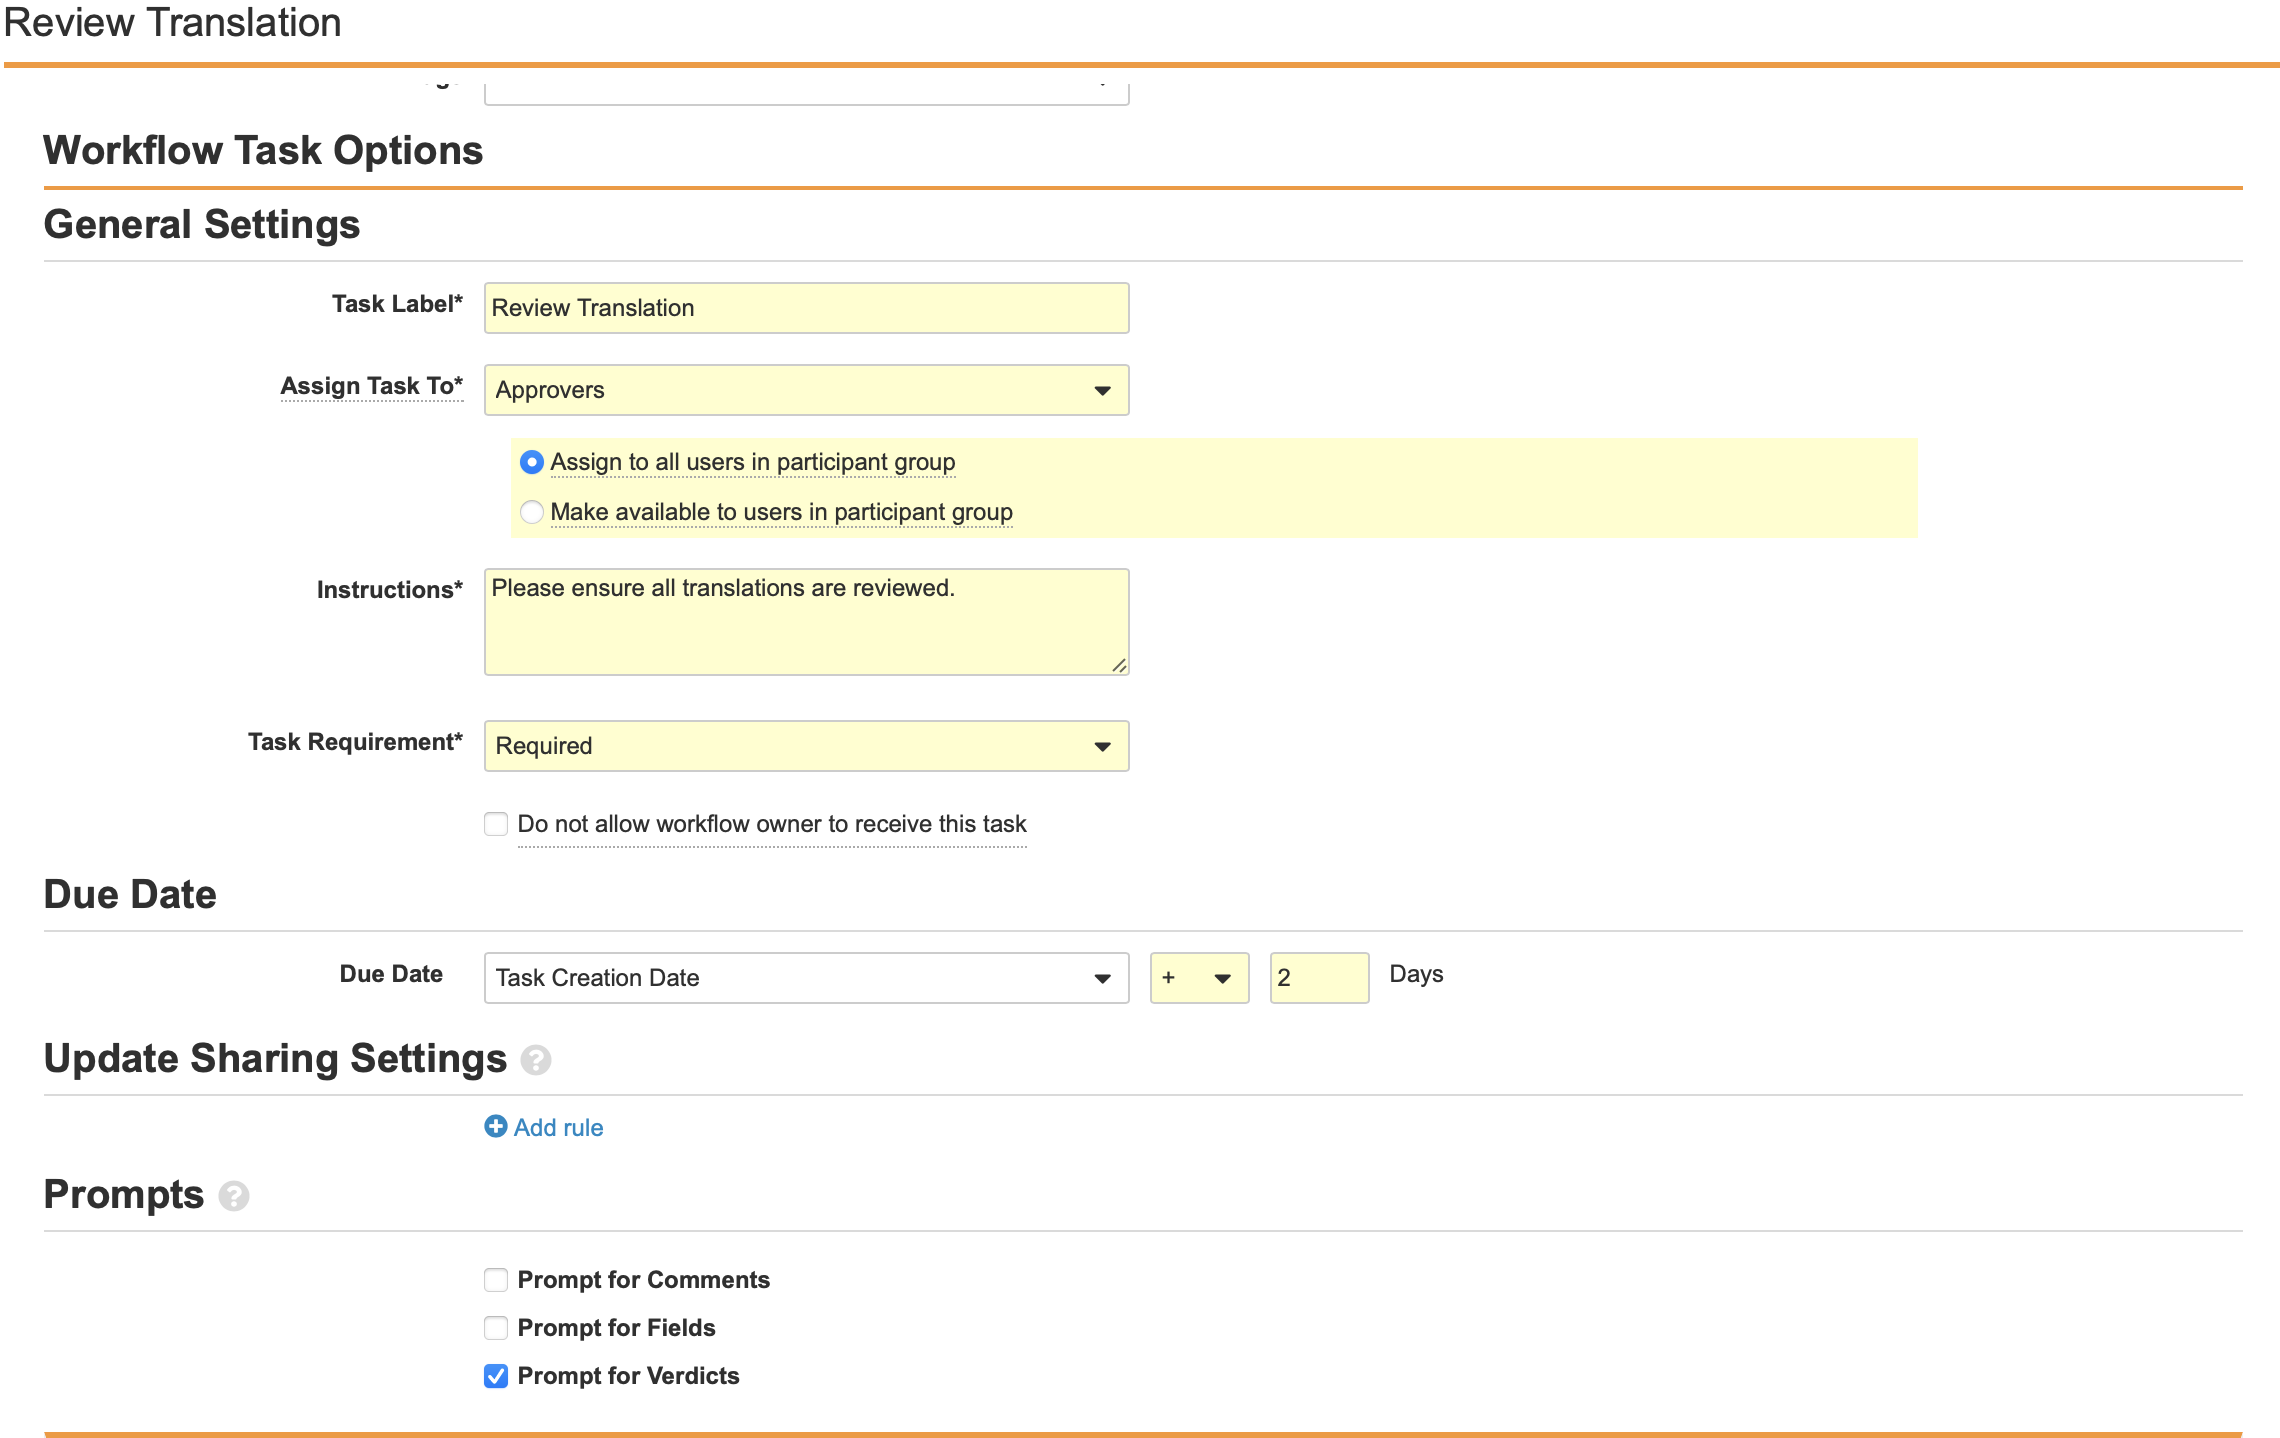
- Add a Workflow Task after the State Change: Translation Review step, labelled Task: Review Translation in the Localized Case Translation Workflow.
- Configure the General Settings with the following properties:
- Task Label: Review Translation
- Assign Task To: Approvers
- Make available to users in participant group
- Instructions: “Please ensure all necessary fields are translated.”
- Task Requirement: Required
- Configure the Due Date:
- Task Creation Date: + 2 Days
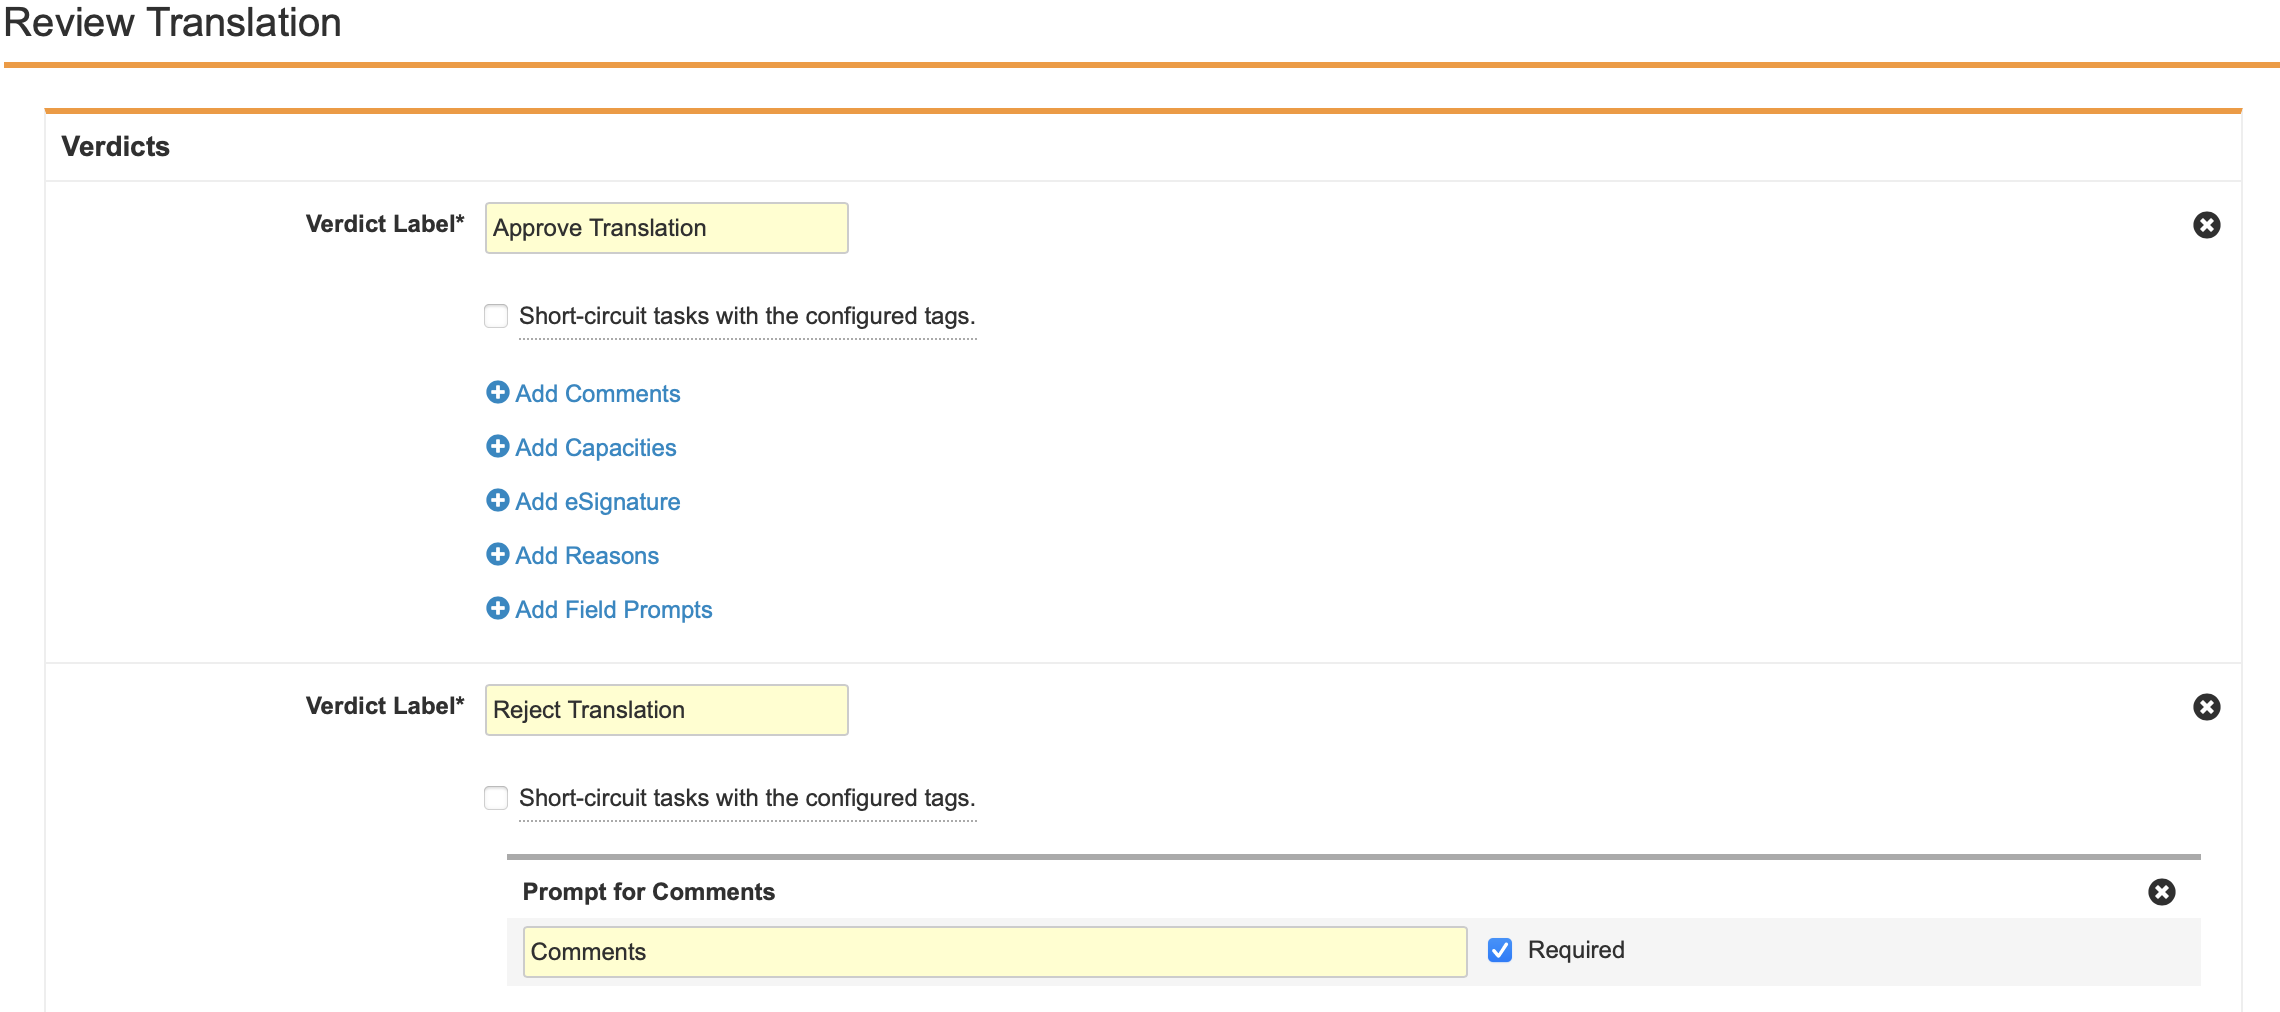
- Select Prompt for Verdicts from the Prompts section.
- Create two Verdicts with the following properties:
- Verdict Label: Approve Revision
- Verdict Label: Reject Revision
- Prompt for Comments: “Comments”
- Required
- Select Save.
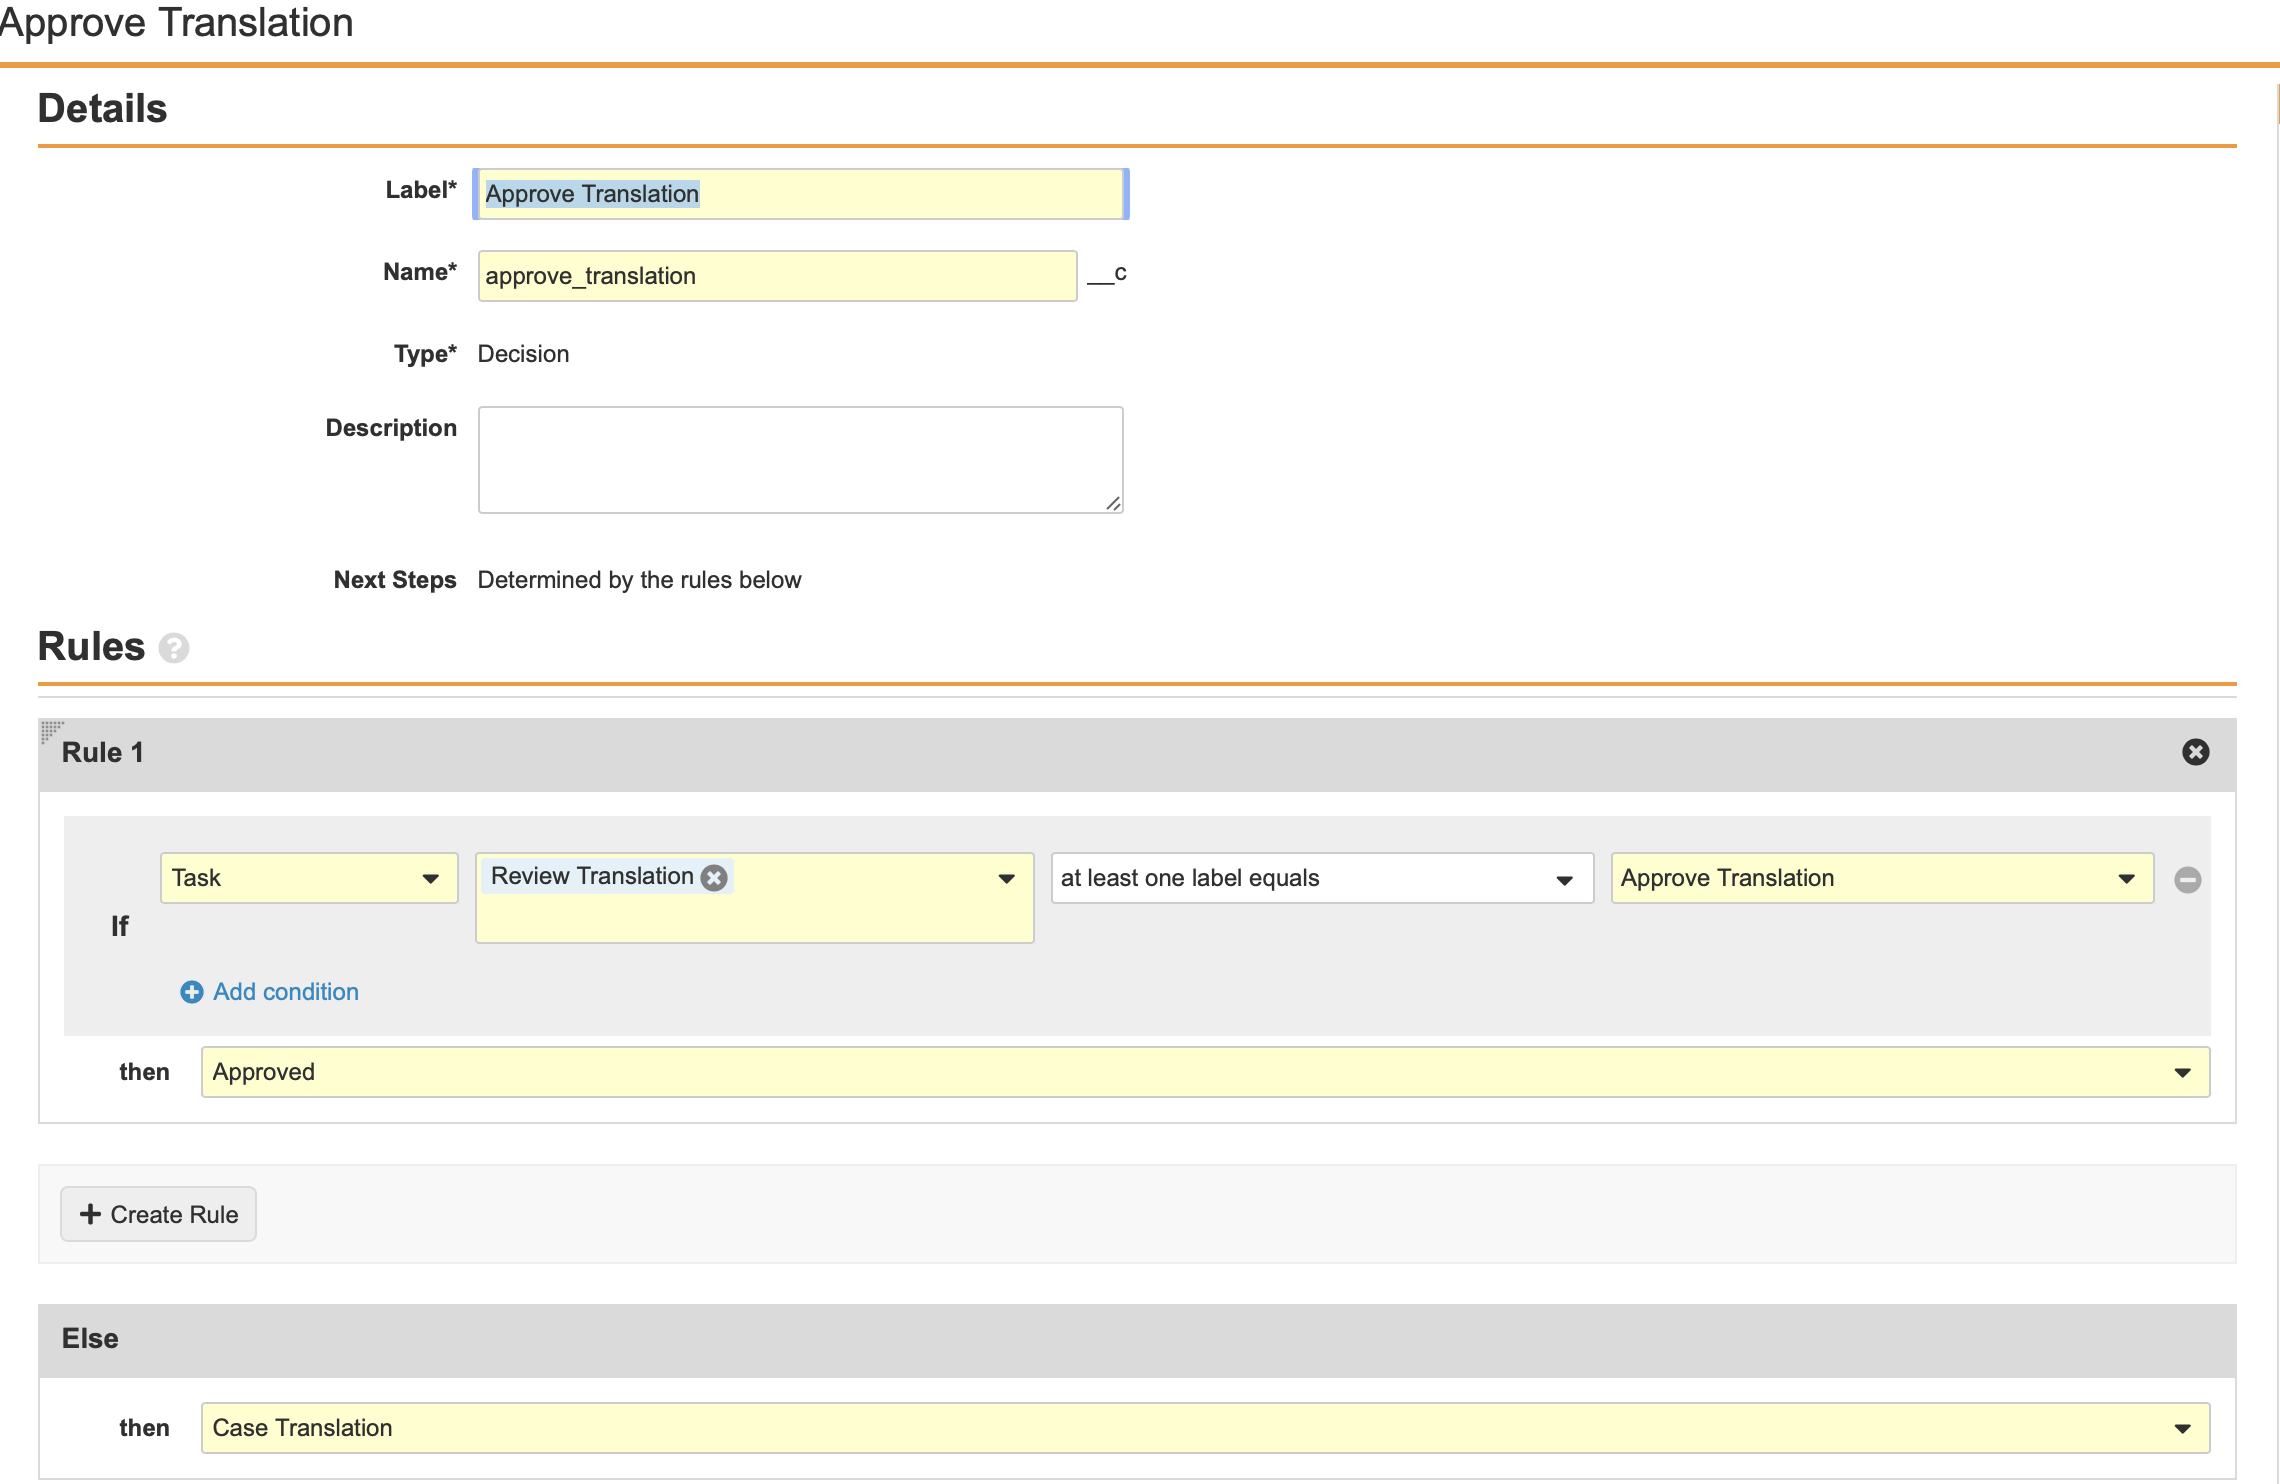
Configure the Decision: Approve Translation Workflow Step
- Add a Workflow Task after the Workflow Task: Translation Review step, labelled Decision: Approve Translation in the Localized Case Translation Workflow.
- Create a Rule with the following properties:
- IF: Task - Review: Translation - at least one label equals - Approve Translation
- Then: Approved
- Else:
- Then: Case Translation
- Select Save.
(21R2) (Optional) Configure the Localized Case Revision Workflow
Create the Localized Case Revision Workflow
- In Admin, go to Configuration > Workflows.
- Select Create.
- Select Object Workflow from the drop-down menu.
- Select Continue.
- Create the workflow with the following details:
- Label: Localized Case Revision
- Lifecycle: Localized Case
- Select Save.
- Select Create from the Workflow Steps section.
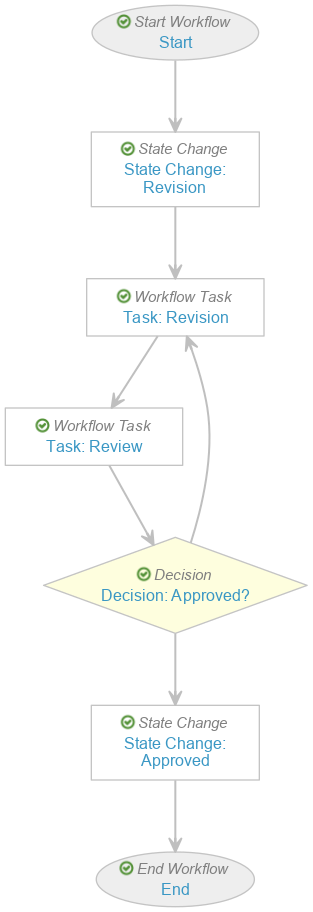
- Add the following workflow steps:
- State Change: State Change: Revision
- Workflow Task: Task: Revision
- Workflow Task: Task: Review
- Decision: Approved?
- State Change: State Change: Approved
- Select Save.
Configure the Start Workflow: Start Workflow Step
- Add the Start step.
- Select Add Control.
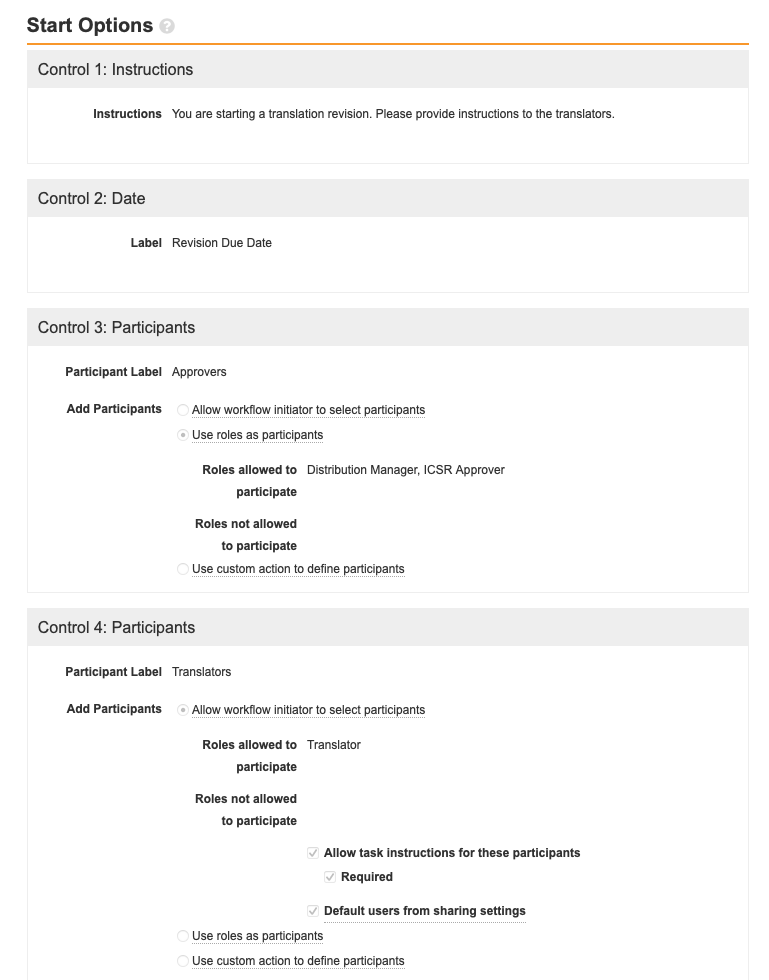
- Configure the Start Options with the following properties:
- Control 1: Instructions
- Instructions: “You are starting a translation revision. Please provide instructions to the translators.”
- Control 2: Date
- Label: Revision Due Date
- Control 3: Participants
- Participation Label: Approvers
- Add Participants: Use roles as participants
- Roles allowed to participate: Distribution Manager, ICSR Approver
- Control 4: Participants
- Participation Label: Translators
- Add Participants: Allow workflow initiator to select participants
- Roles allowed to participate: Translator
- Allow task instructions for these participants
- Required
- Default users from sharing settings
- Control 1: Instructions
Configure the Task: Revision Workflow Step
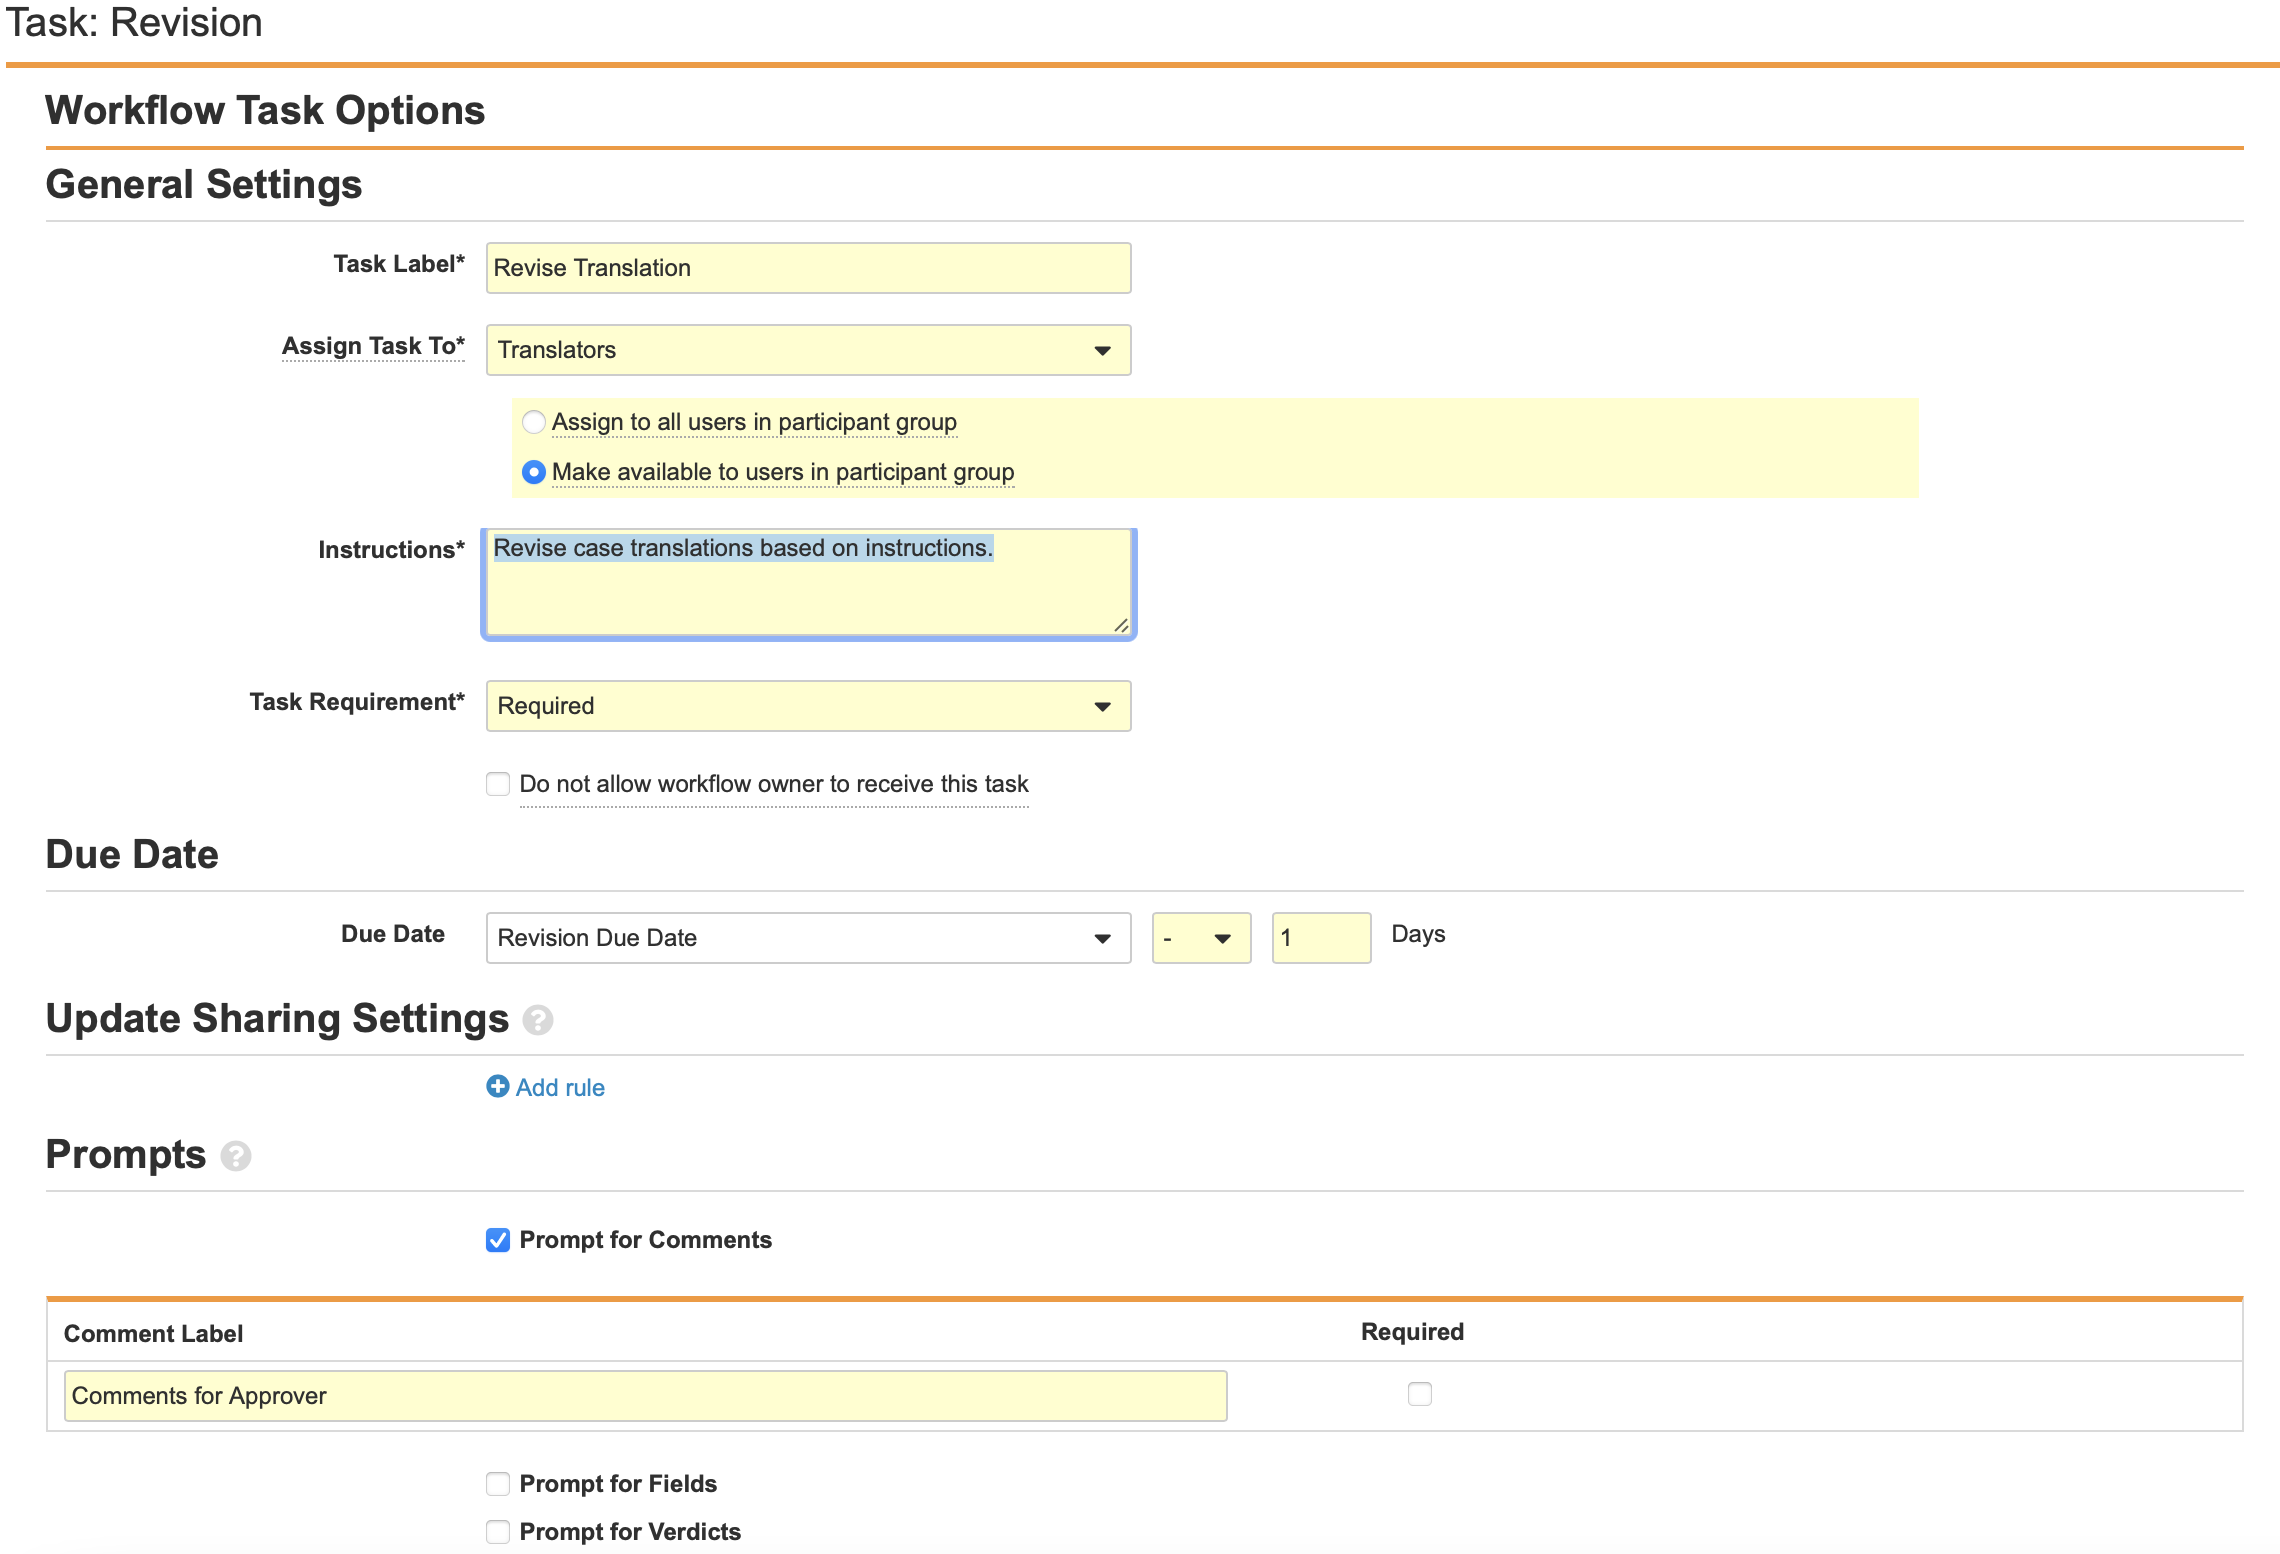
- Navigate to Task: Revision in the Localized Case Revision Workflow.
- Select Edit.
- Configure the General Settings with the following properties:
- Task Label: Revise Translation
- Assign Task To: Translators
- Make available to users in participant group
- Instructions: “Revise case translations based on instructions.”
- Task Requirement: Required
- Configure the Due Date:
- Task Creation Date: - 1 Days
- Select Prompt for Comments from the Prompts section.
- Select Save.
Configure the Task: Review Workflow Step
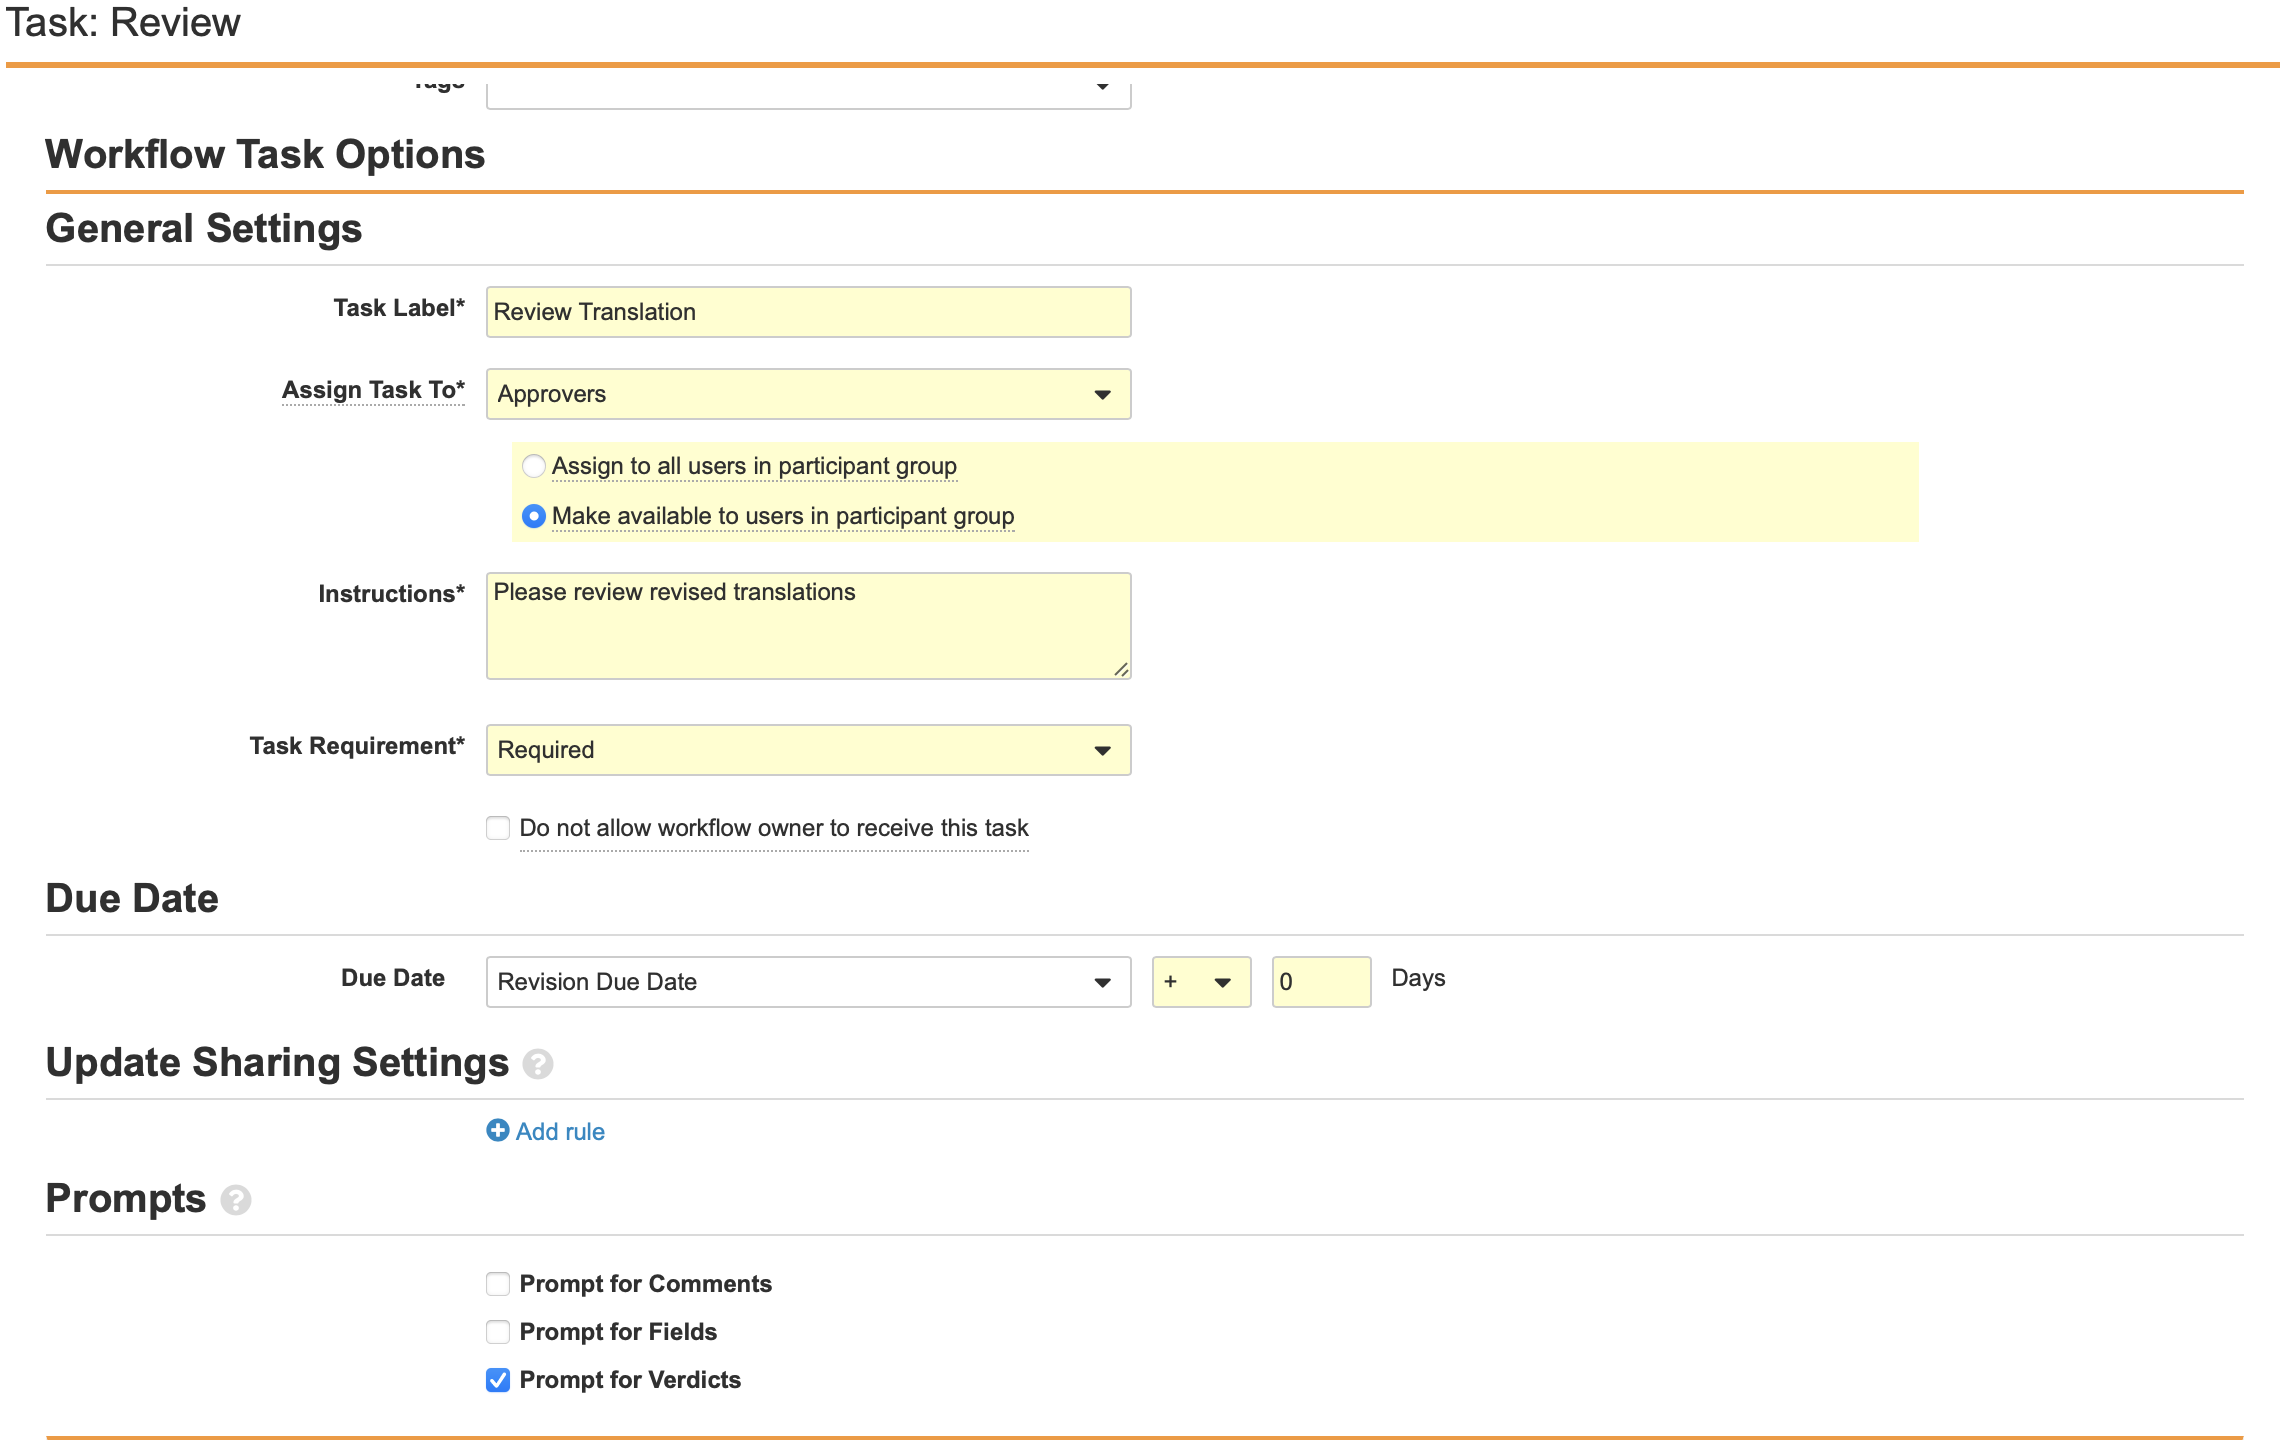
- Navigate to Task: Review in the Localized Case Revision Workflow.
- Select Edit.
- Configure the General Settings with the following properties:
- Task Label: Review Translation
- Assign Task To: Approvers
- Make available to users in participant group
- Instructions: “Please review revised translations.”
- Task Requirement: Required
- Configure the Due Date:
- Task Creation Date: + 0 Days
- Select Prompt for Verdicts from the Prompts section.
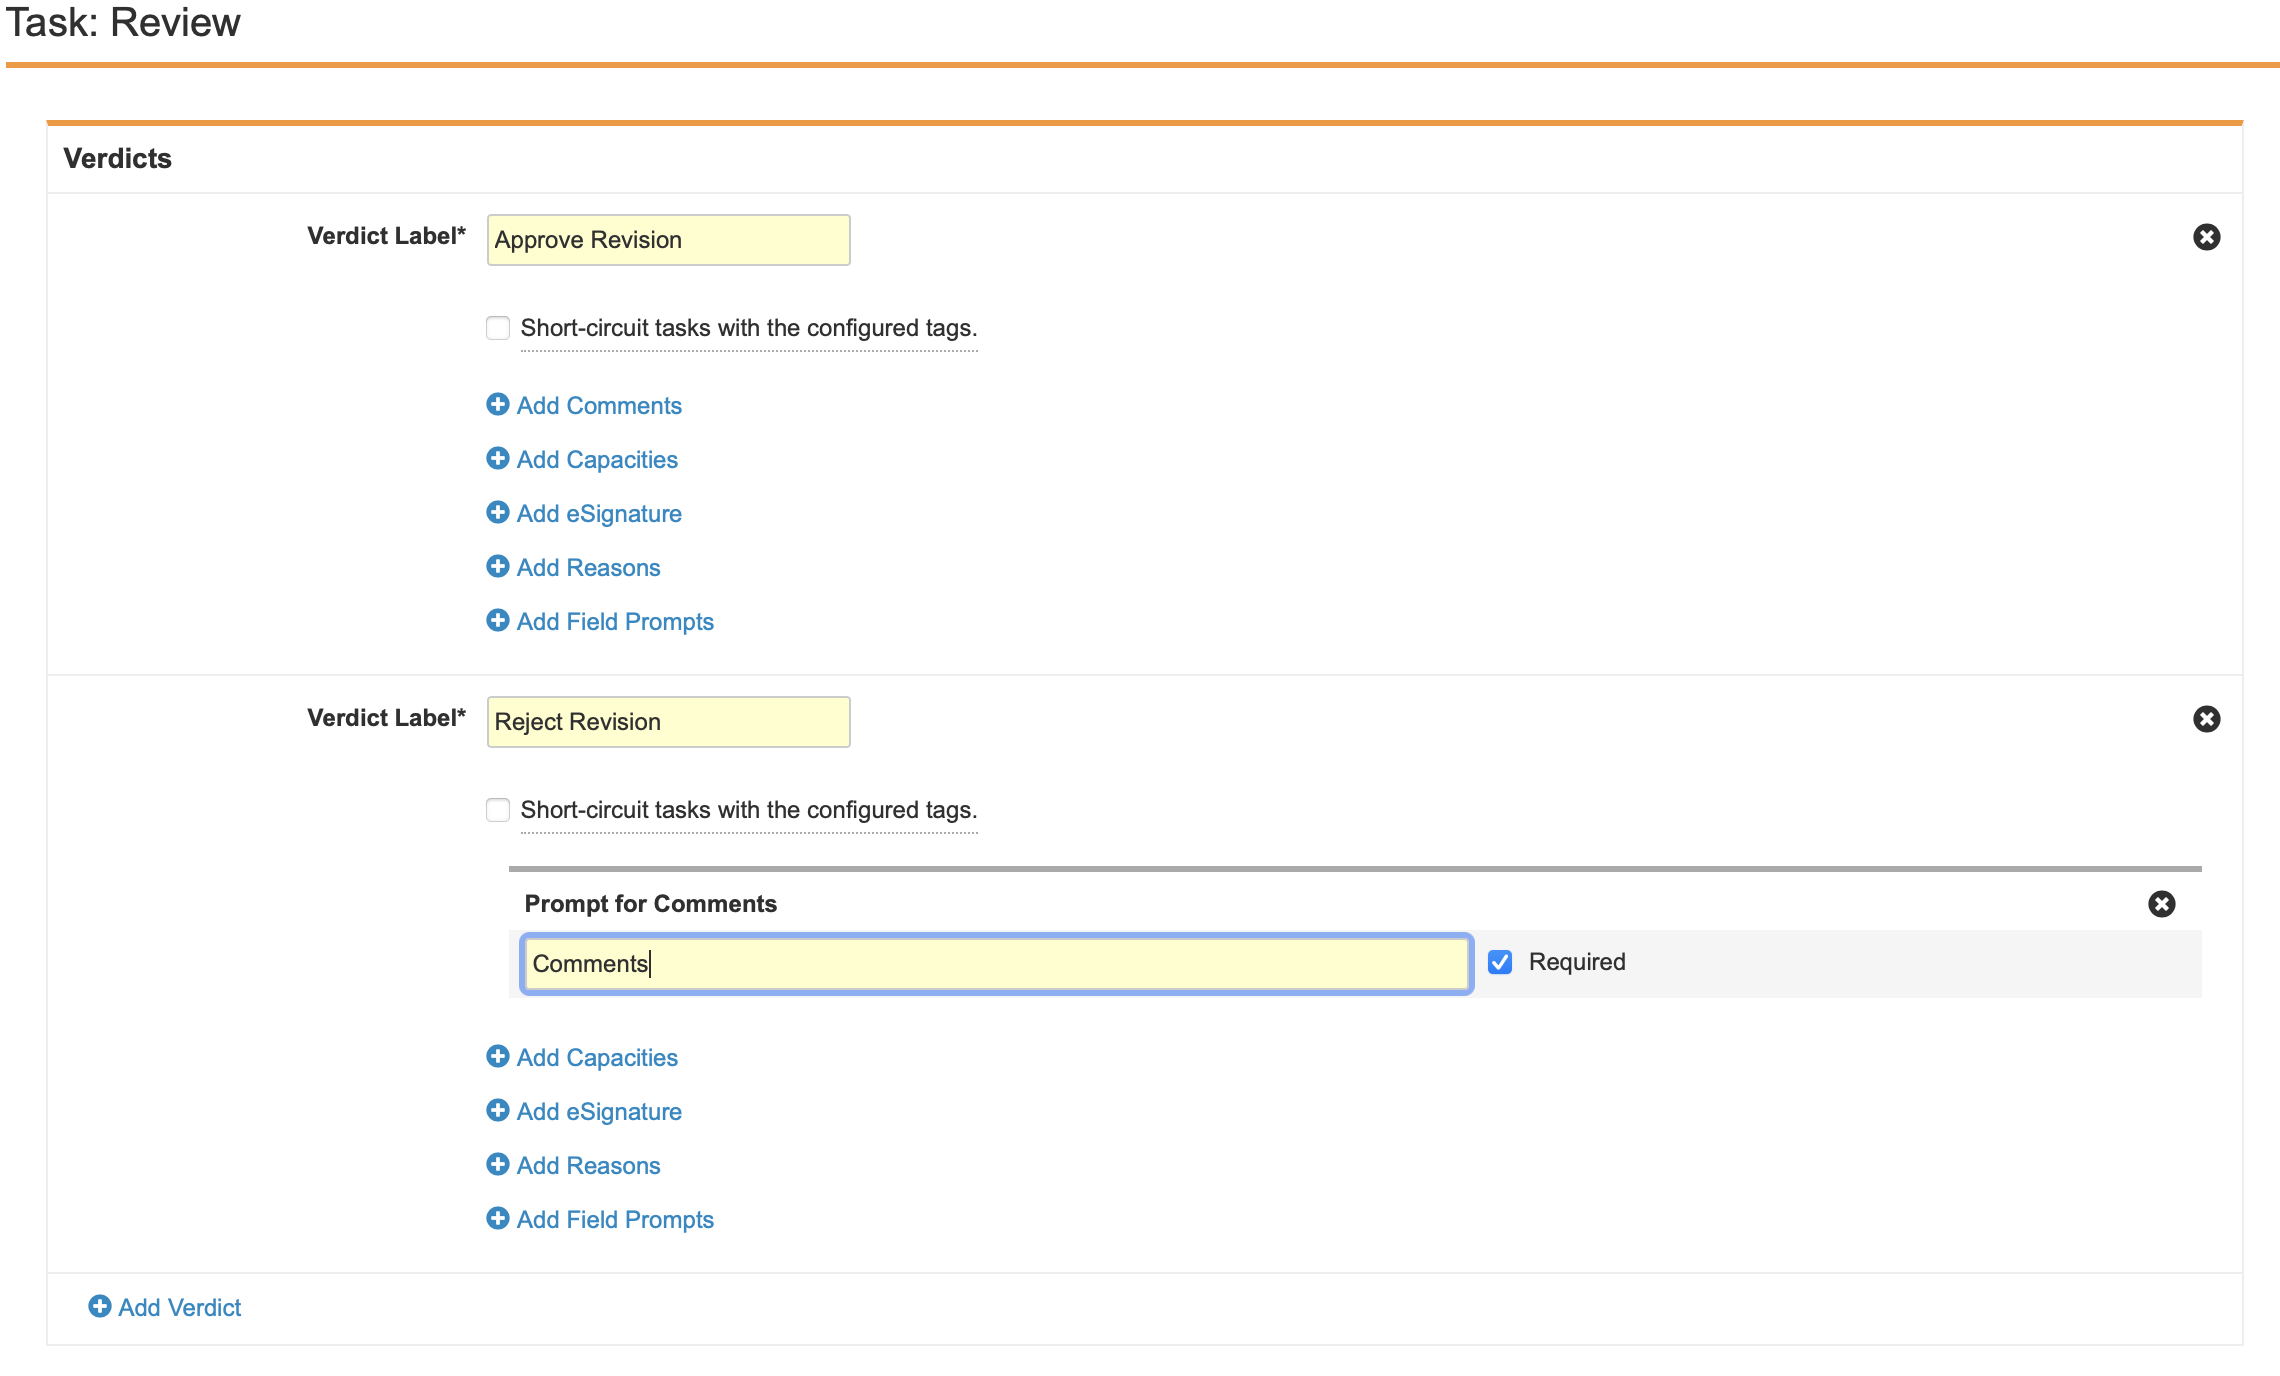
- Create two Verdicts with the following properties:
- Verdict Label: Approve Revision
- Verdict Label: Reject Revision
- Prompt for Comments: “Comments”
- Required
- Select Save.
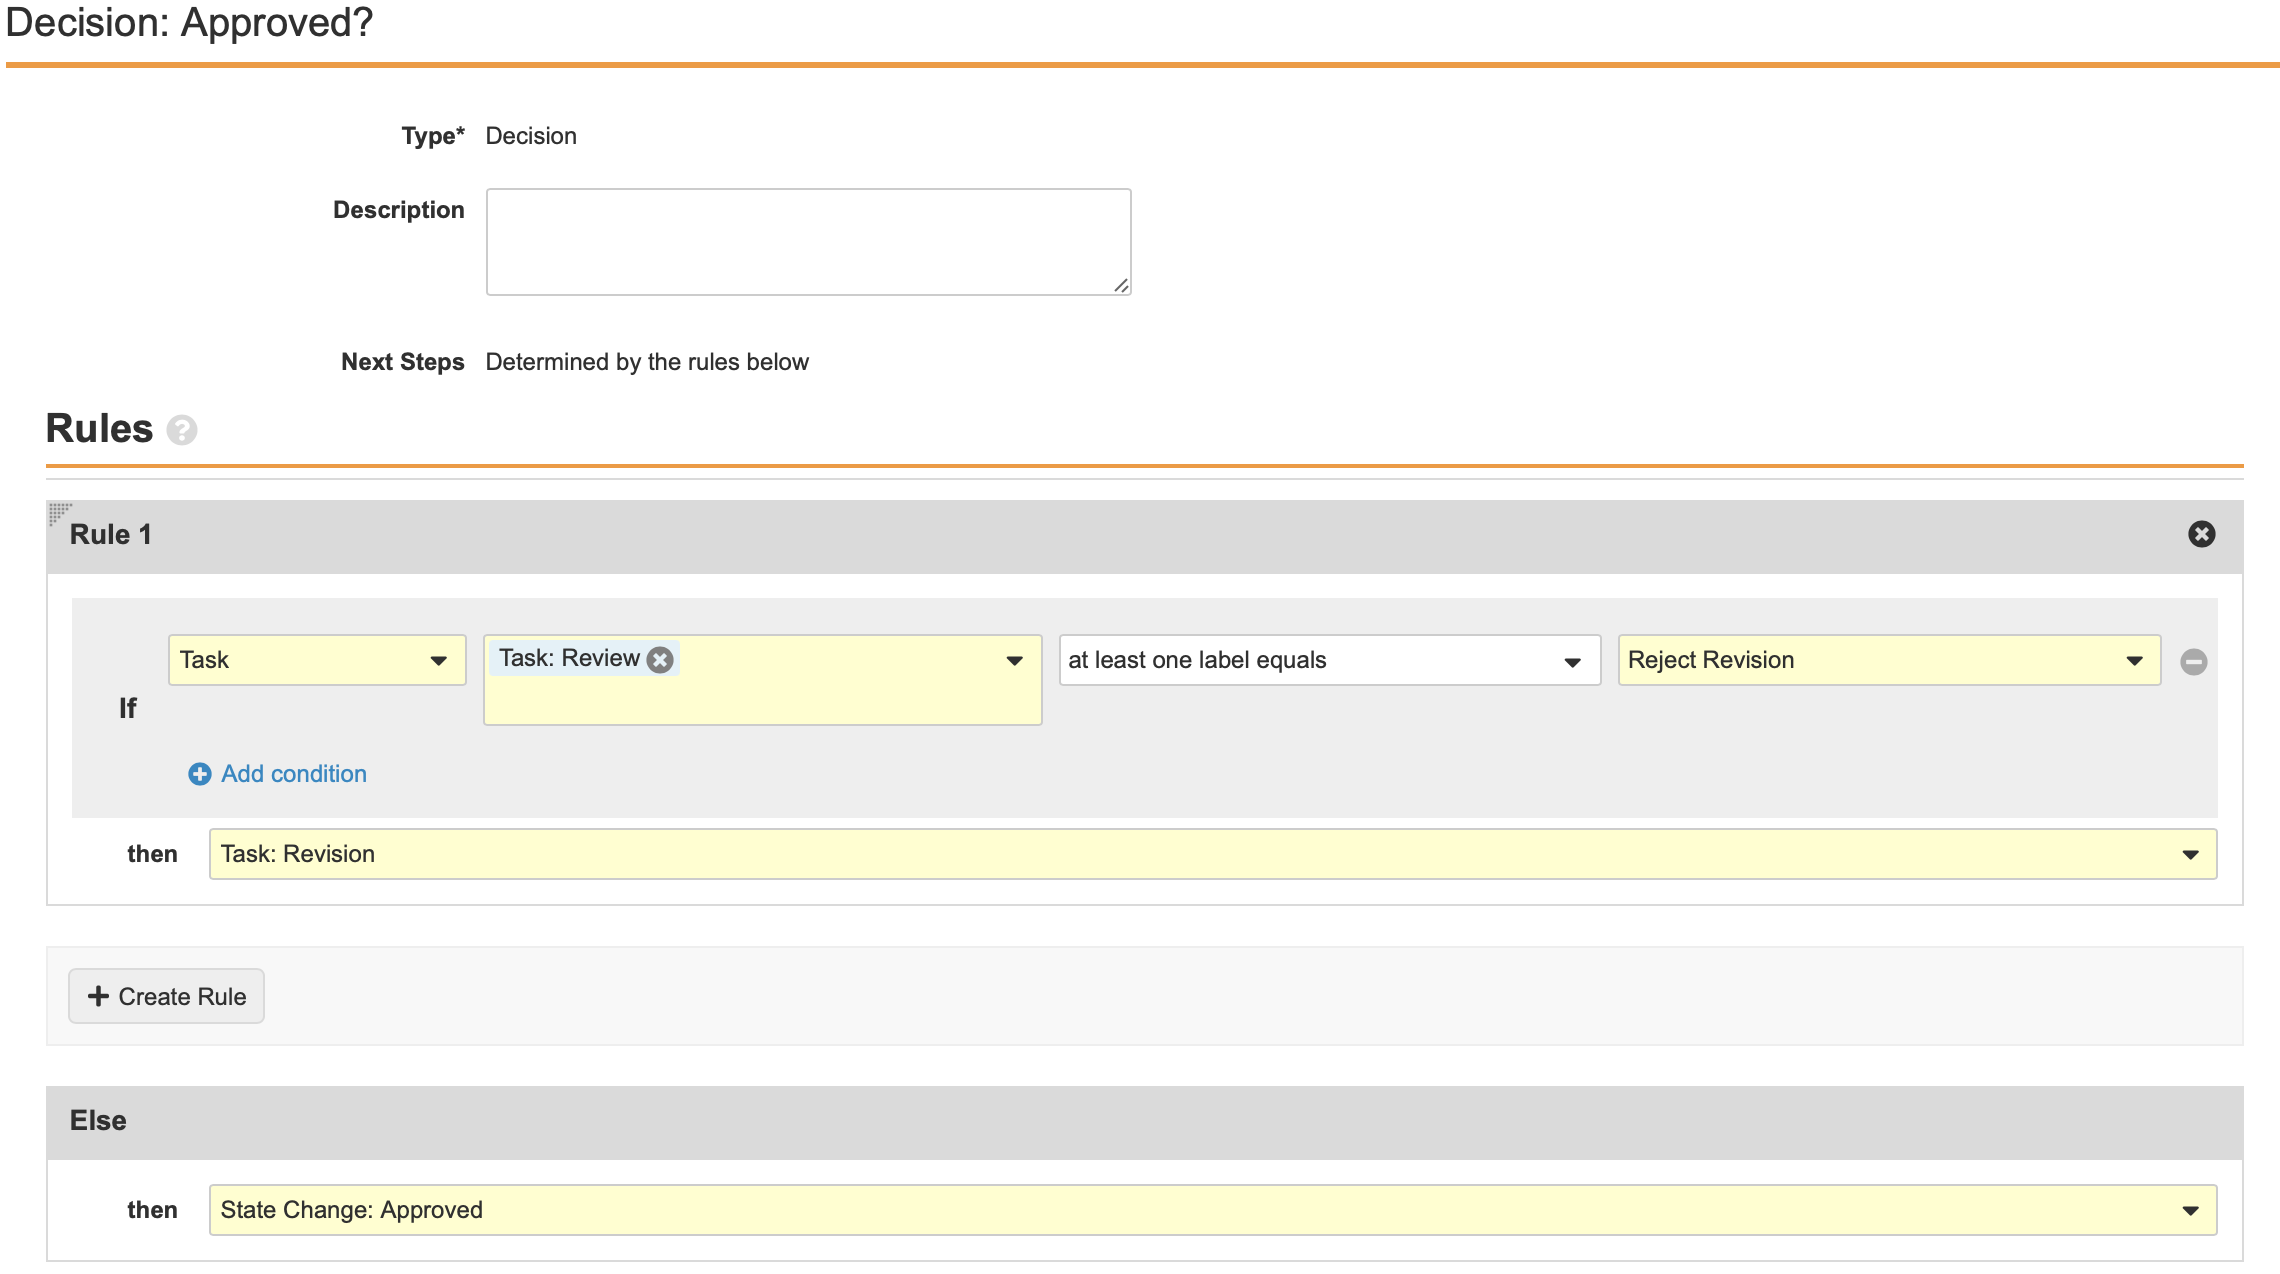
Configure the Decision: Approved? Workflow Step
- Navigate to Decision: Approved? in the Localized Case Revision Workflow.
- Select Edit.
- Create a Rule with the following properties:
- IF: Task - Task: Review - at least one label equals - Reject Revision
- Then: Task: Revision
- Else:
- Then: State Change: Approved
- Select Save.
(21R2) Configure Entry Actions and Criteria in the Localized Case Lifecycle
Add Entry Actions on the Approved State
- In Admin, go to Configuration > Object Lifecycles > Localized Case Lifecycle > Approved.
- Select Edit from the Entry Actions section.
- Add the “Change related object lifecycle state” action and Change the State to Locked for the following objects:
- Localized Case Adverse Events
- Localized Case Assessment Results
- Localized Case Assessments
- Localized Case Causes of Death
- Localized Case Comment
- Localized Case Contacts
- Localized Case Drug History
- Localized Case Identifiers
- Localized Case Medical History
- Localized Case Product Dosage
- Localized Case Product Indications
- Localized Case Product Substances
- Localized Case Products
- Localized Case Test Results
- Case Product Registration
- Add the “Change related Document lifecycle state” action to the following:
- Document Reference Field: Case Narrative
- State Type: Document Workflow: Approved
- Select Save.
Add Entry Actions on the Closed State
- In Admin, go to Configuration > Object Lifecycles > Localized Case Lifecycle > Closed.
- Select Edit from the Entry Actions section.
- Add the “Change related object lifecycle state” action and Change the State to Locked for the following objects:
- Localized Case Adverse Events
- Localized Case Assessment Results
- Localized Case Assessments
- Localized Case Causes of Death
- Localized Case Comment
- Localized Case Contacts
- Localized Case Drug History
- Localized Case Identifiers
- Localized Case Medical History
- Localized Case Product Dosage
- Localized Case Product Indications
- Localized Case Product Substances
- Localized Case Products
- Localized Case Test Results
- Add the “Change related Document lifecycle state” action to the following:
- Document Reference Field: Case Narrative
- State Type: Steady State
- Select Save.
Add Entry Actions on the Revision State
- In Admin, go to Configuration > Object Lifecycles > Localized Case Lifecycle > Revision.
- Select Edit from the Entry Actions section.
- Add the “Change related object lifecycle state” action and Change the State to Locked for the following objects:
- Localized Case Adverse Events
- Localized Case Assessment Results
- Localized Case Assessments
- Localized Case Causes of Death
- Localized Case Comment
- Localized Case Contacts
- Localized Case Drug History
- Localized Case Identifiers
- Localized Case Medical History
- Localized Case Product Dosage
- Localized Case Product Indications
- Localized Case Product Substances
- Localized Case Products
- Localized Case Test Results
- Add the “Change related Document lifecycle state” action to the following:
- Document Reference Field: Case Narrative
- State Type: Starting State
- Select Save.
Add Entry Criteria on the Closed State
- In Admin, go to Configuration > Object Lifecycles > Localized Case Lifecycle > Closed.
- Select Edit from the Entry Criteria section.
- Add Validate That criteria with the following properties:
- State of Related Record > Transmissions > No Records Equal to each of the following lifecycle states:
- Pending
- E2B ACK Rejected
- Error
- E2B ACK Accepted
- MDN Received
- Sending Attachments
- E2B ACK Warning
- MDN Failure
- Ready for Submission
- Sending ICSR
- State of Related Record > Transmissions > No Records Equal to each of the following lifecycle states:
- Select Save.
(21R2) Configure Lifecycle Stage Groups for the Localized Case Lifecycle
Hide the Localized Organization object in Business Admin:
- In Admin, go to Configuration > Lifecycle Stage Groups > Localized Case Stages.
- Select Create.
- Create the following Stage Groups:
- Translation
- Review
- Submission
- Complete
Security and Permissions
(21R2) Configure Atomic Security on the Localized Case Lifecycle
Add Atomic Relationship Security Read Permissions to the Closed and Approved States
The objects must have Secure Relationships enabled before you can configure the Atomic Security: Relationship permissions.
- In Admin, go to Configuration > Object Lifecycles > Localized Case Lifecycle > [Approved/Closed].
- Select Edit from the Atomic Security: Relationships section.
- Change Atomic Security: Relationship permissions to Read on the following objects:
- Localized Case Adverse Events
- Localized Case Assessment Results
- Localized Case Assessments
- Localized Case Causes of Death
- Localized Case Comment
- Localized Case Contacts
- Localized Case Drug History
- Localized Case Identifiers
- Localized Case Medical History
- Localized Case Product Dosage
- Localized Case Product Indications
- Localized Case Product Substances
- Localized Case Products
- Localized Case Test Results
- Case Product Registration
- Select Save.
Add Read Access to Roles in the Localized Case Objects
You must add read access to all roles in all of the Localized Case objects:
- Localized Case
- Localized Case Adverse Events
- Localized Case Assessment Results
- Localized Case Assessments
- Localized Case Causes of Death
- Localized Case Comment
- Localized Case Contacts
- Localized Case Drug History
- Localized Case Identifiers
- Localized Case Medical History
- Localized Case Product Dosage
- Localized Case Product Indications
- Localized Case Product Substances
- Localized Case Products
- Localized Case Test Results
- In Admin, go to Configuration > Objects > [Localized Case Object].
- Select Edit from the Roles section.
- Add Read permissions to all roles.
(21R2) Configure Matching Sharing Rules
Matching Sharing Rules must be enabled on every Localized object, the Transmission object, and the Case Product Registration object in your Vault. The list of localization objects are:
- Localized Case
- Localized Case Adverse Events
- Localized Case Assessment Results
- Localized Case Assessments
- Localized Case Causes of Death
- Localized Case Comment
- Localized Case Contacts
- Localized Case Drug History
- Localized Case Identifiers
- Localized Case Medical History
- Localized Case Product Dosage
- Localized Case Product Indications
- Localized Case Product Substances
- Localized Case Products
- Localized Case Test Results
- Localized Controlled Vocabulary
- Localized Country
- Localized Dose Form
- Localized Organization
- Localized Product
- Localized Reason Omitted
- Localized Route of Administration
- Localized Study
- Localized Substance
- Localized Unit of Measurement
- Transmission
- Case Product Registration
Enable Matching Sharing Rules on All Localized Objects
To enable matching sharing rules, perform the following steps:
- In Admin, go to Configuration > Objects > [Object].
- Select Edit.
- Select Enable Matching Sharing Rules.
- Select Continue from the prompt.
- Select Save.
Create Matching Sharing Rules on All Localized Objects
- In Admin, go to Configuration > Objects > [Object].
- Go to the Sharing Rules tab.
- Select Create from the Matching Sharing Rules section.
- Add Sharing Rules using the table below.
- For each sharing rule, configure the matching criteria to use the Organization (
organization__v) field:

| Label | Application Role |
|---|---|
| [Object] - Data Entry | Data Entry |
| [Object] - Dist Manager | Distribution Manager |
| [Object] - Translator | Translator |
| [Object] - ICSR Approver | ICSR Approver |
For example: Localized Case Comments - Dist Manager
Create Matching Sharing Rules for the Localized Organization Object
- In Admin, go to Configuration > Objects > Localized Organization.
- Go to the Sharing Rules tab.
- Select Create from the Matching Sharing Rules section.
- Add Sharing Rules using the table below.
- For each sharing rule, configure the matching criteria to use the Organization (
organization__v) field:

- Select Save.
| Label | Application Role |
|---|---|
| Organization - Data Entry | Data Entry |
| Organization - Distribution Manager | Distribution Manager |
| Organization - Editor | Editor |
| Organization - Head of Safety | Head of Safety |
| Organization - Intake | Intake |
| Organization - Medical Coder | Medical Coder |
| Organization - Medical Reviewer | Medical Reviewer |
| Organization - QC | QC |
| Organization - Safety Operations | Safety Operations |
| Organization - Safety Writer | Safety Writer |
(21R2) Configure Permissions on the Transmission Lifecycle
Hide the Localized Organization object in Business Admin:
- In Admin, go to Configuration > Object Lifecycles > Transmission Lifecycle.
- Select Add from the Roles section.
- Ensure the following roles are added:
- Data Entry
- Distribution Manager
- ICSR Approver
- Intake
- Medical Coder
- Medical Reviewer
- Quality Controller
- Safety Operations
- Safety Writer
- Select Save.
(21R2) Configure Permissions for the Translator Role on Document Lifecycles
You must add the Translator role and permissions to the following document lifecycles:
- Narrative Lifecycle
- Case Generated Document Lifecycle
- Case Source Document Lifecycle
Perform the configuration described in the following sections on each of the above lifecycles.
Add the Translator Role
- In Admin, go to Configuration > Document Lifecycles > [Document Lifecycle] > Roles.
- Select Create.
- Create the Translator role with the following properties:
- Label: Translator
- Application Role: Translator
- Select Enable Dynamic Access Control.
- Select Save.
Add the Translator Sharing Rule
- Go to the Sharing Rules tab.
- Select Create.
- Create the Sharing Rule with the following properties
- Label: [Document Lifecycle Name] - Translator. For example, Narrative - Translator
- Rule Criteria: Translator
- Organization (
organization__v) - Blind Protection (
blind_protection__v)
- Organization (
- Select Save.
Add Translator Permissions
- In Admin, go to Configuration > Document Lifecycles > [Document Lifecycle] > States.
- Select a state.
- Go to the Security Settings tab.
- Select Edit.
- Configure permissions for each lifecycle state, according to the following table:
| Lifecycle | State | Permissions Granted for Translator Role |
|---|---|---|
| Case Source Lifecycle | Imported |
|
| Narrative Lifecycle | Draft |
|
| Review |
|
|
| Approved |
|
|
| Closed |
|
|
| Case Generated Document Lifecycle | Generated |
|
| Closed |
|
