Vault sometimes receives Inbox Items that require little to no triage, and can automatically promote certain Inbox Items to an initial or follow-up Case. Inbox Items received through the following sources can be promoted to a Case automatically:
- An AS2 gateway transmission
- An Intake Vault API endpoint
- The Safety-EDC Connection
- Imported from any structured source
Vault then determines whether an automatically promoted Case should be an initial or follow-up version or should be marked as follow-up.
Note: Automated Case Promotion and Duplicate E2B XML File Detection are not compatible. You can enable both features in your Vault but you can use only one for an inbound source.
Prerequisites
Your Admin may enable the following features:
- Automated Case Promotion on Transmission Profiles. This includes enabling automatic promotion and configuring merge methods on the Transmission Profile used to receive cases.
- Automated Case Promotion for E2B Imported Inbox Items
- Email to Vault Safety Inbox Item to support automatic promotion of Inbox Items generated from email attachments.
- Automated Case Promotion for non-Cases
- MedDRA Suggestions to provide MedDRA coding suggestions during promotion (when your Vault has an active MedDRA dictionary). For example, when automatic case promotion would be prevented by an incorrect or missing MedDRA code on the source document, Vault populates high-confidence terms, when available, during import or Inbox Item creation.
Automatic Case Promotion Process
When Vault generates an Inbox Item, it determines whether automatic case promotion is possible:
- Vault generates Inbox Items using the following methods:
- A source organization, such as a trading partner or health authority, sends a transmission through an AS2 gateway (E2B file) or Intake API (JSON or E2B file) to be imported as an Inbox Item.
- A study site creates an SAE in EDC and the Safety-EDC Connection transfers the data to your Safety Vault, generating an Inbox Item.
- An Inbox Item is created from an E2B (single E2B, multi-E2B, or ZIP file from your Library or email attachment).
- Vault determines if Inbox Items can be automatically promoted using the following criteria:
- Is the auto promote option enabled in the applicable Transmission Profile or for the document fields?
- Is the Inbox Item valid for promotion or is it missing information?
- Vault determines how to promote Inbox Items.
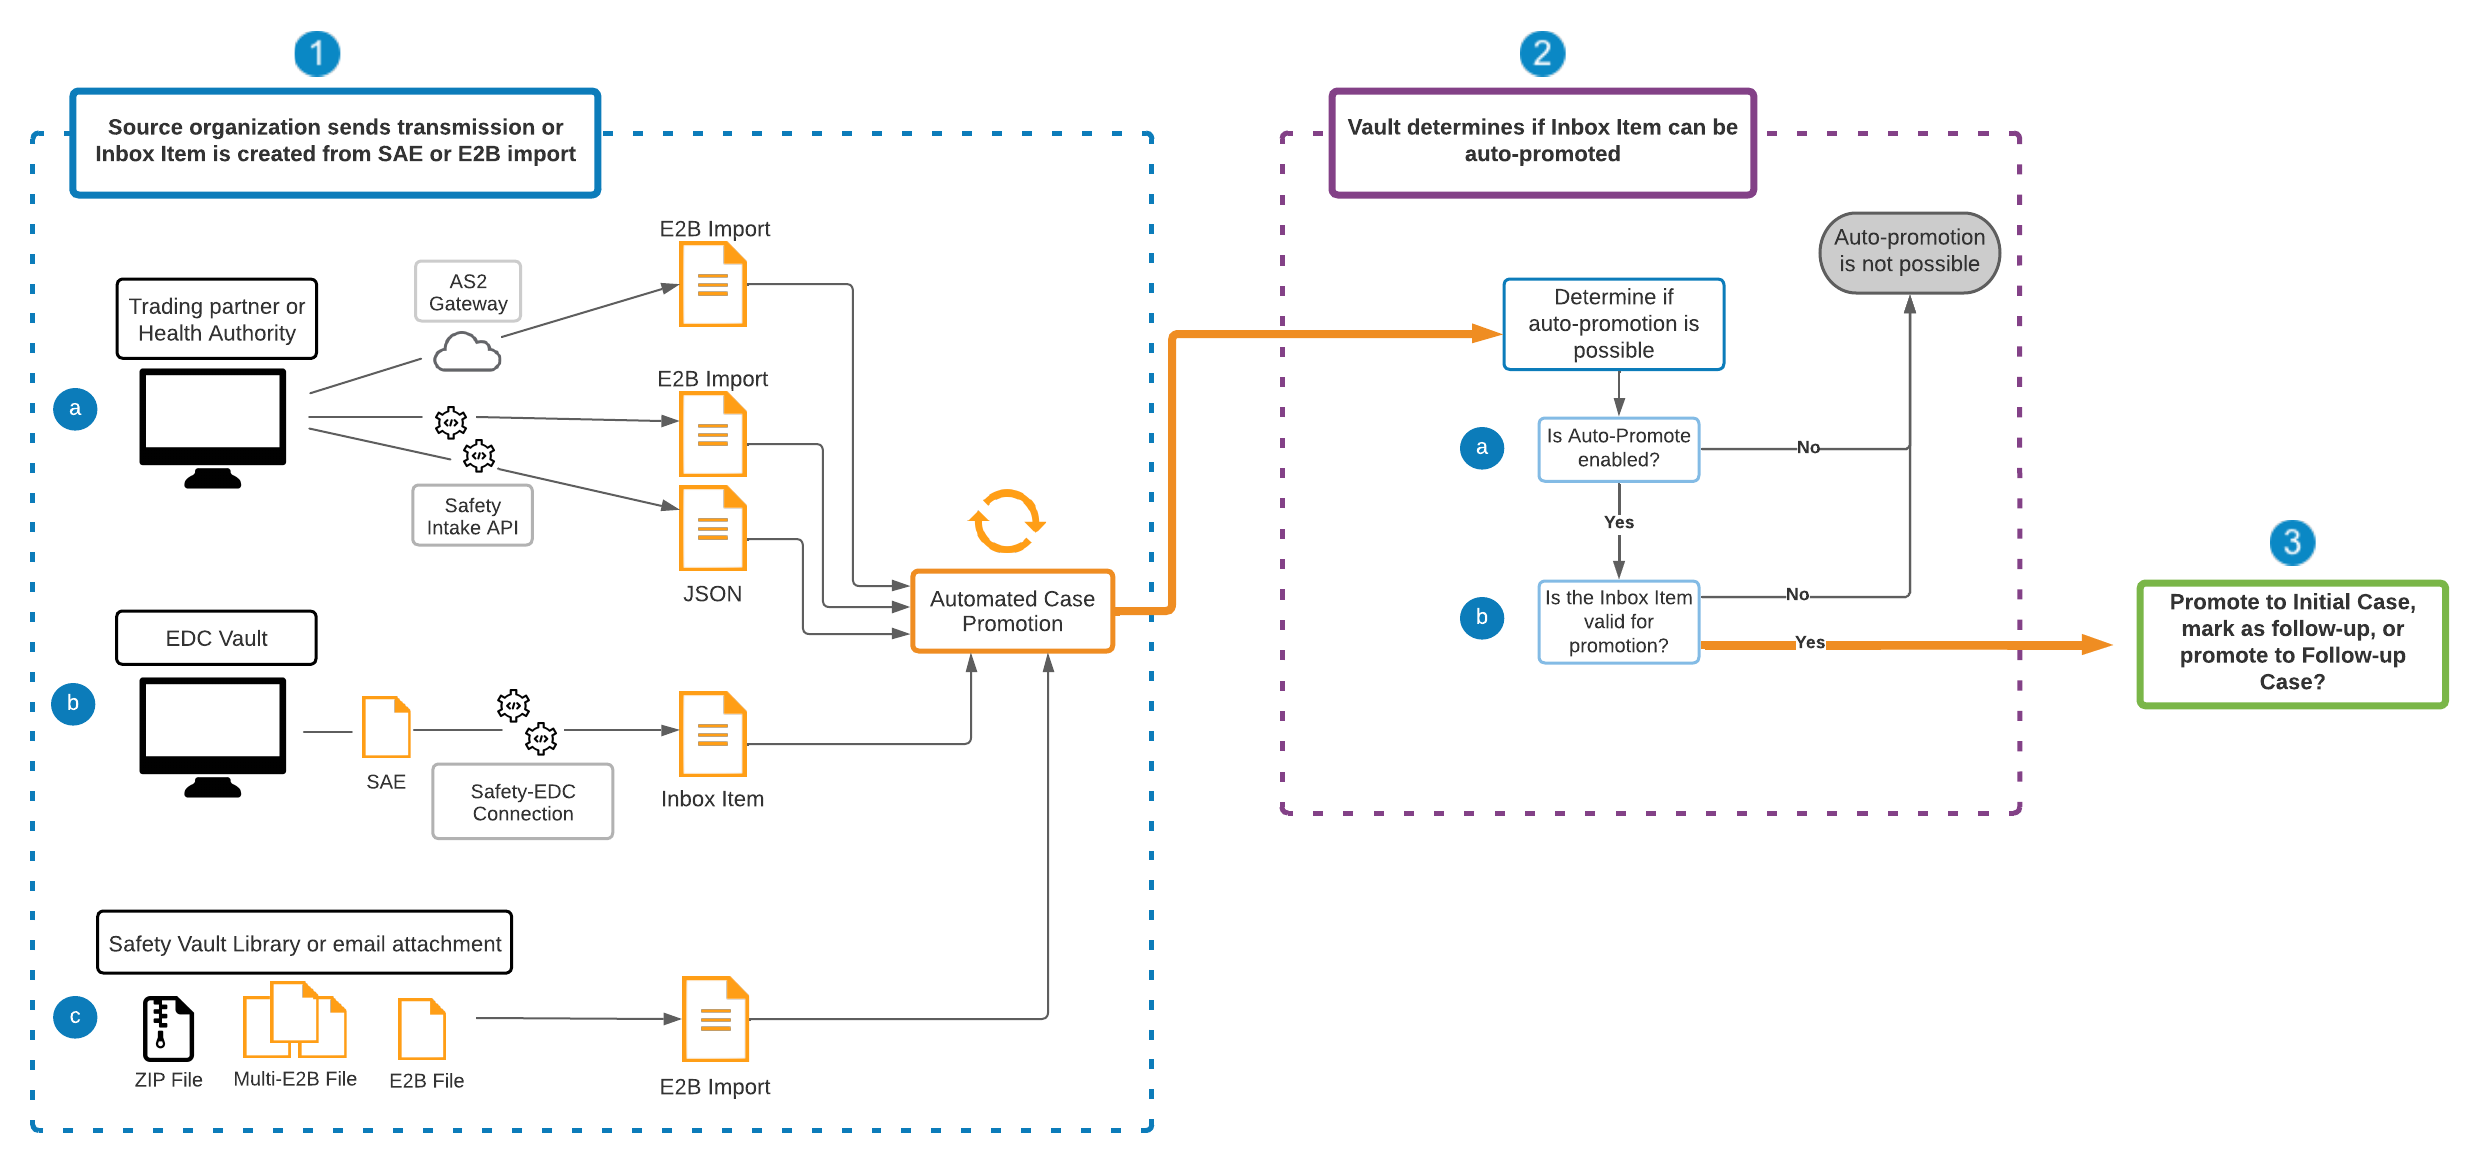
After confirming automatic promotion is possible, the Inbox Item state changes to Processing and Vault determines whether the Inbox Item can be promoted to an initial Case, marked as a follow-up for merge into an in-flight Case, or promoted to a follow-up Case.
- Vault performs duplicate detection and checks whether there is a Case with a matching Case Identifier. If there is no matching Case Identifier, Vault promotes the Inbox Item to an initial Case.
- If there is a Case with a matching Case Identifier, Vault determines whether the Inbox Item can be marked as follow-up. The matching Case cannot be in a prohibited state based on the Allow Mark Follow-up application settings. If the Inbox Item can merge to the matching in-flight Case, Vault indicates this by setting the Inbox Item state to Marked as Follow-Up and linking it to the Case.
- If the Inbox Item cannot be marked as a follow-up, Vault determines if it can be promoted to a follow-up Case. First, it determines whether to treat the Case as serious or non-serious using the following criteria:
- Serious: If the Inbox Item has a primary Adverse Event with a Seriousness value. The primary Adverse Event for E2B files is the first entry in the Reaction(s)/Event(s) section, which is E.I in E2B(R3) files and B.2 in E2B(R2) files.
- Non-serious: If the Inbox Item does not have a primary Adverse Event or the Seriousness of the primary Adverse Event is blank.
- Vault determines if the Inbox Item can be created as a follow-up Case. The matching Case cannot be in a prohibited state based on the Follow-Up Options application settings. If the matching Case is in a prohibited state, Vault moves the Inbox Item to the Promotion Failed state and links it to the Case.
- Vault proceeds with the merge method specified on the applicable Transmission Profile (if sent from a source organization or Veeva EDC) or on the source document. Your Admin can configure the merge method to use for each Transmission Profile and you can configure the merge method to use for each uploaded source document, depending on whether the Case is serious or non-serious.

Merge Methods
Vault includes the following merge methods for automatically promoting Inbox Items to follow-up Cases:
- Manual: After Inbox Item import, you must manually merge the Inbox Item into a follow-up Case.
- Smart: Vault creates a follow-up Case from both the Inbox Item and initial Case data using default merging behavior.
- Override: Vault creates a follow-up Case from only the Inbox Item data.
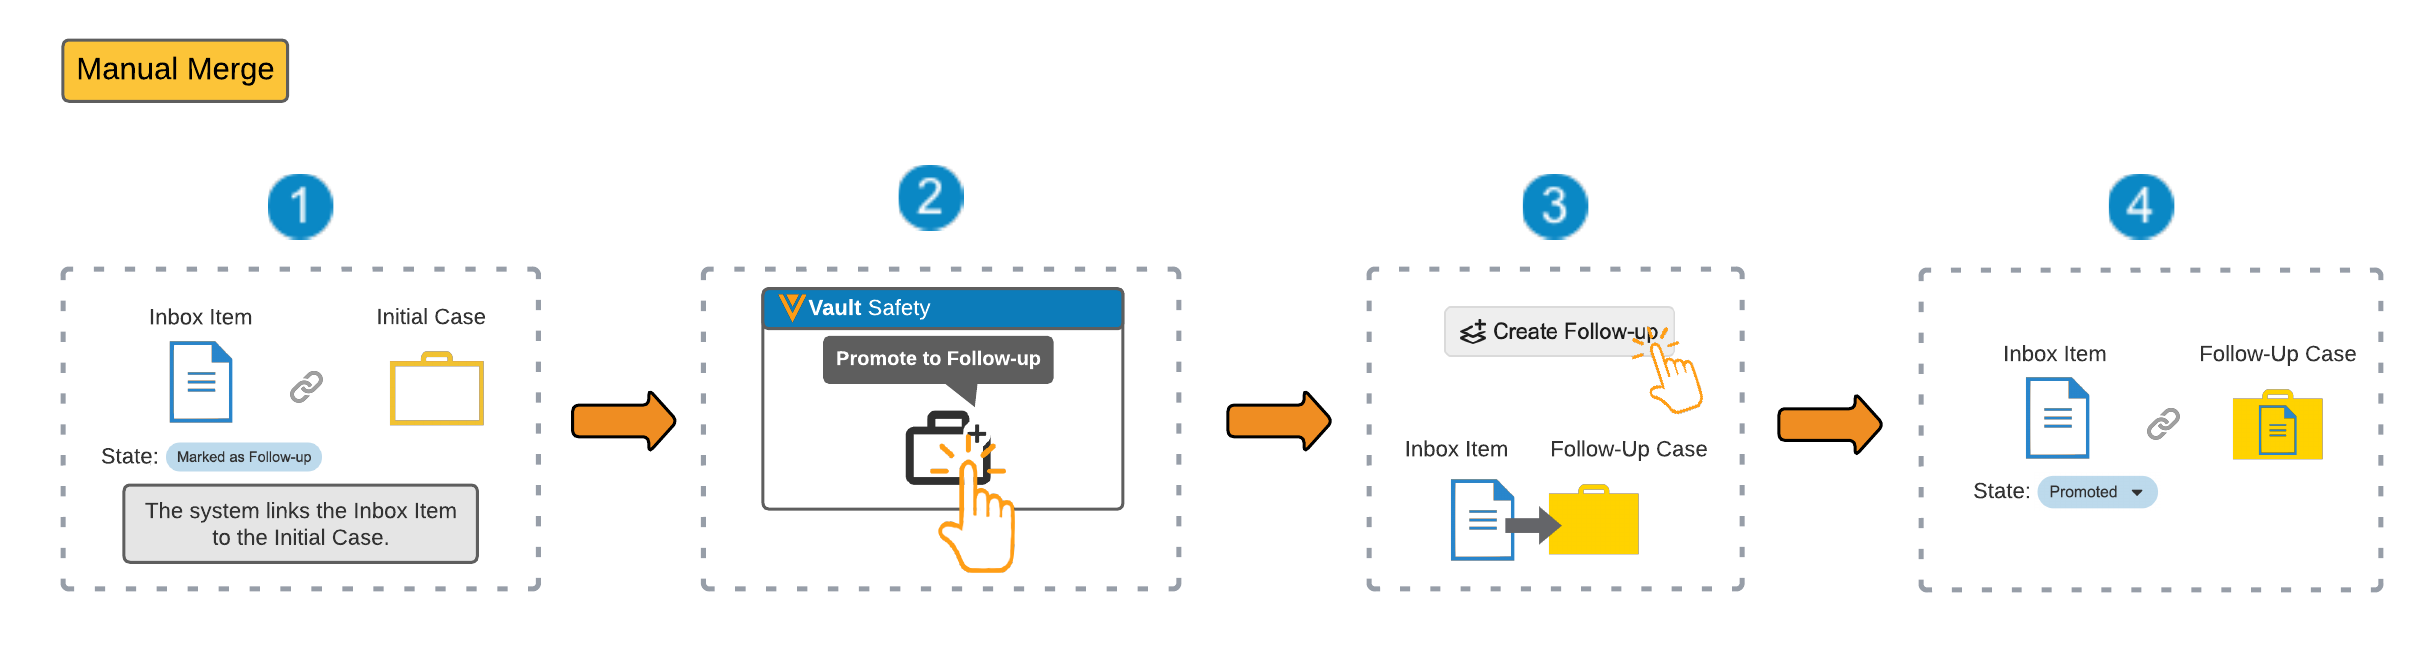
Manual Merge
The following steps describe the manual merge method:
- Vault sets the Inbox Item state to Marked as Follow-Up and links it to the initial Case to indicate they are related.
- Once the Inbox Item has been imported into your Vault, you must go to the Inbox Item and select Promote to Follow-up. Since the Inbox Item is in the Marked as Follow-Up state and is linked to the initial Case, Vault directs you to the Inbox Item to Case Compare page.
- Prior to creating a follow-up Case, you can compare the two Cases and select any changes you want to make. Your Admin can turn off auto-calculation during Inbox Item promotion.
- Vault moves the Inbox Item to the Promoted state and links to this follow-up Case.
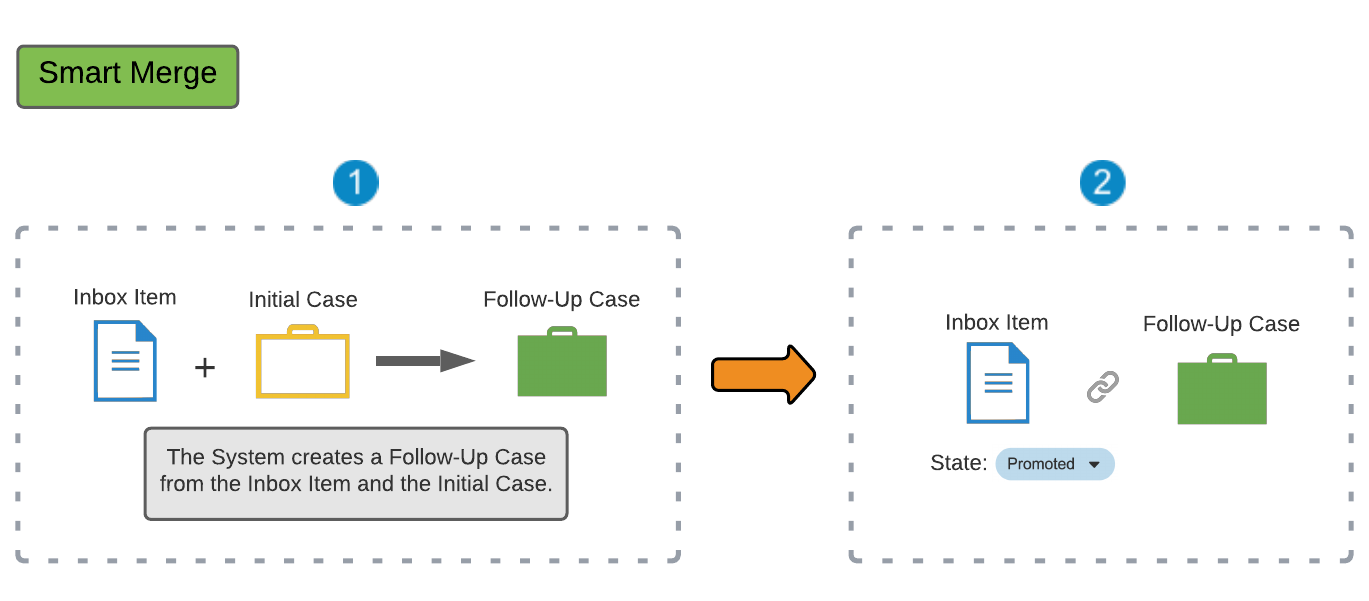
Smart Merge
The following steps describe the smart merge method:
- Vault creates a follow-up Case from the Inbox Item information and the initial Case using the default merge behavior.
- Vault moves the Inbox Item to the Promoted state and links to this follow-up Case.
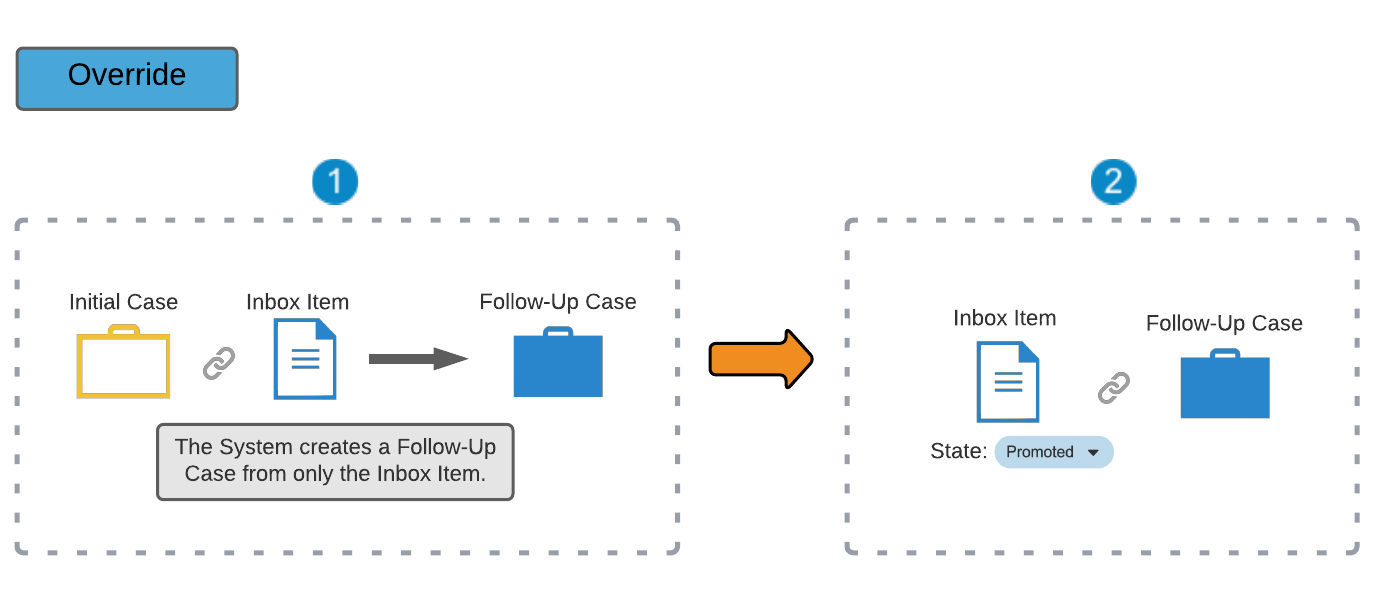
Override Merge
The following steps describe the override merge method:
- Vault creates a follow-up Case using only the Inbox Item information, meaning the follow-up Case is identical to the Inbox Item. If the initial Case has any narrative documents, Vault appends them to the generated narratives on the follow-up Case. Vault combines document references from the initial Case and Inbox Item on the follow-up Case.
- Vault moves the Inbox Item to the Promoted state and links to this follow-up Case.
Note: When promoting a Global type Inbox Item matching a domestic Case using the override merge method, Vault carries over only the Inbox Item’s data, including the Localization. The override merge method creates a global follow-up Case instead of a domestic Case in this scenario. For more information about promoting a Global type Inbox Item to a domestic Case on the Inbox Item to Case Compare page, see Inbox Item Follow-Up.
Automated Case Promotion for Non-Cases
For Cases that do not need to be reported to any health authority, your Admin may configure your Vault to:
- Automatically promote Inbox Items that enter a certain lifecycle state.
- Include the Auto-Promote to Case action on Inbox Items in specified lifecycle states.
To manually promote an Inbox Item, from the All Actions menu, select Auto-Promote to Case.
Automated Case Promotion Error Troubleshooting
When you import an Inbox Item, Vault sends a notification to indicate the results of the import. See Verify an Imported Inbox Item for more information about confirming the success of the import and how Vault displays validation errors, if any.
Missing Information
After attempted auto-promotion, Inbox Items enter the Missing Information state and the related Inbound Transmission enters the Validation Error state when any validation error occurs or there is no primary Company Product with a Rank of 1. Validation errors occur when an Inbox Item includes invalid data, such as a future date or missing values.
Promotion Failed
After attempted auto-promotion, Inbox Items enter the Promotion Failed state when:
- There are multiple open Case versions with a matching Case Identifier.
- There is one Case version with a matching Case Identifier, but the Case cannot be marked as follow-up or promoted to follow-up based on the configured prohibited states.
- The import includes multiple files with the same ID and New Info Date.
Note: If an Inbox Item in the Promotion Failed state exists and a user imports a new Inbox Item that is eligible for automatic case promotion, Vault does not re-attempt to promote the existing Inbox Item in the Promotion Failed state.
Prohibited States
When Vault finds one Case version with a matching Case Identifier, Vault may prevent automatic case promotion based on your Admin’s configured merge method and mark as follow-up intake setting. If your Admin has configured the Allow Mark Follow-up setting:
- If the matching Case is not in a specified prohibited state, for all merge methods, Vault marks the Inbox Item as a follow-up and links the matched Case.
- If the matching Case is in a specified prohibited state:
- For Manual merge, the Inbox Item enters the Promotion Failed state.
- For Smart or Override merge, Vault promotes the Inbox Item to a follow-up Case.
Vault also populates the Automation Message field on the applicable Inbox Item with the reason automated Case promotion couldn’t complete.
Workarounds
After attempting automated Case promotion, if your Inbox Item enters the Missing Information or Promotion Failed state, you can use the following workarounds:
- Check that the Inbox Item is valid and includes all data required to perform duplicate detection.
- If your Admin has configured a user action to change the state of Inbox Items from Missing Information or Promotion Failed states to New, you can manually promote the Inbox Item:
- From the All Actions menu of the Inbox Item, select the option to change the state to New.
- From the All Actions menu of the Inbox Item, select Promote to Case.