Learn how to upgrade your Vault configuration to enable pregnancy and parent-child case data collection.
About the Feature
Vault Safety added support to collect information about pregnancy cases and outcomes in 21R1. This page provides instructions to upgrade your Vault configuration to enable this data capture.
For information on using Pregnancy Cases for data entry once this feature has been enabled, see Add a Pregnancy Case.
Note: Vaults originally deployed from the 21R1 Vault Safety template include all of the configuration required for this feature already, with the exception of the following:
Update Case Page Layout
- Go to Configuration > Objects.
- Open the Case (
case_version__v) object. - Go to the Layouts tab.
- Open the Case Page Layout.
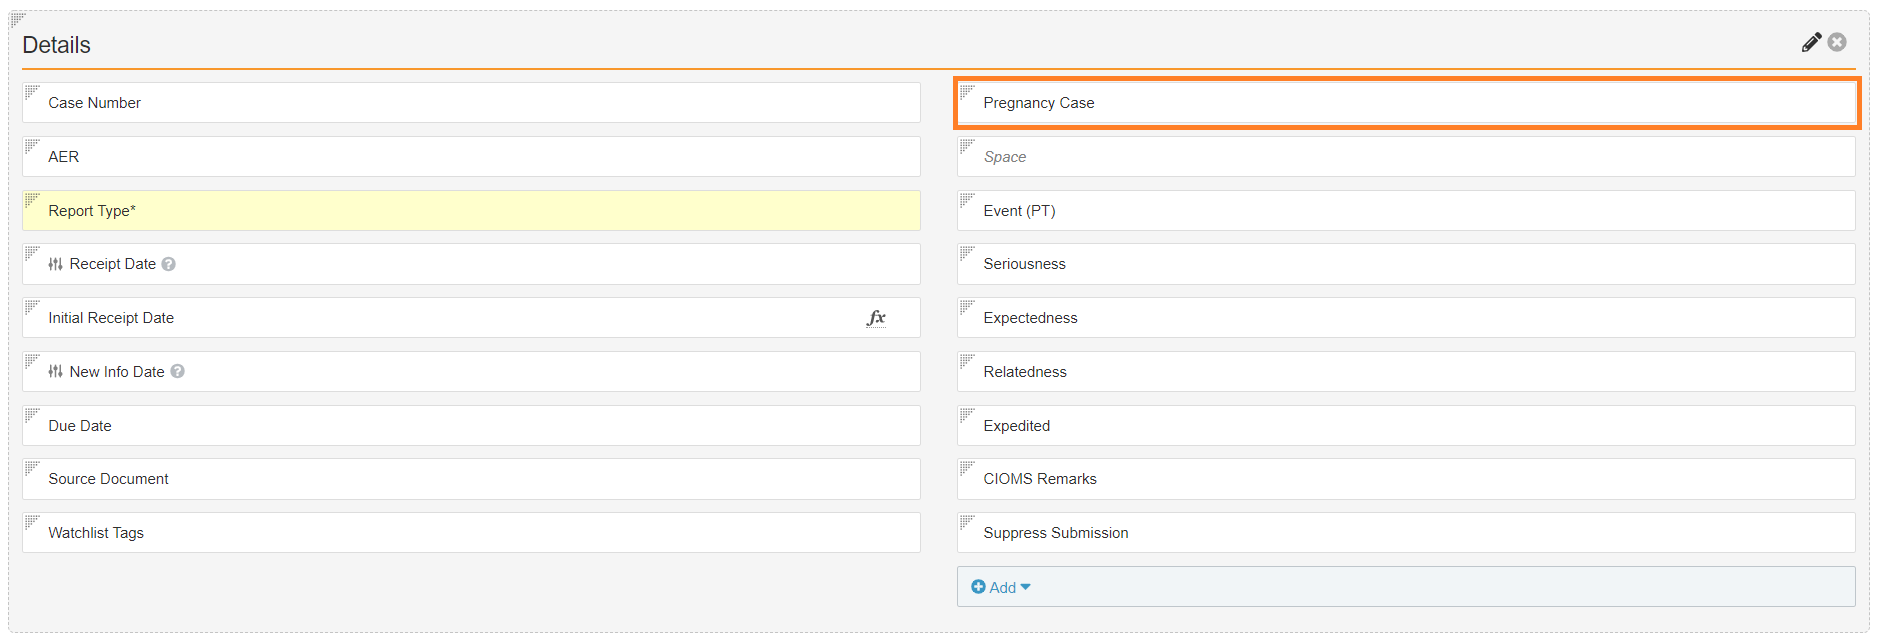
- Add the Pregnancy Case field to the Details section. See the suggested layout in the following image:
- Insert a Pregnancy Information section with pregnancy fields. See the following image for the suggested layout and fields, which includes moving the Pregnancy Conception Date and Pregnancy Due Date fields out of the Patient section to the Pregnancy Information section:

- Add the following layout rule to hide pregnancy information:
- Label: Enter a Label, such as “Not Pregnancy Case/Pregnant at Exposure”
- Name: The system populates this field based on the Label
- Status: Active
- IF this Layout Rule Expression is TRUE:
pregnancy_case__v != true && pregnant_at_vaccination__v != true - Apply the following display effects:
- Effect: Hide
- Type: Sections
- Values: Pregnancy Information
Add Pregnancy-Related Fields to Imported Case
If your Vault receives Imported Cases from an external system that collects pregnancy information, add pregnancy-related to the Imported Case (imported_case__v) object type.
Add Fields to Object Type
- Go to Configuration > Objects.
- Open the Case (
case_version__v) object. - Open the Object Types tab.
- Open the Actions menu, and select Edit Object Type Fields.
- Under the Imported Case (
imported_case__v) object type, ensure the following fields are selected:- Pregnancy Case
- Gestation
- Last Menstrual Date
- Pregnancy Conception Date
- Pregnancy Due Date
- Number of Fetuses
- Gravida/Gravidity
- Para/Parity
- Pregnancy Outcome
- Delivery Method
- Date of Pregnancy Outcome
- Sponsor Pregnancy Awareness
- Select Save.
Update Imported Case Page Layout
- Go to Configuration > Objects.
- Open the Case (
case_version__v) object. - Go to the Layouts tab.
- Open the Imported Case Page Layout.
- Add the Pregnancy Case field to the Details section. See the suggested layout in the following image:
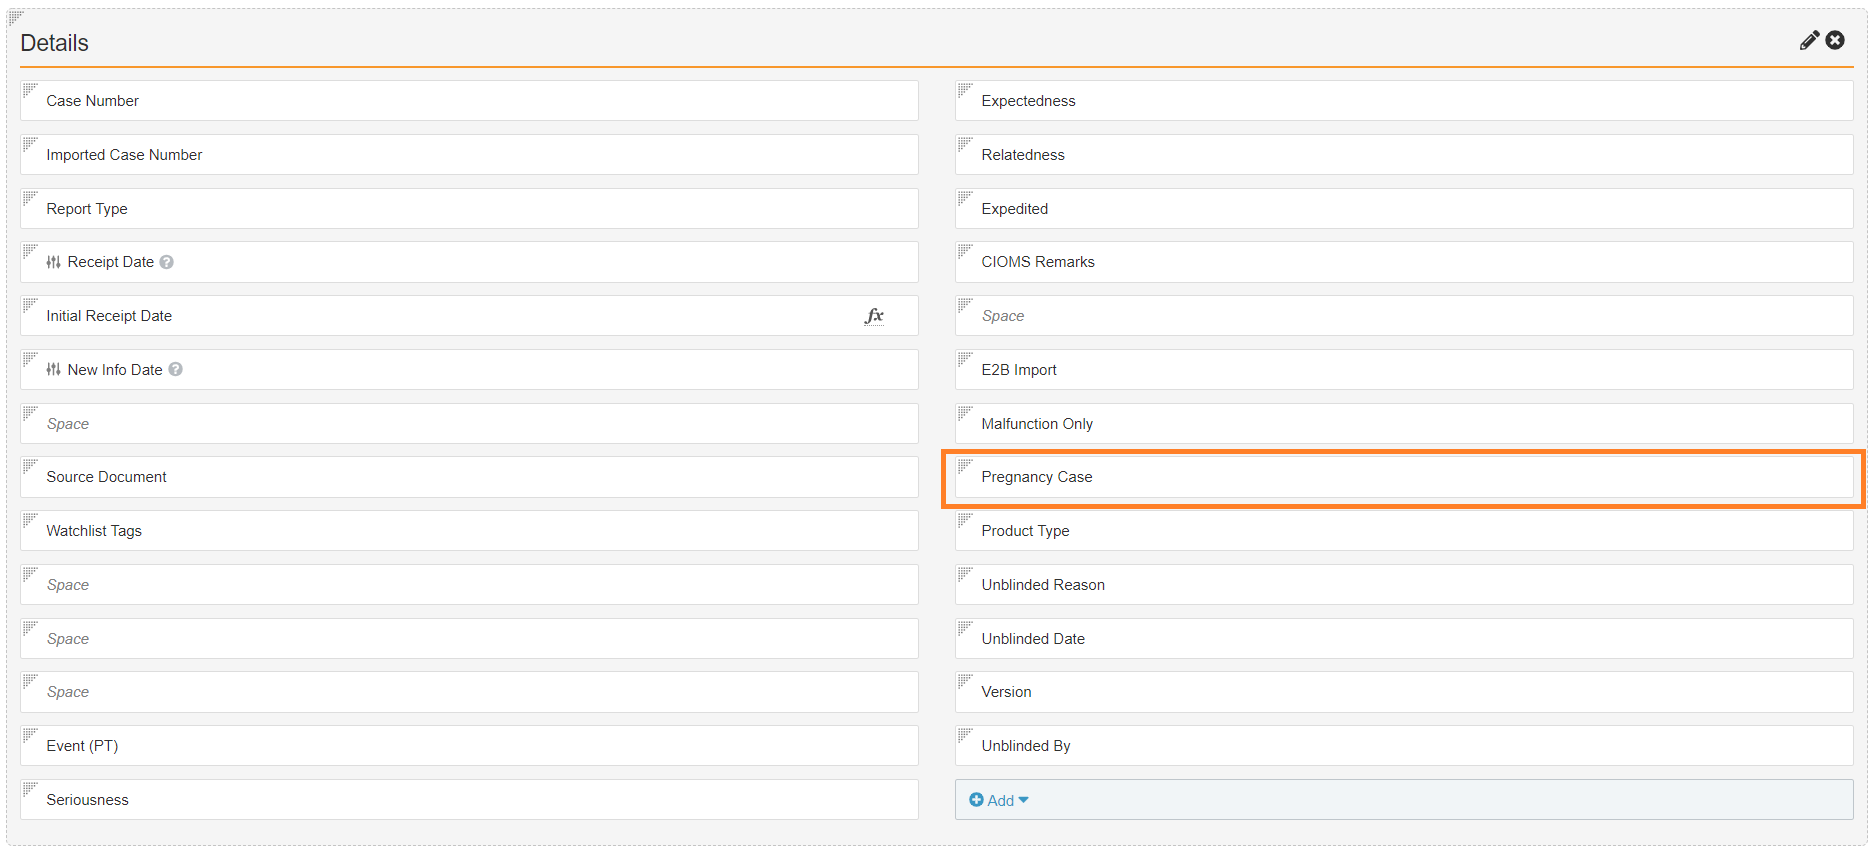
- Insert a Pregnancy Information section with pregnancy fields. See the following image for the suggested layout and fields, which includes moving the Pregnancy Conception Date and Pregnancy Due Date fields out of the Patient section to the Pregnancy Information section:

- Add the following layout rule to hide pregnancy information:
- Label: Enter a Label, such as “Not Pregnancy Case/Pregnant at Exposure”
- Name: The system automatically populates this field based on the Label
- Status: Active
- IF this Layout Rule Expression is TRUE:
pregnancy_case__v != true && pregnant_at_vaccination__v != true - Apply the following display effects:
- Effect: Hide
- Type: Sections
- Values: Pregnancy Information
Post-21R1: Case and Imported Case Object Configuration Changes
The following configuration changes must be made in all Vaults deployed in 21R1 and earlier.
- In Configuration > Objects > Case > Fields, update the label for the Pregnancy Case (
pregnancy_case__v) field to “Pregnancy”. - Go to the Layouts tab and complete steps 3–6 on the following layouts:
- Case Page Layout
- Imported Case Page Layout
- (Recommended) Rearrange the following fields on the layout:
- Move Last Menstrual Period below Gender
- Move Pregnancy below Last Menstrual Period
- Move Pregnant at Exposure below Pregnancy
- Move Gestation below Pregnancy Due Date
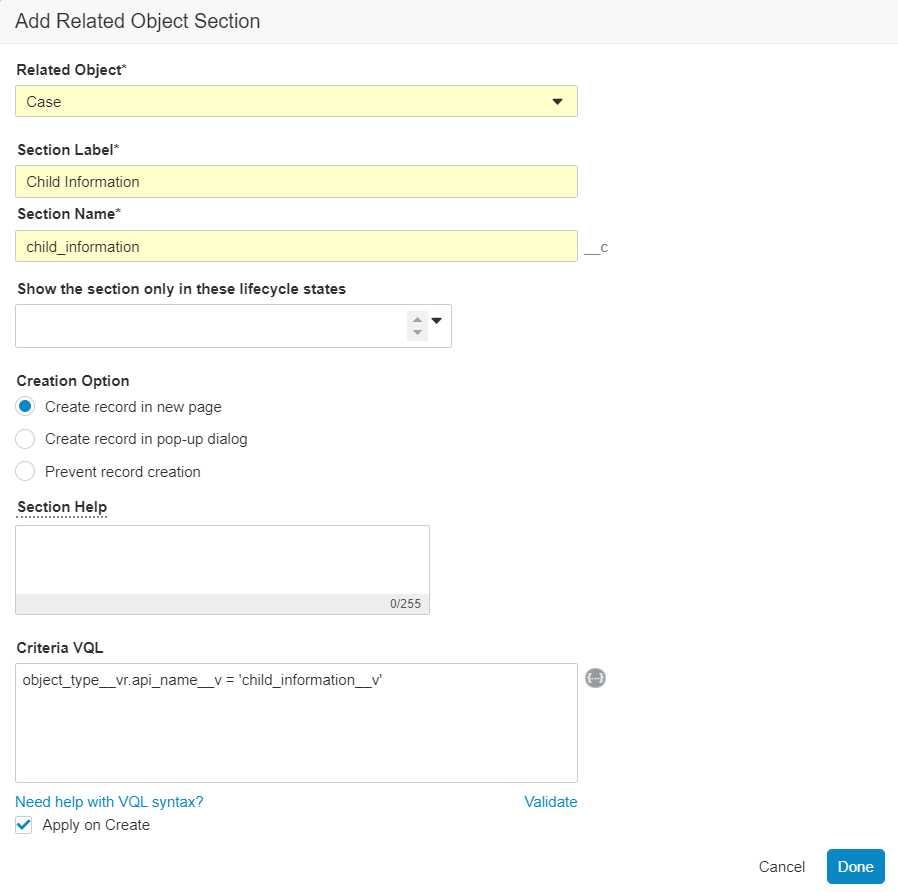
- Insert a Related Object section for Child Information Cases:
- In the Related Object field, select the second Case in the list
- In the Section Label field, enter
Child Information - In the Section Name field, enter
child_information - In the Criteria VQL field, enter:
object_type__vr.api_name__v = 'child_information__v' - Select Apply on Create
- Include the following columns in the Child Information section:
- Patient Initials
- Date of Birth
- Lifecycle State
- Change the Menstrual layout rule:
- Go to the Layout Rules tab.
- Open the Menstrual layout rule for editing.
- Update the Apply the following display effects section as follows:
- For Controls, add the following values: Last Menstrual Period, Pregnant at Exposure, Gestation
- For Fields, add the following value: Pregnancy Case
- Save the layout rule.
- Change the Not Pregnancy Case/Pregnant at Exposure layout rule:
- Go to the Layout Rules tab.
- Open the Not Pregnancy Case/Pregnant at Exposure layout rule for editing.
- Update the Apply the following display effects section as follows:
- For Sections, add the following values: Pregnancy Information, Child Information
- Save the layout rule.
Configure Child Information Case Object Type
Add fields to the object type, and then create a layout for Child Information Cases.
Add Fields to Object Type
- Go to Configuration > Objects.
- Open the Case (
case_version__v) object. - Open the Object Types > Fields tab.
- Open the Actions menu, and select Edit Object Type Fields.
- Under the Child Information (
child_information__v) object type, ensure the following fields are selected:- Height
- Weight
- Select Save.
Create Child Information Case Layout
- In Configuration > Objects > Case, open the Layouts tab.
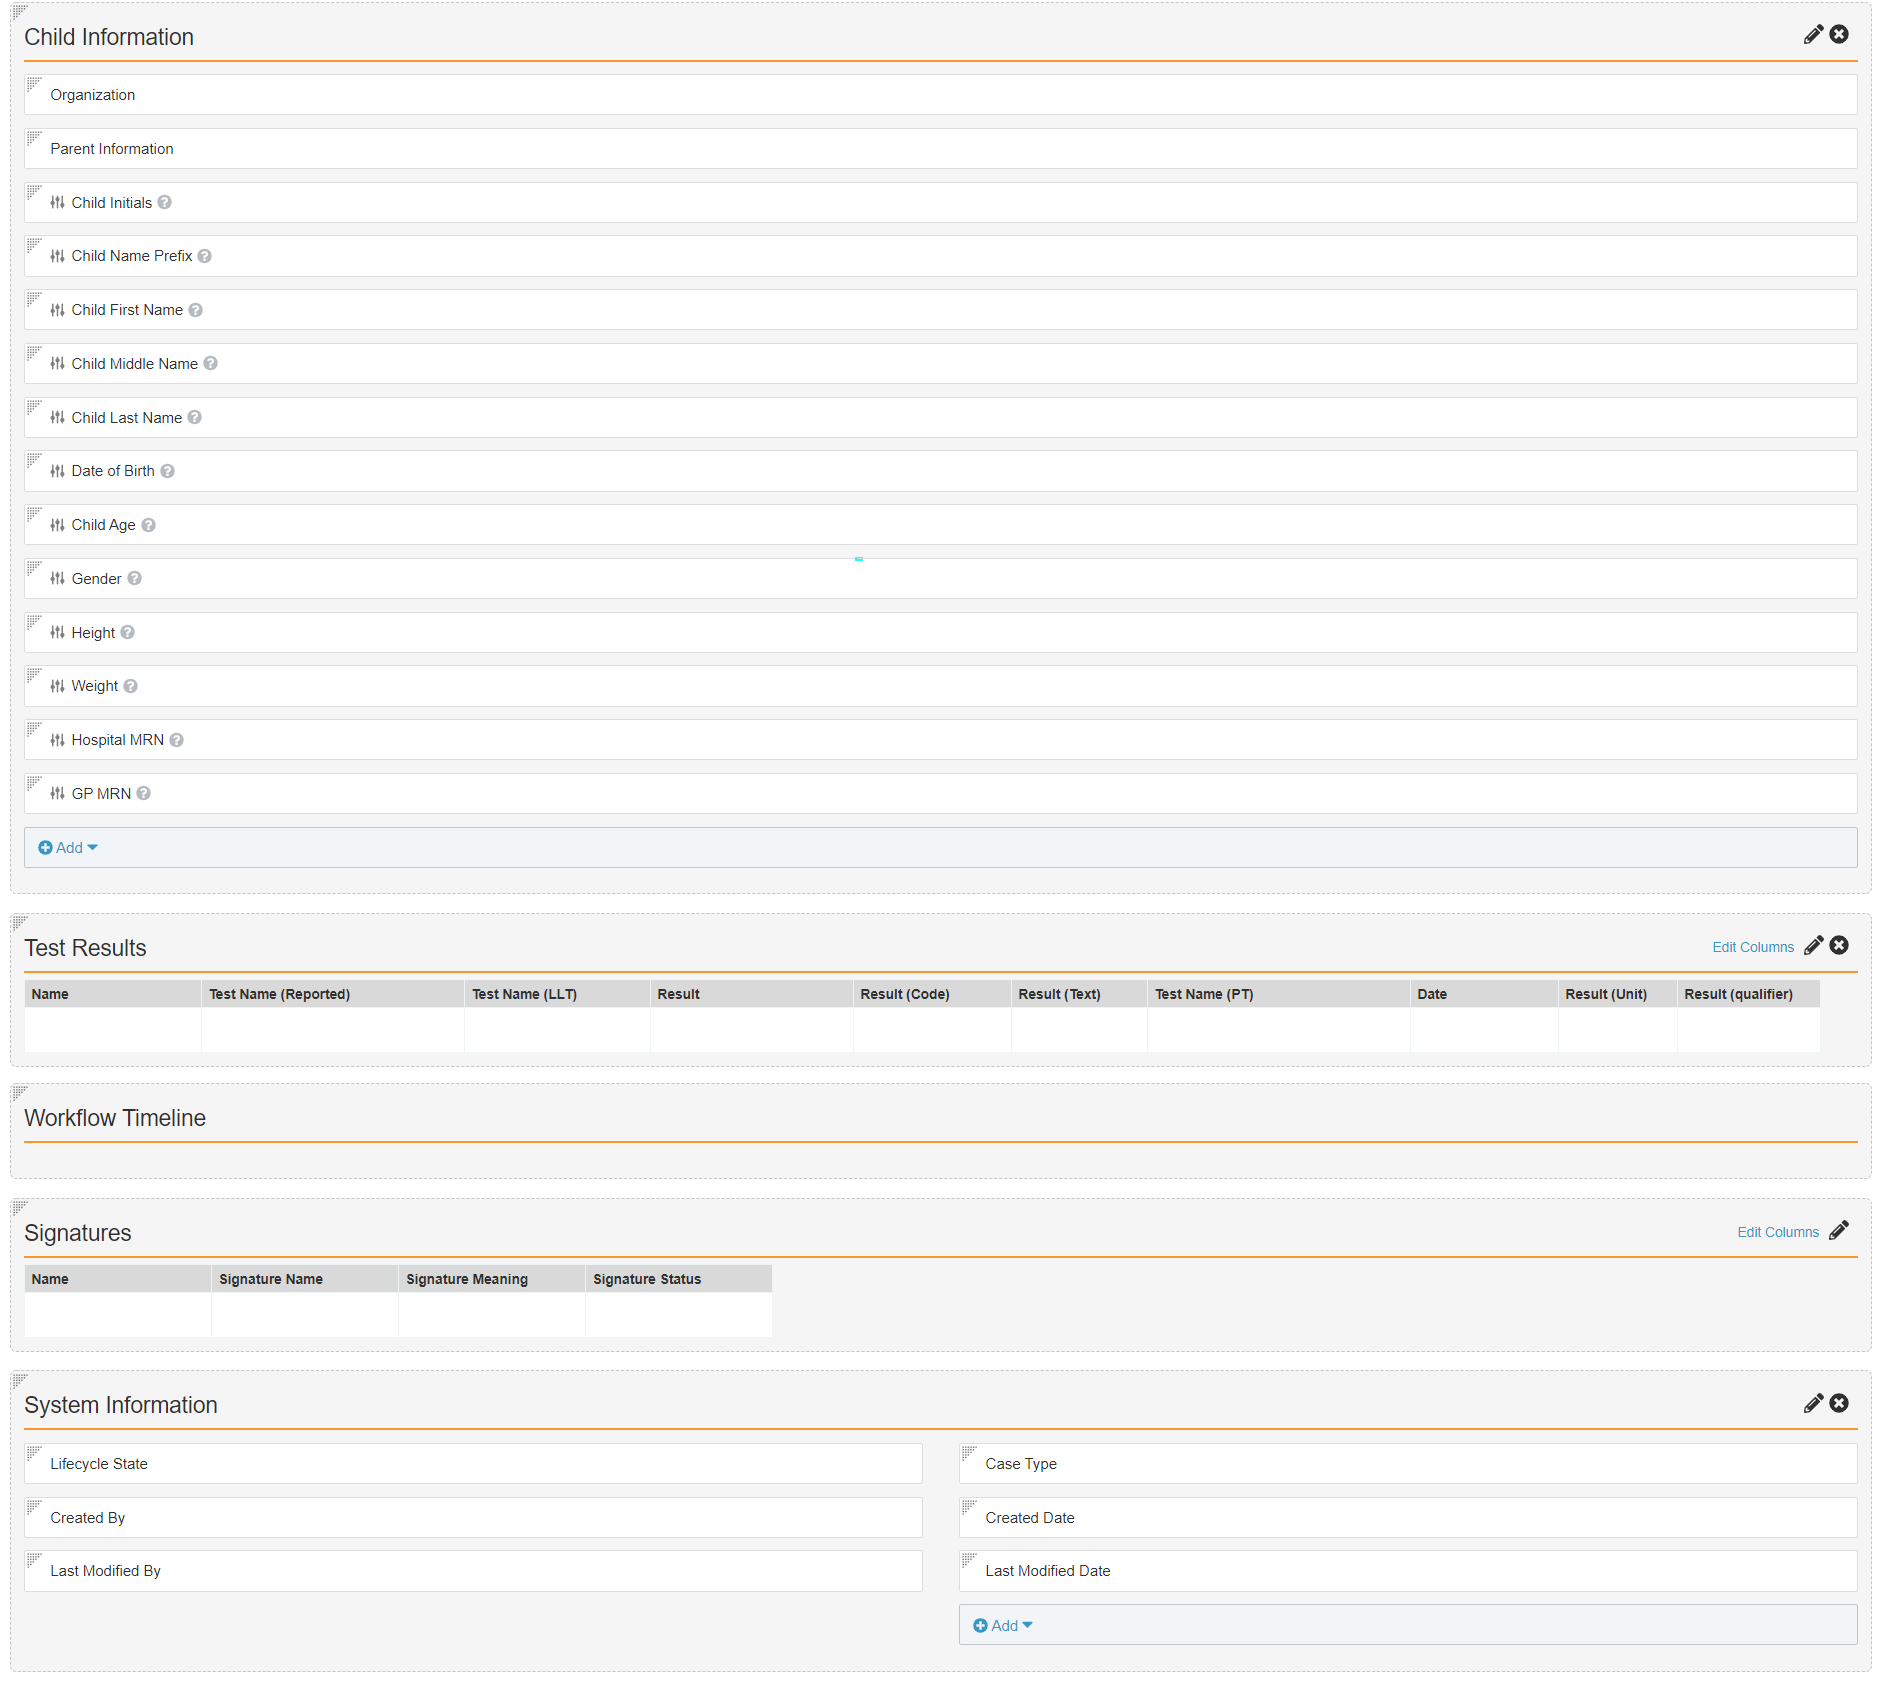
- Create a layout for the Child Information Object Type.
- Update the Details section to add the following fields:
- Organization
- Parent Information
- Patient Initials / ID
- Patient Name Prefix
- Patient First Name
- Patient Middle Name
- Patient Last Name
- Date of Birth
- Age at Onset
- Gender
- Height
- Weight
- Hospital MRN
- GP MRN
- (Optional) Make the Organization field required. The Organization is required to create Child Information and Child Information Test Results with appropriate Sharing Settings. Setting Up Object Types: How to Set Up Required Object Type Fields provides instructions for setting up required object type fields.
- For the following fields, update the label as indicated. You can also update the field help text if desired:
- Patient Initials / ID: Child Initials
- Patient Prefix: Child Name Prefix
- Patient First Name: Child First Name
- Patient Middle Name: Child Middle Name
- Patient Last Name: Child Last Name
- Age at Onset: Child Age
- Insert a Case Test Results related object section.
Result
The following image shows the Child Information Case Layout after configuration:
Configure Parent Information Case Object Type
Add study-related fields to the Parent Information (parental_case__v) object type. Then, update the Parent Information layout to support entering the related Study on pregnancy cases.
Add Fields to the Parent Information Object Type
- Go to Configuration > Objects.
- Open the Case (
case_version__v) object. - Open the Object Types tab.
- Open the Actions menu, and select Edit Object Type Fields.
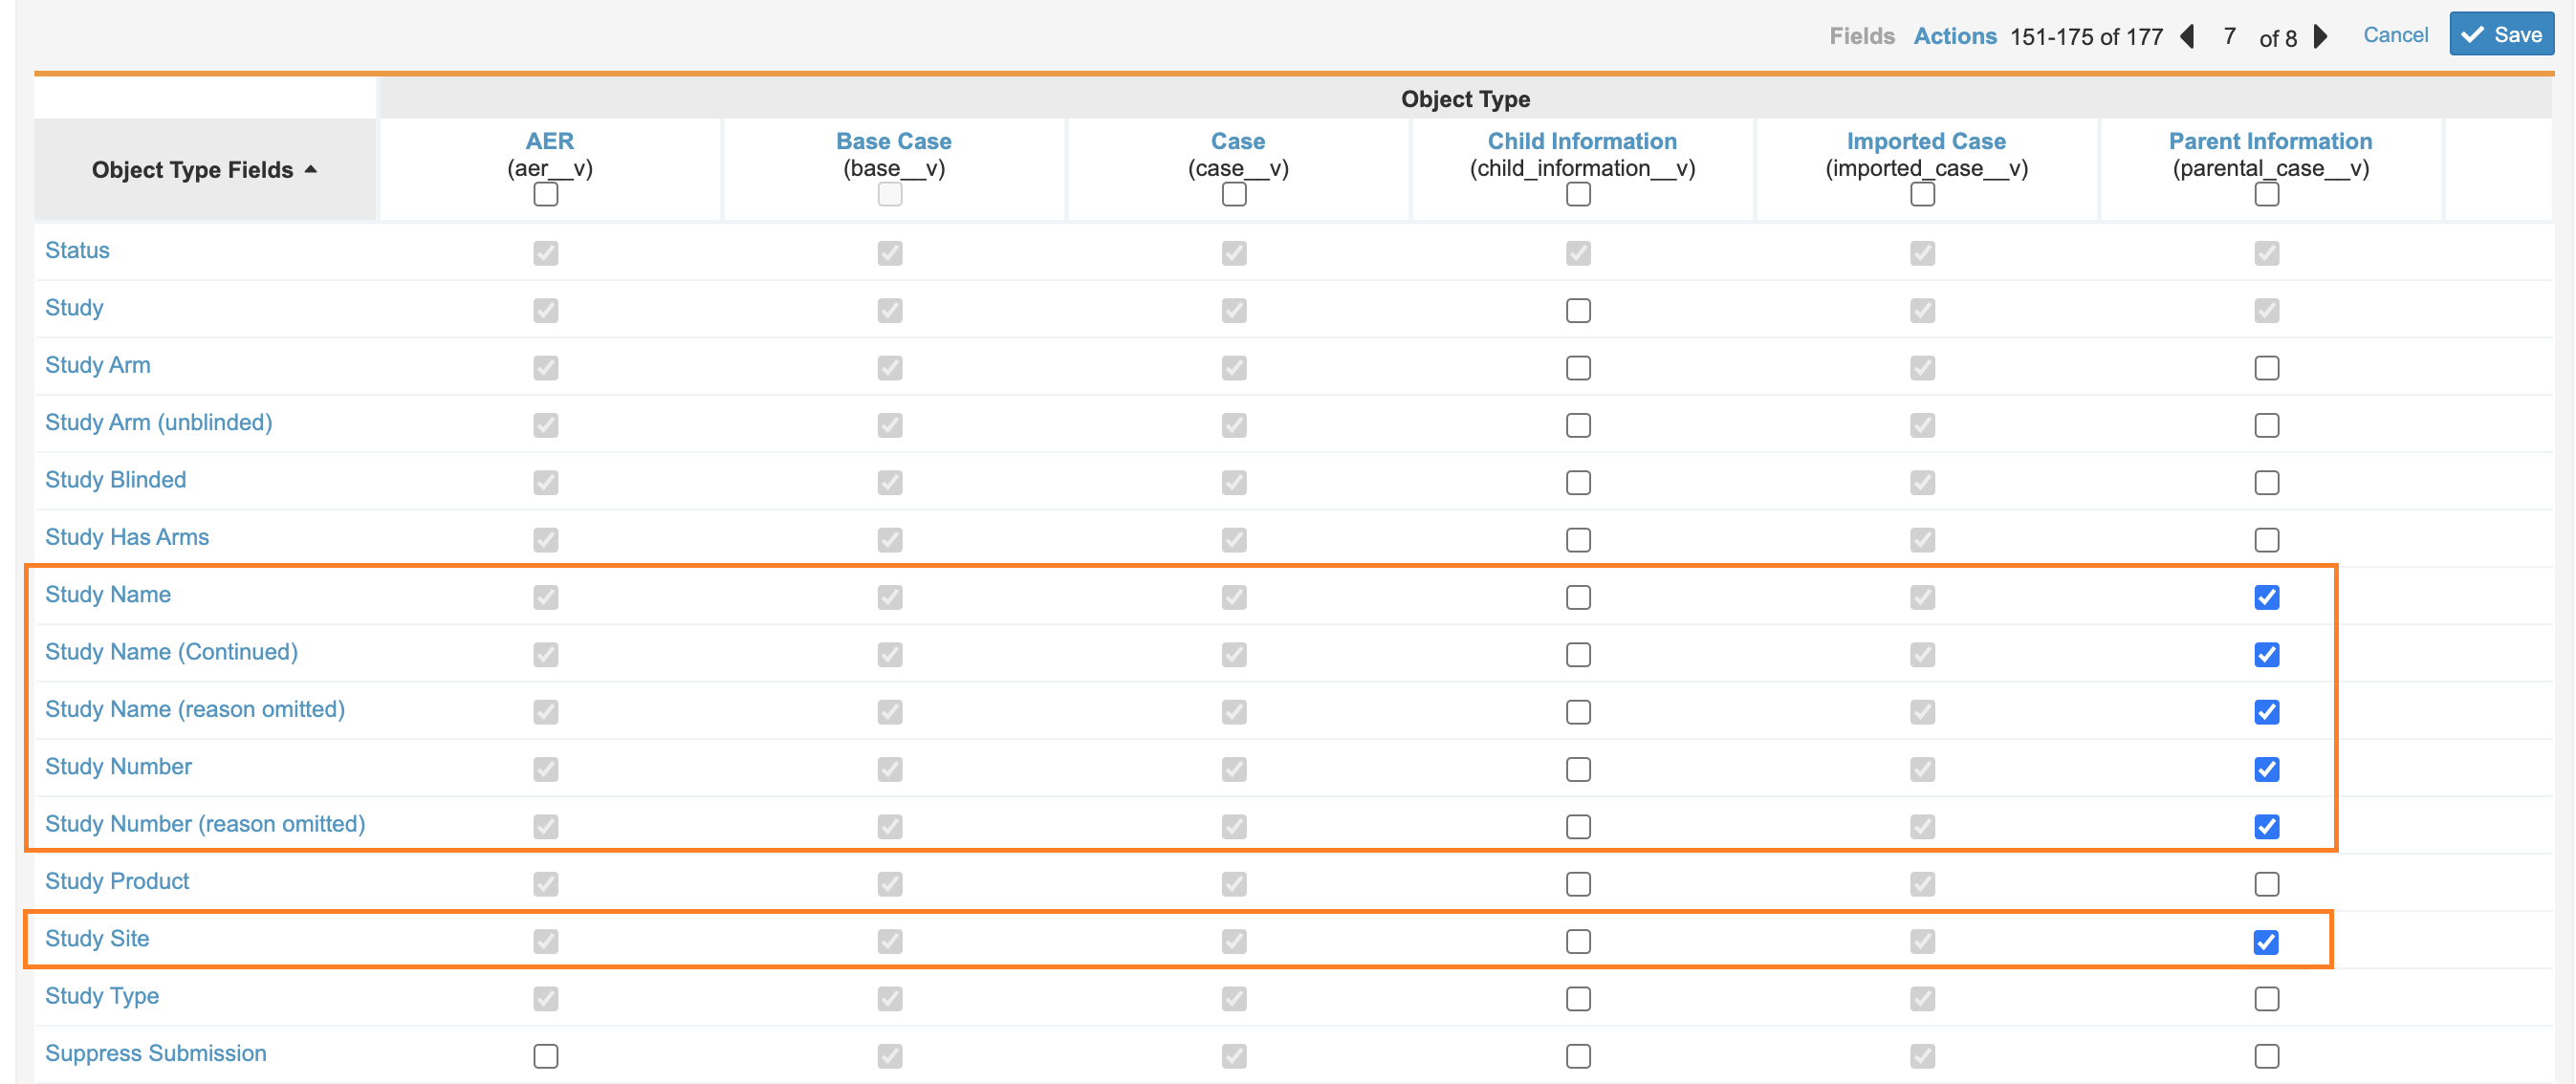
- Under the Parent Information (
parental_case__v) object type, select the following fields: - Select Save.
Update the Parental Case Layout
Update the Parental Case Detail Page Layout (parental_case_detail_page_layout__c) to add fields and add a layout rule.
Add Fields to the Layout
- In Configuration > Objects > Case, open the Layouts tab.
- Open the Parental Case Detail Page Layout (
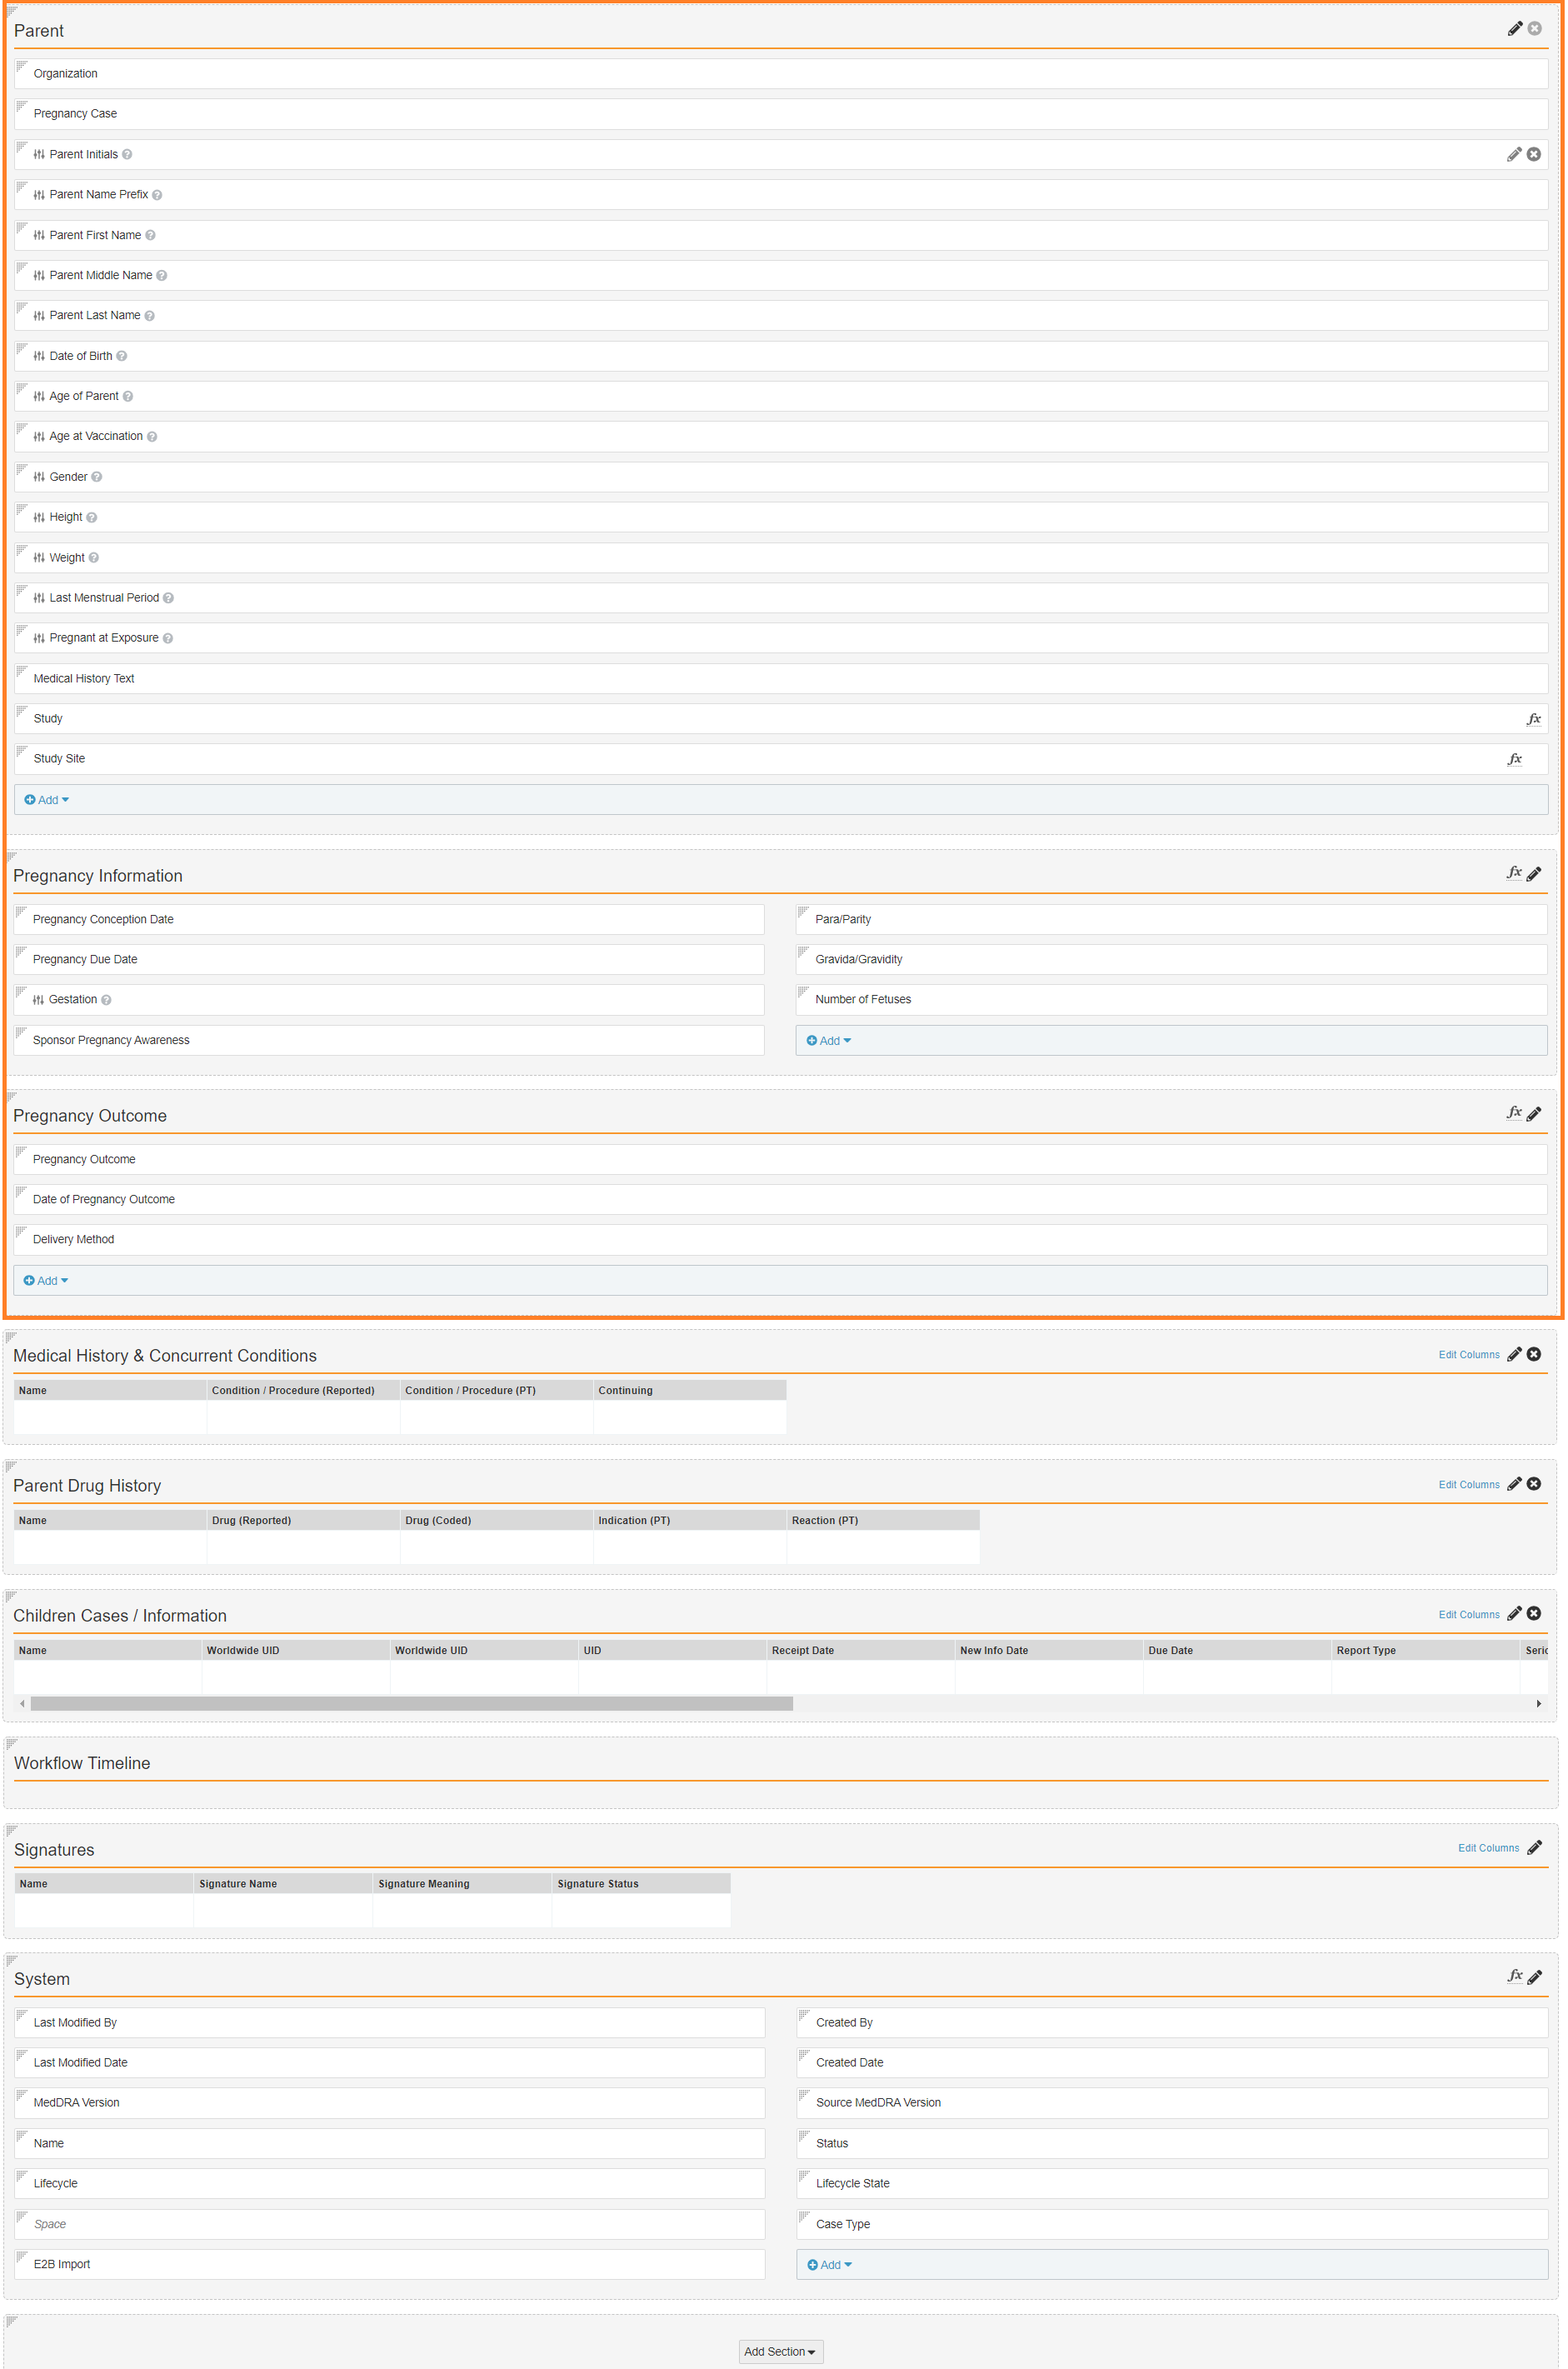
parental_case_detail_page_layout__c). - Add the Pregnancy field to the Parent section.
- (Optional) Add Pregnancy Information and Pregnancy Outcome detail sections to organize the pregnancy-related fields.
- Add the following pregnancy-related fields to the layout:
- Add the following fields to the Pregnancy Information section, if added:
- Last Menstrual Period
- Pregnancy Conception Date
- Pregnancy Due Date
- Gestation
- Para/Parity
- Gravida/Gravidity
- Number of Fetuses
- Sponsor pregnancy awareness
- Add the following fields to the Pregnancy Outcome section, if added:
- Date of Pregnancy Outcome
- Pregnancy Outcome
- Delivery Method
- Add the following fields to the Pregnancy Information section, if added:
- Ensure the MedDRA Version field is on the layout. This field is required to auto-code the Child Test Results.
- Add the following study-related field controls to the layout. We recommend adding these controls to the Parent section:
- Study
- Study Site
- (Optional) Consider moving the Gestation field from the Parent detail section to the Pregnancy Information section. If you move this field to the Pregnancy Information section, it may be hidden according to the layout rule described in the following section.
- For the following fields, update the label as indicated. You can also update the field help text if desired:
- Patient Initials / ID: Parent Initials
- Patient Prefix: Parent Name Prefix
- Patient First Name: Parent First Name
- Patient Middle Name: Parent Middle Name
- Patient Last Name: Parent Last Name
- Age at Onset: Age of Parent
- (Optional) Rename the Children Cases related object section to Children Cases/Information.
- Save the page.
Result
The following image shows the Parental Case Detail Page Layout after configuration:
Add Layout Rules
- On the Parental Case Detail Page Layout (
parental_case_detail_page_layout__c), go to Layout Rules. - Add the following layout rule to hide pregnancy-related sections if not tracking pregnancy or if the parent is not pregnant at exposure:
- Label: Enter your preferred Label
- Name: The system automatically populates this field based on the Label
- Status: Active
- IF this Layout Rule Expression is TRUE:
pregnancy_case__v != true && pregnant_at_vaccination__v != true - Apply the following display effects:
- Effect: Hide
- Type: Sections
- Values: Pregnancy Information, Pregnancy Outcome
- Add the following rule to hide study-related fields if it is not a pregnancy case:
- Label: Enter your preferred Label
- Name: The system automatically populates this field based on the Label
- Status: Active
- IF this Layout Rule Expression is TRUE:
pregnancy_case__v != true - Apply the following display effects:
- Effect: Hide
- Type: Fields
- Values: Study, Study Site
- Update the existing Menstrual (
menstrual__c) layout rule to hide additional fields if the gender is not female:- Label: Menstrual
- Name: menstrual__c
- Status: Active
- IF this Layout Rule Expression is TRUE:
gender_value__vr.name__v != "Female" - Apply the following display effects:
- Effect: Hide
- Type: Fields
- Values: Last Menstrual (normalized), Last Menstrual, Pregnant at Exposure, Pregnant at Exposure (Reason Omitted), Last Menstrual (reason omitted)
Post-21R1: Parent Information Case Configuration Changes
We recommend that you make the following configuration changes in all Vaults deployed in 21R1 and earlier.
- Go to Configuration > Objects > Case.
- Go to the Layouts tab, and open the Parental Case Detail Page Layout.
- Rearrange the following fields on the layout:
- Move Last Menstrual Period below Gender
- Move Pregnancy below Last Menstrual Period
- Move Pregnant at Exposure below Pregnancy
Permissions and Security Updates
Update permission sets as described in the following sections, per your organization’s requirements.
Grant Permissions to the Child Information Object Type
For users that require access to the Child Information Case object type, ensure to update permission sets.
Note: Permissions to the Child Information Case object type must be configured in all Vaults created in 21R1 and earlier.
- Go to Users & Groups > Permission Sets and open the appropriate permission set, such as Case Entry Actions.
- Open the Objects tab.
- Select Case.
- On the Case permissions page, under Object Permissions, grant Read, Create, and Edit permissions to the Child Information object type, as required.
Grant Permissions to Edit Pregnancy Fields
You must grant users permissions to allow them to read and edit the new pregnancy fields
- Go to Users & Groups > Permission Sets and open the appropriate permission set, such as Case Entry Actions.
- Open the Objects tab.
- Select Case.
- On the Case permissions page, under Object Field Permissions, grant Read and Edit permissions to the following fields (as required):
- Gestation
- Last Menstrual
- Pregnancy Conception Date
- Pregnancy Due Date
- Pregnancy Case
- Sponsor Pregnancy Awareness
- Date of Pregnancy Outcome
- Pregnancy Outcome
- Delivery Method
- Number of Fetuses
- Para/Parity
- Gravida/Gravidity
Additional Resources
Support for collecting pregnancy information on Inbox Items was also added to Vault Safety in 23R1. This feature allows intake users to track pregnancy exposure before Case promotion, facilitating data entry during Case processing.
See Enable Pregnancy Case Intake to enable this feature and About Pregnancy Case Intake for more information.
