Vault provides a selection of dose form terms for intake, case processing, and EDQM mapping. You can also add custom Dose Forms, Routes of Administration, and Unit of Measurement values. Encoded dose forms in E2B reports imported into Vault map using these dictionary entries. You can add, edit, deprecate, and delete custom values. Once loaded, new and updated custom values are immediately available for use. Deprecated values remain in your Business Admin library and on Cases where previously used, but are no longer available for selection in picklists. Deleted values are no longer available in your Business Admin library. You can only delete values that are not referenced by any other standard object.
Managing custom values involves the following steps:
- Prepare a CSV file
- Attach a CSV file
- Upsert or delete the custom values
Prerequisite
To manage custom values, your Admin must first enable Manage Custom Dose Forms, Routes of Administration, and Units of Measurement.
Prepare a CSV File
To prepare a CSV file with the details of the changes you want to make, you must first extract, then populate the file. A single file can be used to indicate changes as follows:
- One file to specify which records to add, change, or deprecate
- One file to specify which records to delete
Extract the CSV File
We recommend using Vault Loader to extract the CSV file for preparation. After extracting the loader file, delete any rows with standard or custom values that you are not changing or deleting. You can add and rearrange columns in the CSV file. Vault ignores additional columns during CSV file upload. Each supported object requires the following columns in the CSV file, which each require certain minimum required values:
- Agency Unit of Measurement (
agency_unit_of_measurement__v):idname__vagency__vcode__vfile_format__v
- Dose Forms (
dose_form__v):idname__v
- Routes of Administration (
route_of_administration__v):idname__v
- Units of Measurement (
unit_of_measurement__v):idterm__vuom_picklist__v
Populate the Custom Value Data
Populate the CSV file as applicable:
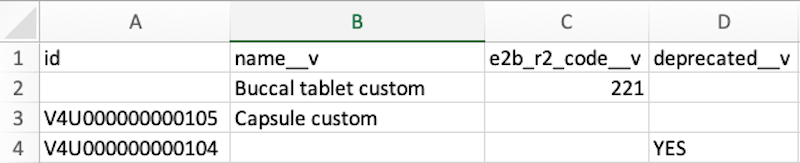
- Add a new custom value:
idcolumn: Blankdeprecated__vcolumn: Blank or enterNoto make the value available in picklists- Enter data in the other columns of the row with minimum required values
- During record creation, Vault generates an ID.
- Change a custom value:
idcolumn: Keep the extracted valuedeprecated__vcolumn: Blank or enterNoto make the value available in picklists- Enter updates to any other columns in the row with minimum required values
- Deprecate a custom value:
idcolumn: Keep the extracted valuedeprecated__vcolumn: EnterYes
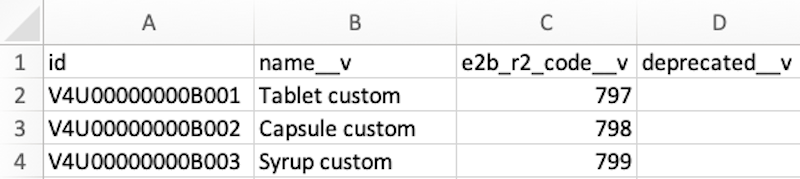
- Delete a custom value:
idcolumn: Keep the extracted value- Enter updates to any other columns in the row with minimum required values
Sample Dose Forms CSV for Addition, Change, Deprecation
Sample Dose Forms CSV for Deletion
Minimum Required Values
The following table describes how to populate the minimum required values for a successful CSV upload, depending on the object type:
| Custom Value Header | Value Format Rules | Required for Object Types |
|---|---|---|
id |
This is a Vault-generated value. To create new custom values, leave this cell blank. To change, deprecate, or delete existing custom values, enter the Vault-provided ID. IDs are included in files extracted from Vault Loader. |
|
name__v |
The label for the custom value. Enter a unique value up to 128 characters. |
|
term__v |
The label for the custom value. Enter a unique value up to 128 characters. | Unit of Measurement |
agency__v |
The agency for which the custom value applies, such as V0Z000000000101. Enter this value exactly as it appears in the agency__v column of the extracted Agency Unit of Measurement CSV file.
|
Agency Unit of Measurement |
code__v |
The agency-specific code for the custom value. Enter up to 100 characters. | Agency Unit of Measurement |
file_format__v |
The file format that supports the agency-specific code, such as fda_vaers_e2b_r3__v. Enter these values exactly as they appear in the file_format__v column of the extracted Agency Unit of Measurement CSV file or the Picklist Value Name column on the File Format field of the Agency Unit of Measurement object.
|
Agency Unit of Measurement |
uom_picklist__v |
The unit of measurement for the custom value. Enter these values exactly as they appear in the Picklist Value Name column on the Unit of Measurement Picklist field of the Unit of Measurement object. | Unit of Measurement |
deprecated__v |
To make a value active and available in picklists, leave the column blank or enter No or False. To inactivate a value so it remains in your Business Admin library but is not available in picklists, enter Yes or True. Entries in this column are not case sensitive.
|
All object types when deprecating values only |
Attach a CSV File
The Dictionary object enables you to upload CSV files with custom values, update the records, and troubleshoot any issues. Depending on your Admin’s configuration, your Vault may include the following dictionaries:
- Agency Units of Measurement
- Dose Form
- Route of Administration
- Unit of Measurement
To attach the CSV file, complete the following steps:
- Navigate to Business Admin > Objects > Dictionaries > [Dictionary].
- Expand the Attachments section.
- If any attachments exist, they must be deleted. Select Delete from the Actions menu and then Continue.
- In the Attachments section, select Upload and then upload your CSV file.
When you run the Upsert Records and Delete Records user actions, Vault uses the uploaded CSV file for updating the custom values.
Upsert Custom Values
When you are adding, changing, or deprecating custom values, once you have one CSV file in the Attachments section of the dictionary, you are ready to make changes. From the All Actions menu of your dictionary, select Upsert Records. The state changes to Importing. Vault notifies you when the records have successfully loaded and the dictionary state changes to Active.
Delete Custom Values
When you are deleting custom values, once you have one CSV file in the Attachments section of the dictionary, you are ready to make changes. From the All Actions menu of your dictionary, select Delete Records. The state changes to Importing. Vault notifies you when the records are successfully loaded and the dictionary state changes to Active.
Note: You cannot delete any custom value referenced by any other standard object.
Troubleshooting Upsert and Delete Errors
Vault notifies you if any errors occur while processing the CSV file. Vault updates the dictionary state to Error and adds an error file to the Attachments section of the dictionary, which you can download the file to assist you with revisions. The Error message column in the CSV file indicates any rows for which Vault could not complete the change.
View Custom Values
You can view standard and custom values by navigating to to Business Admin > Objects > [Object] to view both standard and custom values. Optionally, add any of the following columns to the grid view to enable easier filtering of the available values:
- Created By (dictionary): Identifies which user created the custom value.
- Deprecated: Indicates whether a value is available in picklists for intake, case processing, and EDQM mapping. Records with a Yes value are unavailable for use.
- Last Modified By (dictionary): Identifies which user last updated the custom value.
- System Managed: Indicates whether a value is Vault-provided or user-created. Records with a Yes value are standard and cannot be changed.