Learn how to set up your Vault to share PVA documents with partner organizations.
About the Feature
With the 24R1 release, SafetyDocs supports distributing PVA documents to other users in your Vault, providing an efficient and secure way of sharing PVA documents without needing to depend on an external system. This allows users to:
- Provide partner organization employees with a User record with access to PVA Activities and PVA Action Items, and their associated documents
- Assign tasks to Users to confirm document receipt or review
For more information, see Distribute PVA Documents via Vault Task.
Note: This feature is best used in combination with PVA Document Distribution via Email. We recommend configuring both features together. For more information, see Enable PVA Document Distribution via Email.
Configure Layouts
Layouts are managed through Admin > Configuration > Objects > [Object] > Layouts.
Update the PVA Activity Layout
Complete the following steps to add the Partner Access field and a layout rule to hide it when the Delivery Method is not Vault Task:
- On the PVA Activity object, go to Layouts > PVA Activity Detail Page Layout.
- In the Distribution Details section, select Add and add the Partner Access field.
- From the top-right, select Layout Rules > Create.
- On the Create Layout Rule page, complete the fields as follows:
- Label: Enter “Non-Vault Task Outbound”
- IF this Layout Rule Expression is TRUE: Enter
delivery_method__v != Picklist.pva_communication_method__v.vault_task__v - Apply the following display effects:
- Effect: Select Hide
- Type: Select Fields
- Values: Select Partner Access
- Select Save.
Update the PVA Action Item Layout
Complete the following steps to add the Partner Access field and a layout rule to hide it when the associated Activity Type is not outbound and the Delivery Method is not Vault Task:
- On the PVA Action Item object, go to Layouts > PVA Action Item Detail Page Layout.
- In the Distribution Details section, select Add and add the Partner Access field.
- From the top-right, select Layout Rules > Create.
- On the Create Layout Rule page, complete the fields as follows:
- Label: Enter “Non-Vault Task Outbound”
- IF this Layout Rule Expression is TRUE: Enter
activity_type__v != Picklist.pva_distribution_type__v.outbound__v || contact_communication_method__c != Picklist.pva_communication_method__v.vault_task__v - Apply the following display effects:
- Effect: Select Hide
- Type: Select Fields
- Values: Select Partner Access
- Select Save.
Configure Object Lifecycles
Object lifecycles are managed through Admin > Configuration > Object Lifecycles.
Configure the PVA Activity Lifecycle
Go to Object Lifecycles > PVA Activity Lifecycle and make the following updates:
Update Permissions
Complete the following steps to update permissions for the Document Recipient role:
- In the Roles section, select Edit.
- Grant permissions on the Document Recipient role as follows:
- Sent to Partner: Read, Edit
- Complete: Read
- Select Save.
Update Atomic Security
Complete the following steps to hide the Partner Access field in the New, In Progress, and Received from Partner states:
- In the States section, select New.
- In the Atomic Security: Fields section, select Edit.
- Set Atomic Security for the Partner Access field to Hide.
- Select Save.
- Repeat steps 2-4 for the In Progress and Received from Partner states.
Configure the PVA Action Item Lifecycle
Go to Object Lifecycles > PVA Action Item Lifecycle and make the following updates:
Update Permissions
Complete the following steps to update permissions for the Document Recipient role:
- In the Roles section, select Edit.
- Grant permissions on the Document Recipient role as follows:
- Sent to Partner: Read, Edit
- Complete: Read
- Select Save.
Update Atomic Security
Complete the following steps to hide the Partner Access field in the Open state:
- In the States section, select Open.
- In the Atomic Security: Fields section, select Edit.
- Set Atomic Security for the Partner Access field to Hide.
- Select Save.
Add User Action
Complete the following steps to add a user action to the Open state:
- In the States section, select Open.
- In the User Actions section, select Edit > Create Rule and create the following rule:
- Perform with conditions > Contact Communication Method > equals > Vault Task
- Change State to > Sent to Partner
- Perform with conditions > Contact Communication Method > equals > Vault Task
- Select Save.
Add Entry Action
Complete the following steps to add an entry action to the Sent to Partner state:
- In the States section, select Sent to Partner.
- In the Entry Actions section, select Edit > Create Entry Action and create the following action:
- Perform with conditions > Contact Communication Method > equals > Vault Task
- Update field > Partner Access
- Set to Value:
Picklist.pva_access_granted__v.access_granted__v
- Perform with conditions > Contact Communication Method > equals > Vault Task
- Select Save.
Configure the PVA Document Distribution Lifecycle
Go to Object Lifecycles > PVA Document Distribution Lifecycle and make the following update:
Update Permissions
Complete the following steps to update permissions for the Document Recipient role:
- In the Roles section, select Edit.
- On the Document Recipient role, grant Read permission to the Active state.
- Select Save.
Update the PVA Activity Outbound Workflow
Go to Admin > Configuration > Workflows > PVA Activity Outbound Workflow and complete the procedures described in this section. Use these steps as a starting point, but configure your workflows according to your business processes:
Add Controls to the Start Step
Go to the Start step and in the Start Options section, select Add Control to add controls and complete fields as follows:
- Control 1: Instructions
- Instructions: Enter “Please select the task owner for ${Object.name__v}”
- Control 2: Prompt for Fields
- Fields: Select Due Date and set it as required
- Control 3: Participants
- Participant Label: Enter “Task Owner”
- Add Participants: Select Allow workflow initiator to select participants
-
Control 4: Participants
- Participant Label: Enter “Document Recipient”
- Add Participants: Select Use roles as participants
- Roles allowed to participate: Select Document Recipient
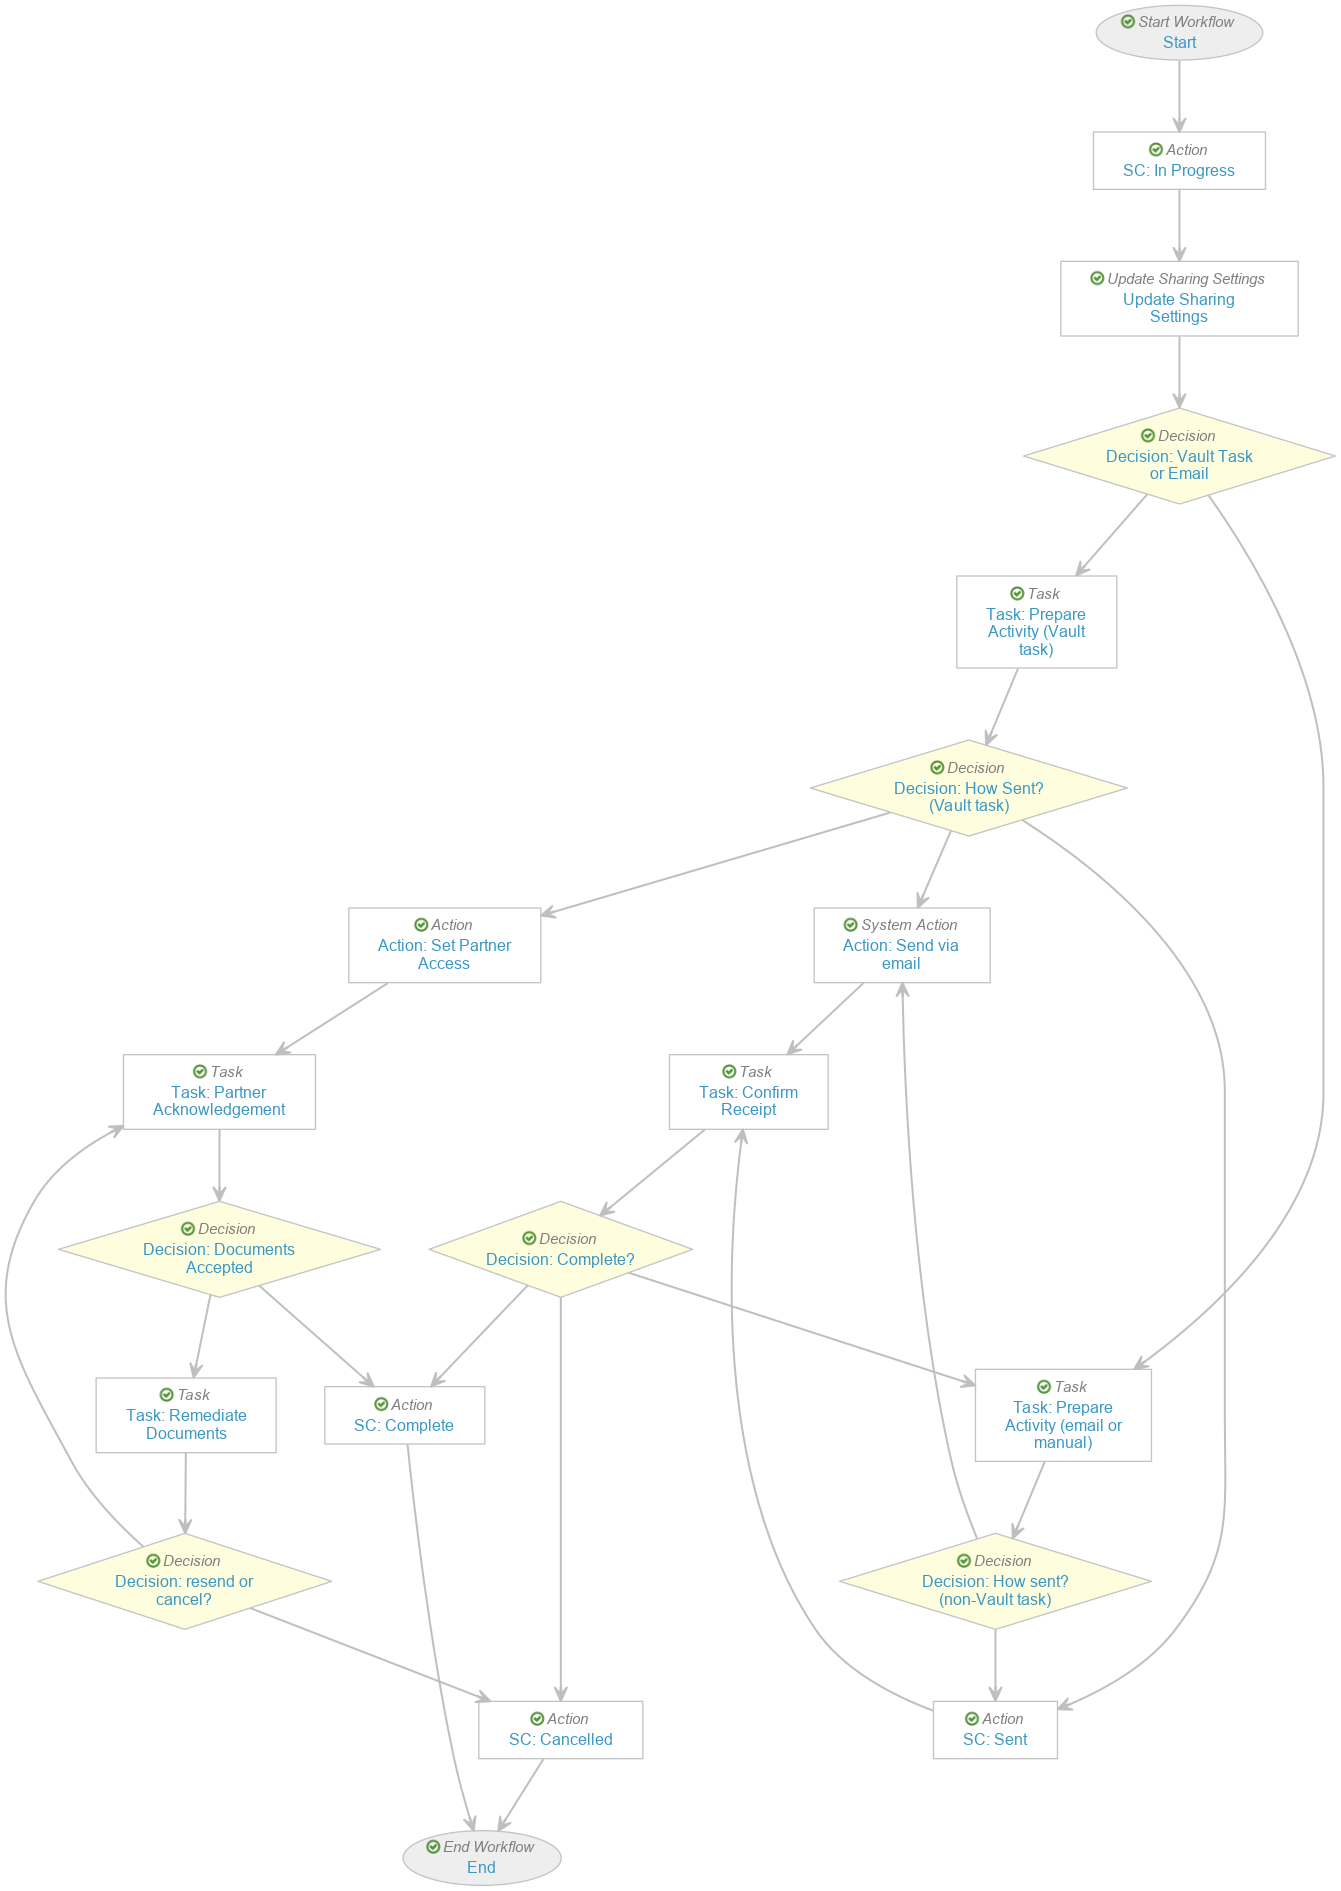
Configure Workflow
Update the rest of the workflow to set up branches for document distribution procedures. Use the following image as a guide but configure the workflow according to your organization’s requirements:
Add Notification Template
Complete the following steps to add a template for notifications sent to users when documents are distributed:
- Go to Admin > Configuration > Notification Templates and select Create.
- In the Create Message dialog, select Object > PVA Activity and then select Continue.
- On the Create Notification Template page, complete the fields as follows:
- Label: Enter “PVA Activity Document Recipient”
- Email Preferences: Select Every Occurrence
- Notification Category: Select Send As Link
- Subject: Enter “You have been sent documents”
-
Notification Text: Enter the following text:
“You have been sent one or more documents from your partner under the terms of the PVA ${Object.pv_agreement__v}.
Documents are available here: ${Object.name__v}
Please confirm the receipt of these documents.”
-
Email Body: Enter the following text:
“You have been sent one or more documents from your partner under the terms of the PVA ${Object.pv_agreement__v}.
Documents are available here: ${Object.name__v}
Please confirm the receipt of these documents.
Additional Comments: ${Object.activity_comments__v}”
- Select Save.
Configure Security
Add security settings to grant access to this feature. Use the following instructions as a starting point, but configure access according to your business processes.
Add the PVA Recipient Actions Permission Set
Complete the following steps to add this permission set:
- Go to Admin > Users & Groups > Permission Sets.
- Select Create.
- In the Name field, enter “PVA Recipient Actions”.
- Select Save.
Grant Permissions
Complete the following steps to ensure your permission sets are granted the appropriate level of access to application actions, objects, and tabs.
Application Permissions
On the PVA Recipient Actions permission set, go to the Application tab and select Edit. Grant permissions as follows:
- Workflow: Start, Participate, eSignature
- Document: Download Document, Download Rendition
- User: View User Profile
Object Permissions
On the PVA Recipient Actions permission set, go to the Objects tab and select Edit. Grant permissions as follows:
- Grant Read permissions on the following objects:
- Country
- Document Lifecycle Stage Label
- Document Lifecycle State-Stage
- Document Type Detail
- Language
- Object Lifecycle Stage Label
- Object Lifecycle State-Stage
- Organization
- Partner
- Sponsor
- Person
- Base Person
- Study Person
- Email Person
- Receiver Person
- Product
- Product
- Biologic
- Drug
- Device
- Combination Product
- Vaccine
- Company Product
- PV Agreement
- PVA Contact
- PVA Document for Distribution
- PVA Obligation
- PVA-Country
- PVA-Product
- PVA-Study
- Relationship
- Study
- Tab Group
- Workflow
- Grant Read and Edit permissions on the following objects:
- PVA Action Item
- PVA Activity
- Select Save.
Tab Permissions
On the PVA Recipient Actions permission set, go to the Tabs tab and select Edit. Grant View permissions as follows:
- Home
- PVAs
- PV Agreements
- Open PVA Actions
Add the PVA Recipient (External) Security Profile
Complete the following steps to create a new security profile and associate it with the PVA Recipient Actions permission set:
- Go to Admin > Users & Groups > Security Profiles.
- Select Create.
- In the Name field, enter “PVA Recipient (External)” and select Save.
- On the Security Profiles page, select the PVA Recipient (External) security profile you just created.
- In the Permission Sets section, select Add > Existing Permission Set.
- Select PVA Recipient Actions from the picklist, and then select OK.
Add the Security Profile to the External Users Group
Complete the following steps to add the new PVA Recipient (External) security profile to the External Users Group:
- Go to Admin > Users & Groups > Groups > External Users.
- Select Edit.
- In the Included Security Profiles field, add PVA Recipient (External).
- Select Save.