You can generate Inbox Items from imported E2B(R2), E2B(R3), and non-E2B files by importing data in the following ways:
- E2B file import: You can generate Inbox Items from uploaded E2B files, including batch XML files (multi-E2B), and ZIP files containing multiple E2B(R2) or (R3) compliant XML files using the Create Inbox Item From Document action.
- Non-E2B file import: You can create Inbox Items from non-E2B files using the Create Inbox Item From Document action. Vault creates a blank Inbox Item that you can use for manual intake. You can also generate an Inbox Item from a document placeholder and capture the citation in the Reference field of the document metadata.
- Multi-case tabular data import: You can extract multiple case details from CSV files to create multiple Inbox Items at once using the Create Inbox Item action.
- Vault API import: API users can upload JSON files using the Intake API to generate Inbox Items populated with the data in the structured data file. Vault records the details of the incoming Vault API transmission in an Inbound Transmission. When configured by your Admin, API import supports local intake.
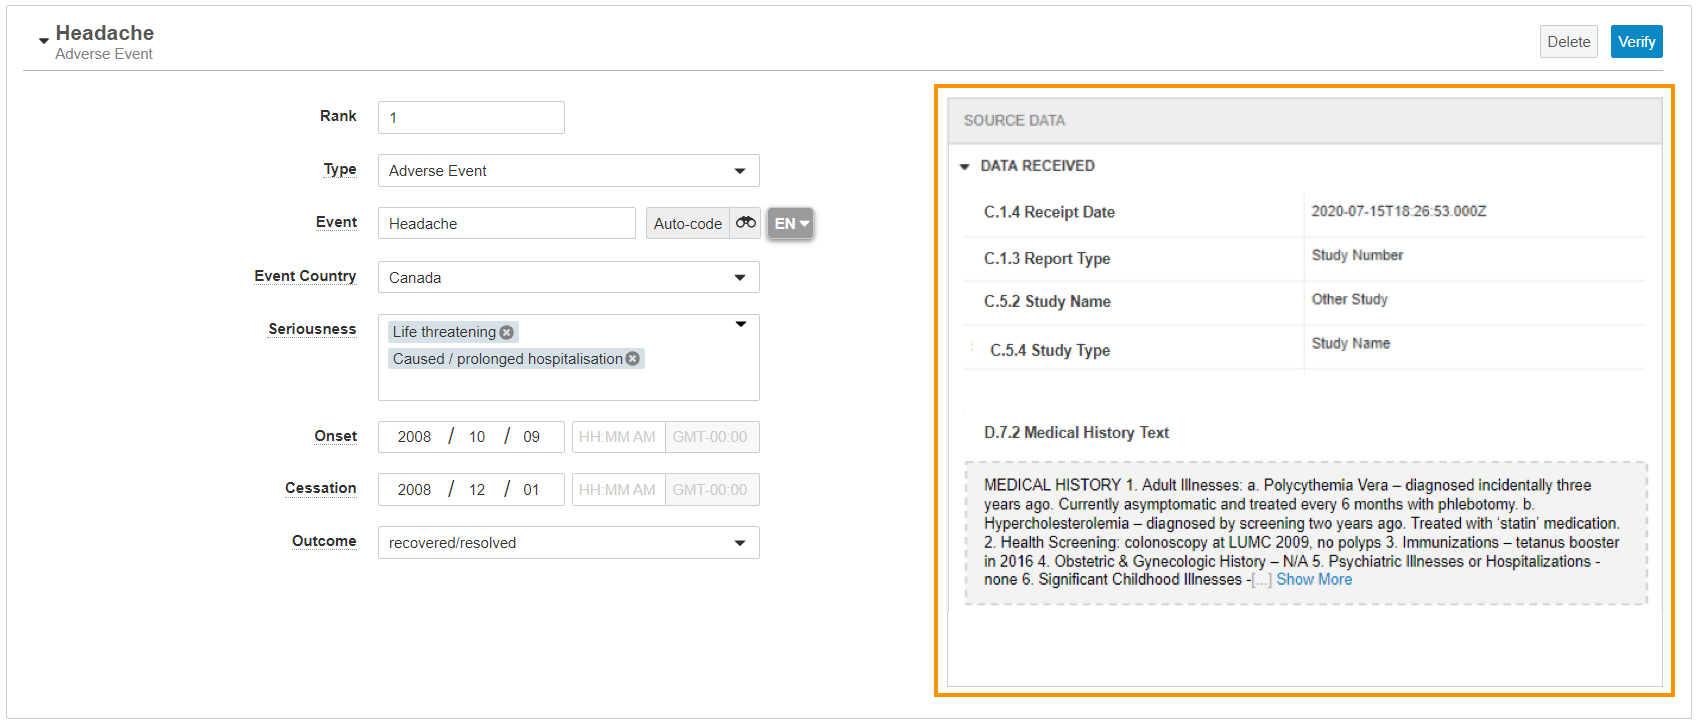
When you import data from structured source files, you can verify the file data in the Source Data pane and review Vault-generated suggestions. Vault attempts to match source file study and products to existing Studies and Products. If your Vault has an active MedDRA dictionary, Vault auto-codes MedDRA terms. Vault also generates an Inbound Transmission to capture details from the source document and sends you a notification, which includes details about any warnings or errors. For example, if there are issues mapping data from an E2B file, the notification includes a warning message explaining the affected E2B data element and value.
Prerequisites
Your Admin must complete the following, as applicable for your business needs:
- Enable Import Inbox Items
- Enable Multi-Case Tabular Data Import and Manage Multi-Case Tabular Data Import
- Configure Your Vault for the Intake Inbox Item Vault API
- To support local import for E2B and Vault API sources, enable localization-based import mapping
E2B File Import
You can upload a single E2B file, a batch XML file (multi-E2B), or a ZIP file containing multiple E2B(R2) or (R3) compliant XML files to your Library. Vaults using Vault AI for Safety may automatically generate an Inbox Item for each Case > Source > Adverse Event Report (AER) classified document uploaded to your Library. Alternatively, you can run the Create Inbox Item From Document action to generate the record. Vault generates a CSV rendition of the E2B file for the Inbox Item. When you create an Inbox Item from an E2B file, Vault populates the document’s Case Access Group field on the document based on the value on the generated Inbox Item, which you cannot modify.
When you create Inbox Items from E2B XML files, Vault maps each E2B data element to populate the associated Inbox Item field. Because Inbox Items do not contain all Case fields, certain data does not appear until you promote the Inbox Item to a Case. For more information about how Vault maps E2B data to a Case, see E2B Case Import Data Mapping and PMDA E2B(R3) Case Import for details about Japan-specific objects and fields.
Local Inbox Item Import
When configured by your Admin, Vault maps the localized data in the source files to the corresponding localized Inbox Item fields and imports the applicable MedDRA code, which maps to the generated Localized Case upon promotion. Vault maps the A.1.11.1 Source(s) of the Case Identifier E2B(R2) element and the C.1.9.1.r.1 Source(s) of the Case Identifier E2B(R3) element to the Source field of the Inbox Item, not to the localized field.
When performing local language to English intake, you can translate Inbox Item text fields to English.
Import E2B Inbox Items from a ZIP File
You can upload a ZIP file containing up to 1,000 E2Bs to your Library. Vault imports each file individually as a document and creates an Inbox Item from each document. Vault also does the following:
- Links the documents to the associated Inbox Item and Inbound Transmission from the Inbox Item field and Inbound Transmission field, respectively.
- Links the single-case documents in the parent ZIP file under the Relationship > Single-Case Document section and the parent ZIP file under the Relationship > Multi-Case Document section in each single-case document.
- Links any duplicate files.
- Generates a CSV rendition of the E2B source data for each document.
Vault successfully processes the ZIP file if it is valid:
- Each E2B file cannot exceed 25 MB.
- The number of E2B files in the ZIP file cannot exceed 1,000.
- Each E2B file must be an XML document.
- The ZIP file cannot contain multi-E2Bs.
- The E2B files must be in the root (top-level directory) of the ZIP file or must be in a root folder in the file.
Note: If the ZIP file contains any non-E2B files, only the E2Bs are imported and Vault will log a warning for the non-E2B files. If Vault is unable to process the ZIP file, an error message appears with the error details and the appropriate next steps. You can manually resolve the issues and upload the file again.
Duplicate E2B XML File Detection
If the reporter’s Organization associated Transmission Profile has E2B document duplicate detection enabled, Vault detects duplicate files already successfully imported into your Vault when you import XML files received from a multi-E2B or ZIP file. When this happens, the generated Inbox Items are in the Duplicate lifecycle state and each duplicate file links to the original version already in your Vault, which you can view in the Duplicated Documents section on the Doc Info page for both files.
CSV Renditions of Imported E2B Files
Vault generates a CSV rendition of the E2B file once you create an Inbox Item from this E2B. The rendition can be generated for E2B(R2) and (R3) files (for example, through manual upload, AS2 gateway, or the Vault API). Depending on your Admin’s configuration, you can access the CSV file in either of the following ways:
- The Conformance Validations section of the applicable Inbox Item
- The Attachments section of the Document Files (
 ) panel on the file’s Doc Info pane in your Library
The CSV file contains E2B source data in a readable format. The following is an example snippet of a CSV file:

The following considerations apply to CSV renditions:
- The file does not include elements that do not exist in the ICH E2B(R2) or (R3) guidelines.
- Vault does not support embedded files for E2B(R2).
- If CSV rendition generation fails, E2B file import fails.
- When viewing the rendition using your web browser, long blocks of text (such as case narratives) may be truncated. The complete text block is available in the downloaded CSV file.
Automated Case Promotion
Vault supports automated Case promotion for uploaded E2B documents of single files, multi-E2B files, and ZIP files containing multiple E2Bs. This is possible if the Enable Auto Promote is on for the applicable gateway or document.
To automatically promote, you can navigate to the document’s General section and populate the following fields:
- Enable Auto Promote: Yes
- Non-Serious Merge Method: Select a merge method for Non-Serious Cases
- Serious Merge Method: Select a merge method for Serious Cases
Import an Inbox Item
To import an E2B or non-E2B file to an Inbox Item from a source document:
- Navigate to the latest document version or placeholder in your Library.
- For E2B files, the file must be classified as Case > Source > Adverse Event Report (AER) and in New state.
- For non-E2B files, the file must be classified as Case > Source > Literature and in Imported state.
- Complete applicable document fields:
- Organization: Select the organization that will process the Inbox Item and Case. The Organization Type must be Sponsor.
- Receipt Date: Optional: Select the receipt date.
- For non-E2B files, Vault maps this field to the New Info Date field on the Inbox Item. If blank, Vault populates the current date.
- For E2B files, Vault does not consider this field. Vault populates a date based on the E2B data elements.
- Report Type: Optional: Select the report type. For non-E2B files and E2B files that do not specify the report type, if you leave this blank, Vault sets the Report Type of the Inbox Item to Spontaneous.
- Reference: For documents or placeholders with the Case > Source > Literature classification, enter the citation for a literature article.
- From the All Actions menu, select Create Inbox Item From Document. For E2B files, ensure Vault has generated a viewable rendition of the document before running the action.
Case Assessment Result Generation
When assessments in source files include assessment results, Vault:
- Imports the data as received and generates a Case Assessment Result for each assessment result in the source file.
- Does not generate additional Case Assessment Results during promotion.
- Populates the Source (text) field based on information in the source file.
When assessments in source files do not contain any assessment results, Vault:
- Generates two Case Assessment Results for each assessment in the source file upon Case promotion.
- Populates the Source Type field for each Case Assessment Result.
- If applicable, Vault references the reporter’s qualification to determine whether the Source Type is Health Care Professional or Non-Health Care Professional.
For example, if a source file includes two assessments, one with a single assessment result and the other with no assessment results, after Case promotion, the Case includes three Case Assessment Results:
- One from the source file assessment result
- Two Vault-generated records for the assessment without an assessment result, one each for the sponsor and investigator
For information about generating missing Case Assessment Results, see Generate Assessments.
Multi-Case Tabular Data Import
You can import a multi-case CSV file or a ZIP file with multiple CSV or TXT files based on Admin-defined mapping. If CSV files do not specify Age Unit, Height Unit, Weight Unit, or Report Type, Vault may assign values on generated records based on your Admin’s configuration of the associated Tabular Data Format. Each file to import must meet the following criteria:
- CSV Files
-
- No empty files
- File size is equal to or less than 100 MB
- The number of cases per multi-case file does not exceed 1,000
- Rows do not exceed 100,000
- List separator is a comma (
,), semicolon (;), or a pipe character (|) - The file character encoding is UTF-8, EUC-KR, or ISO 8859-1
- Contain at least one record (at least one row of case data)
- Contain at least one column mapped to a Case ID (either Worldwide UID (WWUID) or External System UID)
- Contain unique column headers (except for the Case ID and Record ID columns)
- Sorted by Case ID
- Dates are in the appropriate format:
- ISO 8601:
yyyy-MM-dd'T'HH:mm:ss.SSSXXX - VAERS:
yyyy/MM/DD'T'HH:mm:ss.SSSXXX - KAERS:
yyyyMMdd'T'HH:mm:ss.SSSXXXoryyyyMM'T'HH:mm:ss.SSSXXX - The New Info Date field includes the year, month, and day (for example,
yyyy-MM-dd). For all other date fields, Vault does not require a minimum level of precision and will import the date even if the year, month, or day is missing.
- ISO 8601:
- Adheres to all validation requirements
- Multi-case CSV files with assessments and assessment results must follow a specific format:
- Adverse events and assessments/assessment results must be on different rows.
- There must be an
Adverse Event IDcolumn to map assessments and assessment results to the corresponding Adverse Event.
- CSV files for VAERS symptoms must follow a specific format:
- The VAERS format allows up to five symptoms per row. Subsequent symptoms should continue in a new row with the same VAERS ID.
- The column names must follow the SYMPTOM# and SYMPTOMVERSION# naming convention. For example, “SYMPTOM1” and “SYMPTOMVERSION1”. Vault maps the VAERS data to Inbox Items based on the naming convention. For example, SYMPTOM1 and SYMPTOM2 data are mapped to two records.
- ZIP files
-
- No empty files
- Do not contain more than 50 CSV files
- File size is equal to or less than 50 MB
- The number of cases per multi-case file does not exceed 1,000
Note: To import multiple CSV files with overlapping cases, we recommend importing multiple CSV files individually. Vault promotes Inbox Items asynchronously rather than in sequence, which may cause promotion failures.
Create Inbox Items from a Multi-Case File
To create Inbox Items from a multi-case file:
- Upload the file to your Library.
- Ensure the document type is Case > Source > Adverse Event Report (AER), and the Tabular Data Format field is populated.
- Optional: Populate the Receipt Date document field to specify the New Info Date value on all Inbox Items generated from the document. If your Admin has defined an Import Code Mapping with a field mapping for the New Info Date, Vault populates the Receipt Date based on the mapping regardless of the Receipt Date document field value.
- From the All Actions menu, select Create Inbox Item.
If any of the criteria are not met, an error message appears and the document moves to the Error state. When uploading a ZIP file, Vault unzips the file into individual CSV documents and performs validation on each.
Multi-Case File Import Validation
After running the Create Inbox Item action, Vault validates the following:
- The files’ encoding matches the Tabular Data Format’s Encoding field value, if specified. If the encoding differs or is blank, Vault defaults to UTF-8.
- If the Case Contact type is not specified, Vault imports the Case Contact data to the Reporter object type.
- If the Country on the selected Tabular Data Format is specified, Vault maps to the Event Country and Reporter Country fields on the Inbox Item. Otherwise, these fields are populated with the source file data based on the mapping.
The following requirements apply to ZIP file import:
- The selected Tabular Data Format must contain a source file mapping to the Case (
case_version__v) object. Otherwise, Vault does not import the document and moves it to the Error state. - If a CSV file is specified as a source file for the selected Tabular Data Format, it must exist in the ZIP file being imported. Otherwise, Vault does not import the document and moves it to the Error state.
- If CSV files are specified as source files for the selected Tabular Data Format, Vault only validates these files during ZIP import and will ignore all other files present. If unspecified CSV files are present in the ZIP being imported, Vault logs this as a global warning in the import log.
Vault also detects any duplicate records (rows) for Case Products, Dosages, Indications, and Adverse Events for a given Case ID and keeps only one copy.
Multi-Case File Import Mapping
If validation is successful, Vault creates a document for each unique Case ID with the Case > Source > Adverse Event Report (AER) classification. When importing a ZIP file, if multiple column headers across different CSV files have the same record ID and are mapped to the same object and field, Vault groups this data in the same record (if not duplicates). Similarly, Vault groups parent and child record data together if the parent ID column header is mapped to the parent object and field as well as to the child object.
For each single-case document, Vault creates an Inbox Item and imports the data to the Inbox Item fields based on the selected Tabular Data Format. Imported data includes standard fields and the following supported objects:
- Case
- Case Adverse Event
- Case Assessment
- Case Assessment Result
- Case Drug History (includes support for Parent Information types of Cases)
- Case Drug History Substance (includes support for Parent Information types of Cases)
- Case Medical History (includes support for Parent Information types of Cases)
- Case Product
- Case Product Device Code
- Case Product Dosage
- Case Product Indication
- Case Product Substance
- Case Test Results
- Reporter Case Contact
On the Inbox Item, Vault sets the Intake Method to Import and the Intake Format to Tabular Data. Upon import completion, Vault attaches an import log to each multi-case CSV source file and you receive a Vault notification and an email. Vault also links the single-case documents in the parent multi-case files under the Relationship > Single-Case Document section and the parent multi-case file under the Relationship > Multi-Case Document section in each single-case document.
Note: Vault ignores imported data for unsupported objects and fields.
Multi-Case Import Log
Vault generates a multi-case import log after creating the Inbox Items, which you can find on the Attachments section of the Document Files () panel on the file’s Doc Info pane in your Library. The log includes the status and the following details, as applicable:
- Global Warnings: Issues affecting multiple cases.
- Global Errors: Document creation failure for a single case or CSV file data extraction failure.
- Single-Case Warnings: Multiple values specified for one case field for the same Case ID or unsupported date formats.
- Single-Case Errors: If validation errors occur for a single case, the import process continues for the other cases. Vault includes an error message in the import log for the cases that failed to import.
Verify Imported Inbox Items
Upon E2B and Vault API import, Vault verifies the Inbox Items. Records and sections with no validation errors are marked as Verified. If there are validation errors or mapping issues, you can manually update Inbox Item fields and verify the records. To edit or manually verify an Inbox Item:
- Navigate to the Inbox Item that you want to verify.
- Review the imported data. The Source Data pane displays mapped source values.
- Optional: Manually update Inbox Item fields.
- After confirming the Inbox Item is a valid case, select the Promote to Case action. If there is any invalid data, Vault displays a window listing the affected sections.
- If applicable, navigate to each section with invalid data. Vault displays the number of records with invalid data in the top right of the Case Contact, Product, and Event sections. Review and correct the errors for each applicable section and record, then verify the updated data:
- Select Edit to edit a field or address suggestions.
- Select Delete to remove a section.
- Select Verify to mark a section as verified. You cannot verify any section with invalid data.
Import Source Data Pane
When you import an Inbox Item from an E2B file or integration with an upstream system, the Source Data pane shows the field values mapped from the file. The pane displays both short text and long text for structured data. If any imported values map to inactive records, the pane displays the values but are blank in the corresponding Inbox Item field. For Inbox Items for Studies, Vault displays an information ( ) icon next to the Study value to indicate the study number in the E2B file matches a Study in your Vault through a Study Number Alias. Hover over the icon to see the matched alias.