Learn how to configure your Vault to share documents with partner organizations and track their progress.
About the Feature
With the 24R1 release, SafetyDocs enables users to distribute documents to assigned recipients via email and track their progress within Vault. Users initiate this process by selecting an action on the applicable PVA Activity or PVA Action Item, allowing for an efficient way to share documents and track compliance with PVA mandates.
For more information, see Distribute PVA Documents via Email.
Note: This feature is best used in combination with PVA Document Distribution via Vault Task. We recommend configuring both features together. For more information, see Enable PVA Document Distribution via Vault Task.
Configure Layouts
Layouts are managed through Admin > Configuration > Objects > [Object] > Layouts.
PV Agreement Layout
Go to Objects > PV Agreement > Layouts > PV Agreement Detail Page Layout and complete the procedures described in this section to update the PV Agreement layout.
Insert the PVA Documents for Distribution Section
Complete the following steps to insert this section:
- On the PV Agreement Detail Page Layout, hover over the area where you want to insert a new section and select the Plus icon.
- Select Insert Section.
- In the Select Section Type dialog, select Related Object and then select Continue.
- In the Add Related Object Section dialog, complete the fields as follows:
- Related Object: Select PVA Document for Distribution.
- Section Label: Enter “PVA Documents for Distribution”.
- Section Name: Enter “pva_documents_for_distribution”.
- Creation Option: Select Create record in pop-up dialog.
- Select Done.
- In the PVA Documents for Distribution section, select Edit Default Columns and ensure the following columns are added:
- Name
- Document for Distribution
- Sent Date (System Managed)
- Link Expiry Date (System Managed)
- Select Save.
Insert the PVA Document Distribution Events Section
Complete the following steps to insert this section:
- On the PV Agreement Detail Page Layout, hover over the area where you want to insert a new section and select the Plus icon.
- In the Select Section Type dialog, select Related Object and then select Continue.
- In the Add Related Object Section dialog, complete the fields as follows:
- Related Object: Select PVA Document Distribution Event.
- Section Label: Enter “PVA Document Distribution Events”.
- Section Name: Enter “pva_document_distribution_events”.
- Creation Option: Select Prevent record creation.
- Select Done.
- In the PVA Document Distribution Events section, select Edit Default Columns and ensure the following columns are added:
- Name
- Event Details
- Event Time
- Event Type
- Recipient
- Email Message ID
- Select Save.
PVA Activity Layout
Go to Objects > PVA Activity > Layouts > PVA Activity Detail Page Layout and complete the configuration described in this section.
Add Field to the Details Section
On the PVA Activity Detail Page Layout, in the Details section, add the Activity Type field and select Save.
Insert the Distribution Details Section
Complete the following steps to insert this section:
- On the PVA Activity Detail Page Layout, hover over the area where you want to insert a new section and select the Plus icon.
- Select Insert Section.
- In the Select Section Type dialog, select Detail Form and then select Continue.
- In the Add Detail Section dialog, complete the fields as follows:
- Section Label: Enter “Distribution Details”.
- Section Name: Enter “distribution_details”.
- Section Layout: Select Detail Form - One Column.
- Select Done.
- In the Details section, remove the Delivery Method field.
- In the Distribution Details section, select Add to add the following fields and select Save:
- Delivery Method
- Message Subject
- Message Body
Insert the PVA Documents for Distribution Section
Complete the following steps to insert this section:
- On the PVA Activity Detail Page Layout, hover over the area where you want to insert a new section and select the Plus icon.
- Select Insert Section.
- In the Select Section Type dialog, select Related Object and then select Continue.
- In the Add Related Object Section dialog, complete the fields as follows:
- Related Object: Select PVA Document for Distribution.
- Section Label: Enter “PVA Documents for Distribution”.
- Section Name: Enter “pva_documents_for_distribution”.
- Creation Option: Select Create record in pop-up dialog.
- Select Done.
- In the PVA Documents for Distribution section, select Edit Default Columns and ensure the following columns are added:
- Name
- Document for Distribution
- Sent Date (System Managed)
- Link Expiry Date (System Managed)
- PVA Action Item
- Select Save.
Insert the PVA Document Distribution Events Section
Complete the following steps to insert this section:
- On the PVA Activity Detail Page Layout, hover over the area where you want to insert a new section and select the Plus icon.
- Select Insert Section.
- In the Select Section Type dialog, select Related Object and then select Continue.
- In the Add Related Object Section dialog, complete the fields as follows:
- Related Object: Select PVA Document Distribution Event.
- Section Label: Enter “PVA Document Distribution Events”.
- Section Name: Enter “pva_document_distribution_events”.
- Creation Option: Select Prevent record creation.
- Select Done.
- In the PVA Document Distribution Events section, select Edit Default Columns and ensure the following columns are added:
- Name
- Event Time
- Event Type
- Recipient
- Select Save.
Add PVA Activity Layout Rules
On the PVA Activity Detail Page Layout, select Layout Rules and then select Create to create the following rules:
Inbound Activity
Complete the fields as follows and select Save:
- Label: Inbound Activity
- Name: inbound_activity
- IF this Layout Rule Expression is TRUE:
activity_type__v = Picklist.pva_distribution_type__v.inbound__v - Apply the following display effects:
| Effect | Type | Values |
|---|---|---|
| Hide | Sections | Distribution Details, PVA Documents for Distribution, PVA Document Distribution Events |
Outbound Activity
Complete the fields as follows and select Save:
- Label: Outbound Activity
- Name: outbound_activity
- IF this Layout Rule Expression is TRUE:
activity_type__v = Picklist.pva_distribution_type__v.outbound__v - Apply the following display effects:
| Effect | Type | Values |
|---|---|---|
| Display As Required | Fields | Delivery Method |
Email Outbound
Complete the fields as follows and select Save:
- Label: Email Outbound
- Name: email_outbound
- IF this Layout Rule Expression is TRUE:
delivery_method__v = Picklist.pva_communication_method__v.email__v - Apply the following display effects:
| Effect | Type | Values |
|---|---|---|
| Display As Required | Fields | Message Subject, Message Body |
Non-Email Outbound
Complete the fields as follows and select Save:
- Label: Non-Email Outbound
- Name: nonemail_outbound
- IF this Layout Rule Expression is TRUE:
delivery_method__v != Picklist.pva_communication_method__v.email__v - Apply the following display effects:
| Effect | Type | Values |
|---|---|---|
| Hide | Sections | PVA Document Distribution Events |
| Hide | Fields | Message Subject, Message Body |
PVA Action Item Layout
Go to Objects > PVA Action Item > Layouts > PVA Action Item Detail Page Layout and complete the configuration described in this section.
Add Field to the Details Section
On the PVA Action Item Detail Page Layout, in the Details section, add the Activity Type field and select Save.
Insert the Distribution Details Section
Complete the following steps to insert this section:
- On the PVA Action Item Detail Page Layout, hover over the area where you want to insert a new section and select the Plus icon.
- Select Insert Section.
- In the Select Section Type dialog, select Detail Form and then select Continue.
- In the Add Detail Section dialog, complete the fields as follows:
- Section Label: Enter “Distribution Details”.
- Section Name: Enter “distribution_details”.
- Section Layout: Select Detail Form - One Column.
- Select Done.
- In the Distribution Details section, select Add to add the following fields and select Save:
- Message Subject
- Message Body
Insert the PVA Documents for Distribution Section
Complete the following steps to insert this section:
- On the PVA Action Item Detail Page Layout, hover over the area where you want to insert a new section and select the Plus icon.
- Select Insert Section.
- In the Select Section Type dialog, select Related Object and then select Continue.
- In the Add Related Object Section dialog, complete the fields as follows:
- Related Object: Select PVA Document for Distribution.
- Section Label: Enter “PVA Documents for Distribution”.
- Section Name: Enter “pva_documents_for_distribution”.
- Creation Option: Select Create record in pop-up dialog.
- Select Done.
- In the PVA Documents for Distribution section, select Edit Default Columns and ensure the following columns are added:
- Name
- Document for Distribution
- Sent Date (System Managed)
- Link Expiry Date (System Managed)
- Select Save.
Insert the PVA Document Distribution Events Section
Complete the following steps to insert this section:
- On the PVA Action Item Detail Page Layout, hover over the area where you want to insert a new section and select the Plus icon.
- Select Insert Section.
- In the Select Section Type dialog, select Related Object and then select Continue.
- In the Add Related Object Section dialog, complete the fields as follows:
- Related Object: Select PVA Document Distribution Event.
- Section Label: Enter “PVA Document Distribution Events”.
- Section Name: Enter “pva_document_distribution_events”.
- Creation Option: Select Prevent record creation.
- Select Done.
- In the PVA Document Distribution Events section, select Edit Default Columns and ensure the following columns are added:
- Name
- Event Time
- Event Type
- Recipient
Add PVA Action Item Layout Rules
On the PVA Action Item Detail Page Layout, select Layout Rules and then select Create to create the following rules:
Inbound Activity
Complete the fields as follows and select Save:
- Label: Inbound Activity
- Name: inbound_activity
- IF this Layout Rule Expression is TRUE:
activity_type__v= Picklist.pva_distribution_type__v.inbound__v - Apply the following display effects:
| Effect | Type | Values |
|---|---|---|
| Hide | Sections | Distribution Details, PVA Documents for Distribution, PVA Document Distribution Events |
Email Outbound
Complete the fields as follows and select Save:
- Label: Email Outbound
- Name: email_outbound
- IF this Layout Rule Expression is TRUE:
activity_type__v= Picklist.pva_distribution_type__v.outbound__v && contact_communication_method__c = Picklist.pva_communication_method__v.email__v - Apply the following display effects:
| Effect | Type | Values |
|---|---|---|
| Display As Required | Fields | Message Subject, Message Body |
Non-Email Outbound
Complete the fields as follows and select Save:
- Label: Non-Email Outbound
- Name: nonemail_outbound
- IF this Layout Rule Expression is TRUE:
activity_type__v= Picklist.pva_distribution_type__v.outbound__v && contact_communication_method__c != Picklist.pva_communication_method__v.email__v - Apply the following display effects:
| Effect | Type | Values |
|---|---|---|
| Hide | Fields | Message Subject, Message Body |
PVA Document for Distribution Layout
Go to Objects > PVA Document for Distribution > Layouts > PVA Document for Distribution Detail Page Layout and complete the configuration described in this section.
Add Fields to the Details Section
On the PVA Document for Distribution Detail Page Layout, in the Details section, add the following fields and select Save:
- Document for Distribution
- PV Agreement
- PVA Activity
- PVA Action Item
Insert the System Section
Complete the following steps to insert this section:
- On the PVA Document for Distribution Detail Page Layout, hover over the area where you want to insert a new section and select the Plus icon.
- Select Insert Section.
- In the Select Section Type dialog, select Detail Form and then select Continue.
- In the Add Detail Section dialog, complete the fields as follows:
- Section Label: Enter “System”.
- Section Name: Enter “system”.
- Section Layout: Select Detail Form - Two Columns.
- Select Done.
- In the System section, select Add to add the following fields and select Save:
- Created By
- Created Date
- Token (System Managed)
- Sent Date (System Managed)
- Last Modified By
- Last Modified Date
- Link Expiry Date (System Managed)
- Email Message ID
PVA Document Distribution Event Layout
Go to Objects > PVA Document Distribution Event > Layouts > PVA Document Distribution Event Detail Page Layout and complete the configuration described in this section.
Add Fields to the Details Section
On the PVA Document Distribution Event Detail Page Layout, in the Details section, add the following fields and select Save:
- PVA Activity
- PVA Action Item
- Recipient
- Event Type
- Event Time
- Event Details
Insert the System Section
Complete the following steps to insert this section:
- On the PVA Document Distribution Event Detail Page Layout, hover over the area where you want to insert a new section and select the Plus icon.
- Select Insert Section.
- In the Select Section Type dialog, select Detail Form and then select Continue.
- In the Add Detail Section dialog, complete the fields as follows:
- Section Label: Enter “System”.
- Section Name: Enter “system”.
- Section Layout: Select Detail Form - Two Columns.
- Select Done.
- In the System section, select Add to add the following fields and select Save:
- Created By
- Created Date
- Status
- PV Agreement
- Last Modified By
- Last Modified Date
- Email Message ID
Add the Distribute PVA Document(s) Action
Complete the following steps to add an action to the PVA Activity and PVA Action Item objects:
- Go to Configuration > Objects > PVA Activity.
- In the Actions tab, select Create.
- In the Create Action dialog, select Distribute PVA Document(s) and then select Continue.
- On the Create Action page, complete the fields as follows and select Save:
- Label: Enter “Distribute PVA Document(s)”.
- Name: Enter “distribute_pva_documents”.
- Repeat these steps for the PVA Action Item object.
Add Default Values to Objects
Complete the following steps to add default values for the Message Subject and Message Body fields on the PVA Activity and PVA Action Item objects:
Note: The following default values are only recommendations. Make sure to edit them based on your organization’s verbiage and processes for PVA distributions.
- Go to Configuration > Objects > PVA Activity.
- In the Fields tab, select Message Subject.
- Select Edit.
- In the Default Value section, enter
"PVA Document Distribution". - Select Save.
- Return to the Fields tab and select Message Body.
- Select Edit.
- In the Default Value section, enter the following message:
"Dear ${Custom.RecipientName},<br> <br> You have been sent documents under the terms of a pharmacovigilance agreement.<br> Document(s) can be accessed here: ${Custom.AccessLink} <br> This link will be active until ${Custom.AccessLinkExpiry}.<br><br> Please reply to acknowledge receipt.<br> Thank you!" - Select Save.
- Repeat these steps for the PVA Action Item object.
Add Custom Sharing Rule on the PVA Document for Distribution Object
Complete the following steps to add a custom sharing rule to allow PVA Documents to be shared with users with the Editor role:
- Go to Admin > Configuration > Objects > PVA Document for Distribution.
- In the Sharing Rules tab, select Create.
- On the New Sharing Rule page, in the Label field, enter “All PVA Distributions” and select Save.
- In the Roles section, select Add.
- In the Add Manual Assignment dialog, complete the fields as follows and select Save:
- Role: Select Editor.
- Users and Groups: Select PVA Users.
Update the PVA Actions Permission Set
Complete the following steps to update permissions and grant access to this feature:
- Go to Admin > Users & Groups > Permission Sets > PVA Actions.
- On the Objects tab, select Edit and grant permissions as follows:
| Object | Permissions |
|---|---|
| PVA Document for Distribution | Read, Create, Edit, Delete |
| PVA Document Distribution Event | Read |
Update the PVA Activity Outbound Workflow
See Enable PVA Document Distribution via Vault Task for information on how to set up this workflow for document distribution procedures. Use the instructions as a guide but configure the workflow according to your organization’s requirements.
Configure Object Lifecycles
Use the procedures in this section to update object lifecycles as needed for this feature.
Configure Settings on the PVA Activity Lifecycle
Go to Configuration > Object Lifecycles > PVA Activity Lifecycle and complete the configuration described in this section.
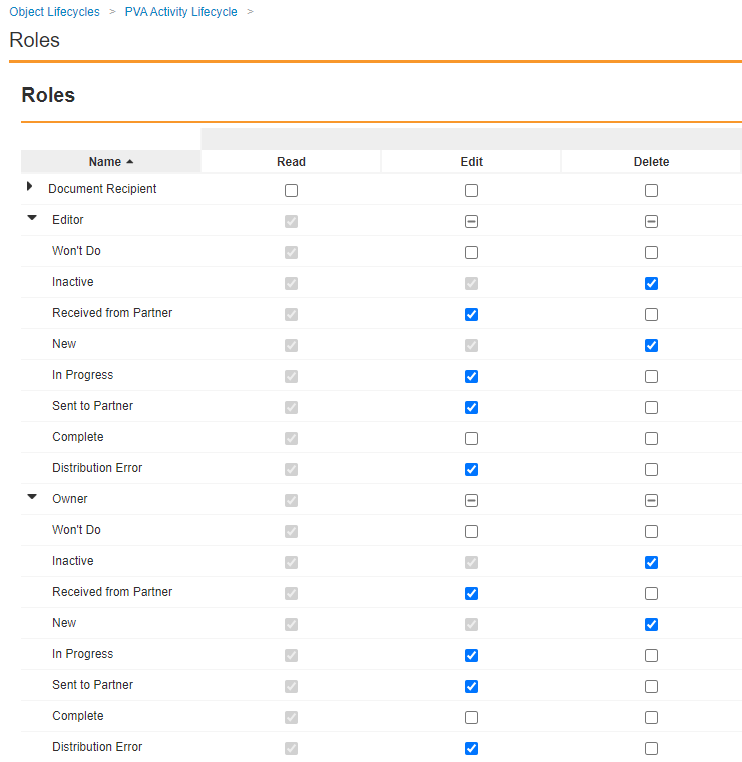
Update Role Permissions
In the Roles section, grant Edit permissions to the Editor and Owner roles on the following states:
- Received From Partner
- In Progress
- Sent to Partner
- Distribution Error
Create User Actions on the Distribution Error State
Complete the following steps to create user actions on this state:
- In the States section, select Distribution Error.
- On the Distribution Error page, in the User Actions section, select Edit.
- Select Create Rule and create the following rules:
Rule 1: Retry Document Distribution via Email
- Perform with conditions > If Activity Type > equals > Outbound
- Add condition > If > Delivery Method > equals > Email
- Allow the following actions > Distribute PVA Document(s)
- Action Label: Enter “Retry Document Distribution via Email”
Rule 2: Cancel Activity or Mark Complete
- Always > Allow the following actions > Change State to > Won’t Do
- Action Label: Enter “Cancel Activity”
- Add Action > Change State to > Complete
- Action Label: Enter “Mark Complete”
Configure Settings on the PVA Action Item Lifecycle
Go to Configuration > Object Lifecycles > PVA Action Item Lifecycle and complete the configuration described in this section.
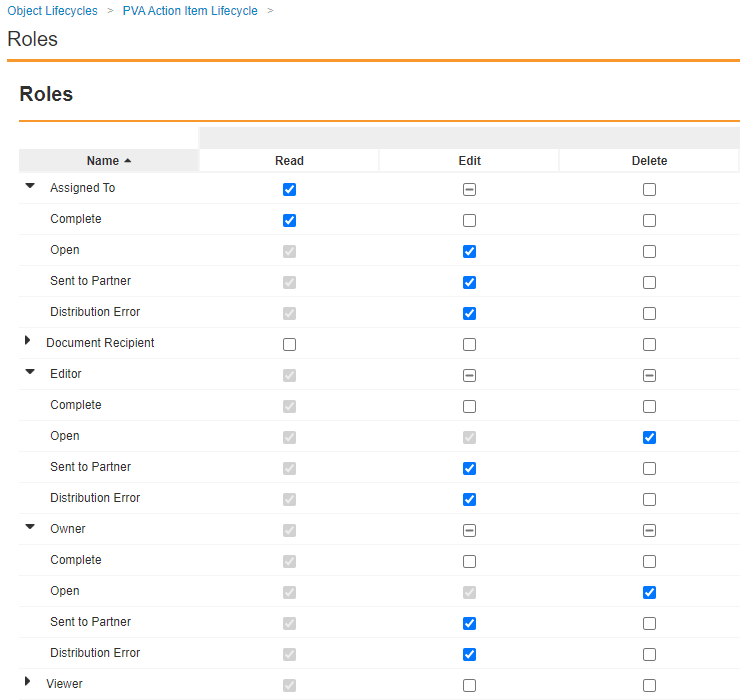
Update Role Permissions
Complete the following steps to update access for relevant roles:
- In the Roles section, grant Edit permissions to the Assigned To, Editor, and Owner roles on the following states:
- Open
- Sent to Partner
- Distribution Error
- Remove Edit and Delete permissions for the Assigned To, Editor, and Owner roles on the Complete state.
Create a User Action on the Open State
Complete the following steps to create a user action on this state:
- In the States section, select Open.
- On the Open page, in the User Actions section, select Edit.
- Select Create Rule and create the following rule:
- Perform with conditions > If Contact Communication Method > equals > Email
- Allow the following actions > Distribute PVA Document(s)
- Action Label: Enter “Send Document(s) via Email”
Create User Actions on the Distribution Error State
Complete the following steps to create user actions on this state:
- In the States section, select Distribution Error.
- On the Distribution Error page, in the User Actions section, select Edit.
- Select Create Rule and create the following rules:
Rule 1: Retry Email Distribution
- Perform with conditions > If Contact Communication Method > equals > Email
- Allow the following actions > Distribute PVA Document(s)
- Action Label: Enter “Retry Email Distribution”
Rule 2: Mark Complete or Back to Open
- Always > Allow the following actions > Change State to > Complete
- Action Label: Enter “Mark Complete”
- Add Action > Change State to > Open
- Action Label: Enter “Back to Open”
Create a User Action on the Sent to Partner State
Complete the following steps to create a user action on this state:
- In the States section, select Sent to Partner.
- On the Sent to Partner page, in the User Actions section, select Edit.
- Select Create Rule and create the following rule:
- Always > Allow the following actions > Change State to > Complete
- Action Label: Enter “Mark Complete”