Learn how to configure your Vault to support aggregate reporting features in SafetyDocs.
About the Feature
With the 24R1 release, SafetyDocs supports managing the end-to-end process of aggregate report authoring. You can divide your reports into Sections based on deliverables to different Aggregate Report Destinations and track their authoring progress in your Vault. These sections can also be created from default or customizable templates to increase the efficiency of your authoring process.
This page covers the enablement instructions for the following Aggregate Reporting features:
- Aggregate Report Authoring
- Aggregate Report Template Management
- Aggregate Reporting: Extract Report to Document
To configure the Aggregate Reporting: Combine Tabulations and Authoring feature, see Enable Generating Tabulations Using Aggregate Report Sections.
Overview
To configure Aggregate Report Management in your Vault, you must:
- Configure Aggregate Report Sections
- Configure Aggregate Report Destinations
- Configure Aggregate Report Templates
- Configure Aggregate Report Template Items
- Configure Aggregate Reports
- Configure Security
- Configure Reports
Configure Aggregate Report Sections
The following sections explain how to set up Aggregate Report Sections in your Vault.
Update Labels
Starting in 24R1, Aggregate Report Tasks are called Aggregate Report Sections. Complete the following steps to update this label across your Vault:
- Go to Admin > Configuration > Objects > Aggregate Report Task.
- Select Edit and update the fields as follows:
- Object Label: Enter “Aggregate Report Section”
- Object Plural Label: Enter “Aggregate Report Sections”
- Select Save.
- On the Object Types tab, select Authoring Task.
- Select Edit and update the fields as follows:
- Label: Enter “Authoring Section”
- Plural Label: Enter “Authoring Sections”
- Select Save.
- On the Fields tab, select Aggregate Report Task Type.
- Select Edit and in the Label field, enter “Aggregate Report Section Type”.
- Select Save.
- On the Fields tab, select Task Order.
- Select Edit and in the Label field, enter “Section Order”.
- Select Save.
- Go to Admin > Configuration > Object Lifecycles > Aggregate Report Task.
- Select Edit and in the Label field, enter “Aggregate Report Section”.
- Select Save.
Configure the Aggregate Report Section Layout
Go to Admin > Configuration > Objects > Aggregate Report Section > Layouts > Aggregate Report Section Detail Page Layout and configure the sections on this layout as follows:
Details Section
In the Details section, add the following fields:
- Name
- Aggregate Report
- Aggregate Report Section Type
- Aggregate Report Destination
- Description
- Source Report
- Report Format
- Source Report Prompt
- Report Document
- Assigned To
- Due Date
- Complete
- Completion Date
Documents Section
Complete the following steps to add and configure this section:
- Under the Details section, select the Plus icon and select Insert Section.
- In the Select Section Type dialog, select Related Documents and then select Continue.
- On the Add Related Document Section dialog, complete the fields as follows and then select Done:
- Referencing Document Field: Select Aggregate Report Section
- Section Label: Enter “Documents”
- Section Name: Enter “documents”
System Section
Complete the following steps to add and configure this section:
- Under the Documents section, select the Plus icon and select Insert Section.
- In the Select Section Type dialog, select Detail Form and then select Continue.
- On the Add Detail Section dialog, complete the fields as follows and then select Done:
- Section Label: Enter “System”
- Section Name: Enter “system”
- Section Layout: Select Detail Form - Two Columns
- In the new System section, add the following fields:
- Created By
- Created Date
- Last Modified By
- Last Modified Date
- Move the existing Document to Generate field from the Details section to this section.
Configure Action to Generate Vault Report Document
Complete the following steps to configure an action on the Aggregate Report Section object to generate documents from Vault reports:
- Go to Admin > Configuration > Objects > Aggregate Report Section > Actions and select Create.
- In the Create Action dialog, select Generate Vault Report Document and then select Continue.
- On the Create Action page, enter a Label and Name for the action.
- Select Save.
Add Action to the Vault Report Object Type
Complete the following steps to associate this action with the Vault Report object type of the Aggregate Report Section object. This enables users to initiate the action from Vault Report type Sections.
- In the Aggregate Report Section object, go to the Object Types tab.
- In the top-right corner, select Actions.
- From the Actions menu, select Edit Object Type Actions.
- For the Vault Report object type, select the Generate Vault Report Document checkbox.
- For all other object types, clear the Generate Vault Report Document checkbox.
- Select Save.
Configure the Aggregate Report Section Assignment Workflow
Complete the following steps to configure a workflow for assigning Aggregate Report Sections. Use these steps as a starting point, but configure your workflows according to your business processes:
- Go to Admin > Configuration > Workflows and select Create.
- In the Create Workflow dialog, select Object Workflow and then select Continue.
- On the Create Workflow page, complete the fields as follows:
- Label: Enter “Aggregate Report Section Assignment”
- Lifecycle: Select Aggregate Report Section Lifecycle
- Select Save.
- Use the following image and the sections below as a guide to configure the workflow and then select Make configuration active.
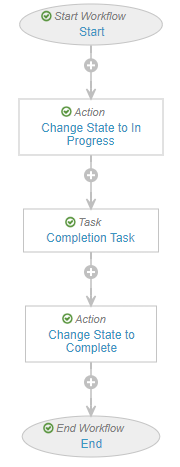
Start Workflow: Start Step
In the Start Options section, select Add Control to add the following controls:
-
Control 1: Instructions
- In the Instructions field, enter text to explain to users that starting this workflow will assign the related Aggregate Report Section to the person responsible for completing it.
-
Control 2: Participants
- In the Participant Label field, enter “Assigned To”.
- Select the Use roles as participants option.
- In the Roles allowed to participate field, select Assigned To.
-
Control 3: Date
- In the Label field, enter “Due Date”.
- Configure the Default Value according to your organization’s requirements.
Action: Change State to In Progress Step
Select Create Rule to add the following rule:
- Always > Change State > In Progress
Task: Completion Task Step
In the General Settings section, complete the fields as follows:
- Task Label: Enter “Complete Aggregate Report Section”.
- Assign Task To: Select Assigned To.
- Select the Assign to all users in participant group option.
- Instructions: Enter task instructions.
- Task Requirement: Select Required.
In the Due Date section, complete the following field:
- Due Date: Select Due Date + 0 Days
Action: Change State to Complete Step
Select Create Rule to add the following rule:
- Always >
- Update field > Complete >
Set to Value:
TRUE - Update field > Completion Date >
Set to Value:
today() - Change State > Complete
- Update field > Complete >
Set to Value:
Update the Aggregate Report Section Object Lifecycle
Go to Admin > Configuration > Object Lifecycles > Aggregate Report Section Lifecycle and make the following updates.
Update State Type
Complete the following steps to change the state associated with the Initial State state type from Active to Open:
- In the State Types section, select Initial State.
- Select Edit.
- In the State field, select Open and then select Save.
Add User Actions
Complete the following steps to add user actions to different lifecycle states:
- Go to the User Actions section of each lifecycle state mentioned in the table below and select Edit > Create Rule.
- Configure user actions according to the following table and then select Save:
| Lifecycle State | User Action |
|---|---|
| Open |
|
| In Progress |
|
| Inactive |
|
Add Entry Actions
Complete the following steps to add entry actions to the Complete lifecycle state:
- In the States section, go to Complete.
- In the Entry Actions section, select Edit > Create Entry Action.
- Create the following actions and select Save:
- Always > Update field > Complete >
TRUE - Always > Update field > Completion Date >
today() - Always > Change related document lifecycle state > Report Document > Steady State
- Always > Update field > Complete >
Update Role Permissions
Complete the following steps to grant permissions on various roles within this lifecycle. This is a recommendation only. Configure permissions according to your organization’s business processes.
- In the Roles section, select Edit.
- Grant permissions as follows:
- Aggregate Report Writer
- In Progress: Read, Edit
- Open: Read, Edit, Delete
- Complete: Read
- Inactive: Read, Edit
- Active: Read, Edit
- Assigned To: Same permissions as the Editor role. We recommend the following:
- In Progress: Read, Edit
- Open: Read, Edit, Delete
- Complete: Read
- Inactive: Read, Edit, Delete
- Active: Read, Edit, Delete
- Owner
- In Progress: Read, Edit, Delete
- Open: Read, Edit, Delete
- Complete: Read
- Inactive: Read, Edit, Delete
- Active: Read, Edit, Delete
- Aggregate Report Writer
- Select Save.
Configure Lifecycle Stage Groups
The following sections describe how to create lifecycle stage groups for this object and associate them with states.
Create the Aggregate Report Section - Authoring Section Stage Group
Complete the following steps to create this group and associate its stages with states:
- Go to Admin > Configuration > Lifecycle Stage Groups and select Create.
- In the Create Lifecycle Stage Group dialog, select Object Stage Group and then select Continue.
- On the Create Lifecycle Stage Group page, complete the fields as follows and select Save:
- Stage Group Label: Enter “Aggregate Report Section - Authoring Section”
- Object Lifecycle: Select Aggregate Report Section Lifecycle
- Object Type: Select Authoring Section
- Select Save.
- On the Aggregate Report Section - Authoring Section page, in the Stages section, select Create and create the following stages in order:
- Open
- In Progress
- Complete
- Add states to each stage according to the table below. To add a state, go to [Stage] > States and select Add. Then select the Plus icon next to the state you want to add and select OK.
| Stage | State to Add |
|---|---|
| Open | Open |
| In Progress | In Progress |
| Complete | Complete |
Configure the Aggregate Report Section - Vault Report Stage Group
Complete the following steps to create this group and associate its stages with states:
- Go to Admin > Configuration > Lifecycle Stage Groups and select Create.
- In the Create Lifecycle Stage Group dialog, select Object Stage Group and then select Continue.
- On the Create Lifecycle Stage Group page, complete the fields as follows and select Save:
- Stage Group Label: Enter “Aggregate Report Section - Vault Report”
- Object Lifecycle: Select Aggregate Report Section Lifecycle
- Object Type: Select Vault Report
- Select Save.
- On the Aggregate Report Section - Vault Report page, in the Stages section, select Create and create the following stages in order:
- Open
- In Progress
- Complete
- Add states to each stage according to the table below. To add a state, go to [Stage] > States and select Add. Then select the Plus icon next to the state you want to add and select OK.
| Stage | States to Add |
|---|---|
| Open | Open, Active |
| In Progress | In Progress |
| Complete | Complete |
Update the Default Object Type
Complete the following steps to update this object’s default object type to Authoring Section:
- Go to Admin > Configuration > Objects > Aggregate Report Section > Details.
- Select Edit.
- In the Default Object Type field, select Authoring Section.
- Select Save.
Inactivate the Base Aggregate Report Section Object Type
Complete the following steps to inactivate this object type so that your Vault is updated with the new functionality:
- Go to Admin > Configuration > Objects > Aggregate Report Section > Object Types.
- Select Base Aggregate Report Section.
- Select Edit.
- In the Status field, select Inactive.
- Select Save.
Add Field VQL
Complete the following steps to add Criteria VQL to the Report Document fields on this object:
- Go to Admin > Configuration > Objects > Aggregate Report Section > Fields > [Field] and select Edit.
- Populate the Criteria VQL of each field according to the table below and select Save:
| Field | Criteria VQL |
|---|---|
| Report Document | type__v = 'Aggregate Reports' |
| Report Document (Masked) | type__v = 'Aggregate Reports' AND subtype__v = 'Summary Tabulation' AND classification__v != 'Log' |
| Report Document (Log) | type__v = 'Aggregate Reports' AND subtype__v = 'Summary Tabulation' AND classification__v = 'Log' |
Configure Aggregate Report Destinations
The following sections explain how to set up Aggregate Report Destinations in your Vault.
Update Field Label
Complete the following steps to update the label of the Health Authority Approval Date field to more accurately reflect its purpose:
- Go to Admin > Configuration > Objects > Aggregate Report Destination > Fields.
- Select Health Authority Approval Date.
- Select Edit.
- In the Label field, enter “Health Authority Received Date”.
- Optionally, enter the following text in the Help Content field: “Date the aggregate report was received by the respective health authority”.
- Select Save.
Update Lifecycle State Label
Complete the following steps to update the label of the HA Approved lifecycle state to more accurately reflect its purpose:
- Go to Admin > Configuration > Object Lifecycles > Aggregate Report Destination Lifecycle.
- In the States section, select HA Approved.
- In the Details section, Select Edit.
- In the State Label field, enter “HA Received” and select Save.
Configure the Aggregate Report Destination Layout
Go to Admin > Configuration > Objects > Aggregate Report Destination > Layouts > Aggregate Report Destination Detail Page Layout and configure the sections on this layout as follows:
Details Section
In the Details section, add the following fields:
- Name
- Aggregate Report
- Applicable Market
- Health Authority
- Planned Submission Date
- Actual Submission Date
- Health Authority Received Date
- Health Authority Decision Date
System Section
Complete the following steps to add and configure this section:
- Under the Details section, select the Plus icon and select Insert Section.
- In the Select Section Type dialog, select Detail Form and then select Continue.
- On the Add Detail Section dialog, complete the fields as follows and then select Done:
- Section Label: Enter “System”
- Section Name: Enter “system”
- Section Layout: Select Detail Form - Two Columns
- In the new System section, add the following fields:
- Created By
- Created Date
- Last Modified By
- Last Modified Date
Update the Aggregate Report Destination Object Lifecycle
Go to Admin > Configuration > Object Lifecycles > Aggregate Report Destination Lifecycle and make the following updates.
Update State Type
Complete the following steps to change the state associated with the Initial State state type from Active to Open:
- In the State Types section, select Initial State.
- Select Edit.
- In the State field, select Open and then select Save.
Add User Actions
Complete the following steps to add user actions to different lifecycle states:
- Go to the User Actions section of each lifecycle state mentioned in the table below and select Edit > Create Rule.
- Configure user actions according to the following table and then select Save:
| Lifecycle State | User Action |
|---|---|
| Open |
|
| In Progress |
|
| Complete |
|
| Submitted |
|
| Deferred |
|
| Inactive |
|
Add Entry Action
Complete the following steps to add an entry action to the HA Received lifecycle state:
- In the States section, go to HA Received.
- In the Entry Actions section, select Edit > Create Entry Action.
- Create the following action:
- Perform with conditions > Health Authority Received Date > is blank
- Update field > Health Authority Received Date >
today()
- Update field > Health Authority Received Date >
- Perform with conditions > Health Authority Received Date > is blank
- Select Save.
Configure the Aggregate Report Destination Stages Stage Group
Complete the following steps to create this group and associate its stages with states:
- Go to Admin > Configuration > Lifecycle Stage Groups and select Create.
- In the Create Lifecycle Stage Group dialog, select Object Stage Group and then select Continue.
- On the Create Lifecycle Stage Group page, complete the fields as follows and select Save:
- Stage Group Label: Enter “Aggregate Report Destination Stages”
- Object Lifecycle: Select Aggregate Report Destination Lifecycle
- Object Type: Select Base Aggregate Report Destination
- Select Save.
- On the Aggregate Report Section - Authoring Section page, in the Stages section, select Create and create the following stages in order:
- Open
- In Progress
- Submitted
- HA Received
- Add states to each stage according to the table below. To add a state, go to [Stage] > States and select Add. Then select the Plus icon next to the state you want to add and select OK.
| Stage | States to Add |
|---|---|
| Open | Open |
| In Progress | In Progress, Complete |
| Submitted | Submitted |
| HA Received | HA Received |
Add Field VQL
Complete the following steps to add Criteria VQL to the Health Authority field:
- Go to Admin > Configuration > Objects > Aggregate Report Destination > Fields > Health Authority and select Edit.
- In the Criteria VQL field, enter
object_type__vr.api_name__v = 'agency__v' - Select Save.
Configure Aggregate Report Templates
The sections below describe how to set up Aggregate Report Templates in your Vault.
Configure the Global Aggregate Report Template Layout
Complete the following steps to set up the layout for the Global Aggregate Report Template object type:
- Go to Admin > Configuration > Objects > Aggregate Report Template > Layouts.
- Select Create.
- On the Add Layout dialog, complete the fields as follows and select Done:
- Object Type: Select Global Aggregate Report Template
- Layout Label: Enter “Global Aggregate Report Template Detail Page Layout”
- Layout Name: Enter “global_aggregate_report_template_detail”
- Configure sections on the Global Aggregate Report Template Detail Page Layout as follows and select Save.
Details Section
In the Details section, add the following fields:
- Name
- Aggregate Report Type
- Aggregate Report Template Type
Aggregate Report Template Items Section
Complete the following steps to add and configure this section:
- Under the Details section, select the Plus icon and select Insert Section.
- In the Select Section Type dialog, select Related Object and then select Continue.
- On the Add Related Object Section dialog, complete the fields as follows and then select Done:
- Related Object: Select Aggregate Report Template Item
- Section Label: Enter “Aggregate Report Template Items”
- Section Name: Enter “aggregate_report_template_items”
- Ensure the following columns are added to the new Aggregate Report Template Items section:
- Name
- Item Order
- Aggregate Report Section Type
- Document Template
Local Aggregate Report Templates Section
Complete the following steps to add and configure this section:
- Under the Aggregate Report Template Items section, select the Plus icon and select Insert Section.
- In the Select Section Type dialog, select Related Object and then select Continue.
- On the Add Related Object Section dialog, complete the fields as follows and then select Done:
- Related Object: Select Aggregate Report Template
- Section Label: Enter “Local Aggregate Report Templates”
- Section Name: Enter “local_aggregate_report_templates”
- Ensure the following columns are added to the new Local Aggregate Report Templates section:
- Name
- Core Template
- Applicable Market
- Health Authority
System Section
Complete the following steps to add and configure this section:
- Under the Local Aggregate Report Templates section, select the Plus icon and select Insert Section.
- In the Select Section Type dialog, select Detail Form and then select Continue.
- On the Add Detail Section dialog, complete the fields as follows and then select Done:
- Section Label: Enter “System”
- Section Name: Enter “system”
- Section Layout: Select Detail Form - Two Columns
- In the new System section, add the following fields:
- Status
- Created By
- Created Date
- Last Modified By
- Last Modified Date
- Vault Safety UUID
Configure the Local Aggregate Report Template Layout
Complete the following steps to set up the layout for the Local Aggregate Report Template object type:
- Go to Admin > Configuration > Objects > Aggregate Report Template > Layouts.
- Select Create.
- On the Add Layout dialog, complete the fields as follows and select Done:
- Object Type: Select Local Aggregate Report Template
- Layout Label: Enter “Local Aggregate Report Template Detail Page Layout”
- Layout Name: Enter “local_aggregate_report_template_detail”
- Configure sections on the Local Aggregate Report Template Detail Page Layout as follows and select Save.
Details Section
In the Details section, add the following fields:
- Name
- Aggregate Report Type
- Aggregate Report Template Type
- Applicable Market
- Core Template
- Health Authority
Aggregate Report Template Items Section
Complete the following steps to add and configure this section:
- Under the Details section, select the Plus icon and select Insert Section.
- In the Select Section Type dialog, select Related Object and then select Continue.
- On the Add Related Object Section dialog, complete the fields as follows and then select Done:
- Related Object: Select Aggregate Report Template Item
- Section Label: Enter “Aggregate Report Template Items”
- Section Name: Enter “aggregate_report_template_items”
- Ensure the following columns are added to the new Aggregate Report Template Items section:
- Name
- Item Order
- Aggregate Report Section Type
- Document Template
System Section
Complete the following steps to add and configure this section:
- Under the Aggregate Report Template Items section, select the Plus icon and select Insert Section.
- In the Select Section Type dialog, select Detail Form and then select Continue.
- On the Add Detail Section dialog, complete the fields as follows and then select Done:
- Section Label: Enter “System”
- Section Name: Enter “system”
- Section Layout: Select Detail Form - Two Columns
- In the new System section, add the following fields:
- Status
- Created By
- Created Date
- Last Modified By
- Last Modified Date
- Vault Safety UUID
Update the Default Object Type
Complete the following steps to update this object’s default object type to Global Aggregate Report Template:
- Go to Admin > Configuration > Objects > Aggregate Report Template > Details.
- Select Edit.
- In the Default Object Type field, select Global Aggregate Report Template.
- Select Save.
Inactivate the Base Aggregate Report Template Object Type
Complete the following steps to inactivate this object type so that your Vault is updated with the new functionality:
- Go to Admin > Configuration > Objects > Aggregate Report Template > Object Types.
- Select Base Aggregate Report Template.
- Select Edit.
- In the Status field, select Inactive.
- Select Save.
Configure Aggregate Report Template Items
The sections below describe how to set up Aggregate Report Template Items in your Vault.
Configure the Aggregate Report Template Item Layout
Go to Admin > Configuration > Objects > Aggregate Report Template Item > Layouts > Aggregate Report Template Item Detail Page Layout and configure the sections on this layout as follows:
Details Section
In the Details section, add the following fields:
- Name
- Parent Template
- Aggregate Report Type
- Aggregate Report Section Type
- Item Order
- Report Format
- Source Report
- Source Report Prompt
- Document Template
System Section
Complete the following steps to add and configure this section:
- Under the Details section, select the Plus icon and select Insert Section.
- In the Select Section Type dialog, select Detail Form and then select Continue.
- On the Add Detail Section dialog, complete the fields as follows and then select Done:
- Section Label: Enter “System”
- Section Name: Enter “system”
- Section Layout: Select Detail Form - Two Columns
- In the new System section, add the following fields:
- Status
- Created By
- Created Date
- Last Modified By
- Last Modified Date
- Vault Safety UUID
- Move the existing Document to Generate field from the Details section to this section.
Update the Default Object Type
Complete the following steps to update this object’s default object type to Authoring Section:
- Go to Admin > Configuration > Objects > Aggregate Report Template Item > Details.
- Select Edit.
- In the Default Object Type field, select Authoring Section.
- Select Save.
Inactivate the Base Aggregate Report Template Item Object Type
Complete the following steps to inactivate this object type so that your Vault is updated with the new functionality:
- Go to Admin > Configuration > Objects > Aggregate Report Template Item > Object Types.
- Select Base Aggregate Report Template Item.
- Select Edit.
- In the Status field, select Inactive.
- Select Save.
Configure Aggregate Reports
The following sections explain how to update the Aggregate Report object in your Vault.
Add Fields to All Object Types
Complete the following steps to add fields to all the object types on the Aggregate Report object. This will ensure that the fields appear on all Aggregate Report Type records.
- Go to Admin > Configuration > Objects > Aggregate Report > Object Types.
- From the Actions menu, select Edit Object Type Fields.
- Ensure that the following fields are added to all the available object types:
- Earliest Submission Date
- External ID
- Select Save.
Configure the Aggregate Report Layout
Go to Admin > Configuration > Objects > Aggregate Report > Layouts > Aggregate Report Detail Page Layout and configure the sections on this layout as follows:
Details Section
Complete the following steps to configure this section:
- In the Details section, add the following fields:
- Aggregate Report Template
- Earliest Submission Date
- Remove the Documents to Generate field because this has been moved to the Aggregate Report Section object.
Aggregate Report Destinations Section
Complete the following steps to add and configure this section:
- Under the Details section, select the Plus icon and select Insert Section.
- In the Select Section Type dialog, select Related Object and then select Continue.
- On the Add Related Object Section dialog, complete the fields as follows and then select Done:
- Related Object: Select Aggregate Report Destinations
- Section Label: Enter “Aggregate Report Destinations”
- Section Name: Enter “aggregate_report_destinations”
- Ensure the following columns are added to the new Aggregate Report Destinations section:
- Name
- Applicable Market
- Health Authority
- Planned Submission Date
- Actual Submission Date
- Health Authority Received Date
Aggregate Report Sections Section
Complete the following steps to add and configure this section:
- Under the Aggregate Report Destinations section, select the Plus icon and select Insert Section.
- In the Select Section Type dialog, select Related Object and then select Continue.
- On the Add Related Object Section dialog, complete the fields as follows and then select Done:
- Related Object: Select Aggregate Report Section
- Section Label: Enter “Aggregate Report Sections”
- Section Name: Enter “aggregate_report_sections”
- Ensure the following columns are added to the new Aggregate Report Sections section:
- Name
- Section Order
- Assigned To
- Due Date
- Aggregate Report Section Type
- Aggregate Report Destination
- Report Document
- Completion Date
Configure Action to Generate Sections
Complete the following steps to configure an action on the Aggregate Report object to generate Aggregate Report Sections:
- Go to Admin > Configuration > Objects > Aggregate Report > Actions and select Create.
- In the Create Action dialog, select Generate Aggregate Report Sections and then select Continue.
- On the Create Action page, set a Label and Name for the action.
- Select Save.
Add Action to All Object Types
Complete the following steps to add this action to all the object types on the Aggregate Report object. This enables users to initiate the action from any Aggregate Report Type.
- Go to Admin > Configuration > Objects > Aggregate Report > Object Types.
- In the top-right corner, select Actions.
- From the Actions menu, select Edit Object Type Actions.
- Ensure that the Generate Aggregate Report Sections action is enabled on all the available object types.
- Select Save.
Update the Aggregate Report Object Lifecycle
Go to Admin > Configuration > Object Lifecycles > Aggregate Report Lifecycle and make the following updates.
Update State Type
Complete the following steps to change the state associated with the Initial State state type from Pending to Open:
- In the State Types section, select Initial State.
- Select Edit.
- In the State field, select Open and then select Save.
Update State Labels
Complete the following steps to update state labels to more accurately reflect their purpose:
- Go to the States section and select Completed.
- In the Details section, select Edit.
- In the State Label field, enter “Complete” and then select Save.
- Return to the States section and select HA Approved.
- In the Details section, select Edit.
- In the State Label field, enter “HA Received” and then select Save.
Add User Actions
Complete the following steps to add user actions to different lifecycle states:
- Go to the User Actions section of each lifecycle state mentioned in the table below and select Edit > Create Rule.
- Configure user actions according to the following table and then select Save.
| Lifecycle State | User Action |
|---|---|
| Open |
|
| In Progress |
|
| Complete |
|
| Submitted |
|
| Deferred |
|
| Inactive |
|
Add Entry Criteria
Complete the following steps to add entry criteria to different lifecycle states:
- Go to the Entry Criteria section of each lifecycle state mentioned in the table below and select Edit > Create Rule.
- Configure entry criteria according to the following table and then select Save.
| Lifecycle State | Entry Criteria |
|---|---|
| Complete |
|
| Submitted |
|
Update Role Permissions
Complete the following steps to grant permissions on various roles within this lifecycle. This is a recommendation only. Configure permissions according to your organization’s business processes.
- In the Roles section, select Edit.
- Grant permissions as follows:
- Aggregate Report Writer
- Pending: Read
- Open: Read, Edit, Delete
- Deferred: Read, Edit, Delete
- In Progress: Read, Edit
- Submitted: Read, Edit
- Inactive: Read, Edit, Delete
- HA Received: Read
- Complete: Read
- Owner
- Pending: Read, Edit
- Open: Read, Edit, Delete
- Generated: Read
- Generating: Read
- Submission: Read
- Deferred: Read, Edit, Delete
- In Progress: Read, Edit, Delete
- Submitted: Read, Edit
- Inactive: Read, Edit, Delete
- Error: Read
- HA Received: Read
- Active: Read, Edit, Delete
- Complete: Read, Edit
- Aggregate Report Writer
- Select Save.
Configure Aggregate Report Lifecycle Stage Groups
The following sections describe how to configure lifecycle stage groups for this object and associate them with states.
Create the PMDA Post-Market Stages Group
Complete the following steps to create this group and associate its stages with states:
- Go to Admin > Configuration > Lifecycle Stage Groups and select Create.
- In the Create Lifecycle Stage Group dialog, select Object Stage Group and then select Continue.
- On the Create Lifecycle Stage Group page, complete the fields as follows:
- Stage Group Label: Enter “PMDA Post-Market Stages”
- Object Lifecycle: Select Aggregate Report
- Object Type: Select PMDA Post-Market
- Select Save.
- In the Stages section, select Create and create the following stages in order:
- Open
- In Progress
- Complete
- Submitted
- HA Received
- Add states to each stage according to the table below. To add a state, go to [Stage] > States and select Add. Then select the Plus icon next to the state you want to add and select OK.
| Stage | State to Add |
|---|---|
| Open | Open |
| In Progress | In Progress |
| Complete | Complete |
| Submitted | Submitted |
| HA Received | HA Received |
Update Other Aggregate Report Lifecycle Stage Groups
Make the updates described in this section for each of the following lifecycle stage groups:
- DSUR Stages
- PADER Stages
- PBRER Stages
- PSUR Stages
- Go to Admin > Configuration > Lifecycle Stage Groups > [Lifecycle Stage Group].
- In the Stages section, delete the following stages. To delete a stage, go to [Stage], and from the Actions menu, select Delete.
- Pending
- Authorship
- Submission
- In the Stages section, select Create and create the following stages in order:
- Open
- In Progress
- Complete (this stage may already be configured in your Vault)
- Submitted
- HA Received
- Add states to each stage according to the table below. To add a state, go to [Stage] > States and select Add. Then select the Plus icon next to the state you want to add and select OK.
| Stage | State to Add |
|---|---|
| Open | Open |
| In Progress | In Progress |
| Complete | Complete |
| Submitted | Submitted |
| HA Received | HA Received |
Update the Aggregate Report Document Lifecycle
Complete the following steps to grant permissions to the Assigned To role for each lifecycle state:
- Go to Admin > Configuration > Document Lifecycles > Aggregate Report.
- In the States section, select Draft > Security Settings.
- Select Edit.
- Grant the same permissions to the Assigned To role that you have granted to the Editor role.
- Select Save.
Add Field VQL
Complete the following steps to add Criteria VQL to the Aggregate Report Template field so that your Vault is updated with the new functionality:
- Go to Admin > Configuration > Objects > Aggregate Report > Fields > Aggregate Report Template and select Edit.
- In the Criteria VQL field, enter
object_type__vr.name__v = 'Global Aggregate Report Template' - Select Save.
Configure Security
Add security settings to grant access to the aggregate report management features. Use the following settings as a starting point, but configure access according to your organization’s requirements.
Note: Vaults deployed prior to 23R2 that use Dynamic Access Control for Aggregate Report documents may require User Role Setup records for all users who need access to Aggregate Report document types.
Update Permission Sets
Permission sets are managed through Admin > Users & Groups > Permission Sets. The following sections describe how to update various permission sets in your Vault to grant access to aggregate reporting features:
Administration Actions
- Go to the Administration Actions permission set.
- In the Objects tab, select Edit.
- Grant Read, Create, and Edit permissions on the following objects:
- Aggregate Report Template:
- Global Aggregate Report Template
- Local Aggregate Report Template
- Aggregate Report Template Item:
- Authoring Section
- Aggregate Report Template:
- Grant Read permissions on the following objects:
- Aggregate Report Section:
- Vault Report
- Aggregate Report Template Item:
- Vault Report
- Aggregate Report Section:
- Select Save.
Aggregate Report Writer
- Go to the Aggregate Report Writer permission set.
- In the Objects tab, select Aggregate Report Section.
- In the Object Action Permissions section, select Edit.
- Grant View and Execute permissions on all the actions and select Save.
- Return to the Objects tab and select Edit.
- Grant Read, Create, Edit, and Delete permissions on the following objects:
- Aggregate Report:
- PSUR
- CIOMS II
- Aggregate Report Destination
- Aggregate Report Section:
- Authoring Section
- Vault Report
- Aggregate Report Template:
- Global Aggregate Report Template
- Local Aggregate Report Template
- Aggregate Report Template Item:
- Authoring Section
- Aggregate Report:
- Grant Read, Create, and Edit permissions on the following object:
- Aggregate Report Template Item:
- Vault Report
- Aggregate Report Template Item:
- Select Save.
Safety Operations Actions
- Go to the Safety Operations Actions permission set.
- In the Objects tab, select Edit.
- Grant Read, Create, and Edit permissions on the following objects:
- Aggregate Report Section:
- Authoring Section
- Vault Report
- Aggregate Report Template:
- Global Aggregate Report Template
- Local Aggregate Report Template
- Aggregate Report Template Item:
- Authoring Section
- Vault Report
- Aggregate Report Destination
- Aggregate Report Section:
- Select Save.
Configure Custom Sharing Rule
Complete the following steps to configure a custom sharing rule for the Aggregate Report Writer role. This rule is a recommendation only. Configure sharing rules according to your Vault’s security configuration and role permissions.
- Go to Admin > Configuration > Objects > Aggregate Report Section > Sharing Rules and select Create.
- On the New Sharing Rule page, in the Label field, enter “Aggregate Reporting”.
- Select Save.
- In the Roles section, select Add and complete the fields in the Add Manual Assignment dialog as follows:
- Role: Select Aggregate Report Writer
- Users and Groups: Select Aggregate Reporting
- Select Save.
Configure Reports
The following sections describe how to create a new report type and sample reports to generate data for aggregate reports.
Create Report Type
Complete the following steps to create a report type for aggregate reporting:
- Go to Admin > Configuration > Report Types.
- Select Create.
- On the Create Report Type page, complete the fields as follows:
- Label: Enter “Aggregate Report with Destinations and Sections”
- Name: Enter “aggregate_report_destination_section”
- Primary Reporting Object: Select Aggregate Report
- Select Add Related Object and add the following objects under Aggregate Report:
- Aggregate Report Destinations (Child)
- Aggregate Report Sections (Child)
- Select Save.
Create the Aggregate Reports in Flight Sample Report
On the user side of your Vault, complete the following steps to set up a sample report for in-flight aggregate reports:
- Go to Analytics > Reports and select Create.
- On the Create Report page, in the Report Type sidebar, select Aggregate Report > Aggregate Report with Destinations and Sections.
- In the Name field, enter “Aggregate Reports in Flight” and select Continue.
- Configure the Filters section as follows:
- Field: Select Aggregate Report > Lifecycle State
- Condition: Select in
- Lifecycle States: Select Open, In Progress, Complete, and Submitted
- In the Group rows by field, select Aggregate Report > Aggregate Report Type.
- Select Edit Columns to configure the columns as follows and select Save:
| Section | Columns |
|---|---|
| Aggregate Report |
|
| Aggregate Report Destination |
|
| Aggregate Report Section |
|