Once data entry and QC are complete, authorized users can perform medical review and assess the Case causality and expectedness.
Note: Depending on your Admin’s configuration, your Vault’s object, field, and section labels, lifecycle states, and workflows may differ from the general information in all articles. Refer to your organization’s business processes for guidance.
About Medical Review
After QC is complete, the system assigns a Medical Review task to users assigned the Medical Review role.
During Medical Review, an authorized user reviews the Case and performs the following tasks:
- Reviews and updates the Case narrative, if available, or generates the narrative if it is not yet written.
- Assesses and enters the causality assessment result for each linked adverse event and suspect product.
- If required, combines signs and symptoms that were reported into a single Case Diagnosis.
- Ensures the entire case is entered correctly and enters or edits the expectedness and seriousness criteria, as required.
To help with reviewing and assessing a Case, you can preview it as a regulatory report, such as a CIOMS I or FDA 3500A form. Generate a Regulatory Report provides more information.
Prerequisites
With default Vault configuration, the following prerequisites apply:
- The Data Entry and QC tasks must be complete.
- You must be assigned the Medical Reviewer role.
Your Vault may have custom configuration with different prerequisites. If so, follow the recommendations in your business standard operating procedure.
Use the Medical Review Timeline
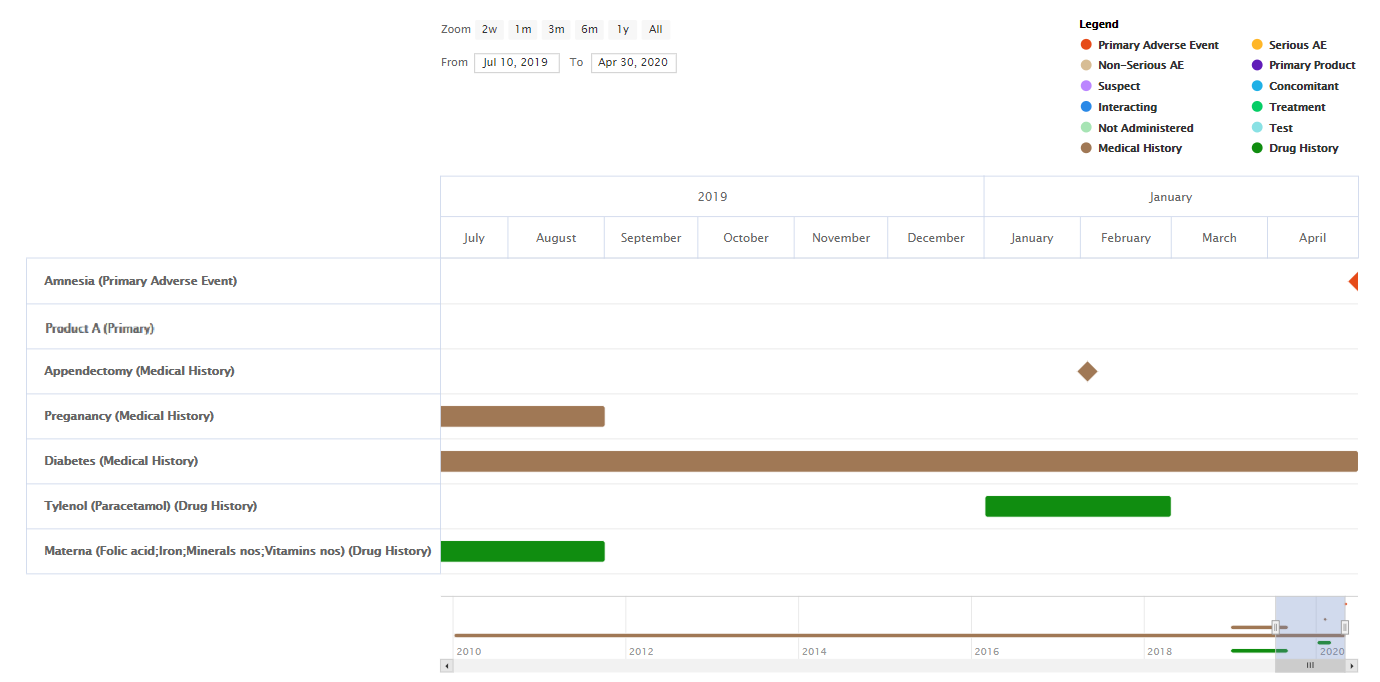
The Medical Review Timeline provides a highly visual and interactive context to display the time and duration of adverse events, product usage, dosage regimens, test results, drug history, and medical history.
The following video provides an overview on how to use this feature:
Medical Review Timeline
The Medical Review Timeline can help medical reviewers assess the causality of adverse events more quickly and accurately. The following image shows the Medical Review Timeline:
Access the Medical Review Timeline
To access the Medical Review Timeline, go to Cases, select a case, and then expand Timeline.
Note: Your configuration may only display the timeline in certain lifecycle states. By default, the Medical Review Timeline is available from the Medical Review stage and onwards (Approved, Closed, and so on).
Toggle Legend and Timeline Elements
When you toggle elements on the legend, the respective element disappears on the timeline. A grey legend entry indicates that a category is hidden.
Users can expand Case Products to view dosages by selecting the Down Arrow icon. When you hover over the elements on the timeline, a hovercard appears with a hyperlink to navigate to the corresponding Case record.
Note: If there are multiple Case Products, when you select a legend element, the timeline may display product elements incorrectly. Also, if you select the Primary Product legend element more than three times, the Primary Product toggle stops working. Refresh the page to reset the timeline. This is a known issue that will be fixed in a future release.
Adjust Dates and Date Range
Users can view elements in different periods of time to gain a thorough understanding of the cause and effects certain products have on the patient. By default, the Date Range end date is set to the New Info Date field.
- Select a Zoom button to set and view the respective Date Range on the timeline.

- Change the Date Range fields to adjust the timeline.

- Adjust the length of the Zoom bar at the bottom and drag it to view the events within this Date Range.
Note: Some dates are inferred on this timeline based on other available data on the case. Inferred dates are approximate and marked with a ~. You should verify the underlying data before making final determinations.
Note: A one-day event (such as a dosage regimen with a first administration date the same as last administration date) appears on the date range for two days in some circumstances.
Enter Case Causality Assessment
Vault generates a Case Assessment for the primary Case Adverse Event and primary Case Product, which medical reviewers can then use to enter Case Assessment Results.

Auto-Expectedness on Case Assessment Results
If an Admin has configured Product Datasheets with expected adverse events, Vault calculates adverse event expectedness using the Product Datasheet. This is calculated and populated through system-generated Case Assessment Expectedness records.
Complete the Medical Review Task
This section describes the default workflow for completing the Medical Review task for postmarket and Study Cases. If your organization has a custom workflow, follow the recommendations in your business standard operating procedure for completing medical reviews.
For general information on this topic, see How to Complete Assigned Tasks in Using Object Workflows.
When you select Complete on the Medical Review task, the Medical Review dialog appears. Complete the following steps:
- Select one (1) of the following verdicts:
- To set the Case to the In Approval lifecycle state, select Move to Approval. Optionally, add comments in the Comments field.
- To send the Case for additional data entry, select Requires Data Entry and then enter details in the Instructions field.
- For blinded Study Cases only, to begin the Unblinding workflow, select Unblind.
- Select Complete.
Result
Vault assigns tasks based on the selected verdict.