Configure narrative templates to customize how Vault generates narrative documents for Cases. Using custom narrative templates saves case processing time by generating a narrative document with only case-specific details. When users open a Case, Vault generates a narrative document using a document template and includes details based on the Case’s details. You can configure custom templates for any combination of Organization, Report Type, Study Type, Study, and Localization.
Prerequisites
Before configuring this feature in your Vault, you must complete the following:
- Enable Narrative Templates for Report Types and Studies.
- To use custom templates:
- Configure controlled document templates.
- Ensure the Narrative Template Type field value is Override Template for the applicable Transmission Profiles.
In Vaults using Veeva AI for Safety, you can enable the Narrative Agent to allow users to run the agent on narrative documents.
Narrative Template Types
When generating narrative documents on a Case, Vault determines which document template to use for narrative generation based on the template type. Vault provides the following types:
- Default: Generates the narrative document for all Cases manually entered by a user and Cases promoted from an Inbox Item, except Cases matched to any custom templates.
- Blinded: Generates the narrative document for blinded study Cases. If your Vault does not include an active Blinded template, Vault applies the Default template. Blinded study Cases imported from E2B files use the E2B Import template.
- E2B Import: Generates the narrative document for Cases created from an imported E2B file and Cases created from the Import Narrative Vault API.
You can add a blinded template, update templates, and create custom templates as needed.
Add a Blinded Template
If a blinded template does not already exist in your Vault, you can add one:
- Navigate to Business Admin > Templates.
- In the Template Location tree, expand Template > Narrative (Template) > Default.
- Select Create > Document Template.
- On the Create Document Template page, enter the following details:
- Type: Select Basic Document Template.
- Label: Enter
Narrative Template Blinded. - Name: Ensure the name is
narrative_template_blinded__c.
- In the More Information section, select Upload File.
- Select Save.
Note: Do not include sensitive information in your blinded template, such as product name merge field tokens. Vault does not mask product information in blinded Distributions. We recommend creating a dedicated blinded narrative template without any sensitive tokens.
Update Templates
You can update narrative document templates from the Document & Binder Template page:
- Navigate to Business Admin > Templates.
- In the Template Location tree, expand Template > Narrative (Template) and select the template you want to update.
- Select Edit.
- In the More Information section, select Upload File.
- In the dialog, open the applicable DOCX file.
- Select Save.
Create Custom Narrative Templates
You can create custom controlled document templates to fit the specific needs of your organization, which Vault uses as the source file for the template.
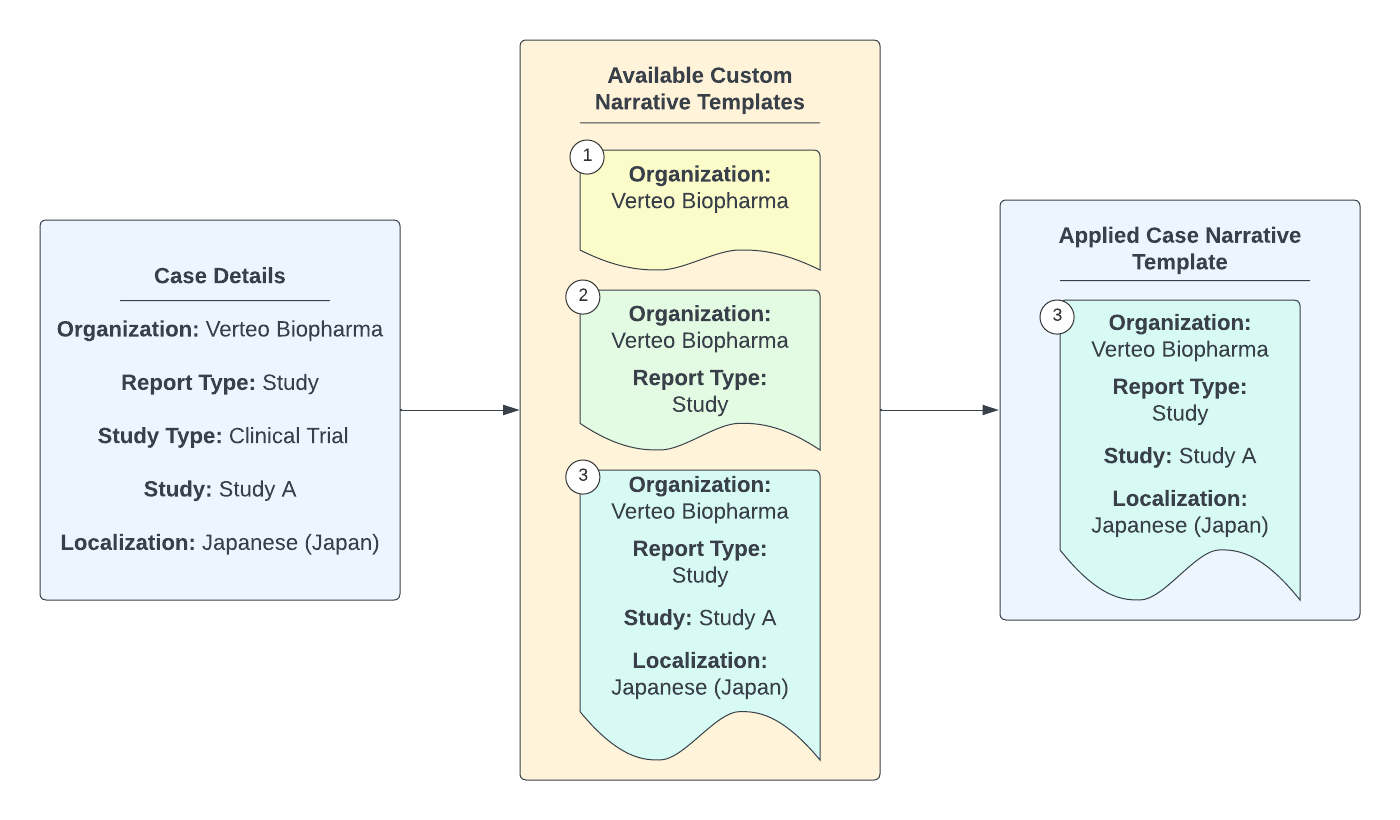
Vault applies custom templates during E2B import or Case promotion. Vault applies the narrative template that shares the most details with the Case. If no custom template details match, Vault applies a system-provided narrative template. When you create a domestic Case, Vault generates a localized narrative document using a localized template, if available. Otherwise, Vault applies the global narrative template. When generating narrative documents on a Case, Vault applies custom templates based on the record’s details, including:
- Case Type (E2B or Manual)
- Organization
- Report Type
- Study Type
- Study (Blinded or Unblinded)
- Localization
To create a custom document template:
- Ensure the Template > Narrative (Template) document type is active.
- On the Upload Files (Step 1) page, upload the applicable DOCX file and classify the type as appropriate:
- For a default template, select Template > Narrative (Template) > Default.
- For an E2B import template, select Template > Narrative (Template) > E2B Import.
- Select Next.
- Enter a Name to identify the template. We recommend that you include the organization in the name. For example,
Narrative Template - Default - Verteo BioPharma. - Select the Template Document Type depending on how you classified the uploaded document.
- On the Upload Files (Step 2) page, populate the applicable details to specify the parameters under which Vault applies the template:
- Organization
- Localization
- Study Type
- Report Type
- Study
- Add values for any other optional fields, as applicable.
- Select Save.
- From the document’s Workflow Actions menu, select Make Active to activate the template.
- In the Change Document Status dialog, select Yes.
The new template will now appear on the Document & Binder Template page in the Case > Summary > Narrative section of the Template Location tree.
Organization-Specific Templates
For Vaults with Cases across multiple Organizations, you can create Organization-specific narrative document templates. Vault applies a sponsor’s template to generate the narrative document for every Case associated with that Organization. Organization-specific templates use controlled document templates, which point to a Steady-state Vault document, referred to as a template document, as the source file for the template.
You can only configure one default organization-specific template. You cannot upload both a standard default template and a blinded template for the same organization. Controlled document narrative templates do not support both regular and blinded templates. If your organization handles blinded study data, do not upload a template with tokens for sensitive data that should be blind-protected.
Configure Merge Fields for Templates
You can configure Merge Fields to include Case field values in the template, which Vault populates based on token resolution with values from the Case record. Add Merge Fields to auto-populate generated narrative documents with details such as product name, organization, and receipt date. Because narratives are transmitted as plain text in submissions, we recommend that you use merge fields with caution and keep templates with merge fields very basic. We do not recommend including tables or images in your template.
Note: If any merge field tokens in a narrative document cannot resolve, Vault will not resolve any tokens with the same filter, including any tokens without a filter. For example, if the unresolved token has no filter, Vault cannot resolve any tokens without a filter. This is a known issue that will be fixed in a future release.