Learn how to make recommended updates to your Vault’s configuration to exclude obsolete documents from the PSMF PDF.
About the Feature
With the 24R1 release, SafetyDocs excludes obsolete PSMF documents with the PSMF Content and PSMF Generated Document subtypes from the generated PSMF PDF. For more information, see Manage PSMF Binders and Logbooks.
To support this feature, we recommend making the configuration updates described on this page.
Configure Settings on the PSMF Content Lifecycle
Navigate to Admin > Configuration > Document Lifecycles > PSMF Content Lifecycle and complete the following procedures.
Add the In Obsoletion State
To add a new state to the PSMF Content Lifecycle:
- On the States tab, select Create.
- In the Label field, enter
In Obsoletion. - Select the Do not execute entry actions for workflow cancel state checkbox.
- Select Save.
Add Security Settings to the In Obsoletion State
To grant permissions to different roles in the In Obsoletion state:
- On the States tab, select In Obsoletion.
- On the Security Settings tab, select Edit.
- Configure the settings as follows then select Save:
| Role | Permissions |
|---|---|
| Owner |
|
| Coordinator |
|
| Editor |
|
| Reviewer |
|
| Approver |
|
| PSMF Office |
|
Configure the PSMF Content Obsoletion Workflow
To create the PSMF Content Obsoletion workflow:
- Navigate to Admin > Configuration > Workflows.
- Select Create and then select Document Workflow.
- On the Create Workflow page, complete the fields as follows then select Save:
- Label: Enter
PSMF Content Obsoletion - Document Lifecycle: Select PSMF Content Lifecycle
- Label: Enter
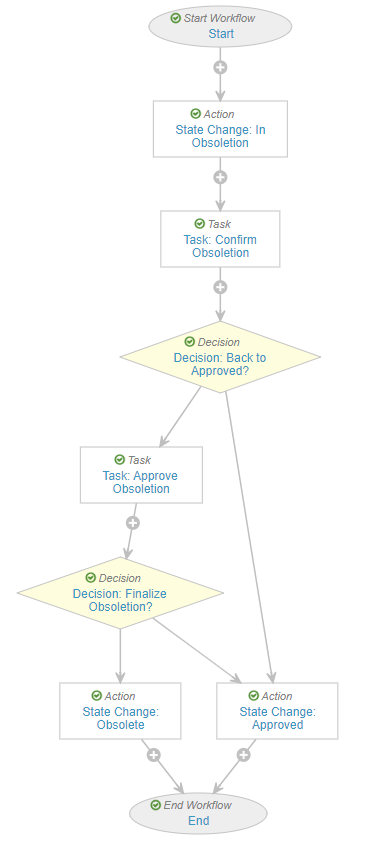
- Configure the workflow according to your organization’s requirements and business processes. The image below and the sections that follow are a general guide for creating this workflow:
Start Step
To configure the Start step:
- In the Workflow Steps section, select Start.
- Select Edit.
- In the Start Options section, select Create Rule and complete the fields as follows:
- Control 1: Select Participants
- Participant Label: Enter
PSMF Office - Add Participants: Select Use Role as Participants
- Role allowed to participate: Select PSMF Office
- Select Save.
State Change: In Obsoletion Step
To configure the State Change: In Obsoletion step:
- In the Workflow Steps section, select State Change: In Obsoletion.
- Select Edit.
- In the Rules section, select Create Rule and create the following rule:
- Always > perform actions > Change State
- Lifecycle State: In Obsoletion
- Select Save.
Task: Confirm Obsoletion Step
To configure the Task: Confirm Obsoletion step:
- In the General Settings section, complete the fields as follows:
- Task Label: Enter
Confirm Obsoletion. - Assign Task To: Select Workflow Owner.
- Instructions: Enter a description of the task asking the assignee to confirm that they want the document to be made obsolete, and remind them to enter a comment about the obsoletion in the associated Logbook.
- Task Requirement: Select Required.
- Task Label: Enter
- In the Due Date section, enter Workflow Start Date + 7 Days.
- In the Prompts section, select the Prompt for Verdicts checkbox and then select Multiple Verdicts: One verdict for each item.
- In the Verdicts section, create verdicts as follows then select Save:
| Role | Permissions |
|---|---|
| Verdict 1 |
|
| Verdict 2 |
|
Decision: Back to Approved? Step
To configure the Decision: Back to Approved? step:
- In the Rules section, select Create Rule and create the following rule:
- If > Task > Task: Confirm Obsoletion > all labels equal > Confirm Obsoletion
- Then > Create Step > Label:
Task: Approve Obsoletion - Else > then > Create Step > Label:
State Change: Approved
- Select Save.
Task: Approve Obsoletion Step
To configure the Task: Approve Obsoletion step:
- In the General Settings section, complete the fields as follows:
- Task Label: Enter
Approve Obsoletion. - Assign Task To: Select PSMF Office.
- Select Make available to users in participant group.
- Instructions: Enter a description of the task asking the assignee to approve the document’s obsoletion, and remind them that completing this task will complete obsoletion and move any associated Logbook comments to the Final state.
- Task Requirement: Select Required.
- Display information about previous tasks: Select Task: Confirm Obsoletion.
- Task Label: Enter
- In the Due Date section, enter Workflow Start Date + 7 Days.
- In the Prompts section, select the Prompt for Verdicts checkbox and then select Multiple Verdicts: One verdict for each item.
- In the Verdicts section, create verdicts as follows and select Save:
| Role | Permissions |
|---|---|
| Verdict 1 |
|
| Verdict 2 |
|
Decision: Finalize Obsoletion? Step
To configure the Decision: Finalize Obsoletion? step:
- In the Rules section, select Create Rule and create the following rule:
- If > Task > Task: Approve Obsoletion > all labels equal > Confirmed, Obsolete Document
- Then > State Change: Obsolete
- Else > then > State Change: Approved
- Select Save.
Add a User Action on the PSMF Content Lifecycle
To configure an action that can be used to trigger the PSMF Content Obsoletion Workflow when a document enters the Approved state:
- Navigate to Admin > Configuration > Document Lifecycles > PSMF Content Lifecycle.
- On the States tab, select Approved.
- On the User Actions tab, select Edit and then select Create Rule to create the following rule:
- Always > Workflow > PSMF Content Obsoletion
- Action Label:
Start Obsoletion
- Select Save.