When you generate a report, Vault structures the data in the output according to the Workbench Report Layout section. By default, the fields (columns) available in the layout depend on the Workbench View Columns of the selected safety view and any views dependent on the selected safety view. You can customize the Workbench Report layout by removing fields or restructuring this section.
Navigate to Workbench > Ad Hoc Reports > [report]. Select the Edit icon and expand the Layout section to make updates.
To define the tabular structure of report data by uploading an Excel template file instead of setting up the Workbench Report layout, see Use Custom Templates for Workbench Reports.
Select Layout Fields
To add, remove, and reorder the field data that displays in the layout:
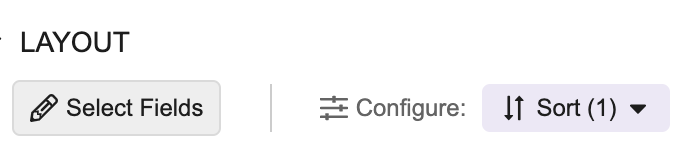
- Select Select Fields.
- In the Select Fields to Display window, add, remove, and reorder the fields as appropriate.
If you added full-width columns (fields), the Selected Fields section displays Columns and Full-Width Columns. You cannot add or reorder the full-width fields in this window. Some fields require the use of Dynamic Views. A single Workbench Report can reference up to 15 Dynamic Views; this includes any filters you add and view columns you select in the Layout. - Select Ok.
You can also reorder the data by dragging and dropping the field columns directly on the layout.
Result
Vault updates the Workbench Report layout with your field changes.
Add Full-Width Fields
For long-text fields that include many characters, for example, Case Narrative Previews, you can identify the field as a full-width field.
To identify a field as full-width:
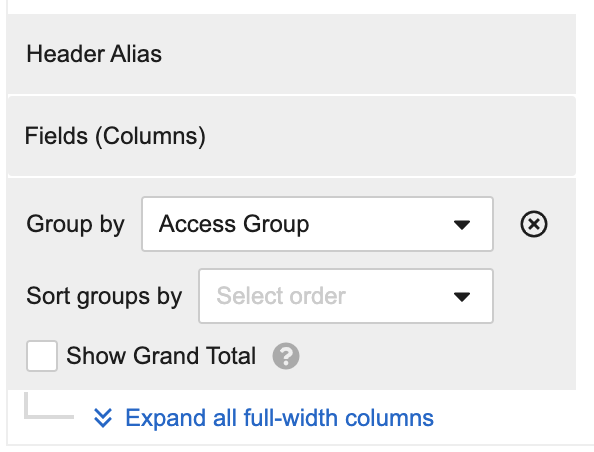
- Select Expand all full-width columns.
- Drag and drop the respective fields to this section. Vault maintains any setup associated with this field (for example, aliases and aggregate functions) in the full-width section.
- Add, remove, and reorder fields as appropriate.
The following considerations apply to full-width fields:
- You cannot sort the report by full-width fields.
- In order to use a full-width field, your report must contain two (2) or more columns.
- You can add a maximum of ten (10) full-width fields.
Set Column Aliases
Setting a column alias allows you to rename a column in the report layout and in the downloaded report results.
To set, remove, or change a column alias:
- Select the Enter Header Alias area above or beside the column to which you want to add an alias.
- Enter, clear, or edit the column alias.
- Select an area outside the field to set the alias.
- Repeat the above steps for all desired columns.
Result
When Vault generates the report, column headers use column aliases.
Add Groups
Use groups to organize your data by a specific field. You can also add aggregate functions for fields.
Before you can add groups, ensure the field by which you are grouping data has been added to the Workbench Report layout and configured by your Admin.
To add a group and define functions:
- Add the field you want to group by to the layout.
- In the Group by drop-down, select the field. Vault organizes the Workbench Report layout fields by the selected field. Aggregate functions appear under each field except the Group by field. You cannot group fields by a full-width field or a field of the Multi-Value Picklist column type.
- Under each layout field, select the aggregate function drop-down to define a function. See the Functions on Fields section for more information about each function.
Vault assigns the first function in the list by default. - Select Save.
Selecting a different Group by value resets the aggregate functions to default.
Vault inactivates grouping when you upload an Excel template to the Workbench Report or when you’ve associated the selected view with a Dynamic View.
Functions on Fields
If you group rows in the Workbench Report layout, you can add several aggregate functions on text, number, and date fields. You can select only one (1) function per field. Safety Workbench does not support aggregate functions on long or rich text fields.
The following table displays the available aggregate functions:
| Aggregate Function | Definition | Notes |
|---|---|---|
| List | Returns concatenated text of all row values in a group, separated by a delimiter and space |
|
| Count | Counts all values in the set and returns a number |
|
| Sum | Returns the sum of the set |
|
| Max | Returns the largest number in the set (number field) or the newest date (date field) |
|
| Min | Returns the smallest number in the set (number field) or the oldest date (date field) |
|
| Avg | Returns the average of the set |
|
Add Sorting
To sort by a specific field, you must first add it to the Workbench Report layout. You can sort data using the following methods:
- Select the Follow View Sort Order checkbox to follow your Admin’s sorting parameters configured on the safety view. When you select this checkbox, Vault makes the Sort menu inactive.
- Use the Sort groups by drop-down to sort grouped data.
- Use the Sort menu to sort data within a column. If the data is grouped, for fields using the List aggregate function, Vault uses your specified sort option to sort the order of values in the resulting list. When you use the Sort menu, Vault makes the Follow View Sort Order checkbox inactive.
Note: A field can only be used in one (1) sort method. For example, when sorting groups by Age, you cannot sort by Age in the Sort menu.
Sort Grouped Data
To sort the grouped data:
- Select the Sort groups by drop-down and select a sort option. This field appears only when you populate Group by.
- To sort a different field, select another field in the Group by drop-down.
Sort Column Data
To sort data within a column:
- Select the Sort menu. When you first add layout fields, Vault populates the left-most one as the first Sort menu field. Vault will prioritize sorting by this field first.
- In the Sort by drop-down, select a field.
- Select a sort option in the drop-down that appears next to the Sort by field.
- To sort by more fields, select Add Sort and repeat steps 2 and 3. You can add up to ten (10) fields in the Sort menu. Vault displays a Configure (
 ) icon above a column header to indicate that the field was added to the Sort menu.
 - To remove sorting by a specific field, select the x icon.
- To re-prioritize the fields by which you want to sort, select the All Actions menu next to the field and then select Move up or Move down.
- To clear field sorting, select Clear.
Sort Options
The sorting options depend on the column type of the selected field in the Sort groups by drop-down and the Sort menu. The following table displays the sorting options for each column type:
| Column Type | Sorting Options |
|---|---|
| Text, Object, Picklist, Multi-Value Picklist | Alphabetical (A-Z or Z-A) |
| Number | Smallest - Largest or Largest - Smallest |
| DateTime | Oldest First or Newest First |
| Yes/No | No - Yes or Yes - No |
Display Totals for Grouped Data
To include a Grand Total row in the last row of the report output, select the Show Grand Total checkbox. The Grand Total row summarizes each column’s data using the aggregate functions, for example, setting the aggregate function of Age to Min will generate the minimum age of this data set in the Grand Total row for the Age column.
The Show Grand Total checkbox appears only when you populate Group by. For the Group by field, the Grand Total row also displays a count in brackets, for example, if the Group by field is Case Number and there are 100 Case Numbers in the report output, the last row displays Grand Total (100).
Note: Grand Totals do not support full-width fields or the List aggregate function.
The default formatting for the Grand Total row is bold styling. See Use Custom Templates for Workbench Reports to learn how to apply custom formatting to this row.
Show Links in Report Output
To display fields as links to the respective object record detail page in the Excel output of the Workbench Report, select the Show links in export checkbox. The output only displays links for Object and MedDRA field types. If the report data is grouped by a field, Vault only displays links for the Group by field. When you upload the Excel output as a Workbench Report document to the Vault Library, Vault displays links for the PDF rendition. This feature also applies when you create Workbench Report documents from Workbench Report Set scheduling and PVA scheduling.
You cannot display links for CSV outputs.