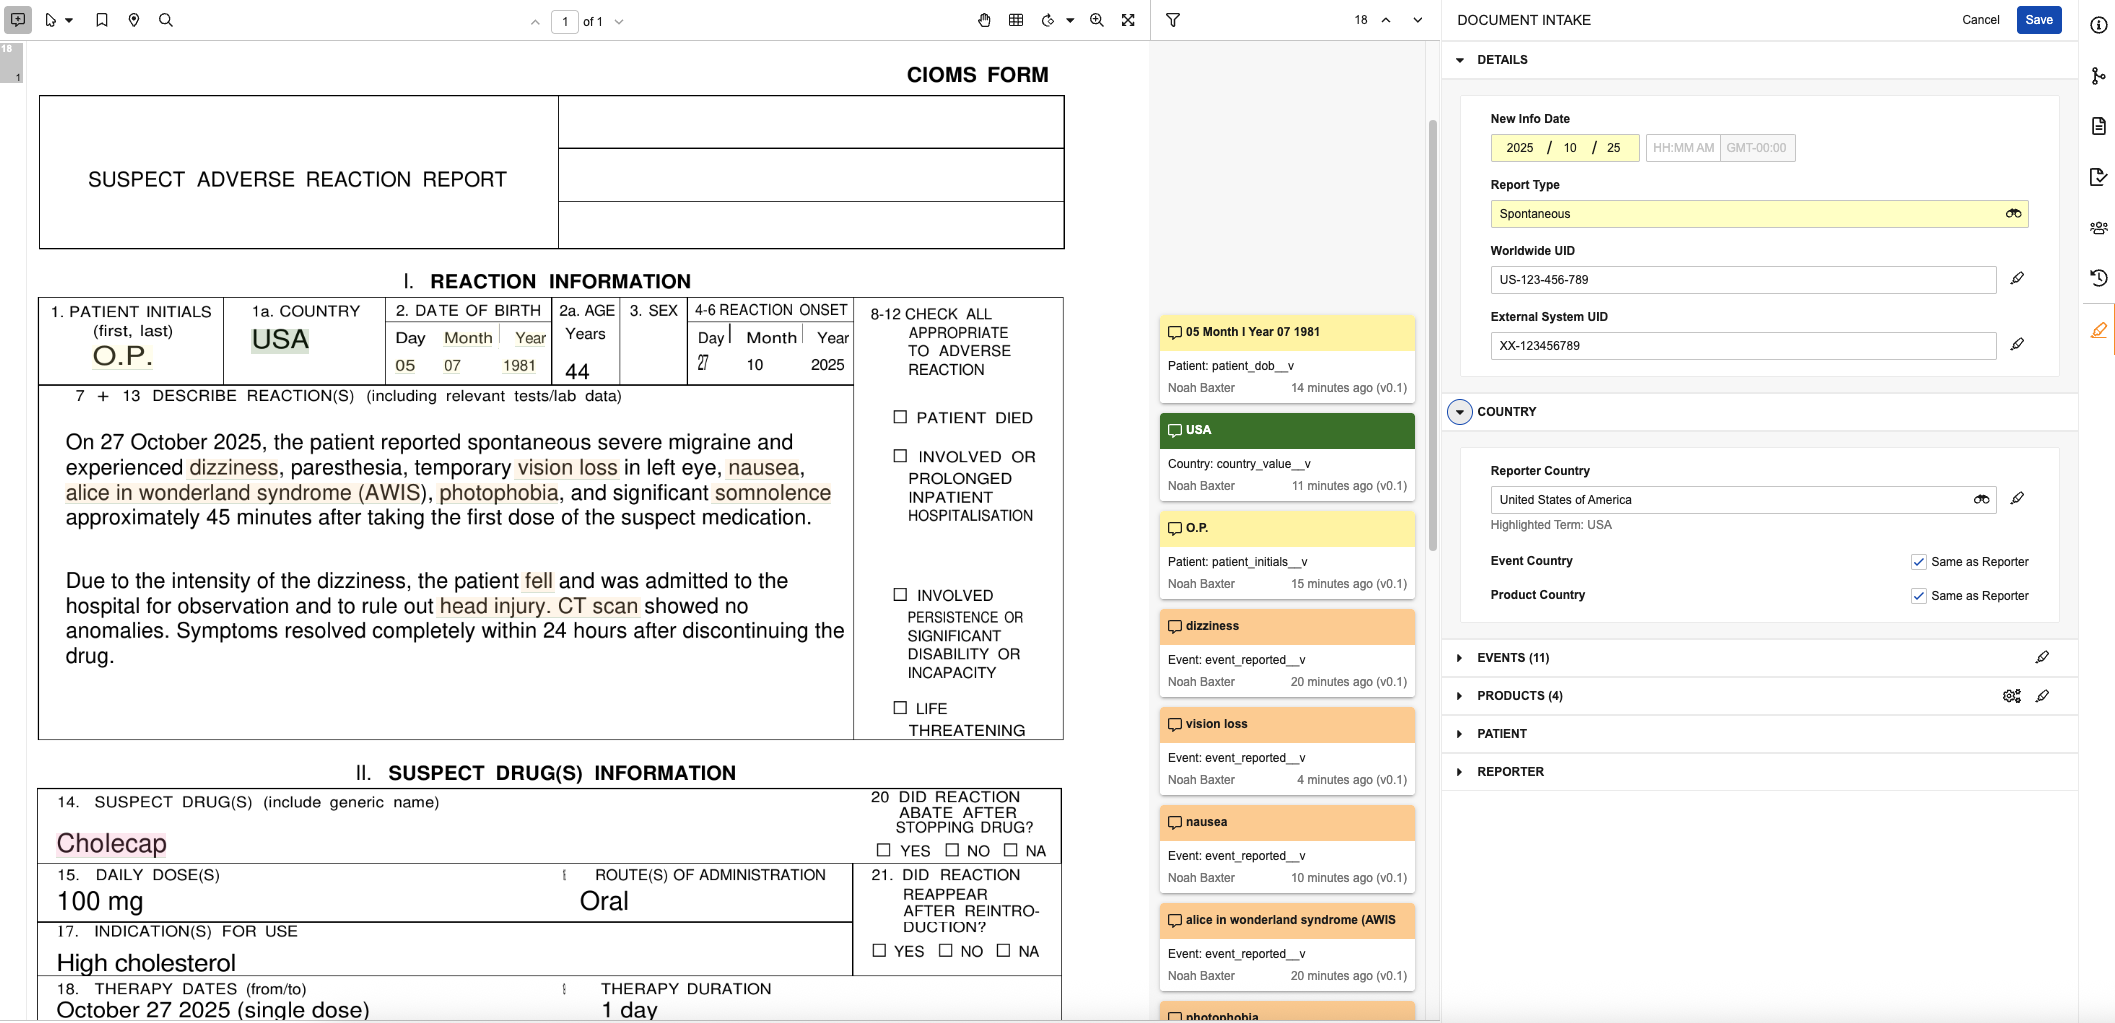
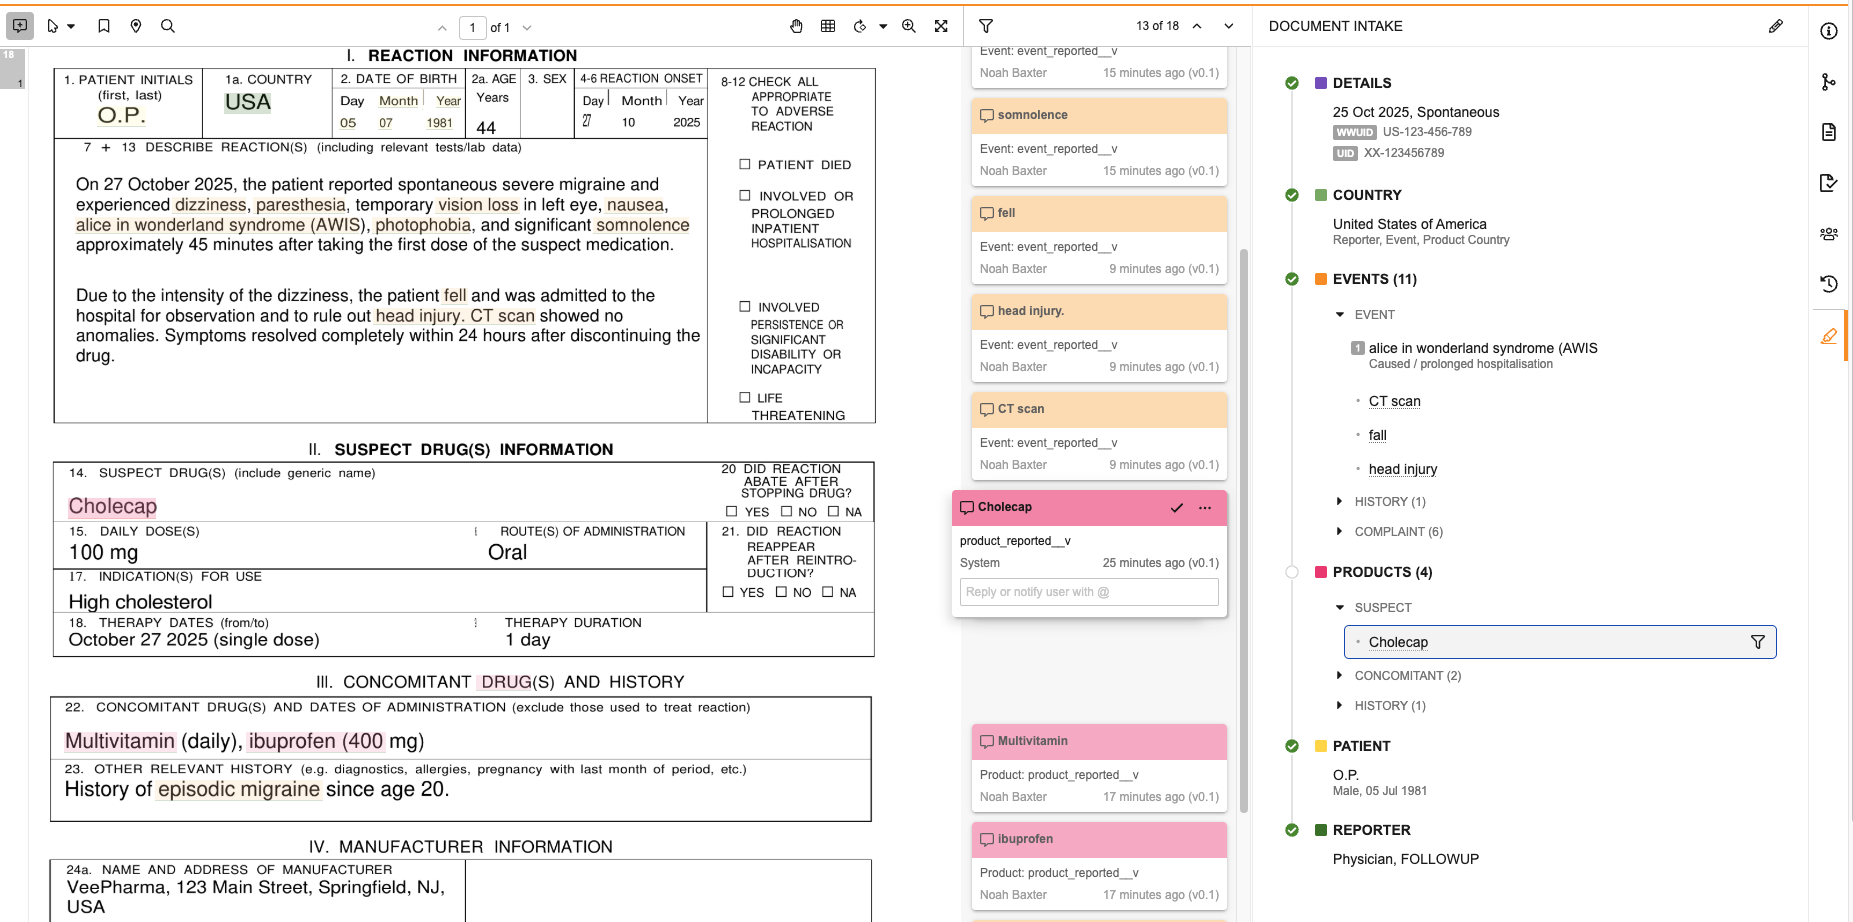
The Document Intake Highlighter panel allows you to intake data from unstructured and semi-structured source documents such as emails and CIOMs forms. Use the panel to extract data from a document mapped to Inbox Item fields and promote to a Case. In Vaults using Veeva AI for Safety, use the panel to review data extracted by the Intake Agent. As you review data in the document, you can populate fields with content in the source document manually or by highlighting and extracting content from the document, which adds annotation info cards so you can easily trace how field values map to the data in the document. When configured by your Admin, you can extract Company Product details from the document based on matches in your Product library.
In Vaults using Veeva AI for Safety, Vault may automatically generate an Inbox Item for each Case > Source > Adverse Event Report classified document uploaded to your Library. You can then use the panel to populate fields on the generated record. Otherwise, Vault generates the Inbox Item after you populate all required fields. When you access the panel for a document already associated with an Inbox Item, it displays a summary view of the mapped fields. You can select the edit () icon to populate and update fields. For documents not yet associated with an Inbox Item, you can immediately begin populating fields.
Vault generates an Inbox Item mapped to the values you sourced from the document. Any time you save changes to the values on a document or Inbox Item, Vault updates the corresponding record or document with the new values. If the generated Inbox Item meets all criteria to promote it to a Case, you can do so directly from the panel’s summary view. You can access the associated Inbox Item and Case from the Case section of the document’s Information panel.
Prerequisites
To utilize the Document Intake Highlighter, your Admin must enable the feature.
Access the Document Intake Highlighter
You can access the Document Intake Highlighter on the Document Intake Highlighter panel, which is available on the Doc Info pane of Adverse Event Report classified documents of supported file formats.
Note: The document’s Organization field value must reference a Sponsor type.
Populate and Update Inbox Item Fields
Use the panel to populate and update fields based on data in the document viewer. You can populate values manually or highlight and extract content to populate fields from content in the document. The fields available to populate in the panel required to generate an Inbox Item and promote it to a Case. These fields are maintained by Veeva and cannot be modified by your Admin. We recommend entering the minimum information required for triage, validation and duplicate search, and then entering the remaining details on the Case during data entry. To create an Inbox Item without populating all required fields in the panel, you can manually create the record.
To populate Inbox Item fields in the panel:
- Navigate to the Adverse Event Report document in your Library. If you’re updating an existing Inbox Item, you can navigate here from the Source Document field in its Case Validity and Source section.
- On the Doc Info pane, select the Document Intake Highlighter (
 ) icon.
 - Select the edit () icon.
- Populate fields in the following panel sections as applicable. You can do this manually or by highlighting and extracting content to map values directly to content in the document.
- Details: Specify report details. You must specify New Info Date and Report Type, which you cannot populate by extracting content.
- Country: Specify country details. You must specify Reporter Country or Event Country.
- Event: Add events. To promote the Inbox Item to a Case, you must add a primary Adverse Event.
- Product: Add products. To promote the Inbox Item to a Case, you must add a primary Product.
- Patient: Specify patient details.To promote the Inbox Item to a Case, you must populate at least one of these fields.
- Reporter: Specify reporter details. To promote the Inbox Item to a Case, you must populate at least one of these fields.
- When you’re done making changes, select Save.
After saving changes, review your entries on the summary view. If all required fields contain values and Vault finds no validation errors for the populated fields, it generates or updates the applicable Inbox Item based on the values you populated in the panel. You can access the Inbox Item from the Case section of the Information panel to review and update fields, as needed. If you make any changes to fields on the Inbox Item, Vault syncs them to the fields displayed in the panel. You can navigate back to the panel from the Source Document field on the Inbox Item.
Specify Country Details
If country details are known, we recommend populating these fields before adding events and products so that Vault applies the specified countries to those items. When you populate Reporter Country, Vault applies the same value for the Event Country and Product Country fields. To specify a different country for either of these fields, clear the applicable Same as Reporter checkbox and then populate a different value for that field. If you leave the checkbox selected for either field, Vault applies the same value you populate for Reporter Country.
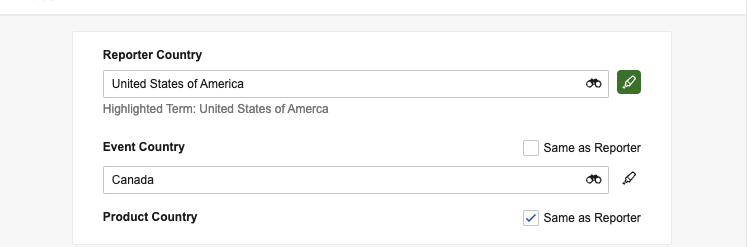
If you add country details after adding event and product items and do not clear the corresponding Same as Reporter checkboxes, Vault populates the Event Country of generated Events and the Country Obtained of generated Products with the same value as the Reporter Country.
Add Events
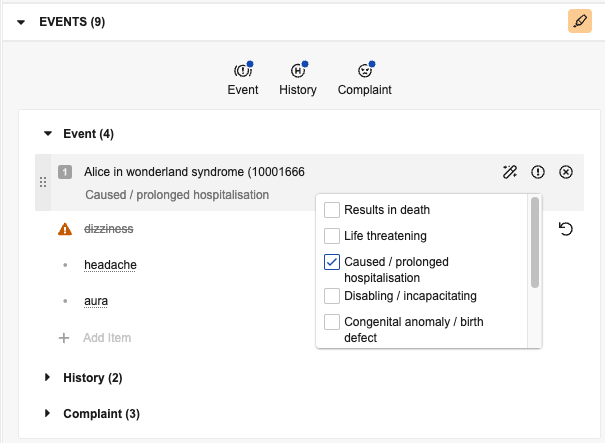
Manually add events in the panel based on details in the source document. By default, events you add in the panel are of the Adverse Event type. To view and add different types, select the applicable button:
- Event: Adds an Adverse Event
- History: Adds a Medical History & Concurrent Condition
- Complaint: Adds a Product Quality Complaint
Buttons with blue dot (![]() ) icons indicate types with existing events. To view all events without filtering by type, unselect all buttons. Select the caret icons to expand () or minimize () a section. If an expanded section includes more than ten items, use the Next Page (>) and Previous Page (<) icons to move through the pages. You can drag an item to a type section button to change its type. If you move an item to a different type, it sorts at the bottom of the list for that type.
) icons indicate types with existing events. To view all events without filtering by type, unselect all buttons. Select the caret icons to expand () or minimize () a section. If an expanded section includes more than ten items, use the Next Page (>) and Previous Page (<) icons to move through the pages. You can drag an item to a type section button to change its type. If you move an item to a different type, it sorts at the bottom of the list for that type.
Note: The panel displays up to 500 event items for an intake document. You can view additional items in the Medical Events section of the generated Inbox Item.
Auto-Coding
When you add an event, Vault attempts to auto-code terms with exact matches to a MedDRA dictionary term or synonym. If Vault finds a match, the item is underlined in the panel. Hover over the underlined item to view details in a hovercard.
Manage Events
Hover over any listed item to access the following options:
- Mark as primary (
 ): Select this to specify an item as the primary adverse event for the report. The primary event is denoted with a primary (
 ) icon.
 - Auto-code (
 ): If you update a previously entered term, select this to match and code the MedDRA term. Select the icon again to Clear Auto-code (
 ).
). - Assign Seriousness Criteria (
 ): For Events and Complaints, select this to reveal checkboxes you can select to assign seriousness. Vault displays the selected criteria below the item.
 - Delete Record (): Select this to remove the item before saving changes.
- Mark for Deletion (): If the record already exists, select this so Vault does not add the associated record to the Case when you promote to Case. Vault displays an alert (
 ) icon to indicate the pending deletion. Once deleted, Vault removes any associated annotations.
- Undo (
 ): Select this to unmark a record for deletion before promoting.
- Undo (
Add Products
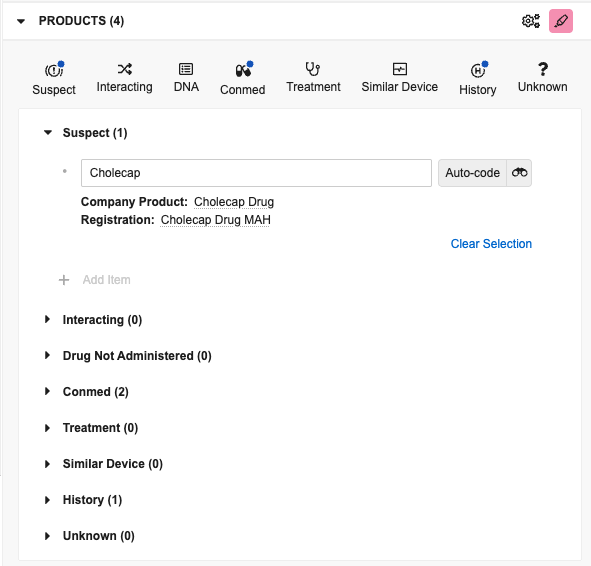
You can extract products from the document and manually add them based on details from the source document. By default, products you add in the panel are Case Products with a Drug Role of Suspect. To view and add different types, select the applicable button:
- Suspect: Adds a Case Product with a Drug Role of Suspect
- Interacting: Adds a Case Product with a Drug Role of Interacting
- DNA: Adds a Case Product with a Drug Role of Drug Not Administered
- Conmed: Adds a Case Product with a Drug Role of Concomitant
- Treatment: Adds a Case Product with a Drug Role of Treatment
- Similar Device: Adds a Device type of Case Product with a Drug Role of Similar Device
- History: Adds a Drug History
- Unknown: Adds a Case Product with a blank Drug Role
Buttons with blue dot (![]() ) icons indicate types with existing products. To view all products without filtering by type, unselect all buttons. Select the caret icons to expand () or minimize () a section. If an expanded section includes more than ten items, use the Next Page (>) and Previous Page (<) icons to move through the pages.
) icons indicate types with existing products. To view all products without filtering by type, unselect all buttons. Select the caret icons to expand () or minimize () a section. If an expanded section includes more than ten items, use the Next Page (>) and Previous Page (<) icons to move through the pages.
Note: The panel displays up to 500 unique Company Products for an intake document. You can view additional items in the Products section of the generated Inbox Item.
Auto-Coding
When you add a product item, Vault attempts to auto-code the item to relevant matches in your Product library. If Vault finds a match, the item is underlined in the panel. Hover the underlined Company Product or Registration to view details in a hovercard.
Product Hovercard:

Registration Hovercard:

Extract Company Products
Select the Extract Company Products (![]() ) icon in the Products section header to extract up to 500 unique Company Products from the document based on matches to your Product library. When this action finishes running, Vault adds matches to the Products section as Suspect items, highlights the associated terms in the document, and adds an annotation info card so you can trace the source of each item. All generated annotations for extracted products display as created by “System”. The highlighted terms are the Product Reported of each item. After Vault adds these items, you can manually update or remove them in the panel, as needed.
) icon in the Products section header to extract up to 500 unique Company Products from the document based on matches to your Product library. When this action finishes running, Vault adds matches to the Products section as Suspect items, highlights the associated terms in the document, and adds an annotation info card so you can trace the source of each item. All generated annotations for extracted products display as created by “System”. The highlighted terms are the Product Reported of each item. After Vault adds these items, you can manually update or remove them in the panel, as needed.
Note: You cannot extract products until Vault has generated the document’s viewable rendition.
How Vault Extracts Company Products
Vault adds product items in the panel based on values matching the following field values in your Product library:
- Products
- Product Name
- Abbreviation
- Generic Name
- Product Families
- Name
- Product Family Abbreviation
- Substances
- Name
- Substance Name
- Substance Aliases
- Alias
If Vault finds duplicate matches, it adds separate annotations for each, but adds only one item and creates only one Product Reported record. Vault sorts the items in the panel using the following logic:
- Product Type
- Suspect
- Interacting
- Drug Not Administered
- Concomitant
- Treatment
- Drug History
- Inbox Item ranked as
1 - Inbox Item ranked from
2onward in alphabetical order
Manage Products
After you add items in the panel, you can drag and drop them to rearrange the order and move them into different product sections to change their type. You can drag an item to a type section or button to change its type. If you move an item to a different type, it sorts at the bottom of the list for that type. Hover over a listed item to access the following options:
- Mark as primary (): Select this to specify an item as the primary product for the report. The primary event is denoted with a primary () icon. You cannot mark Unknown items as primary.
- Auto-code: If you update a previously entered term, select this to match and code the MedDRA term. If you edit the item’s name after it’s coded, Vault strikes out the details and displays a message that the reported term is modified.
- Select the binoculars (
 ) icon to open the Product Browser.
 - Select Clear Selection to remove the code.
- Select the binoculars (
- Delete Record (): Select this to remove the item before saving changes.
- Mark for Deletion (): If the record already exists, select this so Vault does not add the associated record to the Case when you promote to Case. Vault displays an alert () icon to indicate the pending deletion. Once deleted, Vault removes any associated annotations.
- Undo (): Select this to unmark a record for deletion before promoting.
- Undo (
Highlight Annotations
You can highlight and extract content within a document to populate certain fields in the panel, which is similar to annotating documents. When you highlight content in the document, Vault creates an annotation info card with details about the sourced data and maps it to the selected section in the panel. Use Annotate mode to review all annotation info cards, including any added by other users. When you switch to View mode, Vault hides the cards, but the highlighted terms in the document remain visible when the Document Highlighter Panel is open.
Vault uses different highlight colors for each section in the panel so you can visualize the different areas from which you’ve pulled source data:
- Details: Light purple (
 ) annotations
 - Country: Dark green (
 ) annotations
 - Event: Light orange (
 ) annotations
 - Product: Dark pink (
 ) annotations
 - Patient: Light yellow (
 ) annotations
 - Reporter: Light green (
 ) annotations
Note: After adding comment annotations, we recommend that you do not change the color, edit the text style, or perform any actions.
For text fields, Vault populates the field with the exact text you highlighted. For fields that support certain values based on existing records or controlled vocabulary, Vault populates the field only if you’ve highlighted an exact valid text match to the available values for that field. For example, if you’re trying to populate the Gender field, which supports Female and Male values, and you highlight “Woman” within the document, Vault adds a comment and maps it to the field without populating it, since there is no exact matching value. When this happens, Vault displays the highlighted term below the field in the panel for reference. You can manually add the applicable field value in the panel.
Note: Moving or deleting an annotation info card does not update or remove the mapped field value in the panel. You must manually update the field.
How to Highlight & Extract
To highlight and extract content in the document and populate fields:
- Select the highlighter () icon next to the field or section you want to populate.
- Highlight the word or phrase in the source document to map to the field.
- If you highlight valid text, Vault adds a comment and populates the selected field or adds the item.
- If you highlight invalid text, Vault adds a comment but does not populate the selected field or add the item.
- Optional: Modify the populated value as appropriate.
If you populated a field with a valid value, Vault unselects the highlighter and you can populate a different field or section. If you populated the Event or Product section, the highlighter remains selected until you unselect the highlighter for that section or select the highlighter for a different section or field.
Note: If you exit the panel after populating fields without saving, Vault saves any annotation info cards you added but does not map them to fields in the panel. You can manually delete these as needed.
Summary View
The panel displays a summary of the Inbox Item values after saving changes and when viewing the panel for a document already associated with an Inbox Item. The Events and Products section headers include the number of items in each section in parenthesis next to the section name. When all required details are complete, you can promote to Case from the panel.
In the summary view for all documents, you can review the details for the Inbox Item:
- Hover over any event or product item to view details in a hovercard.
- Review the status of each section.
- If all sections have green checkmark (
 ) status icons, you can select the Promote to Case (
 ) icon to generate a Case.
 - If any sections have grey empty (
 ) status icons, you must add required details to that section before you can promote the Inbox Item to a Case.
 - Hover over a status icon to view the identifiable criteria for that section.
- Select a header to collapse () or expand () that section.
- If an expanded section includes more than ten items, use the Next Page (>) and Previous Page (<) icons to move through the pages.
- If all sections have green checkmark (
- For any mapped highlighted term, select the value to jump to the associated annotation info card in the document viewer.
- For any extracted Company Products, hover over the item and select the Apply Filter () icon to view only annotations associated with that item. Select the icon again to remove the filter.
- Select the edit () icon to populate fields.
- In Vaults using Veeva AI for Safety, the summary view for Inbox Items processed by the Intake Agent includes additional details on the Case Qualification and Review tabs.
Case Qualification & Review
For Inbox Items processed by the Intake Agent, the summary view displays information on the Case Qualification and Review tabs.
Case Qualification
This tab lists qualifiable Inbox Item fields populated with data extracted from the source document, including an information (![]() ) section with the following details:
) section with the following details:
- Document Type: Specifies the type of document (CIOMS, MedWatch, or other).
- Contains AER: Specifies if the document contains an Adverse Event Report (AER). If this value is No, the generated Inbox Item is blank.
- Language: Specifies the document’s language.
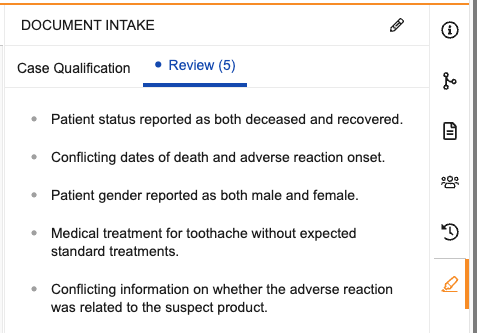
Review
This tab lists up to 20 potential anomalies detected by the agent in the data extracted from the source document. These may include contradicting details and potential discrepancies concerning such information as dates, patient information, and medical treatment. If the agent detects anomalies, a blue dot (![]() ) icon displays and the number of items for review appears in parentheses in the tab’s header. Review the data to verify the listed anomalies. If applicable, select the edit () icon to update fields in the panel.
) icon displays and the number of items for review appears in parentheses in the tab’s header. Review the data to verify the listed anomalies. If applicable, select the edit () icon to update fields in the panel.
Note: Vault uses AI to identify these potential anomalies and may not detect every discrepancy. Always review the source file to verify the accuracy of the data.
Promote to Case
If you’ve added all details required to promote the Inbox Item to a Case, all sections have green checkmark status icons, and you can select the Promote to Case (![]() ) icon at the top of the panel summary view to open the Potential Matches page. You can access the generated record from the Case section of the Information panel to review and update fields, as needed. You can navigate back to the panel from the Source Document field on the generated Case.
) icon at the top of the panel summary view to open the Potential Matches page. You can access the generated record from the Case section of the Information panel to review and update fields, as needed. You can navigate back to the panel from the Source Document field on the generated Case.
When you promote an Inbox Item processed by the Intake Agent, the Case may contain additional annotated data from the source document that does not appear in the panel fields.