About the Feature
Vault SafetyDocs supports automatically generating PSMF documents from Vault reports. These reports can be set up to run whenever information is updated, and the system will create a new version of the relevant document.
Support for this feature was added in 23R2, which includes the necessary configuration by default. Vaults deployed prior to 23R2 must have the configuration upgrades described on this page to enable this feature.
See Generate PSMF Documents from Vault Reports for more information.
Complete the steps on this page to enable this feature in your Vault.
23R3 Update: Add the PSMF Annex Field to the PSMF Generated Report Classification
The PMSF Annex field can be used to specify which annex of the PSMF is being uploaded. Complete the following steps to add the PSMF Annex field to the PSMF Generated Report classification in your Vault.
- Go to Admin > Configuration > Document Fields > Pharmacovigilance System Master File > PSMF Generated Document > PSMF Generated Report.
- Select Add > Existing Shared Field.
- In the Use Shared Field window, select PSMF Annex from the picklist and then select OK.
Add Document Fields
Complete the following steps to add related document fields to the PSMF Details section of the Document Information page.
- Go to Admin > Configuration > Document Fields > Pharmacovigilance System Master File > PSMF Generated Document > PSMF Generated Report > Report Generation Type.
- Select Edit.
- In the Display Section field, select PSMF Details from the picklist and save the page.
- Go back to Configuration > Document Fields and select Shared Fields.
- Complete steps 2 and 3 for the following fields:
- PSMF Jurisdiction
- Report Format
- Source Report
- Source Report Prompt
Configure the PSMF Generated Document Lifecycle
Go to Admin > Configuration > Document Lifecycles > PSMF Generated Document Lifecycle and configure the following settings:
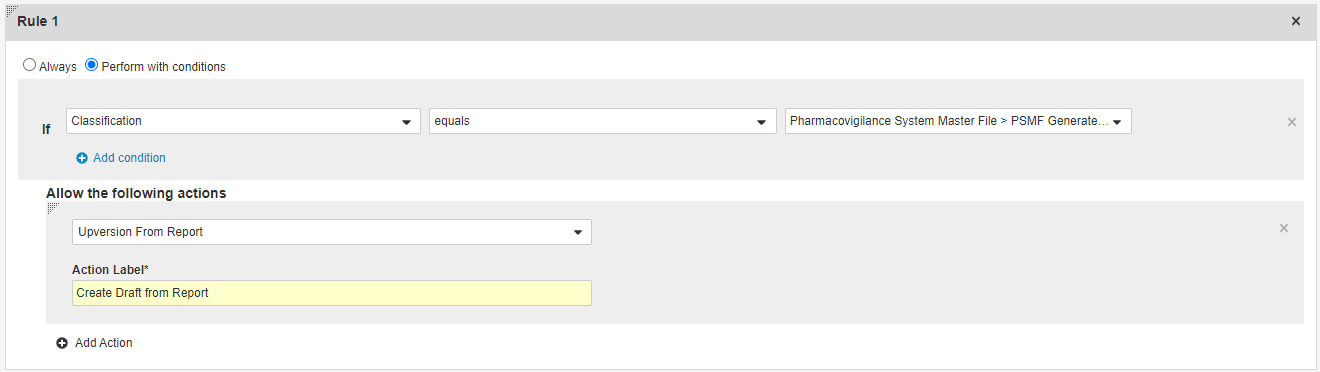
Create a User Action on the Generated State
- On the PSMF Generated Document Lifecycle, go to States > Generated.
- In the User Actions section, select Edit and then select Create Rule.
- Select Perform with conditions.
- Select Classification > equals > Pharmacovigilance System Master File > PSMF Generated Document > PSMF Generated Report.
- Under Allow the following actions:
- Select Upversion from Report.
- In the Action Label field, enter Update Content from Report.
User Action on the Generated State - Select Save.
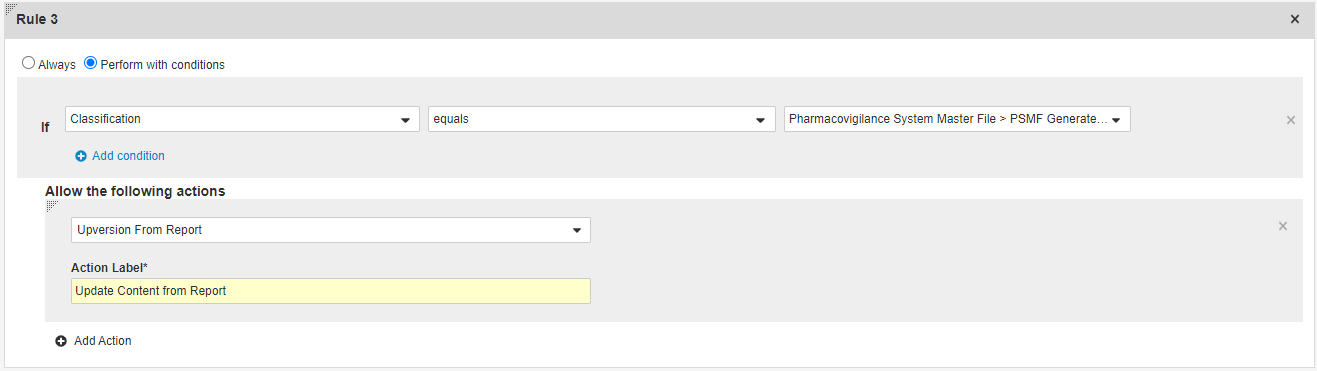
Create a User Action on the Final State
- On the PSMF Generated Document Lifecycle, go to States > Final.
- In the User Actions section, select Edit and then select Create Rule.
- Select Perform with conditions.
- Select Classification > equals > Pharmacovigilance System Master File > PSMF Generated Document > PSMF Generated Report.
- Under Allow the following actions:
- Select Upversion from Report.
- In the Action Label field, enter Create Draft from Report.
User Action on the Final State - Select Save.
Create a User Action on the Planned State
- On the PSMF Generated Document Lifecycle, go to States > Planned.
- In the User Actions section, select Edit and then select Create Rule.
- Select Perform with conditions.
- Select Classification > equals > Pharmacovigilance System Master File > PSMF Generated Document > PSMF Generated Report.
- Under Allow the following actions:
- Select Upversion from Report.
- In the Action Label field, enter Generate from Report.
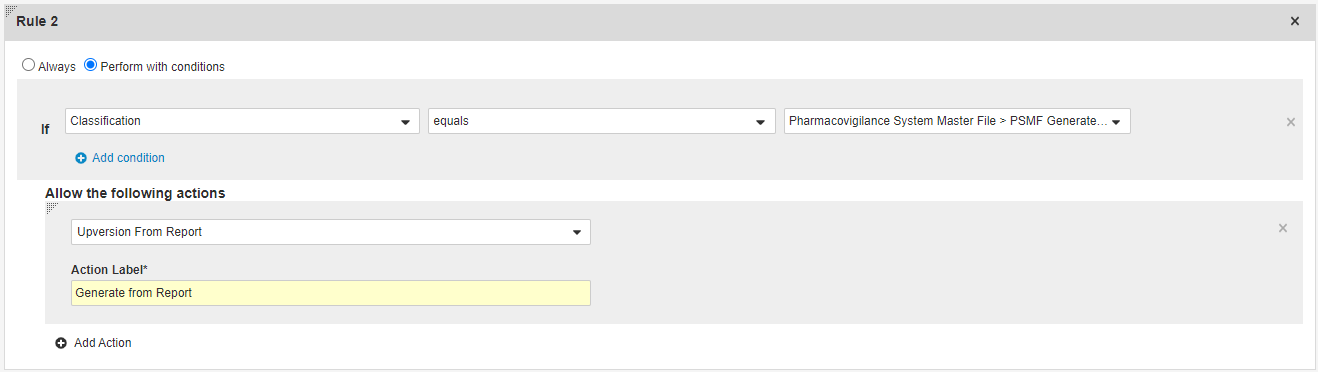
User Action on the Planned State - Select Save.