Sections in This Article
Note Depending on your Admin's configuration, object, field, and section labels, lifecycle states, and workflows may differ from the general information on this page. Refer to your organization's business processes for guidance.
Set Up Organizations
As all records require linking to an organization for security, the first task you should complete as an Administrator is to set up Organization records.
Start by updating the built-in Vault Customer record with your organization’s details. See the following sections for how to set up as a Contract Research Organization (CRO) or a Sponsor.
- Add a Contract Research Organization as Vault Customer
- Go to Business Admin > Objects > Organizations.
- Find the Organization record named Vault Customer. If there are multiple pages, use the Next Page arrow button to move through the list.
- Hover over Vault Customer, and then select

- Select Change Type, and then in the Select New Organization Type dropdown list, select CRO.
- In the Change Organization Type window, select Continue.
- On the CRO: Vault Customer page, in the Details section update the Organization fields. Note that fields appear based on your vault's configuration.
- In the Address section, add contact information. For organizations that manufacture and report on medical device products, this section is required to populate device fields on the MedWatch 3500A form.
- (Optional) In the Localized Organizations section, for Japan reporting destinations other than PMDA, you can create a Localized Organization.
- In the Transmission Profiles section, add the Organization’s Transmission Profiles to facilitate Submissions and Distributions.
- (Optional) In the Distribution Lists section, create a Distribution List using your Organization’s Reporting Family type. This enables automatically generating Distributions for each partner or site with which you must transmit ICSRs.
- Select Save.
Next Steps
Add secondary Organization records for each sponsor for which you will process cases and information.
- Add a Sponsor as Vault Customer
- Go to Business Admin > Objects > Organizations.
- Find the Organization record named Vault Customer. If there are multiple pages, use the Next Page arrow button to move through the list.
- Hover over Vault Customer, and then select .
- Select Change Type, and then in the Select New Organization Type dropdown list, select Sponsor.
- Select Continue.
- On the Sponsor: Vault Customer page, in the Details section update the Organization fields.
- In the Address section, add contact information. For organizations that manufacture and report on medical device products, this section is required to populate device fields on the MedWatch 3500A form.
- In the Studies section, add Studies that your Organization monitors and reports on.
- In the Products section, add Products that your Organization monitors and reports on.
- In the Combination Products section, add Combination Products that your Organization monitors and reports on.
- (Optional) In the Distribution Lists section, create a Distribution List using your Organization’s Reporting Family type. This enables automatically generating Distributions for each partner or site with which you must transmit ICSRs.
- In the Transmission Profiles section, add the Organization’s Transmission Profiles to facilitate Submissions and Distributions.
- (Optional) In the Localized Organizations section, for Japan reporting destinations other than PMDA, you can create a Localized Organization.
- Select Save.
- Add Additional Organizations
- Go to Business Admin > Objects > Organizations.
- Select Create.
The Create Organization window appears. - On the Create Organization window, select the organization type, and then select Continue.
- Complete the fields that appear.
The following table describes the Organization object fields that may appear, depending on your vault's configuration:Field Description Name
(name__v)Enter the name of the Organization. Organization UID Code (organization_uid_code__v)Enter the Unique Identification (UID) Code of the Organization. The system uses this value to assign Case UID numbers.
By default, this field appears only for Sponsor-type Organizations.PV Agreement (pv_agreement__v)Select the type of Pharmacovigilance Agreement. Select Agent if your organization acts on behalf of sponsor organizations, as agreed to in the pharmacovigilance contract.
By default, this field appears only for CRO-type Organizations.
This field impacts how the system imports the Receipt Date and New Info Date from inbound E2B Transmissions.
Sender Type (sender_type__v)Select the type of Sender Organization or Individual.
This field is used in E2B report generation for Sender Type (A.3.1.1/C.3.1).
Submission Rules (submission_rules__v)Select the submission ruleset associated with the Organization.
Note Submission Rules are intended for use with Agency-type organizations only, and populating this field assigns a reporting ruleset to the Agency. For more information, see Regulatory Agency Reporting Rules.
Cross Report Priority (cross_report_priority__v)Select one of the following values to determine the priority of generated cross reports in the event that multiple cross reports are generated for the same Destination:
- Marketing
- Investigational
- Marketing and Investigational
The system will assume the default option (Marketing) if the Cross Report Priority field is left blank.
In the event that an Agency has both X→Investigational and X→ Marketing reporting obligations then the system prioritizes which Submissions to an agency are generated based on the value of this field as follows:
Marketing (default value) If both a Marketing Submission and an Investigational Submission would be generated, then the system will select the Marketing Submission.
If there are multiple Marketing Submissions, the system generates the Marketing Submission with the earliest due date.
If there are no Marketing Submissions but there is an Investigational Submission, then the system will generate the Investigational Submission.
Investigational If both an Investigational Submission and a Marketing Submission would be generated, then the system will select the Investigational Submission.
If there are multiple Investigational Submissions, the system generates the Investigational Submission with the earliest due date.
If there are no Investigational Submissions but there is a Marketing Submission, then the system will generate the Marketing Submission.
Marketing and Investigational The system generates the Submission with the earliest due date. If there are multiple Submissions with the earliest due date, the system selects the Submission with the earliest created registration. This field is only supported for Agency-type Organizations.
Cross Reporting
Substance Lookup Method(cross_reporting_
substance_lookup_method__v)Specifies the Substance lookup match criteria when considering cross reporting obligations to this Agency based on the Substances contained in the Case Product.
Select one of the following options to specify when the system reports to the Agency based on Case Product Substance:
Cross Reporting Substance Lookup Method Conditions for Reporting to the Agency Subset Matching The cross-reportable Product includes all of the Substances within the Case Product. The cross-reportable Product may include additional Substances in this scenario.
Subset matching includes Exact matching scenarios.
Exact Matching The cross-reportable Product includes the exact same Substance list as the Case Product. Partial Matching The cross-reportable Product includes at least one of the same Substances as the Case Product.
Partial matching includes both Subset and Exact matching scenarios.
If the field is left blank, then the system uses the Subset Matching method.
Note This field applies to agency-type Organizations only.
See Cross Reporting Substance Matching for more information.
Localization (localization__v)Select the Localization record corresponding to the organization's region. The Localization option, along with the reporting rules configured for the Organization, control the Translations generated for Cases reportable to this Organization.
- Select Save.
Set Up User Accounts
Vault Safety restricts user access to data by role per organization. After configuring organizations, add users and configure one or more roles for each user for the organizations that they must be able to access.
Vault Online Help provides complete information about Creating & Managing Users in your Vault.
Vault Online Help also provides complete information about Managing Permissions with User Roles.
Add Products
Add each product that your organization monitors and reports on to Vault Safety’s internal Product library. Optionally, group products into Product Families for easier organization and maintenance.
Note To be included in a Product Family, Products must be linked to the same organization and have the same Substance (active ingredient).
- Create a Product Family Record
- Go to Business Admin > Objects > Product Families.
- On the Product Families page, select Create.
- Complete the fields on the Create Product Family page.
- Select Save.
Product Family Fields
Result When a Product Family record is saved, a Products section appears. You can create new Products that will be included in the Product Family by selecting Create on this page. If Products are set up separately and linked to a Product Family, they are automatically listed in the Products section.Field Description Name
(name__v)Enter a name for the Product Family. Organization
(organization__v)Select the Organization to which the Product Family belongs. Family Datasheet
(datasheet__v)Add a Datasheet that applies to all Products within the Product Family that do not have a specified Datasheet. If the Product Family Datasheet changes, those updates are automatically applied to those Products. Therapeutic Area
(therapeutic_area__v)Select the Therapeutic Area for the Product Family. - Create a Product Record
- Go to Business Admin > Objects > Products.
- On the Products page, select Create.
- In the Create Product window, select the product type, and then select Continue.
- If the Product has multiple Product Type registrations to meet agency requirements, select Product. If not, select from the other options.
Note When you select a product type registered in the FDA's jurisdiction, the product type determines how the system automatically generates submissions to the FDA. See FDA Report Formats for more information.
- Complete the fields on the Create Product page.
- Select Save.
Product Fields
Field Description Organization
(organization__v)Select the Organization to which the product belongs.
When adding a Case Product, the Case must be associated with this organization to allow users to select this product.
Product Name
(name__v)Enter the primary name of the product. Vault Safety references the product using the name that you enter in this field.
When a Case Product references this Product record, the system uses this field to generate the Case Product Name.
Product Family
(product_family__v)Select the Product Family to which the Product belongs. Abbreviation
(abbreviation__v)Enter the abbreviated name for the product.
This field is for reference only.
Generic Name
(generic_name__v)Enter the generic name for the product.
For Device-type products, this field is used in report generation for FDA E2B (R2), FDA VAERS E2B (R3), and FDA MedWatch 3500A report formats.
Vaccine Type
(vaccine_type__v)If the product is a vaccine, select the vaccine type.
When a Vaccine-type Case Product references this Product record, the system snapshots this field to the Case Product.
International Birthdate
(international_birthdate__v)Enter the date when a regulatory authority first granted marketing authorization for the product.
This field is used in report generation for the FDA MedWatch 3500A format (G.5 Pre-1938).
Expiration Date
(case_product_expiration_control__v)Enter the expiration date for the product. Partial dates are supported and the minimum precision required is the year.
The system snapshots this field to the Case Product. For Device-type products, this field is used in report generation for FDA E2B (R2) (B.4.k.2.4.FDA.1).
Manufacturer
(manufacturer__v)Select the organization that manufactures the product, if it is different from the one selected in the Organization field.
For Device-type products, this field is used in report generation for FDA E2B (R2), FDA VAERS E2B (R3), and FDA MedWatch 3500A report formats.
Core Datasheet
(datasheet__v)Select the Core Datasheet for the product family.
Datasheets are used to automatically detect expectedness for an adverse event and the suspect or interacting Case Products.
Non-Company Product
(non_company_product__v)If selected, the system will consider Marketing→Investigational and Marketing→Marketing (Cross-Agency) cross reporting scenarios for the Product. API Name
(api_name__v)Enter a unique identifier that can be used with the Safety Rule "Product" parameter to define a specific Product for a reporting rule.
To learn more, see Reporting Rule Parameter Reference.
Market Segment
(market_segment__v)Select a Market Segment from the picklist.
This field does not appear on page layouts by default. Depending on your organization’s security configuration, it may be added by your Admin.
- Add Product Registrations
Add product registration details for each country the product is registered in.
- Go to the Product record.
Find Product records on the Business Admin > Objects > Products page. - Under Registrations, select Create.
- Complete the Create Product Registration page.
- Select Save.
Product Registration Fields
Field Description Organization
(organization__v)The system automatically populates this field with a reference link to the Organization on the parent Product record.
If the Registration Applicant/Holder field is blank, the system snapshots this field to the Registration Holder field on Case Products.
Product
(product__v)The system automatically populates this field with a reference link to the Product parent record. Registration Name
(name__v)(Required) Enter a name for the Product Registration. Vault Safety references the registration using the name that you enter in this field. Product Type
(product_type__v)The system automatically populates this field with the product type of the Product parent record. Combination Type
(combination_type__v)If the product is a combination product, select the combination type.
The system snapshots this field to the Case Product and is used in report generation for the FDA VAERS E2B (R3) format.
Registration Number
(registration_number__v)Enter the product authorization or application number for the country where the product is marketed.
For U.S. Registrations, ensure that the value you enter in this field adheres to the FDA E2B format requirements for element B.4.k.4.1 (Authorisation / Application Number).
The system snapshots this field to the Case Product and is used in report generation for E2B, FDA MedWatch 3500A, and PADER formats.
Registration Date
(registration_date__v)Enter the date when the product was registered.
This field is for reference only.
Registration Type
(registration_type__v)Select the registration type.
This field is used in report generation for FDA MedWatch 3500A and PADER formats.
This field is needed to correctly match Transmission Profile Scope records for any Organization with multiple Transmission Profiles for the same destination Agency.
Country
(country__v)Select the country where the product is registered and authorized.
The system snapshots this field to the Registration Country field on a Case Product and is used in report generation for E2B formats.
Route of Administration
(route_of_administration__v)Select the route of administration TermID code.
This field is for reference only.
Compounding Type
(compounding_type__v)If the product is a compounded product, select the compounding type.
The system snapshots this field to the Case Product and is used in report generation for E2B formats.
Agency
(agency__v)Based on the Country selected on the Product Registration, the system automatically populates this field with the Agency assigned jurisdiction over that country.
If configured, reporting rules generate Submissions to this Agency when a Case Product references this Product Registration.
Transmission Profile
(transmission_profile__v)To specify the Transmission Profile the system should use when automatically generating Submissions for this registration, select the Transmission Profile. We recommend setting this field when you have a Transmission Profile corresponding to this reporting destination and report type.
Local Datasheet
(datasheet__v)Select the Local Datasheet for this product registration. A Local Datasheet is specific to a country or region, listing expected adverse events that apply to that product registration.
Datasheets are used to automatically detect expectedness for an adverse event and the suspect or interacting Case Products.
Registration Applicant/Holder
(registration_holderapplicant__v)The system snapshots this field to the Registration Holder field on Case Products. If this field is blank, the value in the Organization field is snapshot instead.
MAH
(reporting_organization__v)This field may also be named Reporting Organization depending on your Admin's configuration.
If you have a Marketing Authorization Holder (MAH) that manages your ICSR reporting obligations for this registration, select the Organization. Selecting an Organization in this field creates an MAH Distribution List, and thereby a reporting obligation, for this registration.
Note Removing the last remaining MAH/Reporting Organization from an MAH Distribution List will also delete the MAH Distribution list.
Warning Use caution when setting this field. Reporting Obligations are for Distributions only and override agency submission rules. Do not select an Agency such as the FDA or EMA.
Registered As
(transmission_product_type__v)Select the product type for this registration from the following options:
- Drug
- Biologic
- Device
- Vaccine
- Nutritional
- Cosmetic
- OTC Drug
- OTC Device
- Combination Product
The system snapshots this field to the Case Product Registered As field.
When generating E2B Transmissions for this registration, the system snapshots this field, then uses that value to determine whether Device-type Combination Product Constituents are exported.
See Exclude Device Constituents from E2B Exports for more information.
When generating an FDA 3500A form for a non-Combination Company Product, this field determines which section of the form is populated, as follows:
- If the Registered As field is set to Device or OTC Device, populate the Suspect Medical Device sections.
- If the Registered As field is not set to Device or OTC Device, populate the Suspect Product(s) section.
- If the Company Product has multiple FDA registrations (one device, and one non-device, for example), populate the Suspect Product(s) section.
- If the Company Product has no FDA registration, populate the Suspect Product(s) section.
For information on how the product type for a registration is used when evaluating reporting rules, see the Product Registration Type rule parameter.
This field does not appear on page layouts by default, but can be added to Transmission page layouts by your Admin. Depending on your Admin's configuration, this field may be called Transmission Product Type.
Default Registration
(default_registration__v)Designates the registration as the most current or commonly used registration for the selected country.
If the registration is the most commonly used for the selected country, select the checkbox. During data entry, in the Case Product Registration field, this registration is prioritized in the picklist, though all active Product Registrations remain available for use.Strength
(strength_number__v|strength_unit__v)Enter the strength of the product.
In the first field, enter a numeric value. In the second field, select a unit of measurement from the picklist or enter a custom unit.MPID
(mpid__v)Enter the Medicinal Product Identifier (MPID) for the product.
Note You can specify only one type of product identifier. Do not specify a MPID if you have entered a PhPID.
The system snapshots this field to the Case Product and is used in report generation for E2B (R3) and CIOMS I formats.
PhPID
(phpid__v)Enter the Pharmaceutical Product Identifier (PhPID).
Note You can specify only one type of product identifier. Do not specify a PhPID if you have entered a MPID.
The system snapshots this field to the Case Product and is used in report generation for E2B (R3) and CIOMS I formats.
National Drug Code
(ndc__v)Enter the US National Drug Code (NDC) or unique identifier for the product.
This field is used in report generation for the FDA MedWatch 3500A format.
Product Code
(product_code__v)Enter the device Product Code.
The system snapshots this field to Device-type Case products, and it is used in report generation for FDA E2B(R2), FDA VAERS E2B(R3), and FDA MedWatch 3500A report formats.
Local Product Code
(local_product_code__v)Enter the region-specific Medicinal Product Identification (MPID) code. This field is used for Localized Cases. Trade Name
(trade_name__v)The system snapshots this field to Device-type Case products, and it is used in report generation for FDA E2B(R2) (B.4.k.20.FDA.1). PMDA Fields
Use the PMDA section on a Product Registration to set up information for a Japanese Product Registration. Add a Japan Product Registration provides information on the PMDA fields. - Go to the Product record.
- Add a Product Substance (Active Ingredient)
- On the Product page, expand Substances, and then select Add.
Your Admin may need to configure your Vault to add the Substance section to the Product page. -
Use any of the following methods to add a Substance:
- Select existing Substances from the library, and then select OK.
In the Search: Substance window, use filters to refine your search. - Select Create. On the Create Substance page, enter the substance details, and then select Save.
You can also add a Product to a Substance by going to Business Admin > Objects > Substances. Create or select a Substance, and then expand Products.
- Select existing Substances from the library, and then select OK.
- Select OK.
Product Substance Fields
Field Description Substance Name
(name__v)(Required) Enter the name of the substance. Vault Safety references the substance using the name that you enter in this field.
The system snapshots this field to the Case Product Substance and is used in report generation for E2B(R2) and E2B(R3) formats.
This field supports up to 128 characters. If your Admin has configured your Vault for 250-character Substance Names, this field may be unavailable and have a different field name.
Substance Name
(substance_name__v)(Required) Enter the name of the substance. Vault Safety references the substance using the name that you enter in this field.
The system snapshots this field to the Case Product Substance and is used in report generation for E2B(R2) and E2B(R3) formats.
This field supports up to 250 characters. Your Admin must enable this field in your Vault.
Organization
(organization__v)(Required) Select the organization or use the binoculars icon to search for the organization associated with the substance. Substance ID
(substance_id__v)Enter the unique identifier for the substance.
This field is for reference only.
Term ID
(termid__v)Enter the substance TermID.
The system snapshots this field to the Case Product Substance and is used in report generation for E2B(R3) formats.
Term ID Version
(termid_version__v)Enter the version date or number for the TermID.
The system snapshots this field to the Case Product Substance and is used in report generation for E2B(R3) formats.
Description
(description__v)Enter a description for the substance.
This field is for reference only.
- On the Product page, expand Substances, and then select Add.
Add Product Datasheets
Vault Safety determines whether a Case Adverse Event is expected or unexpected using the Product Family, Product or Study Core, Local, or Study Product Datasheets associated with the Case Product.
- Create a Product Family Datasheet
- Go to the Product Family record for which you want to add a Product Family Datasheet.
Find Product Families in Business Admin > Objects > Product Families. - Open the Product Family and then select Edit.
- In the Family Datasheet field, select an existing Product Core Datasheet from the dropdown list.
If you do not see the Datasheet you want to select, you must create a Datasheet. - Select Save.
Create a Datasheet
Complete the following steps to create a Datasheet to apply to a Product Family, Product, Product Registration, Study, or Study Product:- Go to the Business Admin > Objects > Datasheets.
- Select Create.
- Complete the fields on the Create Datasheet page.
- Select Save.
Datasheet Fields
Field Description Name Enter a name for the Datasheet. Organization Select the organization to which the Datasheet belongs. Label/Brochure Select the document corresponding to the Datasheet from the Library. Core Identify whether this Datasheet is a core Datasheet: - For a Product Family Datasheet, select Yes.
- For a Core Product or Study Datasheet, select Yes.
- For a Local Datasheet specific to a product registration, select No.
- For a Study Product Datasheet, select No.
Core Datasheet (Optional) To inherit expected adverse events from a Core Datasheet, select the Core Datasheet. This field appears only for Local Datasheets and Study Product Datasheets. Country Select the country for which the datasheet applies. Submissions for agencies with jurisdiction over this country will evaluate expectedness using this datasheet. This field only appears for Local Datasheets and Study Product Datasheets. MedDRA Version Select the version of MedDRA to use in coding expected adverse events (MedDRA Criteria). Enable Precise Expectedness Select this field to prevent the system from assigning an Expectedness value of "No" (Unexpected) for terms that are not listed on the Datasheet.
When this field is selected, if Vault Safety evaluates Expectedness for an unlisted term, the system leaves the Expectedness blank.
You can define which terms are unexpected using the Expectedness field on the Datasheet's MedDRA Criteria.
Unexpected Seriousness Criteria To define conditions for which events are always unexpected, select one or more seriousness criteria.
When this field is defined, if Vault Safety evaluates Expectedness for a listed term with one or more matching values in the Case Adverse Event Seriousness field, the system populates Expectedness as "No" (Unexpected).
If Seriousness Exclusion is defined at the MedDRA Criteria level, the MedDRA Criteria setting takes precedence and this field is ignored for that term.
- Go to the Product Family record for which you want to add a Product Family Datasheet.
- Create a Core Datasheet (Study or Product)
- Go to the Study or Product record for which you want to add a Core Datasheet:
- Find Products in Business Admin > Objects > Products.
- Find Studies in Business Admin > Objects > Studies.
- Select Edit.
- In the Core Datasheet field, select an existing Datasheet from the dropdown list or Create Datasheet.
- For new Datasheets, complete the fields on the Create Datasheet page, and then select Save.
- On the Product record, select Save.
Datasheet Fields
Field Description Name Enter a name for the Datasheet. Organization Select the organization to which the Datasheet belongs. Label/Brochure Select the document corresponding to the Datasheet from the Library. Core Identify whether this Datasheet is a core Datasheet: - For a Product Family Datasheet, select Yes.
- For a Core Product or Study Datasheet, select Yes.
- For a Local Datasheet specific to a product registration, select No.
- For a Study Product Datasheet, select No.
Core Datasheet (Optional) To inherit expected adverse events from a Core Datasheet, select the Core Datasheet. This field appears only for Local Datasheets and Study Product Datasheets. Country Select the country for which the datasheet applies. Submissions for agencies with jurisdiction over this country will evaluate expectedness using this datasheet. This field only appears for Local Datasheets and Study Product Datasheets. MedDRA Version Select the version of MedDRA to use in coding expected adverse events (MedDRA Criteria). Enable Precise Expectedness Select this field to prevent the system from assigning an Expectedness value of "No" (Unexpected) for terms that are not listed on the Datasheet.
When this field is selected, if Vault Safety evaluates Expectedness for an unlisted term, the system leaves the Expectedness blank.
You can define which terms are unexpected using the Expectedness field on the Datasheet's MedDRA Criteria.
Unexpected Seriousness Criteria To define conditions for which events are always unexpected, select one or more seriousness criteria.
When this field is defined, if Vault Safety evaluates Expectedness for a listed term with one or more matching values in the Case Adverse Event Seriousness field, the system populates Expectedness as "No" (Unexpected).
If Seriousness Exclusion is defined at the MedDRA Criteria level, the MedDRA Criteria setting takes precedence and this field is ignored for that term.
- Go to the Study or Product record for which you want to add a Core Datasheet:
- Create a Local Datasheet
- Go to Business Admin > Objects > Products.
- Open the Product, and then open the Product Registration for which you want to add a Local Datasheet.
- Select Edit.
- In the Local Datasheet field, select an existing Datasheet from the dropdown list or Create Datasheet.
- For new Datasheets, complete the fields on the Create Datasheet page, and then select Save.
- On the Product Registration record, select Save.
Datasheet Fields
Field Description Name Enter a name for the Datasheet. Organization Select the organization to which the Datasheet belongs. Label/Brochure Select the document corresponding to the Datasheet from the Library. Core Identify whether this Datasheet is a core Datasheet: - For a Product Family Datasheet, select Yes.
- For a Core Product or Study Datasheet, select Yes.
- For a Local Datasheet specific to a product registration, select No.
- For a Study Product Datasheet, select No.
Core Datasheet (Optional) To inherit expected adverse events from a Core Datasheet, select the Core Datasheet. This field appears only for Local Datasheets and Study Product Datasheets. Country Select the country for which the datasheet applies. Submissions for agencies with jurisdiction over this country will evaluate expectedness using this datasheet. This field only appears for Local Datasheets and Study Product Datasheets. MedDRA Version Select the version of MedDRA to use in coding expected adverse events (MedDRA Criteria). Enable Precise Expectedness Select this field to prevent the system from assigning an Expectedness value of "No" (Unexpected) for terms that are not listed on the Datasheet.
When this field is selected, if Vault Safety evaluates Expectedness for an unlisted term, the system leaves the Expectedness blank.
You can define which terms are unexpected using the Expectedness field on the Datasheet's MedDRA Criteria.
Unexpected Seriousness Criteria To define conditions for which events are always unexpected, select one or more seriousness criteria.
When this field is defined, if Vault Safety evaluates Expectedness for a listed term with one or more matching values in the Case Adverse Event Seriousness field, the system populates Expectedness as "No" (Unexpected).
If Seriousness Exclusion is defined at the MedDRA Criteria level, the MedDRA Criteria setting takes precedence and this field is ignored for that term.
- Create a Study Product Datasheet
- Go to Business Admin > Objects > Studies.
- Open the Study, and then open the Study Product for which you want to add a Study Product Datasheet.
- Select Edit.
- In the Study Product Datasheet field, select an existing Datasheet from the dropdown list or Create Datasheet.
- For new Datasheets, complete the fields on the Create Datasheet page, and then select Save.
- On the Product Registration record, select Save.
Datasheet Fields
Field Description Name Enter a name for the Datasheet. Organization Select the organization to which the Datasheet belongs. Label/Brochure Select the document corresponding to the Datasheet from the Library. Core Identify whether this Datasheet is a core Datasheet: - For a Product Family Datasheet, select Yes.
- For a Core Product or Study Datasheet, select Yes.
- For a Local Datasheet specific to a product registration, select No.
- For a Study Product Datasheet, select No.
Core Datasheet (Optional) To inherit expected adverse events from a Core Datasheet, select the Core Datasheet. This field appears only for Local Datasheets and Study Product Datasheets. Country Select the country for which the datasheet applies. Submissions for agencies with jurisdiction over this country will evaluate expectedness using this datasheet. This field only appears for Local Datasheets and Study Product Datasheets. MedDRA Version Select the version of MedDRA to use in coding expected adverse events (MedDRA Criteria). Enable Precise Expectedness Select this field to prevent the system from assigning an Expectedness value of "No" (Unexpected) for terms that are not listed on the Datasheet.
When this field is selected, if Vault Safety evaluates Expectedness for an unlisted term, the system leaves the Expectedness blank.
You can define which terms are unexpected using the Expectedness field on the Datasheet's MedDRA Criteria.
Unexpected Seriousness Criteria To define conditions for which events are always unexpected, select one or more seriousness criteria.
When this field is defined, if Vault Safety evaluates Expectedness for a listed term with one or more matching values in the Case Adverse Event Seriousness field, the system populates Expectedness as "No" (Unexpected).
If Seriousness Exclusion is defined at the MedDRA Criteria level, the MedDRA Criteria setting takes precedence and this field is ignored for that term.
- Add Expected Adverse Events (MedDRA Criteria)
Once you create and save a Datasheet, the Expected Adverse Events and Datasheet MedDRA Queries sections appear. These sections enable you to list expected adverse events by adding MedDRA Criteria and MedDRA Query records. To support hierarchical browsing of MedDRA Terms, we recommend making some criteria VQL updates in your Vault. Contact your Admin to enable MedDRA UI Enhancements for Non-Case Coding. To use MedDRA Queries to add a large group of adverse events from a combination of SMQs, CMQs, and MedDRA Terms at once, your Admin must enable MedDRA Query Building Blocks.
Add Expected Adverse Events (MedDRA Criteria)
Adverse events can be added to Datasheets at any level of the MedDRA hierarchy. When Case Processors code adverse events on Cases, any MedDRA LLT is considered a match if it is listed on or falls under the hierarchy of the term on the Datasheet. For example, if the Datasheet includes the HLGT “Allergic conditions” as an unexpected adverse event, then the Case-level LLT “Drug-cross-reactivity” would be considered unexpected because it falls under the Datasheet-coded HLGT. Add individual expected adverse events as MedDRA Criteria records under the Datasheet.- Go to the Datasheet record page.
Find Datasheets on the Business Admin > Objects > Datasheets page. - Under Expected Adverse Events, select Create.
- Complete the fields on the Create MedDRA Criteria window:
Field Description MedDRA Term Enter a search term for any level of the MedDRA hierarchy and then select Auto-code or the Advanced Search (  ) icon to search in the MedDRA Browser.
Note To use a term during aggregate reporting, terms must be added at the PT or LLT level.
Auto-Code
When you select Auto-code, the system attempts to match the term to the least specific level of the hierarchy, searching in priority order of SOC, HLGT, HLT, PT, and then LLT.
When the system finds an exact match, the term is populated in the field. Below the field, the matched term and level appear in bold and any less specific hierarchical levels are listed below.
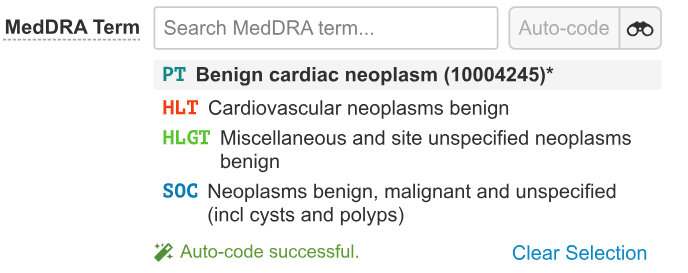
All levels of the MedDRA hierarchy displayed in Edit mode If the system does not find an exact match, a notification appears. You can enter a different search term to auto-code or search using the MedDRA Browser. If you have entered a term in the MedDRA Term field, it appears in the MedDRA Browser Search bar.
Advanced Search
To search for a term using the MedDRA Browser, complete the following steps:
- To the left of the Search bar, select the MedDRA hierarchy level you want to search.
- In the Search bar, enter the search term.
- (Optional) To filter the MedDRA Browser to show only terms that are part of a primary system organ class, select the Only Primary SOC checkbox.
- Select the Search (
 ) icon to initiate the search.
The search results are displayed based on the hierarchy level selected in step 1. There is a 1,000 search result limit in the browser. - To code a MedDRA term, select the term and then select Confirm.
Result
The term is populated in the field. Below the field, the matched term and level appear in bold and all of the less specific hierarchical levels are listed below.
Note When you hover over the hovercard for the MedDRA Term, the Primary SOC is listed only if the field is coded at the LLT or PT level. The Primary SOC is not listed if the field is coded at the HLT, HLGT, or SOC level of the hierarchy.
Include Lower Levels (Optional) This field determines whether lower-level terms are included when evaluating expectedness during aggregate reporting (DSUR, PBRER, and PSUR). If an adverse event does not match a Preferred Term (PT) in the Datasheet, the system checks whether the adverse event matches a Lower Level Term (LLT). MedDRA Condition Enter the name of the medical condition to which the adverse event applies and then select Auto-code or the Advanced Search ( ) icon to select the MedDRA LLT from the MedDRA Browser. The system matches the medical condition with the Product Indications on a Case to determine whether an adverse event is expected.Active Date Start To specify when a term was approved to be listed on the datasheet, enter the date of approval. The date is inclusive.
This setting impacts expectedness evaluation in aggregate reports (DSUR, PBRER, and PSUR). Active Range for Expectedness in Aggregate Reports provides more information.
Active Date End Optionally, to specify the last day when a term was approved to be listed on the datasheet, enter the end date. The date is inclusive.
The day after the Active Date End is the first day the term is considered unlisted and unexpected.If you don't specify an end date, the term is considered actively approved and expected.
This field is not displayed by default and must be added to the page layout to appear.
This setting impacts expectedness evaluation in aggregate reports (DSUR, PBRER, and PSUR). Active Range for Expectedness in Aggregate Reports provides more information.
Description Enter a description of the expected adverse event. Expectedness By default, all terms on the datasheet are considered expected. However, you can use this field to specify whether terms on the sheet are unexpected. If unspecified, this field defaults to Yes (expected). Seriousness Exclusion To define conditions for which this event is always unexpected, select one or more seriousness criteria.
When this field is defined, if Vault Safety evaluates Expectedness for a Case Adverse Event with this term and one or more matching Seriousness values, the system populates Expectedness as "No" (Unexpected).
If you populate this field, the system ignores the Unexpected Seriousness Criteria setting on the Datasheet for this term.
- Select Save.
Add Datasheet MedDRA Queries (MedDRA Query Building Blocks)
MedDRA Query Building Blocks offer a way to combine existing Standard MedDRA Queries (SMQs), hierarchical MedDRA terms, and Custom MedDRA Queries (CMQs) in a MedDRA Query record. The MedDRA Query with the Building Blocks can then be applied to multiple Datasheets and Watchlists, and all of the MedDRA Terms within the Building Blocks are added to those records. Admins control when to push MedDRA Query record changes to all Datasheets and Watchlists using it. Add each MedDRA Query record under the Datasheet.- Go to the Datasheet record page.
Find Datasheets on the Business Admin > Objects > Datasheets page. - Under MedDRA Queries, select Create and then complete the following fields:
Field Description MedDRA Query Select a MedDRA Query record from the dropdown list. Scope Select whether the terms in the MedDRA Query record are Narrow, Broad, or both.
Select Narrow or Broad to pull in values with the corresponding scope applied on the SMQ or CMQ term. Leave blank to pull in all values.
Expectedness Select whether all the terms in the MedDRA Query are Expected or Unexpected. Seriousness Exclusion To define conditions for which the listed events are always Unexpected, select one or more seriousness criteria.
When this field is defined, if Vault Safety evaluates Expectedness for a Case Adverse Event with any of the MedDRA Query record terms and one or more matching Seriousness values, the system populates Expectedness as "No" (Unexpected).
If you populate this field, the system ignores the Unexpected Seriousness Criteria setting on the Datasheet for these terms.
Active Date Start To specify when the terms were approved to be listed on the Datasheet, enter the date of approval. The date is inclusive. This field applies only to Clinical Trial Study Cases.
This setting impacts expectedness evaluation in aggregate reports (DSUR, PBRER, and PSUR). Active Range for Expectedness in Aggregate Reports provides more information.
Active Date End Optionally, to specify the last day when the terms were approved to be listed on the Datasheet, enter the end date. The date is inclusive. This field applies only to Clinical Trial Study Cases.
The day after the Active Date End is the first day the terms are considered unlisted and unexpected. If you don't specify an end date, the term is considered actively approved and expected.
This setting impacts expectedness evaluation in aggregate reports (DSUR, PBRER, and PSUR). Active Range for Expectedness in Aggregate Reports provides more information.
Description Enter a description of the expected adverse event. - Select Save.
Tip Select Save + Create to add another MedDRA Query record to your Datasheet.
- In the All Actions menu, select Update from MedDRA Queries.
Result
All of the MedDRA LLTs that fall under the MedDRA Query records are listed in the Expected/Unexpected Event Terms section.
- Go to the Datasheet record page.
Add Studies
Add a Study record for each clinical study that your organization monitors and reports on. Before you add a Study, ensure to add the Study Product to the Product library.
- Create a Study Record
- Go to Business Admin > Objects > Studies.
- Select Create.
- Complete the fields on the Create Study page.
- Select Save.
Study Details Fields
Field Description Study Number
(name__v)Enter the sponsor study number. Vault Safety references the study using the number that you enter in this field.
The system snapshots this field to Cases linked to this Study and uses the Study Number to generate Case Names.
This field is also used in E2B, DSUR, and FDA 3500A report generation.
Development Phase
(development_phase__v)For Studies reportable to the PMDA (Japan), select the development phase.
If this field does not appear on the page layout, your Admin can add it as part of the steps to enable PMDA (Japan) fields.
Study Type
(study_type__v)Select the reason the patient was administered the Study Product. The following options are available, but your vault may be configured with additional options:
- Clinical Trial: This option corresponds to E2B code
1for data element C.5.4. - Individual Patient Use: For example, compassionate use, named patient basis. This option corresponds to E2B code
2for data element C.5.4. - Other Study: For example, pharmacoepidemiology, pharmacoeconomics, intensive monitoring. This option corresponds to E2B code
3for data element C.5.4.
The system snapshots this field to Cases linked to this Study.
This field is used to define postmarket studies for PADER, PBRER, PSUR, CIOMS I, and FDA MedWatch 3500A reports. This field is also used in E2B report generation.
If this field does not appear on the page layout, an administrator can add it as part of the steps to enable post market studies.
Masking
(masking__v)(Required) Select the masking level required for the study.
When this field is set to Double-Blind, you can use the Blinded field to enable blind protection.
Depending on your Admin's configuration, this field may have a different name.
Start Date
(start_date__v)Enter the start date for the study.
This field is for reference only.
Completion Date
(completion_date__v)Enter the completion date for the study.
This field is for reference only.
Study Name
(study_name__v)Enter the study name as registered in the jurisdiction where you will submit case reports.
The system snapshots this field to Cases linked to this Study.
This field is also used in E2B report generation.
Protocol Title
(protocol_title__v)This field is used by organizations with a Vault Clinical Operations to Vault Safety Connection. When Study records are created or edited in the Clinical Operations Vault, values in the Protocol Title field are applied to the associated Study records in Vault Safety.
In Vault Safety, this field is for reference only.
Organization
(organization__v)Select the Organization that sponsors the study.
When selecting the Study on a Case, the Case must be associated with this organization to allow users to select this study.
MedDRA Version
(meddra_version__v)Select the MedDRA version for the study.
This field is for reference only.
Note This field does not control the MedDRA Version used by Cases associated with the Study.
Download Dosage to Case
(download_dosage_to_case__v)This field only appears when the following conditions are true on the Study record:
- Blinded is set to Yes
- Study Has Arms is set to Yes
Select one of the following options to control how the system will snapshot Study Arm Product Dosage information to Cases involving the Study:
- When Case is Opened: Dosage information will be populated upon case promotion.
- When Case is Unblinded: (Default) Dosage information will be populated once the Case has been unblinded.
- Never: The system will not snapshot Study Arm Product Dosage information to Cases.
Blinded
(study_blinded_control__v)Select whether the study is Open Label, Unblinded, or Blinded.
When you select Blinded, the system applies blind protection to this Study and its Cases. Blind protection is activated after unblinding for Case Products and associated assessments.
Depending on your Admin's configuration, the Blinded field on Studies may be named "Blinding Type".
Note If your Admin has configured a default value for the Blinded field, upon record creation the system applies that value, regardless of whether another value is entered. To override the default value, edit the record, update the Blinded field, and then select Save.
Study Has Arms
(study_has_arms__v)Select Yes if the study has arms. Once you save the Study, you can add Study Arms. Select No if the study does not have arms. Study Has Unspecified Products
(study_has_unspecified_products__v)Select this checkbox if you want to create a Study with Unspecified Products. This option is mostly for organized data collection of reports from non-clinical trial studies. For example, for Patient Support Programs (PSPs) and Market Research Programs (MRPs) that may not have Study information available, such as Study Products or Study Product Registrations.
If you select this option, the system uses Product Registrations when evaluating reporting obligations for Cases involving this Study.
The system can not save the Study if you select this checkbox for a Study that has Study Products, Study Arms, or Registrations.
Note If you do not see this checkbox, you must add it to the Study page layout.
Core Datasheet
(datasheet__v)Select the Core Datasheet for the Study.
Datasheets are used to automatically detect expectedness for an adverse event reported for a Study.
Non-Company Sponsored Study
(non_company_sponsored_study__v)If selected, the system will consider Investigational→Investigational and Investigational→Marketing (Cross-Agency) cross reporting scenarios for the products within the Study. API Name
(api_name__v)Enter a unique identifier that can be used with the Safety Rule "Study" parameter to define a specific Study for a reporting rule.
To learn more, see Reporting Rule Parameter Reference.
- Add a Study Product
Note You must add the Product to the product library before you can add a Study Product.
- Go to the Study to which you want to add the Study Product.
Find Study records on the Business Admin > Objects > Studies page. - Under Study Products, select Create.
- In the Create Study Product window, select the product type, and then select Continue.
Select the same product type that the Product record is set to. - Complete the fields on the Create Study Product page and select Save.
Study Product Fields
Field Description Organization
(organization__v)The system automatically populates this field with the Organization the Study is associated with. Products must be linked to the same Organization to be selected on the Study Product.
Study
(study__v)The system automatically populates this field with the parent Study record. Name
(name__v)Enter a name to identify the Study Product. The name should be consistent with the relevant Product Registration. Study Product Role
(study_product_role__v)Select the role of the product in the study. If you leave this field blank, Investigational is used by default.
The following standard options are available:
- Investigational (Default)
- Active Comparator
- Placebo
- Device
- Diagnostic
- Standard of Care
This field is used to classify products in DSUR report generation.
Product
(product__v)Select the Product from the product library. Start typing the name of the product to live search the product library. Product Registration
(product_registration__v)Select the Product Registration associated with this Study Product. The list of records is filtered by the Product selected in the Product field.
Study Product Datasheet
(study_product_datasheet__v)For Studies with multiple products, you can add Study Product-specific Investigator Brochures.
Select from existing Datasheets, or create a new Datasheet.
Dose
(dose_number__v|dose_unit__v|dose_unit_text__v)Enter the amount of product that is administered in each dose. In the first field, enter a numeric value. In the second field, select a unit of measurement from the picklist or enter a custom unit.
When a blinded Study Arm Product references this Study Product, the system snapshots this field to Cases in accordance with the Download Dosage to Case setting on the Study.
Frequency
(frequency__v)Enter a numeric value specifying the frequency of the administered dose.
When a blinded Study Arm Product references this Study Product, the system snapshots this field to Cases in accordance with the Download Dosage to Case setting on the Study.
Frequency (unit)
(frequency_unit__v)Select the unit of measurement specifying the frequency of the administered dose.
When a blinded Study Arm Product references this Study Product, the system snapshots this field to Cases in accordance with the Download Dosage to Case setting on the Study.
Dose Form
(dose_form__v|dose_form_text__v)Select the pharmaceutical dose form of the product from the picklist, or use a custom entry.
Vault Safety supports a selection of dose form terms, including terms from the Extended Eudravigilance Medicinal Product Dictionary (xEVMPD) and the Medicines and Healthcare products Regulatory Agency (MHRA).
For open-label and single-blinded Studies and Study Arms, the system snapshots this field to Cases upon Case promotion.
When a blinded Study Arm Product references this Study Product, the system snapshots this field to Cases in accordance with the Download Dosage to Case setting on the Study.
RoA
(roa__v|roa_text__v)Select the route of administration of the product from the picklist or enter a custom entry.
For open-label and single-blinded Studies and Study Arms, the system snapshots this field to Cases upon Case promotion.
When a blinded Study Arm Product references this Study Product, the system snapshots this field to Cases in accordance with the Download Dosage to Case setting on the Study.
Dosage Notes
(dosage_notes__v)(Optional) Enter any additional notes about the dose.
This field is for reference only.
Market Segment
(market_segment__v)Select a Market Segment from the picklist.
This field does not appear on page layouts by default. Depending on your organization's security configuration, it may be added by your Admin.
- Go to the Study to which you want to add the Study Product.
- Add Study Arms
Complete the following steps to add Study Arms to a Study.
- Go to the Study to which you want to add the Study Arm.
Find Study records on the Business Admin > Objects > Studies page. - Under Study Arms, select Create. The Create Study Arm window appears.
- Complete the fields on the Create Study Arm window.
- Select Save.
Study Arm Fields
Field Description Organization
(organization__v)The system automatically populates this field with the Organization the parent Study is associated with.
Study
(study__v)The system automatically populates this field with the parent Study record. Name
(name__v)Enter a name to identify the Study Arm. Vault Safety references the Study Arm using the name that you enter in this field. Blinded
(study_arm_blinded_control__v)This field appears when the parent Study Blinded field is set to Blinded.
If this arm requires blind protection, select Blinded. The system applies blind protection to Cases and Study Products linked to this Study Arm.
If this arm does not require blind protection, select Open Label or Unblinded, as applicable.
Depending on your Admin's configuration, the Blinded field on Study Arms may be named "Masking".
Note If your Admin has configured a default value for the Blinded field, upon record creation the system applies that value, regardless of whether another value is entered. To override the default value, edit the record, update the Blinded field, and then select Save.
Indication
(indication_meddra__v)Enter the Study Arm Indication at the LLT or PT level in the text field, then use the Auto-Code button to automatically match and code the MedDRA term. Alternatively, use the Advanced Search (
) icon to open the MedDRA browser.To learn more, see Code MedDRA Terms.
The system snapshots this field to create a Case Product Indication under the Study Products for this Study Arm. For blinded Study Arms, the indication will be snapshot according to the Download Dosage to Case option.
Description
(description__v)Enter a description for the Study Arm.
This field is for reference only.
Add Study Arm Products
Once you have added study arms, you can add study arm Products.
- Go to the Study record page.
Find Study records on the Business Admin > Objects > Studies page. - Under Study Arm Products, select Create. The Create Study Arm Product window appears.
- Complete the fields on the Create Study Arm Product window and select Save.
Field Description Organization
(organization__v)The system automatically populates this field with the Organization the parent Study is associated with. Study Arm
(study_arm__v)If you add the Study Arm Product under a Study Arm, the system automatically populates this field with the parent Study Arm record. Otherwise, select the Study Arm. Study Product
(study_product__v)Select the Study Product for this arm from the drop-down list. Name
(name__v)Enter a name to identify the Study Arm Product. Vault Safety references the Study Arm using the name that you enter in this field. Dose
(dose_number__v|dose_unit__v|dose_unit_text__v)Enter the amount of product that is administered in each dose.
In the first field, enter a numeric value. In the second field, select a unit of measurement from the picklist or enter a custom unit.For open Study Arms, the system snapshots this field to Cases upon Case promotion.
This field is hidden for blinded Study Arms. Instead, the system snapshots the Dose from the referenced Study Product.
Frequency
(frequency__v)Enter a numeric value specifying the frequency of the administered dose.
For open Study Arms, the system snapshots this field to Cases upon Case promotion.
This field is hidden for blinded Study Arms. Instead, the system snapshots the Frequency from the referenced Study Product.
Frequency (unit)
(frequency_unit__v)Select the unit of measurement specifying the frequency of the administered dose.
For open Study Arms, the system snapshots this field to Cases upon Case promotion.
This field is hidden for blinded Study Arms. Instead, the system snapshots the Frequency (unit) from the referenced Study Product.
Blinded Name
(study_product_placeholder__v)This field is hidden for open Study Arms.
You can use this field to specify a Blinded Name to assign descriptive Case Product names while still protecting the blind.
To specify a blinded name for this product, perform one of the following actions:
- If a blinded name (Study Product Placeholder) has already been added, select the record from the list or select the binoculars to open the browser.
- If a blinded name has not been added, create one:
- Click into the field, and then select Create Study Product Placeholder from the drop-down.
- In the Create Study Product Placeholder window, enter the blinded name in the Name field.
- Select Save.
- Go to the Study to which you want to add the Study Arm.
- Add a Study Indication
Add a Study Indication to code the MedDRA term for the medical condition relevant to the study.
- Go to the Study record page.
Find Study records on the Business Admin > Objects > Studies page. - Under Indications, select Create.
- Specify the Indication on the Create Study Indication page.
- Select Save.
Study Indication Field
Field Description Indication
(indication_meddra__v)Enter the Study Indication at the LLT or PT level in the text field, then use the Auto-Code button to automatically match and code the MedDRA term. Alternatively, use the Advanced Search (
) icon to open the MedDRA browser.To learn more, see Code MedDRA Terms.
- Go to the Study record page.
- Add Study Registrations
Add a Study Registration for each country the study is registered in. When a Case Report Type is Study, the system looks at the Study Registration Countries to generate Submissions according to reporting rules in your Vault. Understand the Reporting Rules Engine provides more information.
- Go to the Study record.
Find Study records on the Business Admin > Objects > Studies page. - Under Registrations, select Create.
- Complete the fields on the Create Study Registration page.
- Select Save.
Study Registration Fields
Field Description Organization
(organization__v)The system automatically populates this field with a reference link to the Organization on the Product parent record.
The system snapshots this field to the Registration Holder field on a Case Product.
Study
(study__v)The system automatically populates this field with a reference link to the Study parent record. Registration Number
(registration_number__v)Enter the study identifier assigned by the registry.
Country
(country__v)(Required) Select the country where the product is registered and authorized.
Reporting Organization
(reporting_organization__v)This field may also be named MAH depending on your vault's configuration.
If you have a Marketing Authorization Holder (MAH) that manages your ICSR reporting obligations for this registration, select the Organization. Selecting an Organization in this field creates an MAH Distribution List, and thereby a reporting obligation, for this registration.
Warning Use caution when setting this field. Reporting Obligations are for Distributions only and override agency submission rules. Do not select an Agency such as the FDA or EMA.
Registration Type
(registration_type__v)Select the registration type.
This field is used in report generation for FDA MedWatch 3500A and PADER formats.
This field is needed to correctly match Transmission Profile Scope records for any Organization which has multiple Transmission Profiles for the same destination Agency.
Transmission Profile
(transmission_profile__v)To specify the Transmission Profile the system should use when automatically generating Submissions for this registration, select the Transmission Profile. We recommend setting this field when you have a Transmission Profile corresponding to this reporting destination and report type.
Transmission Product Type
(transmission_product_type__v)Select the product type for this registration.
The system snapshots this field when generating Transmissions for this registration, then uses that value to determine whether Device-type Combination Product Constituents are exported in E2B transmissions.
See Exclude Device Constituents from E2B Exports for more information.
This field does not appear on page layouts by default, but can be added to Transmission page layouts by an administrator.
Clinical Compound Number
(clinical_compound_number__v)Enter the Japanese Clinical Compound Number (CCN) of the investigational drug. This field appears only if the Country field is set to Japan.
When reporting Study Cases for Clinical Trial Studies registered in Japan, the system populates this value in the J2.12 Clinical Compound Number (CCN) data element of PMDA E2B(R3) reports.
If this field is blank, the system maps the CCN of the primary Case Product Registration from the Local Reporting Details section of the Case.
This field must be configured by your Admin to appear on page layouts. For more information, see Enable PMDA Clinical Trial Reporting Enhancements.
- Go to the Study record.
- Add a Study Site
For multisite clinical studies, create a Study Site record for each site. Study Sites are linked with Site-type Organization records.
- In Business Admin > Objects > Studies, select the Study to which you want to add a Study Site.
- Under Study Sites, select Create. The Create Study Site page appears.
- Complete the fields on the Create Study Site page using the table below.
- Select Save.
Study Site Fields
Field Description Organization
(organization__v)The system automatically populates this field with a reference link to the Organization on the Product parent record.
The system snapshots this field to the Registration Holder field on a Case Product.
Study
(study__v)The system automatically populates this field with a reference link to the Study parent record. Study Site Number
(name__v)Select the Study Site with which this Study Person should be associated. When performing intake, users must select this Study Site to be able to select this Study Person on an AER or Inbox Item (if enabled by Veeva Support and your Admin). Registration
(registration__v)Select the Study Registration associated with this Study Site. Site
(site__v)To specify the site, perform one of the following actions:
- If the Site-type Organization has already been added, select the record from the list or select the binoculars to open the browser.
- If a Site-type Organization has not been added, create one:
- Click into the field, and then select Create Organization from the drop-down.
- In the Create Organization window, select Site as the Organization Type, and then select Continue.
- In the Create Site window, enter the name and address of the Study Site.
- Select Save.
Set Up the MedDRA Dictionary
To enable the medical coding with the Medical Dictionary for Regulatory Activities (MedDRA) for coding symptoms, disease, indicators, and adverse events, you must set up Vault Safety’s centrally managed MedDRA dictionary.
- Set Up MedDRA Centralization
Complete the following steps to set up the central MedDRA dictionary on your Vault.
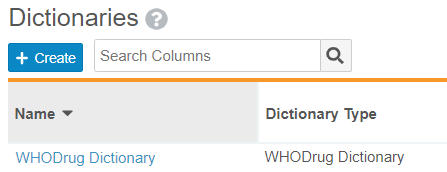
- Go to Business Admin > Objects > Dictionaries.
- On the Dictionaries page, select MedDRA Dictionary from the table.
- On the MedDRA Dictionary page, select Edit.
- In the Dictionary Source field, select Central. If this field is left blank, the Dictionary Source is automatically treated as Central.
- In the Active MedDRA Version field, select the dictionary version you want to use.
- In the Languages field, select one or more of the supported languages. This field determines which languages are available for localized MedDRA coding.
Note Adding a MedDRA language affects only new Cases.
- In the MedDRA ID and MedDRA Password fields, enter your MedDRA credentials.
Your MedDRA username and password are PHI-protected and are used only to ensure you have an active MedDRA license. - Select Save.
Set Up the WHODrug Dictionary
Veeva manages the IDMP-compliant WHODrug dictionary automatically. However, to enable the WHODrug dictionary to code products, you must activate a WHODrug dictionary version.
- Activate the WHODrug Dictionary
- Go to Business Admin > Objects > Dictionaries.
- On the Dictionaries page, select WHODrug Dictionary from the table.
- On the WHODrug Dictionary page, select Edit.
- Beside Active Version (WHODrug), select the version of the dictionary that you want to activate from the list.
- Select Save.
Result
The system activates the WHODrug version and it is available for use.
Set Up Aggregate Reporting Families
To enable aggregate report authoring in Vault Safety, you must set up the Reporting Family. The Reporting Family defines which Products and Studies to include in an aggregate report and the reporting time period.
- Create an Aggregate Reporting Family
Note The Base Reporting Family object type is deprecated and should not be used for aggregate reporting. We recommend that all aggregate reporting families be of the type Product Family. This recommendation applies both to creating new aggregate report tabulations and re-generating tabulations on existing aggregate reports already setup in the system.
- Go to Business Admin > Objects > Reporting Families.
- Select Create.
- In the Create Reporting Family window, select Product Family, and then select Continue.
- Complete the following fields on the Create Reporting Family page:
Field Description Name Enter a name for the product family. Note If your organization uses Reporting Families for aggregate reporting, we recommend that product family names have a maximum of 75 characters. Longer names may impact report generation.
Organization Select the organization that is responsible for preparing the report. IBD Select the international birth date (IBD) for the product family. This field is informational only, and is not used in aggregate reporting. Reporting Period (Months) Enter the number of months that the reporting period spans. The time period you enter in this field determines the reporting schedule the system uses to automatically generate subsequent aggregate reports when the Generate Next Aggregate Report Record action is triggered. - Select Save.
- Add Products to the Reporting Family
- On the Reporting Family page, expand Products.
- Select Create.
The Create Reporting Family Member window appears. - In the Product field, select the Product to include in the report.
The products that appear are filtered by the organization. - Select Save.
Result
The Product is added to the Reporting Family. Any Studies associated with the Product are also added to the Reporting Family. Add additional Products as required.
- Add Studies to the Reporting Family
If the report must include a Study Product that does not share registration details with a record in the Product library, add the Study.
- On the Reporting Family page, expand Studies.
- Select Create.
The Create Reporting Family Member window appears. - In the Study field, select the Study to include in the report.
The studies that appear are filtered by the organization. - Select Save.
Result
The Study and associated Products are added to the Reporting Family. Add additional Studies as required.