About the Feature
Vault SafetyDocs supports importing literature references in bulk from third-party databases. Users upload an RIS file from a database into the Vault Library and then associate a Search Term with it. Users can select an action to import articles from the file, directing the system to create Literature Article records and map all of the file’s information to them. For more information, see Import Literature References from Database Files.
Support for this feature was added in 23R3, which includes the necessary configuration by default. Vaults deployed prior to 23R3 must have the configuration upgrades described on this page to enable this feature.
Configure Page Layouts
Page layouts are managed through Admin > Configuration > Objects > [Object] > Page Layouts.
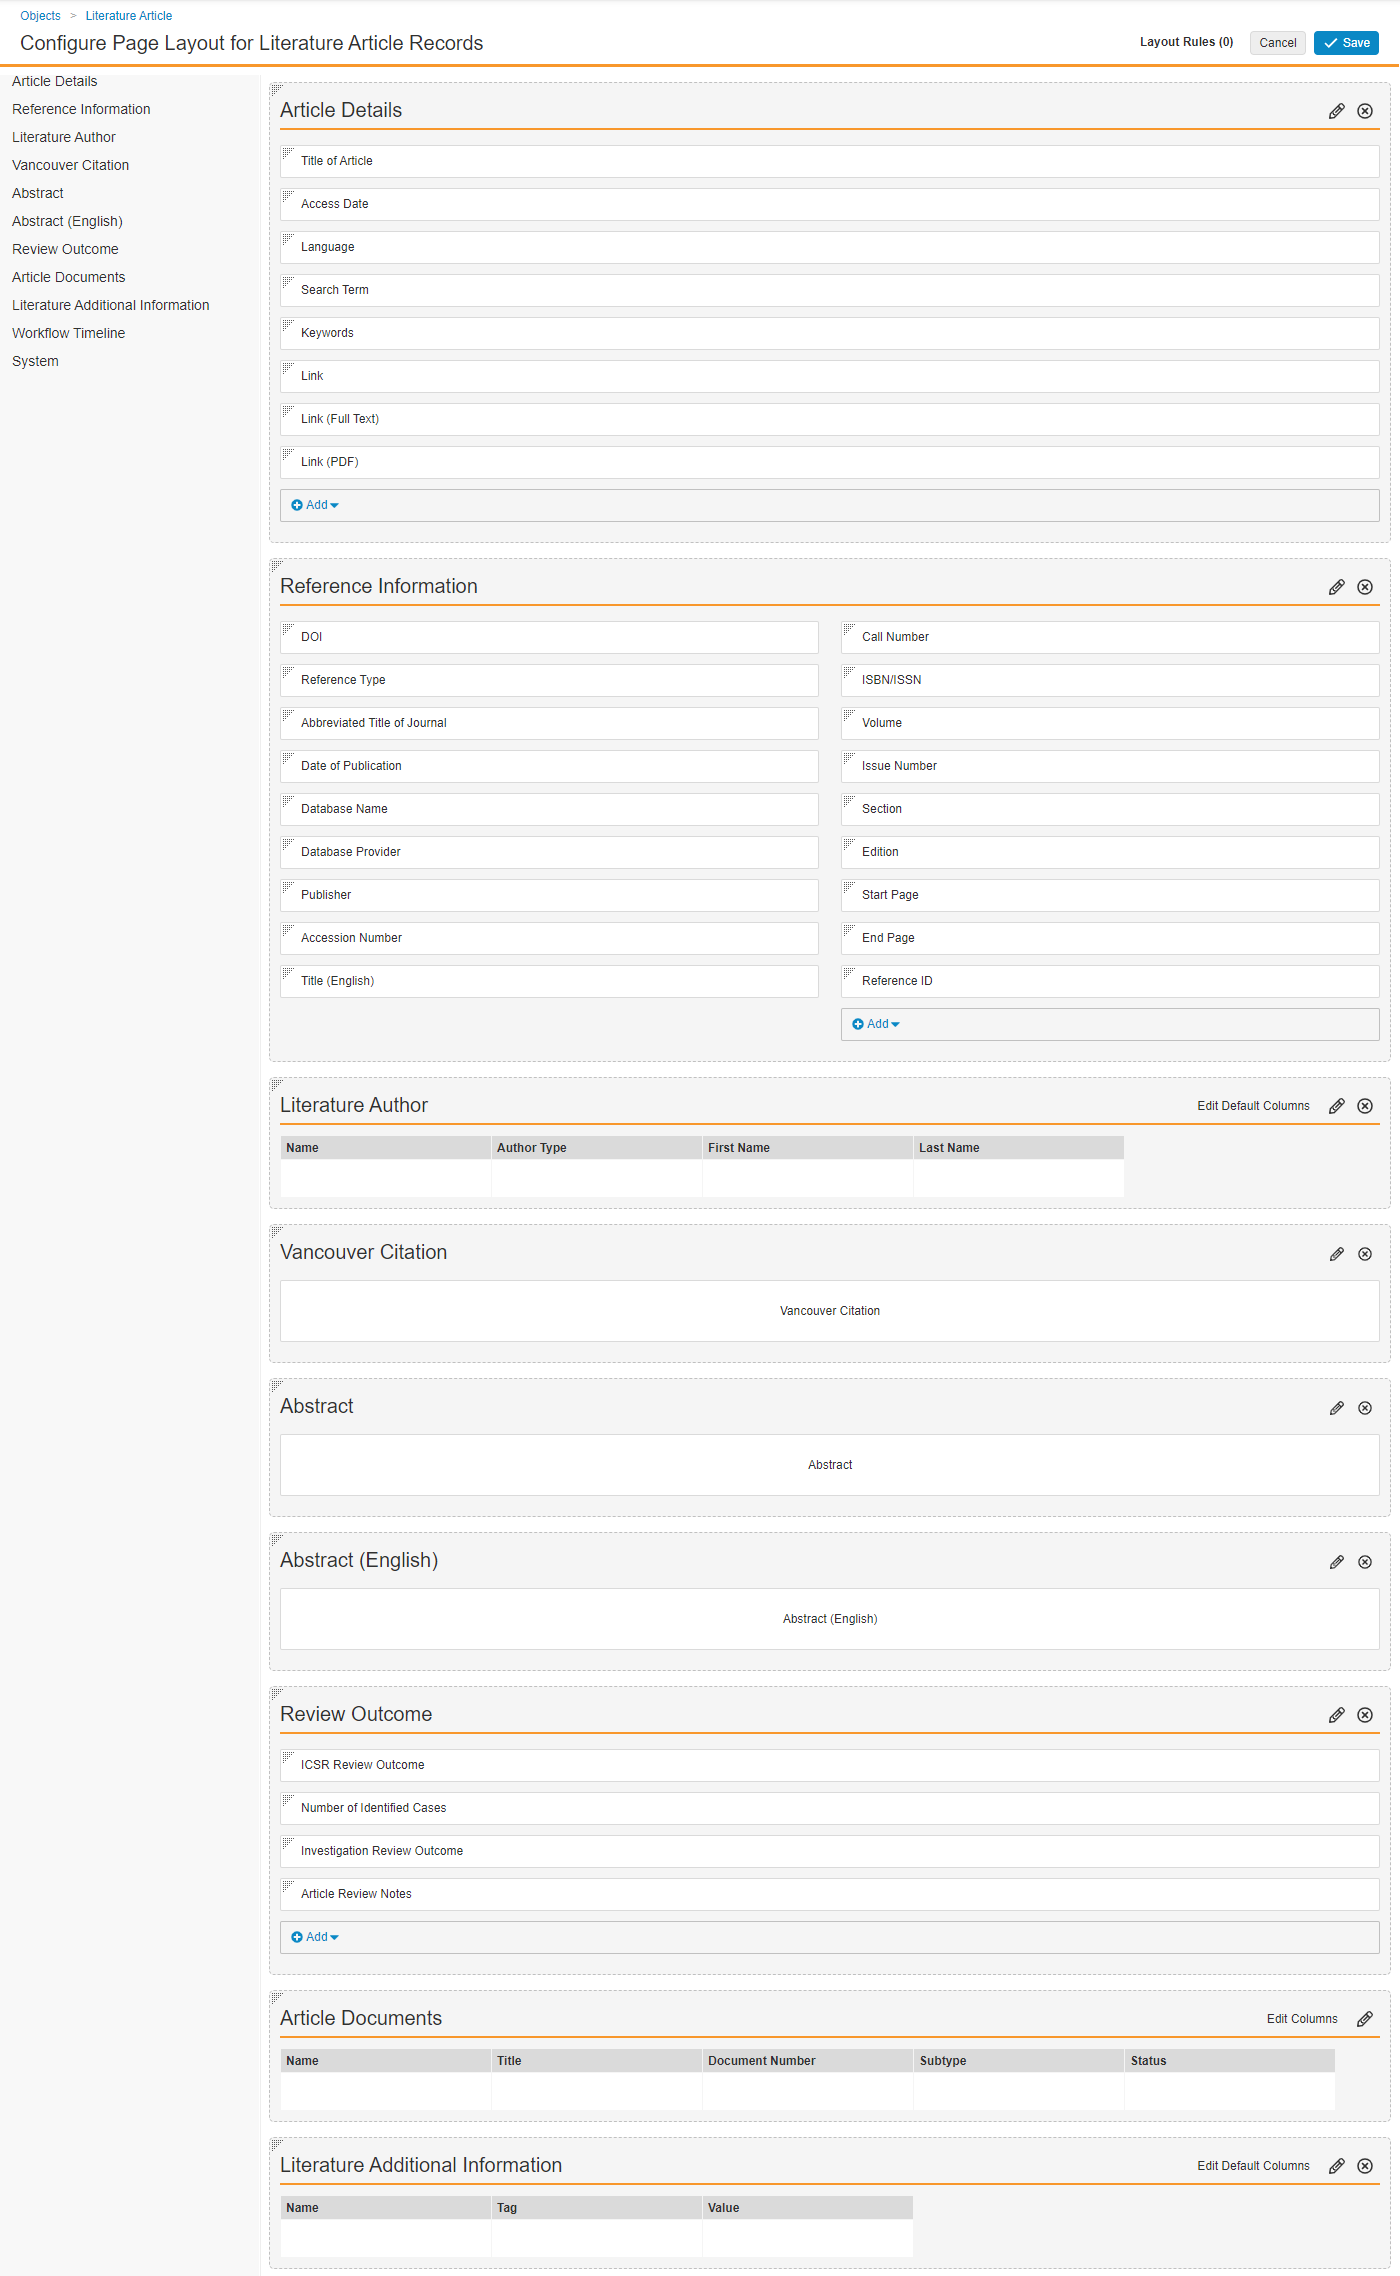
Literature Article Detail Page Layout
- Go to Objects > Literature Article > Page Layouts > Literature Article Detail Page Layout.
- Add the following fields to the Reference Information section:
- DOI
- Reference Type
- Abbreviated Title of Journal
- Date of Publication
- Database Name
- Database Provider
- Publisher
- Accession Number
- Title (English)
- Call Number
- ISBN/ISSN
- Volume
- Issue Number
- Section
- Edition
- Start Page
- End Page
- Reference ID
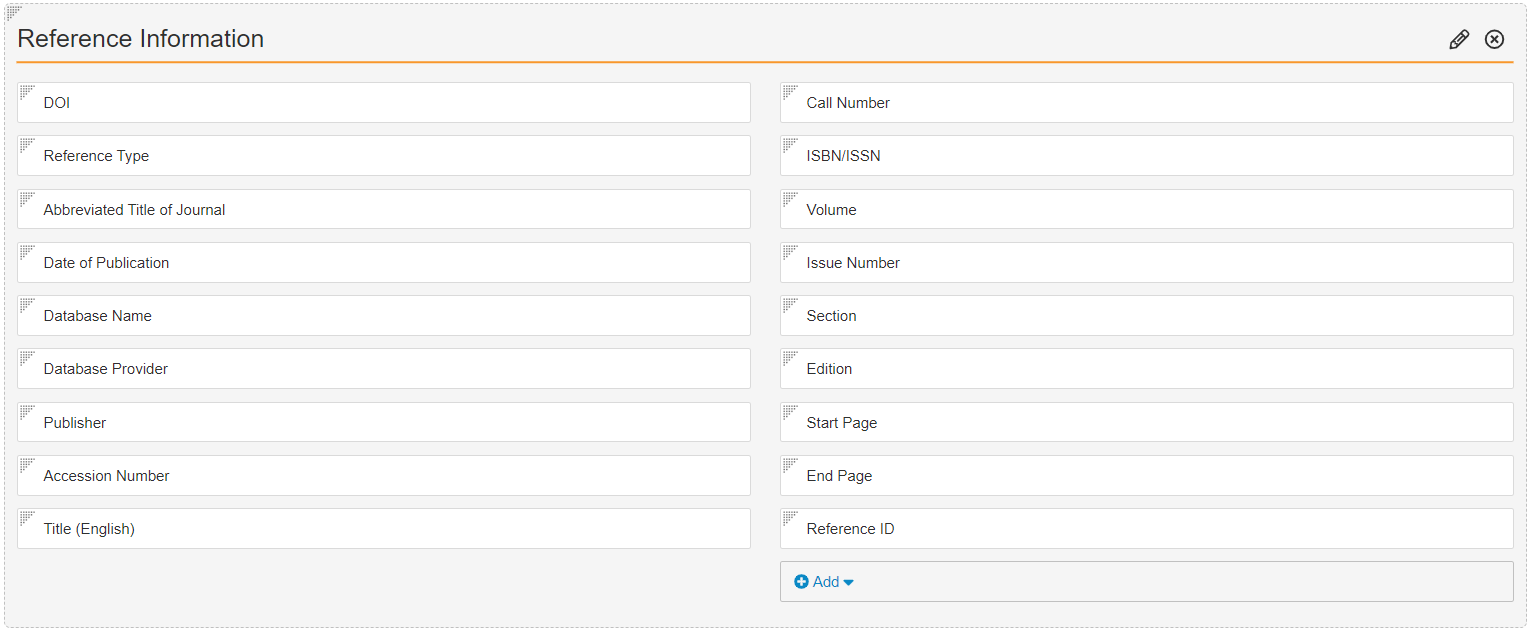
Reference Information Section
Add Literature Author Section
- On the Literature Article Detail Page Layout, select Add Section and then select Related Object from the picklist.
- In the Add Related Object Section dialog, add Literature Author as the related object and select the Create record in pop-up dialog option.
- In the Literature Author section, select Edit Columns and ensure the following columns are added:
- Author Type
- First Name
- Last Name
Add the Vancouver Citation Section
- On the Literature Article Detail Page Layout, select Add Section and then select Text from the picklist.
- In the Add Text Section dialog, complete the fields as follows and then select Done:
- Section Label: Enter "Vancouver Citation"
- Section Name: Enter “vancouver_citation”
- Long Text / Rich Text Field: Select Vancouver Citation
Add the Abstract (English) Section
- On the Literature Article Detail Page Layout, select Add Section and then select Text from the picklist.
- In the Add Text Section dialog, complete the fields as follows and then select Done:
- Section Label: Enter "Abstract (English)"
- Section Name: Enter “abstract_english”
- Long Text / Rich Text Field: Select Abstract (English)
Add the Literature Additional Information Section
- On the Literature Article Detail Page Layout, select Add Section and then select Related Object from the picklist.
- In the Add Related Object Section dialog, add Literature Additional Information as the related object and select the Prevent record creation option.
- In the Literature Additional Information section, select Edit Columns and ensure the following columns are added:
- Tag
- Value
Literature Search Term Detail Page Layout
- Go to Objects > Literature Search Term > Page Layouts > Literature Search Term Detail Page Layout.
- Select Add Section and then select Related Documents from the picklist.
- In the Add Related Document Section dialog, edit the fields as needed and then select Done.
- In the Documents section, select Edit Columns and ensure the following columns are added:
- Document Number
- Type
- Subtype
- Classification
- Status

Literature Author Detail Page Layout
- Go to Objects > Literature Author > Page Layouts > Literature Author Detail Page Layout.
- Add the following fields to the Details section:
- Author Type
- First Name
- Last Name
- Value
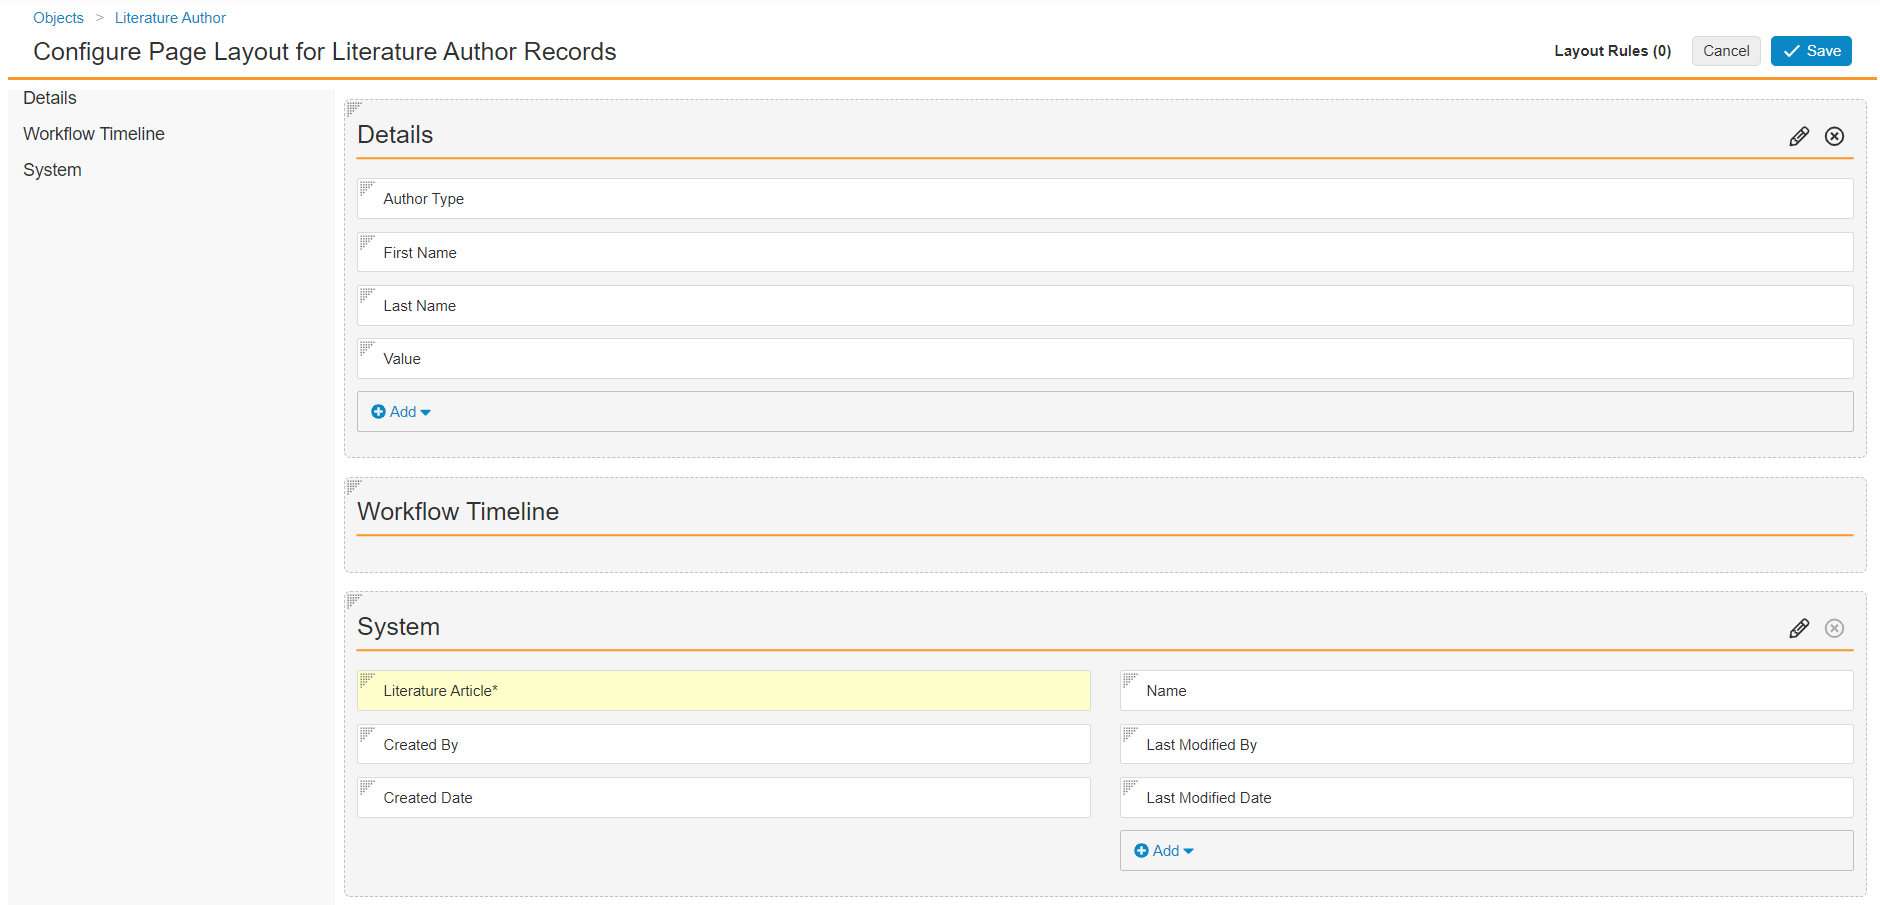
Literature Author Detail Page Layout
Literature Additional Information Detail Page Layout
- Go to Objects > Literature Additional Information > Page Layouts > Literature Additional Information Detail Page Layout.
- Add the following fields to the Details section:
- Literature Article
- Tag
- Value
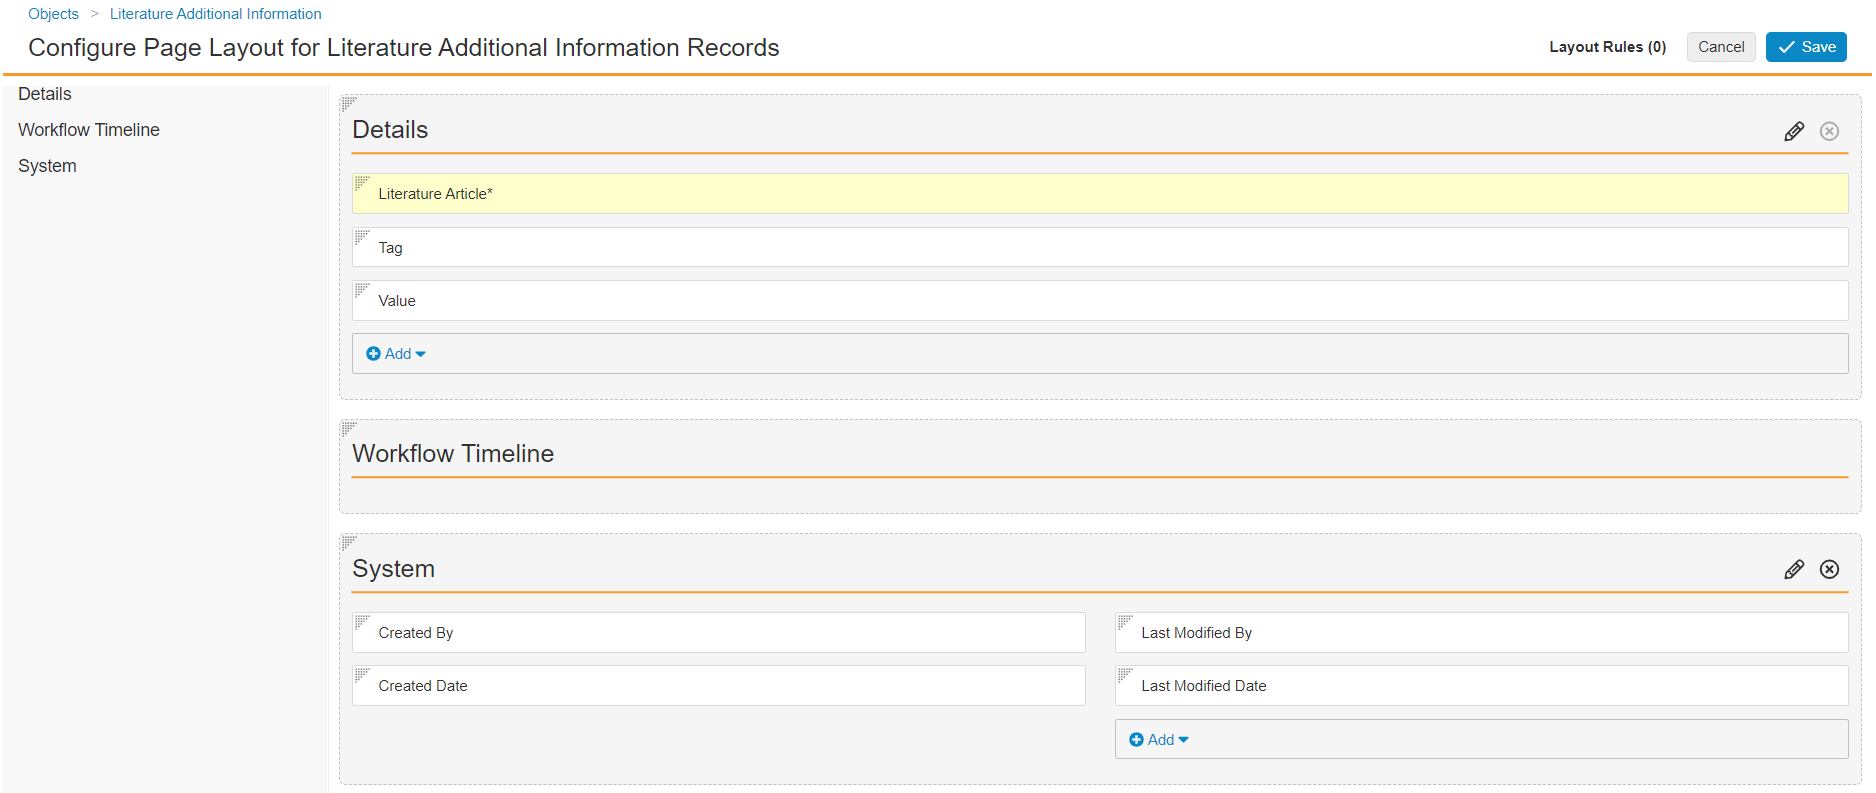
Literature Additional Information Detail Page Layout
Update Field Layout
Complete the following steps to move the Literature Search Term field next to other related fields.
- Go to Admin > Configuration > Field Layout > General (general_c).
- Select Edit.
- Drag and drop the fields to group together the following:
- Literature Review (Literature)
- Literature Article (Literature › Literature Article)
- Literature Search Term (Literature › Review Document › Database Export)
- Save the page.
Create Object Action
Complete the following steps to add the Import Articles from File action on the Literature Search Term object:
- Go to Admin > Configuration > Objects > Literature Search Term.
- On the Actions tab, select Create.
- In the Create Action window, select Import Articles From File and then select Continue.
- Make any required changes to the action and then save the page.
Configure Object Lifecycles
Complete the following steps to set up the object lifecycles related to this feature.
Configure Settings on the Literature Search Term Lifecycle
Go to Admin > Configuration > Object Lifecycles > Literature Search Term Lifecycle and complete the following steps:
1. Add Roles
In the Roles section, add the following roles:
- Aggregate Report Writer
- Reviewer
2. Update Role Permissions
In the Roles section, select Edit to update the role permissions as follows:
| Role | Permissions |
|---|---|
| Aggregate Report Writer | All states: Read |
| Editor | All states: Read |
| Owner | All states: Read |
| Reviewer |
|
| Viewer | All states: Read |
3. Add a User Action to the Active State
- In the States section, select Active.
- In the User Actions section, select Edit.
- Select Create Rule and configure the following rule:
- Always > Import Articles From File
- Action Label: Import Articles from File
Configure Settings on the Literature Author Lifecycle
Go to Admin > Configuration > Object Lifecycles > Literature Author Lifecycle and complete the following steps:
1. Add Roles
In the Roles section, add the following roles:
- Aggregate Report Writer
- Reviewer
2. Update Role Permissions
In the Roles section, select Edit to update the role permissions as follows:
| Role | Permissions |
|---|---|
| Aggregate Report Writer | All states: Read |
| Editor | All states: Read, Edit, Delete |
| Owner | All states: Read, Edit, Delete |
| Reviewer |
|
| Viewer | All states: Read |
Configure Settings on the Literature Additional Info Lifecycle
Go to Admin > Configuration > Object Lifecycles > Literature Additional Info Lifecycle and complete the following steps:
1. Add Roles
In the Roles section, add the following roles:
- Aggregate Report Writer
- Reviewer
2. Update Role Permissions
In the Roles section, select Edit to update the role permissions as follows:
| Role | Permissions |
|---|---|
| Aggregate Report Writer | All states: Read |
| Editor | All states: Read, Edit, Delete |
| Owner | All states: Read, Edit, Delete |
| Reviewer | All states: Read |
| Viewer | All states: Read |
Configure Document Lifecycle
Complete the following steps to set up the document lifecycle related to this feature.
Configure Settings on the Literature Document Lifecycle
Go to Admin > Configuration > Document Lifecycles > Literature Document Lifecycle and complete the following steps.
1. Add Role
- On the Roles tab, select Create.
- On the Create Lifecycle Role page, complete the fields as follows:
- Label: Enter "Aggregate Report Writer"
- Application Role: Select Aggregate Report Writer
- Save the page.
2. Add Security Settings to the New State
- On the States tab, select New.
- Go to Security Settings and select Edit.
- Configure the settings as follows:

Security Settings on the New State
3. Add Security Settings to the Importing State
- On the States tab, select Importing.
- Go to Security Settings and select Edit.
- Configure the settings as follows:

Security Settings on the Importing State
4. Add Security Settings to the Error State
- On the States tab, select Error.
- Go to Security Settings and select Edit.
- Configure the settings as follows:

Security Settings on the Error State
Configure Security
Add security settings to grant access to this feature. Use the following settings as a starting point, but configure access according to your business processes.
Add the Literature Actions Permission Set
- Go to Admin > Users & Groups > Permission Sets.
- Select Create.
- In the Name field, enter "Literature Actions".
- Save the page.
Grant Object Permissions
Once the above Permission Set has been created, complete the following steps to ensure your permissions sets are granted the appropriate level of access to objects needed for this feature.
- On the Signal Management permission set, go to the Objects tab and select Edit.
- Grant Read permissions on the Literature Additional Information object.
- Grant Read, Create, Edit, Delete permissions on the Literature Author object.
- Save the page.
Configure Custom Sharing Rules on the Literature Author Object
Complete the steps below to configure Custom Sharing Rules on the Literature Author object:
- Go to Admin > Configuration > Objects > Literature Author.
- On the Details tab, select Edit and then select the Enable Custom Sharing Rules checkbox.
- When prompted, select Continue and save the page.
- In the Sharing Rules tab, select Create.
- In the Label field, enter "Literature Author - Reviewer" and save the page.
- In the Roles section on the new custom rule page, select Add.
- Add the following roles, with Literature Users in the Users & Groups field:
- Editor
- Reviewer