About the Feature
Signal Management is now supported in Vault SafetyDocs. This new area offers the ability to track Signals as Product-Event Combinations, set Product-Event Dispositions, and record details of Safety Investigations.
Support for this feature was added in 23R2, which includes the necessary configuration by default. Vaults deployed prior to 23R2 must have the configuration upgrades described on this page to enable this feature.
See Signal Management for more information.
Configure Page Layouts
Page layouts are managed through Admin > Configuration > Objects > [Object] > Page Layouts.
Product-Event Combination Detail Page Layout
- Go to Objects > Product-Event Combination > Page Layouts > Product-Event Combination Detail Page Layout.
- From the Details section, drag the Primary MedDRA Term field and drop it into the System section.
- In the Details section, select Add.
- Select the
 Primary MedDRA Term app control from the picklist.
 - Configure the rest of the Product-Event Combination Detail Page Layout as shown below:
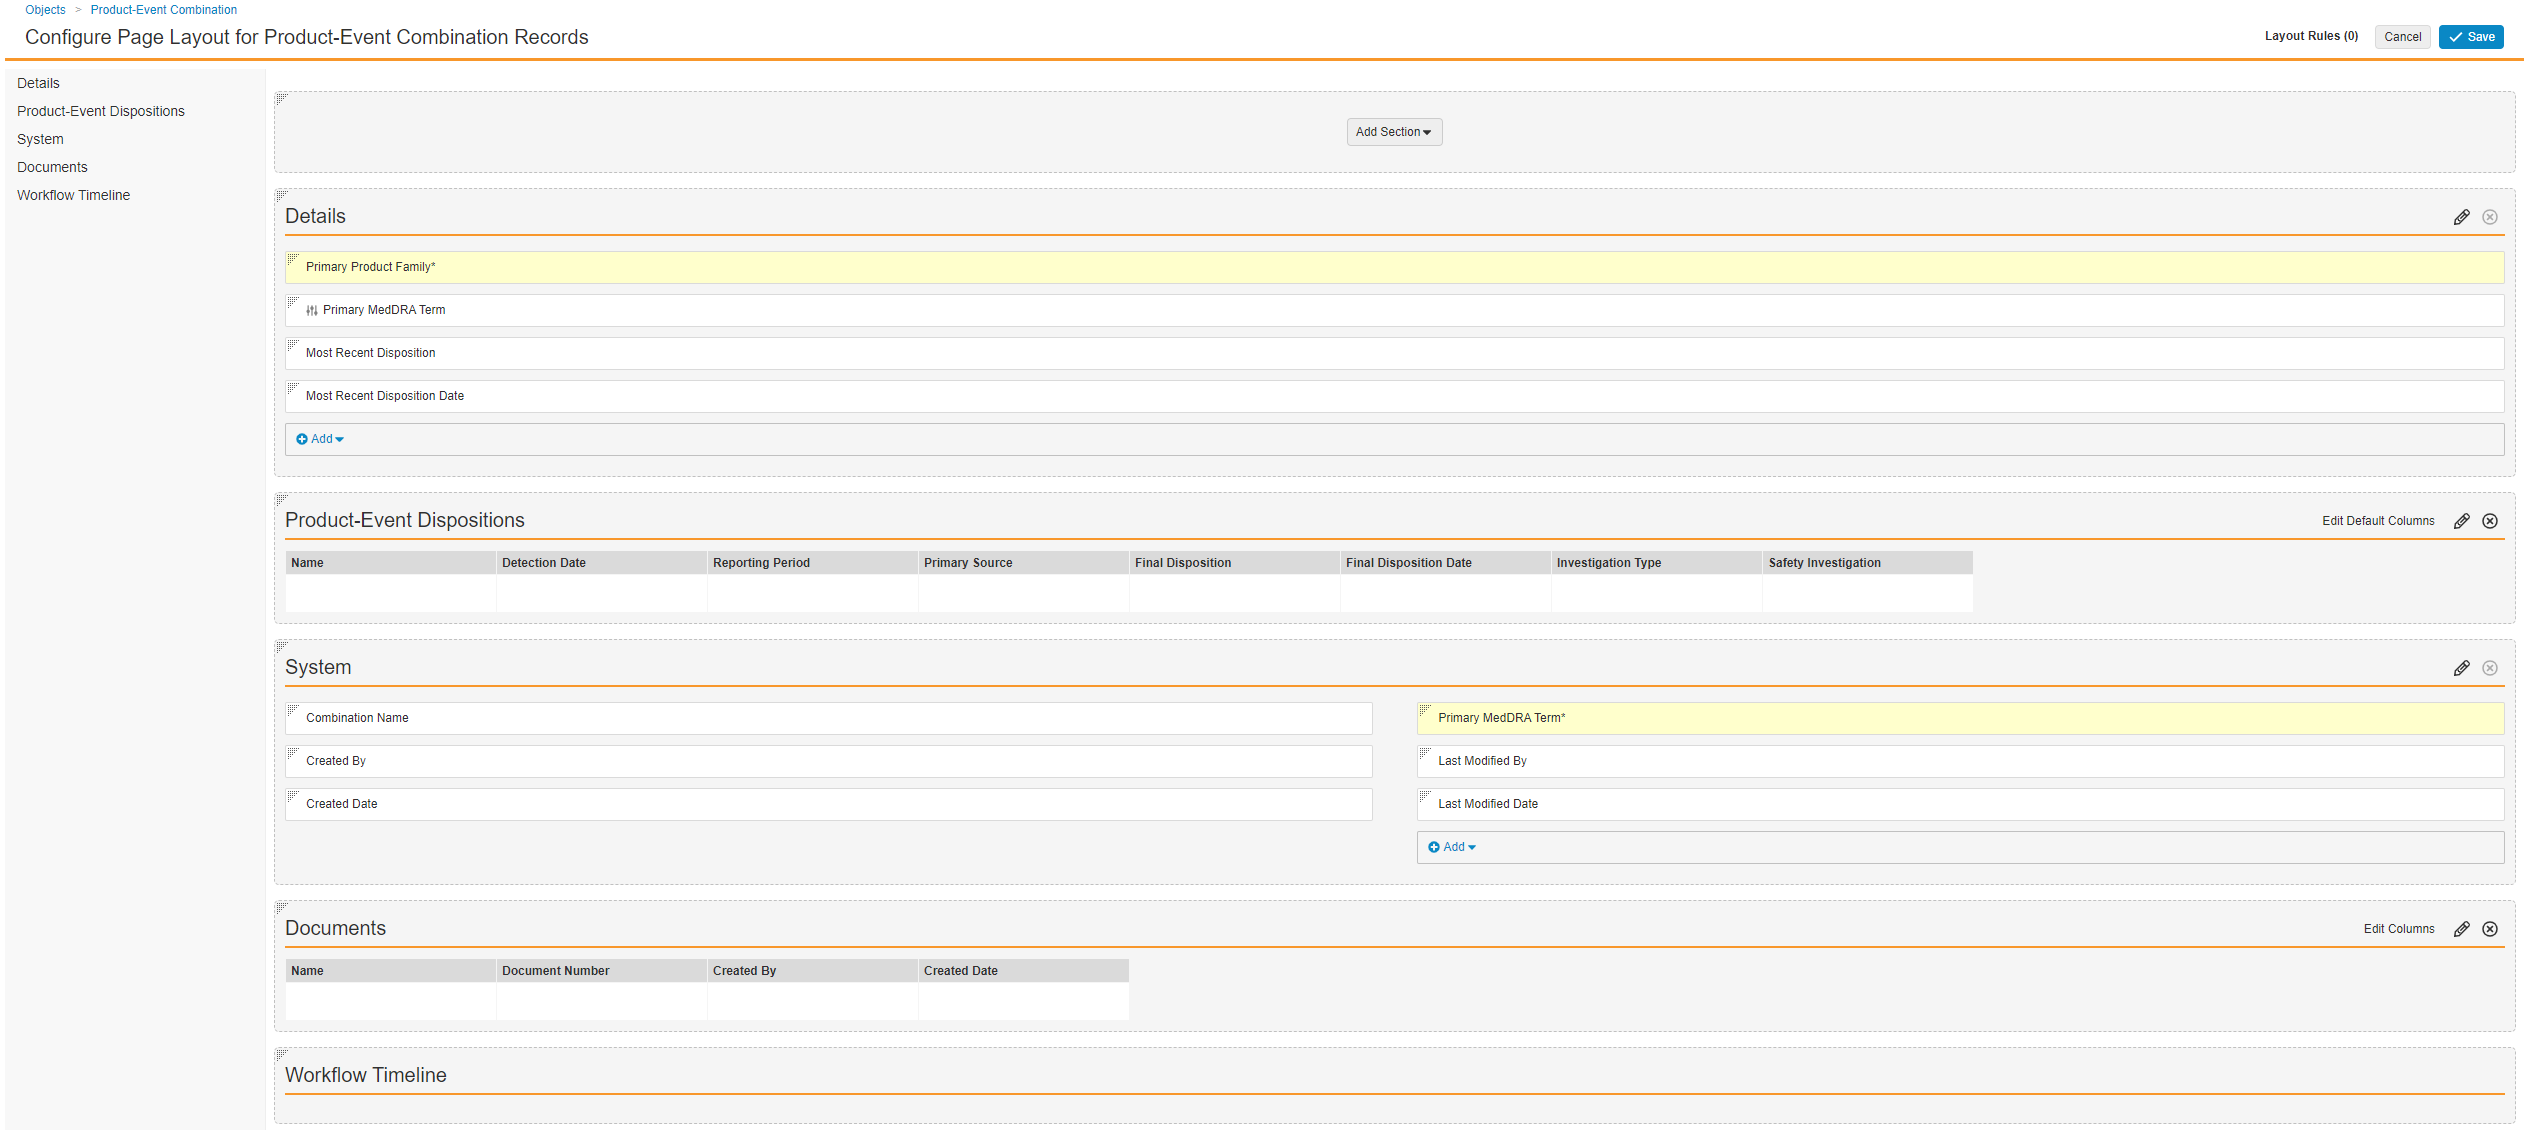
Product-Event Combination Detail Page Layout - Select Save.
Product-Event Disposition Detail Page Layout
- Go to Objects > Product-Event Disposition > Page Layouts > Product-Event Disposition Detail Page Layout.
- In the Details section, select Add.
- Select the Primary MedDRA Term app control from the picklist.
- Configure the rest of the Product-Event Disposition Detail Page Layout as shown below:
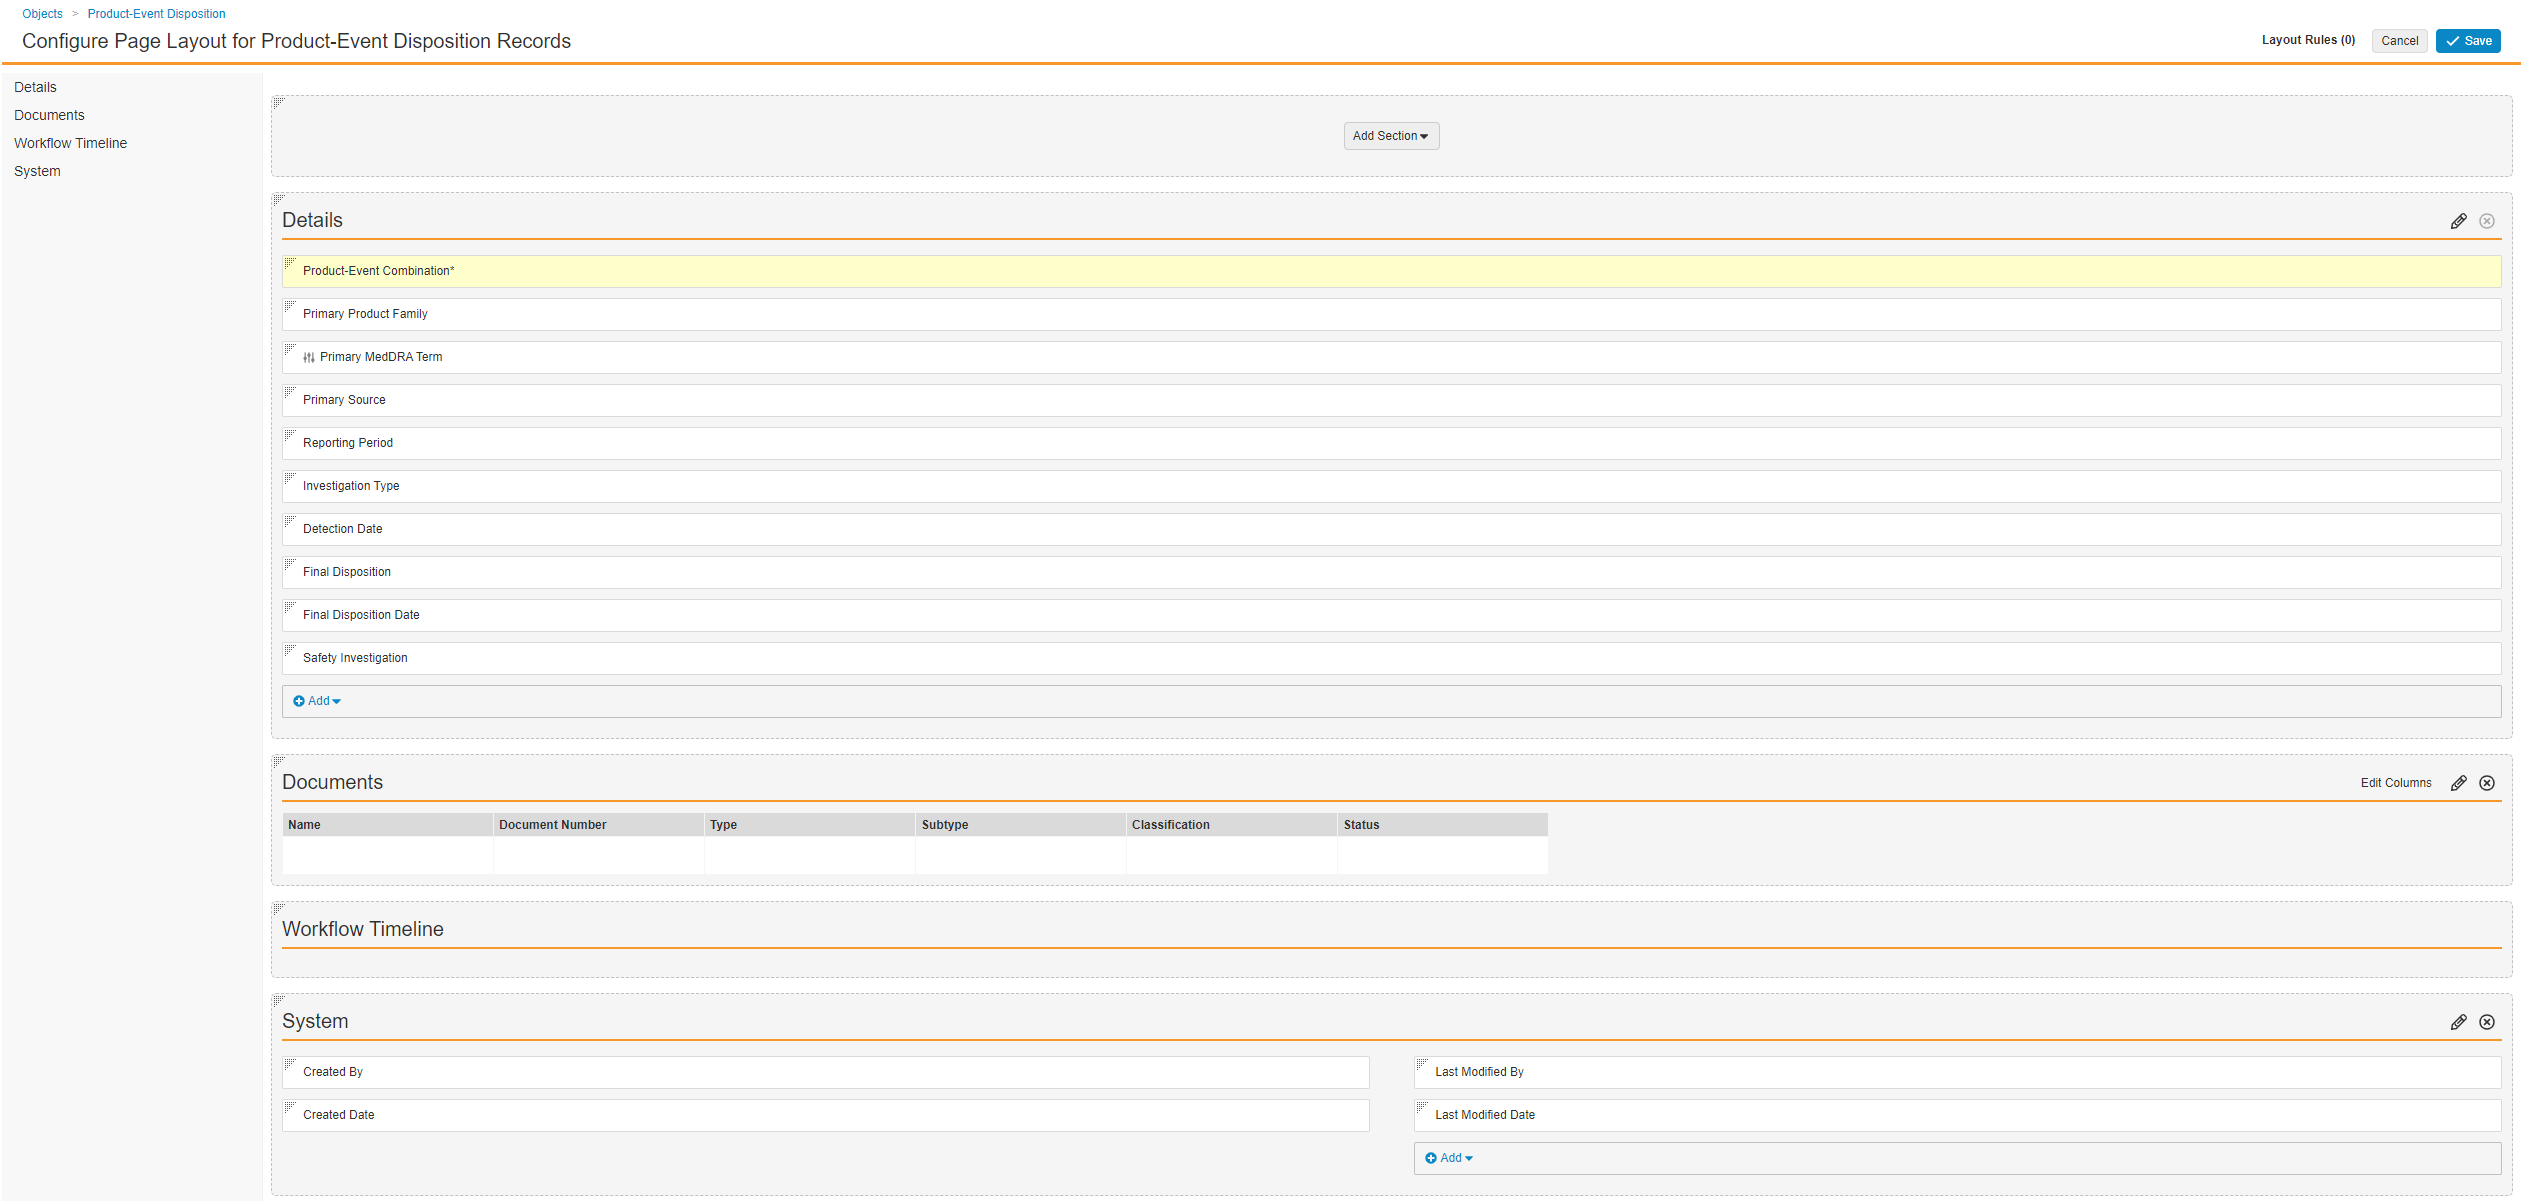
Product-Event Disposition Detail Page Layout - Select Save.
Configure the Signal Source Detail Page Layout
- Go to Objects > Signal Source > Page Layouts > Signal Source Detail Page Layout.
- Configure the Signal Source Detail Page Layout as shown below.
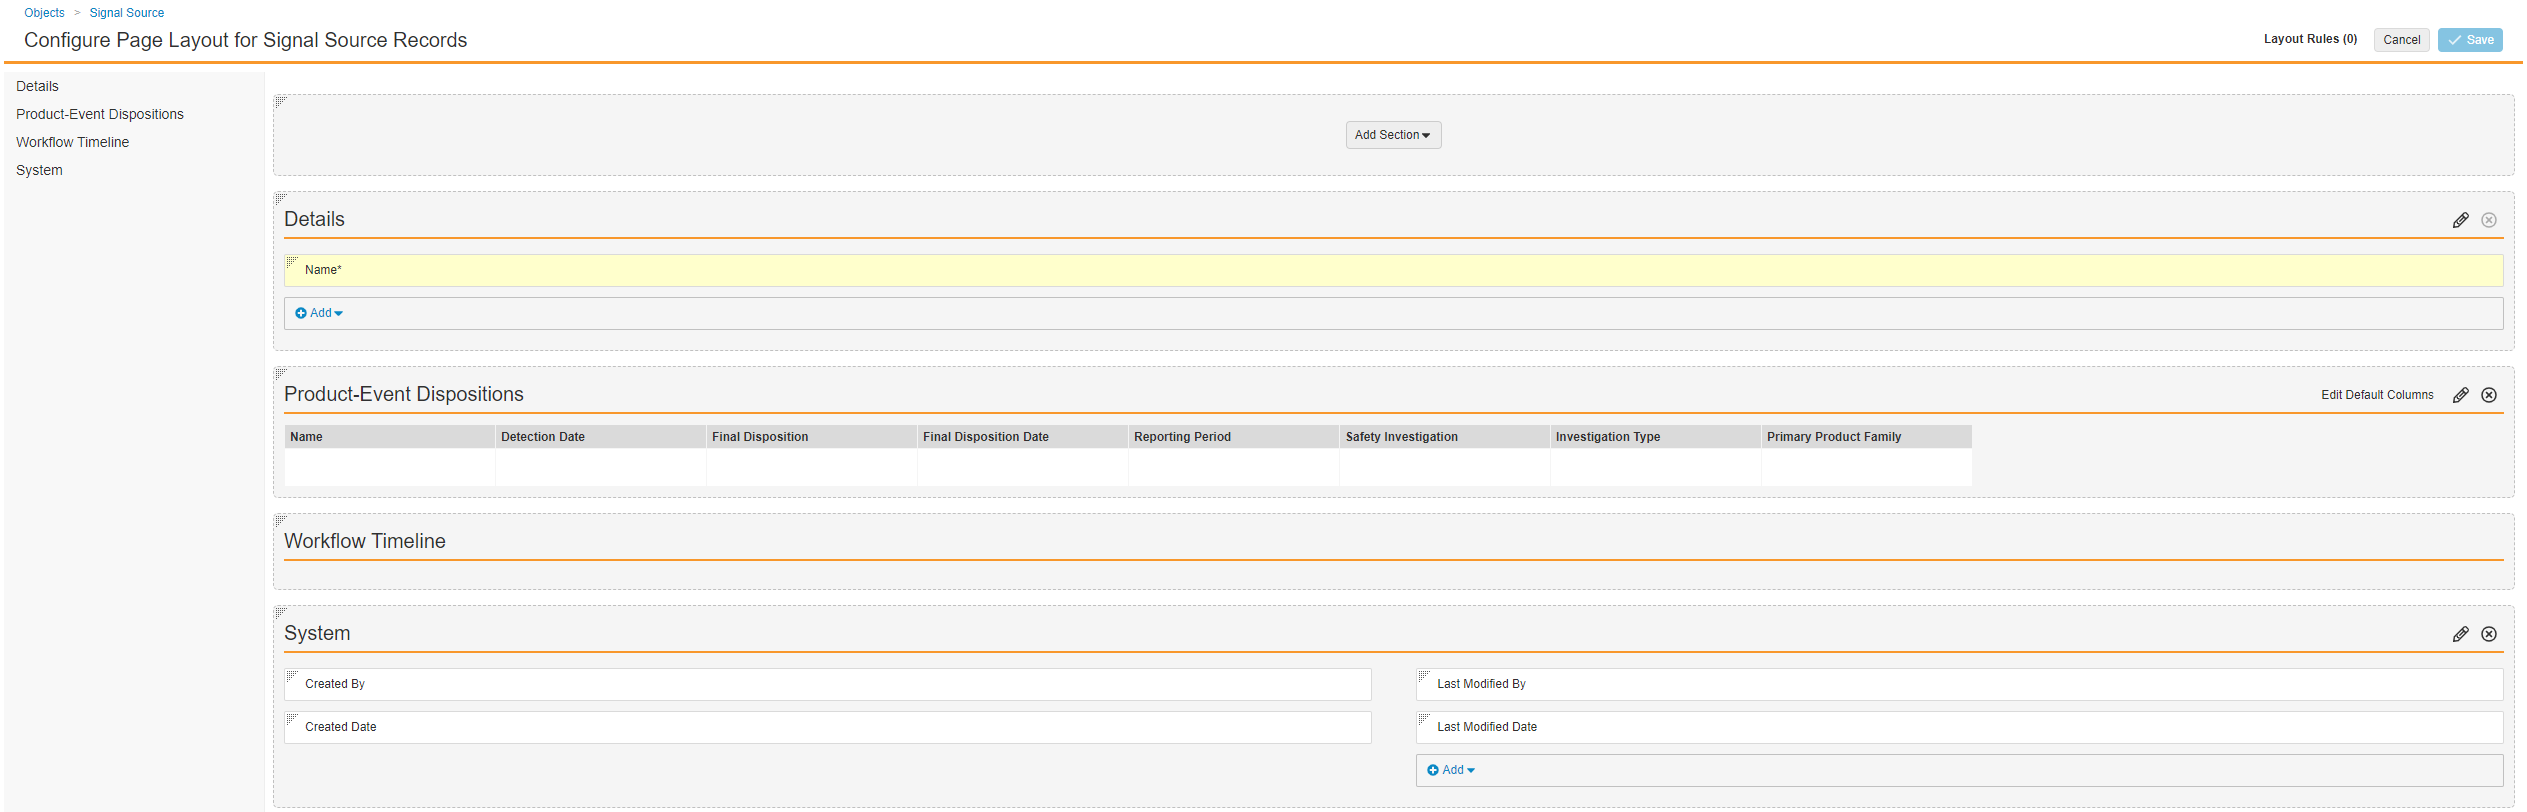
Signal Source Detail Page Layout - Select Save.
Configure the Safety Investigation Detail Page Layout
- Go to Objects > Safety Investigation > Page Layouts > Safety Investigation Detail Page Layout.
- Configure the Safety Investigation Detail Page Layout as shown below.
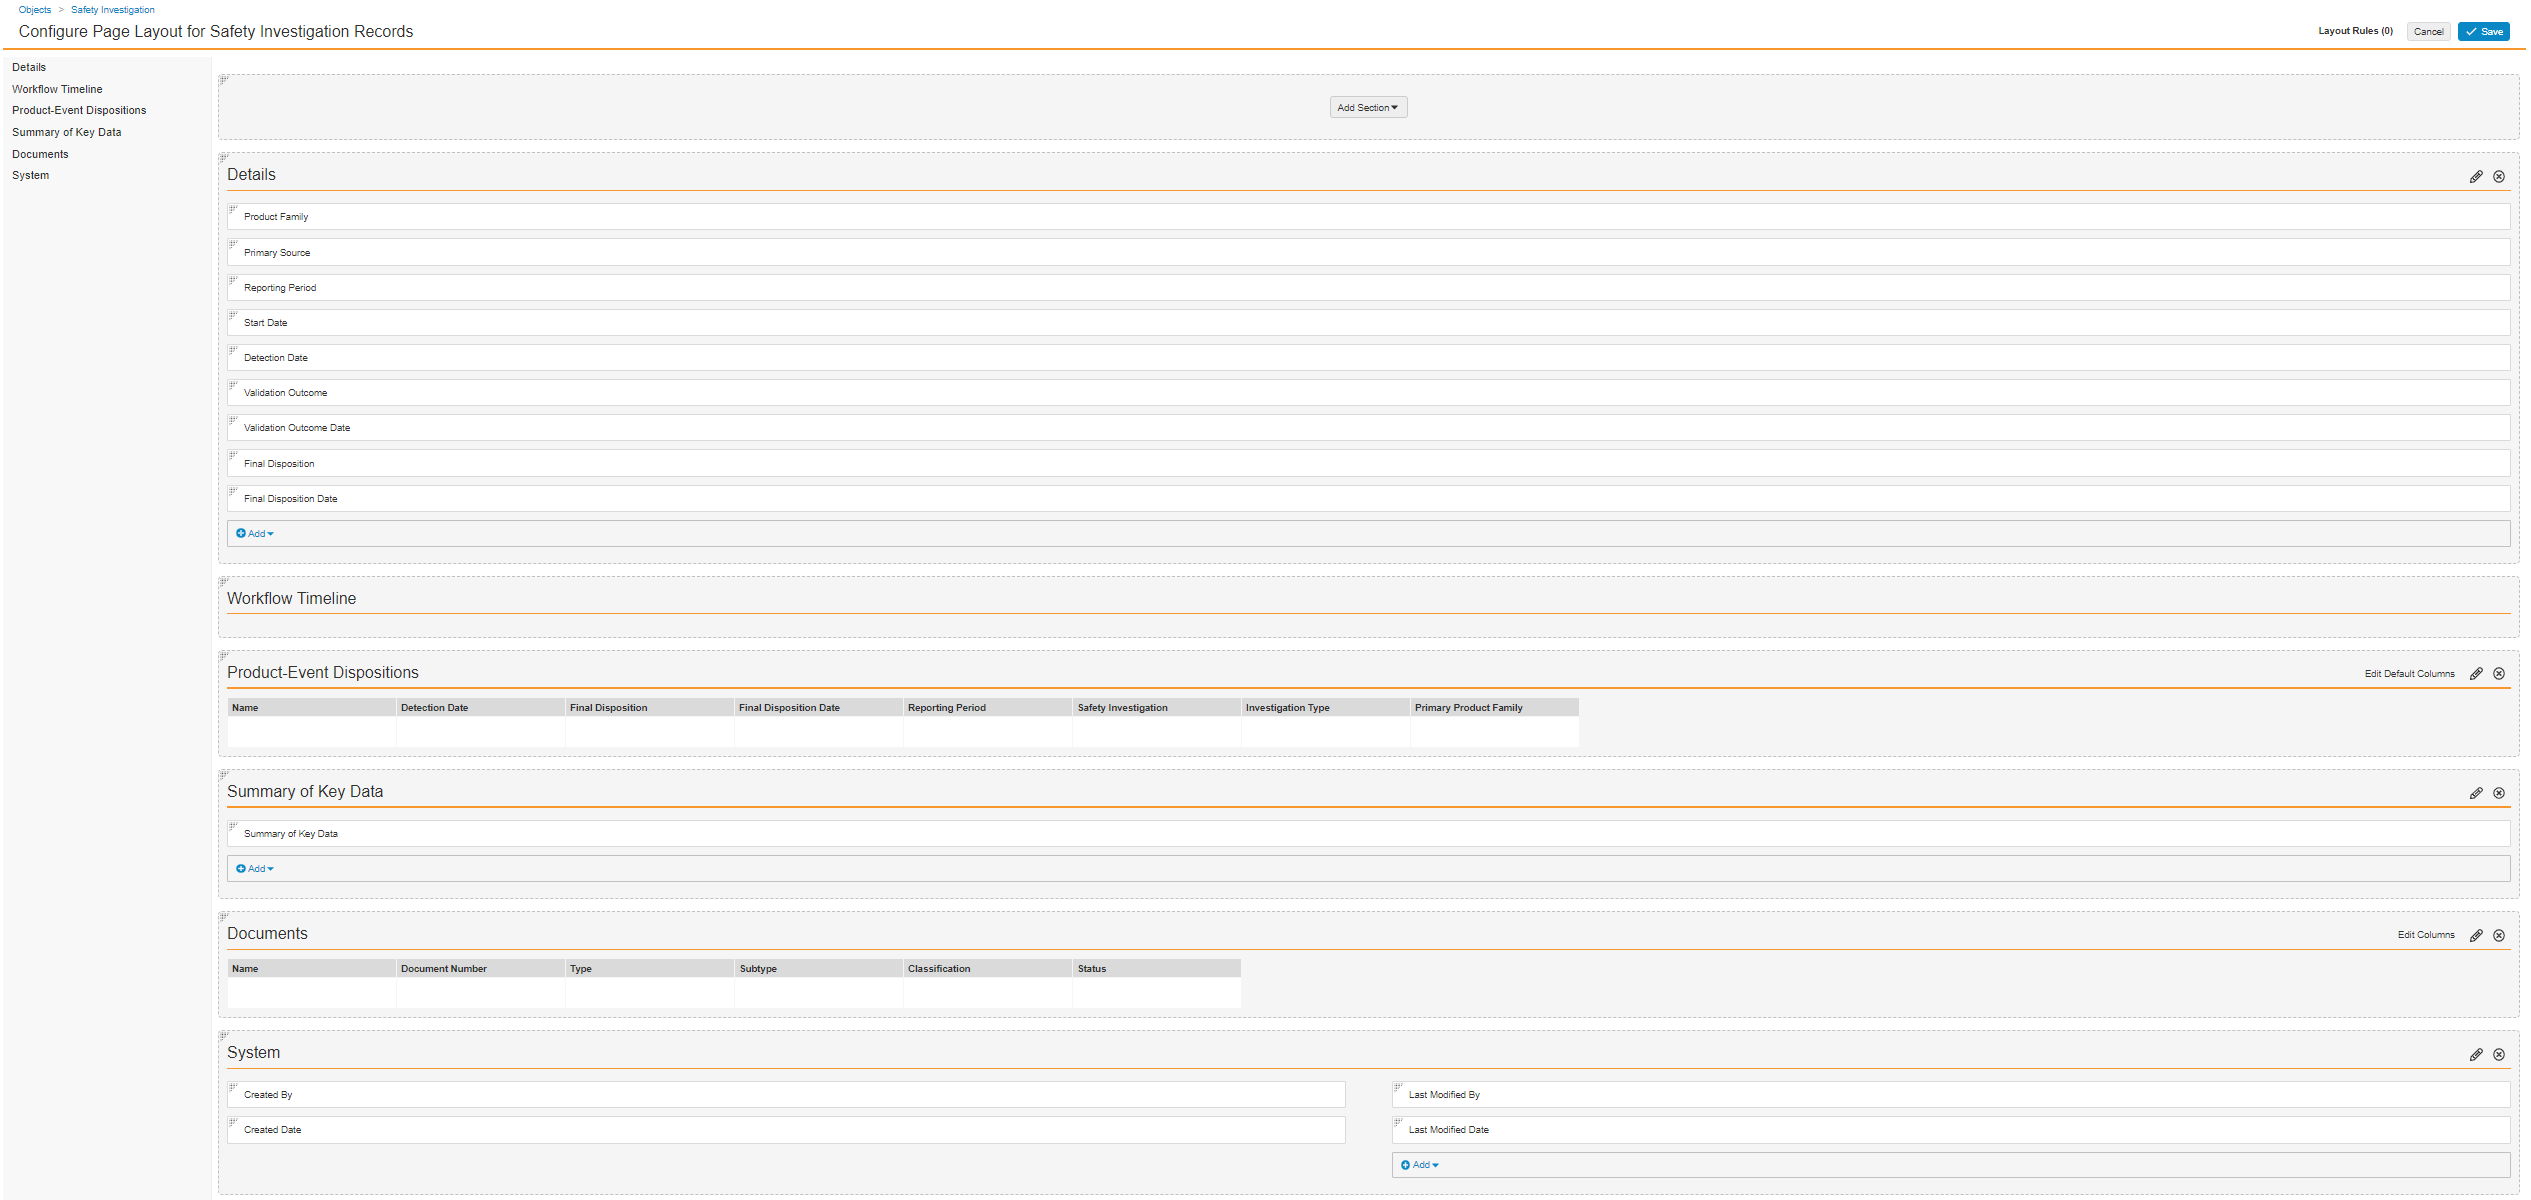
Safety Investigation Detail Page Layout - Select Save.
Configure the Safety Investigation Reporting Period Detail Page Layout
- Go to Objects > Safety Investigation Reporting Period > Page Layouts > Safety Investigation Reporting Period Detail Page Layout.
- Configure the Safety Investigation Reporting Period Detail Page Layout as shown below.
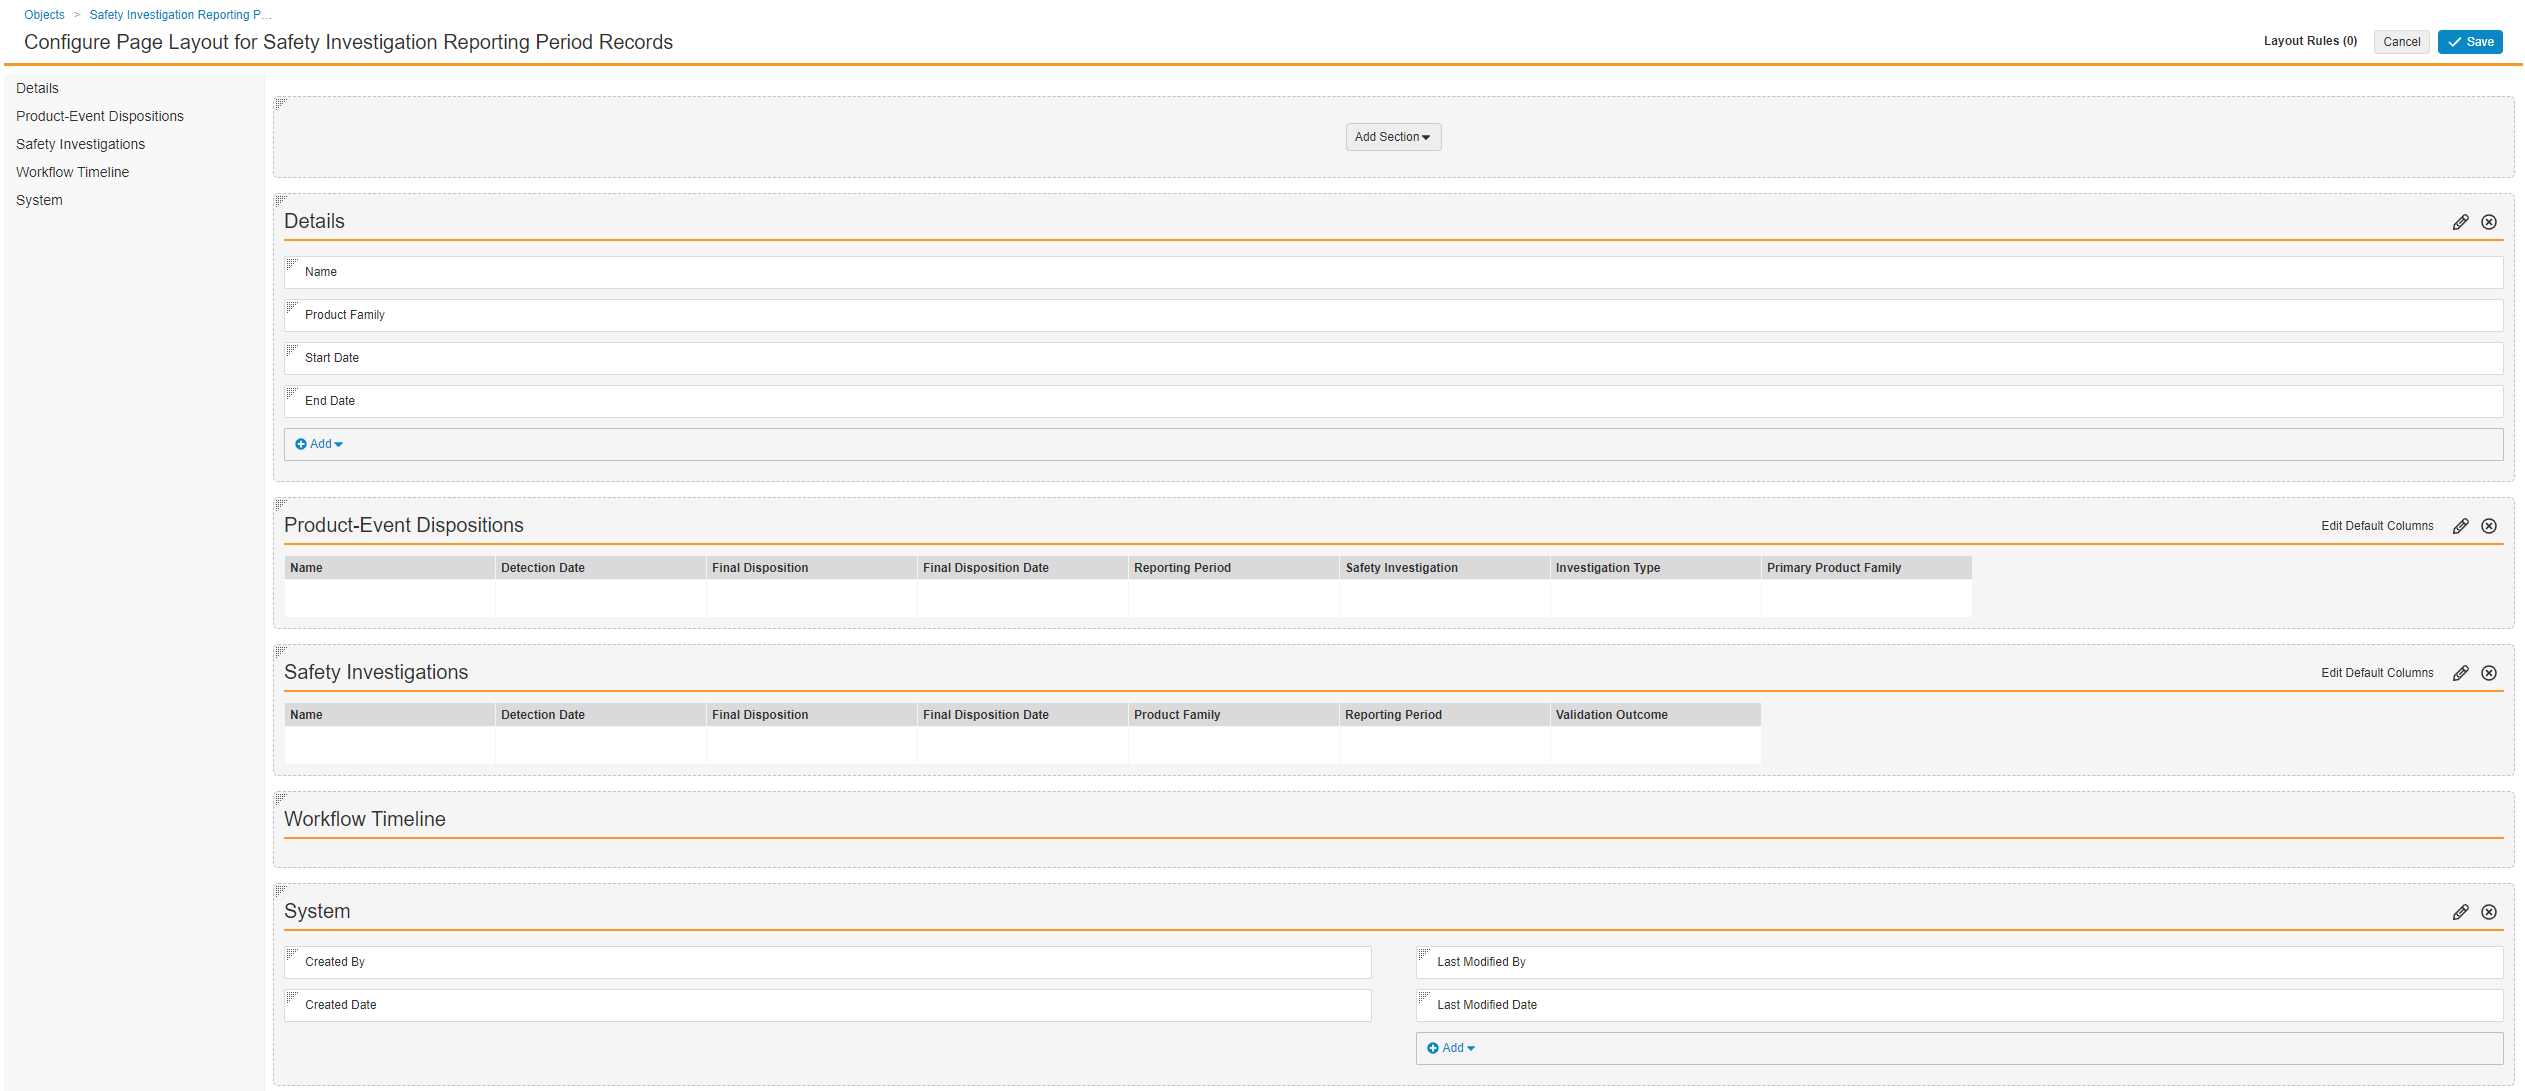
Safety Investigation Reporting Period Detail Page Layout - Select Save.
Configure Object Workflows
Complete the following steps to set up Signal Management workflows. Use these steps as a starting point, but configure your workflows according to your business processes:
Create the Safety Investigation Workflow
- Go to Admin > Configuration > Workflows.
- Select Create and then select Object Workflow.
- In the Label field, enter “Safety Investigation Workflow”.
- In the Lifecycle field, select Safety Investigation Lifecycle.
- The following is an example of one way to configure this workflow:
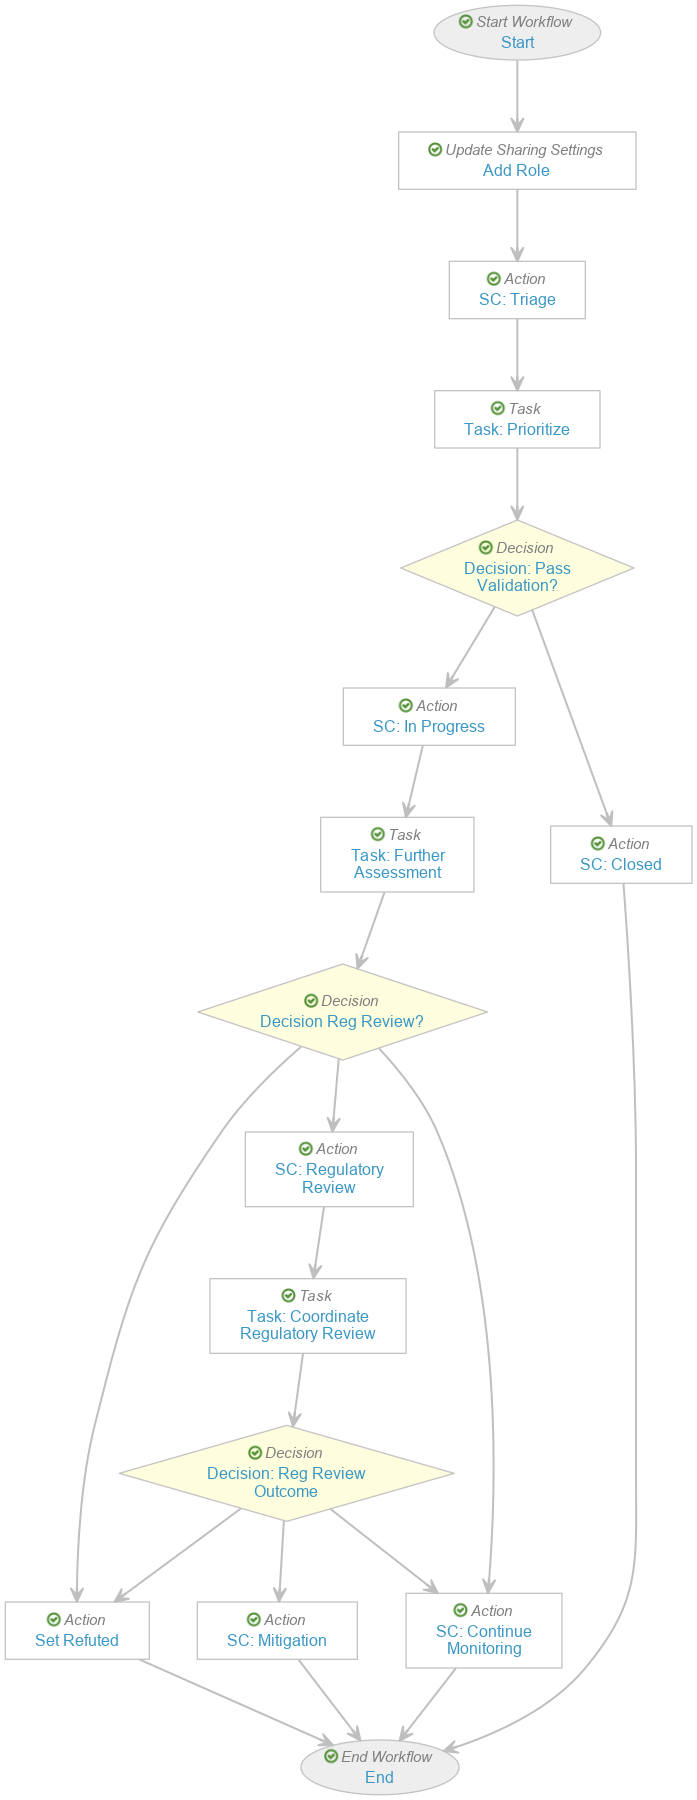
Safety Investigation Workflow - After configuring the workflow according to your requirements, select Make configuration active in the Status field.
Create the Evaluate Disposition Workflow
- Go to Admin > Configuration > Workflows.
- Select Create and then select Object Workflow.
- In the Label field, enter “Evaluate Disposition Workflow”.
- In the Lifecycle field, select Product-Event Disposition Lifecycle.
- The following is an example of one way to configure this workflow:
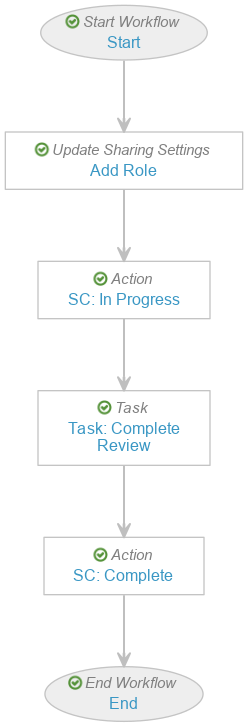
Evaluate Disposition Workflow - After configuring the workflow according to your requirements, select Make configuration active in the Status field.
Configure Object Lifecycles
Complete the following steps to set up the Signal Management object lifecycles.
Configure Settings on the Safety Investigation Lifecycle
Go to Admin > Configuration > Object Lifecycles > Safety Investigation Lifecycle and complete the following steps:
Add a User Action on the Open State
- In the States section, select Open.
- In the User Actions section, select Edit and then select Create Rule.
- Select Always.
- Select Workflow > Safety Investigation Workflow and, in the Action Label field, enter “Start Investigation”.
- Select Add Action and then select Change State to > Closed.
- In the Action Label field, enter “Close Investigation”.
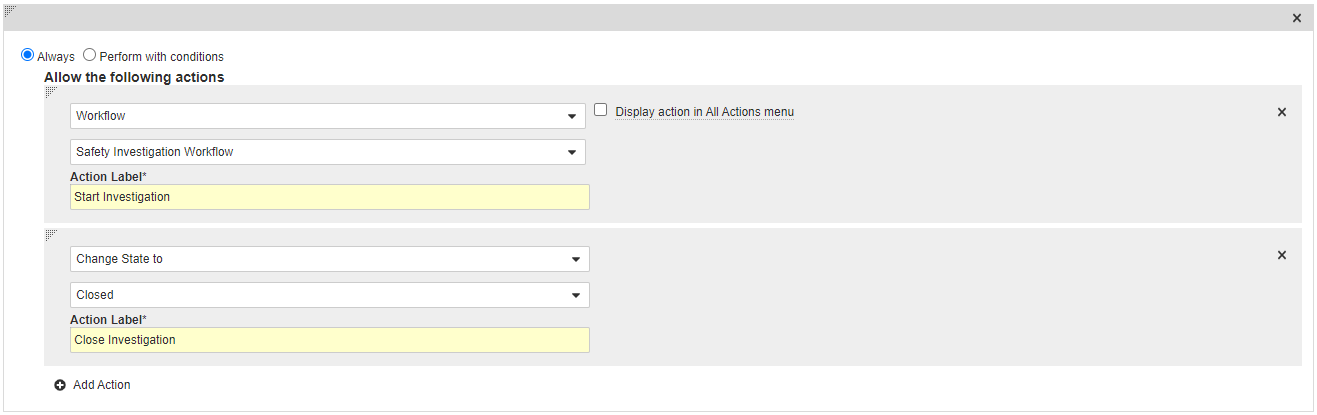
User Action on the Open State - Select Save.
Add a User Action on the Monitoring State
- In the States section, select Monitoring.
- In the User Actions section, select Edit and then select Create Rule.
- Select Always and then select Change State to > Closed.
- In the Action Label field, enter “Change State to Closed”.
- Select Add Action and then select Change State to > Open.
- In the Action Label field, enter “Re-opened”.
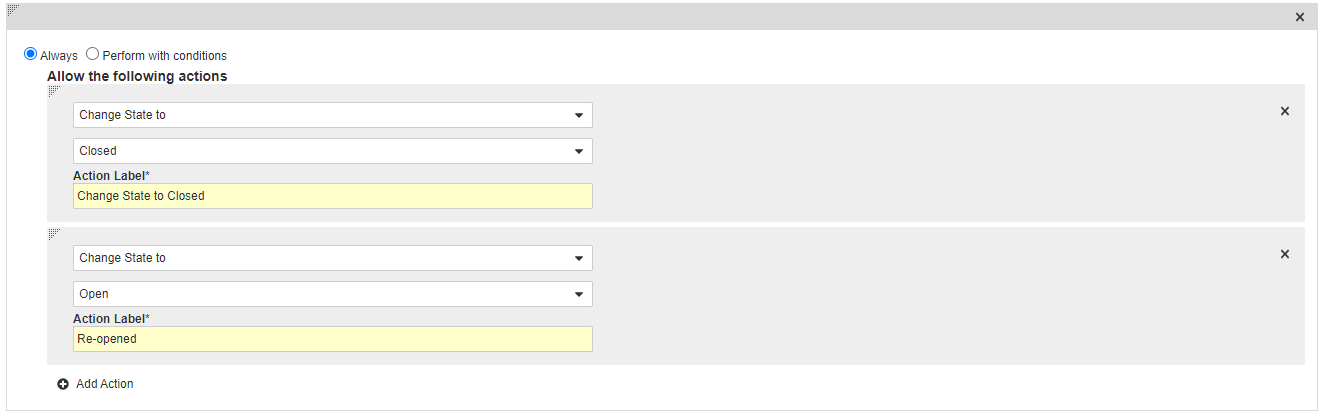
User Action on the Monitoring State - Select Save.
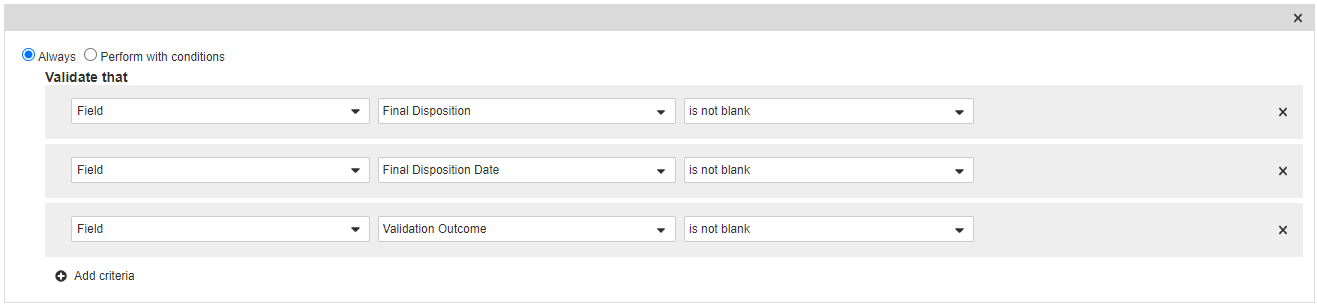
Add Entry Criteria on the Closed State
- In the States section, select Closed.
- In the Entry Criteria section, select Edit and then select Create Rule.
- Select Always and then add the following criteria:
- Field > Final Disposition > is not blank
- Field > Final Disposition Date > is not blank
- Field > Validation Outcome > is not blank
Entry Criteria on the Closed State - Select Save.
Configure Settings on the Product-Event Disposition Lifecycle
Go to Admin > Configuration > Object Lifecycles > Product-Event Disposition Lifecycle and complete the following steps:
Add a User Action on the Active State
- In the States section, select Active.
- In the User Actions section, select Edit and then select Create Rule.
- Select Always and then select Workflow > Evaluate Disposition Workflow.
- In the Action Label field, enter “Evaluate Disposition”.
- Select Add Action and then select Change State to > In Progress.
- In the Action Label field, enter “Change State to In Progress”.
- Select Add Action and then select Change State to > Complete.
- In the Action Label field, enter “Change State to Complete”.
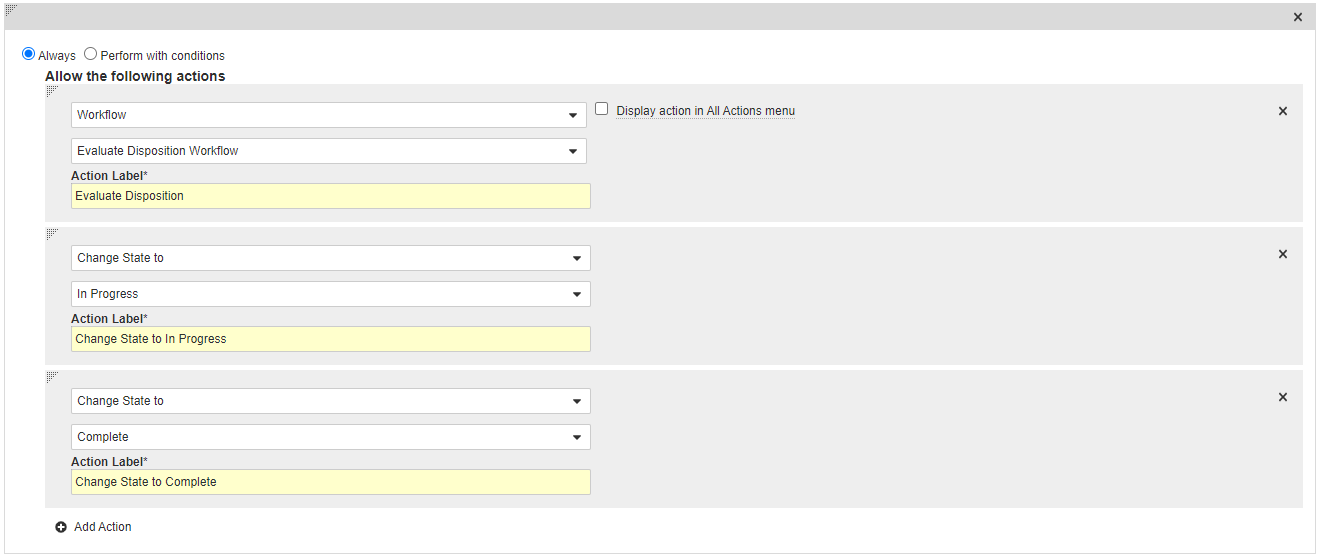
User Action on the Active State - Select Save.
Add Entry Criteria on the Complete State
- In the States section, select Complete.
- In the Entry Criteria section, select Edit and then select Create Rule.
- Select Always and then select Field > Final Disposition > is not blank.

Entry Criteria on the Complete State - Select Save.
Add an Entry Action on the Complete State
- From the Complete state, go to the Entry Actions section and then select Edit.
- Select Create Entry Action.
- Select Perform with Conditions and then configure the following action:
If Final Disposition Date > is blank
Perform Actions Update field > Final Disposition Date > Today ()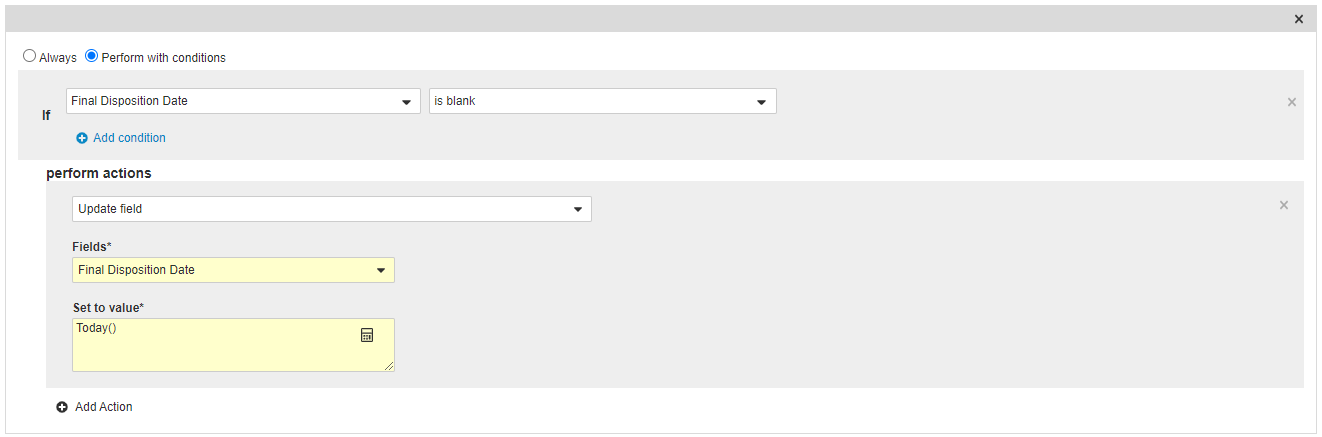
Entry Action on the Complete State - Select Save.
Configure the Safety Investigation Lifecycle Stage Group
- Go to Admin > Configuration > Lifecycle Stage Groups and select Create.
- Select Object Stage Group and then select Continue.
- On the Create Lifecycle Stage Group page, complete the following information:
- Stage Group Label: “Safety Investigation Stages”
- Object Lifecycle: Select Safety Investigation Lifecycle
- Object Type: Select Base Safety Investigation
- Select Save.
- In the Stages section, select Create and then configure the stages as follows:
Stage Description Signal Prioritization Open Signal Validation Triage, Regulatory Review Further Assessment In Progress Mitigation Monitoring, Risk Mitigation Complete Complete
Manage Tabs
For easy access to Signal Management features, configure the following tab settings in your Vault.
Add Signal Management Tabs
- Go to Admin > Configuration > Tabs.
- Select Create.
- Create new tabs according to the details in the following table:
Label Tab Type Object Product-Event Combinations Object Product-Event Combinations Safety Investigations Object Safety Investigations Safety Investigation Reporting Periods Object Safety Investigation Reporting Periods
Create a Signal Management Tab Collection
- Go to Admin > Configuration > Tab Collections.
- Select Create.
- In the Label field, enter “Signal Management”.
- In the Status field, select Active.
- On the right-hand side, select Add Tabs and then add the following tabs to your collection:
- Home
- Safety Investigation Reporting Periods
- Product-Event Combinations
- Safety Investigations
- Analytics
- Cases
- Literature Articles
- Select Save.
Configure Security
Add security settings to grant access to Signal Management features. Use the following settings as a starting point, but configure access according to your business processes.
Add the Signal Management Permission Set
- Go to Admin > Users & Groups > Permission Sets.
- Select Create.
- In the Name field, enter "Signal Management".
- Select Save.
Grant Permissions
Complete the following steps to ensure your permissions sets are granted the appropriate level of access to objects and tabs.
Grant Object Permissions
- On the Signal Management permission set, go to the Objects tab and select Edit.
- Grant Read permissions on the following objects:
- Aggregate Reporting Group
- Case
- Case
- Parent Information
- Imported Case
- Child Information
- Case Access Group
- Case Adverse Event
- Case Assessment
- Case Assessment Expectedness
- Case Assessment Result
- All Case Cause of Death objects
- All Case Contact objects
- Case Diagnosis
- Case Drug History
- Case Drug History Substance
- Case Identifier
- Case Medical History
- Case Number
- All Case Product objects
- Case Product Device Code
- Case Product Dosage
- Case Product Indication
- All Case Product Registration objects
- Case Product Substance
- Case Relationship
- Case Signature
- Case Study Registration
- Case Test Result
- All Controlled Vocabulary objects
- Country
- Country State/Province
- Datasheet
- All Device Code objects
- Dictionary
- MedDRA Dictionary
- WHODrug Dictionary
- EDQM Standard Term
- IMDRF Device Code
- Document Lifecycle Stage Label
- Document Lifecycle State-Stage
- Document Type Detail
- Document Type Group
- Document Type Group Detail
- Document Usage
- Dose Form
- EDQM
- Emailed Document
- IMDRF Device Code
- Inactive Ingredient
- Inactive Ingredient Registration
- Inbox Item
- Language
- Language (ISO)
- Language Locale
- Literature Article
- Literature Database
- Literature Review
- Literature Search Term
- Local Reporting Details
- Local Reporting Details/Product Join
- Locale
- Localization
- Localized Case
- Localized Case Adverse Event
- Localized Case Assessment
- Localized Case Assessment Result
- Localized Case Cause of Death
- Localized Case Comment
- Localized Case Contact
- Localized Case Document
- Localized Case Drug History
- Localized Case Identifier
- Localized Case Medical History
- Localized Case Product
- Localized Case Product Device Code
- Localized Case Product Dosage
- Localized Case Product Indication
- Localized Case Product Substance
- Localized Case Test Result
- Localized Case Translation
- Localized Controlled Vocabulary
- Localized Country
- Localized Country State/Province
- Localized Dose Form
- Localized Organization
- Localized Product
- Localized Reason Omitted
- Localized Route of Administration
- Localized Study
- Localized Study Arm
- Localized Substance
- Localized Unit of Measurement
- Market Segment
- MedDRA
- MedDRA (Localized)
- MedDRA Criteria
- Datasheet Criteria
- Watchlist Criteria
- MedDRA Query Criteria
- MedDRA Join
- MedDRA Query
- MedDRA Synonym
- MedDRA Synonym Context
- MedDRA Version
- Object Lifecycle Stage Label
- Object Lifecycle State-Stage
- All Organization objects
- All Person objects
- All Product objects
- Product Alias
- Product Constituent
- Product Family
- Product Registration
- Product Substance
- Product-Event Combination
- Product-Event Disposition
- Reason Omitted
- Report
- Reporting Group Product Registration
- Reporting Group Study Registration
- Safety Investigation
- Safety Investigation Reporting Period
- Signal Source
- Study
- Study Arm
- Study Arm Product
- Study Indication
- Study Person
- All Study Product objects
- Study Product Group
- Study Product Placeholder
- Study Product Substance
- Study Registration
- Study Site
- Substance
- Substance Alias
- Tab Group
- All Transmission objects
- Unit of Measurement
- All User Task objects
- Validation Result
- Workflow
- Grant Create permissions on the following objects:
- Product-Event Combination
- Product-Event Disposition
- Safety Investigation
- Safety Investigation Reporting Period
- Signal Source
- Grant Edit permissions on the following objects:
- Product-Event Combination
- Product-Event Disposition
- Safety Investigation
- Safety Investigation Reporting Period
- Signal Source
- Grant Delete permissions on the Product-Event Disposition object.
Grant Tab Permissions
- On the Signal Management permission set, go to the Tabs tab and select Edit.
- Grant View permissions on the Signal Management tab collection.
- Grant View permissions on the following tabs:
- Home
- Cases
- Analytics
- Reports
- Dashboards
- Literature
- Literature Articles
- Product-Event Combinations
- Safety Investigations
- Safety Investigation Reporting Periods
- Generated PSMFs
Add the Signal Management Security Profile
- Go to Admin > Users & Groups > Security Profiles.
- Select Create.
- In the Name field, enter “Signal Management”, and select Save.
- On the Security Profiles page, select the Signal Management security profile you just created.
- In the Permission Sets field, select Add > Existing Permission Set.
- Select Signal Management from the picklist, and then select OK.
Add the Signal Managers Group
- Go to Admin > Users & Groups > Groups.
- Select Create.
- In the Label field, enter “Signal Managers”.
- In the Included Security Profiles field, select Signal Management.
- Select Save.
Configure Document Type Permissions
- Go to Admin > Configuration > Document Types.
- Select Signal Management (signal_management__v) and then in the All Actions (
 ) menu, select Edit Details.
 - Go to the Security tab.
- In the Create Document Permission field, add the following:
- Administrators
- Signal Managers
- Under Default Settings for New Documents, in the Editors field, add Signal Managers.
- Select Save.