About the Feature
Vault SafetyDocs now supports the management of Pharmacovigilance Agreements (PVAs), sometimes known as Safety Data Exchange Agreements (SDEAs). This feature promotes regulatory compliance through centralized document storage, making it easy to review and reconcile partner obligations across agreements. In addition, contact management capabilities increase the efficiency of tracking reconciliation activities and managing follow-up agreements.
Support for PVA management was added in 23R1, which includes the necessary configuration by default. Vaults deployed prior to 23R1 must have the configuration upgrades described on this page to enable this feature.
See Manage Pharmacovigilance Agreements for more information.
Overview of Enablement Steps
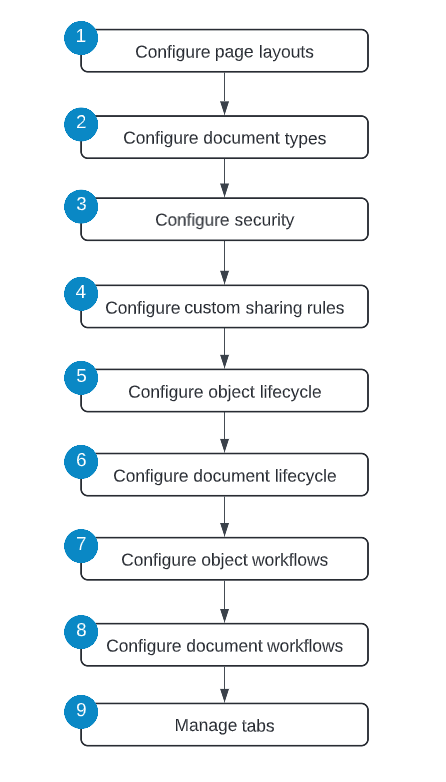
Configure Page Layouts
Configure the page layouts for PVA management.
Configure the Relationship Page Layout
Complete the following steps to configure the page layout for PVA Relationships.
- In Admin, go to Configuration > Objects > PVA Relationship > Page Layouts.
- Configure the Relationship Detail Page Layout as shown below.
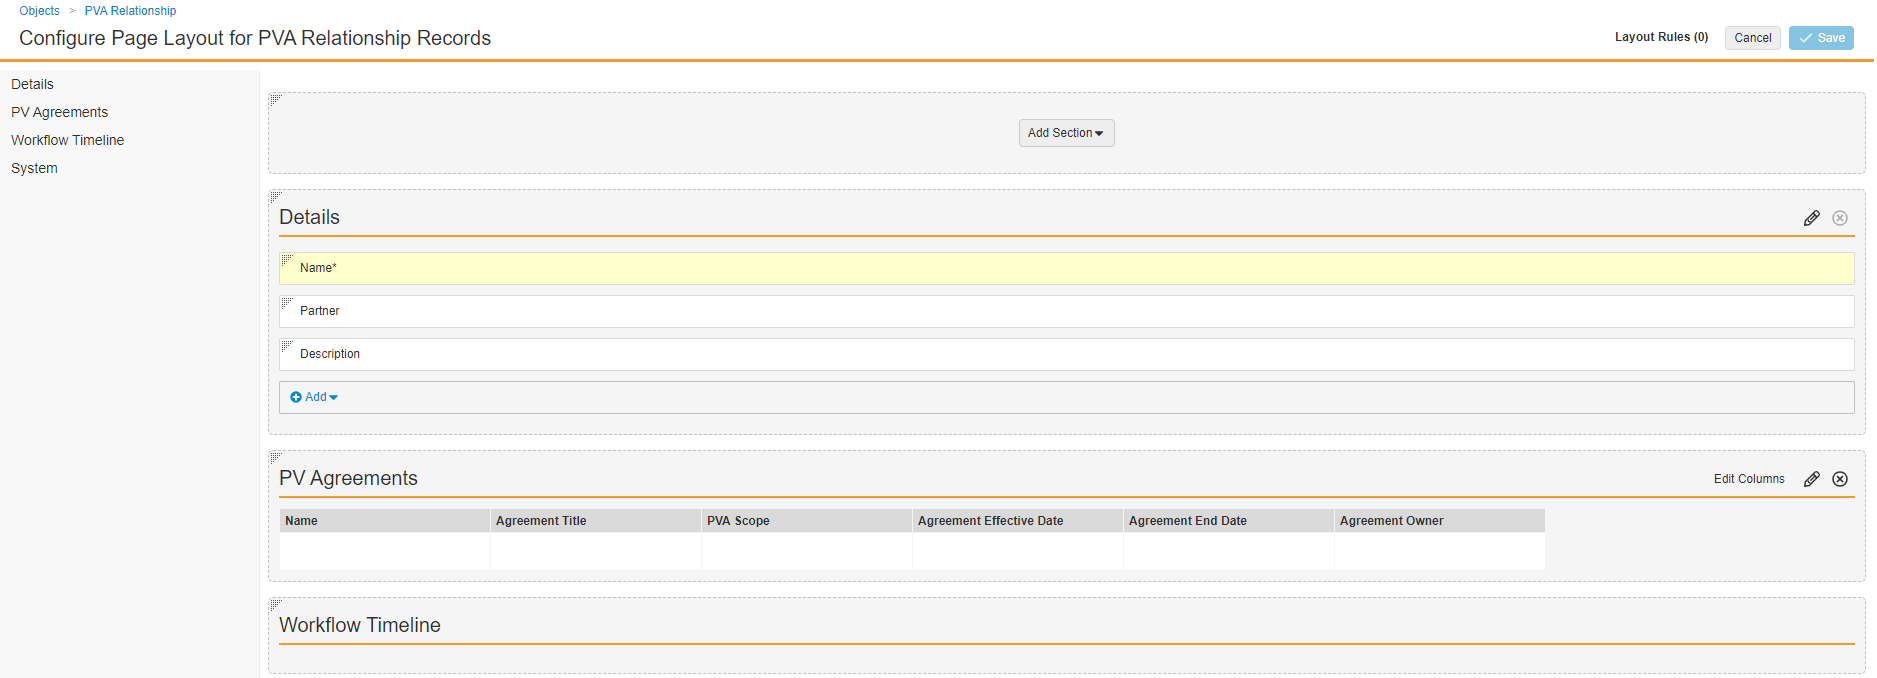
Relationship Detail Page Layout - Select Save.
Configure the PV Agreement Page Layout
Complete the following steps to configure the page layout for PV Agreements.
- In Admin, go to Configuration > Objects > PV Agreement > Page Layouts.
- Configure the PV Agreement Detail Page Layout as shown below.
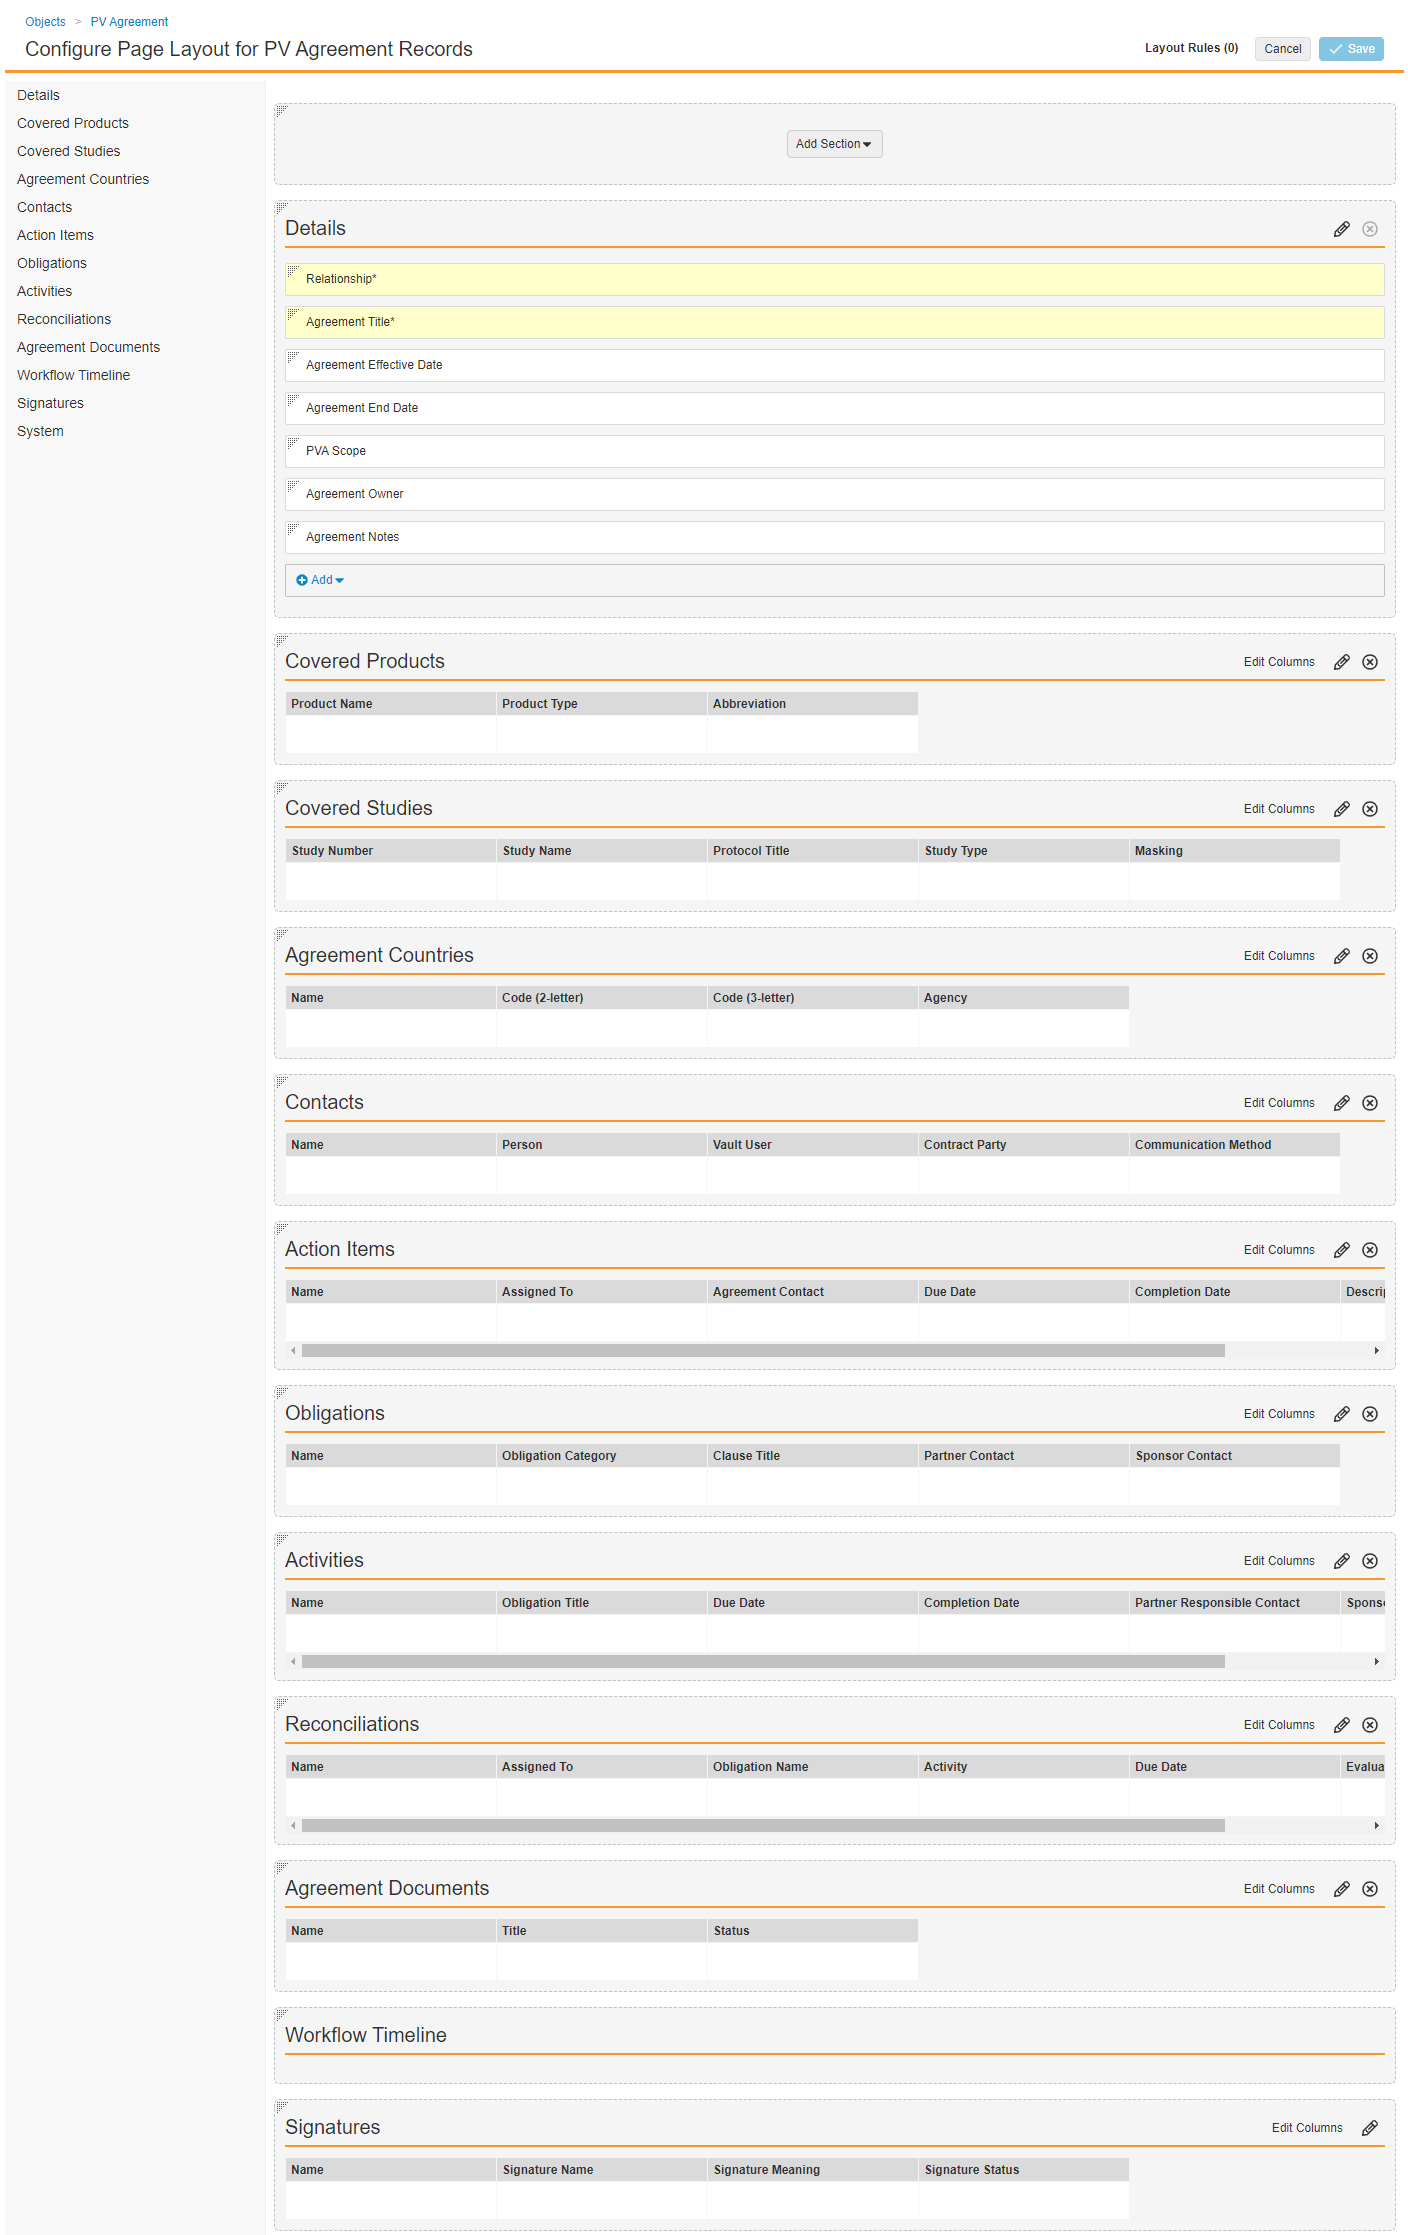
PV Agreement Detail Page Layout - Select Save.
Configure Document Types
Configure the document type group for PVA management and associate it with the PVA document type.
Configure the PVA Documents Document Type Group
- In Business Admin, go to Objects > Document Type Groups.
- Select Create.
- In the Name field, enter "PVA Documents".
- Select Save.
Add the PVA Document Type Group to the PVA Document Type
- In Admin, go to Configuration > Document Types > Pharmacovigilance Agreements.
- From the All Actions (
 ) menu next to Pharmacovigilance Agreements, select Edit Details. The Edit Details: Pharmacovigilance Agreements window appears.
 - On the General tab, in the Document Type Groups field, select PVA Documents.
Configure Security
Add security settings to grant access to the PVA management features. Use the following settings as a starting point, but configure access according to your business process.
Add the PVA Actions Permission Set
- In Admin, go to Users & Groups > Permission Sets.
- Select Create.
- In the Name field, enter "PVA Actions."
- Select Save.
Grant Permissions
Ensure your Permissions Sets are granted the appropriate level of access to applications, objects, and tabs according to your organization’s process.
- In Admin, go to Users & Groups > Permission Sets > PVA Actions.
- On the Applications tab, select Edit.
- Grant Vault Actions permissions as shown in the following table, and then select Save:
Vault Actions Permissions Dashboards and Reports - Create Dashboards
- Delete Dashboards
- Share Dashboards
- Schedule Reports
- Read Group Membership
Workflows - Start
- Read and Understand
- eSignature
CrossLink - Create CrossLink
Viewer Administration - Manage Tags
Document - Cancel Checkout
- Download Document
- Download Rendition
User - Allow As A Delegate
- View User Information
- View User Profile
Search - User Filters
Views - Share Views
Audit Trail - View
- On the Objects tab, select Edit.
- Grant Object permissions as shown in the following table, and then select Save:
Objects Permissions - Application Role
- Country
- Document Stages
- Document Type Group
- Language
- Language (ISO)
- Object Stages
- Person
- Product
- Product Alias
- Product Constituent
- Product Family
- Product Registration
- Product Substance
- Study
- Study Registration
- Study Product
- Study Site
- Substance
- Substance Alias
Read - Organization
- PV Agreement
- PVA Action Item
- PVA Activity
- PVA Contact
- PVA Obligation
- PVA Reconciliation
- PVA-Country
- PVA-Product
- PVA-Study
- PVA Relationship
Create - Organization
- PV Agreement
- PVA Action Item
- PVA Activity
- PVA Contact
- PVA Obligation
- PVA Reconciliation
- PVA-Country
- PVA-Product
- PVA-Study
- PVA Relationship
Edit - PV Agreement
- PVA Action Item
- PVA Activity
- PVA Contact
- PVA Obligation
- PVA Reconciliation
- PVA-Country
- PVA-Product
- PVA-Study
- PVA Relationship
Delete - On the Tabs tab, select Edit.
- Grant View permissions on the following tabs:
- Home
- Library
- PVAs
- PVA Relationships
- PV Agreements
- Open PVA Actions
- Analytics
- Reports
- Dashboards
Add the PVA Management Security Profile
- In Admin, go to Users & Groups > Security Profiles.
- Select Create.
- In the Name field, enter "PVA Management", select Save.
- Select the PVA Management security profile.
- In the Permission Sets field, select Add > Existing Permission Set.
- Select PVA Actions from the picklist, and then select OK. .
Add Groups
Add the following groups to complete PVA management actions:
Add the PVA Users Group
- In Admin, go to Users & Groups > Groups.
- Select Create.
- In the Label field, enter "PVA Users".
- In the Included Security Profiles field, select PVA Management.
- Select Save.
Add the PVA Viewers Group
- In Admin, go to Users & Groups > Groups.
- Select Create.
- In the Label field, enter "PVA Viewers".
- In the Included Security Profiles field, select PVA Management.
- Select Save.
Add the PVA Consumers Group
- In Admin, go to Users & Groups > Groups.
- Select Create.
- In the Label field, enter "PVA Consumers".
- In the Included Security Profiles field, select PVA Management.
- Select Save.
Configure Custom Sharing Rules for PVA Objects
Complete the steps below to configure a Custom Sharing Rule on the following PVA objects:
- PV Agreement
- PVA Action Item
- PVA Activity
- PVA Contact
- PVA Obligation
- PVA Reconciliation
- PVA Relationship
- In Admin, go to Configuration > Objects > [object].
- Select Edit and then select the Enable Custom Sharing Rules checkbox.
- When prompted, select Continue, and then select Save.
- In the Sharing Rules tab, select Create.
- Enter a title for your rule in the Label field, and then select Save.
- In the Roles section on the new custom rule page, select Add. The Add Manual Assignment window appears.
- In the Role field, select Viewer.
- In the Users and Groups field, select PVA Consumers, and then select Save.
- Repeat steps 6 and 7 with the following values:
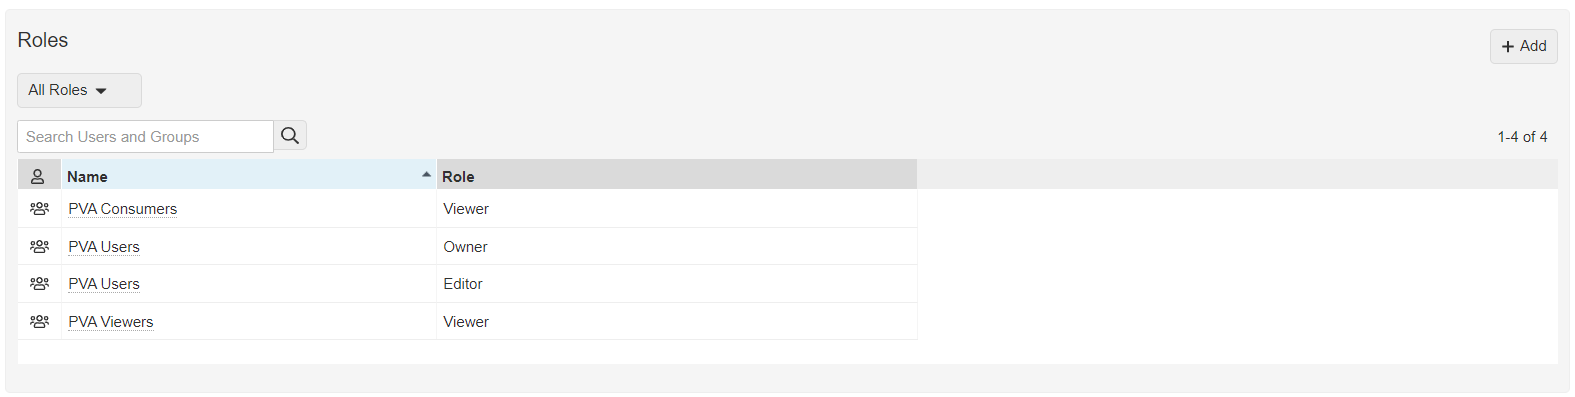
Role Users & Groups Owner PVA Users Editor PVA Users Viewer PVA Viewers
After completing these steps, the [object] > [custom sharing rule] > Roles section for each of the above objects should look like the following:
Configure the PV Agreement Object Lifecycle
Follow the process outlined below to configure this lifecycle:
Configure Settings on the PV Agreement Lifecycle
In Admin, go to Configuration > Object Lifecycles > PV Agreement Lifecycle and complete the following steps:
1. Add Roles
- In the Roles section, add the following roles:
- Approver .
- Reviewer .
- Safety Operations.
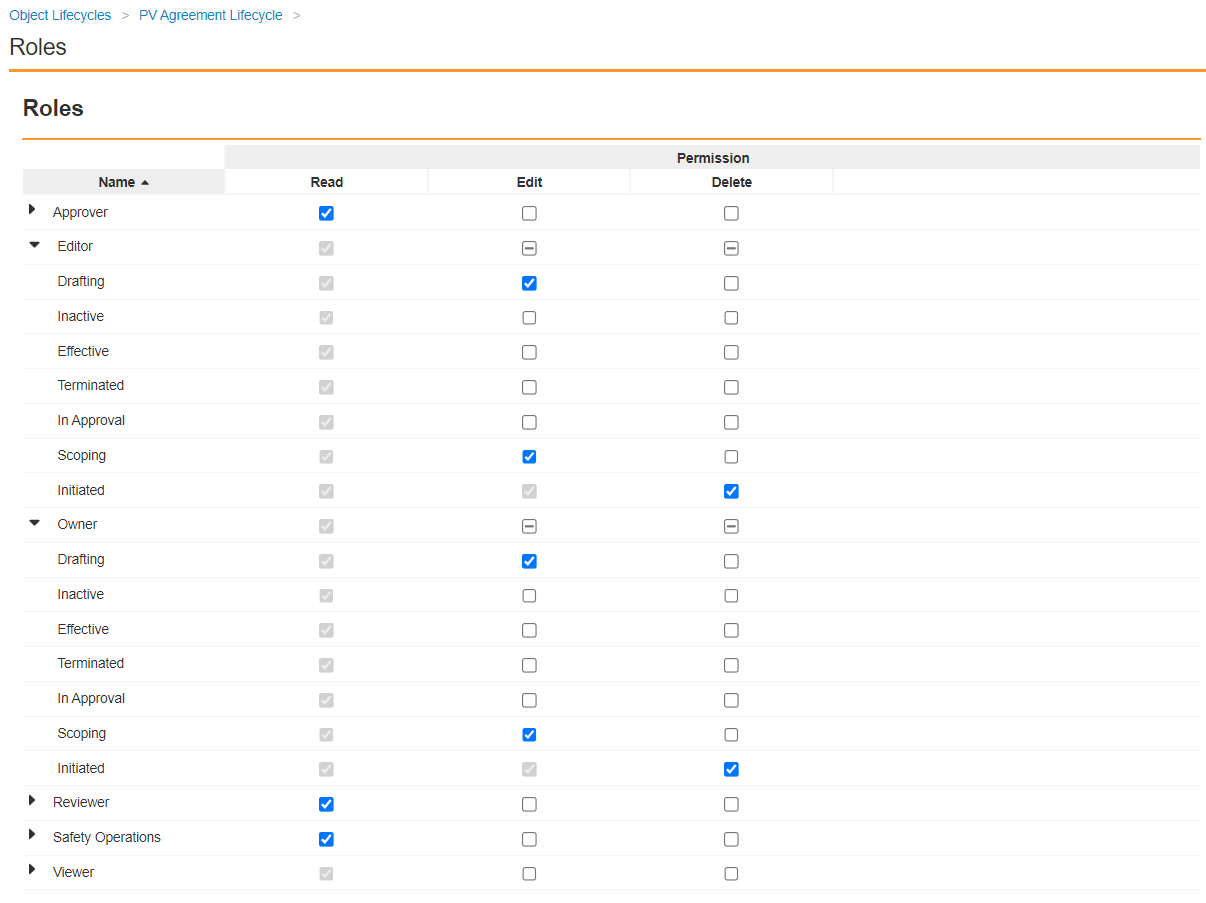
2. Update Role Permissions
In the Roles section, select Edit to update the role permissions as follows:
| Role | Permissions |
|---|---|
| Approver | All states: Read |
| Editor |
|
| Owner |
|
| Reviewer | All states: Read |
| Safety Operations | All states: Read |
Once you have made the above updates, the Roles section should look as follows:
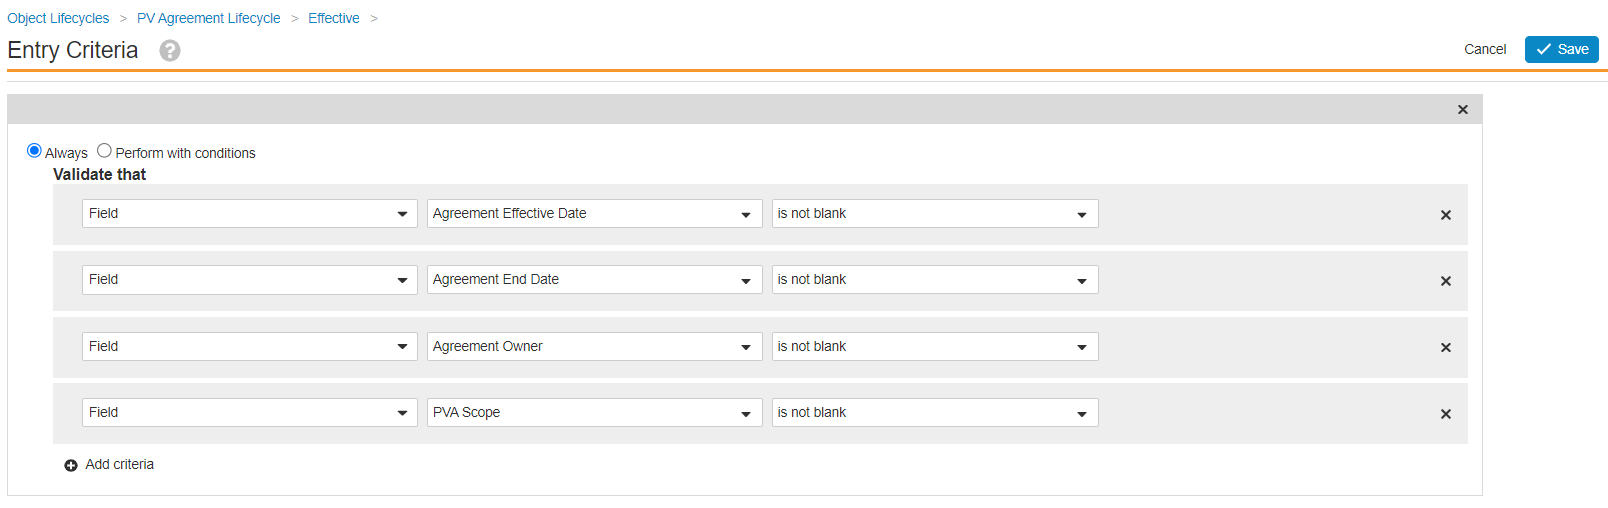
3. Add Entry Criteria to the Effective State
- In the States section, select Effective.
- In the Entry Criteria section, select Edit.
- Select Create Rule and configure the following rules:
Always validate that
- Agreement Effective Date is not blank
- Agreement End Date is not blank
- Agreement Owner is not blank
- PVA Scope is not blank
4. Add Relationship Atomic Security to the Effective State
In the States section, select Effective > Atomic Security: Relationships. Then select Edit and configure the following rules:
| Relationship Label | Default |
|---|---|
| PVA Action Items | Edit |
| PVA Activities | Edit |
| PVA Contacts | Read |
| PVA Obligations | Read |
| PVA Reconciliations | Edit |
| PVA-Countries | Read |
| PVA-Products | Read |
| PVA-Studies | Read |
5. Add Relationship Atomic Security to the Terminated State
In the States section, select Terminated > Atomic Security: Relationships. Then select Edit and configure the following rules:
| Relationship Label | Default |
|---|---|
| PVA Action Items | Read |
| PVA Activities | Read |
| PVA Contacts | Read |
| PVA Obligations | Read |
| PVA Reconciliations | Edit |
| PVA-Countries | Read |
| PVA-Products | Read |
| PVA-Studies | Read |
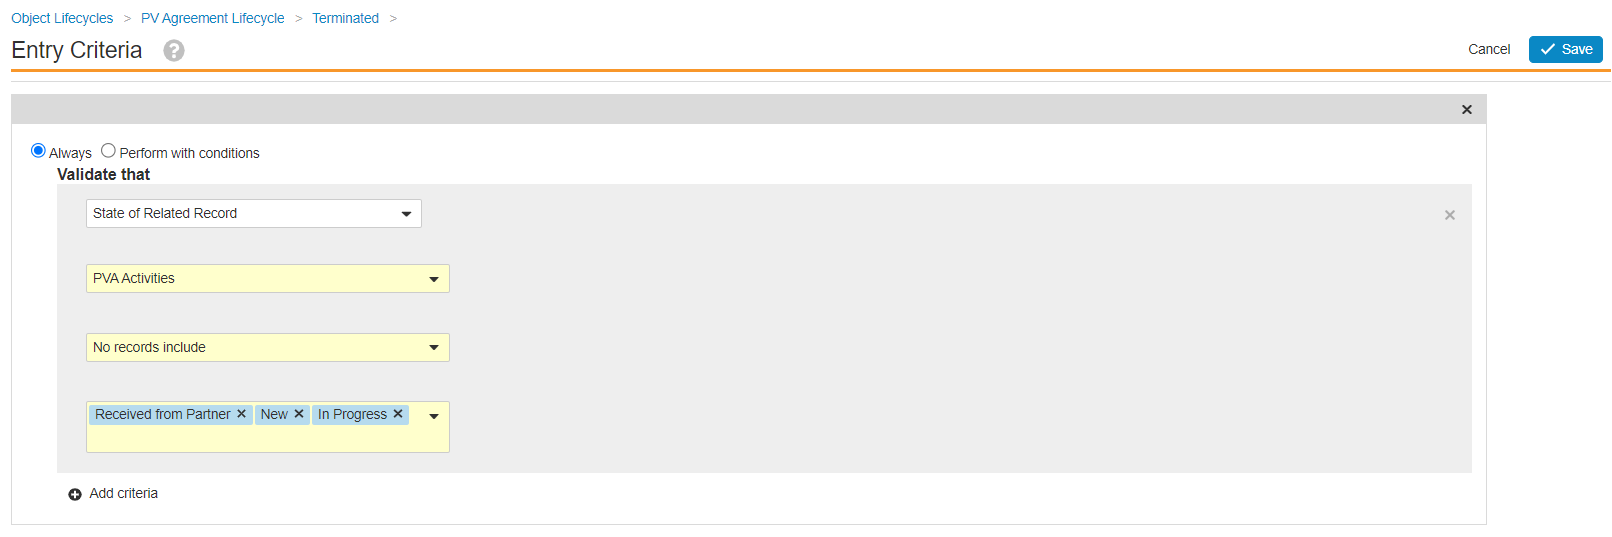
6. Add Entry Criteria to the Terminated State
In the States section, select Terminated > Entry Criteria. Then select Create Rule to configure the following rule:
- Always validate that no PVA activity records include Received from Partner, New, or In Progress activities.
Configure the PVA Lifecycle Stage Group
- In Admin, go to Configuration > Lifecycle Stage Groups and select Create.
- Select Object Stage Group and then select Continue.
- On the Create Lifecycle Stage Group page, complete the following information:
- Stage Group Label: "PVA Stages"
- Object Lifecycle: Select "PV Agreement Lifecycle"
- Object Type: Select "Base PV Agreement"
- Select Save.
- In the Stages section, select Create and then configure the PVA stages as follows:
Stage Description New Initiated Pending Scoping, Drafting, In Approval Effective Effective Terminated Terminated
Configure the PVA Document Lifecycle
Complete the following steps to configure this lifecycle:
Add the PVA Lifecycle
- In Admin, go to Configuration > Document Lifecycles.
- Select Create.
- In the Label field, enter "PVA Lifecycle".
- In the Status field, select Active.
- Select Save.
Configure Settings on the PVA Lifecycle
In Admin, go to Configuration > Document Lifecycles > PVA Lifecycle and complete the following steps.
1. Add States
On the PVA Lifecycle, in the States section, select Create and add the following states:
- Draft
- In Review
- In Approval
- In Authoring
- Approved
- Obsolete
- Superseded
- Ready for Review
- Ready for Approval
- Planned
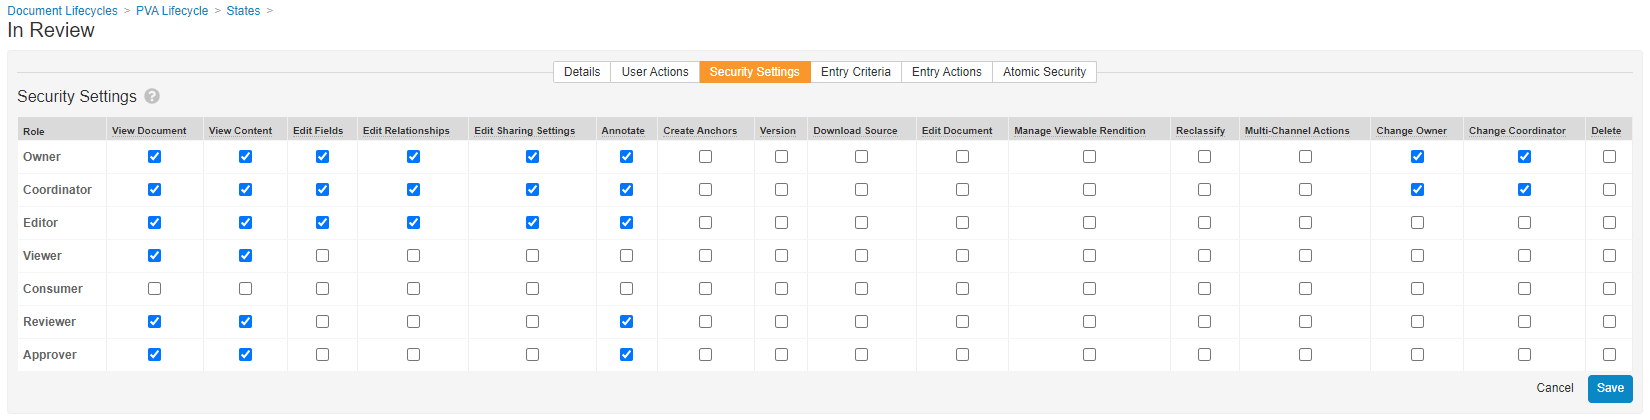
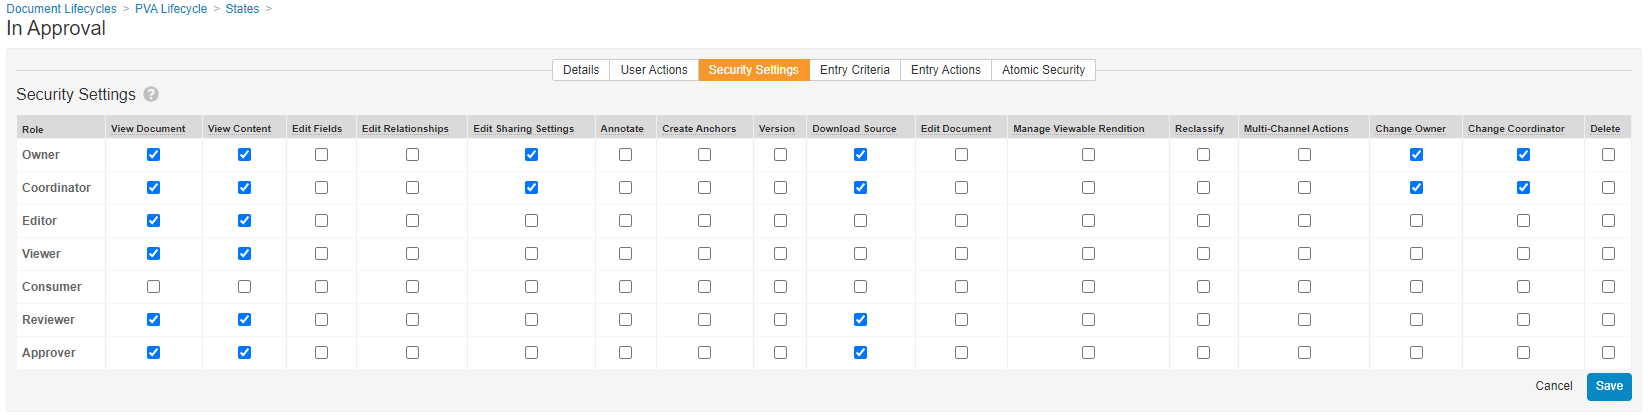
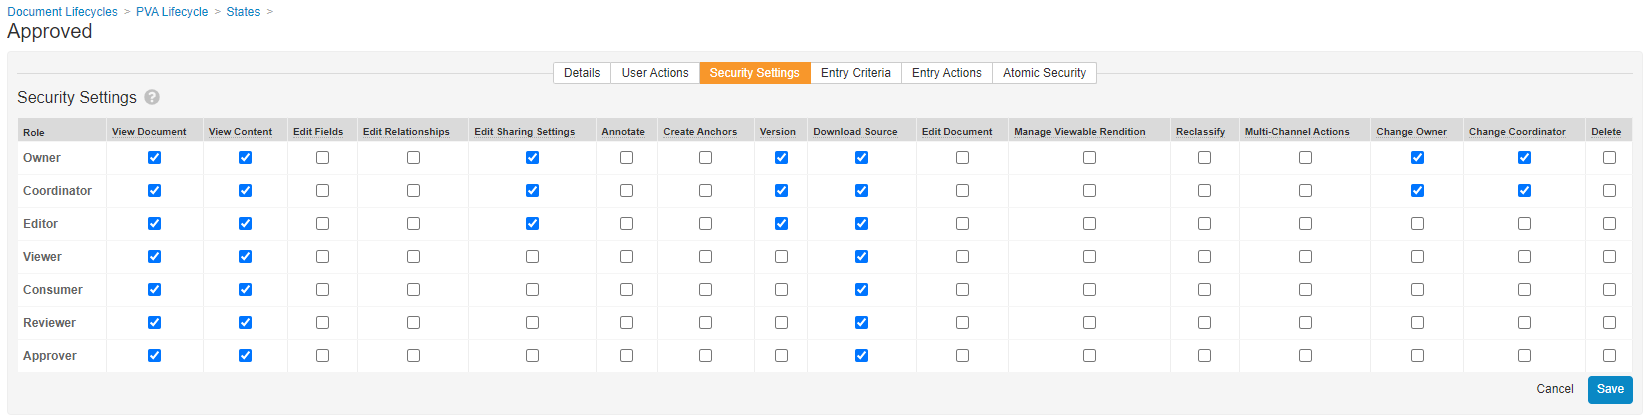
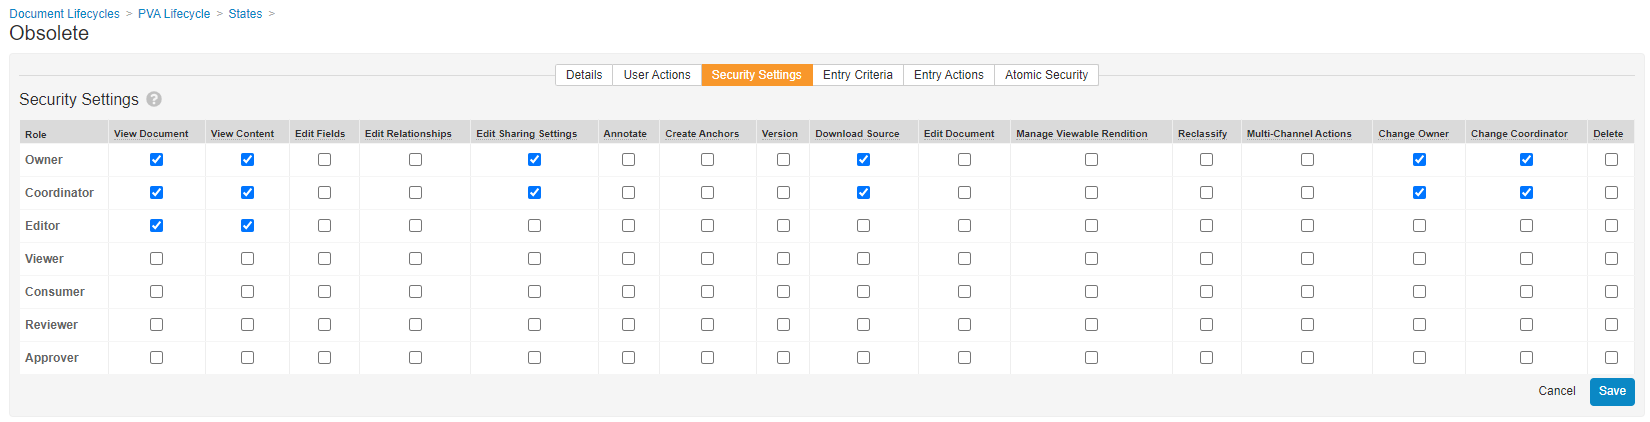
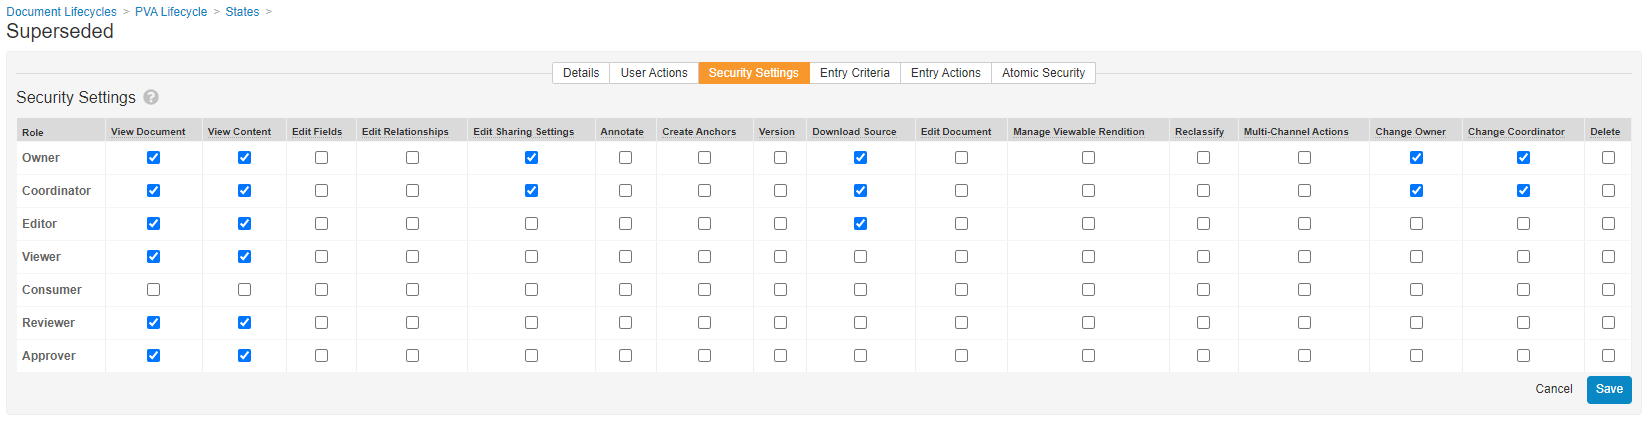
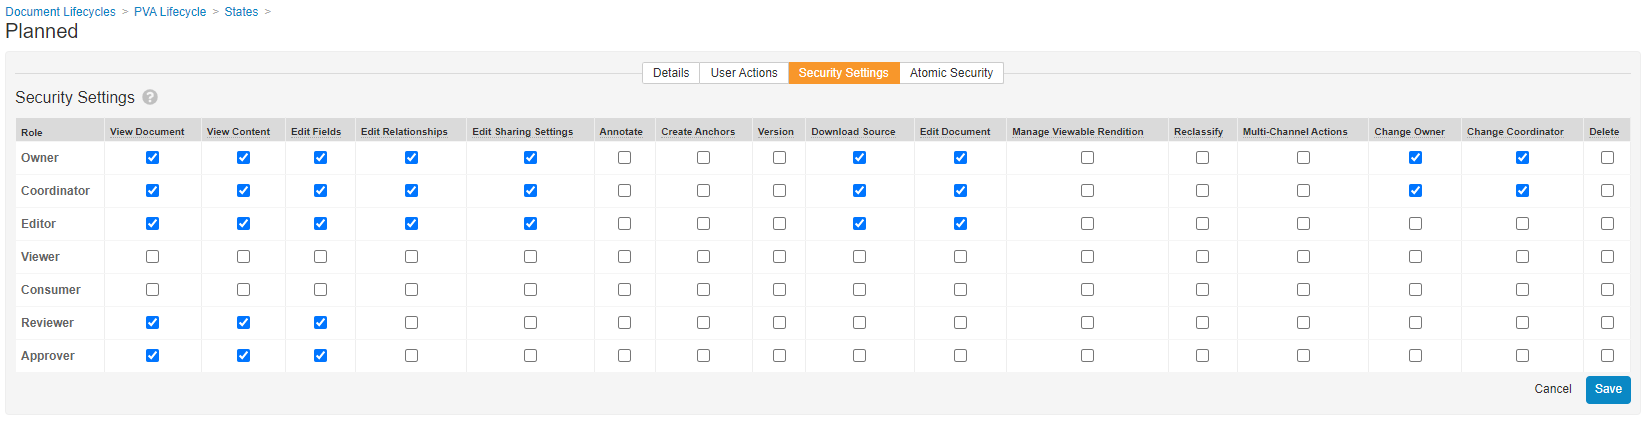
2. Add State Security Settings
On the PVA Lifecycle, in the States section, go to [state] > Security Settings and configure security settings for each of the previously created states as follows:
Draft State

In Review State
In Approval State
Approved State
Obsolete State
Superseded State
Planned State
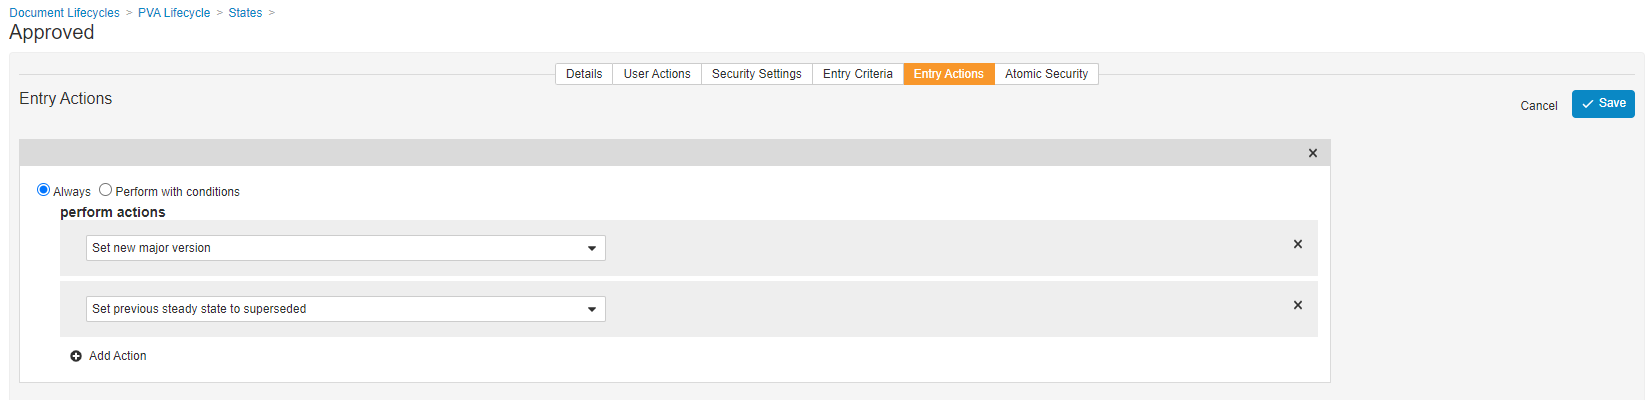
3. Create Entry Actions in the Approved State
On the PVA Lifecycle, in the States section, select Approved > Entry Actions > Edit. Create the following entry actions:
Always
- Set new major version
- Set previous steady state to superseded
4. Edit PVA Lifecycle Details
On the PVA Lifecycle, in the Details section, select Edit and map the previously created states to state types as follows:
| State Type | State |
|---|---|
| Starting State | Draft |
| Steady State | Approved |
| Superseded State | Superseded |
| Obsolete State | Obsolete |
| Document Workflow: Pre-Approval | Ready for Approval |
| Document Workflow: Approved | Approved |
| Document Workflow: Rejected | Draft |
| In Review | In Review |
| Rejected | Draft |
5. Add Default Rules to Roles
On the PVA Lifecycle, in the Roles section, select a role and go to Default Rule. Add the following rules for the Consumer, Viewer, and Editor roles.
Consumer Role

Viewer Role

Editor Role

Add the PVA Lifecycle to the Pharmacovigilance Agreements Document Type
- In Admin, go to Configuration > Document Types > Pharmacovigilance Agreements.
- In the Actions menu, select Edit Details.
- On the General tab, in the Available Lifecycles field, select PVA Lifecycle.
- Select Save.
Configure the PVA Document Lifecycle Stage Group
- In Admin, go to Configuration > Lifecycle Stage Groups and select Create.
- Select Document Stage Group and then select Continue.
- On the Create Lifecycle Stage Group page, complete the following information:
- Stage Group Label: "PVA Document Stages"
- Document Lifecycle: Select "PVA Lifecycle"
- Select Save.
- In the Stages section, select Create and then configure the PVA Document stages as follows:
Stage Description New Draft, Planned Authoring In Authoring, Ready for Review Review & Approval In Review, Ready for Approval, In Approval Approved Approved
Configure Object Workflows
Complete the following steps to set up PVA management object workflows. Use these steps as a starting point, but configure your workflows according to your business processes:
Add the PVA Creation Workflow
Complete the following steps to set up a workflow to manage PVA Creation:
- In Admin, go to Configuration > Workflows.
- Select Create and then select Object Workflow.
- In the Label field, enter "PVA Creation Workflow".
- In the Lifecycle field, select PV Agreement Lifecycle.
- Configure the workflow as shown below:

PVA Creation workflow - In the Status field, select Make configuration active.
Add the PVA Close-Out Workflow
Complete the following steps to set up a workflow to manage PVA close-out or termination:
- In Admin, go to Configuration > Workflows.
- Select Create and then select Object Workflow.
- In the Label field, enter "PVA Close-Out Workflow".
- In the Lifecycle field, select PV Agreement Lifecycle.
- Configure the workflow as shown below:
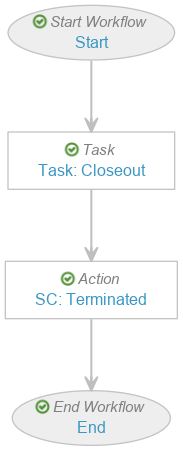
PVA Close-Out Workflow - In the Status field, select Make configuration active.
Configure the PV Agreement Lifecycle
- In Admin, go to Configuration > Object Lifecycles > PV Agreement Lifecycle > States.
- Complete the following setup for the States:
State Tab Description Initiated User Actions - Always: Start the PVA Creation workflow
- Action Label: Start PVA Authoring
Effective User Actions Always: - Always: Start the PVA Close-Out workflow
- Action Label: Close out PVA
Add the PVA Activity Outbound Workflow
Outbound activities are completed by your organization and sent to partner organizations for review.
- In Admin, go to Configuration > Workflows.
- Select Create and then select Object Workflow.
- In the Label field, enter "PVA Activity Outbound Workflow".
- In the Lifecycle field, select PV Activity Lifecycle.
- Configure the workflow as shown below:
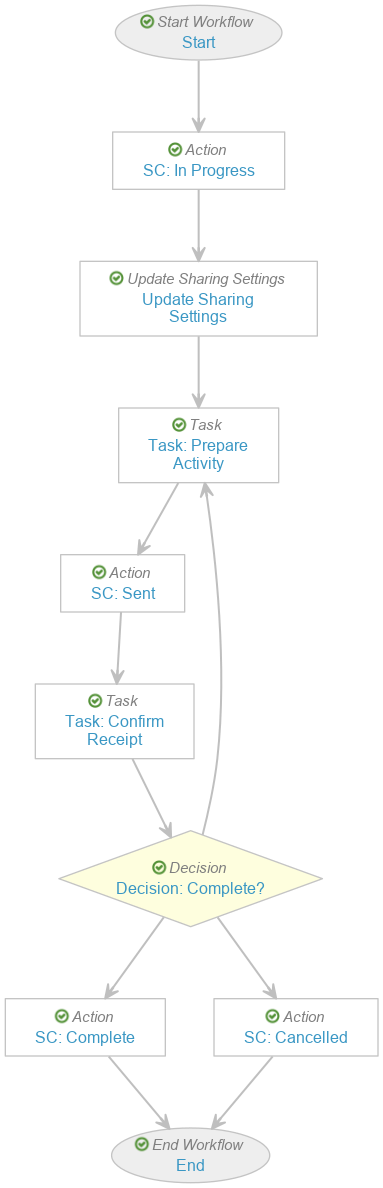
PVA Activity Outbound workflow - In the Status field, select Make configuration active.
Add the PVA Activity Inbound Workflow
Inbound activities are completed by a partner organization and sent to your organization for review.
- In Admin, go to Configuration > Workflows.
- Select Create and then select Object Workflow.
- In the Label field, enter "PVA Activity Inbound Workflow".
- In the Lifecycle field, select PV Activity Lifecycle.
- Configure the workflow as shown below:
PVA Activity Inbound workflow - In the Status field, select Make configuration active.
Configure the PVA Activity Lifecycle
- In Admin, go to Configuration > Object Lifecycles > PVA Activity Lifecycle > States.
- Complete the following setup for the States:
State Tab Description New User Actions - Always: Start the PVA Activity Outbound workflow
- Action Label: Start Outbound Activity
New User Actions - Always: Start the PVA Activity Inbound workflow
- Action Label: Mark Documents Received from Partner
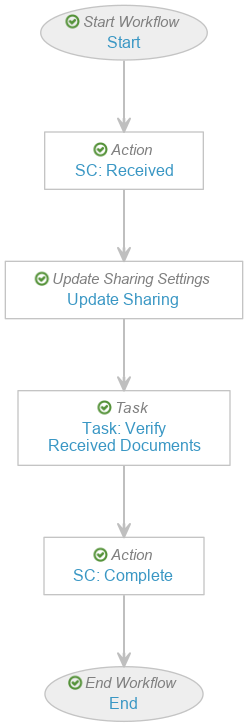
Configure Document Workflows
Complete the following steps to set up PVA management document workflows. Use these steps as a starting point, but configure your workflows according to your business processes:
Add the PVA Authoring Workflow
- In Admin, go to Configuration > Workflows.
- Select Create and then select Document Workflow.
- In the Label field, enter "PVA Authoring Workflow".
- In the Lifecycle field, select PVA Lifecycle.
- Configure the workflow as shown below:
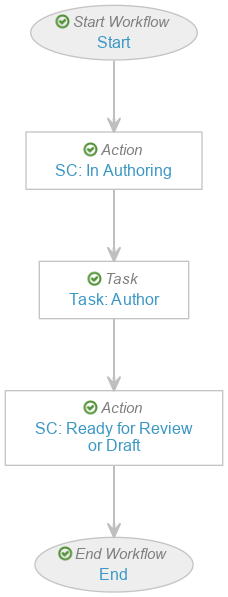
PVA Authoring workflow - In the Status field, select Make configuration active.
Add the PVA Review Workflow
- In Admin, go to Configuration > Workflows.
- Select Create and then select Document Workflow.
- In the Label field, enter "PVA Review Workflow".
- In the Lifecycle field, select PVA Lifecycle.
- Configure the workflow as shown below:
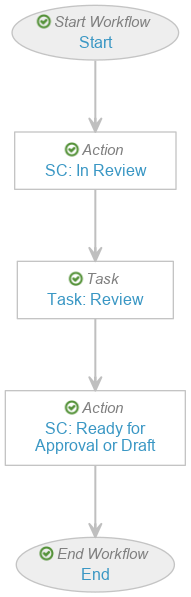
PVA Review workflow - In the Status field, select Make configuration active.
Add the PVA Approval Workflow
- In Admin, go to Configuration > Workflows.
- Select Create and then select Document Workflow.
- In the Label field, enter "PVA Approval Workflow".
- In the Lifecycle field, select PVA Lifecycle.
- Configure the workflow as shown below:
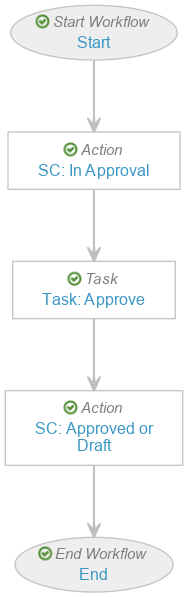
PVA Approval workflow - In the Task: Approve step, select Edit.
- In the Prompts section, configure the following settings:
- Select the Prompt for Verdicts checkbox.
- Select the Multiple Verdicts: One verdict for each item option.
- In the Verdicts section, create the following verdicts:
Verdict Label Settings Approved - Select Add eSignature.
- Instructions: Enter "Please provide an eSignature for Document Approval."
- Select the Manifest eSignature on document checkbox.
Reviewed, Back to Draft - Select Add Comments.
- Prompt for comments: Enter "Comments"
- Select the Required checkbox.
- On the PVA Approval workflow page, in the Status field, select Make configuration active.
Configure the PVA Lifecycle
- In Admin, go to Configuration > Document Lifecycles > PVA Lifecycle > States.
- Complete the following setup for the States:
State Tab Description Draft User Actions - Always: Start the PVA Authoring workflow
- Action Label: Start Authoring
Draft User Actions - Always: Start the PVA Review workflow
- Action Label: Start Review
Ready for Review User Actions - Always: Start the PVA Review workflow
- Action Label: Start Review
Ready for Approval User Actions - Always: Start the PVA Approval workflow
- Action Label: Start Approval
Manage Tabs
For easy user access to PVA management features, configure the following tab settings in your Vault.
Activate PVA Tabs
- In Admin, go to Configuration > Tabs.
- For the following tabs, select Edit and set Status:
Active
- PVAs
- PVA Relationships
- PV Agreements
- Open PVA Actions
- PVAs
Create a PVA Tab Collection
- In Admin, go to Configuration > Tab Collections.
- Select Create.
- In the Label field, enter "PVAs".
- In the Status field, select Active.
- On the right-hand side, select Add Tabs and then add the
following tabs to your collection:
- Home
- PVAs
- Library
- Analytics