Note Beginning with 23R3 content and for all subsequent releases, Vault Release Notes is the official site for Vault Safety release notes.
Vault Safety template revisions include changes to vault configuration for general usability improvements. Template revisions are not automatically rolled out to existing customers.
New vaults created in 20R2 or later will have the following settings by default. Vaults created in an earlier release can optionally be updated to match these changes. The sections on this page provide the instructions to enable these changes.
This page does not cover how to update your template to support new features. The 20R2 New Features page outlines which features require configuration upgrades, and provides links to enablement instructions for each feature.
Added General Document Lifecycle and Workflow
- Go to Configuration > Document Lifecycles and make the following changes to the General Document Lifecycle:
- Add the following states:
- Draft
- Review
- Approved
- Superseded
- Add User Actions, Security Settings, Entry Criteria, and Entry Actions, as appropriate for your business process.
- Update the States and Multi-document Workflow states on the lifecycle Details.
- Add the following states:
- Go to Document Types > Base Document and assign the General Document Lifecycle.
- Go to Multi-document Workflows and add a Review and Approval workflow for the General Document Lifecycle.
Vault Online Help provides instructions to configure a multi-document workflow. The following image shows the recommended workflow: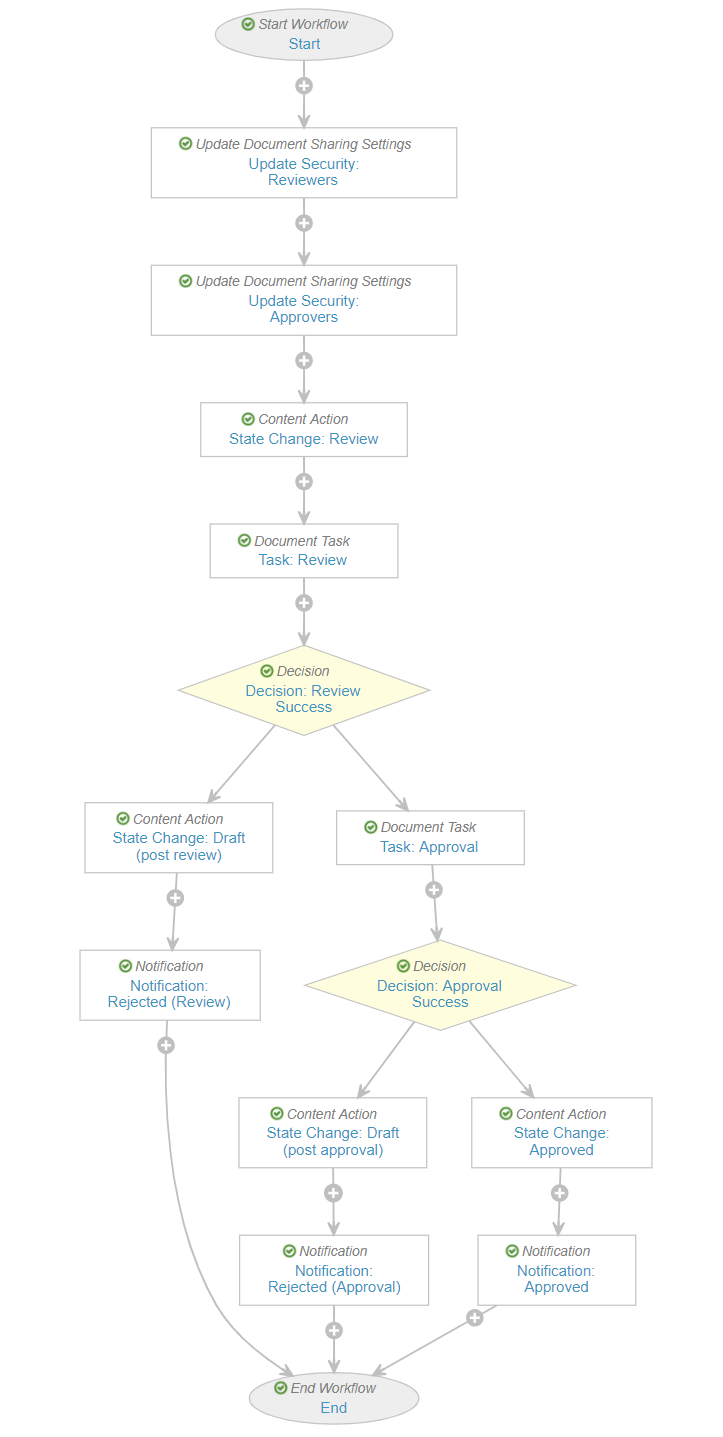
General Multi-Document Workflow
Updated Fields Related to Parental Case
In the 20R2 template, certain field labels and help text around Parental Cases have been updated to improve user experience and clarity. This change builds upon other template changes introduces in Vault Safety 20R1, which are also mentioned below.
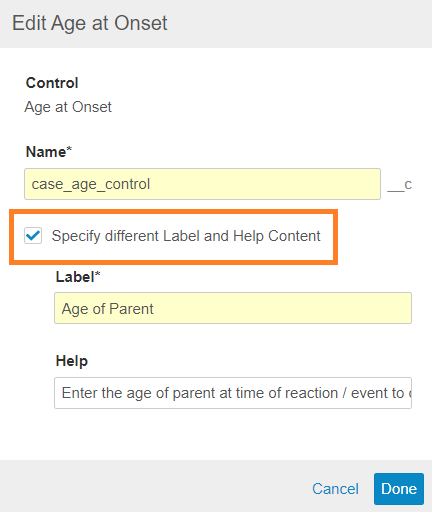
To enable this change in your vault, an administrator can perform the following configuration changes. Note that in order to change field labels and help values, you must edit the field and select the Specify different Label and Help Content option:
Update Fields on the Parental Case Detail Page Layout
Go to Admin > Configuration > Objects > Case > Page Layouts, and then make the following changes to the Parental Case Detail Page Layout:
| Field | Changes | |
|---|---|---|
| Age at Onset |
|
|
| Date of Birth |
|
|
| Gender |
|
|
| Height |
|
|
| Weight |
|
|
| Last Menstrual Period |
|
Update Fields on the Case Page Layout
Go to Admin > Configuration > Objects > Case > Page Layouts, and then make the following changes to the Case Page Layout:
| Field | Changes | |
|---|---|---|
| Patient Initials / ID |
|
|
| Date of Death |
|
|
| Gender |
|
|
| Height |
|
|
| Weight |
|
|
| Last Menstrual Period |
|
Update Fields on the Imported Case Page Layout
Go to Admin > Configuration > Objects > Case > Page Layouts, and then make the following changes to the Imported Case Page Layout:
| Field | Changes | |
|---|---|---|
| Patient Initials / ID |
|
|
| Date of Death |
|
|
| Gender |
|
|
| Height |
|
|
| Weight |
|
|
| Last Menstrual Period |
|
(Added in 20R1 Template) Rename Parental Case
The following changes were made in the 20R1 template. Depending on when your vault was deployed, you may have these changes already.
Verify, and if necessary, configure the following settings:
- Go the Configuration > Objects > Case > Object Types > Parental Case, and relabel the Parental Case object type to
Parent Information(Label) andParents Information(Plural Label). - Go to Admin > Configuration > Objects > Case > Page Layouts, and then rename the Parental Case field to
Parent Informationon the Case Page Layout and Imported Case Page Layout.
(Added in 20R1 Template) Update Fields on the AER Page Layout
The following changes were made in the 20R1 template. Depending on when your vault was deployed, you may have these changes already.
Verify, and if necessary, configure the following settings in Admin > Configuration > Objects > Case > Page Layouts > AER Detail Page Layout:
| Field | Changes | |
|---|---|---|
| Patient Initials / ID |
|
|
| Gender |
|
|
| Date of Death |
|
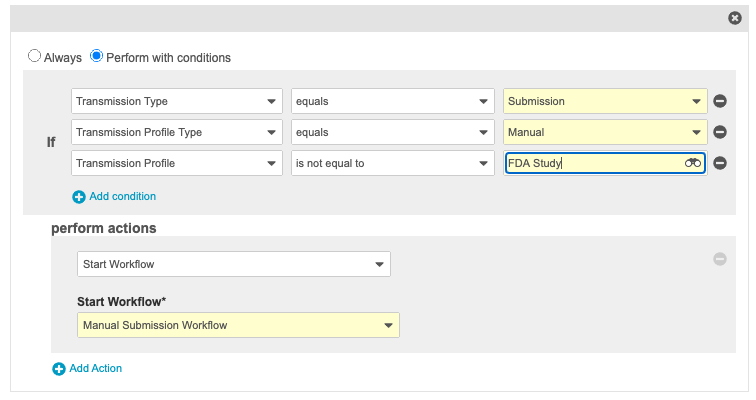
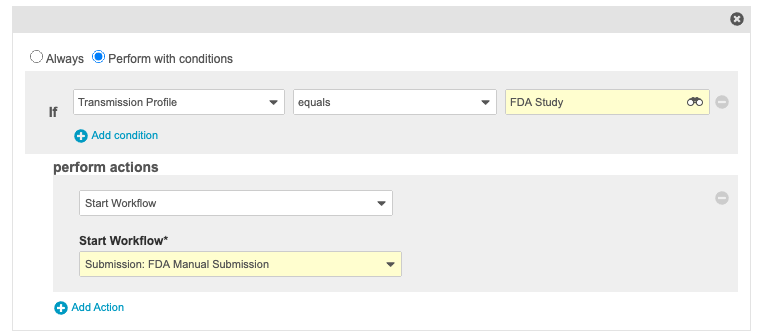
Changed Pending State Entry Actions on Transmission Object Lifecycle
In the 20R2 Template, the Pending state Entry Actions were changed on the transmission object lifecycle so that FDA Manual Submission and Manual Submission workflows are mutually exclusive and will not generate redundant workflow tasks.
In vaults deployed in 20R2, this change is available by default. For existing vaults deployed in 20R1 or earlier, we recommend that you enable this change if you are tracking both FDA Manual Submissions and Manual Submissions in your vault.
The following images show the new Entry Actions:
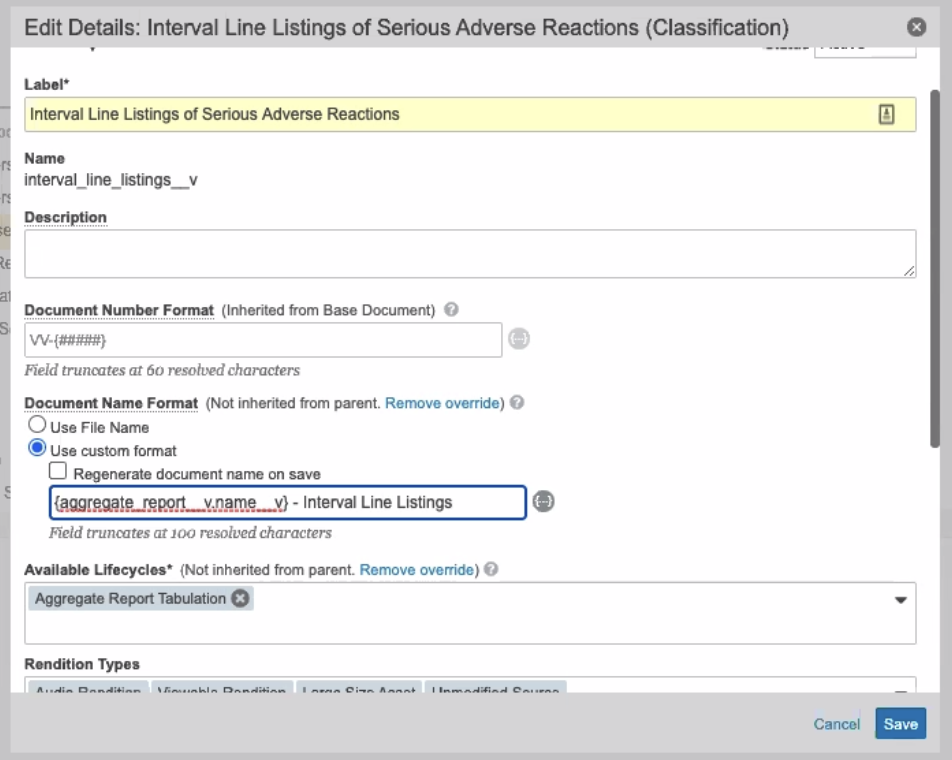
Fixed Autonaming on Interval Line Listing
In the 20R2 template, the autonaming convention on the Document Type has been changed to prevent the word “study” from being automatically added.
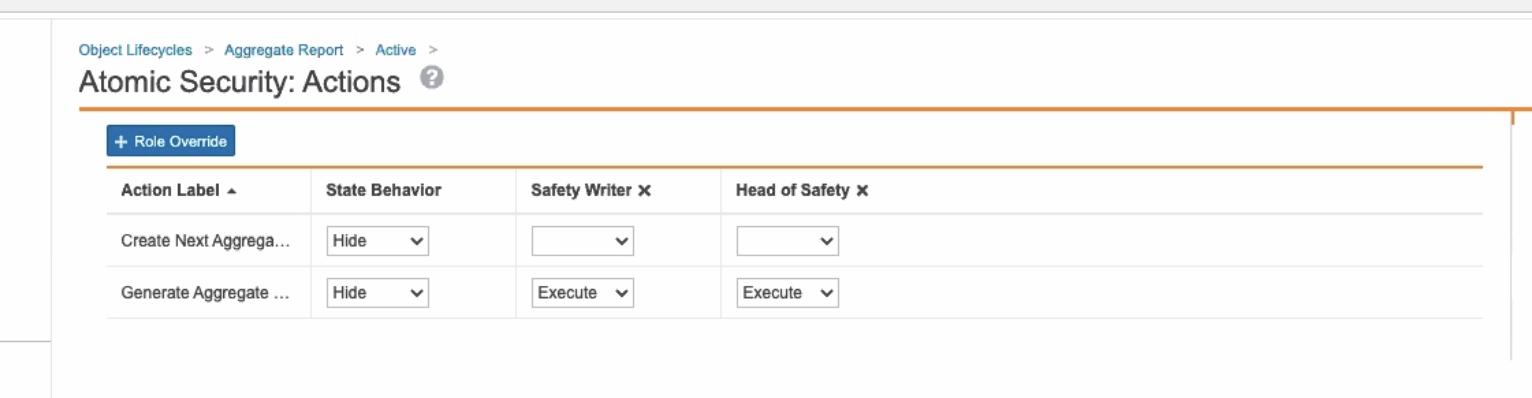
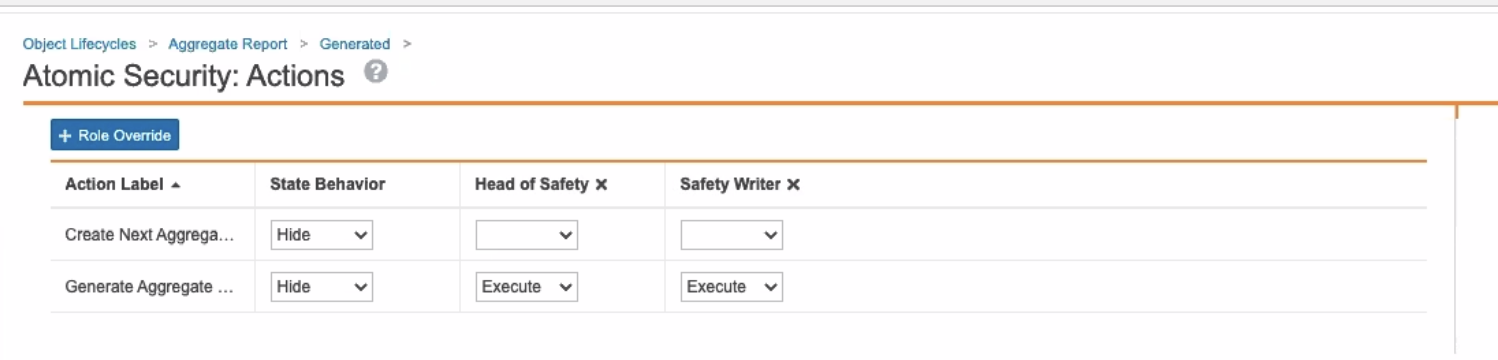
Added Ability to Generate Aggregate Report Tabulations to Safety Writers
In the 20R2 template, the Safety Writer profile now has the ability to Generate Aggregate Tabulation for Aggregate Reports in the Active state and the Generated state by default.
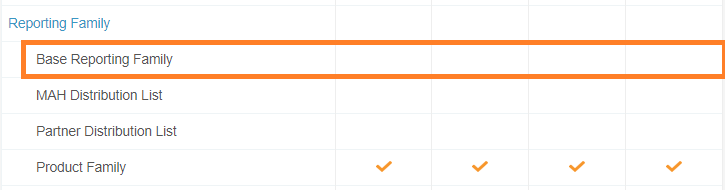
Removed Create Access on Base Product Family
In the 20R2 template, the Create action for base Reporting Family has been disabled for all permission sets.
This change is to prevent users from creating a Reporting Family using the Base Reporting Family object type. Users creating Reporting Families should use the appropriate object type, either MAH Distribution List or Partner Distribution List for reporting rules, or Product Family for aggregate reports.
To enable this change in your vault, an administrator can perform the following steps:
- In Admin, go to Users & Groups > Permission Sets.
- In each permission set, go to the Objects tab.
- Ensure the permission set does not grant access to Create Base Reporting Family objects. If the Create permission is enabled, edit the permission set to remove Create access.
Note If there are existing Base Reporting Family records in your vault, we recommend leaving the Read permission enabled.
- Ensure the permission set grants access to the Product Family object type if users in this permission set require access to configure or view Reporting Families for aggregate or periodic reports.
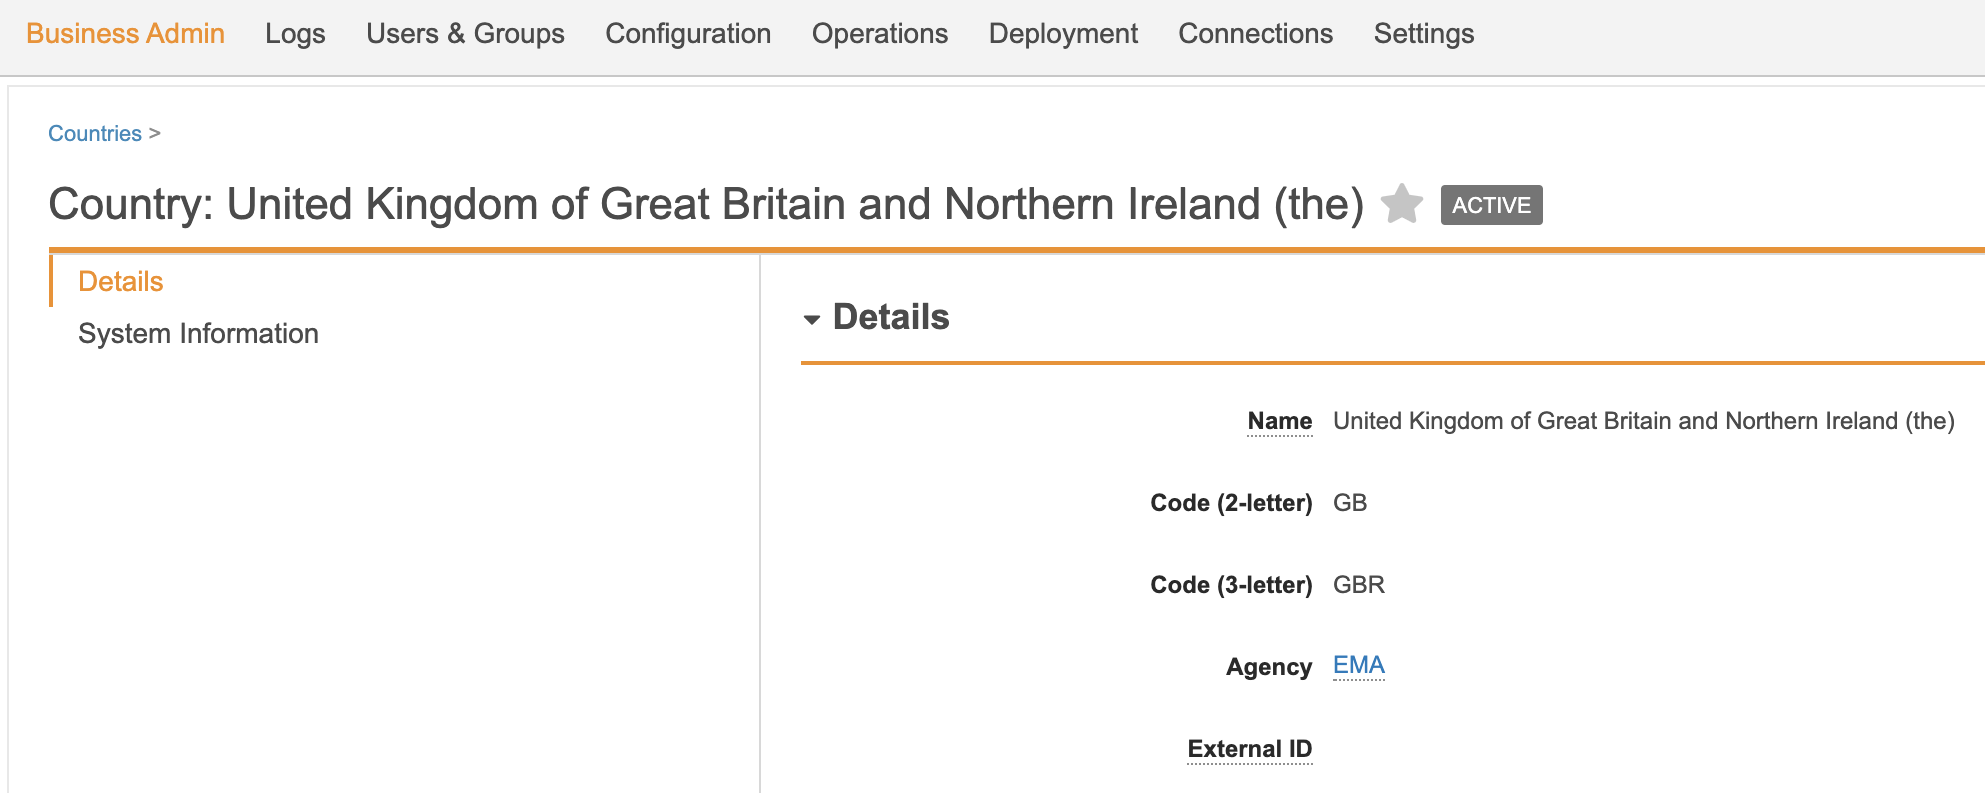
Added UK to EMA Jurisdiction
In the 20R2 template, an issue was fixed where the UK was not included under the EMA’s jurisdiction, which had an impact on reporting rules. If you process Cases submittable to the EMA, we highly recommend that you enable this change.
Note This issue only impacts vaults created from the Vault Safety 20R1 template.
To enable this change in your vault, an administrator can perform the following steps:
- In Admin, go to Business Admin > Organizations.
- Open the EMA Agency.
- Under Jurisdictions, select Create.
- On the Create Country page, enter the following details:
- Name: United Kingdom of Great Britain and Northern Ireland (the)
- Code (2-letter): GB
- Code (3-letter): GBR
Updated Identifiable Patient Formula for MRN
In 20R2, the Identifiable Patient field on the Case object has been updated to allow users to promote an AER to a Case when there is only 1 Patient MRN field with a value.
To enable this change, an administrator can update the Identifiable Patient Field Validation Rule. Replace the Formula Expression with the following updated version:
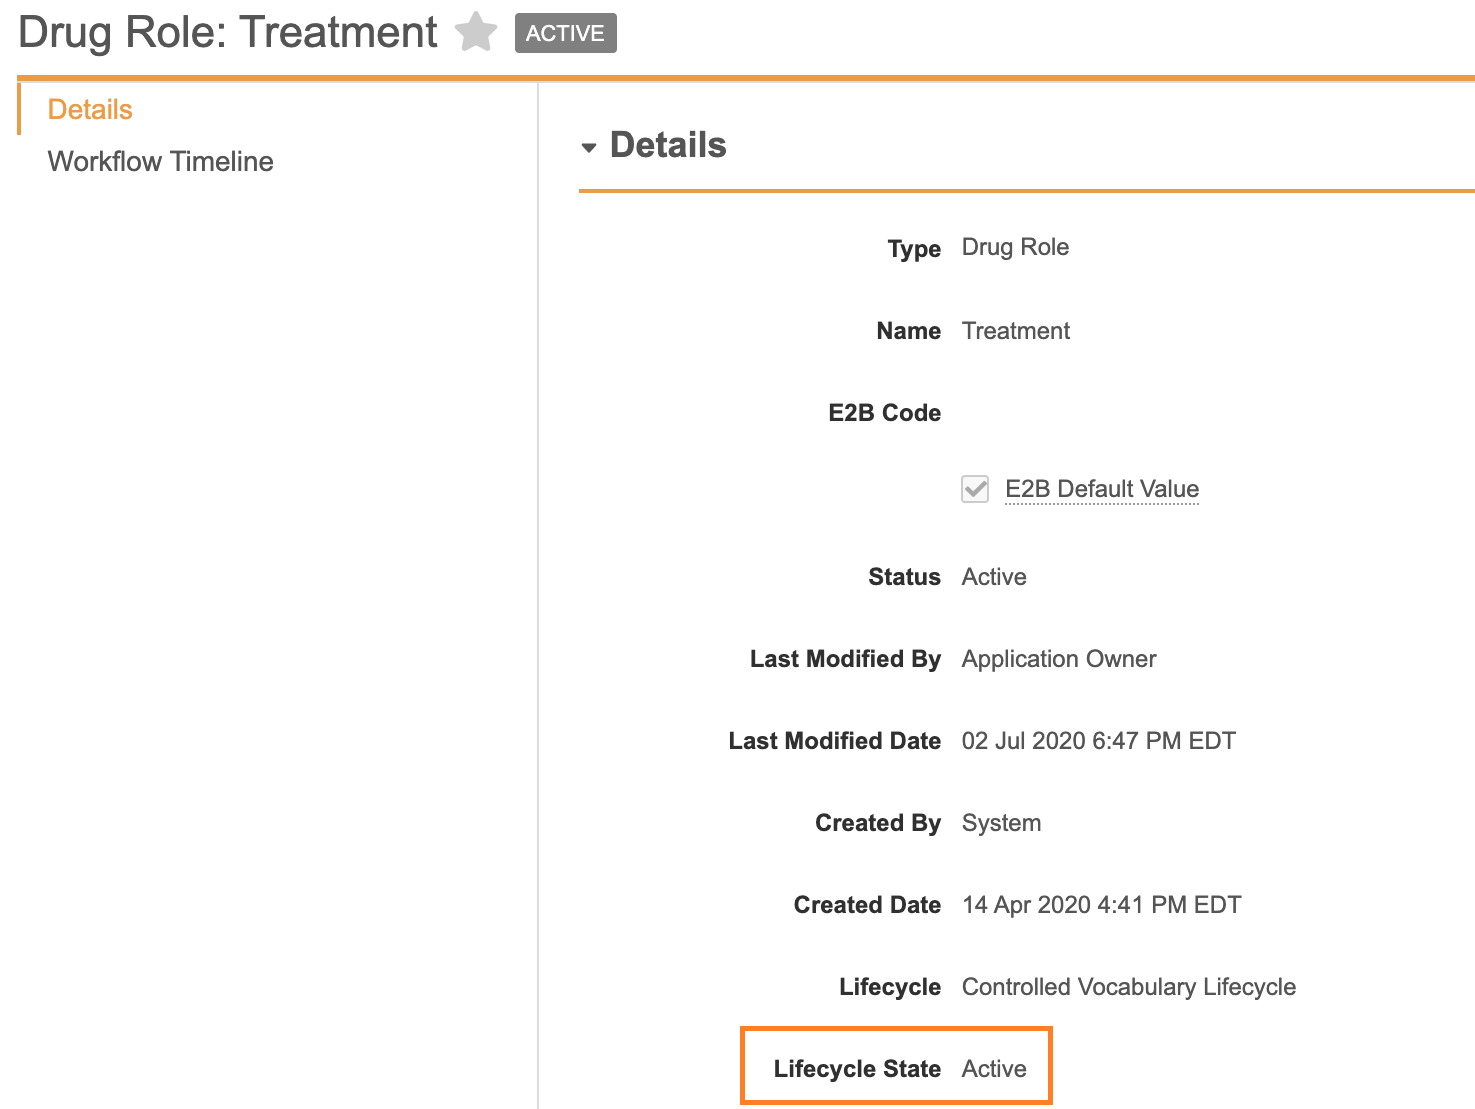
Not(And(isBlank(mrn_gp_value__v),isBlank(mrn_hospital_value__v),isBlank(mrn_investigation_value__v),isBlank(mrn_specialist_value__v),isBlank(patient_id_value__v),isBlank(gender_value__vr.name__v),isBlank(dob_idate__v),isBlank(age_normalized_year__v),isBlank(age_group__vr.name__v),isBlank(gestation_value__v)))Activated the Controlled Vocabulary for Drug Role Treatment
In the 20R2 template, the Controlled Vocabulary for Drug Role: Treatment has been made Active. If you plan to use the Treatment drug role, we recommend that an administrator enables this change.
Updated Overlay for Case Generated Documents
The 20R2 template includes an updated Draft Document Overlay with more information for report previews generated from the Case object.
- In Admin, go to Business Admin > Overlays.
- Open the Draft Document Overlay.
- Edit the following settings:
- Header:
Number:
${document_number_v}, Version:${major_version_numberv}.${minor_version_numberv}Status:${status_v}Name:${name_v}, Case:${case_version_v} - Diagonal Watermark:
${status__v} - Footer:
This copy of the document was retrieved from the system by
${userFullName}on${currentDate}
- Header:
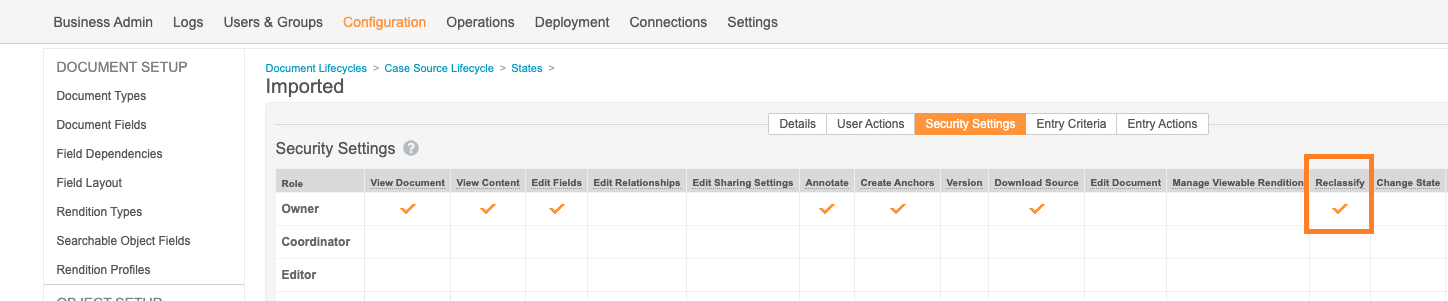
Added Reclassify State Permission for Owner in the Case Source Lifecycle
The 20R2 template includes a change to allow document Owners to reclassify Case Source documents after they’ve been imported.
To enable this change in your vault, an administrator can perform the following steps:
- In Admin, go to Configuration > Document Lifecycles.
- Open the Case Source Lifecycle, and then go to States.
- On the Imported state, go to the Security Settings tab.
- Grant the Owner permission to Reclassify.
Updated Field Validation Rules to Account for Timezone
The Field Validation Rules for Case date fields have been corrected in the 20R2 template to consider differences between Vault and user timezones.
The Field Validation Rules have been updated to allow a receipt date and start date of up to one day in the future to handle different timezones.
The following example shows the updated Validation Expression for the Receipt Date cannot be in the future Field Validation Rule for the Receipt Date field:
isBlank(case_classifier__c) ||
case_classifier__c = 'aer__c' ||
(text(state__v) = "New" || text(state__v) = "Triage"  || text(state__v) = "Duplicate" || text(state__v) = "Revision") ||
If(
  not(isBlank(receiptdate_date__v)),
  receiptdate_date__v <= (Today() + Days(1)),
  true
)
This change has been made to the following fields:
- Case.Receipt Date
- Case.New Info Date
- Case.Date of Death
- Case.Date of Birth
- Case Medical History.Start Date
- Case Medical History.End Date
- Case Drug History.Start Date
- Case Drug History.End Date
- Case Adverse Event.Onset Date
- Case Adverse Event.Resolved Date
- Case Test Result.Test Date
- Case Product Dose.First Admin
- Case Product Dose.Last Admin
- Case Product Dose.First Admin < Last Admin
We recommend that you contact Veeva Managed Services to help with enabling this change.
Increased Maximum Number of Formatted Output Referenced Objects
The maximum number of referenced objects for formatted output has been increased from 10 to 20.
If you would like to use more merge field tokens in narrative templates, we recommend that you enable this change. This setting is managed in Vault Management Console (VMC) under Formatted Output Settings. Contact Veeva Support to help with enabling this change.
Inactivated the Template Document Type
The Template (template__v) document type has been inactivated by default in the 20R2 template to prevent users from creating documents of this type. This document type should only be reactivated if your organization wants to update aggregate report tabulation templates or use controlled document templates.
If you want to use this document type and maintain controlled document templates, we recommend that you modify the Create Document permissions under the Security tab to limit this to a small group of template administrators.
To update this configuration in your vault, perform the following steps as an administrator:
- In Admin, go to Configuration > Document Types.
- Select Template (template__v), and select Edit Details from the Action menu.
- Change the Status to Inactive.
- Optionally, add a description similar to the following:
Inactivate this doctype for normal use. It should only be activated if you want to update tabulation templates or to use controlled document templates.
- Select Save.

Replaced Aggregate Report Document Templates
Basic Document Templates for aggregate report documents (non-tabulations) were under the Template document type, resulting in the wrong document type being used for aggregate reports. In the 20R2 template, this has been corrected and the templates are now under the Aggregate Reports document type.
To update your configuration, delete the basic templates, inactivate the document type, and then re-create the templates in the correct document type.
DSUR Template
- In Admin, go to Business Admin > Documents & Binders.
- Expand Template > Aggregate Report.
- Select DSUR, and then download and save the template document.
- Delete the DSUR template document from Template > Aggregate Report > DSUR.
- Under Base Document, expand Aggregate Reports.
- Under Clinical > DSUR, create a basic document template and upload the document you downloaded in step 3.
- Go to Configuration > Document Types.
- Inactivate the Template > Aggregate Report > DSUR document type.
PADER Template
- In Admin, go to Business Admin > Documents & Binders.
- Expand Template > Aggregate Report.
- Select PADER, and then download and save the template document.
- Delete the PADER template document from Template > Aggregate Report > PADER.
- Under Base Document, expand Aggregate Reports.
- Under Postmarketing > PADER, create a basic document template and upload the document you downloaded in step 3.
- Go to Configuration > Document Types.
- Inactivate the Template > Aggregate Report > PADER document type.
PBRER Template
- In Admin, go to Business Admin > Documents & Binders.
- Expand Template > Aggregate Report.
- Select PBRER, and then download and save the template document.
- Delete the PBRER template document from Template > Aggregate Report > PBRER.
- Under Base Document, expand Aggregate Reports.
- Under Postmarketing > PBRER, create a basic document template and upload the document you downloaded in step 3.
- Go to Configuration > Document Types.
- Inactivate the Template > Aggregate Report > PBRER document type.
PSUR Template
- In Admin, go to Business Admin > Documents & Binders.
- Expand Template > Aggregate Report.
- Select PSUR, and then download and save the template document.
- Delete the PSUR template document from Template > Aggregate Report > PSUR.
- Under Base Document, expand Aggregate Reports.
- Under Postmarketing > PSUR, create a basic document template and upload the document you downloaded in step 3.
- Go to Configuration > Document Types.
- Inactivate the Template > Aggregate Report > PSUR document type.