Note Beginning with 23R3 content and for all subsequent releases, Vault Release Notes is the official site for Vault Safety release notes.
Vault Safety template revisions include changes to vault configuration for general usability improvements. Template revisions are not automatically rolled out to existing customers.
New vaults created in 23R1 or later will have the following settings by default. Vaults created in an earlier release can optionally be updated to match these changes. The sections on this page provide the instructions to enable these changes.
This page does not cover how to update your template to support new features. The 23R1 New Features page outlines which features require configuration upgrades, and provides links to enablement instructions for each feature.
Update Localizations Records
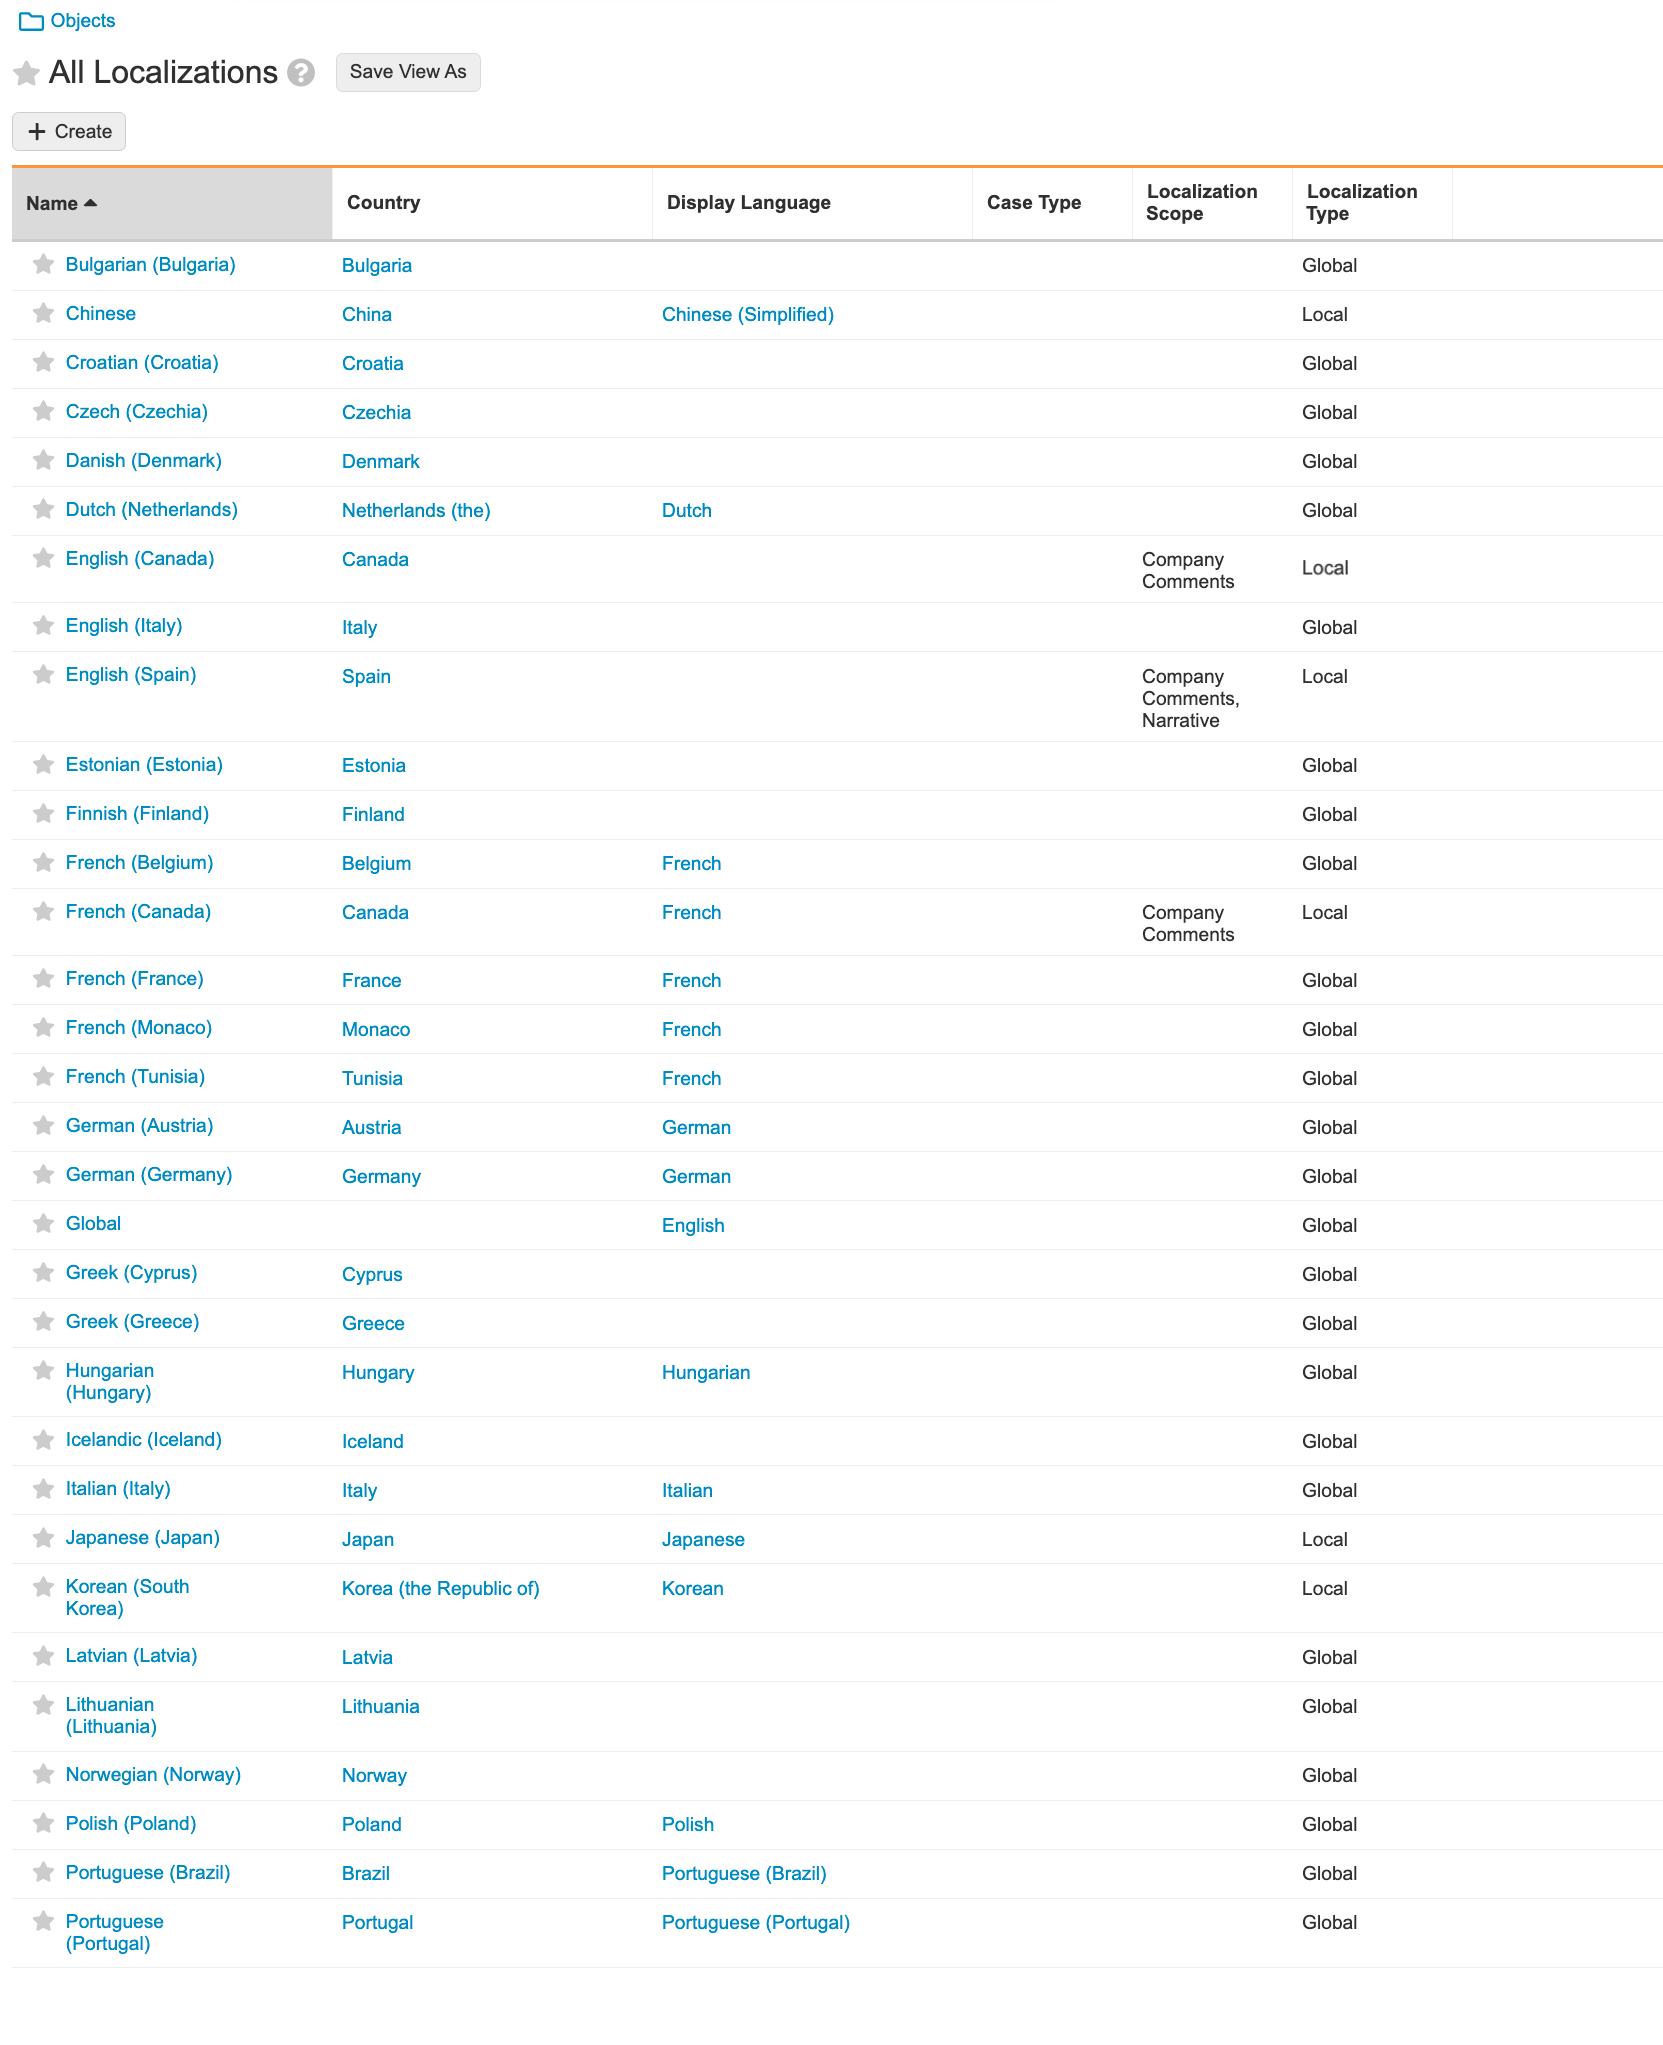
Previously, all Localization Types were set to “Local”, except the Global record. As many customers do not require Localization, multiple Localization Types have been updated. You can update this setup based on the process requirements.
Go to Business Admin > Objects > Localization. Ensure the Localization Scope and Localization Type match the recommended setup:
Update Case Review Workflows for Study and Non-Study Cases
This update simplifies Vault administration. There are no functional changes. Follow the sections below to create separate Case Review workflows for Study and Non-Study Cases:
Once complete, update entry actions for the Case Lifecycle Medical Review state.
Create the Case Review (Post-Market) Workflow
- Go to Admin > Configuration > Workflows.
- Hover over the Case Review workflow and select the
 menu > Copy.
A Copy Object Workflow window appears - Update the Label to “Case Review (post-market)” and then select Copy.
- In the Case Review (post-market) workflow, perform the following updates to obtain the modified workflow as shown:
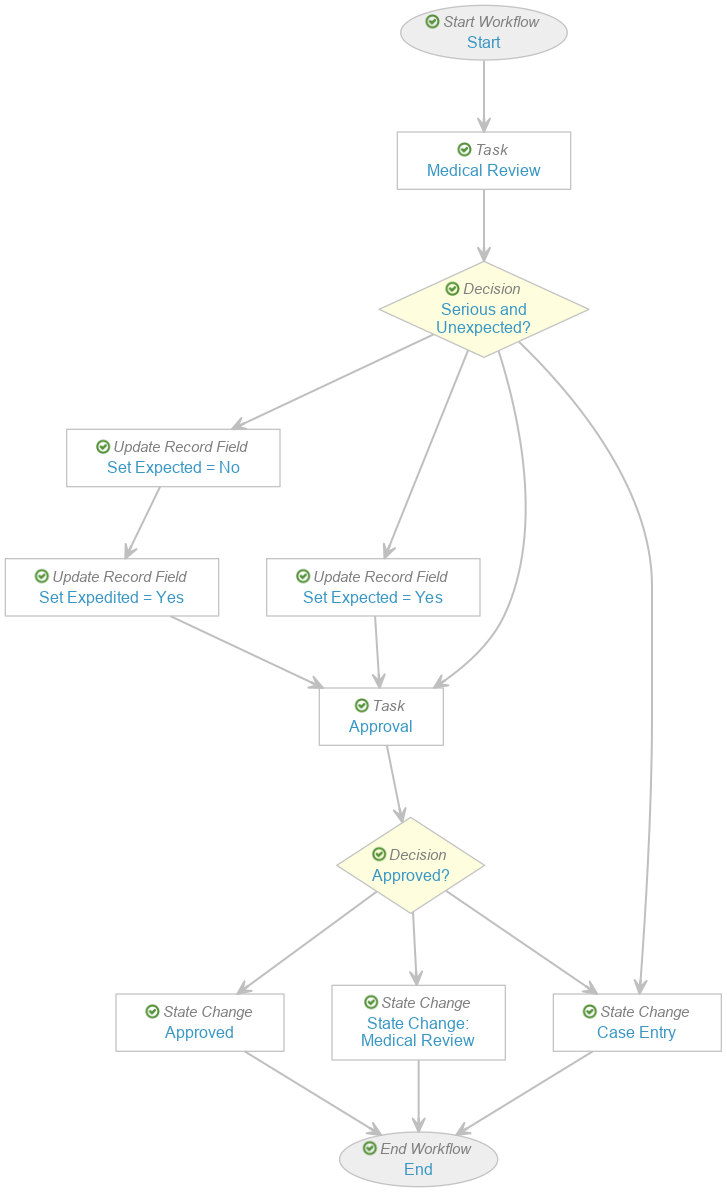
Case Review (post-market) Workflow - Go to the Serious and Unexpected? decision step and remove the following rules:
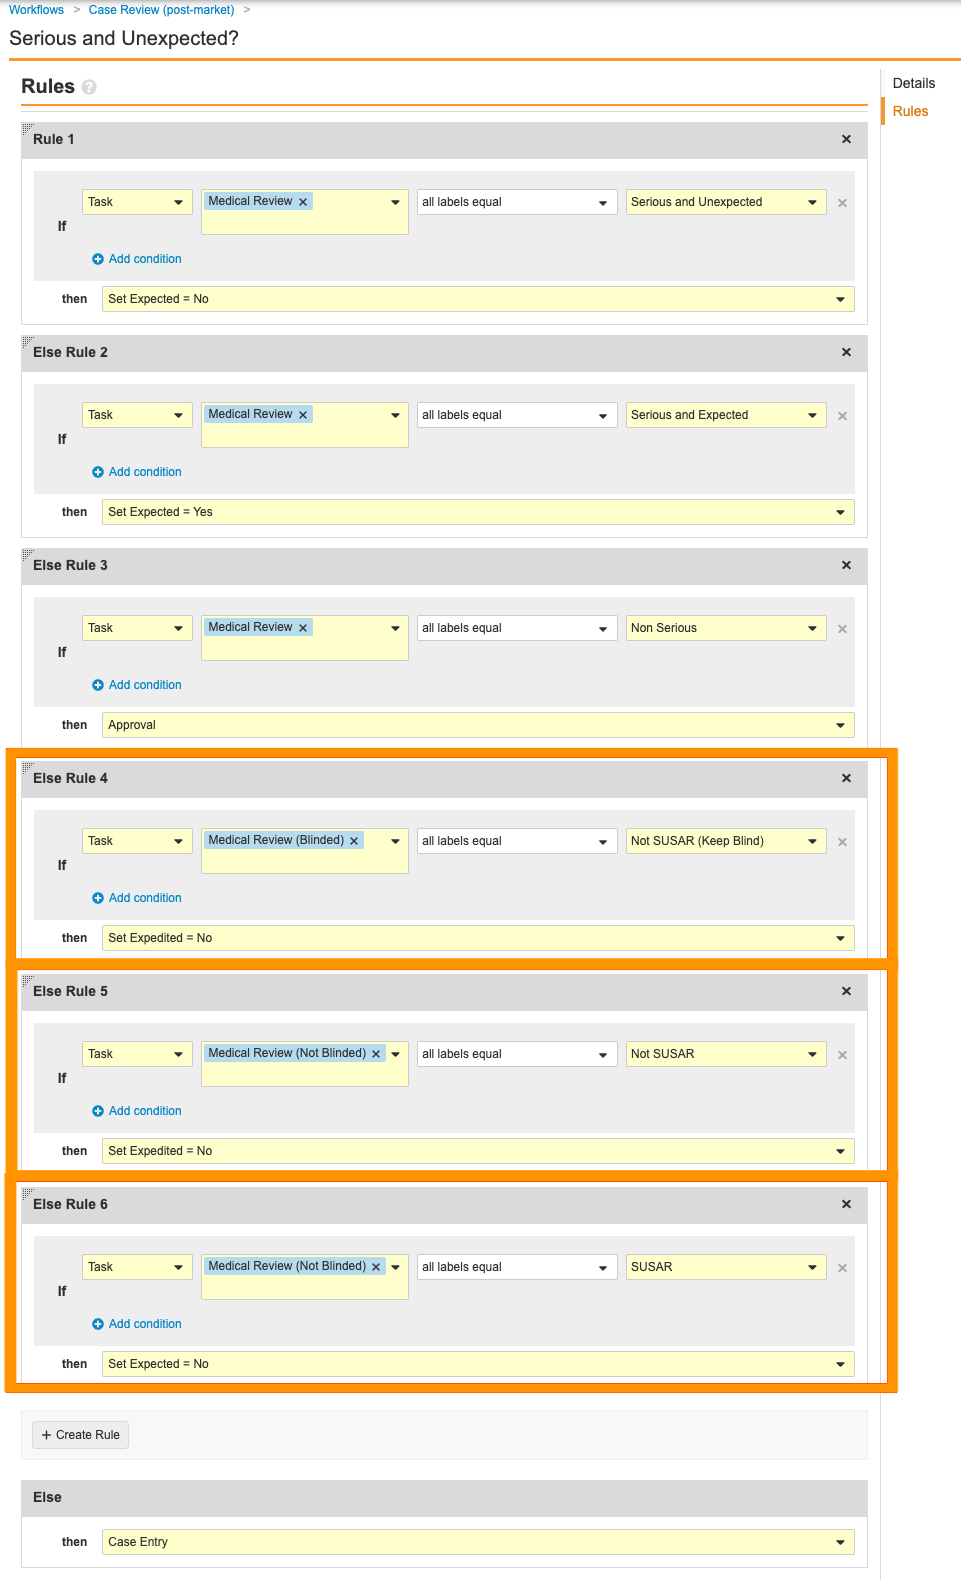
Case Review (post-market) Workflow: Remove Rules in Serous and Unexpected? Step - Delete the following steps by hovering over them and selecting the menu > Delete:
- Study? decision
- Study Blinded? decision
- Case Unblinded? decision
- Open Arm? decision
- Unblind? decision
- Medical Review (Blinded) task
- Medical Review (Not Blinded) task
- Medical Review (Not Blinded) task
- Set Expedited = No update record field step
- Start Unblinding state change
Note You must remove these steps in the provided order as some steps are dependent on others.
- Select the Start step and update the Next Steps to Medical Review.
- Go to the Serious and Unexpected? decision step and remove the following rules:
- Select Make configuration active.
Create the Case Review (Study) Workflow
- Go to the Case Review workflow.
- Update the Label to “Case Review (study)”.
- Perform the following updates on the existing Case Review workflow to obtain the modified workflow as shown:
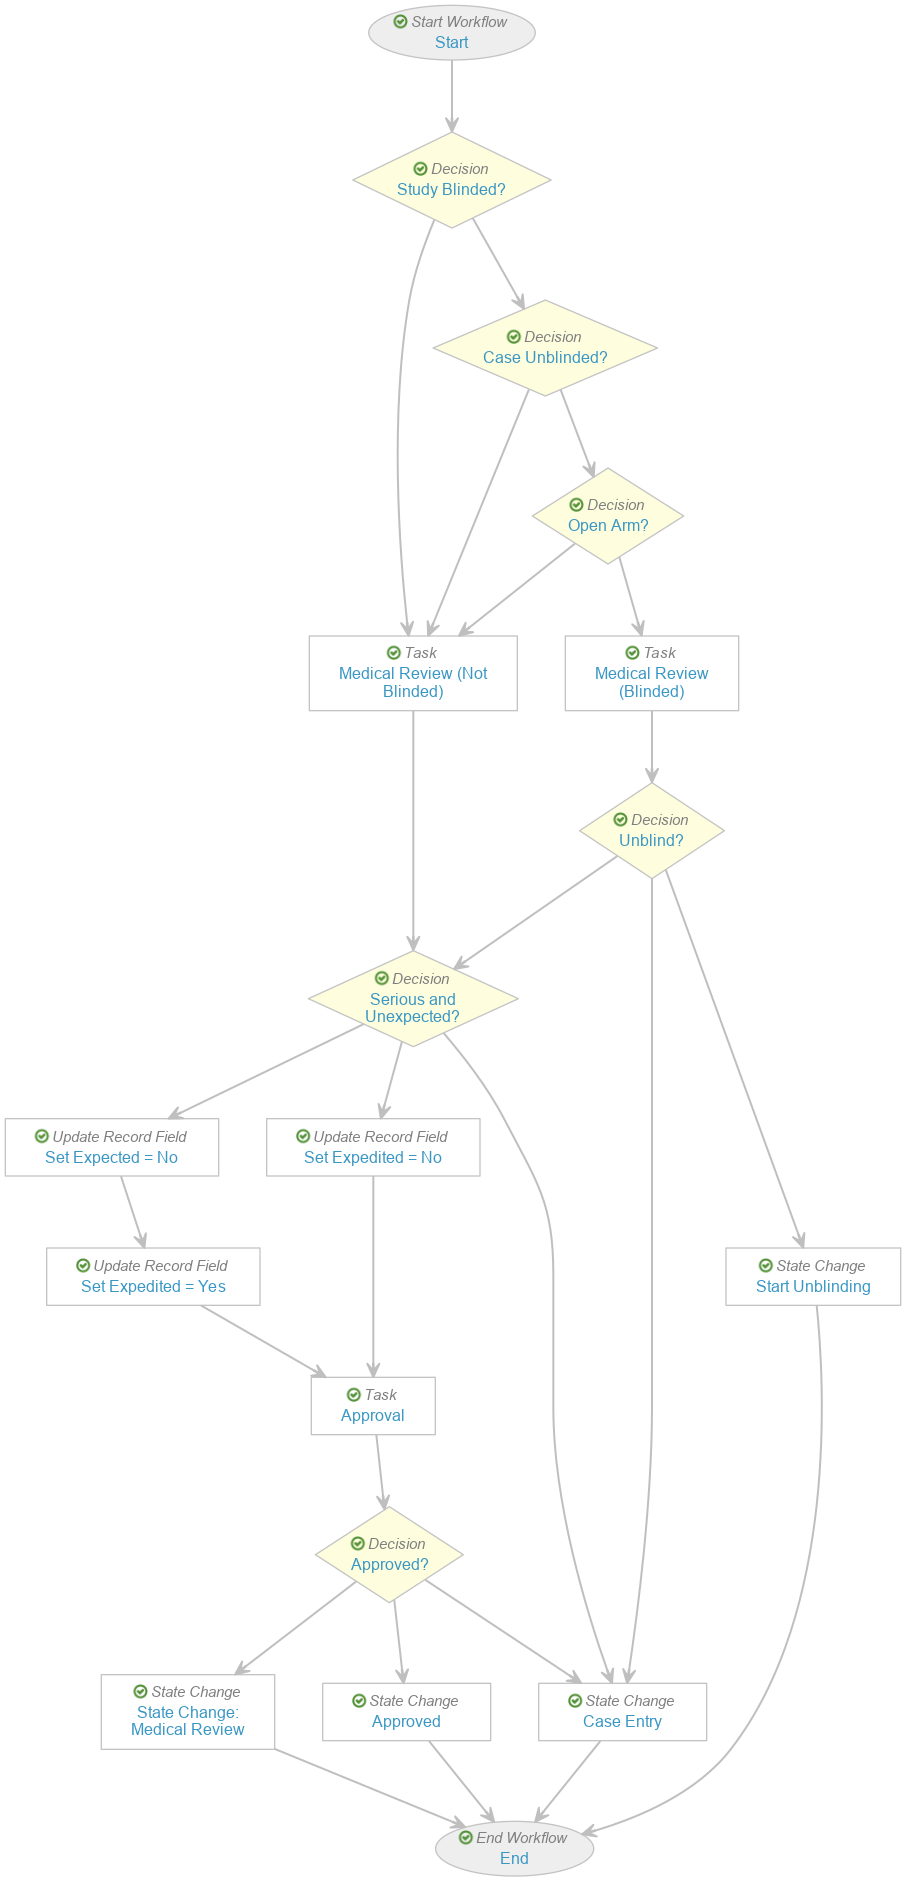
Case Review (study) Workflow - Hover over the Study? decision. Select the menu > Delete.
- Select Start and update the Next Steps to Study Blinded?
- Select the Serious and Unexpected? decision. Remove the following rules:
Case Review (study) Workflow: Remove Rules in Serous and Unexpected? Step - Hover over the Medical Review task. Select the menu > Delete.
- Hover over the Set Expected = Yes update record field step. Select the menu > Delete.
- Hover over the Study? decision. Select the
- Select Make configuration active.
Update Entry Actions for the Case Lifecycle Medical Review State
This configuration ensures that Cases cannot go to Medical Review with major validation failures.
- Go to Admin > Configuration > Object Lifecycles > Case Lifecycle > Medical Review state.
- Update the Entry Actions as shown:
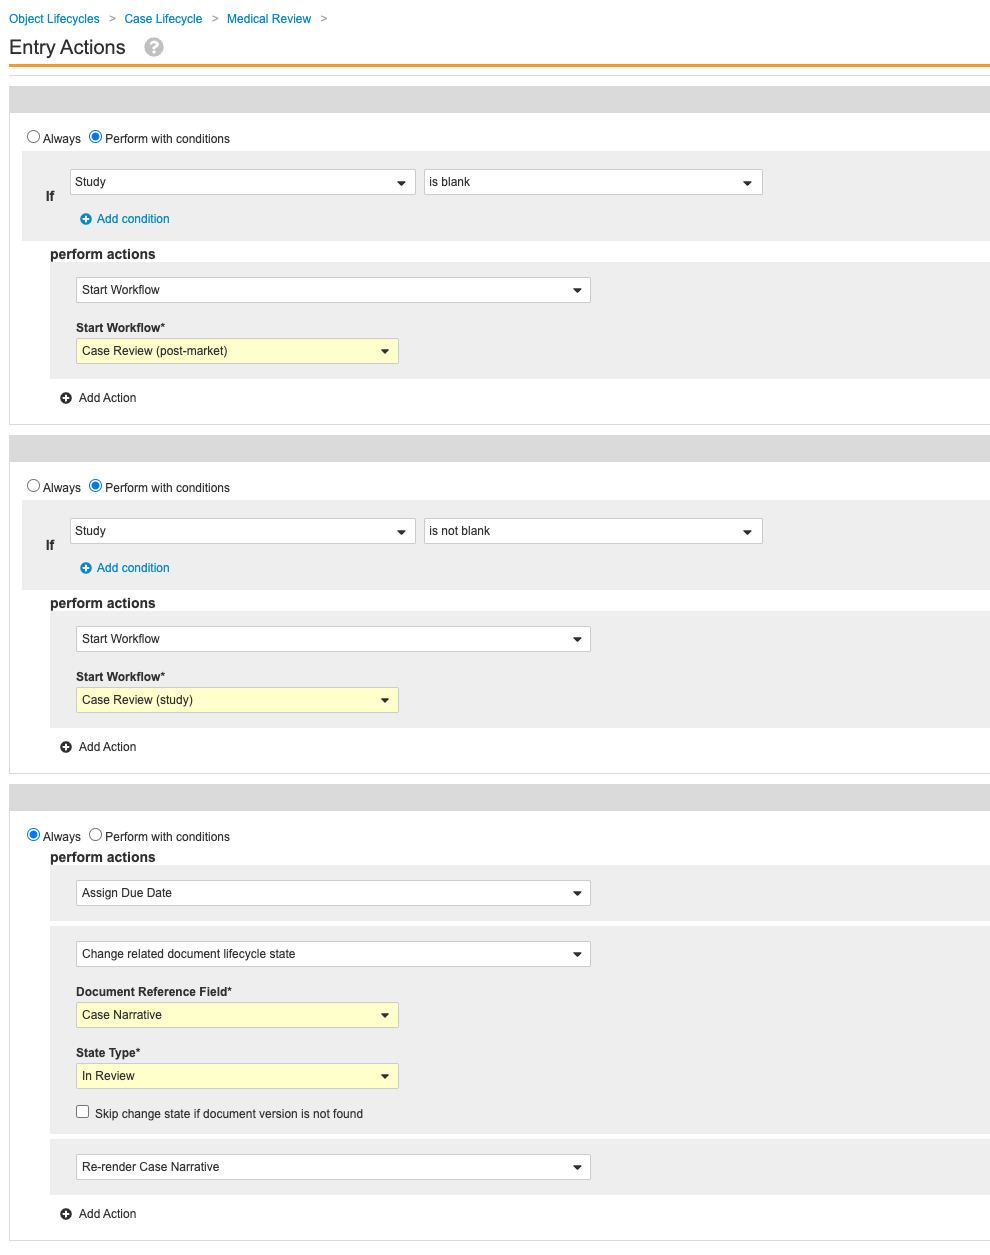
Case Lifecycle Medical Review Entry Actions - Save the page.
Remove the Narrative Document Lifecycle State Change from the Case Triage State
Perform the following steps to remove the narrative document lifecycle state change entry action from the Case lifecycle Triage state:
- Go to Admin > Configuration > Object Lifecycles > Case Lifecycle.
- Select the Triage (
triage_state__v) state. - Remove the following entry action:
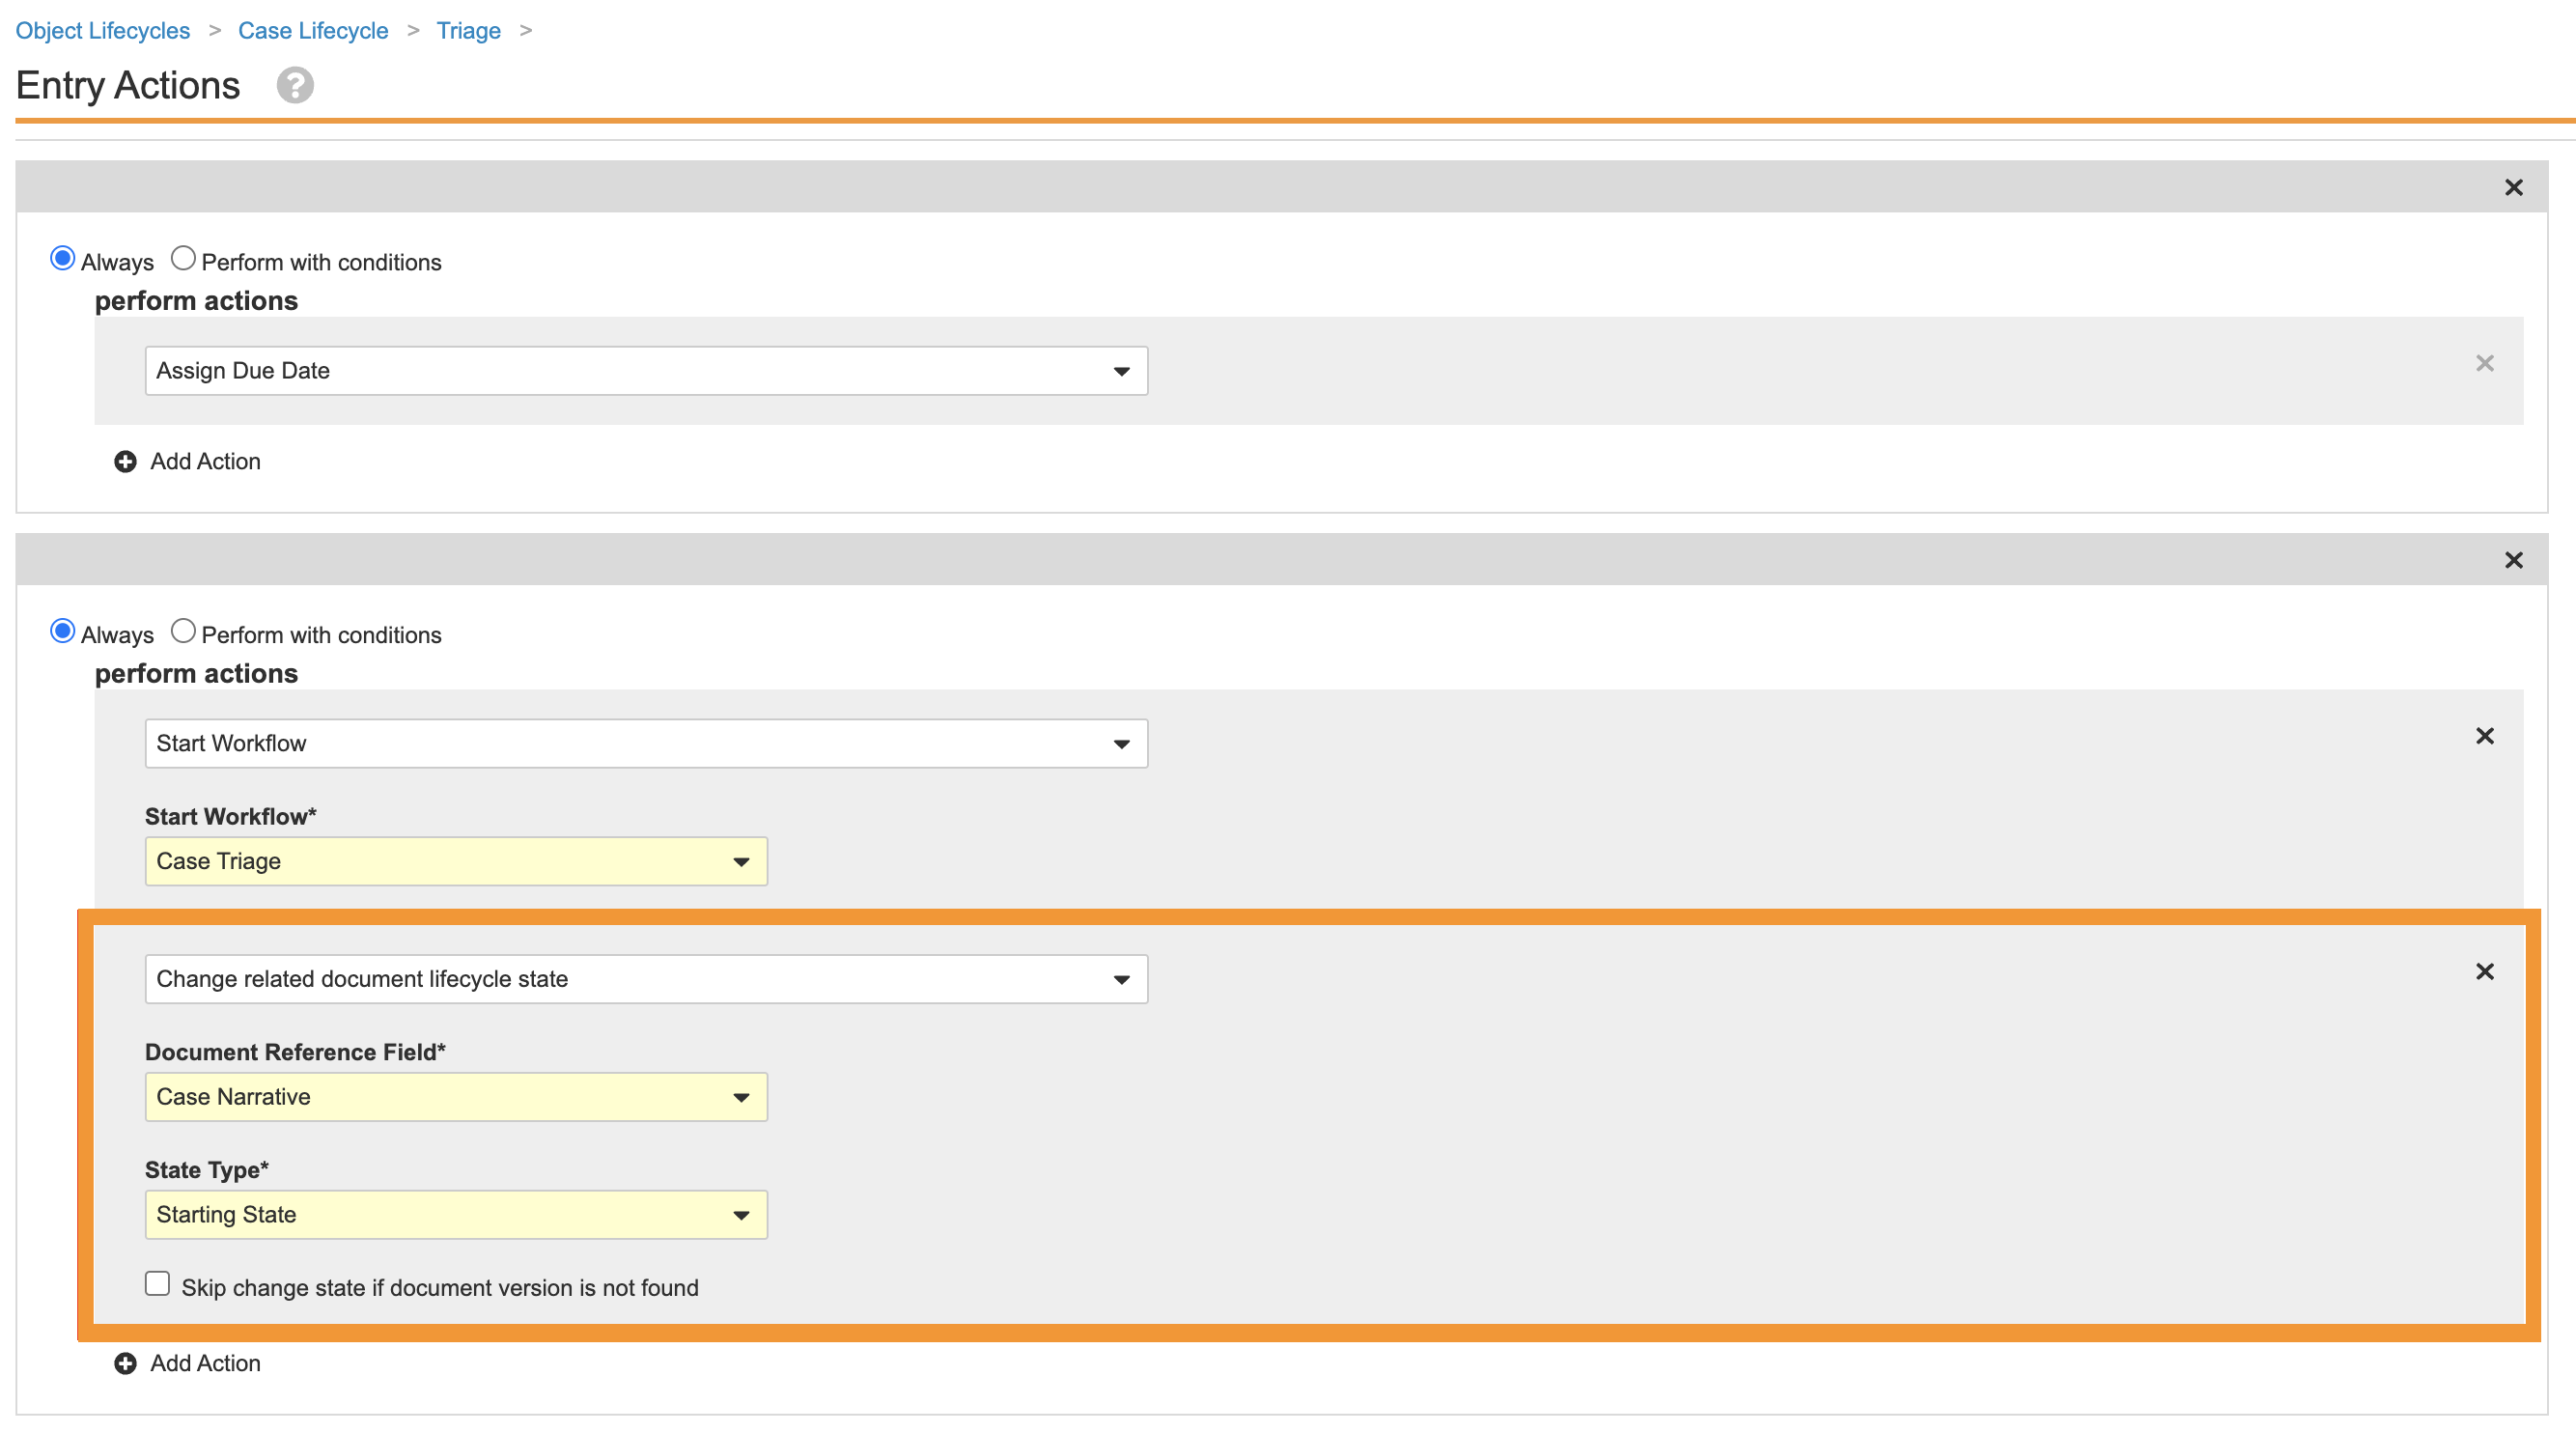
Remove Narrative Document Lifecycle State Change Entry Action on Case Triage State - Save the page.
Remove Inactive Inbox Item Page Layout
Follow the steps below to remove an inactive Inbox Item page layout:
- Go to Admin > Configuration > Objects > Inbox Item > Page Layouts.
- Hover over the Hide Organization (Manual Creation) (
hide_organization_manual_creation__c) page layout and select the menu > Delete.
Update Case Lifecycle Entry Actions and Narrative Lifecycle Entry Criteria
This configuration enhances the overall Case processing experience. It is important to consider your specific business needs.
Perform the steps in the sections below to update the Case and Narrative lifecycles, respectively:
- Update Entry Actions for the Case Lifecycle QC State
- Add Entry Criteria for the Narrative Document Lifecycle Review State
Update Entry Actions for the Case Lifecycle QC State
- Go to Admin > Configuration > Object Lifecycles > Case Lifecycle > QC State.
- Update the entry actions as shown:
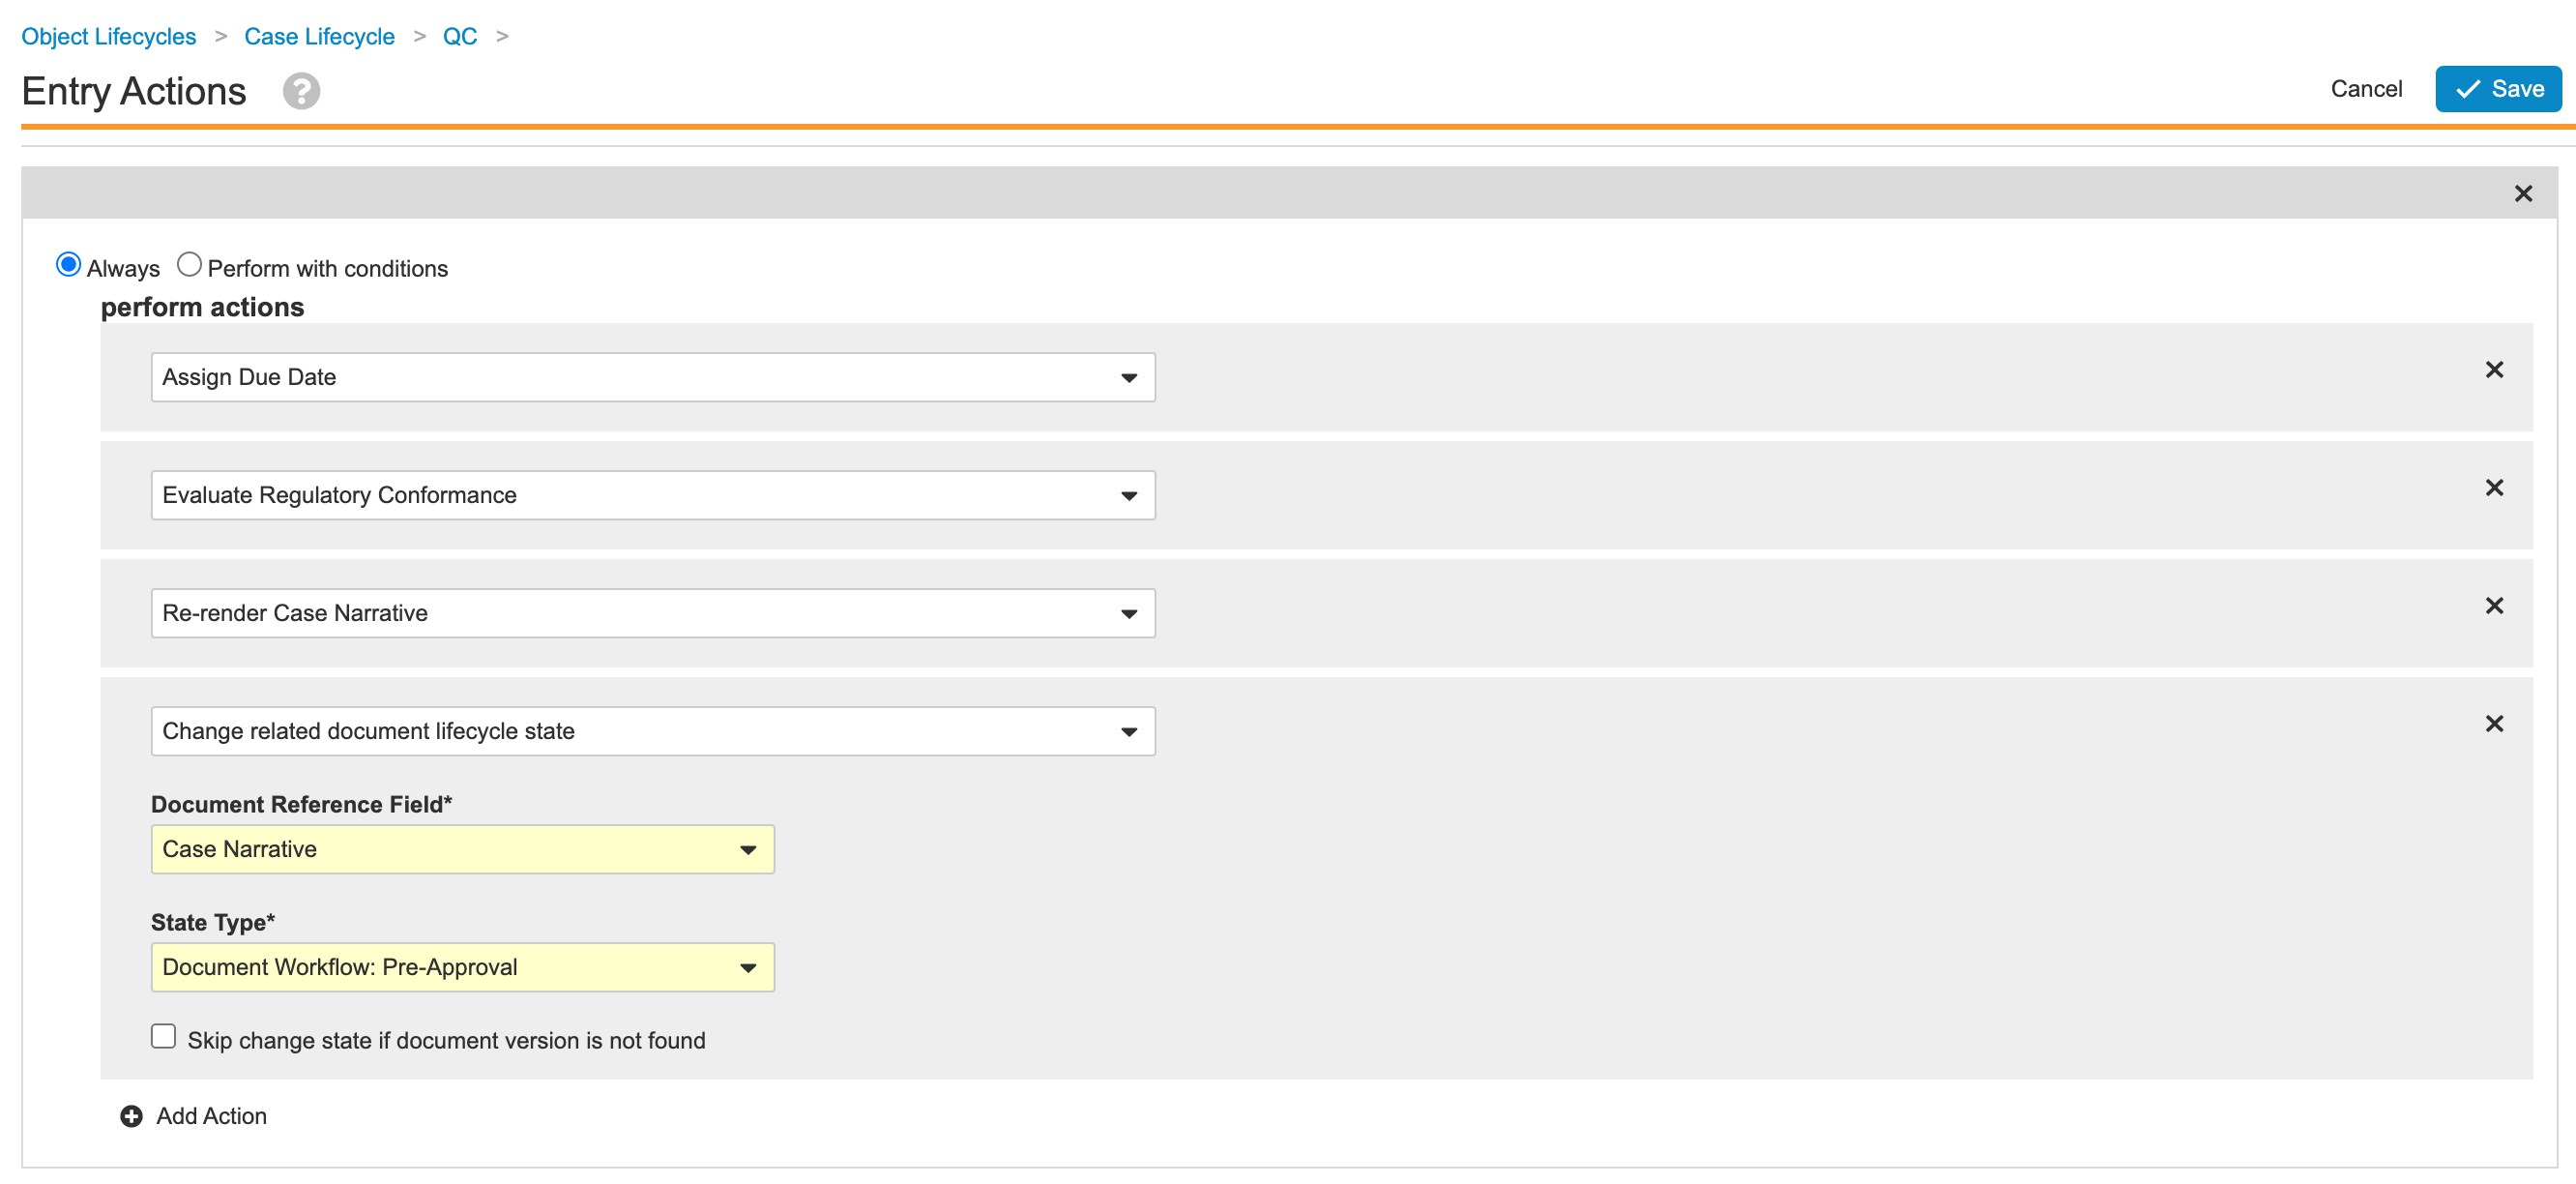
Case Lifecycle QC State Entry Actions - Save the page.
Add Entry Criteria for the Narrative Document Lifecycle Review State
- Go to Admin > Configuration > Document Lifecycles > Narrative Lifecycle > States > Review (review__v).
- In the Review state, go to the Entry Criteria tab.
- Add the following entry criteria as shown:
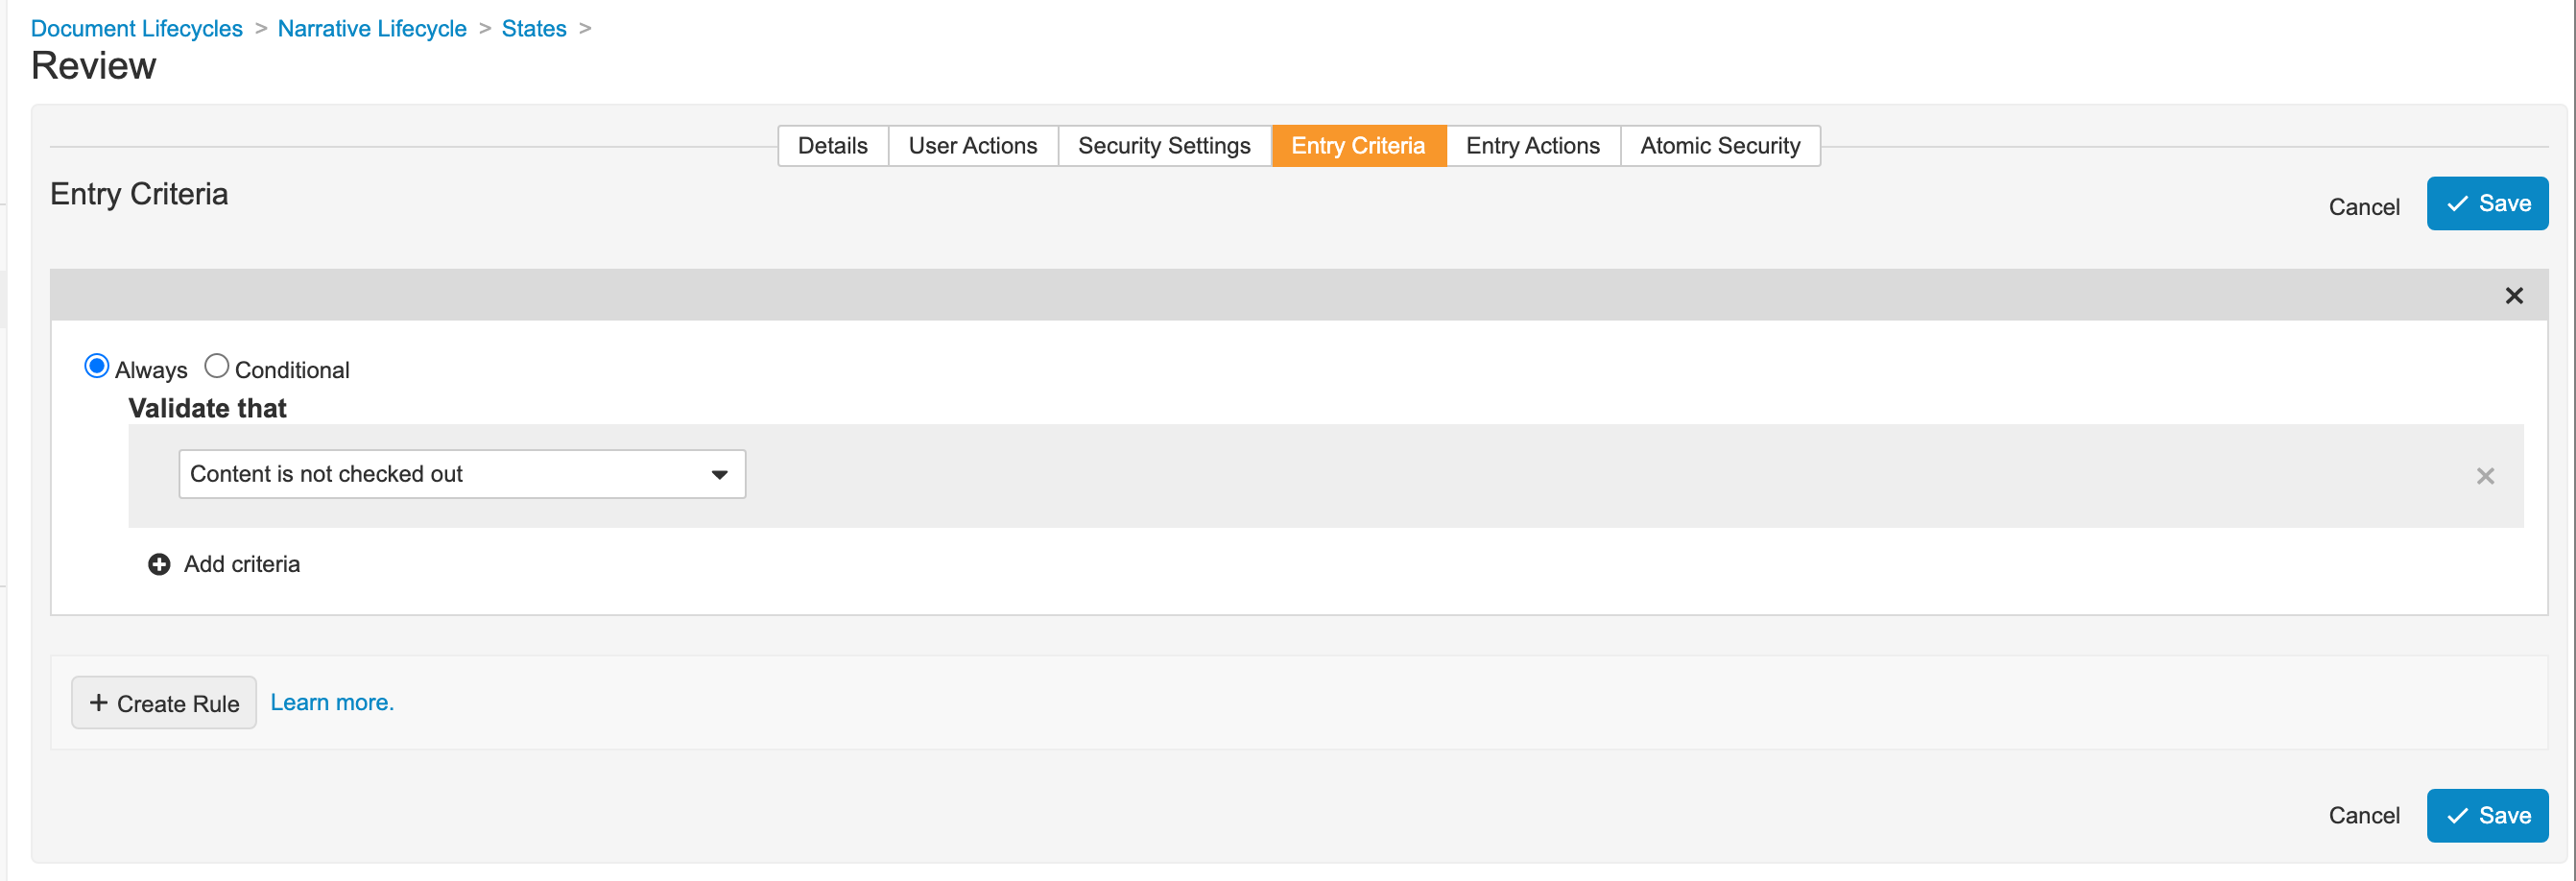
Narrative Lifecycle Review State Entry Criteria - Save the page.
Remove Highlighted Term Layout Rule
This configuration removes the Highlighted Term (highlighted_term__c) layout rule on the Case Adverse Event object so that the Highlighted Term is always visible.
- Go to Admin > Configuration > Objects > Case Adverse Event > Page Layouts > Case Adverse Event Detail Page Layout > Layout Rules.
- Hover over the Highlighted Term (
highlighted_term__c) layout rule and select the menu > Delete.
Upload an Updated Summary ADR from Postmarketing Sources Template
Due to an Excel limitation, the header of the PBRER Summary ADR from Postmarketing Sources is cut off. Follow the steps below to upload an updated template file with the full header:
- Go to Vault Safety Help Configure Aggregate Report Templates: Standard Table Templates and download the following file:
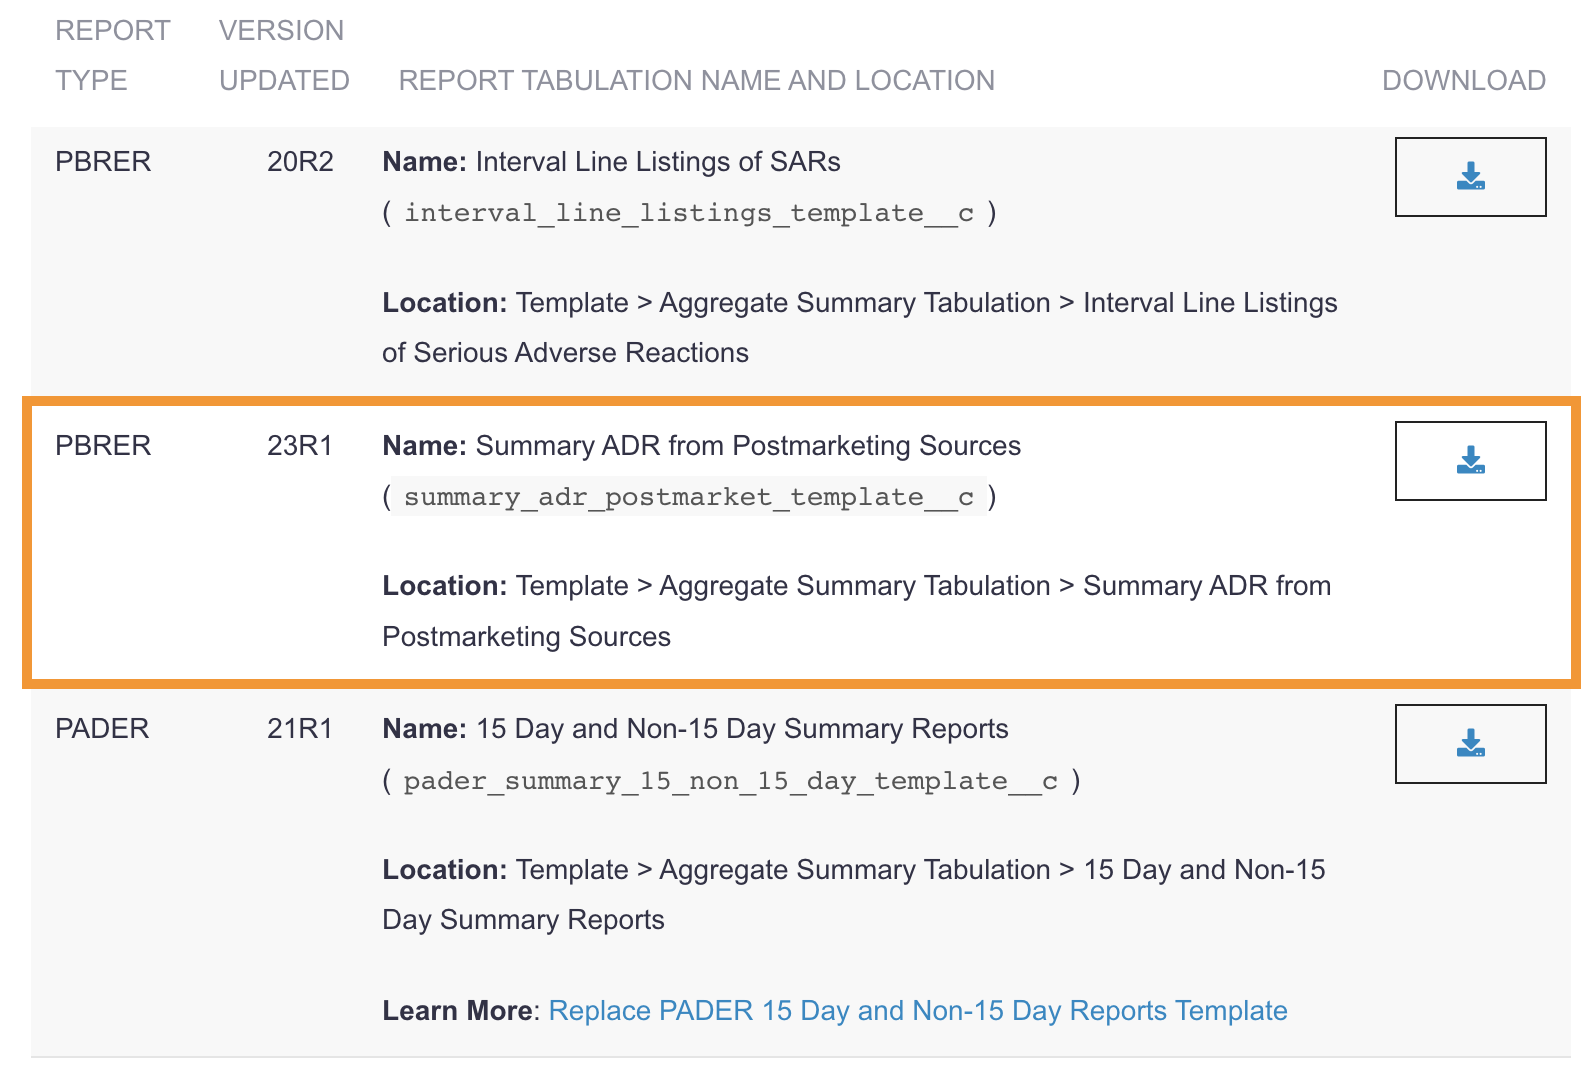
Vault Safety Help PBRER Summary ADR from Postmarketing Sources Download - Go to Business Admin > Templates > Documents & Binder Templates.
- Go to Template > Aggregate Summary Tabulation > Summary ADR from Postmarketing Sources.
- Select Summary ADR from Postmarketing Sources to edit.
- Select Upload File and find the file you want to upload.
- Save the page.
Add the Last Modified Date to the Aggregate Report Page Layout
The Last Modified Date can be useful for troubleshooting issues with aggregate reports. Perform the following steps to add the Last Modified Date to the Aggregate Report page layout:
- Go to Admin > Configuration > Objects > Aggregate Report > Page Layouts > Aggregate Report Detail Page Layout.
- In the Documents section, select Edit Columns.
- Add the Last Modified Date column.
- Save the page.
Update Filter Aliases in SMQ/CMQ Reports
Four (4) system reports were unable to display variable filter criteria in the output. This configuration updates the filter alias values for these reports as shown by the table below:
| REPORT | FILTER | OLD FILTER ALIAS | REPLACEMENT FILTER ALIAS |
|---|---|---|---|
| Sample SMQ/CMQ Search by Product using Root Query | Case > Organization | Organization | Organization equals {#####} |
| Case > Product | Primary Suspect Product | Primary Suspect Product equals {#####} | |
| MedDRA Query > Root Query | Root-Level SMQ/CMQ | Root-Level SMQ/CMQ equals {#####} | |
| MedDRA Criteria > Scope | Query Scope | Query Scope in {#####} | |
| Sample SMQ/CMQ Search by Product across Multiple Queries | Case > Organization | Organization | Organization equals {#####} |
| Case > Product | Primary Suspect Product | Primary Suspect Product equals {#####} | |
| MedDRA Criteria > MedDRA Query | SMQ/CMQs | SMQ/CMQs in {#####} | |
| MedDRA Criteria > Scope | Query Scope | Query Scope in {#####} | |
| Sample SMQ/CMQ Search by Study using Root Query | Case > Organization | Organization | Organization equals {#####} |
| Case > Study | Study | Study equals {#####} | |
| MedDRA Query > Root Query | Root-Level SMQ/CMQ | Root-Level SMQ/CMQ equals {#####} | |
| MedDRA Criteria > Scope | Query Scope | Query Scope in {#####} | |
| Sample SMQ/CMQ Search by Study across Multiple Queries | Case > Organization | Organization | Organization equals {#####} |
| Case > Study | Study | Study equals {#####} | |
| MedDRA Criteria > MedDRA Query | SMQ/CMQs | SMQ/CMQs in {#####} | |
| MedDRA Criteria > Scope | Query Scope | Query Scope in {#####} |
- On the user side of Vault, go to Analytics > Reports.
- Select one of the above reports.
A Select Report Values window appears. - Complete the information in the window:
- Organization: Select the Organization for the report.
- Study: Select the Study for the report.
- Root-Level SMQ/CMQ: Select a root query.
- Query Scope: Select whether the scope is Broad or Narrow.
- Select the
 icon.
icon. - Perform the Filter Alias updates as described in the table above.
- Select Run.
- Save the page.
- Repeat steps 2-5 for the remaining reports.
Update Case Triage and Data Entry Workflows
This configuration supports customers who do not need both a Case Triage and Case Entry workflow. This configuration also ensures all Cases (both E2B and non-E2B) go through the data entry workflow.
Update the Case Lifecycle
Perform the following steps to update the Case lifecycle Data Entry state (case_entry_state__v) Label as well as the Triage state (triage_state__v):
- Label
- Entry Actions
- User Actions
- Go to Admin > Configuration > Objects Lifecycles > Case Lifecycle > Triage (
triage_state__v) state. - Update the State Label to “Data Entry (Initial)”.
- Update the Data Entry (Initial) entry actions as shown:
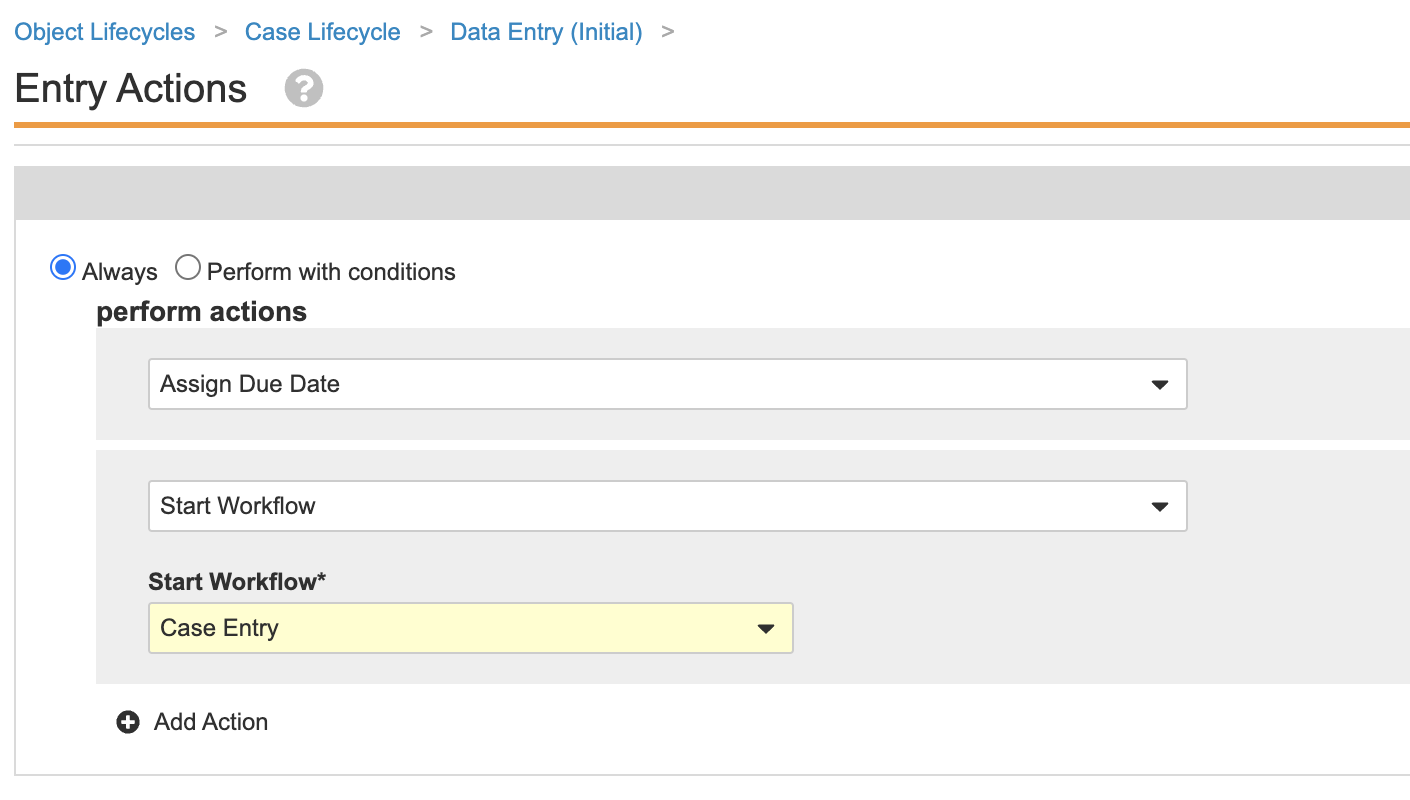
Case Lifecycle Data Entry (Initial) State Entry Actions - Update the Data Entry (Initial) user actions as shown:
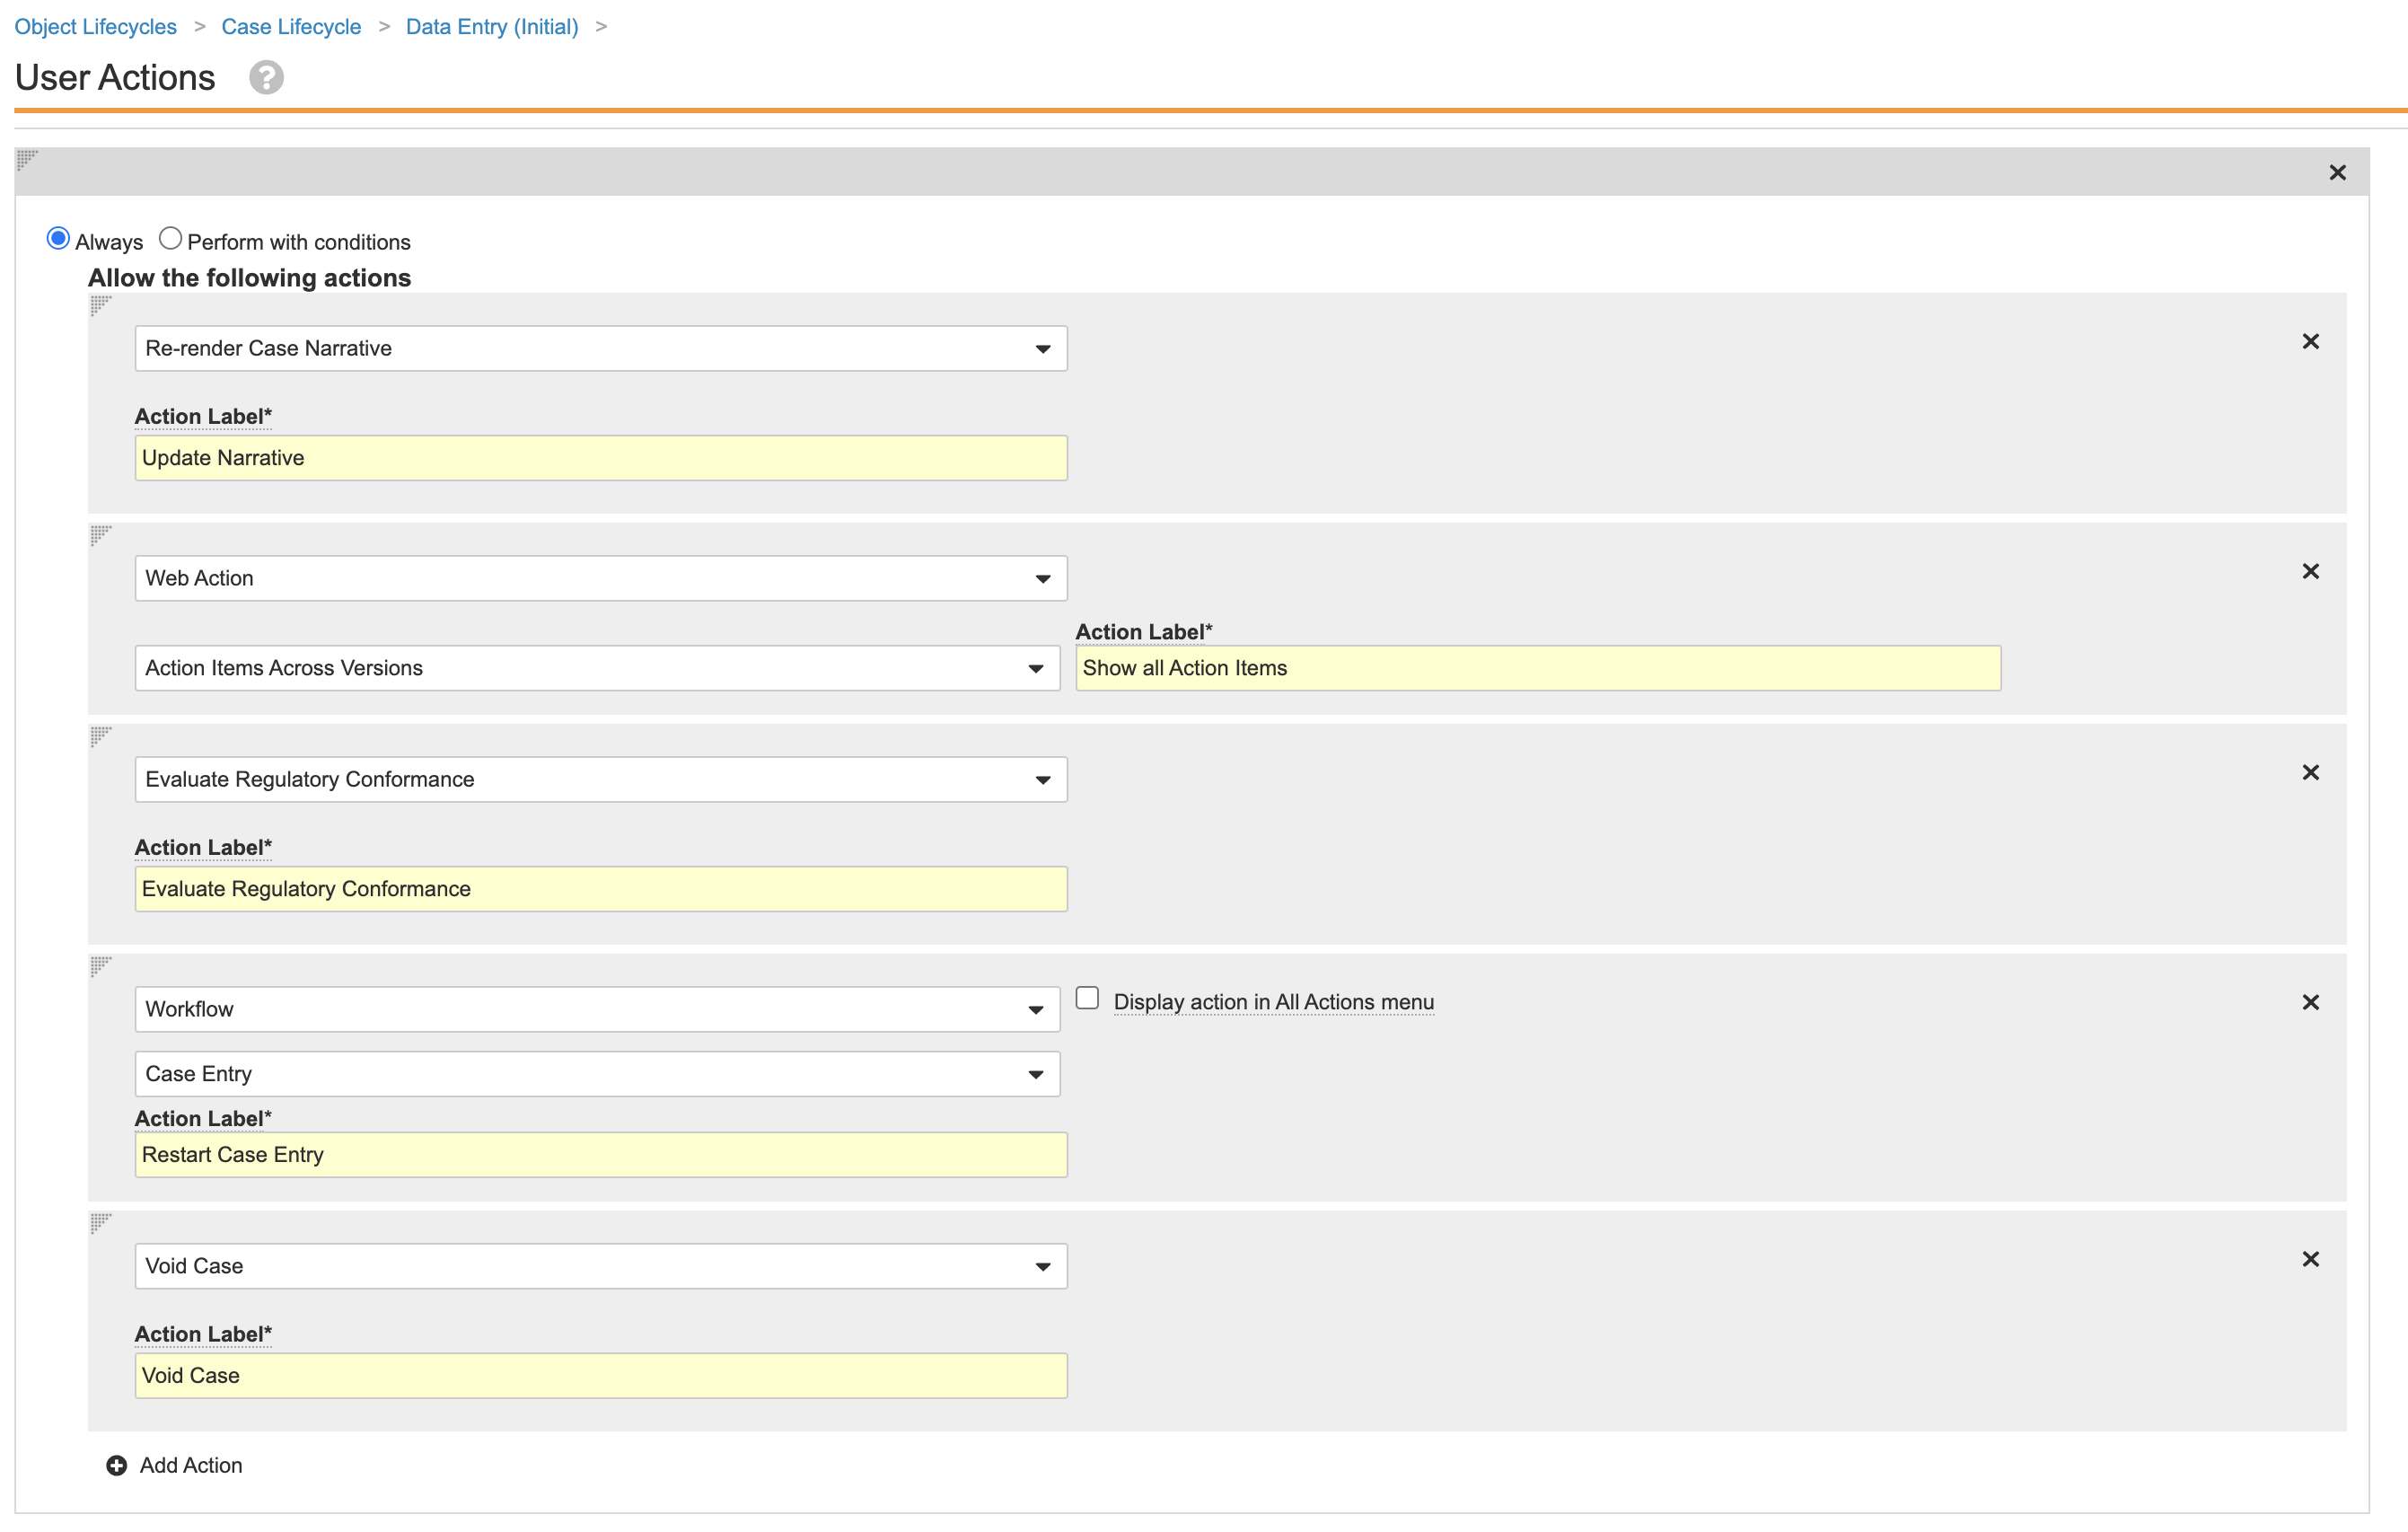
Case Lifecycle Data Entry (Initial) State User Action - Go to the Data Entry (
case_entry_state__v) state and update the Label to “Data Entry (Reopened)”. - Save the page.
Deprecate or Delete the Case Triage Workflow
Perform the following steps to deprecate the Case Triage workflow:
- Go to Admin > Configuration > Workflows > Case Triage (
case_triage__c). - Update the Label to “(Deprecated) Case Triage”.
- Save the page.
- Select Make configuration active.
To completely delete the Case Triage workflow:
- Go to Configuration > Workflows.
- Hover over the Case Triage (
case_triage__c) workflow and select the menu > Delete.
Update the Case Entry Workflow
Perform the following steps to modify the existing Case Entry workflow as shown:
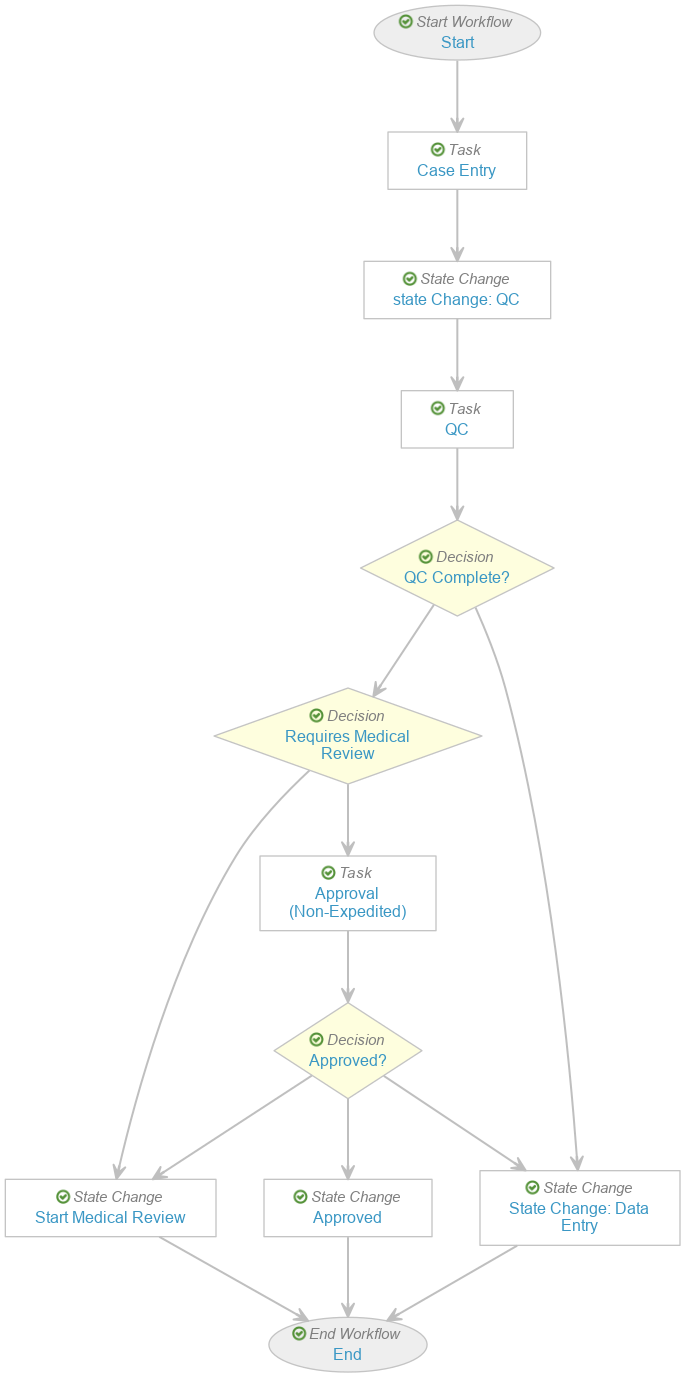
- Go to Admin > Configuration > Workflows > Case Entry.
- Remove the following steps:
- E2B? decision
- DME and Non-Serious? decision
- Seriousness Required task
- Select Start and update the Next Steps to Case Entry.
- Select Start QC and update the Label to “State Change: QC”.
- Select Case Entry and update the Next Steps to State Change: QC.
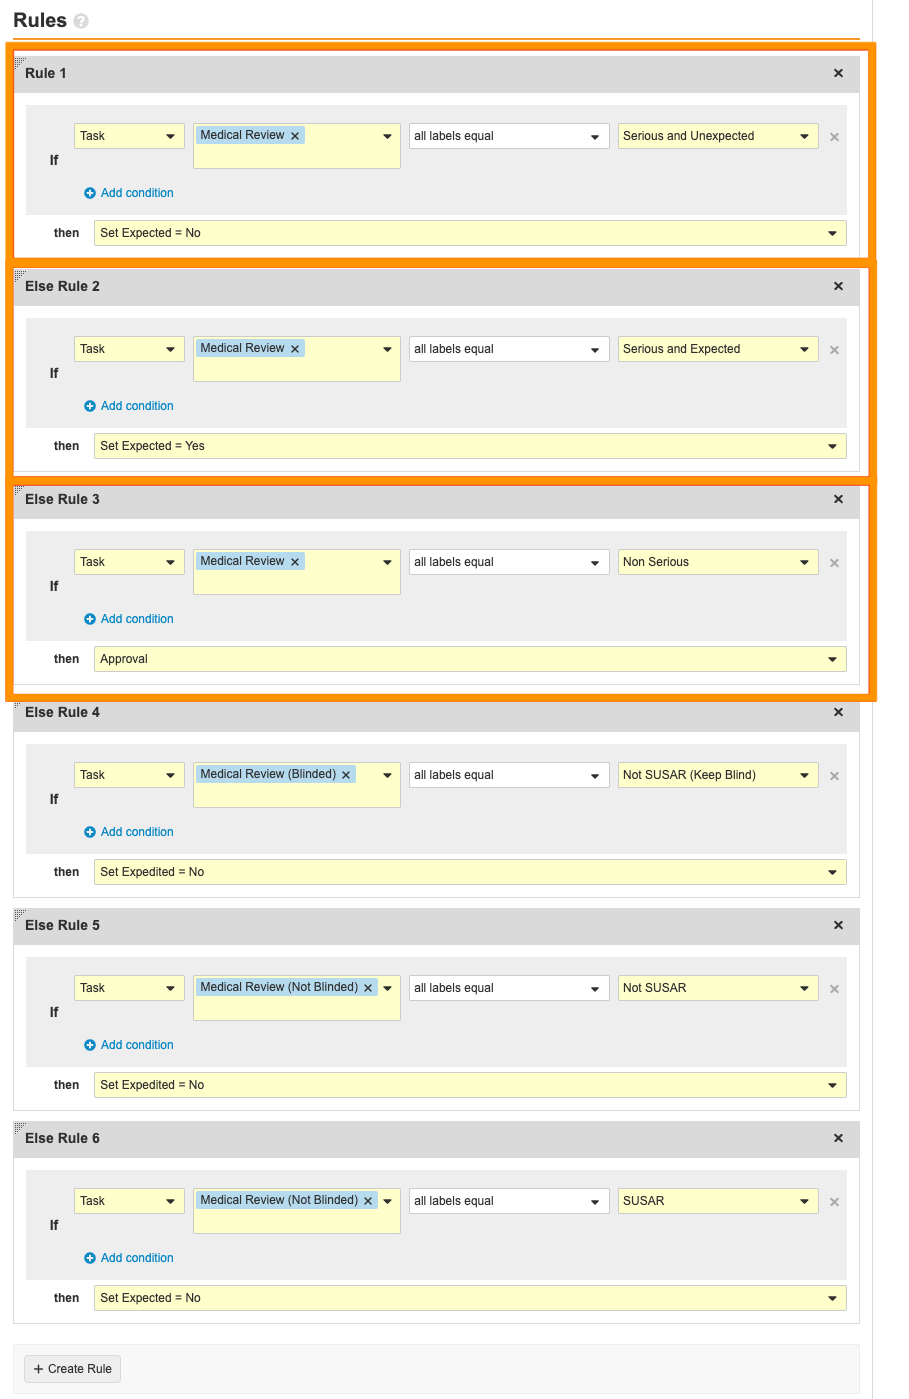
- Select Requires Medical Review and update the Rules as shown below:
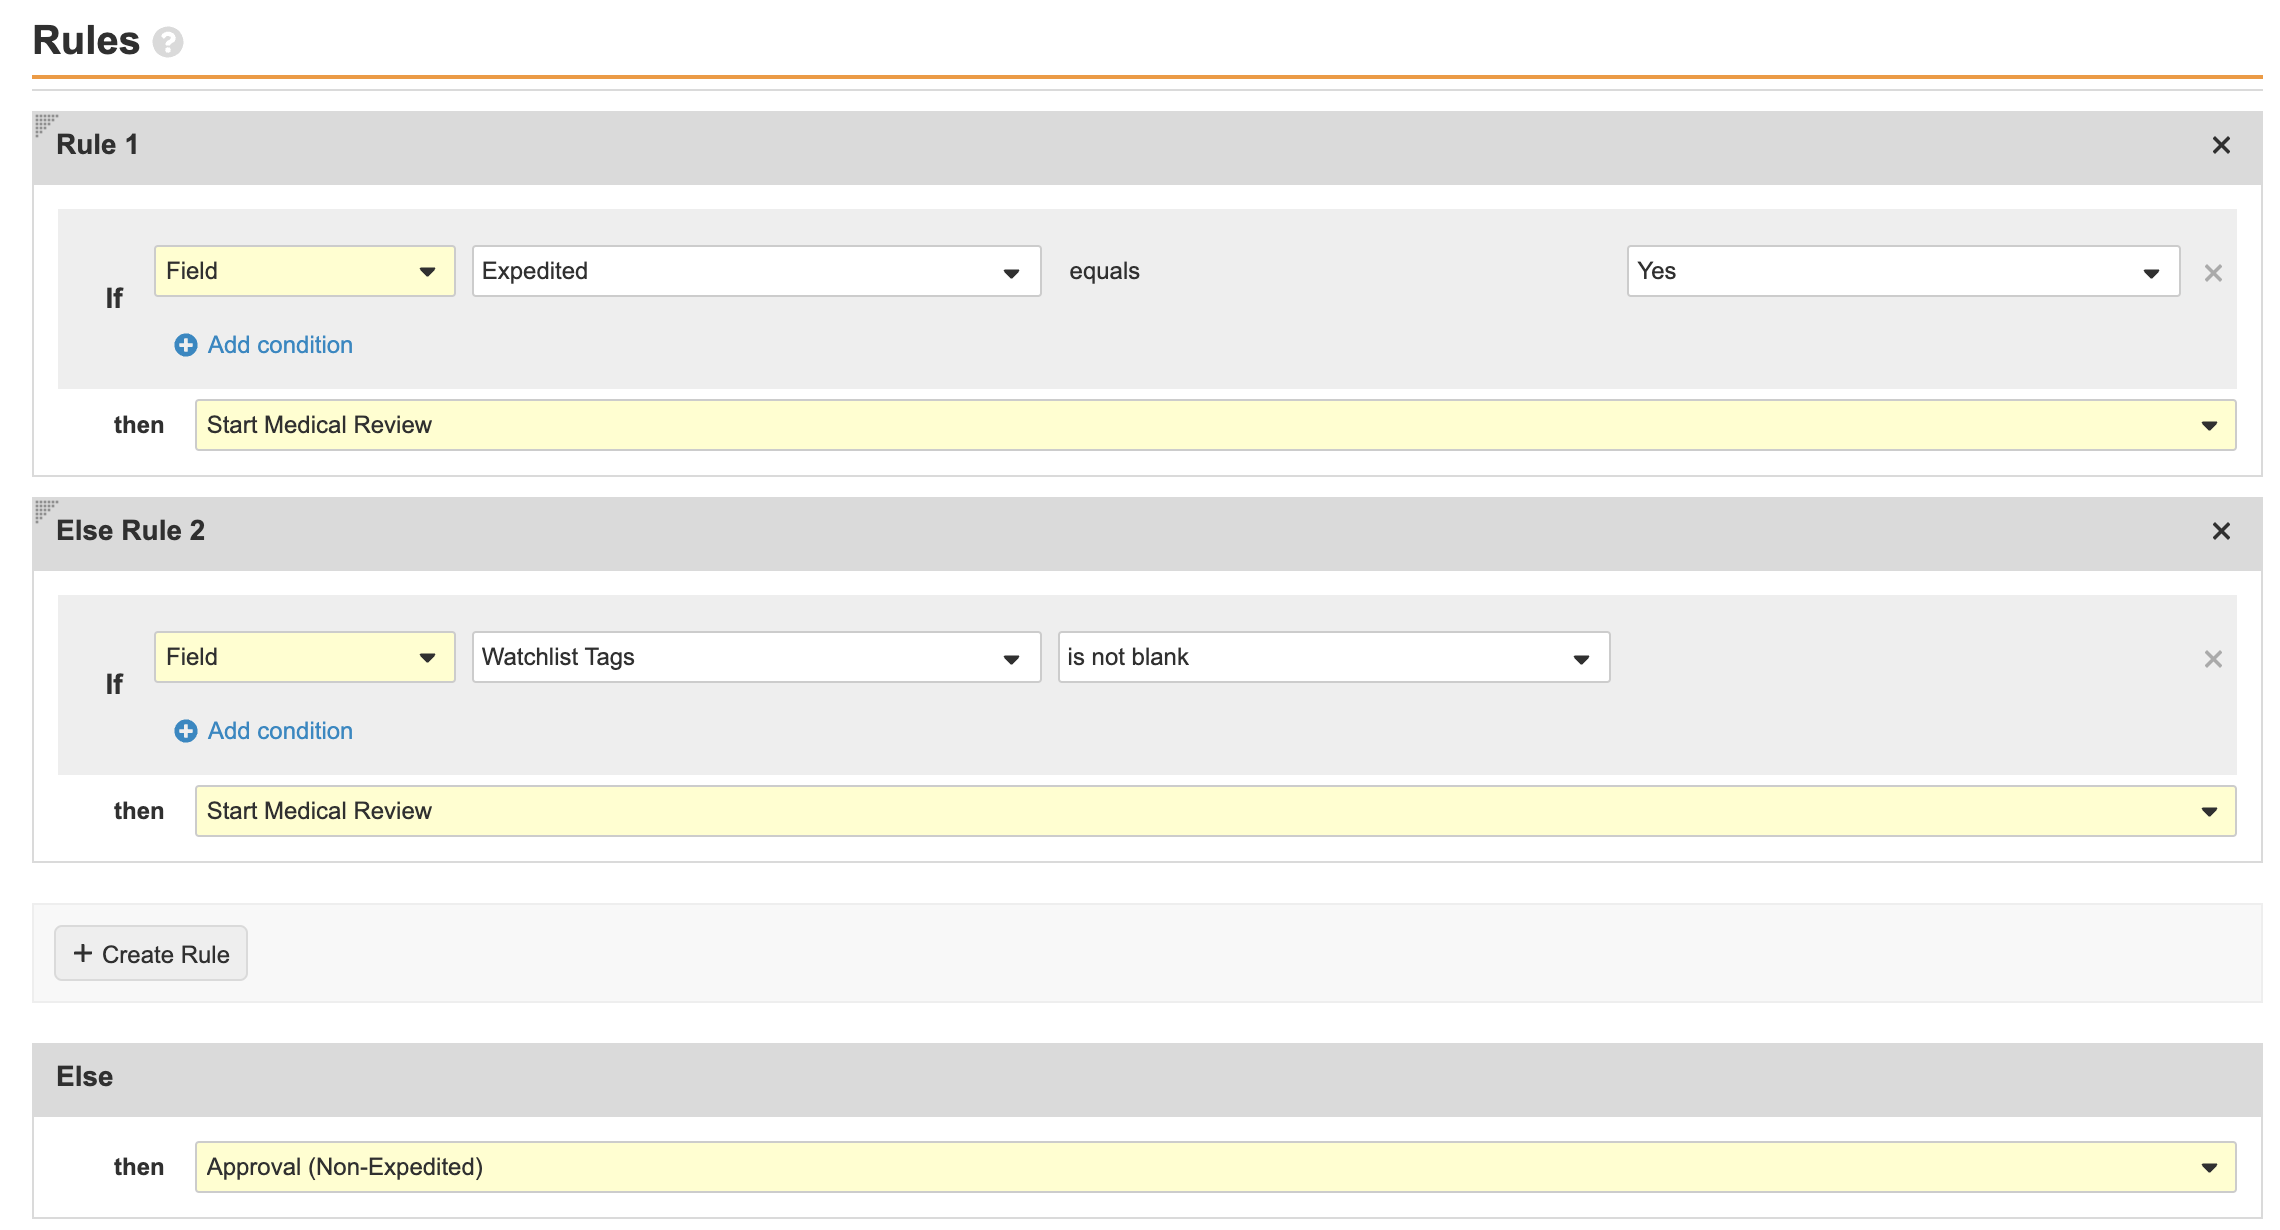
Case Entry Workflow Requires Medical Review Decision Rules - Select Make configuration active.
Remove the Malfunction Only Field from the Case Page Layout
This configuration is for the Remedial Actions and Malfunction for Combination Products feature. Perform the following steps to remove the Malfunction Only (malfuncion_only__v) field from the Case page layout, since Device Report Type is used to indicate malfunction on device-type Case Products:
- Go to Admin > Configuration > Objects > Case > Page Layouts > Case Page Layout.
- In the Device Details section, remove the Malfunction Only field.
- Save the page.
Create the All Transmissions Tab
This configuration allows distribution managers to manage all outbound Submissions more easily.
Perform the following steps to create the All Transmissions (all_transmissions__c) tab:
- Go to Admin > Configuration > Tabs.
- Create a new tab as shown below:

All Transmissions Tab - Save the page.
- Select Reorder and move the All Transmissions tab after the Localized Cases tab.
- Save the page.
Activate PADER and PSUR Tabs
This change allows new customers to generate PADER and PSUR tabulations without having to enable the feature.
Perform the following steps to activate the PADER and PSUR tabs:
- Go to Admin > Configuration > Tabs.
- Go to Aggregate Reports > PADER.
- Update the Status to Active.
- Repeat step 3 for Aggregate Reports > PSUR.
Update Transmission Lifecycle Entry Actions
This configuration ensures a correction workflow will automatically start for Transmissions that enter the MDN Failure state.
Perform the following steps to update the entry actions for the Transmission lifecycle:
- Go to Admin > Configuration > Object Lifecycles > Transmission Lifecycle.
- Select the MDN Failure state.
- Update the entry actions as shown:
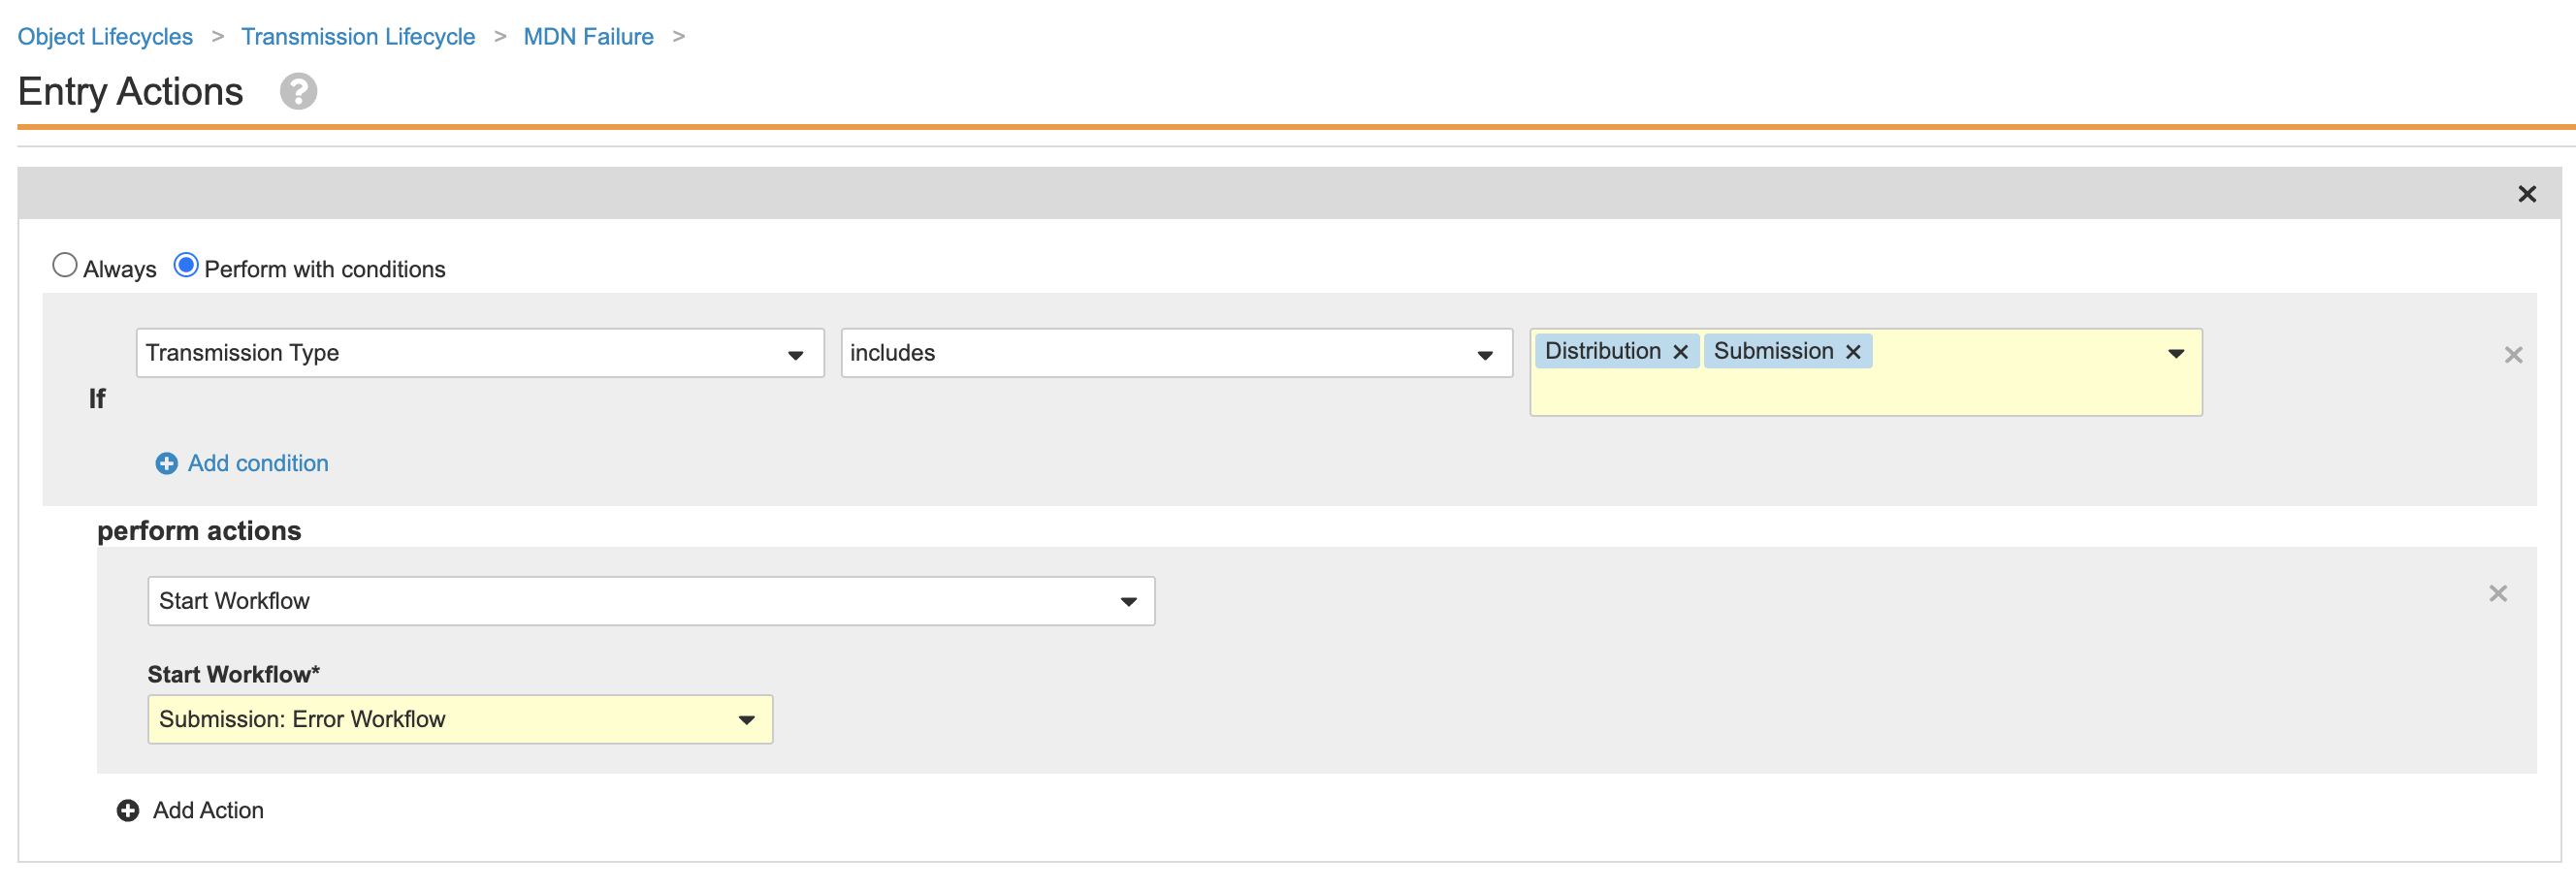
Transmission Lifecycle MDN Failure State Entry Actions - Select the MDN Received state.
- Update the user actions as shown:
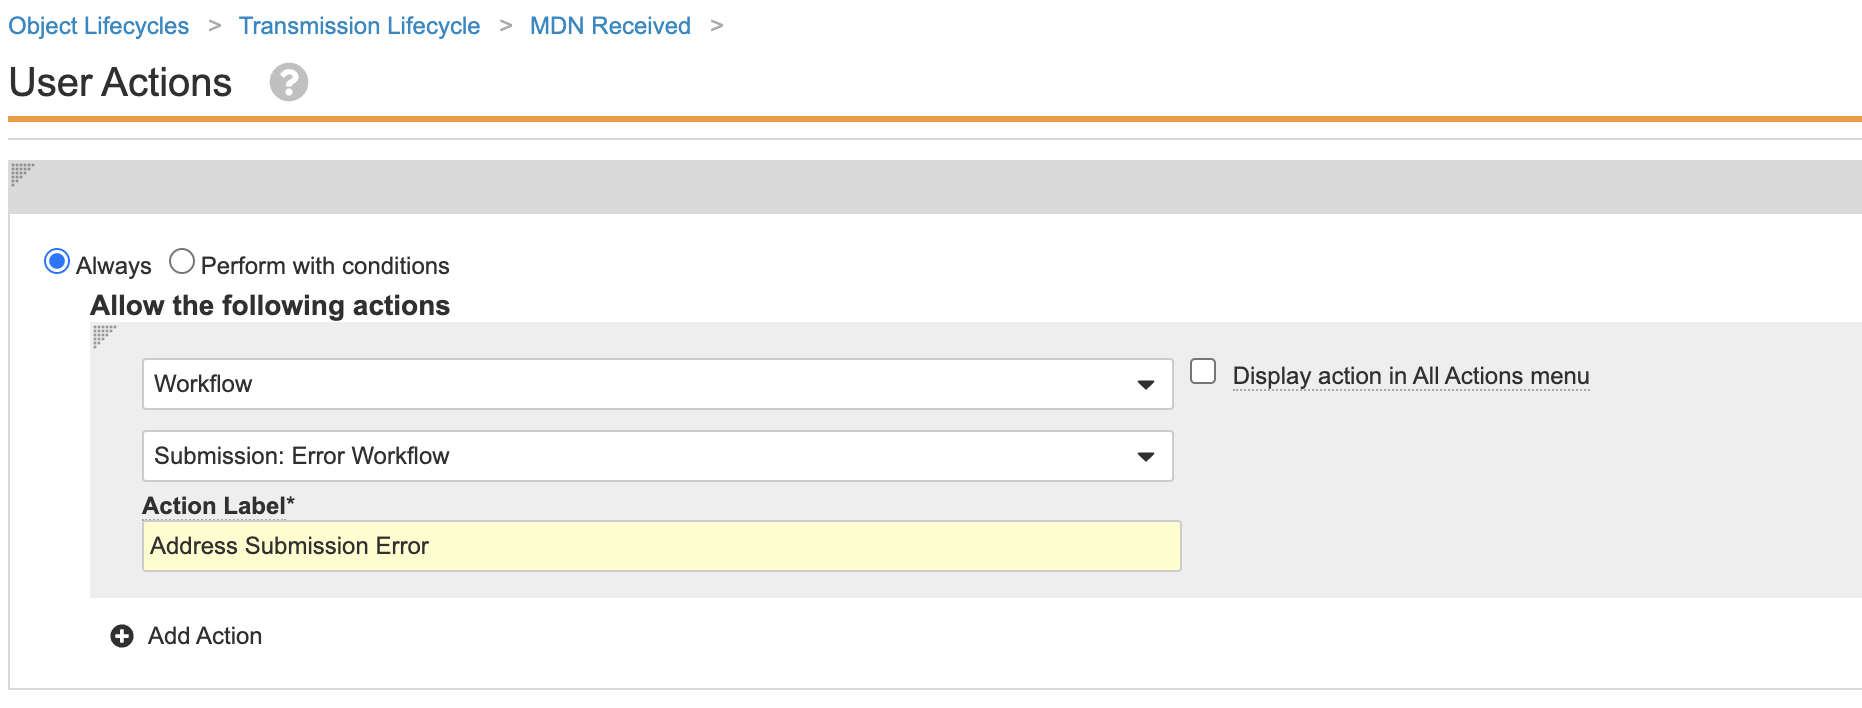
Transmission Lifecycle MDN Received User Actions - Remove the Send a notification entry action for the following Transmission lifecycle states:
- MDN Received
- E2B ACK Accepted
- E2B ACK Warning
- Save the page.
Update Case Serious Field Formula
This configuration ensures that the Serious field is accurately calculated by considering the multiple ways a Case can be tagged as serious.
- Go to Admin > Configuration > Objects > Case > Fields > Serious.
- Edit the Formula Expression to
Or(Not(IsBlank(case_tags__v)),Not(IsBlank(watchlist_tags__v)))
- Save the page.
Inactivate the Study Cases Rule
The Study and Study Registration sections do not appear on Cases if there are no studies in the Library. You do not need to maintain business partner studies, however, if a Case contains the primary Product on a Partner Distribution List, users are still unable to see the entire Study section, which impacts ICSR reporting to agencies.
Perform the following steps to inactivate the Study Cases Rule, which hides the Study and Study Registration sections:
- Go to Admin > Configuration > Objects > Cases > Page Layouts > Case Page Layout > Layout Rules.
- Select the Study Cases Rule.
- Edit the Status field to Inactive.
- Save the page.
Replace Medical History Text App Control
Perform the following steps to replace the Medical History Text app control, which combines the current Medical History Text app control field with the Medical History Text (reason omitted) field:
- Go to Admin > Configuration > Objects > Case > Page Layouts > Case Page Layout.
- In the Patient section, add the new Medical History Text app control field.
The Add Medical History Text window appears. - Select Done in the window.
- Remove the old Medical History Text field from the Patient section as shown:
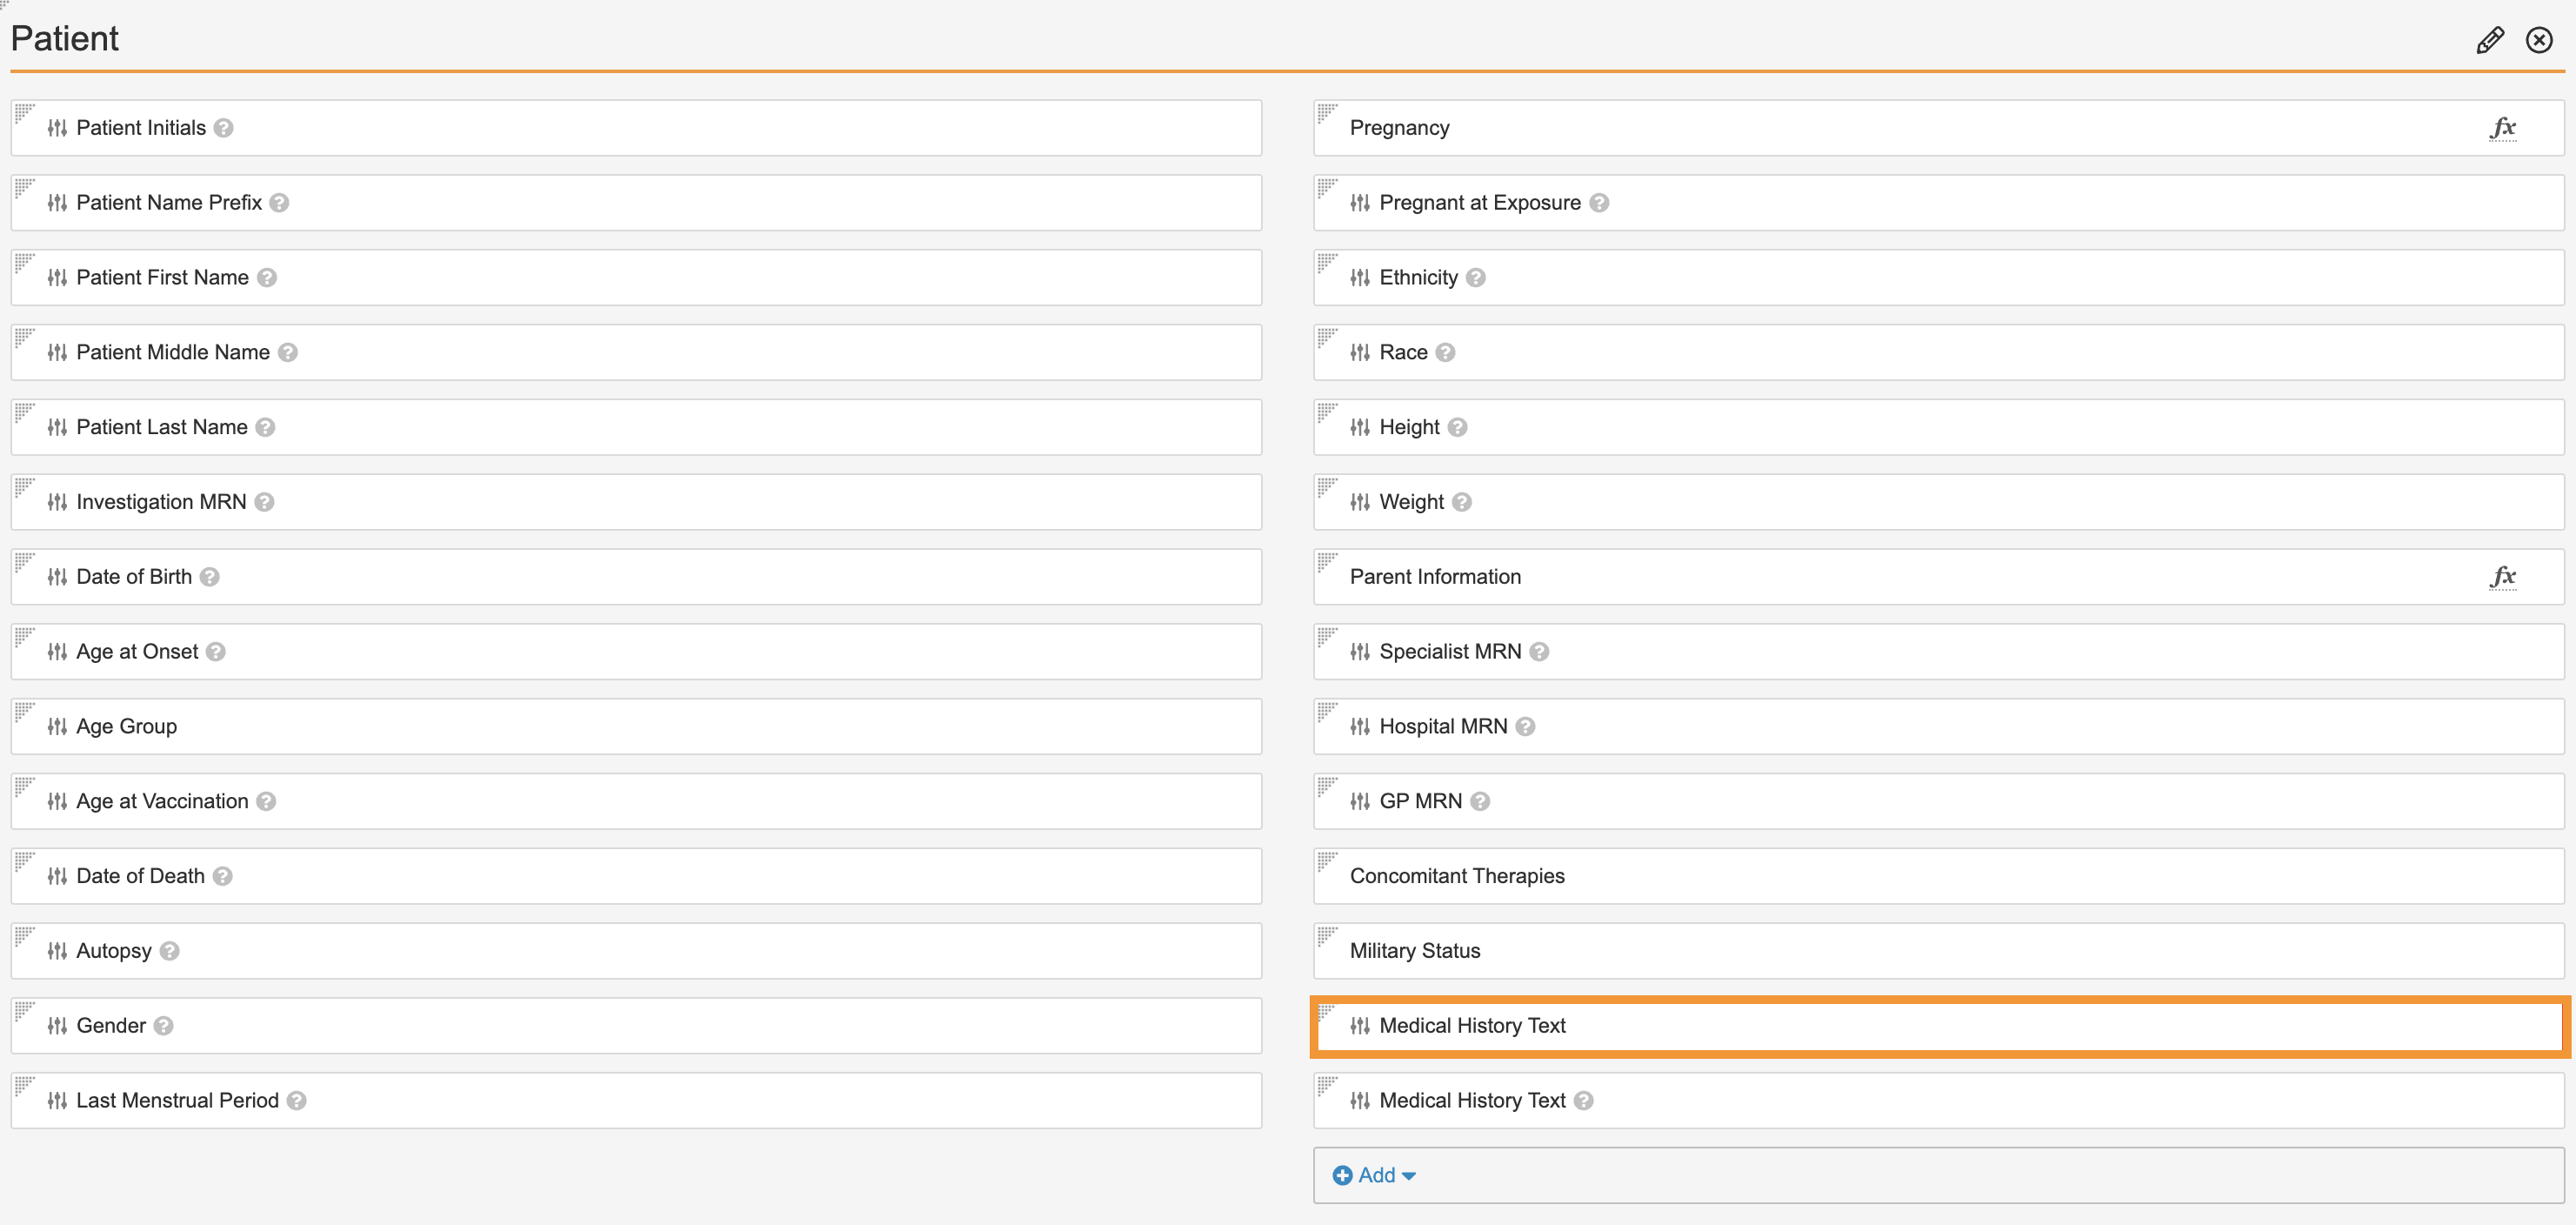
Remove Old Medical History Text Field - Save the page.
Make Auto-Calculated Fields Read-Only
This configuration makes some auto-calculated fields read-only on the Case Entry Actions permission set.
- Go to Admin > Users & Groups > Permission Sets > Case Entry Actions > Objects.
- Select Case.
- Clear the Edit checkbox for the following fields:
- Expected (status)
- Expectedness
- Listedness (Core)
- Listedness (status)
- Seriousness
- Save the page.
Make the Study Type Required for Studies
This configuration makes the Study Type (study_type__v) field required on the Study object.
- Go to Admin > Configuration > Objects > Study > Fields.
- Select the Study Type (
study_type__v) field. - In the Options section, select the User must always enter a value (required) checkbox.
- Save the page.
Move the Create Follow-Up Case User Action to Approved State
This configuration allows the user to create a Follow-up Case when the Case is in Approved state, as opposed to Medical Review state. Perform the following steps to update the Case lifecycle:
- Go to Admin > Configuration > Object Lifecycles > Case Lifecycle.
- Select the Medical Review state and go to the user actions.
- Remove the Create Follow Up Case user action.
- Go to the Approved state.
- Add the Create Follow Up Case user action as shown:
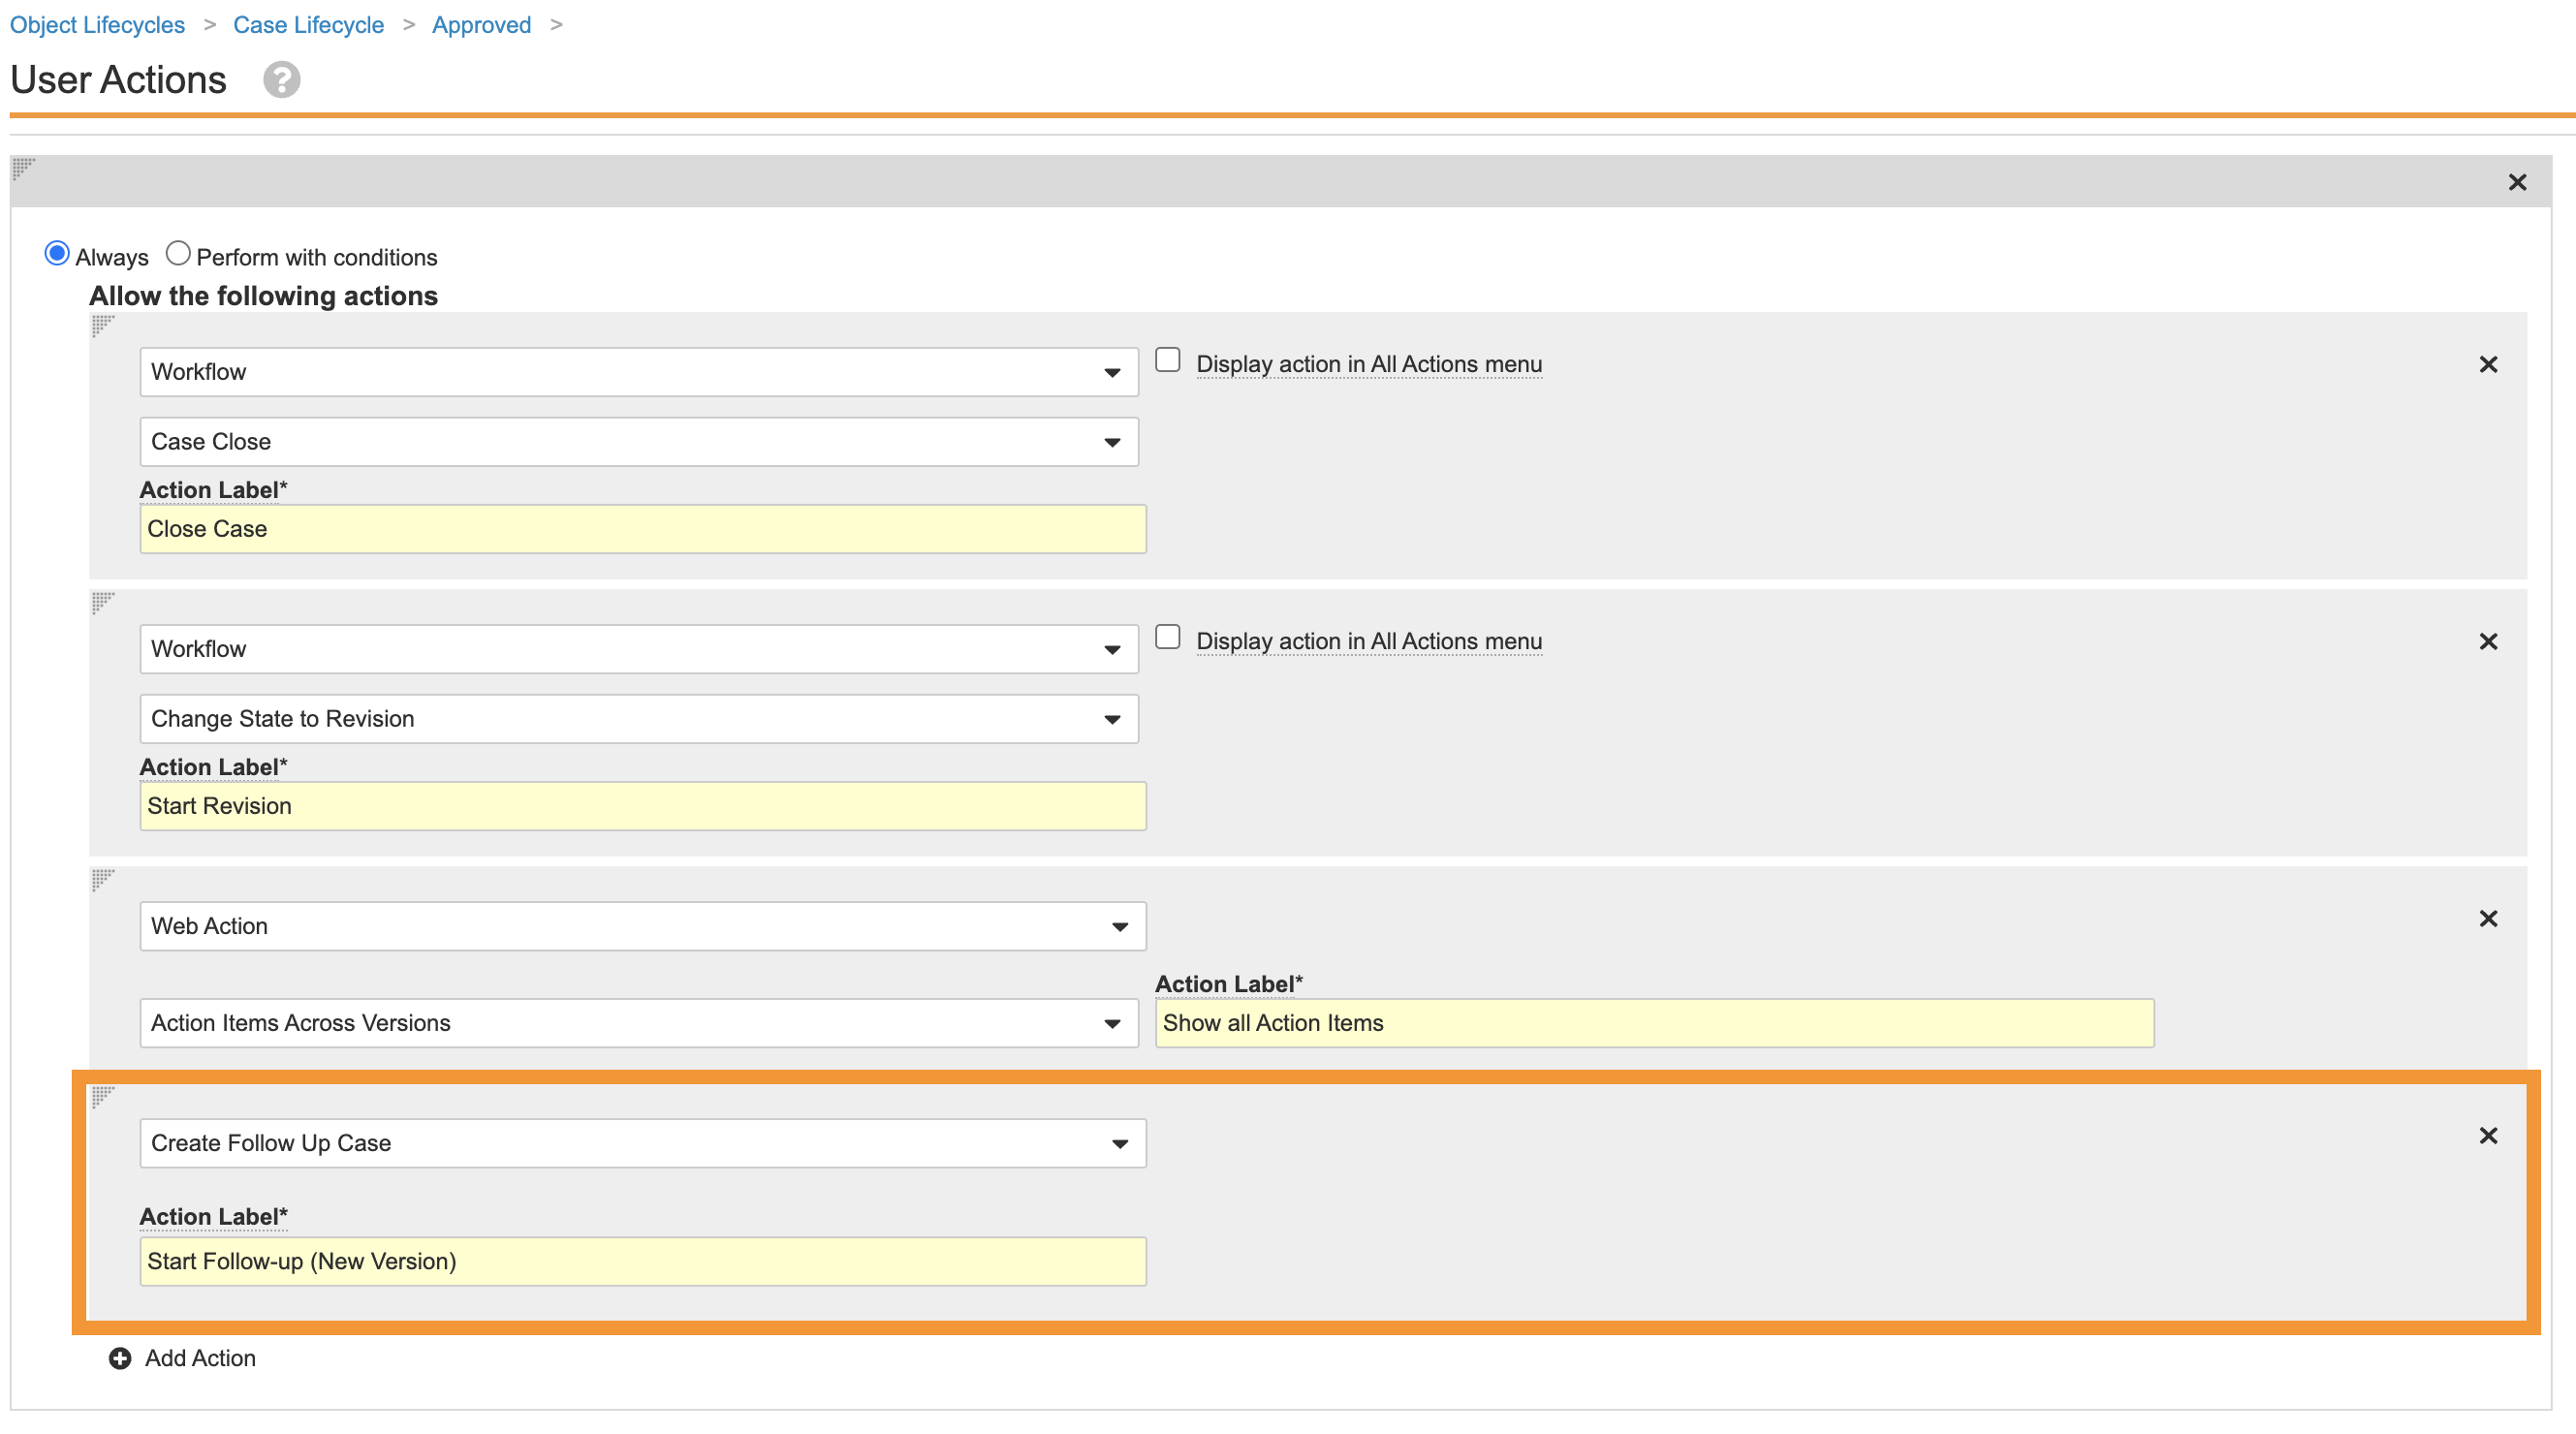
Case Lifecycle Approved State Add Create Follow Up Case User Action - Save the page.
Add Entry Criteria on the Medical Review State for Validation Failures
This configuration prevents Cases with validation failures from entering the Medical Review state. Performing the following steps to update the Case lifecycle:
- Go to Admin > Configuration > Object Lifecycles > Case Lifecycle.
- Select the Medical Review state.
- Add the entry criteria as shown:
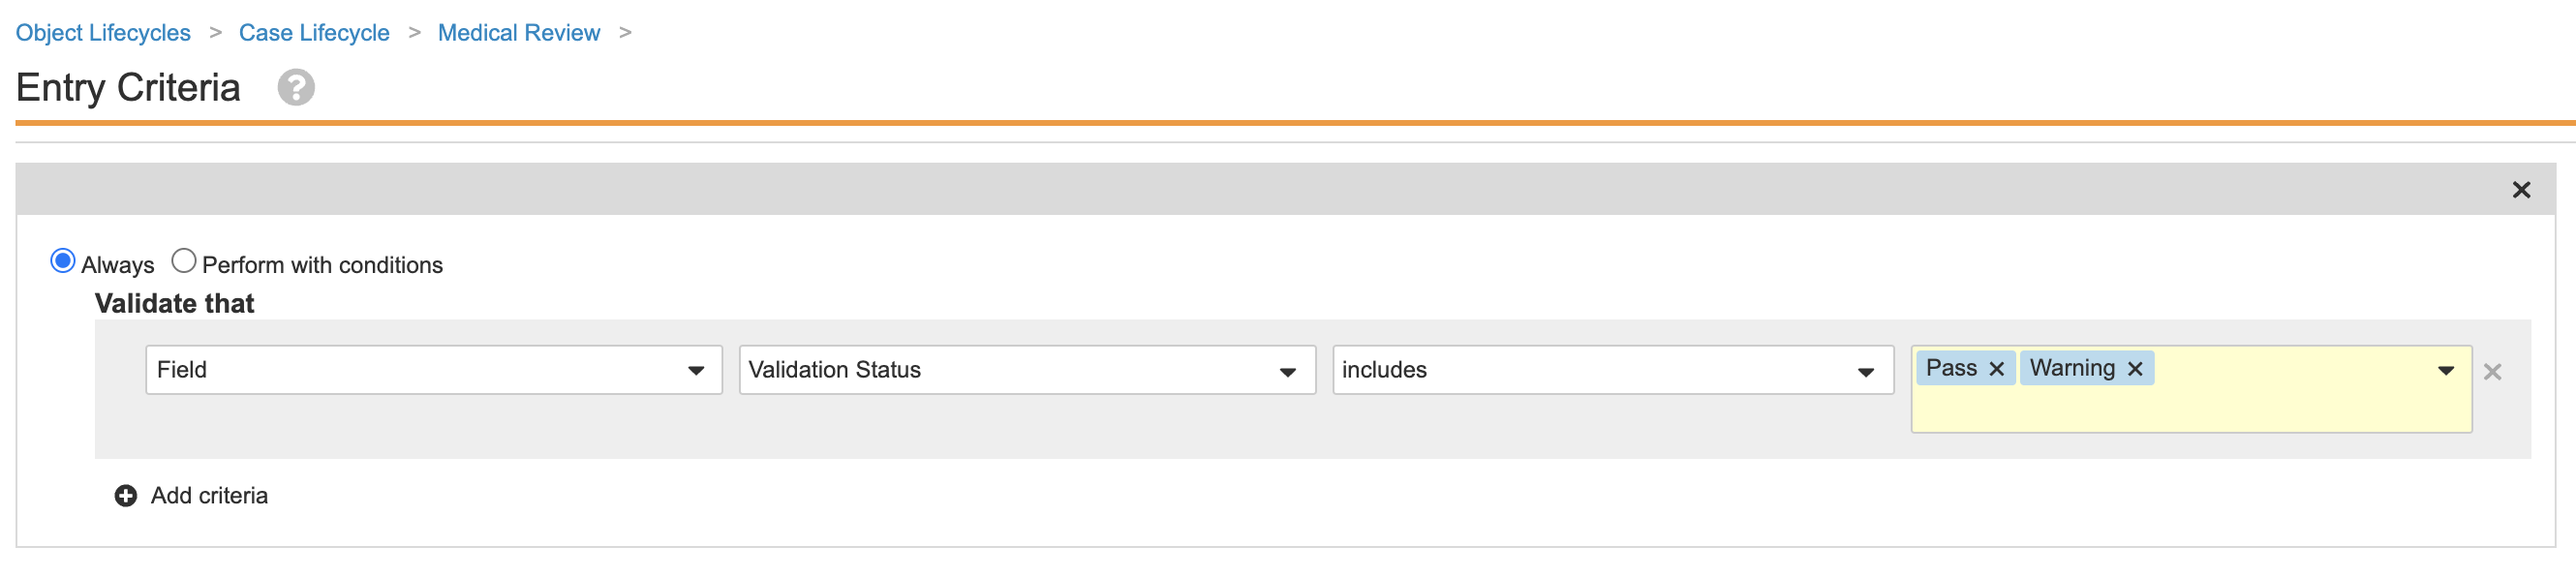
Case Lifecycle Medical Review State Add Validation Status Entry Criteria - Save the page.
Correct the IMDRF Codes in the Device Code Object
Four (4) IMDRF codes in the Device Code (device_code__v) object were previously incorrect, which led to code exclusions for FDA E2B(R2) files. This configuration makes the necessary corrections for the following IMDRF codes:
| IMDRF CODE | LEVEL | CORRECT CODE |
|---|---|---|
| Increase in Suction | 1 | A14 |
| Difficult or Delayed Separation | 2 | A1503 |
| Premature Separation | 2 | A1503 |
| Separation Failure | 2 | A1503 |
- Go to Business Admin > Objects > Device Codes.
- Use the table above to update the respective device codes.
- For level 1 updates, update the Level 1 - IMDRF Code field.
- For level 2 updates, update the Level 2 - IMDRF Code field.
- Save the page.
Update Controlled Vocabularies
This configuration aligns the label on controlled vocabulary records with the most common values requested in implementation.
Perform the following steps to relabel the EU Method of Assessment controlled vocabulary and create new controlled vocabulary records:
- Go to Business Admin > Objects > Controlled Vocabularies.
- Select EU Method of Assessment.
- Update the Name field to “Global Introspection”.
- In the Controlled Vocabularies object, select Create.
- Use the table below to create the new records:
Type Name E2B Code Assessment Result CAUSALITY ESTABLISHED API Name Action Taken Drug Temporarily Discontinued/Interrupted 1 N/A N/A drug_temporarily_discontinued__cStudy Type Investigator-Initiated Study 1 N/A N/A investigator_initiated_ study__cCase Assessment Result Related 1 Related Yes related__cCase Assessment Result Probably Related 1 Probable / Likely Yes probable__cCase Assessment Result Possibly Related 1 Possible Yes possible__cCase Assessment Result Unlikely Related 2 Unlikely No unlikely__cCase Assessment Result Not Related 2 Not Related No not_related__cCase Assessment Result Not applicable 2 Unassessable / Unclassifiable No not_applicable__c - Save the page.
Make Expectedness Required on Datasheet Criteria
This configuration ensures that datasheets are set up more reliably.
Perform the following steps to make Expectedness required on the Datasheet Criteria object type:
- Go to Admin > Configuration > Objects > MedDRA Criteria > Object Types.
- Select the Datasheet Criteria (
datasheet_criteria__v) table heading. - Select Expectedness.
- Select the User must always enter a value (required) checkbox.
- Save the page.
Add Administrators Role to Custom Rules on Localization Objects
This configuration allows Business Admins to make changes to localized library objects.
The steps below describe how to add the Administrators group as Editor on custom sharing rules for the following objects:
- Localized Organization
- Localized Product
- Localized Study
- Localized Study Arm
- Localized Substance
- Go to Admin > Configuration > Objects > [Object].
- In the Details tab, ensure Enable Custom Sharing Rules is selected.
- In the Sharing Rules tab > Custom Sharing Rules section, select Create.
- Use the following table to enter the Label information for the respective object:
Object Label Name Localized Organization All Localized Organizations all_localized_organizations__cLocalized Product All Localized Products all_localized_products__cLocalized Study All Localized Studies all_localized_studies__cLocalized Study Arm All Localized Study Arms all_localized_study_arms__cLocalized Substance All Localized Substances all_localized_substances__c - Save the page.
After saving the page, the Roles section appears. - In the Roles section, select Add.
An Add Manual Assignment window appears. - Complete the following information:
- Role: Editor
- Users and Groups: Administrators
- Save the page.
Configure PMDA Multi-Submission with Localized Case
Configuration updates have been made to the 23R1 template to support submitting multiple PMDA Submissions from a single Case.
These configuration changes are documented in Enable PMDA Multi-Submission with Localized Case.