Learn how to configure your Vault for the Risk Management feature.
About the Feature
With the 24R3 release, SafetyDocs allows you to track the authoring, approval, and distribution of global and local risk management plans (RMPs) and additional risk minimization measures (aRMMs), as well as categorize and track identified risks with measures to be taken globally and by market.
After you have configured this feature, see the following articles for more information:
25R1 Update: Risk Management Enhancements
With the 25R1 release, SafetyDocs introduces the ability to set the Name field to a system-managed value for the following objects:
- RMP Core Implementation Strategy
- RMP Local Implementation Strategy
Overview
To configure risk management in your Vault:
Configure Security
To configure risk management security:
- Copy the Risk Actions permission set
- Create the Risk Management security profile
- Create the Risk Users group
For information on best practices for Vault security, see About Standard & Custom Profiles & Permission Sets.
Copy the Risk Actions Permission Set
To create a copy of the Risk Actions permission set:
- Navigate to Admin > Users & Groups > Permission Sets.
- Select the standard Risk Actions permission set.
- Create a copy of the standard Risk Actions permission set.
Create the Risk Management Security Profile
To create a custom Risk Management security profile:
- Navigate to Admin > Users & Groups > Security Profiles.
- Select Create.
- In the Name field, enter Risk Management.
- Select Save.
Note: If custom security profiles for All SafetyDocs and All Case & All SafetyDocs do not exist in your Vault, create them using the same procedure as for Risk Management described here.
Create the Risk Users Group
To create a custom Risk Users group associated with the relevant security profiles:
- Navigate to Admin > Users & Groups > Groups.
- Select Create.
- In the Label field, enter Risk Users.
- From the Included Security Profiles drop-down, select the following custom security profiles:
- Risk Management
- All SafetyDocs
- All Case & All SafetyDocs
Configure Objects
Perform the steps in each of the following sections to configure objects in your Vault for Risk Management:
- Configure the RMP Risk Measure default object type & Name
- Optional: Update object record naming conventions
- Add object actions
- Configure object layouts
- Configure object lifecycles
Configure the RMP Risk Measure Default Object Type & Name
To set the default object type for the RMP Risk Measure object:
- Navigate to Admin > Configuration > Objects > RMP Risk Measure.
- Select Edit.
- In the Options section, from the Default Object Type drop-down list, select Core Risk Measure.
- Select Save.
- Navigate to the Fields tab and select the Name field.
- Select Edit.
- In the Value Format field, enter the following formula:
{measure_category__v} - {measure_sub_category__v} - v{version__v} {market__vr.abbreviation_2__v} - {#} - Select Save.
Note: The {#} in the formula provided in step 7 above is required to ensure the record name is unique. Failure to include this may result in unexpected failures in your Vault.
Optional: Update Object Record Naming Conventions
To set the Name field of the RMP Core Implementation Strategy object or the RMP Local Implementation Strategy object to a system-managed value:
- Navigate to Admin > Configuration > Objects > [Object].
- Select the Fields tab.
- Select Name.
- Select Edit.
- Select the System manages field value (read-only) checkbox.
- Optional: Update the value in the Value Format field.
- Select Save.
Add Object Actions
Add the required object actions to the risk management objects shown in the table below:
| Object | Actions |
|---|---|
| Core Risk Management Plan Version |
|
| Local Risk Management Plan Version |
|
| RMP Core Implementation Strategy |
|
Configure Object Layouts
To configure object layouts to support risk management:
- Configure the object layouts for all risk management objects
- Add the RMP Required field to the Country object
Configure the Object Layouts for All Risk Management Objects
To support risk management, configure the following object layouts using the process below:
- Core Risk Management Plan
- Core Risk Management Plan Version
- Local Risk Management Plan
- Local Risk Management Plan Version
- RMP Risk
- Local RMP Risk
- RMP Core Implementation Strategy
- RMP Local Implementation Strategy
- RMP Risk Measure object types:
- Core Risk Measure
- Local Risk Measure
- RMP Risk Measure Tracking
To configure the object layout:
- Navigate to Admin > Configuration > Objects > [Object] > Layouts.
- From the Actions menu of the standard layout, select Save As.
- In the Save As dialog, select Done to create a custom version of the standard layout.
- (Optional) Configure the custom object layout to your organization’s requirements.
- Select Save.
- From the custom layout’s Actions menu, select Set As Default.
Add the RMP Required Field to the Country Object
To the Country object layout, add the RMP Required field.
Configure Object Lifecycles
To configure the risk management object lifecycles:
Configure the Complete State Type
To set the Complete state type for each of the risk management object lifecycles in the table below:
- Navigate to Admin > Configuration > Object Lifecycles and select an object lifecycle from the table below.
- In the State Types section, select the Complete State.
- Select Edit.
- From the State drop-down, select the state that corresponds to the object lifecycle shown in the table below.
- Select Save.
| Object Lifecycle | Complete State |
|---|---|
| Core RMP Lifecycle | Effective |
| Core RMP Version Lifecycle | Complete |
| Local RMP Lifecycle | Effective |
| Local RMP Version Lifecycle | Complete |
| RMP Core Implementation Strategy LC | Approved |
| RMP Local Implementation Strategy LC | Approved |
| RMP Risk Measure Lifecycle | Complete |
| RMP Risk Measure Tracking Lifecycle | Complete |
Configure User & Entry Actions
Add the user actions and entry actions for each of the risk management object lifecycles and states in the table below:
| Object Lifecycle | State | User Actions | Entry Actions |
|---|---|---|---|
| Core RMP Lifecycle | Planned | Always allow the following actions:
|
N/A |
| Effective |
Always allow the following actions:
|
N/A | |
| Core RMP Version Lifecycle | Planned | Always allow the following actions:
|
N/A |
| Complete | Always allow the following actions:
|
Always perform actions:
|
|
| Local RMP Lifecycle | Planned | Always allow the following actions:
|
N/A |
| Effective |
Always allow the following actions:
|
N/A | |
| Local RMP Version Lifecycle | Planned | Always allow the following actions:
|
N/A |
| In Progress | Always allow the following actions:
|
Always perform actions:
|
|
| Complete | Always allow the following actions:
|
Always perform actions:
|
|
| RMP Core Implementation Strategy LC | Planned | Always allow the following actions:
|
N/A |
| In Development |
Always allow the following actions:
|
N/A | |
| Approved | Always perform actions:
|
Always perform actions:
|
|
| RMP Local Implementation Strategy LC | Planned | Always allow the following actions:
|
N/A |
| In Development | Always allow the following actions:
|
N/A | |
| Approved | Always allow the following actions:
|
Always perform actions:
|
|
| RMP Risk Measure Lifecycle | Planned |
Always allow the following actions:
|
N/A |
| In Progress |
Always allow the following actions:
|
N/A | |
| Complete |
Always allow the following actions:
|
N/A | |
| RMP Risk Measure Tracking Lifecycle | Targeted | Always allow the following actions:
|
N/A |
Configure Document Workflows & Lifecycles
To configure risk management document workflows and lifecycles:
Configure Document Workflows
Create the following document workflows with the settings provided:
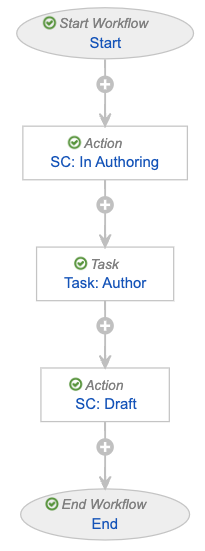
Workflow: Authoring - Risk
Create this workflow with the following settings:
- Label: Authoring - Risk
- Document Lifecycle: Master Risk Lifecycle
- Selected Options: Workflow cancellation comment
- Workflow Steps: Configure the steps as shown in the following image and table.
| Step Type | Label | Next Steps | Settings |
|---|---|---|---|
| Start | Start | SC: In Authoring |
Start Options
|
| Action | SC: In Authoring | Task: Author |
Rules Always: Change State to In Authoring |
| Task | Task: Author | SC: Draft |
Task Options
Due Date
Update Sharing Settings
|
| Action | SC: Draft | End |
Rules Always: Change State to Draft |
| End Workflow | End | N/A | End Type: End Workflow |
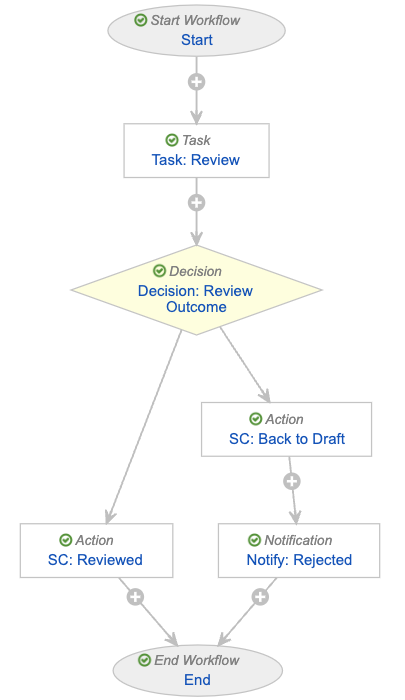
Workflow: Review - Risk
Create this workflow with the following settings:
- Label: Review - Risk
- Document Lifecycle: Master Risk Lifecycle
- Selected Options: Workflow cancellation comment
- Workflow Steps: Configure the steps as shown in the following image and table.
| Step Type | Label | Next Steps | Settings |
|---|---|---|---|
| Start | Start | Task: Review |
Start Options
|
| Task | Task: Review | Decision: Review Outcome |
Task Options
Due Date
Update Sharing Settings
Prompts
Verdicts
Notification
|
| Decision | Decision: Review Outcome | Determined by the step rules |
Rules
|
| Action | SC: Reviewed | End |
Rules Always: Change State to Reviewed |
| Action | SC: Back to Draft | Notify: Rejected |
Rules Always: Change State to Draft |
| Notification | Notify: Rejected | End |
Notification Options
|
| End Workflow | End | N/A | End Type: End Workflow |
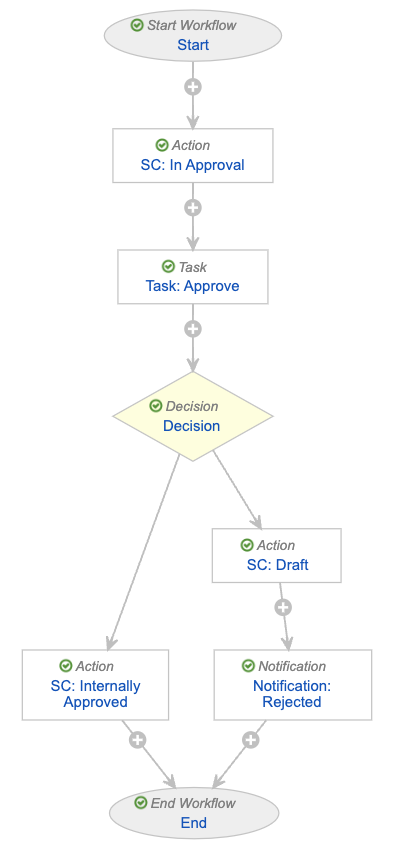
Workflow: Approval - Risk
Create this workflow with the following settings:
- Label: Approval - Risk
- Document Lifecycle: Master Risk Lifecycle
- Selected Options: Workflow cancellation comment
- Workflow Steps: Configure the steps as shown in the following image and table.
| Step Type | Label | Next Steps | Settings |
|---|---|---|---|
| Start | Start | SC: In Approval |
Start Options
|
| Action | SC: In Approval | Task: Approve |
Rules Always: Change State to In Approval |
| Task | Task: Approve | Decision |
Task Options
Due Date
Update Sharing Settings
Prompts
Verdicts
Notification
|
| Decision | Decision | Determined by the step rules |
Rules
|
| Action | SC: Internally Approved | End |
Rules Always: Change State to Internally Approved |
| Action | SC: Draft | Notification: Rejected |
Rules Always:
|
| Notification | Notification: Rejected | End |
Notification Options
|
| End Workflow | End | N/A | End Type: End Workflow |
Configure Document Lifecycles
To configure the risk management document lifecycles:
Configure Security Settings
To configure security settings for each of the Master Risk Lifecycle states shown in the sections below:
- Navigate to Admin > Configuration > Document Lifecycles > Master Risk Lifecycle > States.
- Select one (1) of the states shown in the sections below.
- In the Security Settings tab, select Edit.
- Add the security settings that correspond to the lifecycle state as shown below.
- Select Save.
Note: We recommend these security settings based on the workflow and lifecycle configurations provided in this article. Depending on your business processes, you may require different settings.
- Security Settings: Draft
- Security Settings: In Authoring
- Security Settings: In Review
- Security Settings: Reviewed
- Security Settings: In Approval
- Security Settings: Internally Approved
- Security Settings: Approved for Use
- Security Settings: Current in Use
- Security Settings: Superseded
- Security Settings: Historical
- Security Settings: Planned
Security Settings: Draft
| Role | Permissions |
|---|---|
| Owner |
|
| Coordinator |
|
| Editor |
|
| Viewer |
|
| Reviewer |
|
| Approver |
|
Security Settings: In Authoring
| Role | Permissions |
|---|---|
| Owner |
|
| Coordinator |
|
| Editor |
|
| Viewer |
|
| Reviewer |
|
| Approver |
|
Security Settings: In Review
| Role | Permissions |
|---|---|
| Owner |
|
| Coordinator |
|
| Editor |
|
| Viewer |
|
| Reviewer |
|
| Approver |
|
Security Settings: Reviewed
| Role | Permissions |
|---|---|
| Owner |
|
| Coordinator |
|
| Editor |
|
| Viewer |
|
| Reviewer |
|
| Approver |
|
Security Settings: In Approval
| Role | Permissions |
|---|---|
| Owner |
|
| Coordinator |
|
| Editor |
|
| Viewer |
|
| Consumer |
|
| Reviewer |
|
| Approver |
|
Security Settings: Internally Approved
| Role | Permissions |
|---|---|
| Owner |
|
| Coordinator |
|
| Editor |
|
| Viewer |
|
| Consumer |
|
| Reviewer |
|
| Approver |
|
Security Settings: Approved for Use
| Role | Permissions |
|---|---|
| Owner |
|
| Coordinator |
|
| Editor |
|
| Viewer |
|
| Consumer |
|
| Approver |
|
Security Settings: Current in Use
| Role | Permissions |
|---|---|
| Owner |
|
| Coordinator |
|
| Editor |
|
| Viewer |
|
| Consumer |
|
| Reviewer |
|
| Approver |
|
Security Settings: Superseded
| Role | Permissions |
|---|---|
| Owner |
|
| Coordinator |
|
| Editor |
|
| Viewer |
|
| Reviewer |
|
| Approver |
|
Security Settings: Historical
| Role | Permissions |
|---|---|
| Owner |
|
| Coordinator |
|
| Editor |
|
| Viewer |
|
Security Settings: Planned
| Role | Permissions |
|---|---|
| Owner |
|
| Coordinator |
|
| Editor |
|
Configure the Editor Role
To configure the Editor role on the Master Risk Lifecycle:
- From the Master Risk Lifecycle, select the Roles tab.
- Select the Editor role.
- Select Edit.
- In the Options section under Add Default Users When, select the Creating a document checkbox.
- Select Save.
- Select the Default Rule tab.
- Select Edit.
- Select Add.
- From the Allowed User/Group dropdown, select Risk Users.
- Select the Default User checkbox for Risk Users.
- Select Save.
Configure User & Entry Actions
To add user and entry actions to the Master Risk Lifecycle for each of the states in the table below:
- From the Master Risk Lifecycle, select the States tab.
- Select a state shown in the table below.
- In the User Actions tab, select Edit.
- Add the user actions that correspond to the state as shown in the table below.
- Select Save.
- In the Entry Actions section, select Edit.
- Add the entry actions that correspond to the state as shown in the table below.
- Select Save.
| State | User Actions | Entry Actions |
|---|---|---|
| Planned | Always allow the following actions:
|
N/A |
| Draft | Always allow the following actions:
|
N/A |
| Reviewed | Always allow the following actions:
|
N/A |
| Internally Approved | Always allow the following actions:
|
Always perform actions:
|
| Approved for Use | Always allow the following actions:
|
N/A |
| Current in Use | Always allow the following actions:
|
N/A |


