About the Feature
Support for Domestic Case Processing was added in 21R3. Vaults created in 22R1 or later include the necessary configuration by default, while vaults originally deployed earlier than 21R3 must have the configuration upgrades described on this page to enable this feature.
Note Before you enable this feature, the Object Lifecycles and Workflow section of the configuration for Localized Submissions and Translation Support must be completed.
Once enabled, Prepare a Domestic Case describes how to use this feature.
Note After enabling this feature, enabling Domestic Case Processing for Agency Jurisdictions is recommended.
Update the User Profile Page Layout
Add the Default Localization field to the User page layout:
- In the Admin area, go to Configuration > Pages > User Profile Page.
- Select User Profile Layout.
- Go to the General Information section.
- In the Fields picklist, add the Default Localization before the Language field.
- Save the page.
Configure the Localization Field
- In Business Admin, go to Organization > Agency (MDFS/NMPA).
- Select
 .
. - In the Localization field, Select:
- Korean (South Korea)” for MFDS
- Chinese for NMPA
OR
- Select Save.
Add the Default Localization Field to the User Records Page Layout
- In Admin, go to Configuration > Objects > User.
- On the Page Layouts tab, open the User Detail Page Layout.
- Select Add from the General Info section.
- Select Default Localization.
- Select Save.
Update the Case Object
The following configurations are required on the Case object to enable Domestic Case Processing.
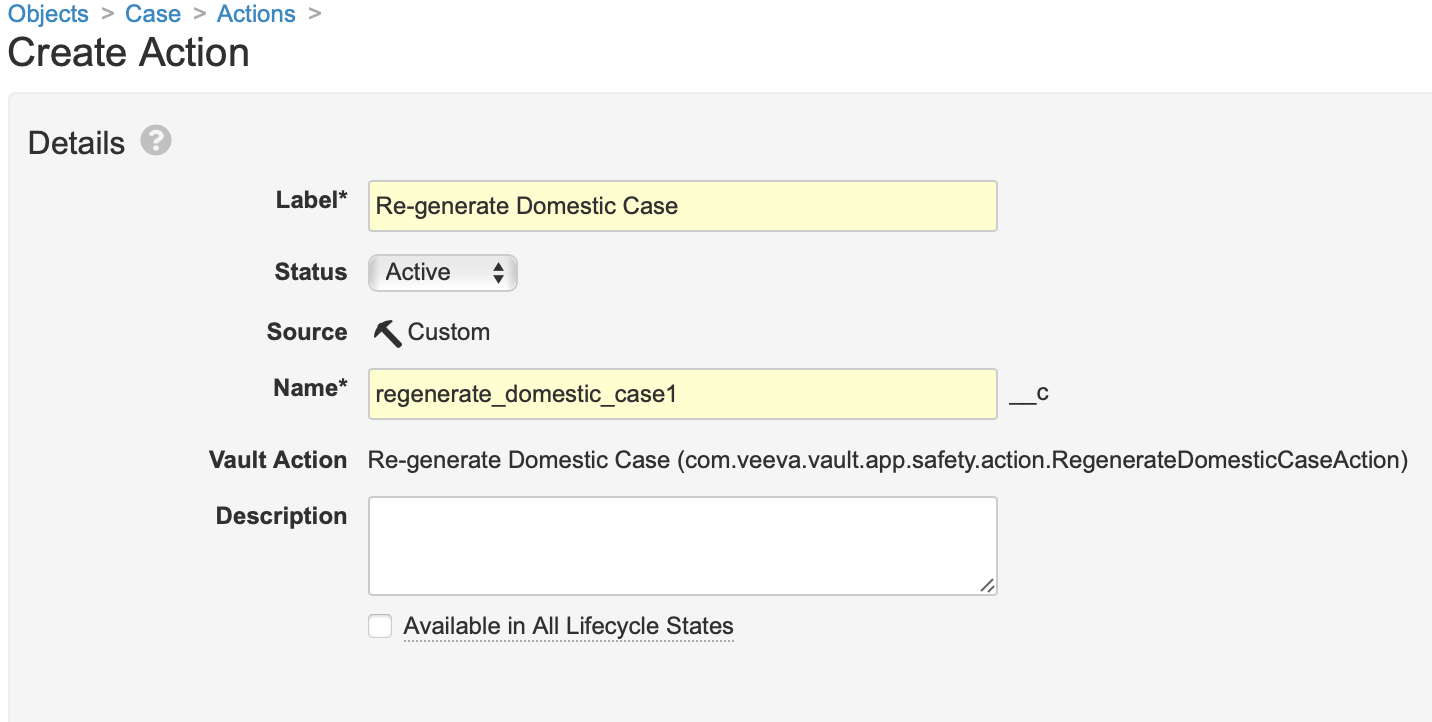
Add the Re-generate a Domestic Case Action to the Case Object
- In Admin, go to Configuration > Objects > Case > Actions.
- Select Create.
- Select Re-generate Domestic Case from the dropdown menu.
- Select Continue.
- Select Save.
Add the Re-generate a Domestic Case Action to the Case Object Lifecycle
- In Admin, go to Configuration > Object Lifecycles > Case Lifecycle.
- Select a State. We recommend configuring the action for the Triage state. However, you can configure the action for any state.
- Select Edit from the User Actions section of the state page.
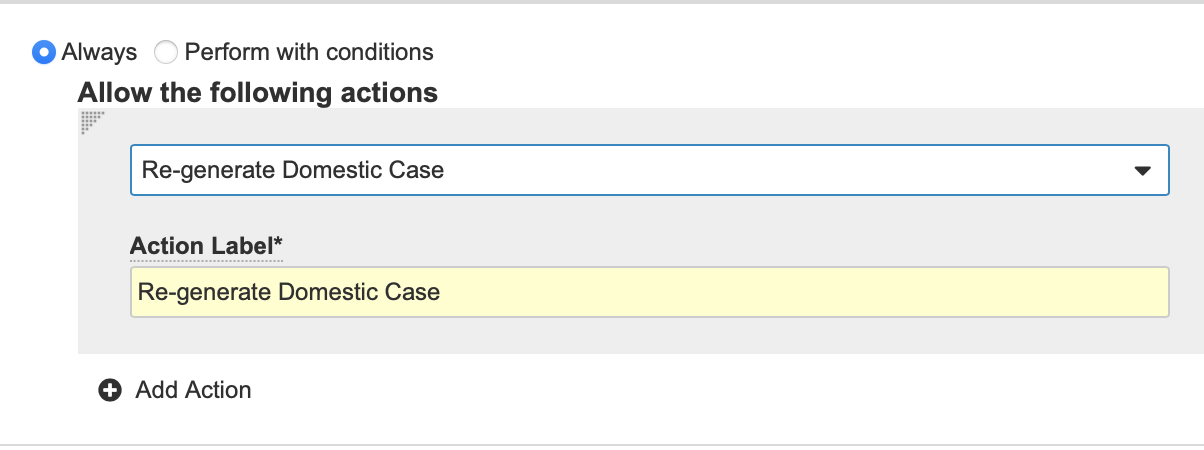
- Select Create Rule.
- Create the Rule form with the following details:
- Always
- Re-generate Domestic Case
- Action Label: Re-generate Domestic Case
- Select Save.
Update the Case Page Layout
Add the Default Localization Field
- In Admin, go to Configuration > Objects > Case.
- On the Page Layouts tab, open the Case Detail Page Layout.
- Select Add from the System section.
- Select Default Localization.
- Select Save.
(Optional) Create the Hide Default Report Type Layout Rule
- On the Case Page Layout, select Layout Rules.
- Select Create.
- Complete the Create Layout Rule form with the following details:
- Label: Hide Default Report Type
- Name: hide_default_report_type_c
- Hide the Following Page Layout Items:
- Type: Field
- Values: Report Type
- IF this Layout Expression is TRUE:
““Or(Not(IsBlank(localization__vr.name__v)), (localization__vr.name__v='global__v'))”
- Select Save.
(Optional) Remove the Case Narrative Field from the Narrative Section
- Navigate to the Narratives section of the Case Details Page Layout.
- Select
 beside the Case Narrative field name.
 - Select Save.
Replace Case Fields with App Control Fields
You must replace the following fields with their respective App Control Field versions. App Control fields are denoted by a  symbol.
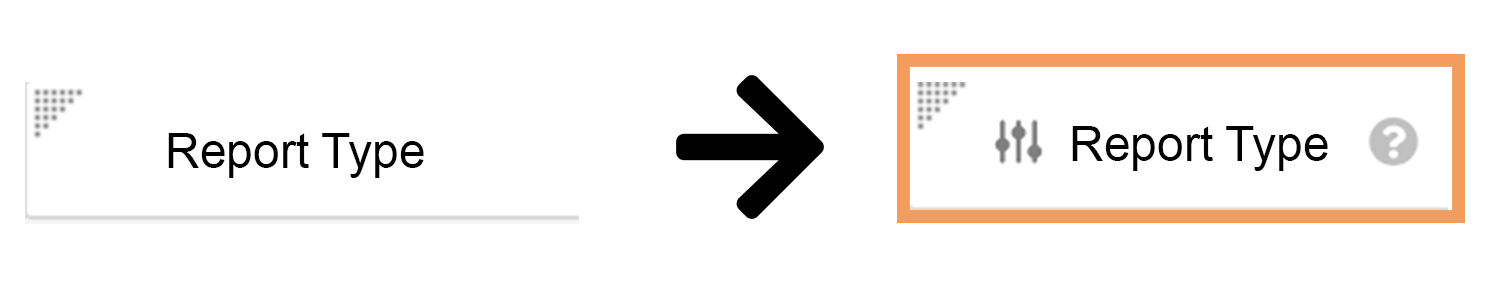
To replace a field with its App Control version:
- Select beside the field name.
- Select
 beside the field name.
 - Enter the name or search for the App Control field.
- Select Done.
Replace the fields in the following table with their app control versions:
| Section | App Control to Switch |
|---|---|
| Patient | Age Group Age Group |
| Patient | Medical History Text Medical History Text |
| Narratives | Narrative Preview Narrative Preview |
| Narratives | Company Comments Company Comments |
| Narratives | Reporter's Comments Reporter's Comments |
| Study | Study Type Study Type |
| Study | Study Name (Reason Omitted) Study Name (Reason Omitted) |
| Device Details | Device Follow-Up Type Device Follow-Up Type |
| Details | Report Type Report Type |
| Details | CIOMS Remarks CIOMS Remarks |
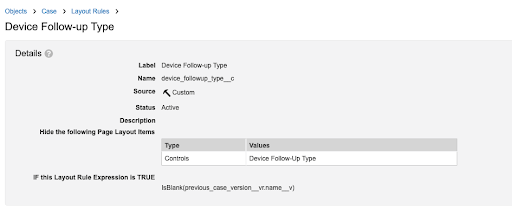
Update the Device Follow-up Type Layout Rule
- On the Case Page Layout, select Layout Rules.
- Select Device Follow-up Type.
- Select .
- Change the Type to "Controls"
- Select Save.
Add the Localization Field to the Child Information Records Page Layout
- In Admin, go to Configuration > Objects > Case.
- On the Page Layouts tab, open the Child Information Detail Page Layout.
- Select Add from the System section.
- Select Localization.
- Select Save.
Update the Parental Case Page Layout
Add the Localization Field to the Child Information Records Page Layout
- In Admin, go to Configuration > Objects > Case.
- On the Page Layouts tab, open the Parental Information Detail Page Layout.
- Select Add from the System section.
- Select Localization.
- Select Save.
Replace the Medical History Text Field with the App Control Field
- Navigate to the Parent section of the Parental Case Detail Page Layout.
- Select
 beside the Medical History Text field name.
 - Select .
- Add the Medical History Text app control field.
- Select Done.
Enable Japanese (PMDA) Domestic Case Processing
The following configurations are required to enable Domestic Case Processing for Japan (PMDA).
Update the Case Page Layout
Add the Case Product Registration Section
- In Admin, go to Configuration > Objects > Case.
- On the Page Layouts tab, open the Case Page Layout.
- Select Related Object from the Add Section drop-down menu.
- Complete the Related Object form with the following details:
- Related Object: Case Product Registration
- Section Label: Case Product Registrations
- Section Name: case_product_registrations
- Creation Option: Create record in new page
- Select Done.
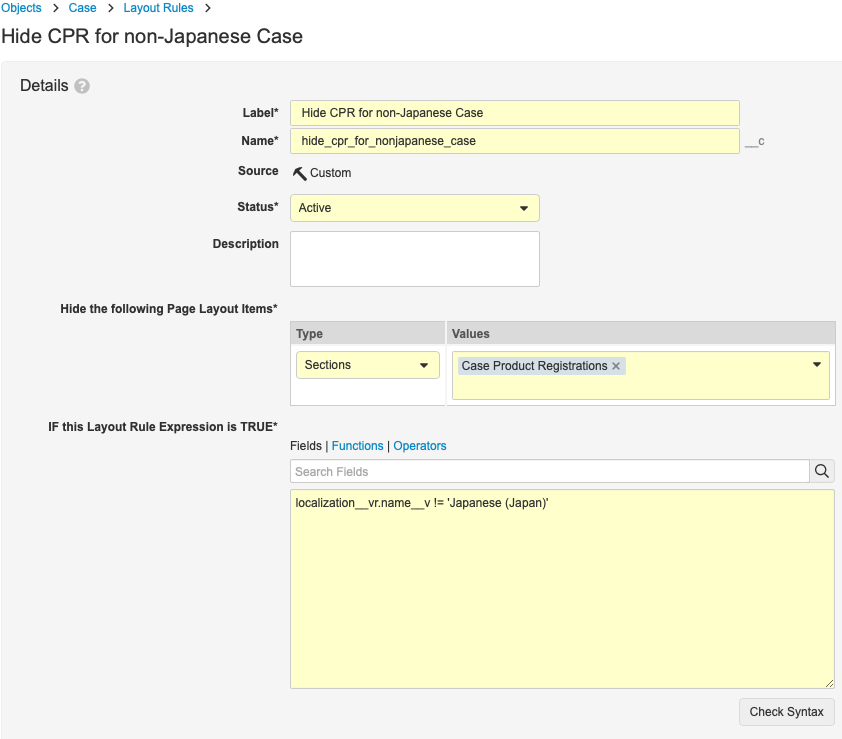
Create the Hide CPR for Non-Japanese Case Page Layout Rule
- In Admin, go to Configuration > Objects > Case.
- On the Page Layouts tab, open the Case Page Layout.
- Select Layout Rules.
- Select Create.
- Complete the Create Layout Rule form with the following details:
- Label: Hide CPR for Non-Japanese Case
- Name: hide_cpr_for_nonjapanese_case__c
- Hide the Following Page Layout Items:
- Type: Sections
- Values: Case Product Registrations
- IF this Layout Expression is TRUE:
“localization__vr.name__v!=’Japanese(Japan)”
- Select Save.
Update the Case Product Registration Page Layout
Update the Details Section
- In Admin, go to Configuration > Objects > Case Product Registration.
- On the Page Layouts tab, open the Case Product Registration Detail Page Layout.
- Select from the Details section.
- Add the following fields to the Details section:
- OTC Drug Channel (App Control)
- Product (App Control)
- Dose Form (App Control)
- Registration Country (App Control)
- Select Save.
- Move the Product field to the System section.
- Select Save.
Add the PMDA Reporting Information Section
- In Admin, go to Configuration > Objects > Case Product Registration.
- On the Page Layouts tab, open the Case Product Registration Detail Page Layout.
- Select Detail Form from the Add Section drop-down menu.
- Complete the Add Detail form with the following details:
- Section Label: PMDA Reporting Information
- Section Name: pmda_reporting_info__c
- Section Layout: Details Form - Two Columns
- Select Done.
- Add the following fields to the PMDA Reporting Information section:
- PMDA Reporting Category
- Completeness
- Immediate Report Type
- Report Overview
- Select Save.

Add the Case Comments Section
- In Admin, go to Configuration > Objects > Case Product Registration.
- On the Page Layouts tab, open the Case Product Registration Detail Page Layout.
- Select Related Object from the Add Section drop-down menu.
- Complete the Related Object form with the following details:
- Related Object: Localized Case Comments
- Section Label: Case Comments
- Section Name: localized_case_comments__c
- Creation Option: Create record in new page
- Select Save.

Enable China (NMPA) and Korea (MFDS) Domestic Case Processing
The following configurations are required to enable Domestic Case Processing for China (NMPA) and Korea (MFDS).
Update the Case Page Layout
Add the Regional Section
- In Admin, go to Configuration > Objects > Case.
- On the Page Layouts tab, open the Case Page Layout.
- Select Detail Form from the Add Section drop-down menu.
- Complete the Add Detail form with the following details:
- Section Label: Regional
- Section Name: case_regional_section_control__c
- Section Layout: Details Form - One Column
- Select Done.
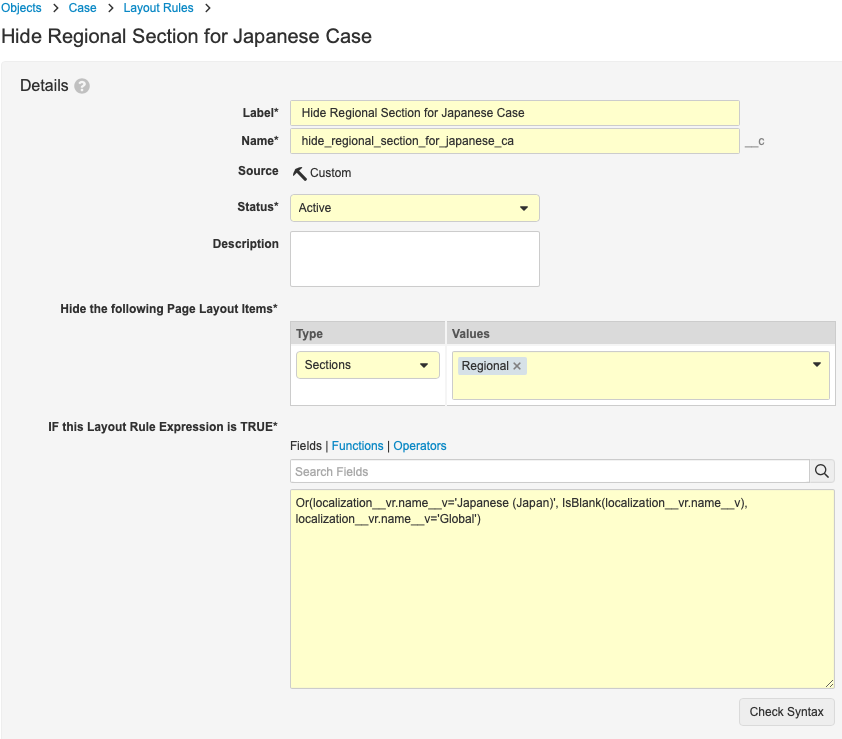
Create the Hide Regional Section for Global and Japanese Cases Layout Rule
- In Admin, go to Configuration > Objects > Case.
- On the Page Layouts tab, open the Case Page Layout.
- Select Layout Rules.
- Select Create.
- Complete the Create Layout Rule form with the following details:
- Label: Hide Regional Section for Global and Japanese Cases
- Name: hide_regional_section_for_japanese_case__c
- Hide the Following Page Layout Items:
- Type: Sections
- Values: Regional
- IF this Layout Expression is TRUE:
“Or(localization__vr.name__v='Japanese (Japan)', IsBlank(localization__vr.name__v), localization__vr.name__v='Global')”
- Select Save.
Update the Case Contact Page Layout
Add the Regional Section
You must add the Regional section to the following Case Contact Page Layouts:
- Health Care Professional Detail Page Layout
- Patient Contact Detail Page Layout
- Reporter Detail Page Layout
- Sender Detail Page Layout
- Facility Detail Page Layout
- In Admin, go to Configuration > Objects > Case.
- On the Page Layouts tab, open a [Page Layout].
- Select Detail Form from the Add Section drop-down menu.
- Complete the Add Detail form with the following details:
- Section Label: Regional
- Section Name: case_regional_section_control__c
- Section Layout: Details Form - One Column
- Select Done.
Create the Hide Regional Section for Global and Japanese Cases Layout Rule
You must add the layout rule to the following Case Contact Page Layouts:
- Health Care Professional Detail Page Layout
- Patient Contact Detail Page Layout
- Reporter Detail Page Layout
- Sender Detail Page Layout
- Facility Detail Page Layout
- In Admin, go to Configuration > Objects > Case.
- On the Page Layouts tab, open a [Page Layout].
- Select Layout Rules.
- Select Create.
- Complete the Create Layout Rule form with the following details:
- Label: Hide Regional Section for Global and Japanese Cases
- Name: hide_regional_section_for_japanese_case__c
- Hide the Following Page Layout Items:
- Type: Sections
- Values: Regional
- IF this Layout Expression is TRUE:
“Or(localization__vr.name__v='Japanese (Japan)', IsBlank(localization__vr.name__v), localization__vr.name__v='Global')”
- Select Save.
Replace Case Contact Fields with App Control Fields
You must replace the following fields with their respective App Control Field versions. App Control fields are denoted by a symbol.
To replace a field with its App Control version:
- Select beside the field name.
- Select beside the field name.
- Enter the name or search for the App Control field.
- Select Done.
Replace the fields in the follwing table with their app control versions:
| Page Layout | Section | App Control to Switch |
|---|---|---|
| Case Contact (All) |
|
Address: Street Line 2 Address: Street Line 2 |
| Case Contact (All) |
|
Qualification Qualification |
| Case Contact (All) | Sender | Organization Organization |
| Case Contact (All) | Facility |
|
| Case Contact (All) | Sender |
|
Update the Case Product Page Layout
Update the Combination Product Layout Rule
You must update the Combination Product layout rule to the following Case Product Page Layouts:
- Biologic Page Layout
- Drug Page Layout
- Device Page Layout
- Vaccine Page Layout
- In Admin, go to Configuration > Objects > Case Product.
- On the Page Layouts tab, open a [Page Layout].
- Select Layout Rules.
- Select Combination Product.
- Add the following to the Hide the Following Page Layout Items section:
- Type: Controls
- Values: Combination Product
- Select Save.

Update the Blinded Rule Layout Rule
- In Admin, go to Configuration > Objects > Case Product.
- On the Page Layouts tab, open a Study Product Page Layout.
- Select Layout Rules.
- Select Blinded Rule.
- Add the following to the Hide the Following Page Layout Items section:
- Type: Controls
- Values: Product (Reported)
- IF this Layout Rule Expression is TRUE:
If(IsBlank(blinded__v), if(IsBlank(case_blinded__v), if(IsBlank(study_blinded__v), FALSE, study_blinded__v), case_blinded__v), blinded__v)
- Select Save.
Replace Case Product Fields with App Control Fields
You must replace the following fields with their respective App Control Field versions. App Control fields are denoted by a symbol.
To replace a field with its App Control version:
- Select beside the field name.
- Select beside the field name.
- Enter the name or search for the App Control field.
- Select Done.
Replace the fields in the follwing table with their app control versions:
| Page Layout | Section | App Control to Switch |
|---|---|---|
| Case Product (All) | Details |
|
| Case Product > Device Details Page Layout | Details | Other Additional Information Other Additional Information |
| Case Product > Device Details Page Layout | Device Information | Device Usage Type Device Usage Type |
| Case Product > Device Details Page Layout | Registration |
|
| Case Product > External Product Page Layout | Other Additional Information | Other Additional Information Other Additional Information |
| Case Product > Vaccine Page Layout | Registrations |
|
| Case Product > Study Product Page Layout | Details | Other Additional Information Other Additional Information |
| Case Product > Study Product Page Layout | Registrations |
|
Replace Case Product Fields with App Control Fields
You must replace the following fields with their respective App Control Field versions. App Control fields are denoted by a symbol.
To replace a field with its App Control version:
- Select beside the field name.
- Select beside the field name.
- Enter the name or search for the App Control field.
- Select Done.
Replace the fields in the follwing table with their app control versions:
| Page Layout | Section | App Control to Switch |
|---|---|---|
| Case Adverse Event | Details |
|
| Case Assessments > Case Assessment Result | Details |
|
| Case Medical History | Details | Comments Comments |
| Case Test Results | Details |
|
Security
(Optional) Configure Read Permission for the Localization Field
We recommend you set Read permissions on the Localization field of the Case object for all Permission Sets except Vault Owner.
- In Business Admin, go to Users & Groups > Permission Sets > [Permission Set] > Objects > Case > Object Field Permissions > Localization.
- Select Edit.
- Set the Read permission for this field for all roles except Vault Owner.
- Select Save.
Configure Edit Permission for the Session Store ID Field
You must set Edit permissions on the Session Store ID field of the Case object for the following Vault Permission sets:
- Case Distribution
- Case Entry
- Case Intake
- Case Review
- Case Translation
- In Business Admin, go to Users & Groups > Permission Sets > [Permission Set] > Objects > Case > Object Field Permissions > Session Store ID.
- Select Edit.
- Set the Edit permission for this field.
- Select Save.
Add Read and Edit Permissions to All Localized Objects on the Case Entry Permission Set
- In Business Admin, go to Users & Groups > Permission Sets > Case Entry Actions > Objects.
- Select Edit.
- Add Read and Edit permissions to all Localized Case objects:
- Localized Case
- Localized Case Adverse Event
- Localized Case Assessment
- Localized Case Assessment Result
- Localized Case Cause of Death
- Localized Case Comment
- Localized Case Contact
- Localized Case Document
- Localized Case Drug History
- Localized Case Identifier
- Localized Case Medical History
- Localized Case Product
- Localized Case Product Dosage
- Localized Case Product Indication
- Localized Case Product Substance
- Localized Case Test Result
- Localized Controlled Vocabulary
- Localized Country
- Localized Dose Form
- Localized Organization
- Localized Product
- Localized Reason Omitted
- Localized Route of Administration
- Localized Study
- Localized Study Arm
- Localized Substance
- Localized Unit of Measurement
- Select Save.
Add Read Permissions to All Localized Objects on Case Permission Sets
You must Read permissions to the following Case Permission Sets:
- Case Distribution
- Case Intake
- Case Review
- Case Translation
- In Business Admin, go to Users & Groups > Permission Sets > [Permission Set] > Objects.
- Select Edit.
- Add Read permissions to all Localized Case objects:
- Localized Case
- Localized Case Adverse Event
- Localized Case Assessment
- Localized Case Assessment Result
- Localized Case Cause of Death
- Localized Case Comment
- Localized Case Contact
- Localized Case Document
- Localized Case Drug History
- Localized Case Identifier
- Localized Case Medical History
- Localized Case Product
- Localized Case Product Dosage
- Localized Case Product Indication
- Localized Case Product Substance
- Localized Case Test Result
- Localized Controlled Vocabulary
- Localized Country
- Localized Dose Form
- Localized Organization
- Localized Product
- Localized Reason Omitted
- Localized Route of Administration
- Localized Study
- Localized Study Arm
- Localized Substance
- Localized Unit of Measurement
- Select Save.