Note Beginning with 23R3 content and for all subsequent releases, Vault Release Notes is the official site for Vault Safety release notes.
Vault Safety template revisions include changes to vault configuration for general usability improvements. Template revisions are not automatically rolled out to existing customers.
New vaults created in 20R3 or later will have the following settings by default. Vaults created in an earlier release can optionally be updated to match these changes. The sections on this page provide the instructions to enable these changes.
This page does not cover how to update your template to support new features. The 20R3 New Features page outlines which features require configuration upgrades, and provides links to enablement instructions for each feature.
Page Layouts and Fields
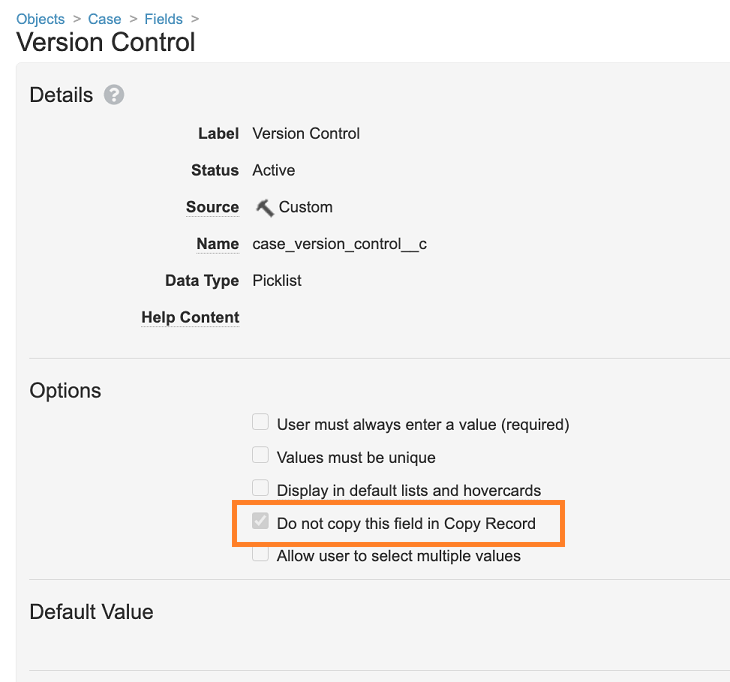
Turn On Do Not Copy on Version Control Field
In the 20R3 template, the Do not copy this field in Copy Record setting is turned on for the Case Version Control field.
This change resolves an issue where a Revision workflow task is not created when a Follow-up Case is created from an approved Case.
Show National Drug Code in Product Registration Layout
In 20R3, the National Drug Code field was added to the Product Registration page layout, in the Registration Details section.
Update Display Settings on the All Organizations Page
We recommend making the following changes to the Organization object to enhance usability:
- In the Business Admin area, go to Configuration > Objects > Organization > Fields.
- Open the Localization field and select Edit.
- Under Options, select the Display in default lists and hovercards checkbox.
- Select Save.
We also recommend setting up the All Organizations list layout according to the following instructions:
- In the Business Admin area, go to the All Organizations page.
- Select the gear icon on the top right side of the screen and then select Edit Columns.
- Reorganize your list layout to match the following order:
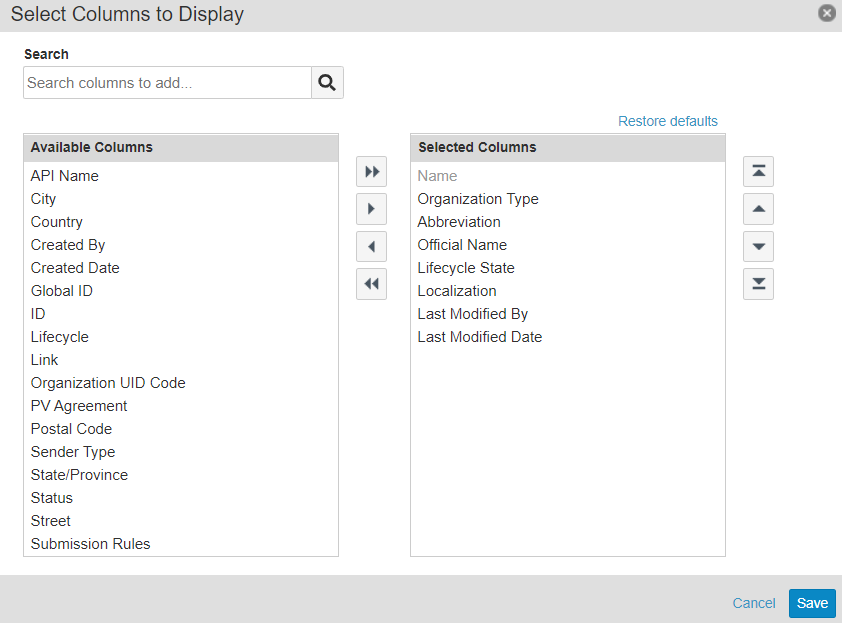
Organization List Layout - Select Save.
Template Updates for Combination Products
Enable Combination Products provide more information about combination product configuration.
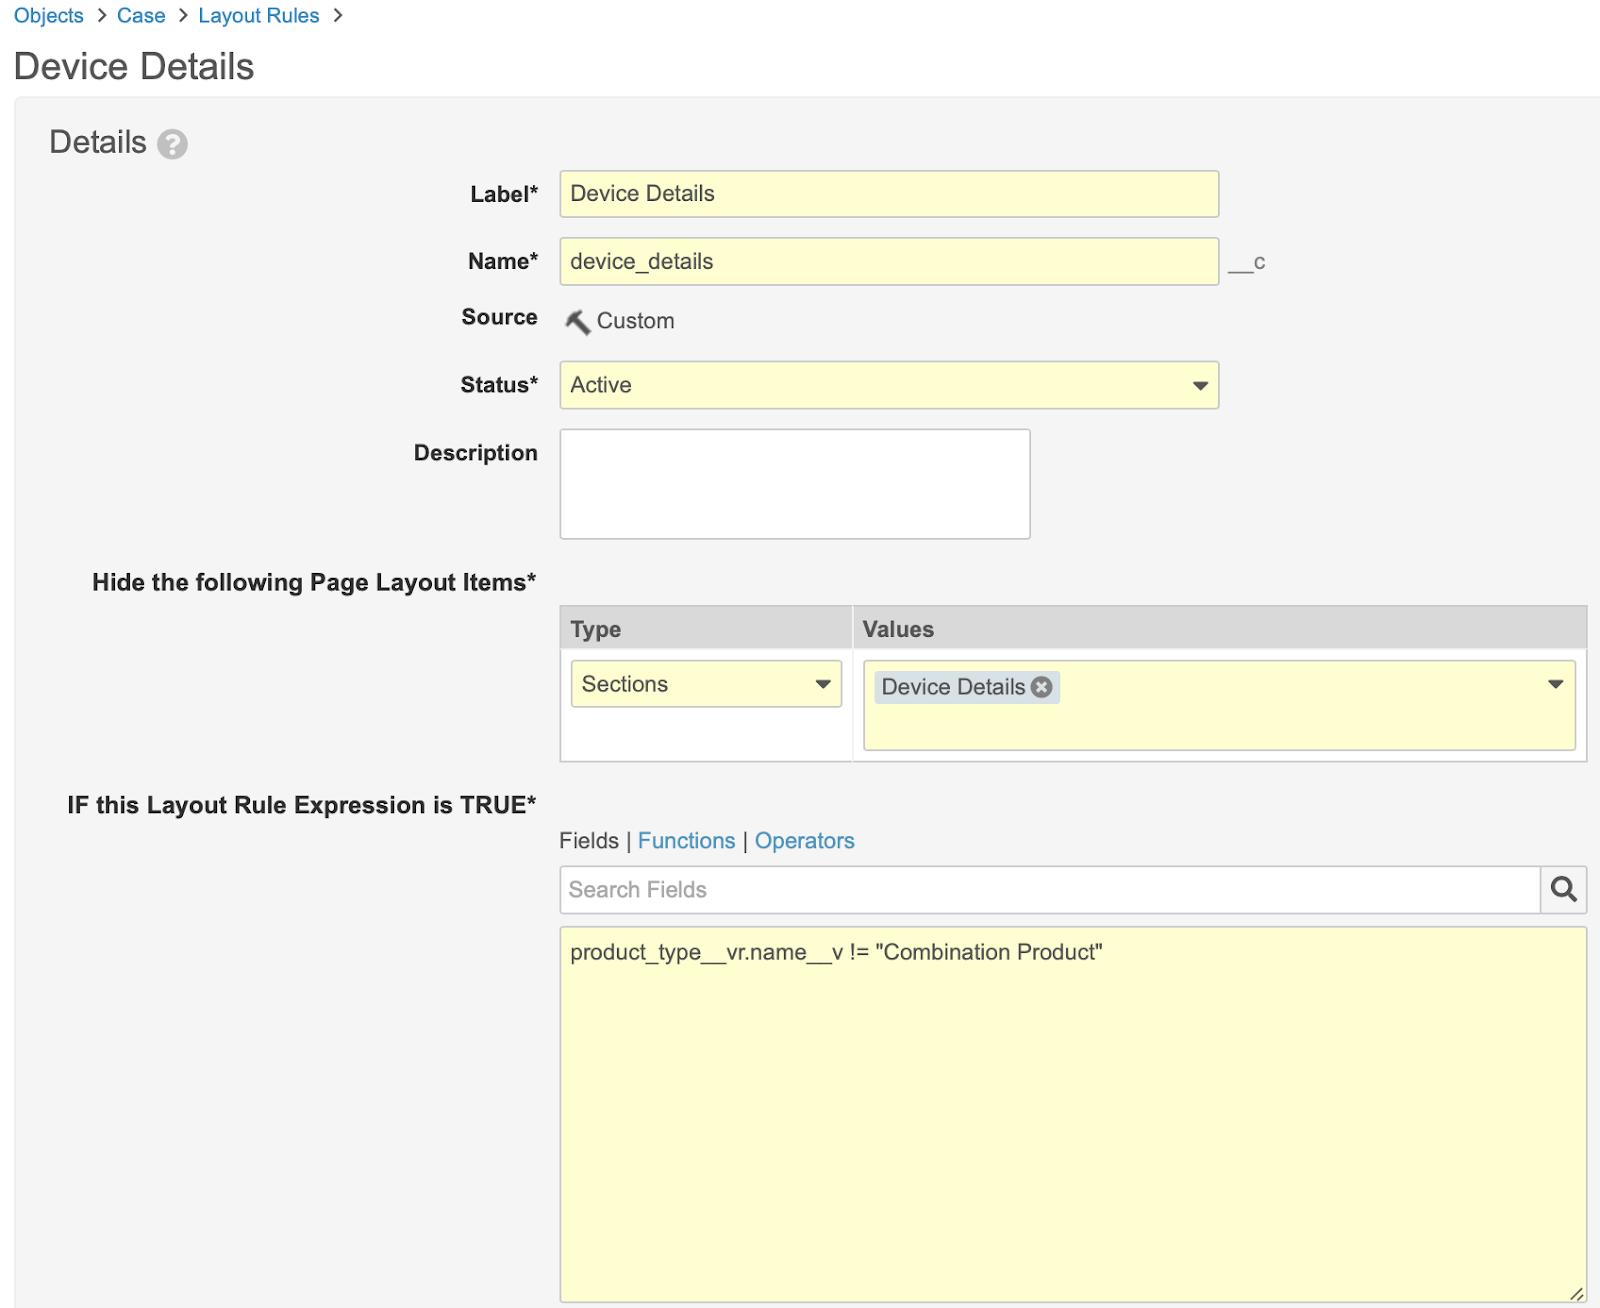
Update the Case Page Layout Rules with Device Details
- In Admin, go to Configuration > Objects > Case > Page Layouts > Case Page Layout > Layout Rules.
- Select Create.
- Create the layout rule with the following details:
- Label: Device Details
- Name:
device_details__c - Hide the following Page Layout Items:
- Type: Sections
- Values: Device Details
- IF this Layout Rule Expression is TRUE:
product_type__vr.name__v != "Combination Product"
- Select Save.
Update the Constituent Product Field on Product Constituent Object
- In Admin, go to Configuration > Objects > Product Constituent > Fields > Constituent Product.
- Select Edit.
- Update the Criteria VQL field to:
organization_v = this.organizationv AND object_typevr.api_namev != 'combination_product_v' - Select Save.

Rename Reporting Organization to MAH on the Product Registration Object
In the 20R3 template, the Reporting Organization field was renamed to MAH. To make this change in your vault:
- In the Business Admin area, go to Configuration > Objects > Product Registration > Fields.
- From the list of fields, select Reporting Organization and then select Edit.
- Change the Label from Reporting Organization to MAH.
- Select Save.
Update the General Field Layout
We recommend making the following changes to the General Field Layout to enhance usability:
- In the Business Admin area, go to Configuration > Field Layout > General (general__c).
- Select Edit and reorganize the fields to match the this order:
General Field Layout - Organize the remaining fields according to your organization’s business practices.
- Select Save.
Note The field order provided above is a suggestion. Consider your organization’s standard operating procedures to determine if your layout should be different.
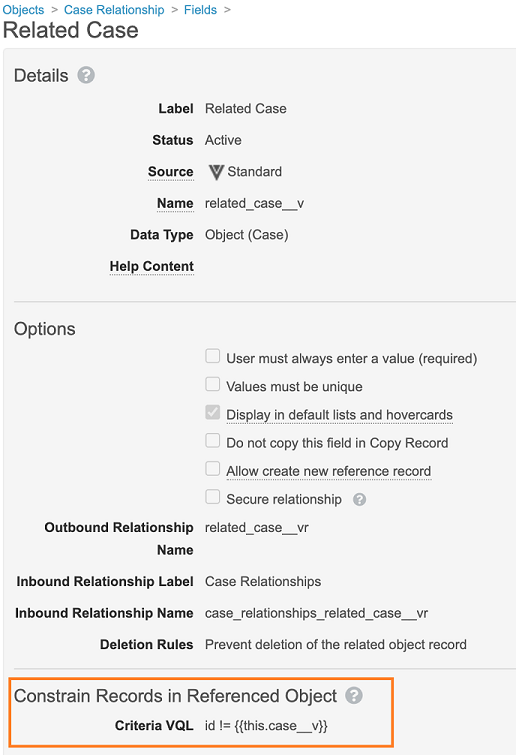
Prevent Self-Referencing Case Relationship
The 20R3 template includes the following VQL constraint to prevent possible issues around self-referencing Case Relationships. To add this to your vault, perform the following steps:
- Go to Configuration > Objects > Case Relationship > Fields.
- Edit the Related Case object field to add the following Criteria VQL:
id !={{this.case__v}}
General Settings
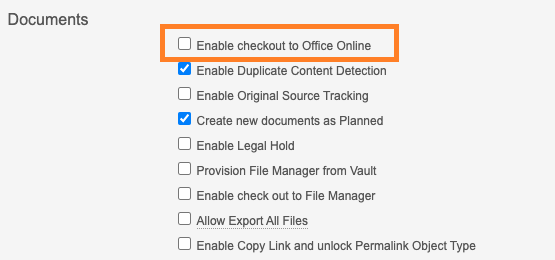
Deactivate Checkout to Office Online
In the 20R3 template, the “Enable Checkout to Office Online” setting is turned off.
If your organization does not use Office Online, you can make this change to your vault to reduce the number of options on the Gear Action Menu for documents.
To edit this setting, in Admin, go to Settings > General Settings > Documents.
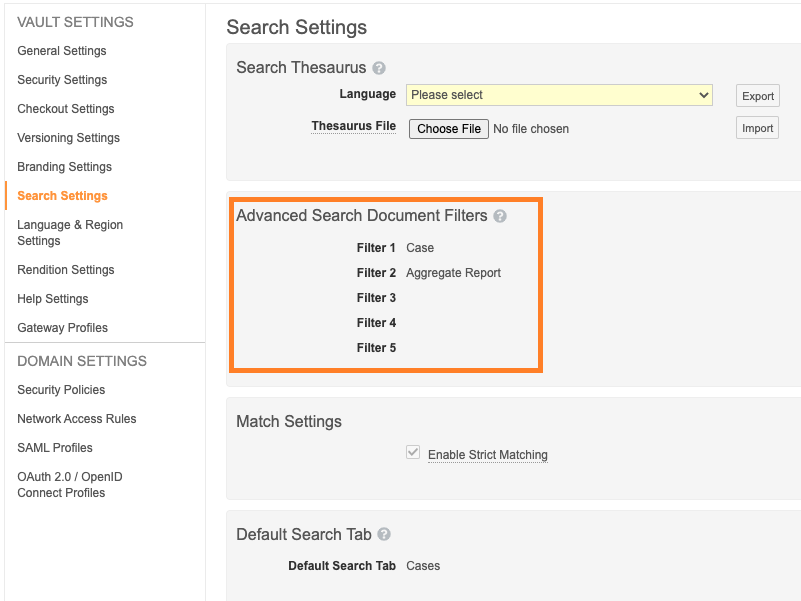
Add Advanced Search Document Filters
The 20R3 template includes Case and Aggregate Report object reference fields as advanced search document filters.
To add this configuration to your vault:
- In Admin, go to Settings > Search Settings.
- Add Case and Aggregate Report as filters.
The following image shows the filters:
Navigation
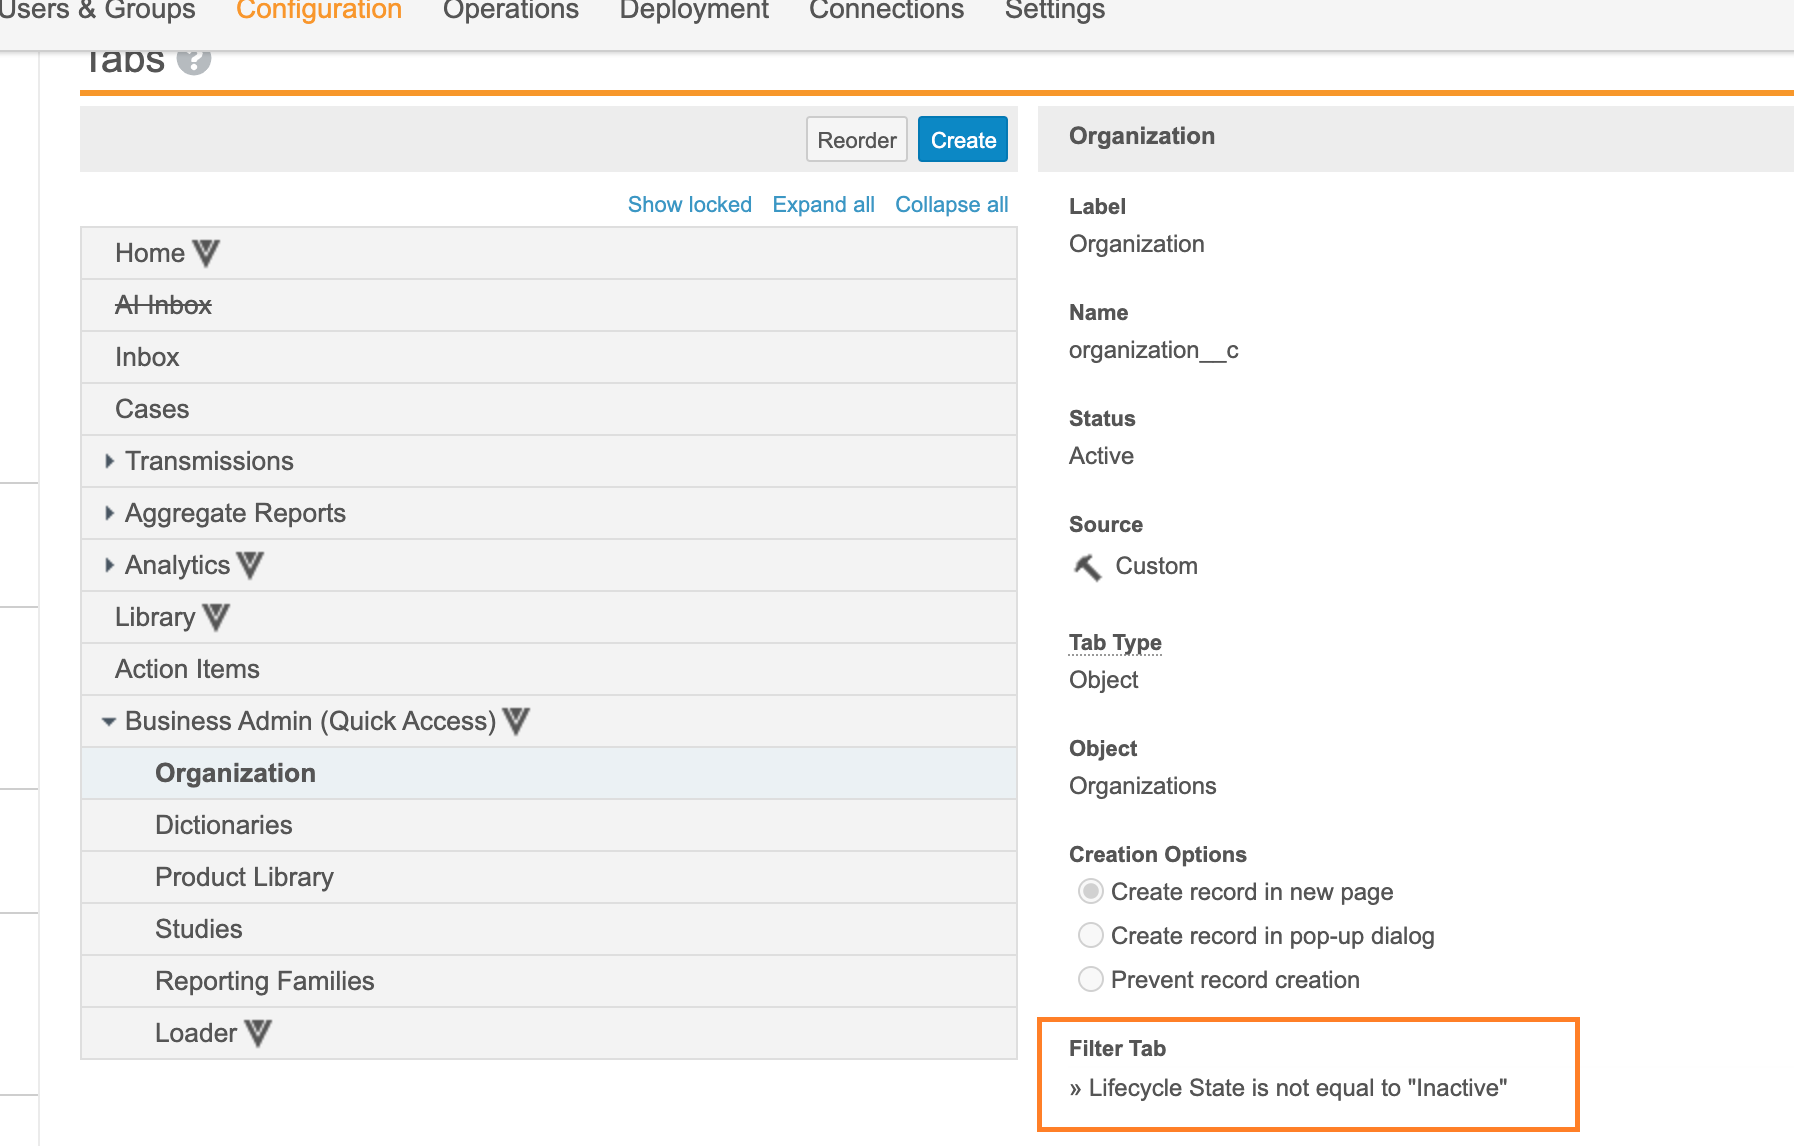
Set Business Admin Organization Tab to Hide Inactive Records
In the 20R3 template, the Business Admin (Quick Access) > Organization tab has been updated to hide Inactive records for a better user experience.
To make this change in your vault, go to Configuration > Tabs, and then edit the Business Admin (Quick Access) > Organization tab to set the Filter Tab option as shown below:
Permissions
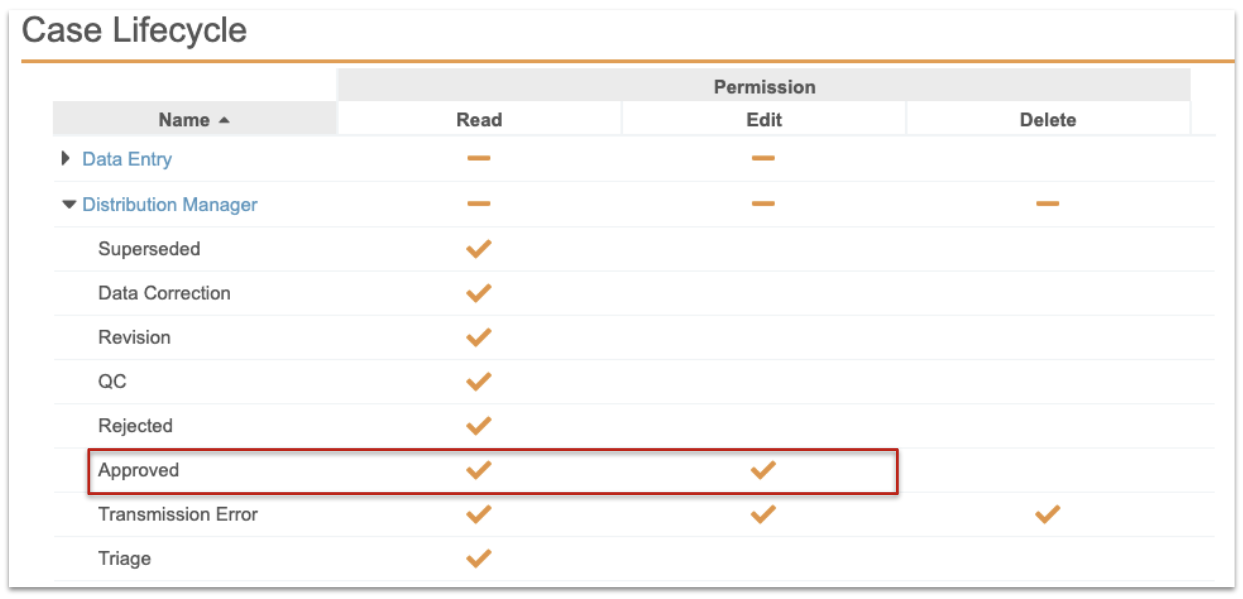
Remove Edit Access on the Approved State
The 20R3 Vault Safety template is updated to ensure that all roles cannot edit Cases (case_version_v) in the Approved (approved_v) state.
In previous Vault Safety template versions, only Head of Safety and Distribution Manager were granted access. However, this will vary depending on your vault configuration.
To make this change in your vault, perform the following steps:
- Go to Configuration > Object Lifecycles > Case Lifecycle.
- Scroll down to Roles.
- Expand each role and ensure the Edit permission is not granted for the Approved state.
Restrict Edit Permission for AER on the Case Object
In the 20R3 template, permissions to edit the AER object are removed from the Case Entry Actions permission set. To make this change in your vault, complete the following steps:
- In the Business Admin area, go to Users & Groups > Permission Sets > Case Entry Actions > Objects.
- Select Edit.
- In the list of Object Permissions, locate Case > AER and clear the Edit checkbox in front of it.
- Select Save.
Permission Updates for the Narrative Template Lifecycle
Administrators Group
In 20R3, a new Administrators group was added with automatic assignment of users in the Vault Owner, System Administrator, Business Administrator security profiles.
The new Administrators group is added to Create Documents on the Base Document Type.
Users in the Administrators group can create Template documents once the document type is activated. All other users are unaffected by these changes.
All Internal Users Group
The following permissions were updated for the All Internal Users group:
- Removed Create Document permissions for the Base Document Type.
- Added Create Document permissions for all document types other than Template (
template__v)
Lifecycle Stage Groups
Add Lifecycle Stage Groups for all Aggregate Report Types
In 20R3, PSUR and PADER stage groups were added to the Vault’s Object Lifecycle Stage Groups. These groups match the DSUR and PBRER stage groups.
Move Validation Error State to Pending Stage
Make the following changes to the Submission Stage Groups to prevent the Error stage group from showing in record details header when there are no errors:
- In the Admin area, go to Configuration > Object Lifecycle Stage Groups > Submission Stages.
- Select the Error stage.
- Under States, find Validation Error and select the
 button next to it, then select Continue on the confirmation dialog box that appears.
 - Select the gear icon on the top right side of the screen and select Delete, then select Continue on the confirmation dialog box that appears.
- Go back to Submission Stages and select the Pending stage.
- Select the Add button on the top right of the States section.
- In the Add States window, select the plus sign next to Validation Error and then select OK.
Object Lifecycles and Workflows
Add Workflow Start for E2B Follow Ups
In the 20R3 template, an entry action is added to the Revision state of the Case object lifecycle to start the Case Triage (Follow-Up) workflow if Version Control is blank.
To make this change in your vault, perform the following steps:
- Go to Configuration > Object Lifecycles > Case Lifecycle.
- Open the Revision state.
- Under Entry Actions, select Edit.
- Select Create Entry Action, and then add the following action:
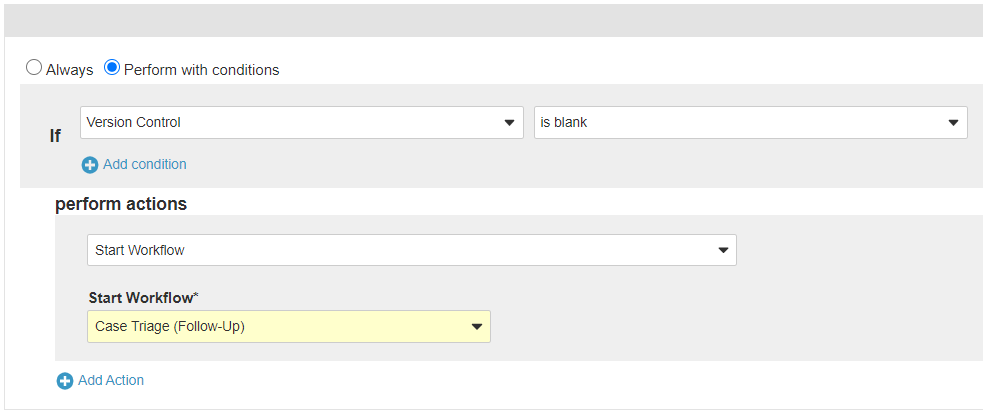
New Case Revision State Entry Action - Save the entry actions.
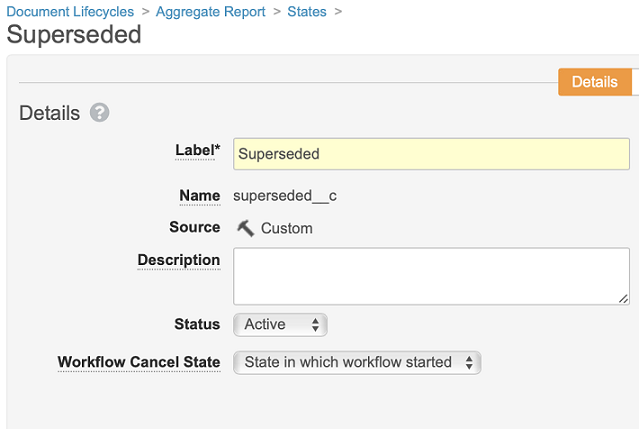
Add Superseded State to Aggregate Report Lifecycle
- In Admin, go to Configuration > Document Lifecycles > Aggregate Report > States.
- Select Create.
- Create the Superseded state.
- Select Save.
- Add the Superseded state to the Aggregate Report Tabulation Lifecycle.
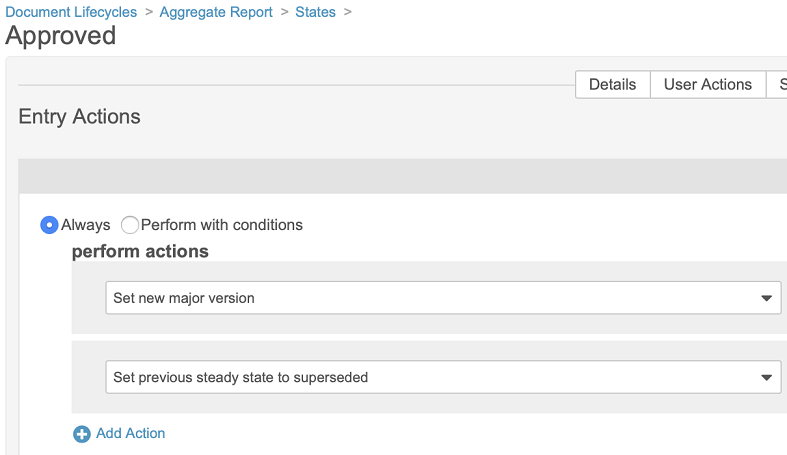
Add Entry Action to Approved State on Aggregate Report and Aggregate Report Tabulation Lifecycle
- In Admin, go to Configuration > Document Lifecycles > Aggregate Report > States > Approved > Entry Actions.
- Create an entry action with the following details:
- Always
- Set new major version
- Set previous steady state to superseded
- Select Save.
- Add the entry action to the Aggregate Report Tabulation Lifecycle.
Turn Off Blind Protection for Keep Blind Scenario
- In Admin, go to Configuration > Object Workflows > Case Unblinding.
- After the Update Record Field - Set State Blinded step, add an Update Record Field workflow step for Blind Protection = Off:
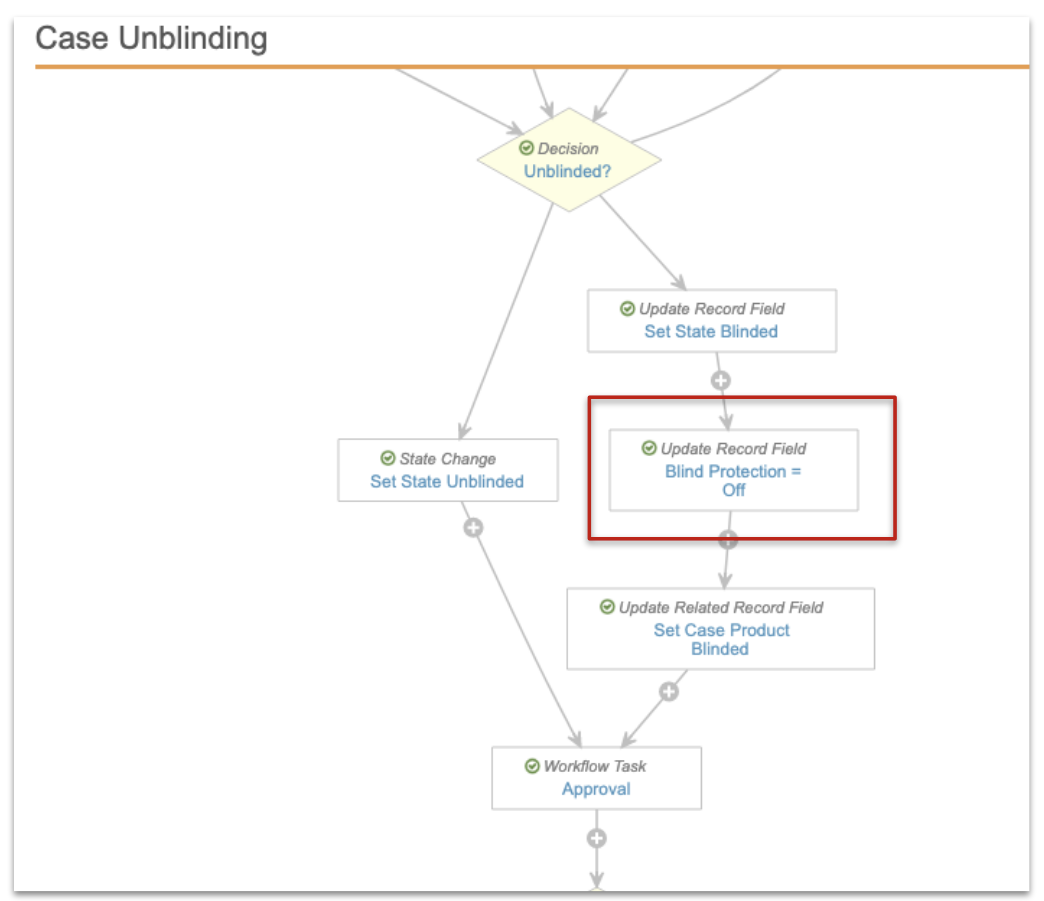
Blind Protection Workflow - Configure the Blind Protection = Off step with the following settings:
- Set Type to Update Record Field.
- Select Blind Protection from the Fields section.
- Enter “Null” in the Set to Value field.
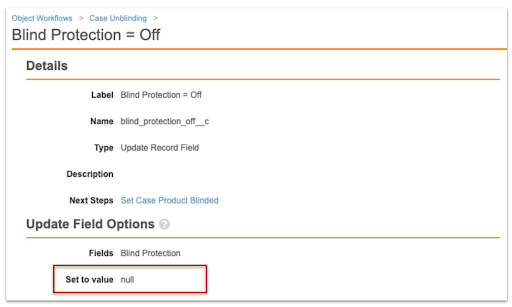
Blind Protection = Off Workflow Step - Select Save.
Hide Submit to Gateway Action from Transmission Lifecycle States
We recommend hiding the Submit to Gateway Action from all Transmission Lifecycle states except for the Ready for Submission state.
To hide this action:
- In Admin, go to Configuration > Object Lifecycles > Transmission Lifecycle.
- Select a state.
- Select Edit from the Atomic Security: Actions section.
- Under Submit to Gateway, select Hide from the drop-down menu under State Behavior and Viewer.
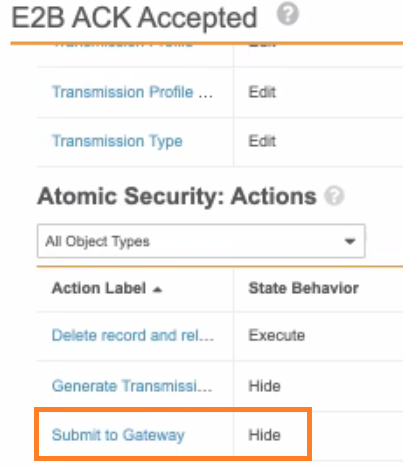
Hide Submit to Gateway Action - Select Save.
- Repeat with all states other than Ready for Submission.
Major Updates to Follow-Up Workflow for Performance Improvements
Vault Safety 20R3 vault template features several changes to Follow-Up workflows. These updates are required to achieve significant performance improvements during the Promote to Case action.
These improvements are accomplished by moving the Create Record Event Actions from the Case Lifecycle to lifecycle state Entry Actions, and adding connections to various workflows.
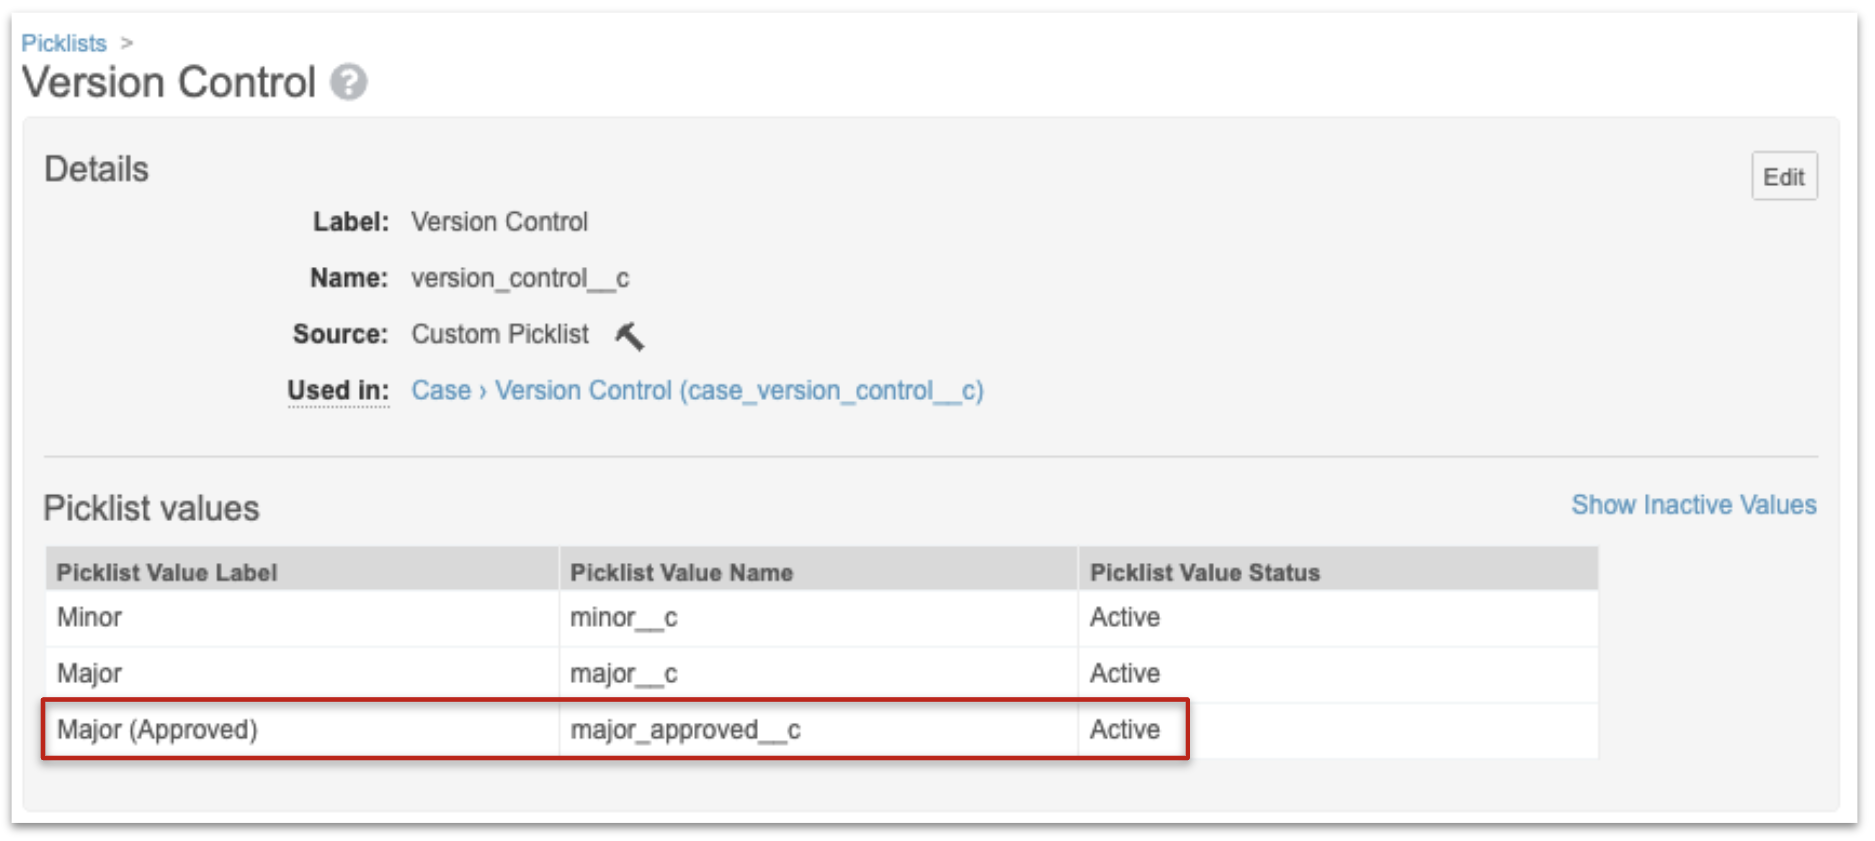
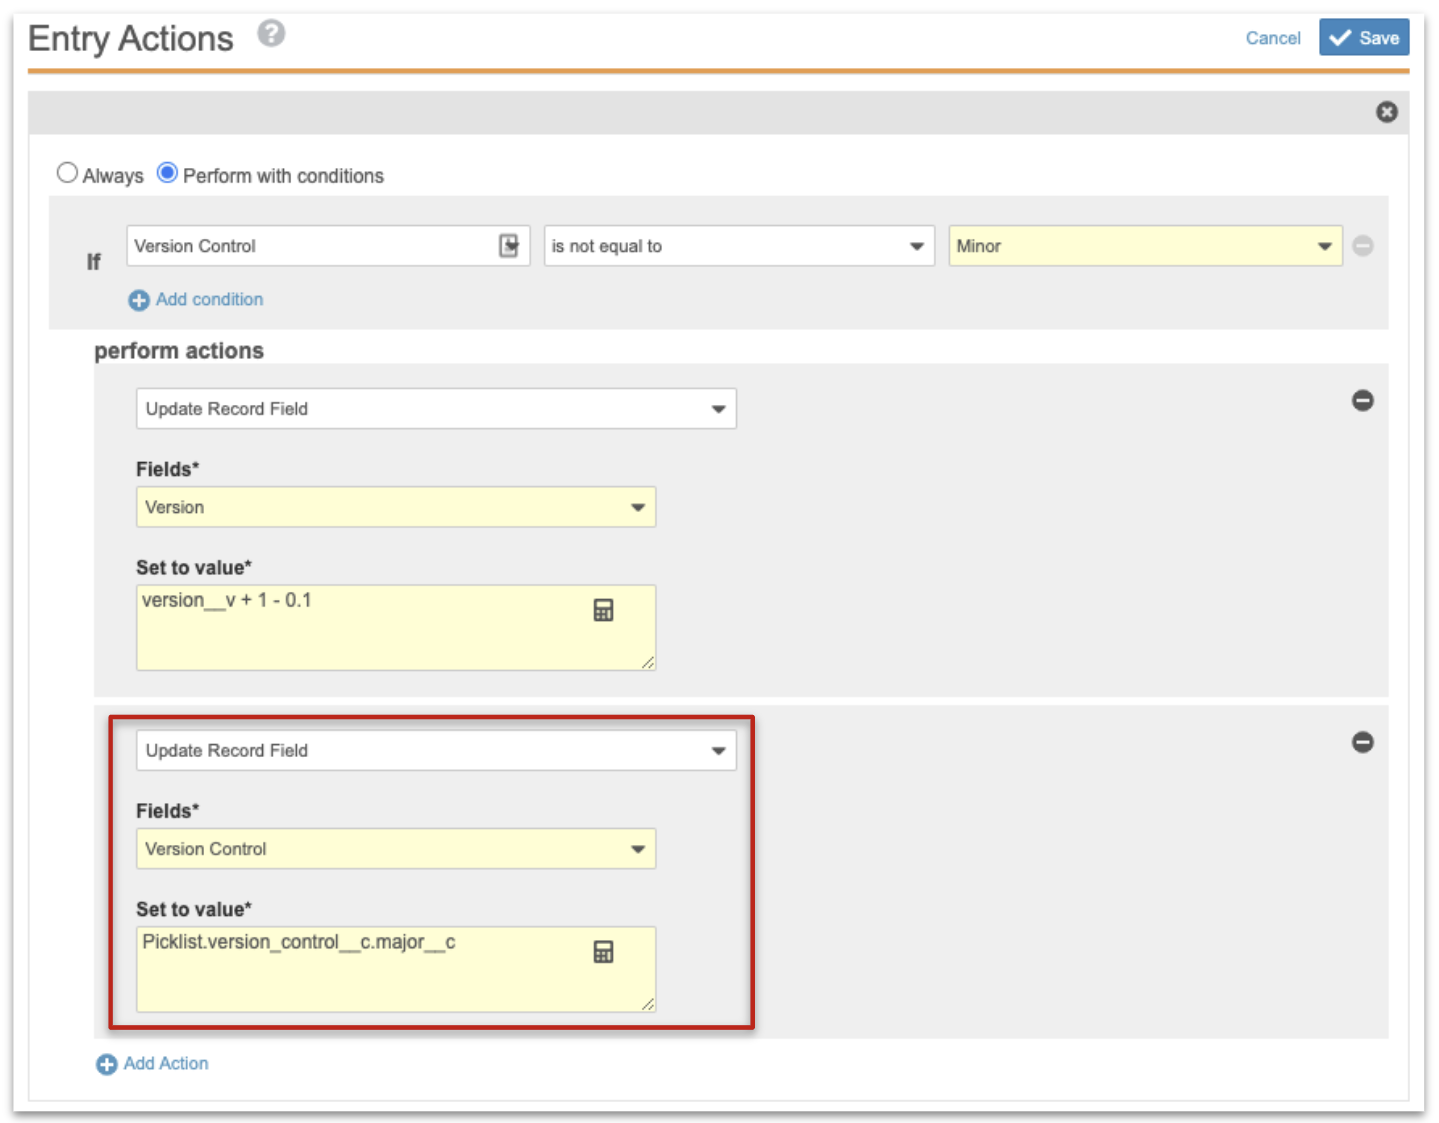
Update Version Control Picklist
The Version Control has been updated with a new option called Major (Approved).
- Used during entry action of Approved state.
- Differentiated from the Major option, which is used by the Closed state.
Updates to Case Lifecycle
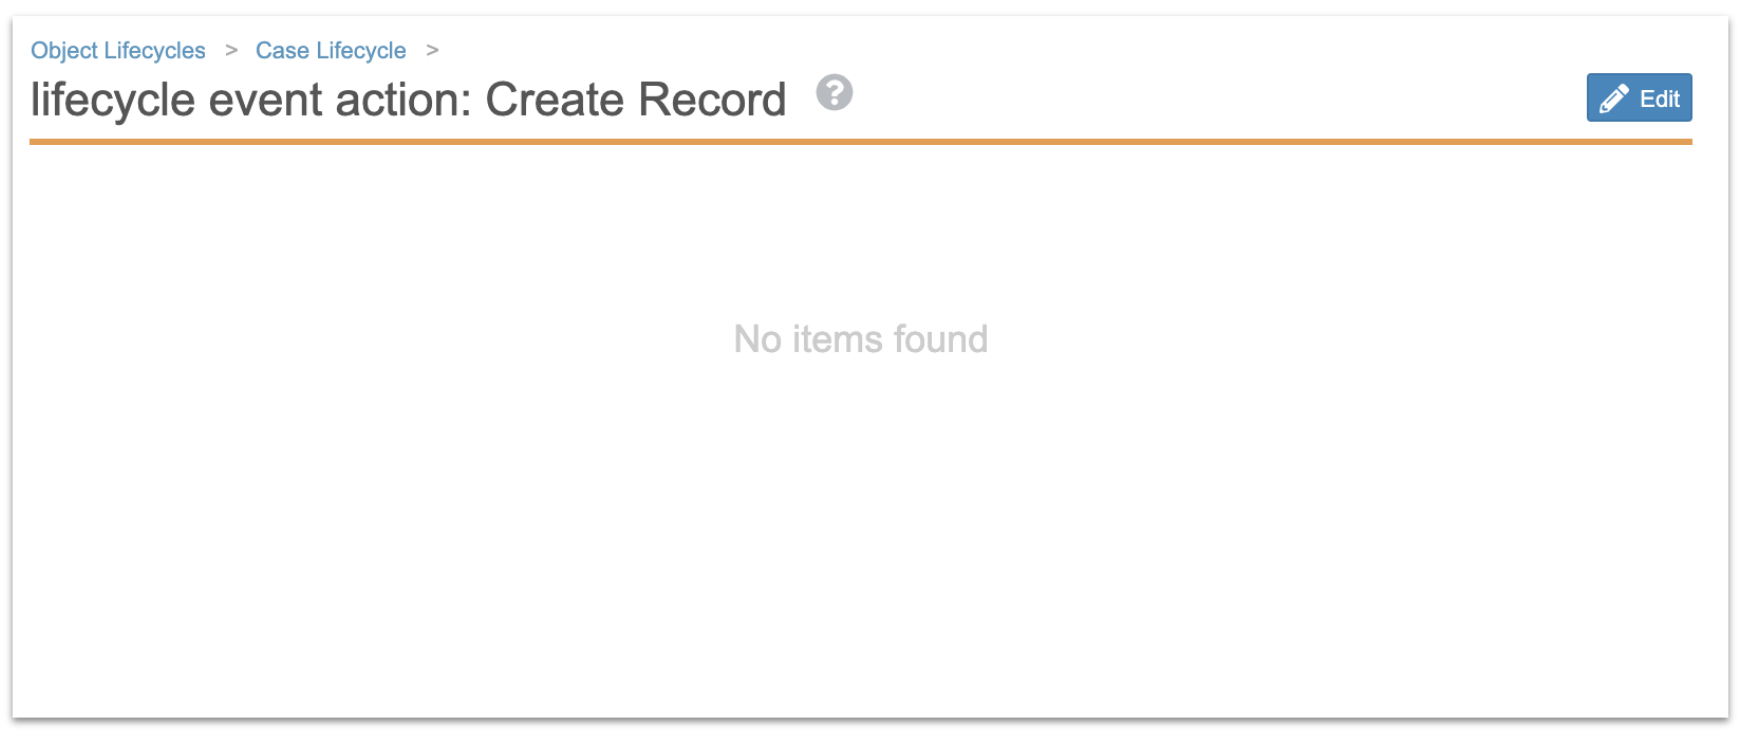
Event Actions: Create Record
All actions have been removed:
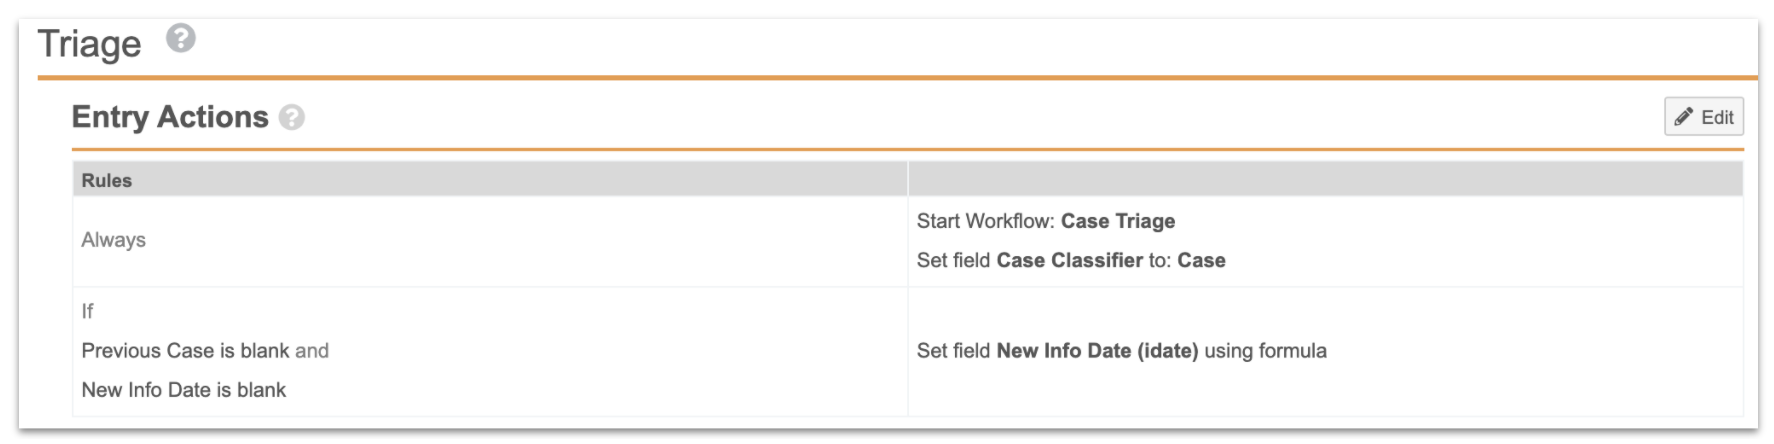
Triage State
A couple of entry actions were added to the Triage state, transitioned from Create Record Event Actions from the Case Lifecycle.
- Auto-Start of Case Triage workflow.
- Case Classifier updated to "Case".
- New Info Date initialized for initial cases.
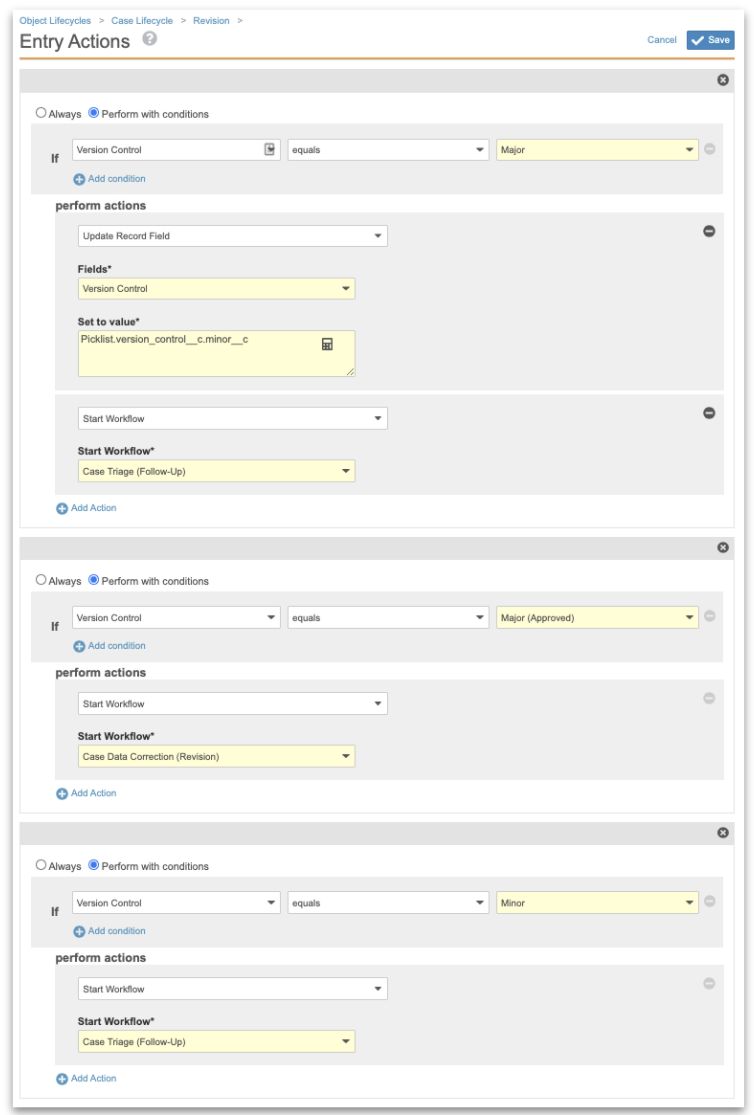
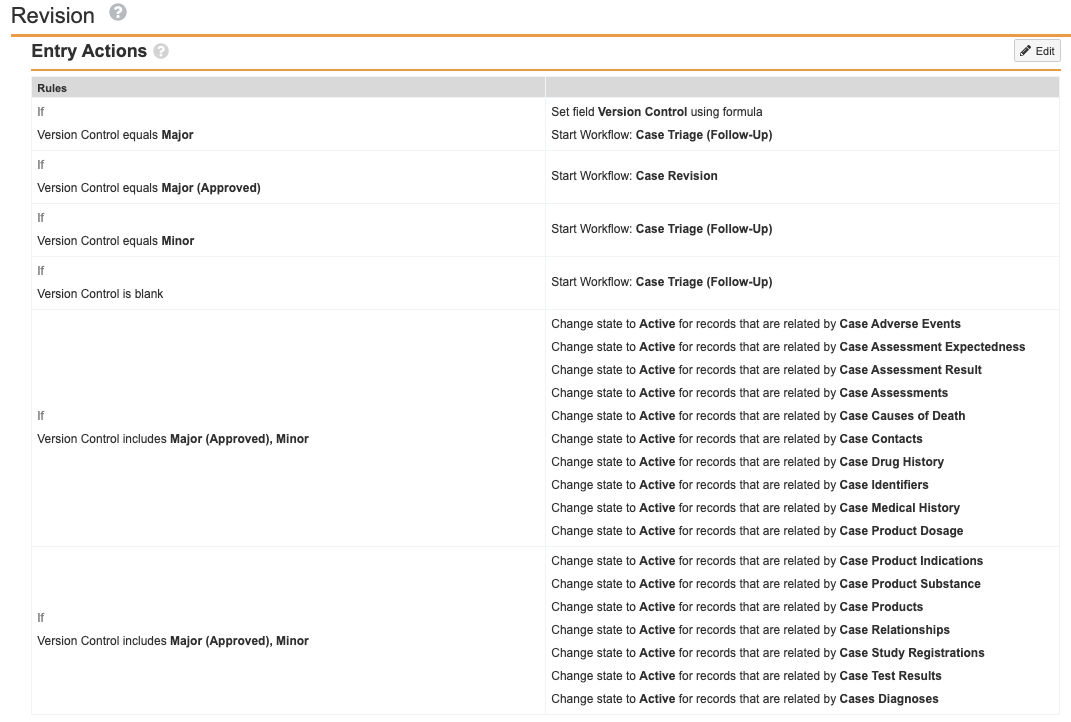
Revision State
Changes were made to entry actions:
- Auto-start of Case Triage (Follow-Up) workflow for Major and Minor version control, including blank.
- Auto-start of Case Data Correction (Revision) workflow for Major (Approved) version control.
- Setting child records to Active state if version control is Minor or Major (Approved).
Approved State
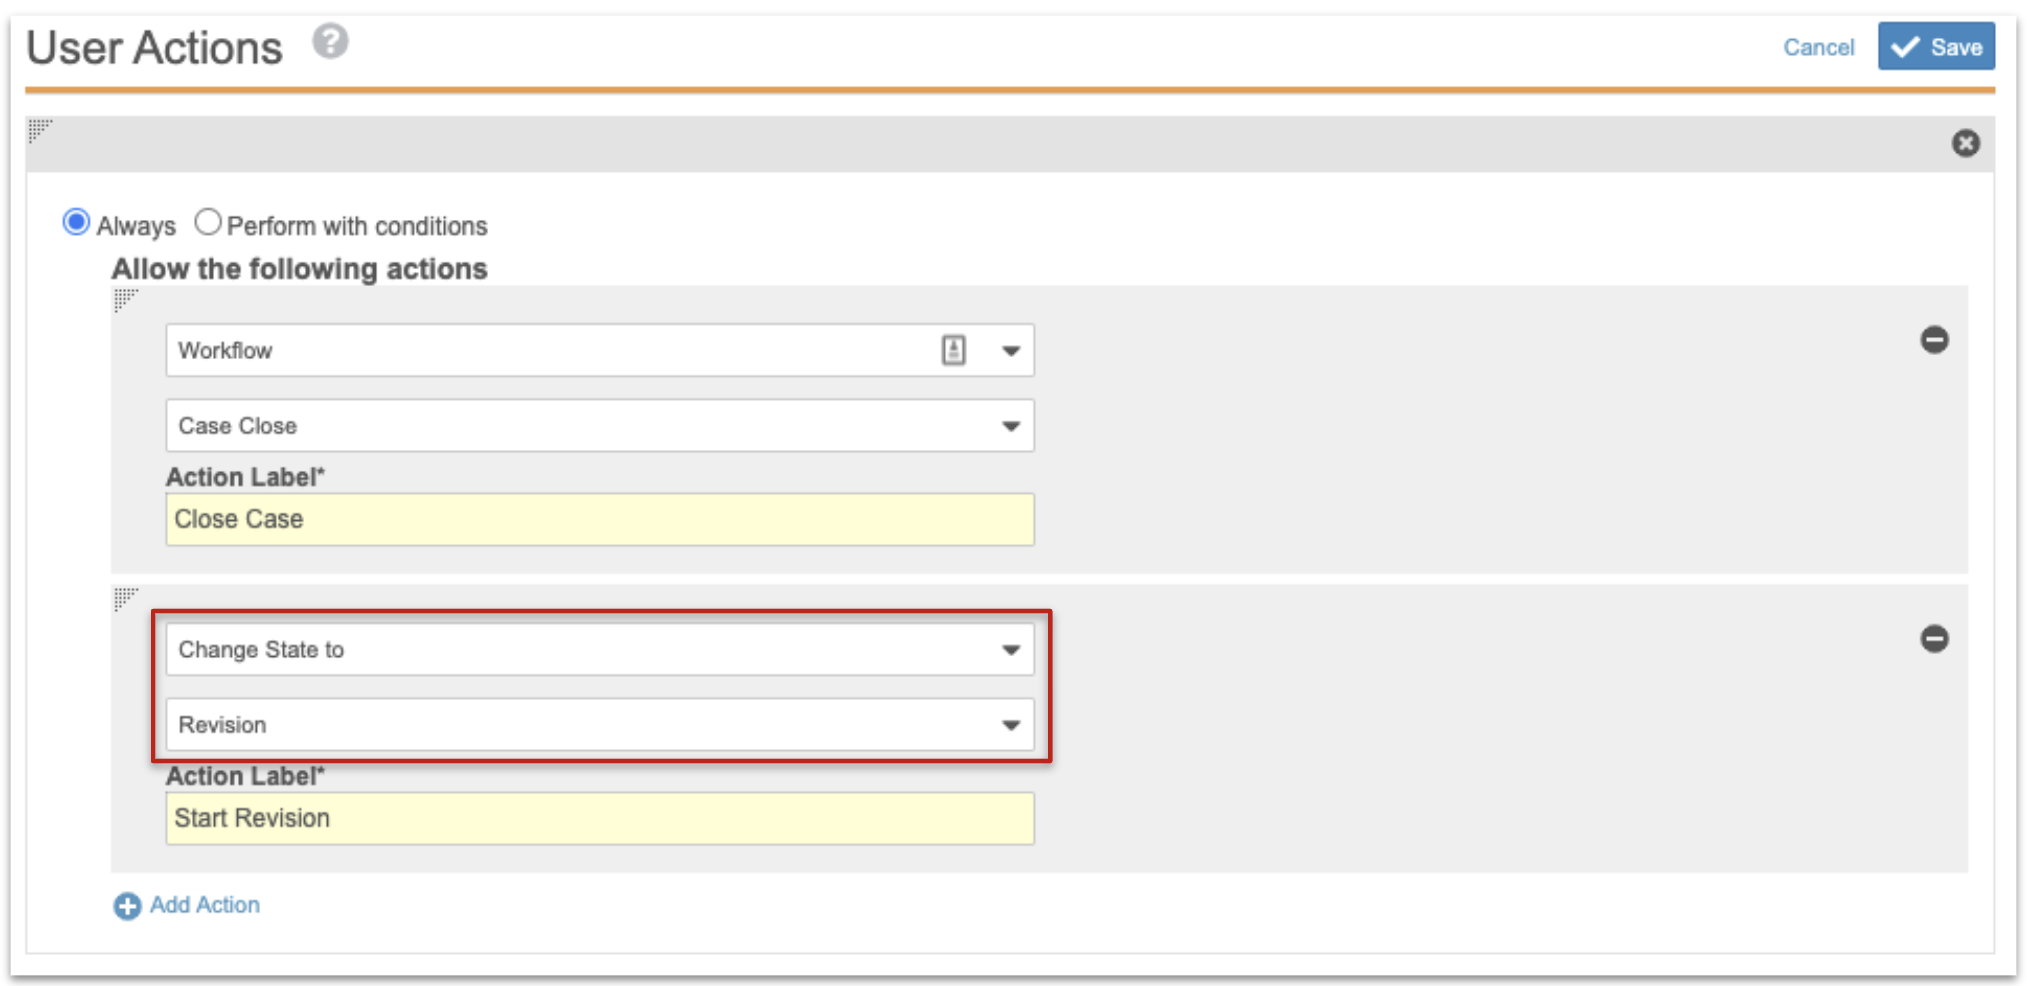
Changes were made to both Entry Actions and User Actions:
- Entry actions sets Version Control to Major (Approved).
- User actions for starting a revision leverages the Revision state (especially for hard-coded blinded case logic).
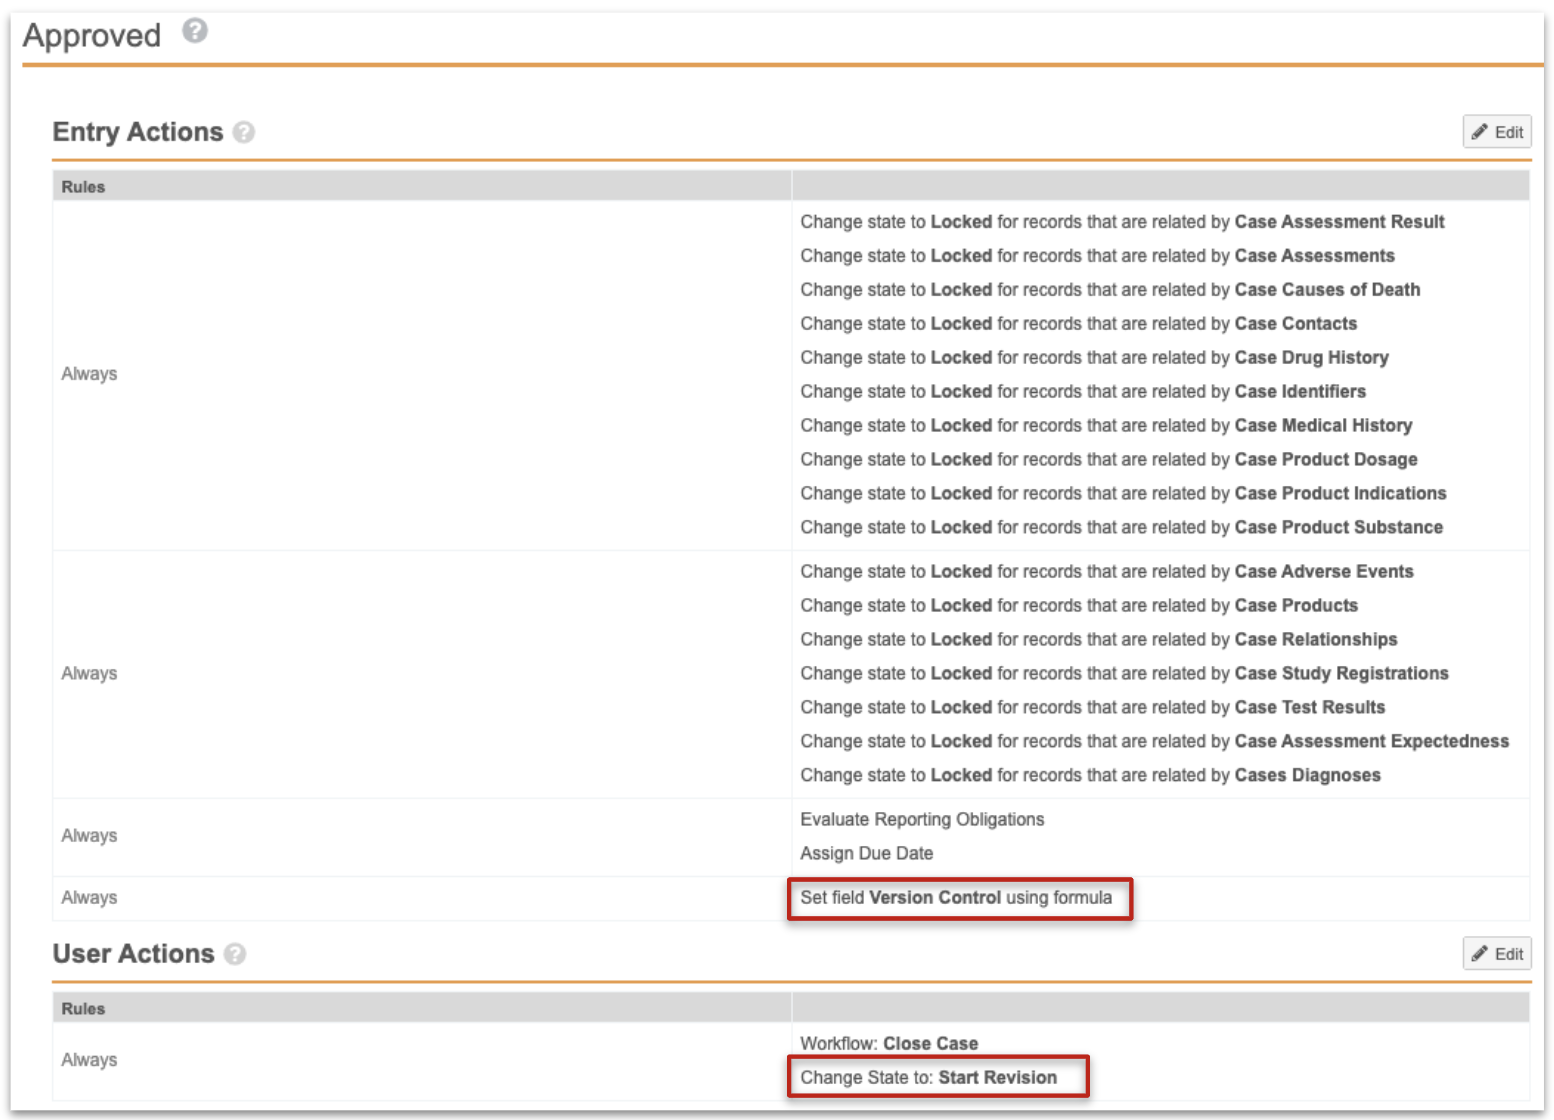

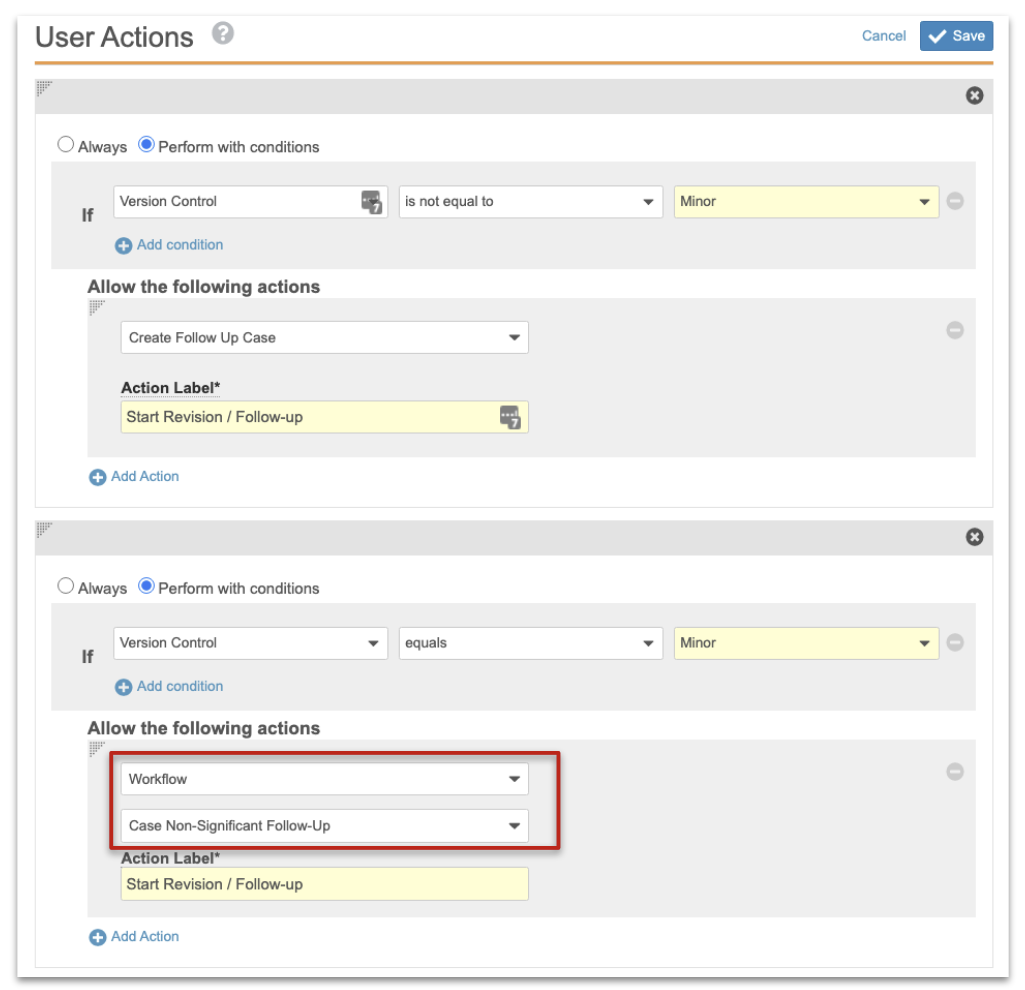
Closed State
Changes were made to both Entry Actions and User Actions:
- Entry actions set Version Control to Major.
- User action for non-significant follow-up leverages the procedural Case Non-Significant Follow-Up workflow.
This workflow simply transitions case to the Revision state.

Permissions
Edit access should be turned on for Approved state for the following application roles:
- Distribution Manager
- Head of Safety
You must enable these users to initiate revision workflow because state changes are dependent on lifecycle role permissions.
Case Workflows
Case Triage (Follow-Up) Workflow
The start step now transitions directly to the Revision task, without any steps in between.

Case Revision Workflow
The start step now transitions directly to the Revision task, without any steps in between.

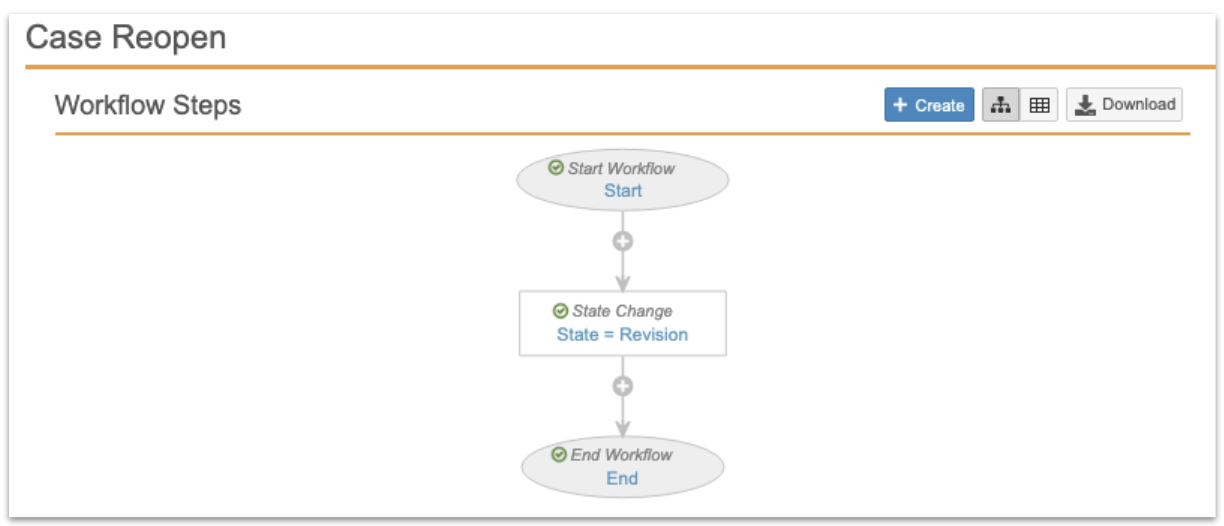
Case Reopen
This procedural auto-start workflow is initiated through an entry action on the Closed state for cases in Minor version control.