Note Beginning with 23R3 content and for all subsequent releases, Vault Release Notes is the official site for Vault Safety release notes.
Vault Safety template revisions include changes to vault configuration for general usability improvements. Template revisions are not automatically rolled out to existing customers.
New vaults created in 22R3 or later will have the following settings by default. Vaults created in an earlier release can optionally be updated to match these changes. The sections on this page provide the instructions to enable these changes.
This page does not cover how to update your template to support new features. The 22R3 New Features page outlines which features require configuration upgrades, and provides links to enablement instructions for each feature.
Grant Edit Access to the Marked as Follow-Up State
Configuration updates have been made to the 22R3 template for the Inbox Item Lifecycle state. Edit permissions were granted to the Marked as Follow-Up state for certain roles so that these users can promote an Inbox Item that was marked for follow-up.
These configuration changes are documented in Enable Merge to In-Flight Case.
Add Administrators as an Editor to the Template Document Type
This configuration allows administrators access to Controlled Document Templates by default.
Perform the following steps to add the Administrator group to the Editor role on the Template Document Type:
- Go to Configuration > Document Types > Template (
template__v). - Go to the Security tab.
- In the Editors field, add Administrators.
- Save the page.
Update Deletion Rules for Case Children Objects
Use the table and configuration steps below to set the Deletion Rules to Cascade delete children records for certain Case children objects. This ensures that when you delete an object record, the system also deletes any object records that have the deleted record as their parent.
Configurable object Deletion Rules is a Vault Platform capability. See Vault Help for more information.
- Go to Configuration > Objects > [object] > Fields tab > [field].
The following table displays the objects and the respective object fields for which to perform the configuration:Object Field Case Product Dosage Case Product Case Product Indication Case Product Substance Case Assessment Result Case Assessment Case Assessment Expectedness Localized Case Adverse Event Localized Case Localized Case Assessment Localized Case Cause of Death Localized Case Comment Localized Case Contact Localized Case Document Localized Case Drug History Localized Case Identifier Localized Case Medical History Localized Case Product Localized Case Test Result Localized Case Assessment Result Localized Case Assessment Localized Case Product Dosage Localized Case Product Localized Case Product Indication Localized Case Product Substance Transmission Message Transmission Transmission System Log - In the Deletion Rules field, select Cascade delete children records.
- Save the page.
(Optional) Update Submission Workflows and Lifecycles
Configuration updates have been made to the 22R3 template to consolidate Submission workflows and simplify workflow administration.
This is not required configuration. It is an enhancement to support administration.
Create the Transmission Manual Submission Workflow
- Go to Configuration > Workflows and create an Object Workflow.
- Complete the Details section with the following information:
- Label: Transmission: Manual Submission
- Name:
transmission_manual_submission__c - Lifecycle: Transmission Lifecycle
- Save the page.
- Complete the Start step with the following information before saving the page:
- Next Steps: Create Step > Task: Review Transmission
- Complete the Task: Review Transmission step using the following information before saving the page:
- Type: Task
- Next Steps: Create Step > Decision: Regenerate
- Task Label: Review Transmission
- Assign Task To: Distribution Manager
- Select Make available to users in participant group.
- Instructions: Review transmission record and related documents. If necessary, modify the record and regenerate the documents.
- Task Requirement: Required
- Due Date: Due Date > - > 2 Days
- Select Update active task due date when date field is updated.
- Prompts: Prompt for Verdicts
- Verdicts:
- Verdict Label: Ready for Submission
- Verdict Label: Regenerate Files
- Verdict Label: Withdraw
- Verdicts:
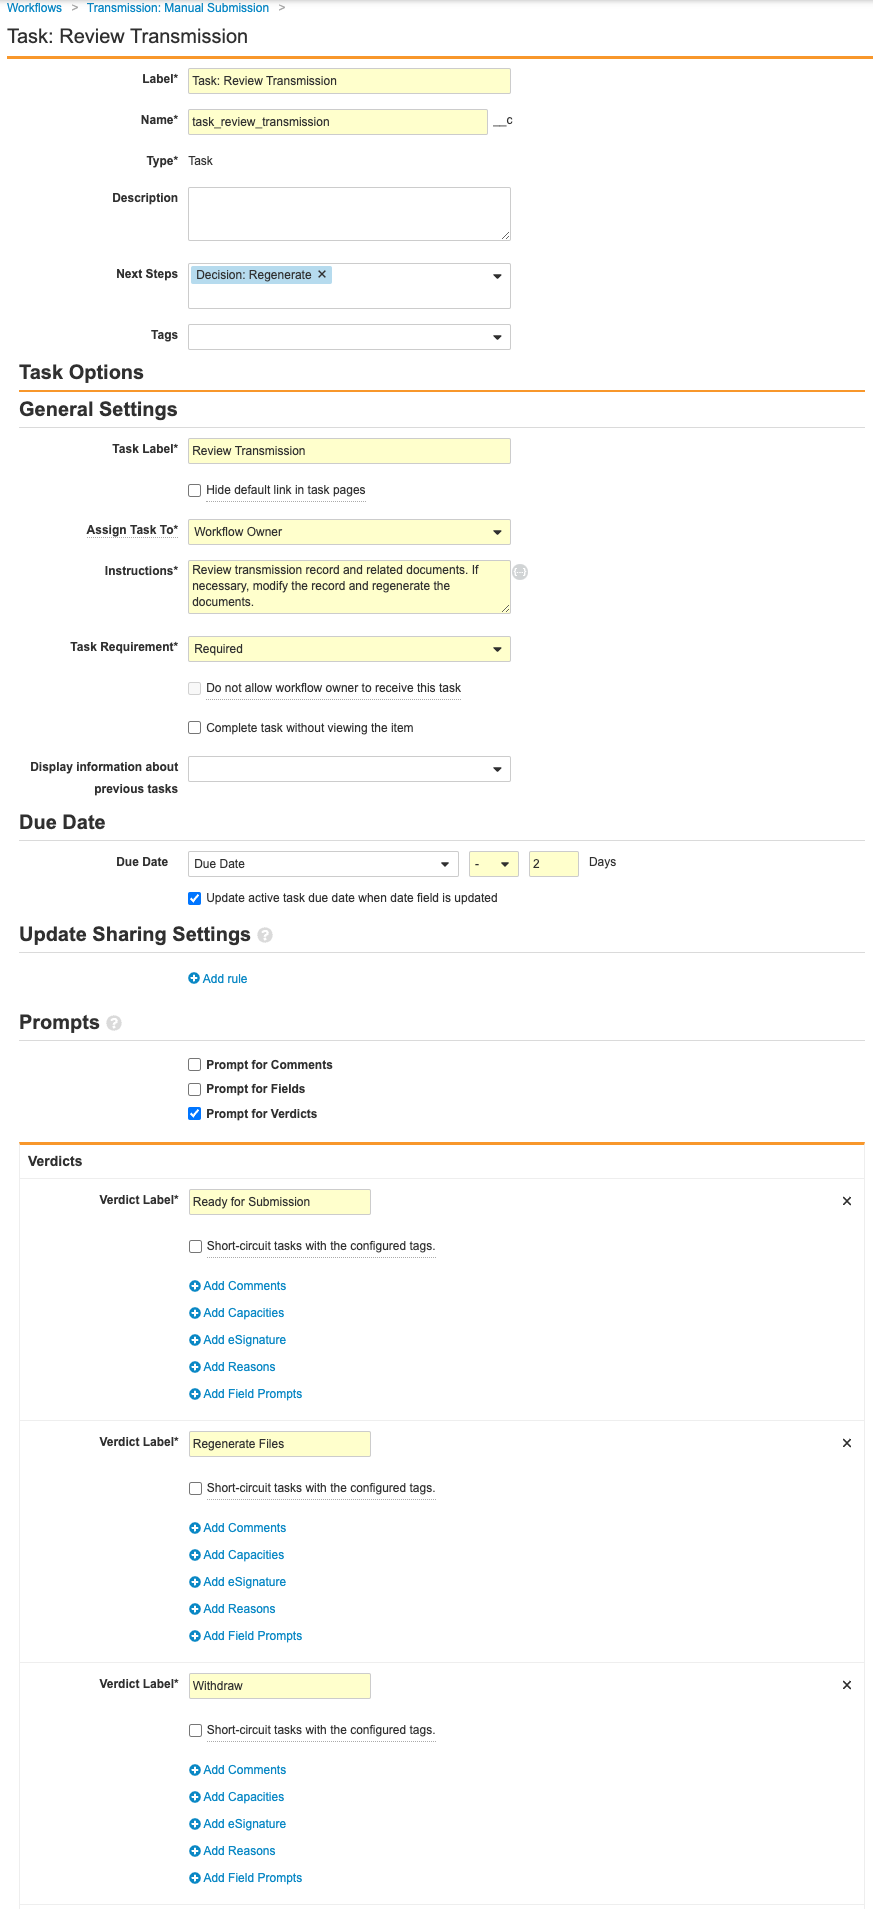
Transmission: Manual Submission Workflow Review Transmission Task - Complete the Decision: Regenerate step with the following information before saving the page:
- Type: Decision
- Rules: Create Rule > Perform with conditions
- If: Task > Task: Review Transmission > at least one label equals > Regenerate Files
- Then: Create Step > State Change > Pending
- Create Rule > If: Task > Task: Review Transmission > at least one label equals > Withdraw
- Then: Change State: Withdrawn
- Else: Create Step > Change State: Ready
- If: Task > Task: Review Transmission > at least one label equals > Regenerate Files
- Select the State Change: Pending step and complete the following information before saving the page:
- Type: Action
- Next Steps: End
- Rules: Create Rule > Always > Change State > Pending
- Select the Change State: Ready step and complete the following information before saving the page:
- Type: Action
- Next Steps: Create Step > Task: Submit
- Rules: Create Rule > Always > Change State > Ready for Submission.
- Complete the Task: Submit step using the following information before saving the page:
- Type: Task
- Next Steps: Create Step > Change State: Complete
- Task Label: Submit ICSR
- Assign Task To: Distribution Manager
- Select Make available to users in participant group.
- Instructions: Submit the documents for ${Object.case_version__v} to ${Object.destination__v}
- Task Requirement: Required
- Due Date: Due Date > + > 0 Days
- Select Update active task due date when date field is updated.
- Prompts: Prompt for Fields
- Fields:
- Transmission Date > select Required
- Destination Case ID
- Fields:
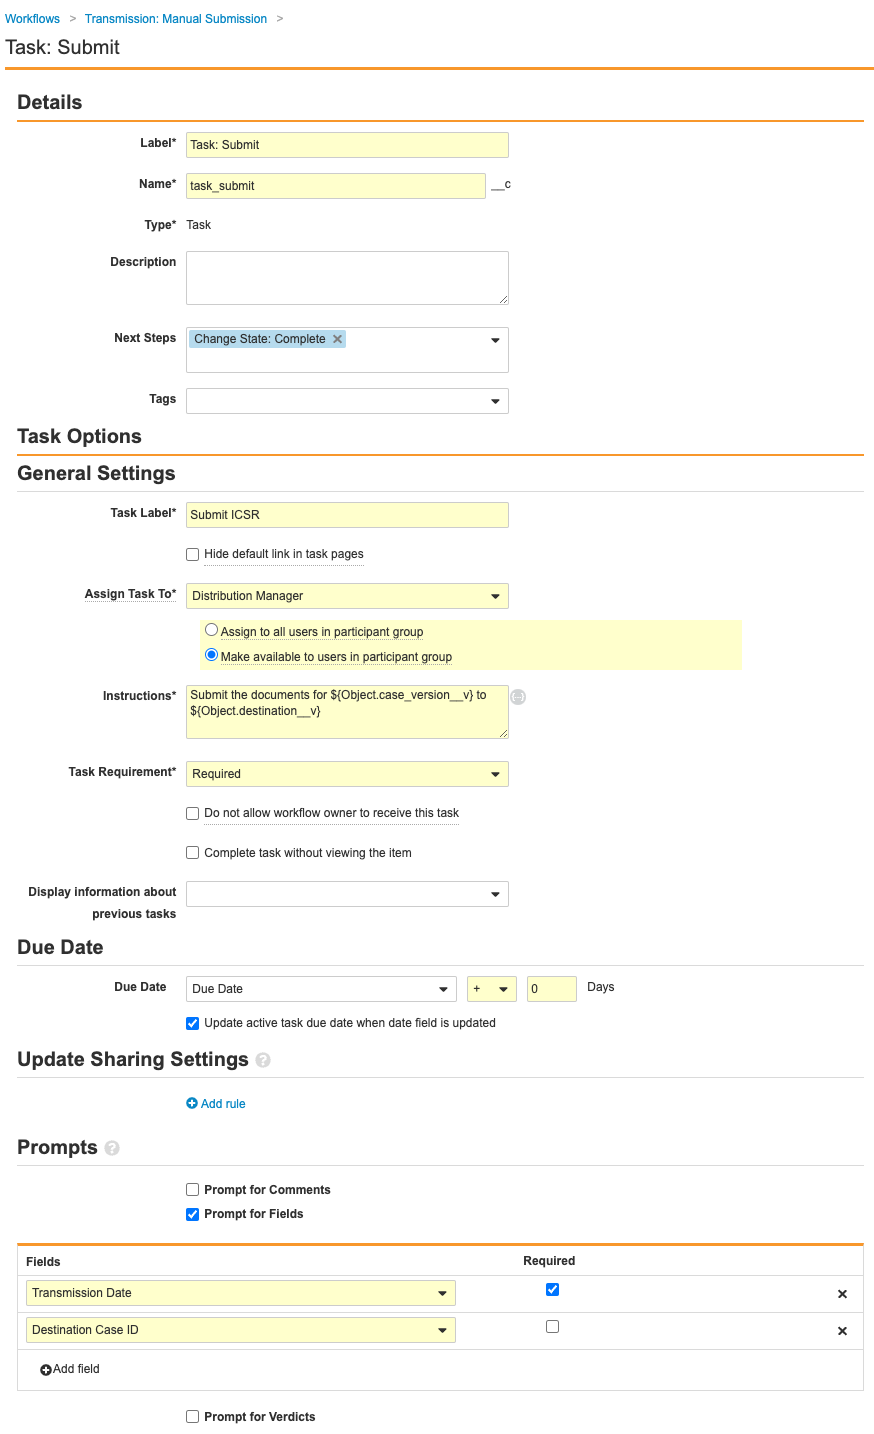
Transmission: Manual Submission Submit Task - Select the Change State: Complete step and complete the following information before saving the page:
- Type: Action
- Next Steps: End
- Rules: Create Rule > Always > Change State > Completed
- Select the Change State: Withdrawn step and complete the following information before saving the page:
- Type: Action
- Next Steps: End
- Rules: Create Rule > Always > Change State > Withdrawn
- Double check your workflow using the image below:
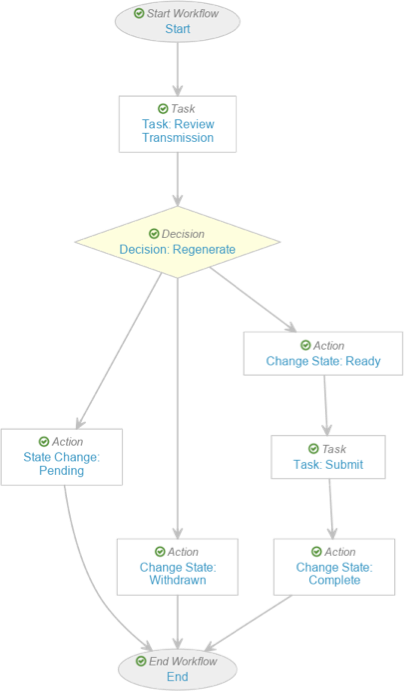
Transmission: Manual Submission Workflow - Select Allow auto-start from entry action and event action and then Make Configuration Active.
Create the Transmission Gateway Workflow
- Go to Configuration > Workflows and create an Object Workflow.
- Complete the Details section with the following information:
- Label: Transmission: Gateway
- Name:
transmission_gateway__c - Lifecycle: Transmission Lifecycle
- Save the page.
- Complete the Start step with the following information before saving the page:
- Next Steps: Create Step > Task: Review Transmission
- Control: Participants >
- Participant Label: Distribution Manager
- Select Use roles as participants
- Roles allowed to participate: Distribution Manager
- Complete the Task: Review Transmission step using the following information before saving the page:
- Type: Task
- Next Steps: Create Step > Decision: Gateway or Manual?
- Task Label: Review Transmission
- Assign Task To: Distribution Manager
- Select Make available to users in participant group.
- Instructions: Review transmission for case ${Object.case_version__v} and related documents. If necessary, modify the record and regenerate the documents.
After task completion the submission will be send to the Gateway. - Task Requirement: Required
- Due Date: Due Date > - > 1 Days
- Select Update active task due date when date field is updated.
- Prompts: Prompt for Verdicts
- Verdicts:
- Verdict Label: Submit via Gateway
- Verdict Label: Submit Manually
- Verdict Label: Withdraw
- Verdicts:
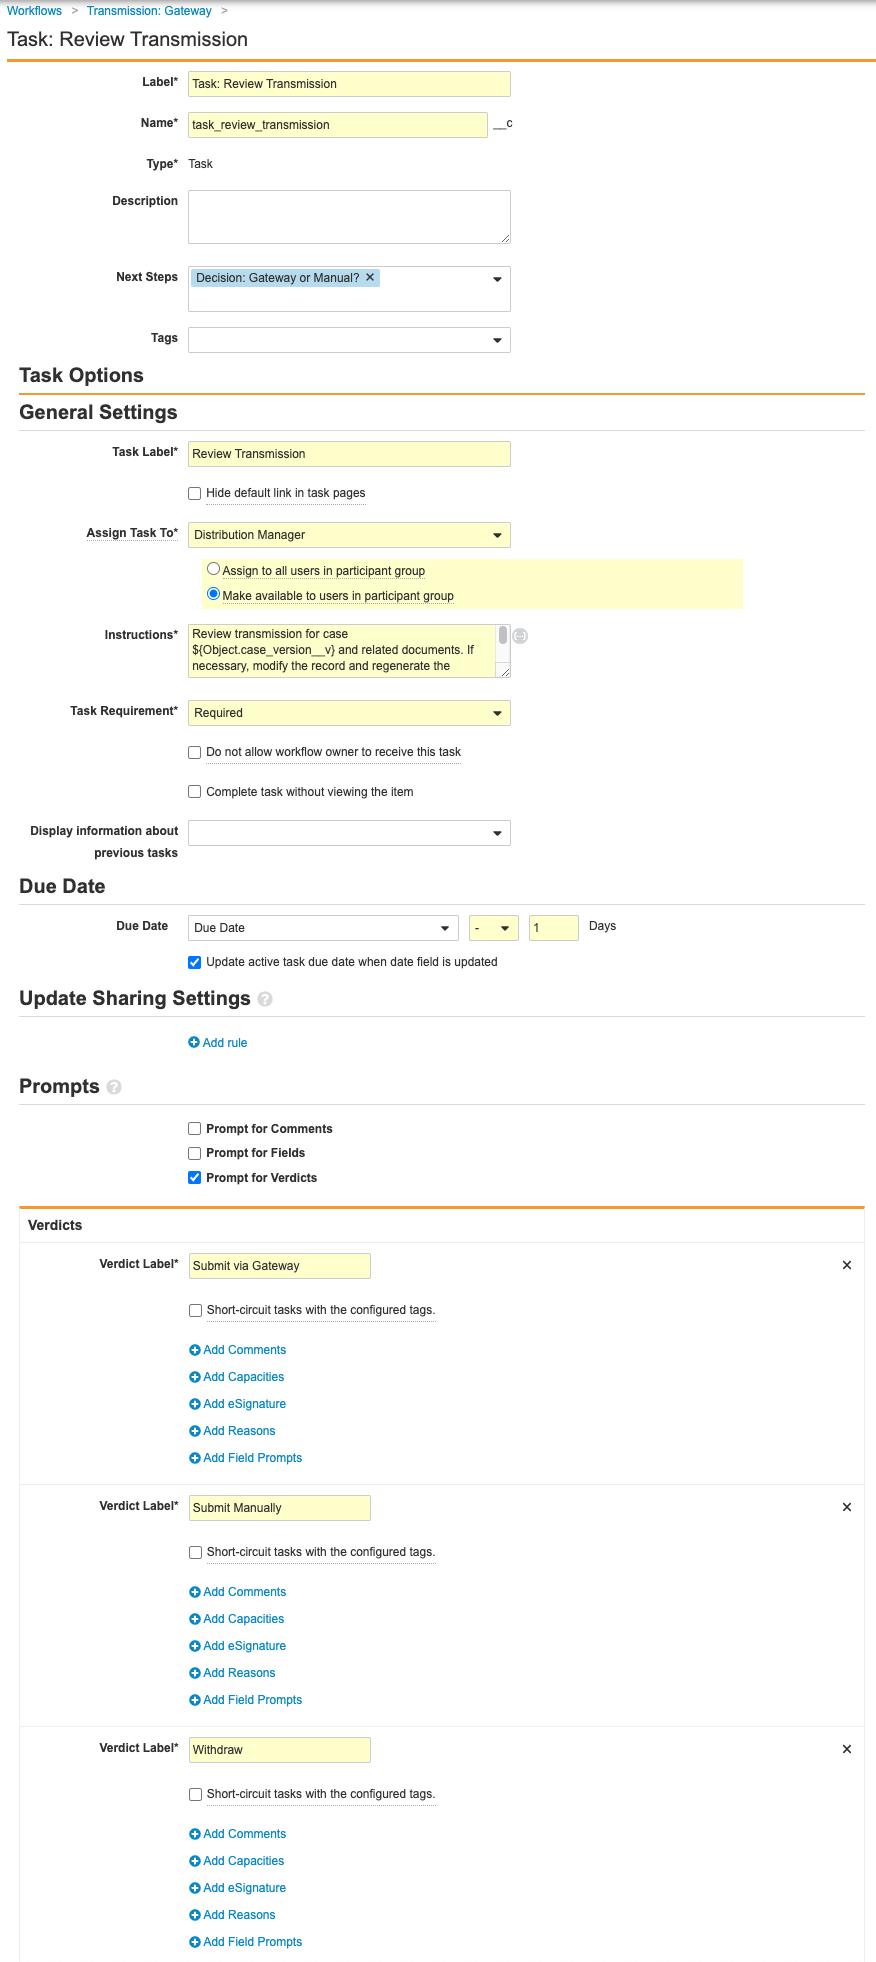
Transmission: Gateway Workflow Review Transmission Task - Complete the Decision: Gateway or Manual? step with the following information before saving the page:
- Type: Decision
- Rules: Create Rule > Perform with conditions
- If: Task > Task: Review Transmission > at least one label equals > Submit via Gateway
- Then: Create Step > State Change: Submit
- Create Rule > If: Task > Task: Review Transmission > at least one label equals > Withdraw
- Then: Change State: Withdrawn
- Else: Create Step > Change State: Ready
- If: Task > Task: Review Transmission > at least one label equals > Submit via Gateway
- Select the State Change: Ready for Submission step and complete the following information before saving the page:
- Type: Action
- Next Steps: Create Step > Task: Submit Manually
- Rules: Create Rule > Always > Change State > Ready for Submission
- Select the Task: Submit Manually step and complete the following information before saving the page:
- Type: Task
- Next Steps: Create Step > Change State: Complete
- Task Label: Submit Transmission
- Assign Task To: Distribution Manager
- Select Make available to users in participant group.
- Instructions: Submit the documents for ${Object.case_version__v} to ${Object.destination__v}
- Task Requirement: Required
- Due Date: Due Date > + > 0 Days
- Select Update active task due date when date field is updated.
- Prompts: Prompt for Fields
- Fields: Transmission Date > Select Required
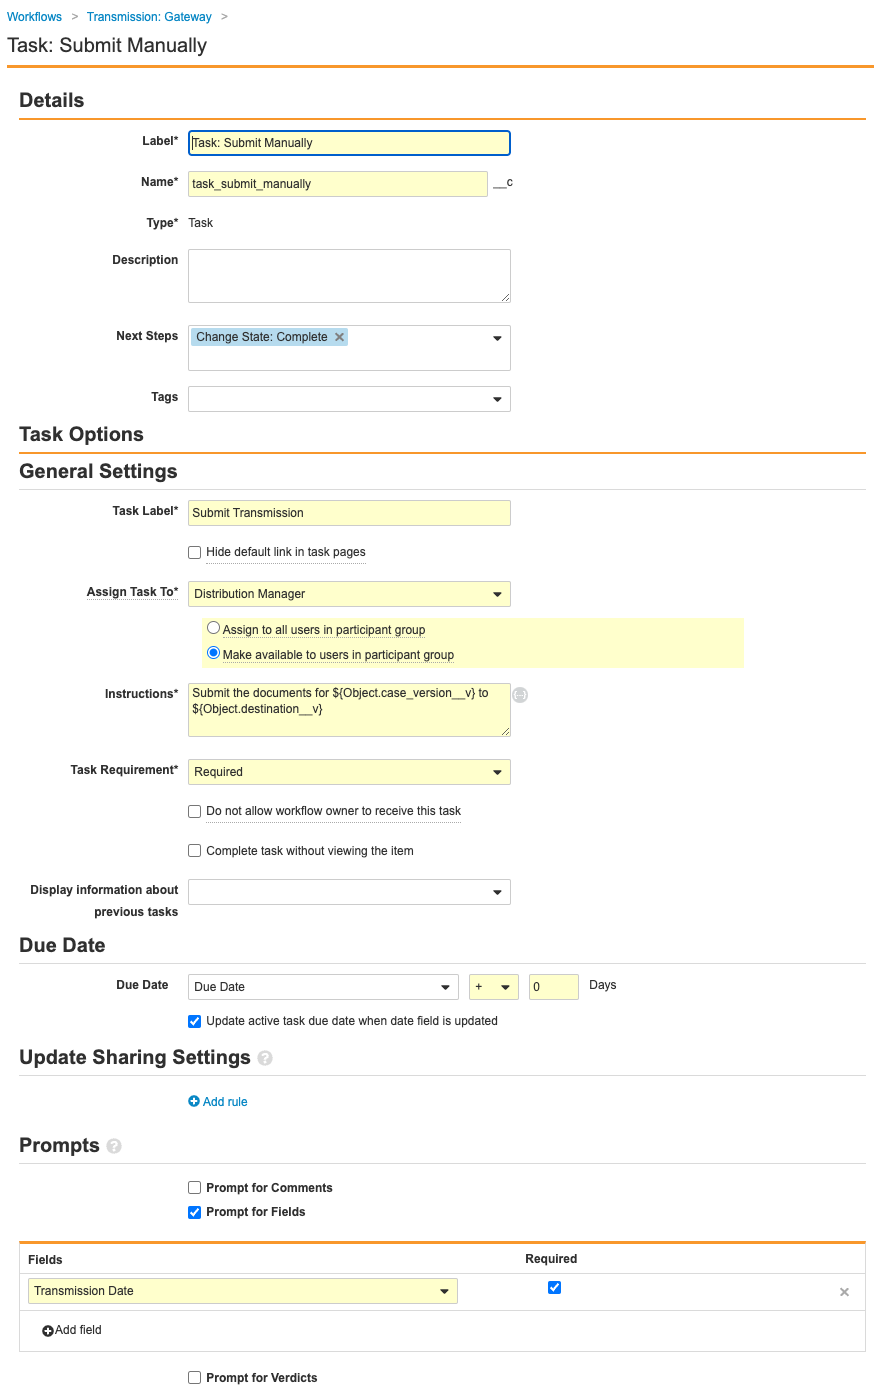
Transmission: Gateway Submit Manually Task - Complete the Change State: Complete step using the following information before saving the page:
- Type: Action
- Next Steps: End
- Rules: Always > Change State > Completed
- Select the Change State: Complete step and complete the following information before saving the page:
- Type: Action
- Next Steps: End
- Rules: Create Rule > Always > Change State > Completed
- Select the Change State: Withdrawn step and complete the following information before saving the page:
- Type: Action
- Next Steps: End
- Rules: Create Rule > Always > Change State > Withdrawn
- Double check your workflow using the image below:
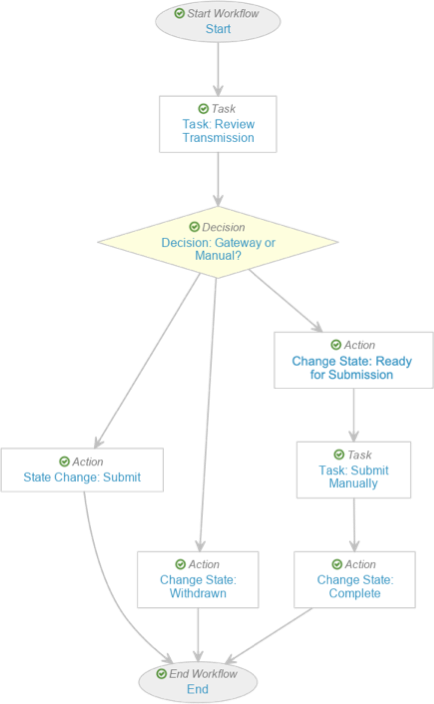
Transmission: Gateway Workflow - Select Allow auto-start from entry action and event action and then Make Configuration Active.
Create the Transmission Withdraw Workflow
- Go to Configuration > Workflows and create an Object Workflow.
- Complete the Details section with the following information:
- Label: Transmission: Withdraw
- Name:
transmission_withdraw__c - Lifecycle: Transmission Lifecycle
- Save the page.
- Select the Start step and complete the following information before saving the page:
- Next Steps: Create Step > Task: Provide Reason
- Select the Task: Provide Reason step and complete the following information before saving the page:
- Type: Task
- Next Steps: Create Step > Change State: Withdrawn
- Task Label: Provide Reason
- Assign Task To: Workflow Owner
- Instructions: Provide a reason for this Submission withdrawal.
- Task Requirement: Required
- Prompts: Prompt for fields
- Fields: Reason Text > select Required
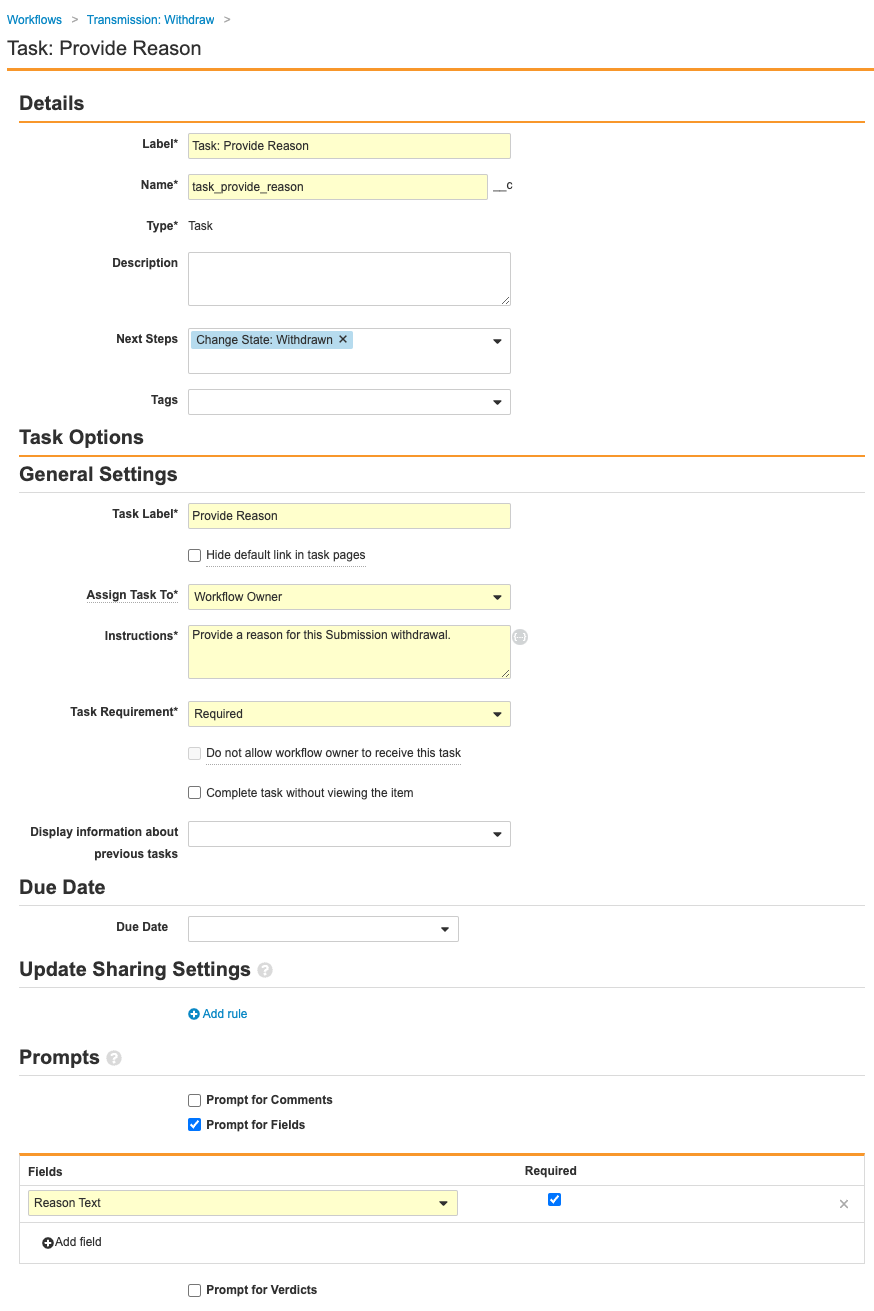
Transmission: Withdraw Provide Reason Task - Select the Change State: Withdrawn step and complete the following information before saving the page:
- Type: Action
- Next Steps: End
- Rules: Create Rule > Always > Change State > Withdrawn
- Double check your workflow using the image below:
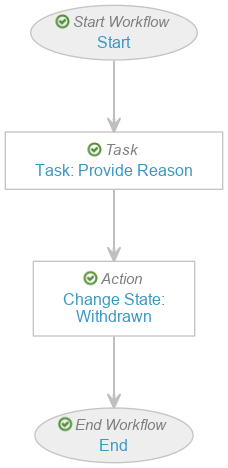
Transmission: Withdraw Workflow - Select Make Configuration Active.
Delete Workflows
Certain workflows were deprecated and removed from the 22R3 template.
To delete a workflow, go to Configuration > Workflows. Then, select Delete from the All Actions menu that appears next to the workflow upon hovering over it. Delete the following workflows:
distribution_manual__csubmission_manual_submission__csubmission_fda_esg_workflow__csubmission_ema_eudravigilance_workflow__cdistribution_as2_gateway__c
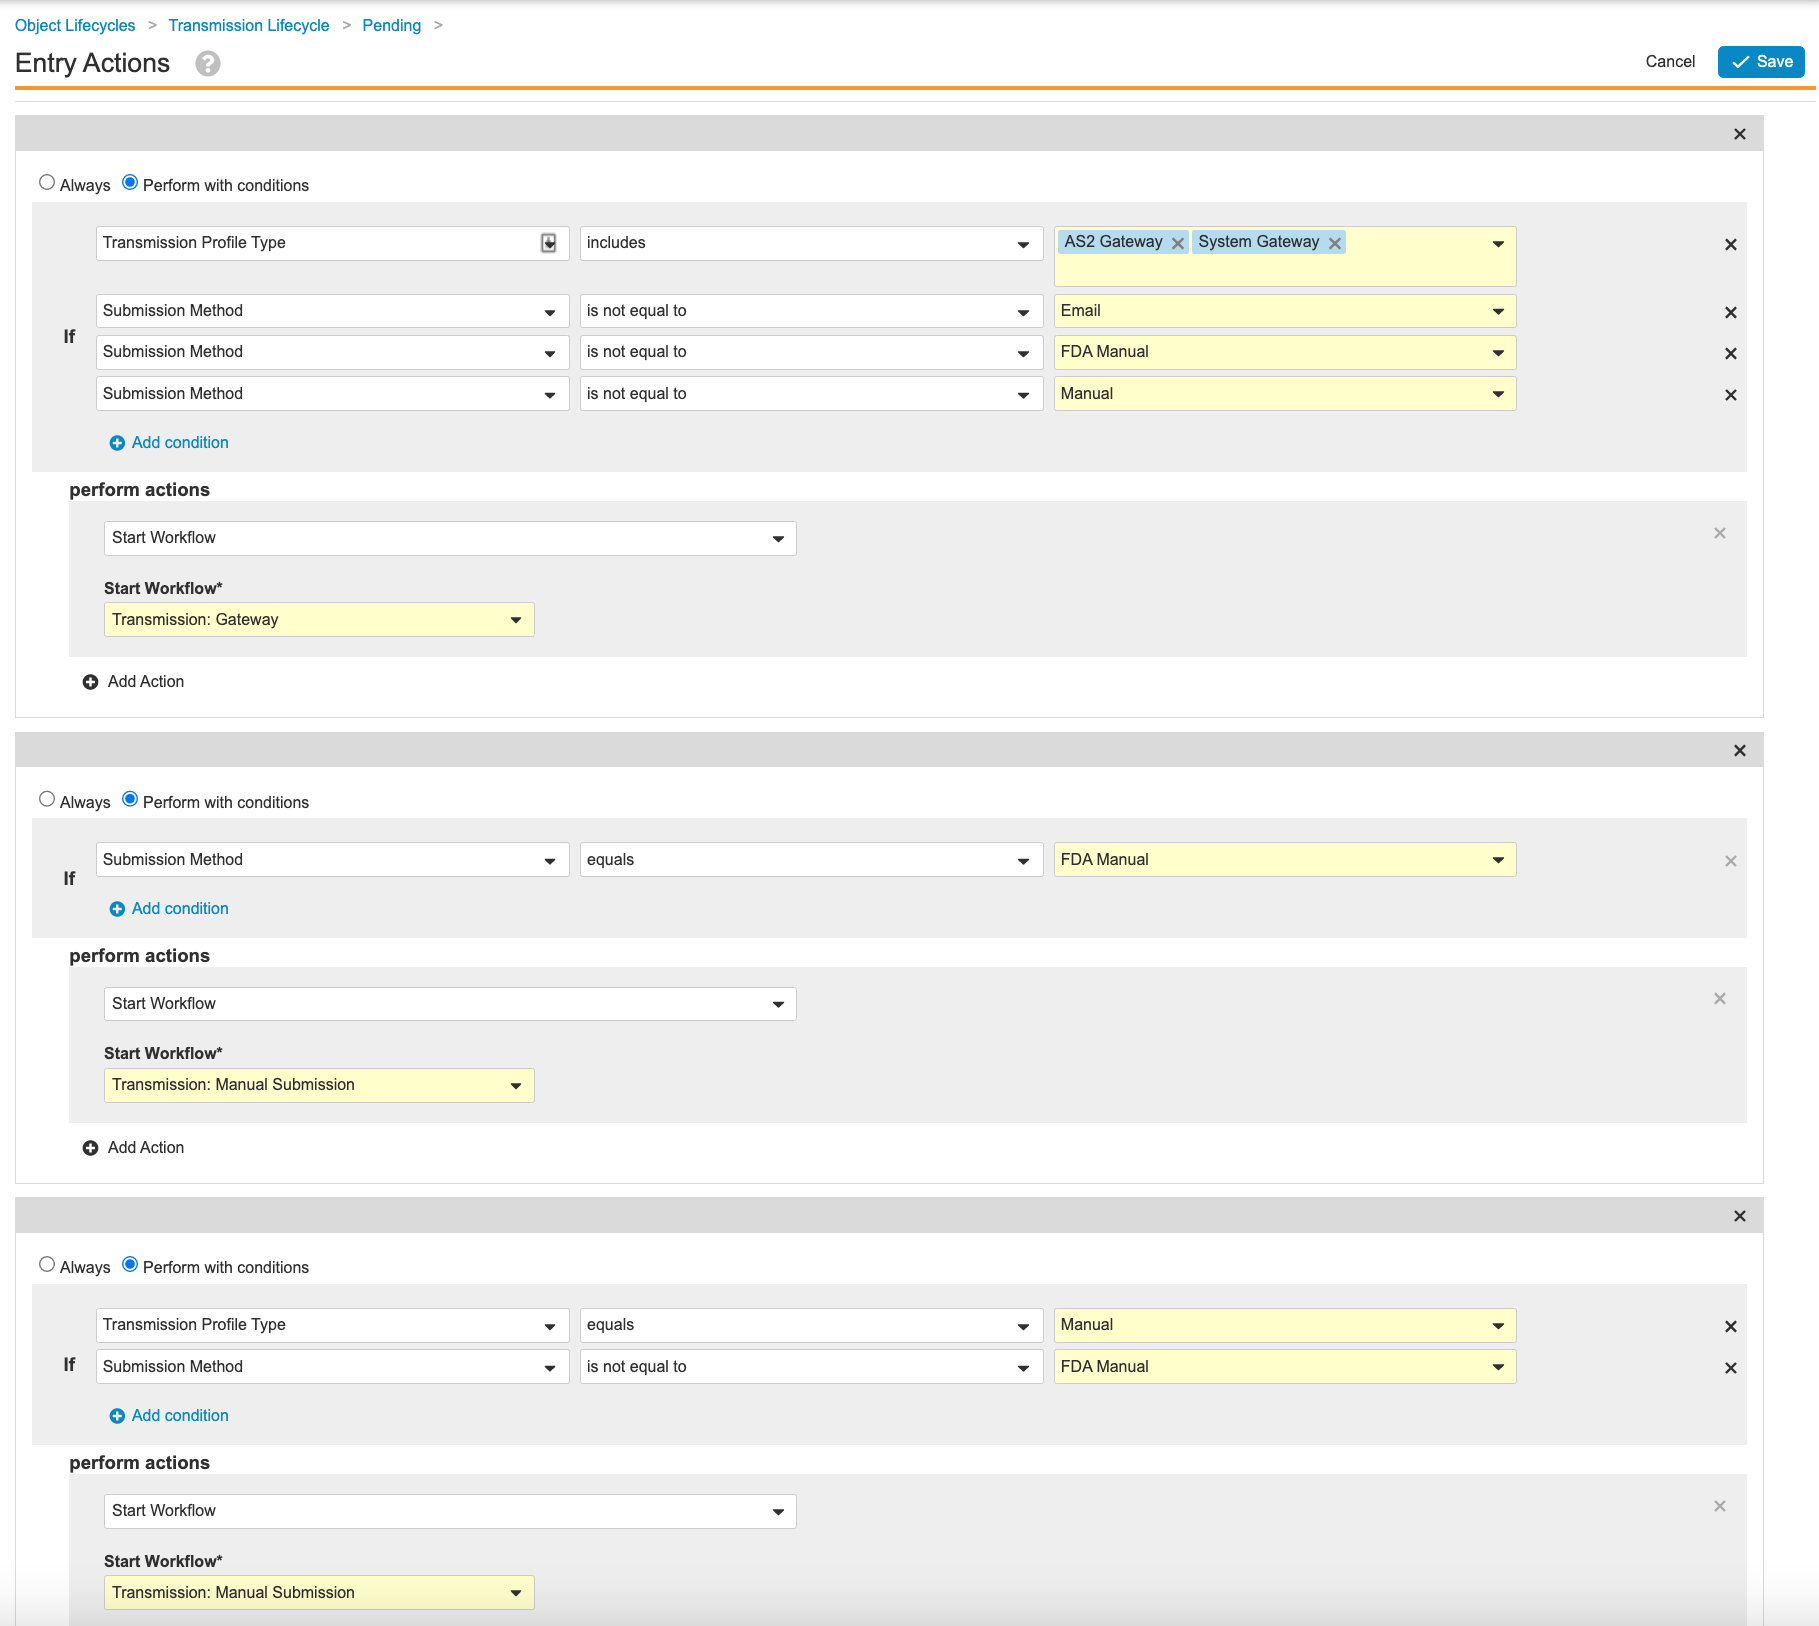
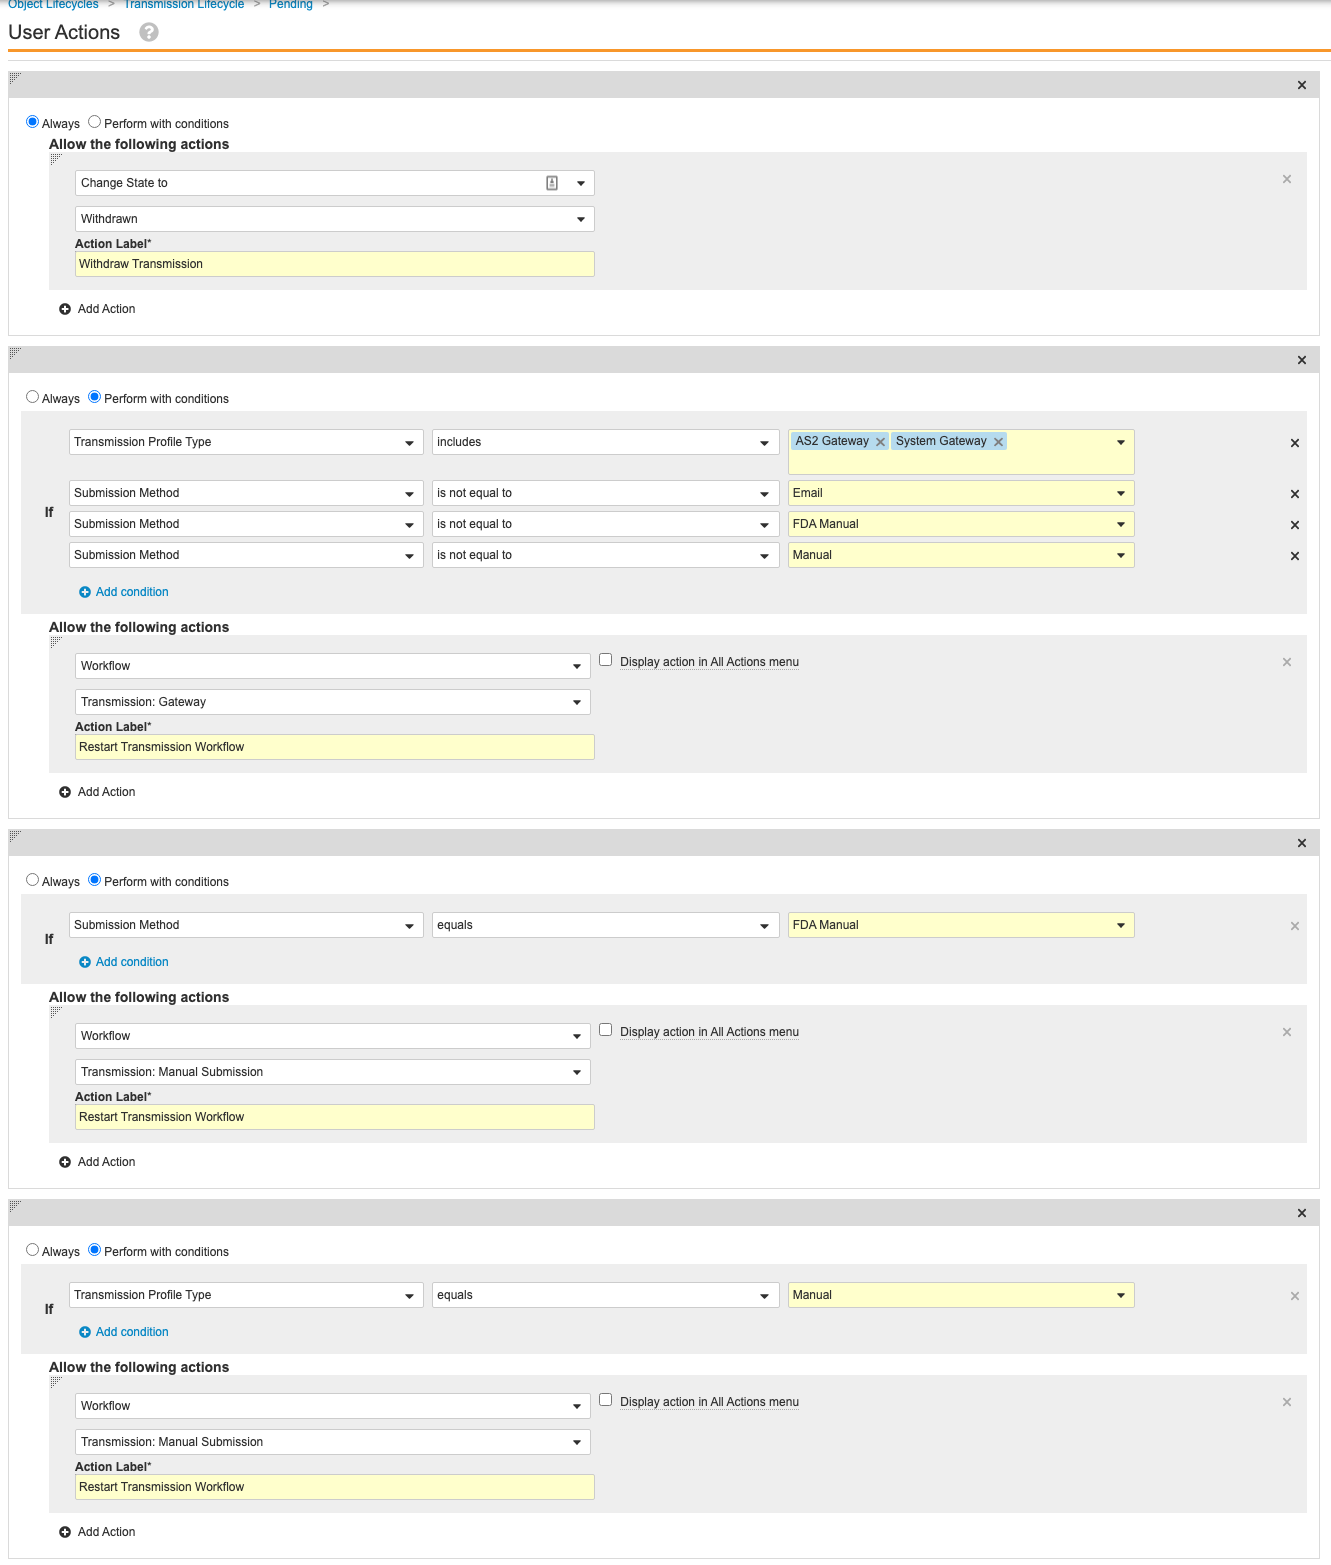
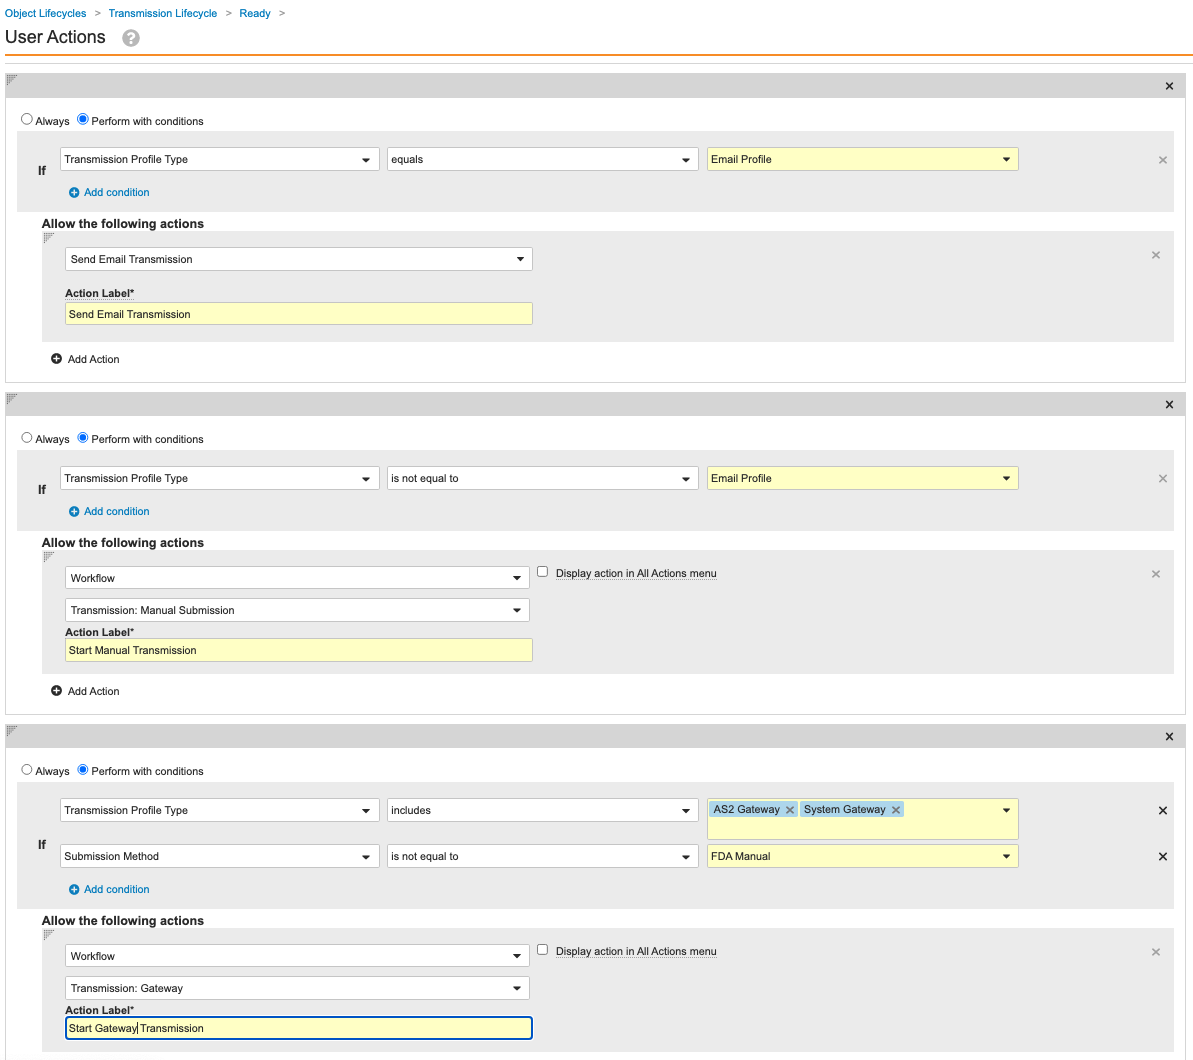
Update the Transmission Lifecycle Entry and User Actions
Go to Configuration > Object Lifecycles > Transmission Lifecycle. Use the following images to update the Entry and User Actions for the following states:
- Pending
- Ready
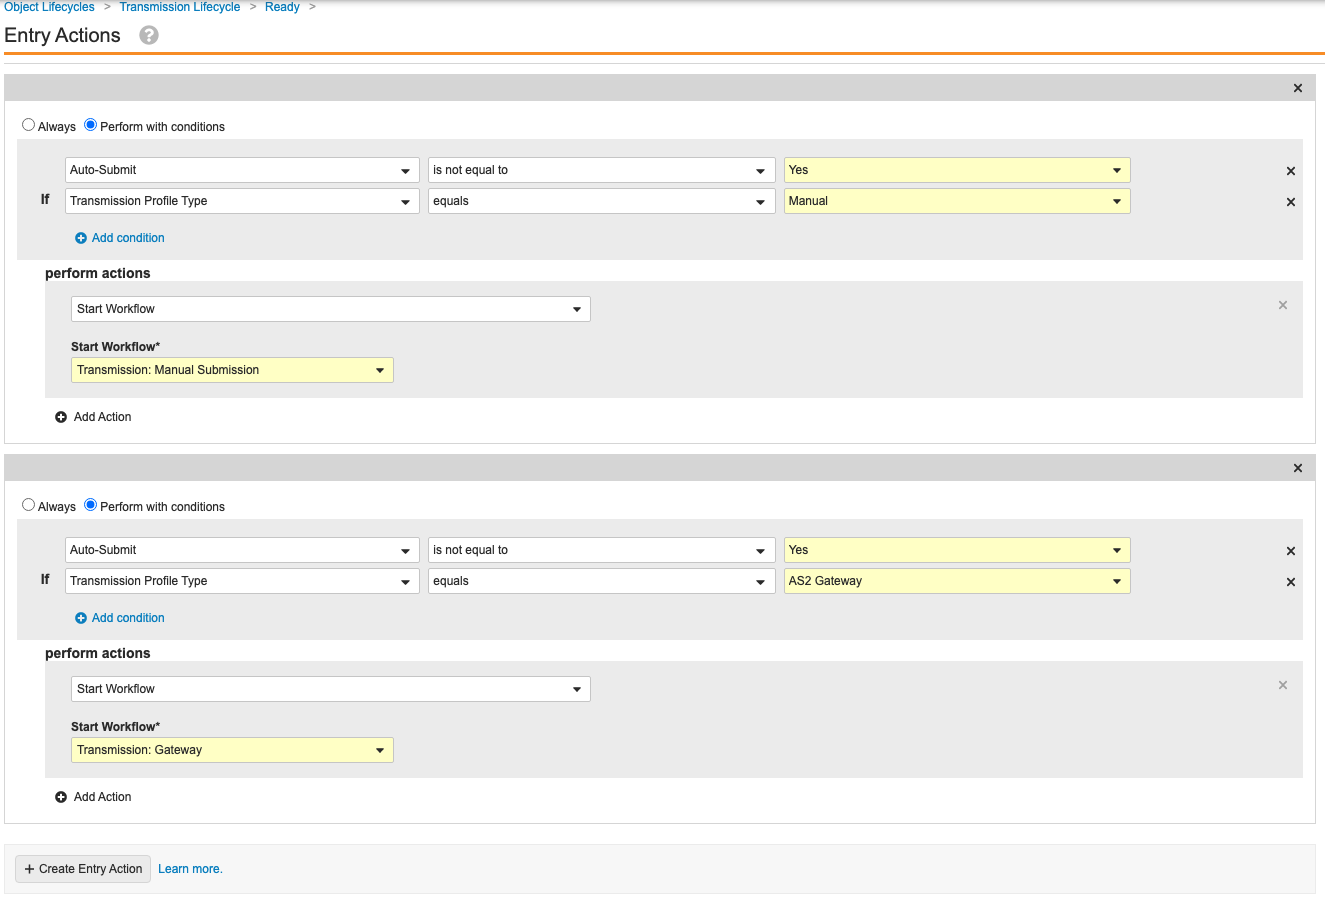
Configure Auto-Submit for Transmission Profiles
Set Auto-Submit to No for the out-of-the-box Transmission Profiles. Configuring auto-submit and updating the Ready state in the previous section prevents Gateway Transmissions from automatically starting. This will result in generated Transmissions to go to the “Ready” state instead of the “Pending” state.
To do this, go to Business Admin > Transmission Profiles. Select the appropriate Transmission Profiles and go to the Outbound Settings section. Update the Auto-Submit field to No and save the page.
Update Workflow Task Due Dates
This enhancement allows task due dates to update dynamically as the Case due date updates over the course of Case processing.
Perform this configuration for certain workflows by going to Configuration > Workflows > [workflow]. Select the task steps. Then, in the Due Date section, select the Update active task due date when field is updated checkbox.
Use the following table to perform this configuration for the appropriate workflow tasks and ensure the Due Date fields are populated as shown:
| WORKFLOW | WORKFLOW TASK | DUE DATE |
|---|---|---|
Case Close (case_close__c) |
Case Closure | Due Date + 0 Days |
Case Entry (case_entry__c) |
Case Entry | Task Creation Date + 2 Days |
| Seriousness Required | Task Creation Date + 1 Days | |
| QC | Due Date - 5 Days | |
| Approval (Non-Expedited) | Due Date - 2 Days | |
Case Transmission Error (case_transmission_error_state_workflow__c) |
Review Case Transmission Error | Due Date - 1 Days |
Case Triage (case_triage__c) |
Triage (w/ Seriousness Criteria) | New Info + 2 Days |
| Triage (w/o Seriousness Criteria) | New Info + 5 Days | |
Case Review (case_review__c) |
Medical Review | Due Date - 3 Days |
| Medical Review (Blinded) | Due Date - 3 Days | |
| Medical Review (Not Blinded) | Due Date - 3 Days | |
| Approval | Due Date - 2 Days | |
Case Revision (case_revision__c) |
Revision | Due Date - 5 Days |
| QC | Due Date - 2 Days | |
| Approval | Due Date - 2 Days | |
Case Unblinding (case_unblinding__c) |
Unblinding (Study Arm) | Workflow start + 2 Days |
| Unblinding | Task Creation + 2 Days | |
| Approval | Due Date - 2 Days | |
Case Triage (Follow-Up) (case_triage_followup__c) |
Revision | Workflow Start + 2 Days |
| Triage (Non-Expedited) | Due Date - 7 Days | |
| Triage (Expedited) | Due Date - 4 Days |
Update the Case Triage and Case Triage (Follow-Up) Workflows
This enhancement clarifies how access should work for the Triage workflow. Perform the steps below to remove the Owner role from the Start step on the following workflows:
- Case Triage
- Case Triage (Follow-Up)
- Go to Configuration > Workflows > [workflow].
- Select the Start step.
- In the Roles allowed to participate field, remove Owner.
- Save the page.
- Repeat the above steps for the other workflow.
Update Async Submit to Gateway Configuration
The Async Submit to Gateway Action is being added to Cases. It should be used over the synchronous version to improve system performance. This is only necessary if you use Auto-Submissions.
Perform the following steps to create a new state and state type for the Transmission Lifecycle.
- Go to Configuration > Object Lifecycles > Transmission Lifecycle.
- In the States section, select Create and complete the following information:
- State Label: Queued for Submission
- State Name:
queued_state__c
- In the State Types section, select Create and complete the following information:
- State Type: Queued State
- State: Queued for Submission
Perform the following steps to add the Async Submit to Gateway action to the Case object:
- Go to Configuration > Objects > Case > Actions tab.
- Select Create > Submit to Gateway and complete the following information:
- Label: Submit to Gateway
- Name:
async_submit_to_gateway__c
- Save the page.
Note To enable the Async Submit to Gateway action, you must set the Auto-Submit field to Yes for the appropriate Transmission Profiles and configure the Submit to Gateway action on the Case lifecycle.
Replace Medical History Text (RO) Field on Case Page Layout
The Medical History Text (reason omitted) field was replaced by the Medical History Text app control field in the 22R3 Template. This app control improves the data entry experience.
Perform the following configuration:
- Go to Configuration > Objects > Case > Page Layouts tab > Case Page Layout.
- Go to the Patient section.
- Replace the Medical History Text (reason omitted) field with the Medical History Text app control field.
- Save the page.
Add the Local Expedited Criteria to the Submission Page Layout
This enhancement allows users to manually set the Local Expedition on Transmissions. This is helpful when diagnosing Case inclusion in PADER reports.
Perform the following steps to add the Local Expedited Criteria field to the Submission page layout:
- Go to Configuration > Objects > Transmission > Page Layouts tab > Submission Detail Page Layout.
- In the Details section, add the Local Expedited Criteria field.
- Save the page.
Update Organization Page Layouts
This enhancement allows administrators to better understand the configured transmissions with partners and agencies.
Perform the following configuration to add Inbound and/or Outbound sections to certain Organization page layouts.
- Go to Configuration > Objects > Organization > Page Layouts tab.
- Use the following table to update the respective Organization page layouts:
PAGE LAYOUT SECTION COLUMNS Agency Detail Page Layout ( agency_detail_page_layout__c)Related Object Section > - Related Object: Transmission Profile
- Section Label: Transmission Profiles (Outbound)
- Section Name:
transmission_profiles_destination__c - Creation Option: Create record in new page
- Name
- Origin
- Origin ID
- Destination
- Destination ID
- Outbound Format
- Auto-Submit
Organization Detail Page Layout ( organization_detail_page_layout__c)Related Object Section > - Related Object: Transmission Profile
- Section Label: Transmission Profiles (Outbound)
- Section Name:
transmission_profiles_destination__c - Creation Option: Create record in new page
- Name
- Origin
- Origin ID
- Destination
- Destination ID
- Sender User
- Outbound Format
Related Object Section > - Related Object: Transmission Profile
- Section Label: Transmission Profiles (Inbound)
- Section Name:
transmission_profiles_origin__c - Creation Option: Create record in new page
- Name
- Origin
- Origin ID
- Destination
- Destination ID
- Sender User
Partner Detail Page Layout ( partner_detail_page_layout__c)Related Object Section > - Related Object: Transmission Profile
- Section Label: Transmission Profiles (Outbound)
- Section Name:
transmission_profiles_destination__c - Creation Option: Create record in new page
- Name
- Origin
- Origin ID
- Destination
- Destination ID
- Sender User
- Outbound Format
- Transmission Profile Type
Sponsor Detail Page Layout ( sponsor_detail_page_layout__c)Related Object Section > - Related Object: Transmission Profile
- Section Label: Transmission Profiles (Outbound)
- Section Name:
transmission_profiles_destination__c - Creation Option: Create record in new page
- Name
- Origin
- Origin ID
- Destination
- Destination ID
- Sender User
Related Object Section > - Related Object: Transmission Profile
- Section Label: Transmission Profiles (Inbound)
- Section Name:
transmission_profiles_origin__c - Creation Option: Prevent record creation
- Name
- Origin
- Origin ID
- Destination
- Destination ID
- Sender User
Update the Case Identifier Field to be Non-Unique
Perform the following configuration to update the Case Identifier object:
- Go to Configuration > Objects > Case Identifier > Fields tab > Case Identifier.
- Unselect the Values must be unique checkbox.
- Save the page.
Update the Case Lifecycle Stages
This enhancement aligns Lifecycle Stages with the Case workflows. It allows for easier recognition of the Case processing stage.
- Go to Configuration > Lifecycle Stage Groups > Case Stages.
- Make sure each Case stage matches the respective States in the following table:
CASE STAGE STATES Intake - New
- Triage
- Importing
Entry - Data Entry
- End of Study Unblinding
- Recoded
- Revision
- Unblinded
- Unblinding
Review - Medical Coding
- Medical Review
- QC
Submission - Approved
- Nullifying
- Transmission Error
- Voiding
Complete - Closed
- Duplicate
- Inactive
- Invalid
- Nullified
- Rejected
- Superseded
- Voided
Update Case Lifecycle State Atomic Security Actions
This enhancement allows users to generate previews of CIOMS and 3500A forms at any point in the Case processing lifecycle.
Perform the following configuration to update the atomic security actions for all Case lifecycle states to allow the generation of CIOMS and 3500A form previews.
- Go to Configuration > Object Lifecycles > Case Lifecycle.
- Select a state and go to the Atomic Security: Actions section.
- Select Execute in the Default Column for Generate Preview: CIOMS I and Generate Preview: MedWatch (3500A).
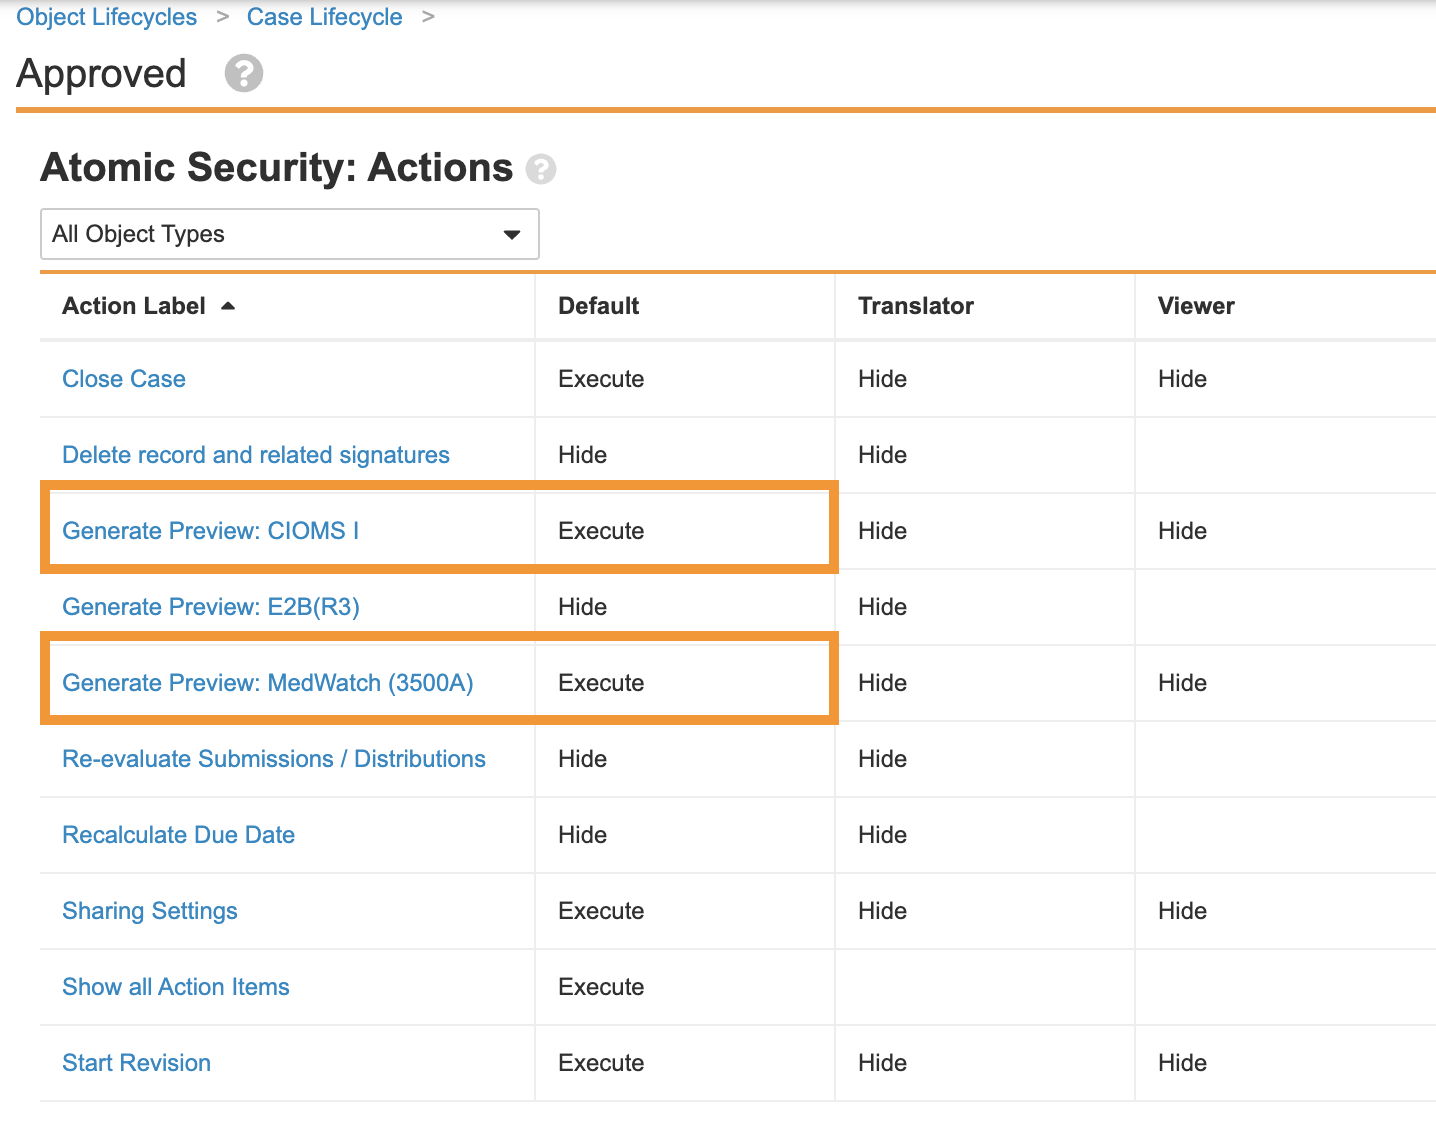
- Repeat step 3 for all states in the Case Lifecycle.
Create a PADER Validation Rule
This update allows administrators to ensure that data is always present for the Case Adverse Event - Event Country. This field is required for accurate PADER generation.
Perform the following steps to create the Validation Criteria PADER.E.i.9. This rule is inactive in template but you can turn it on as needed to ensure all Case Adverse Events have an Event Country for PADER report generation.
- Go to Business Admin > Validation Criteria.
- Select Create.
- Complete the following information:
- Name: PADER.E.i.9
- Source: Custom
- Always Evaluate: Select this checkbox.
- Conformance: Field is required for PADER report generation
- Data Element: E.i.9
- Data Element Name: Event Country Code
- File Format: E2B(R3)
- Evaluation Level: Case
- Result Status Type: Fail
- Vault Object:
case_adverse_event__v - Vault Field:
event_country__v - Rule Version: 1
- Rule Formula:
{ "$schema": "http://json-schema.org/draft-07/schema#", "type": "object", "description": "#/sectionEs", "definitions": { "e_i_9_identificationOfCountry_POPULATED": { "properties": { "e_i_9_identificationOfCountry": { "type": "string", "minLength": 1 } }, "required": [ "e_i_9_identificationOfCountry" ] } }, "properties": { "sectionEs": { "type": "array", "items": { "type": "object", "$ref": "#/definitions/e_i_9_identificationOfCountry_POPULATED" } } } } - Rule Formula Format: File Format
- API Name:
pader_event_country__c
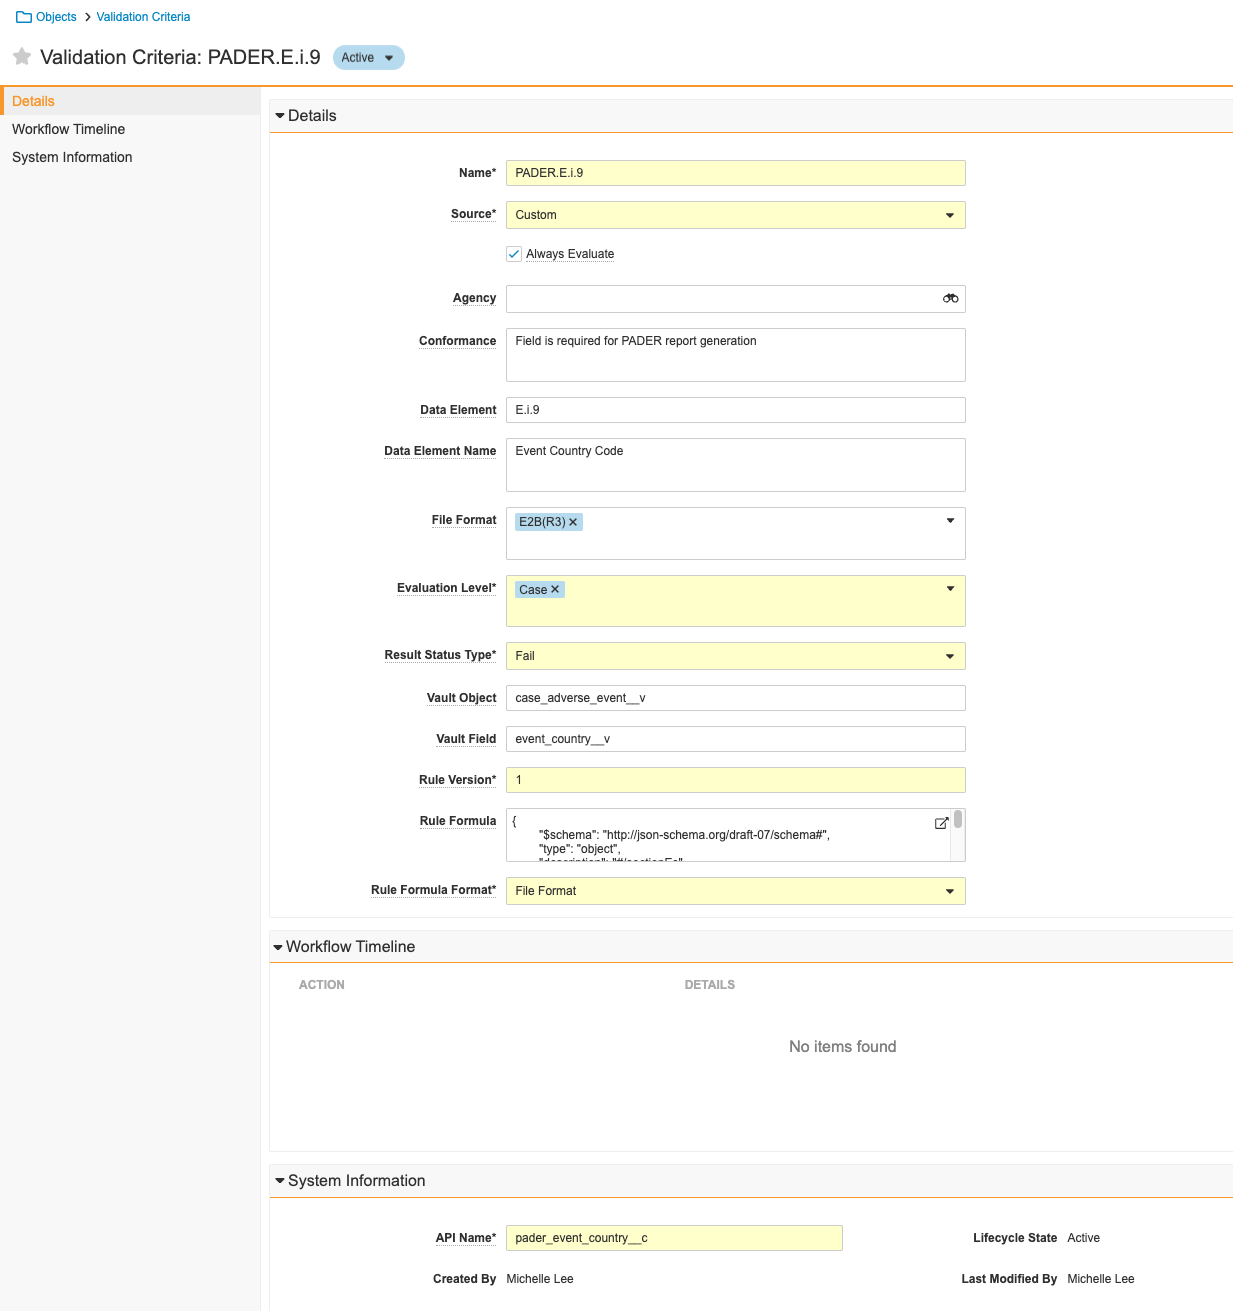
Create the PADER.E.i.9 Validation Criteria - Save the page.
- At the top of the page, select Active. From the dropdown that appears, select Inactive.
Updated DSUR Report Templates
The following report templates were adjusted to accommodate SOCs of up to 52 characters:
- DSUR Cumulative Tabulation of Serious Adverse Reactions from Clinical Trials (
cumulative_sar_trials__c) - DSUR Cumulative Tabulation of Serious Adverse Events from Clinical Trials (
cumulative_sae_trials_template__c)
Previously, SOC terms were cut off due to an Excel limitation.