With the 25R3 release, Veeva SafetyDocs supports creating Pharmacovigilance Agreements (PVA) obligation activities that span multiple PV agreements, simplifying configuration and management of activities required by multiple PVAs. With the introduction of PVA Multi-Agreement Activities, users can easily see all PV Agreements and PVA Obligations linked to a Multi-Agreement Activity, and trigger email distributions to all relevant partner contacts.
After you have enabled this feature, see Manage PVA Multi-Agreement Activities for more information.
Prerequisites
To enable Multi-Agreement Activities in your Vault, you must enable PVA Management. To allow your users to distribute PVA documents via email, you must enable PVA Document Distribution via Email.
Overview
Complete the following procedures to enable this feature in your Vault:
- Update object layouts
- Configure PVA Multi-Agreement Activity workflows
- Configure PVA Multi-Agreement Activity actions
- Create a Multi-Agreement Activities tab
- Grant PVA Actions permissions
Update Object Layouts
To update the PVA Activity and PVA Multi-Agreement Activity object layouts:
- Copy the standard layout for the following objects and ensure the new layout is active:
- PVA Activity
- PVA Multi-Agreement Activity
- Set the copied layout as the default.
- Delete any other existing custom layouts.
- To the PVA Activity layout, create a layout rule to hide the PVA Multi-Agreement Activity field when the field is not populated using the following settings:
- Label: Enter
Non MAA Activity - IF this Layout Rule Expression Is TRUE: Enter
IsBlank(pva_multi_agreement_activity__v) - Apply the following display effects
- Effect: Select Hide
- Type: Select Fields
- Values: Select PVA Multi-Agreement Activity
- Label: Enter
To update the PVA MAA Document for Distribution custom object layout:
- Insert a System Details two-column Detail Form section and move the following fields to this section:
- Created By
- Created Date
- Last Modified By
- Last Modified Date
- Status
- Remove the following fields from the Details section:
- Lifecycle
- Lifecycle State
- Lifecycle State Stage ID
- Lifecycle Stage
Configure PVA Multi-Agreement Activity Workflows
Configure the following workflows for the PVA Multi-Agreement Activity object:
Configure the PVA MAA Generate Related Activities Workflow
To configure the PVA MAA Generate Related Activities Workflow:
- Navigate to Admin > Configuration > Workflows.
- Select Create.
- In the Create Workflow dialog, select Object Workflow, then select Continue.
- On the Create Workflow page, populate the fields as follows:
- Label: Enter
PVA MAA Generate Related Activities - Lifecycle: Select PVA Multi-Agreement Activity Lifecycle
- Label: Enter
- Select Save.
- Configure the following workflow steps:
- Activate the workflow.
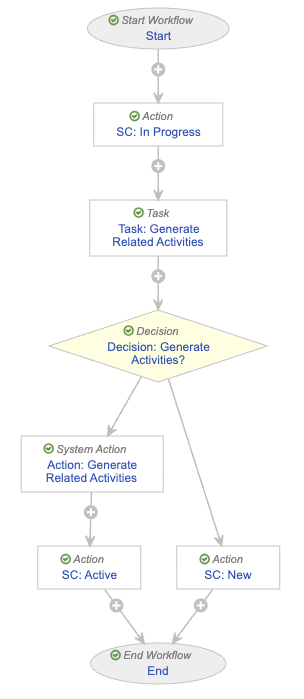
Configure the In Progress State Change Action Step
To configure the In Progress state change action step:
- In the Workflow Steps section, under the Start step, select Create Step.
- In the Label field, enter
SC: In Progress, then select Save. - In the Details section, populate the fields as follows:
- Type: Select Action
- Next Steps
- Remove the End step
- Select Create Step
- In the Step Name field, enter
Task: Generate Related Activities - Select OK
- In the Rules section, select Create Rule and populate the fields as follows:
- Condition Type: Select Always
- perform actions: Select Change State
- Lifecycle State: Select In Progress
- Select Save.
- From the Next Steps field, select Task: Generate Related Activities to navigate to the next step.
Configure the Generate Related Activities Task Step
To configure the Generate Related Activities task step:
- From the Task: Generate Related Activities step page, select Edit.
- In the Details section, populate the fields as follows:
- Type: Select Task
- Next Steps
- Select Create Step
- In the Step Name field, enter
Decision: Generate Activities? - Select OK
- In the Task Options section, populate the fields as follows:
- Task Label: Enter
Generate Related Activities? - Assign Task To: Select Workflow Owner
- Instructions: Enter
Activities will be created for all Obligations related to this Multi-Agreement Activity. - Task Requirement: Select Required
- Task Label: Enter
- In the Prompts section, select the Prompt for Verdicts checkbox.
- In the Verdict Label field that appears, enter
Generate Activities - Select Add Verdict and in the Verdict Label field that appears, enter
Cancel
- In the Verdict Label field that appears, enter
- Select Save.
- From the Next Steps field, select Decision: Generate Activities? to navigate to the next step.
Configure the Generate Activities Decision Step
To configure the Generate Activities? decision step:
- From the Decision: Generate Activities? step page, select Edit.
- In the Type field, select Decision.
- In the Rules section, select Create Rule and populate the fields as follows:
- Condition Type: Select All conditions are met
- if: Select Task > Task: Generate Related Activities > all labels equal > Generate Activities
- then: Select Create Step
- In the Create Step dialog, enter
Action: Generate Related Activities - Select OK
- In the Create Step dialog, enter
- In the then field of the Else section, select Create Step.
- In the Create Step dialog, enter
SC: New - Select OK
- In the Create Step dialog, enter
- Select Save.
- In the Rules section, select Action: Generate Related Activities to navigate to the next step.
Configure the Generate Related Activities System Action Step
To configure the Generate Related Activities system action step:
- From the Action: Generate Related Activities step page, select Edit.
- In the Details section, populate the fields as follows:
- Type: Select System Action
- Next Steps
- Select Create Step
- In the Step Name field, enter
SC: Active - Select OK
- In the System Action field, select Generate Related Activities.
- Select Save.
- In the Next Steps field, select SC: Active to navigate to the next step.
Configure the Active State Change Action Step
To configure the Active state change action step:
- From the SC: Active step page, select Edit.
- In the Details section, populate the fields as follows:
- Type: Select Action
- Next Steps: Select End
- In the Rules section, select Create Rule and populate the fields as follows:
- Condition Type: Select Always
- perform actions: Select Change State
- Lifecycle State: Select Active
- Select Save.
- Navigate to the main page of the workflow.
Configure the New State Change Action Step
To configure the New state change action step:
- From the PVA MAA Generate Related Activities workflow page, select the SC: New step.
- From the SC: New step page, select Edit.
- In the Details section, populate the fields as follows:
- Type: Select Action
- Next Steps: Select End
- In the Rules section, select Create Rule and populate the fields as follows:
- Condition Type: Select Always
- perform actions: Select Change State
- Lifecycle State: Select New
- Select Save.
Activate the Workflow
To activate the PVA MAA Generate Related Activities workflow:
- Navigate to the main page of the workflow.
- In the Status field within the Details section, select Make configuration active.
Configure the PVA MAA Distribute Related Documents Workflow
To configure the PVA MAA Distribute Related Documents Workflow:
- Navigate to Admin > Configuration > Workflows.
- Select Create.
- In the Create Workflow dialog, select Object Workflow, then select Continue.
- On the Create Workflow page, populate the fields as follows:
- Label: Enter
PVA MAA Distribute Related Documents Workflow - Lifecycle: Select PVA Multi-Agreement Activity Lifecycle
- Label: Enter
- Select Save.
- Configure the following workflow steps:
- Activate the workflow.
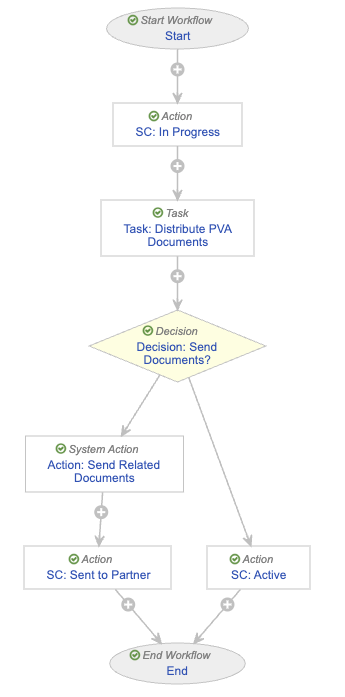
Configure the In Progress State Change Action Step
To configure the In Progress state change action step:
- In the Workflow Steps section, under the Start step, select Create Step.
- In the Label field, enter
SC: In Progress, then select Save. - In the Details section, populate the fields as follows:
- Type: Select Action
- Next Steps
- Remove the End step
- Select Create Step
- In the Step Name field, enter
Task: Distribute PVA Documents - Select OK
- In the Rules section, select Create Rule and populate the fields as follows:
- Condition Type: Select Always
- perform actions: Select Change State
- Lifecycle State: Select In Progress
- Select Save.
- From the Next Steps field, select Task: Distribute PVA Documents to navigate to the next step.
Configure the Distribute PVA Documents Task Step
To configure the Distribute PVA Documents task step:
- From the Task: Distribute PVA Documents step page, select Edit.
- In the Details section, populate the fields as follows:
- Type: Select Task
- Next Steps
- Select Create Step
- In the Step Name field, enter
Decision: Send Documents? - Select OK
- In the Task Options section, populate the fields as follows:
- Task Label: Enter
Distribute PVA Documents? - Assign Task To: Select Workflow Owner
- Instructions: Enter
All related documents for distribution will be sent to partners. - Task Requirement: Select Required
- Task Label: Enter
- In the Prompts section, select the Prompt for Verdicts checkbox.
- In the Verdict Label field that appears, enter
Distribute Documents - Select Add Verdict and in the Verdict Label field that appears, enter
Cancel
- In the Verdict Label field that appears, enter
- Select Save.
- From the Next Steps field, select Decision: Send Documents? to navigate to the next step.
Configure the Send Documents Decision Step
To configure the Send Documents? decision step:
- From the Decision: Send Documents? step page, select Edit.
- In the Type field, select Decision.
- In the Rules section, select Create Rule and populate the fields as follows:
- Condition Type: Select All conditions are met
- if: Select Task > Task: Distribute PVA Documents > all labels equal > Distribute Documents
- then: Select Create Step
- In the Create Step dialog, enter
Action: Send Related Documents - Select OK
- In the Create Step dialog, enter
- In the then field of the Else section, select Create Step.
- In the Create Step dialog, enter
SC: Active - Select OK
- In the Create Step dialog, enter
- Select Save.
- In the Rules section, select Action: Send Related Documents to navigate to the next step.
Configure the Send Related Documents System Action Step
To configure the Send Related Documents system action step:
- From the Action: Send Related Documents step page, select Edit.
- In the Details section, populate the fields as follows:
- Type: Select System Action
- Next Steps
- Select Create Step
- In the Step Name field, enter
SC: Sent to Partner - Select OK
- In the System Action field, select Distribute All Related PVA Documents.
- Select Save.
- In the Next Steps field, select SC: Sent to Partner to navigate to the next step.
Configure the Sent to Partner State Change Action Step
To configure the Sent to Partner state change action step:
- From the SC: Sent to Partner step page, select Edit.
- In the Details section, populate the fields as follows:
- Type: Select Action
- Next Steps: Select End
- In the Rules section, select Create Rule and populate the fields as follows:
- Condition Type: Select Always
- perform actions: Select Change State
- Lifecycle State: Select Sent to Partner
- Select Save.
- Navigate to the main page of the workflow.
Configure the Active State Change Action Step
To configure the Active state change action step:
- From the PVA MAA Distribute Related Documents workflow page, select the SC: Active step.
- From the SC: Active step page, select Edit.
- In the Details section, populate the fields as follows:
- Type: Select Action
- Next Steps: Select End
- In the Rules section, select Create Rule and populate the fields as follows:
- Condition Type: Select Always
- perform actions: Select Change State
- Lifecycle State: Select Active
- Select Save.
Activate the Workflow
To activate the PVA MAA Distribute Related Documents workflow:
- Navigate to the main page of the workflow.
- In the Status field within the Details section, select Make configuration active.
Configure PVA Multi-Agreement Activity Actions
Configure the following on the PVA Multi-Agreement Activity object:
Configure Entry Actions
Assign the following actions to the PVA Multi-Agreement Activity object:
- Distribute All Related PVA Documents
- Generate Related Activities
Then, add the following actions as entry actions on the indicated PVA Multi-Agreement Activity object lifecycle states:
- To the In Progress state, add an entry action and populate the following details:
- Condition Type: Select Always
- Perform actions: Select Change related object lifecycle state
- Related Object: Select PVA Activities
- Change State To: Select In Progress
- To the Sent to Partner state, add an entry action and populate the following details:
- Condition Type: Select Always
- Perform actions: Select Change related object lifecycle state
- Related Object: Select PVA Activities
- Change State To: Select Sent to Partner
Configure User Actions
Add the following actions as user actions on the indicated PVA Multi-Agreement Activity object lifecycle states:
- To the New state, add the PVA MAA Generate Related Activities Workflow action and populate the following details:
- Condition Type: Select All conditions are met
- If: Under the PVA MAA-PVA Obligations drop-down section, select PVA Obligation > At least one record exists
- Allow the following actions
- Select Workflow
- Select PVA MAA Generate Related Activities
- Action Label: Enter
Generate Related Activities
- To the Active state, add the PVA MAA Distribute Related Documents Workflow action and populate the following details:
- Condition Type: Select All conditions are met
- If: Under the PVA MAA Document for Distribution drop-down section, select Name > At least one record exists
- Allow the following actions
- Select Workflow
- Select PVA MAA Distribute Related Documents
- Action Label: Enter
Distribute All Related PVA Documents
Create a Multi-Agreement Activities Tab
Create a custom object sub-tab under the PVAs tab collection for the PVA Multi-Agreement Activities object.
Grant PVA Actions Permissions
Ensure your permission sets are updated to grant the appropriate level of access for users according to your organization’s process:
- Navigate to Admin > Users & Groups > Permission Sets and select the custom PVA Actions permission set.
- Navigate to the Objects tab and select Edit.
- Add the following permissions:
- Delete permissions for the PVA MAA-PVA Obligation object
- Read, Create, Edit, and Delete permissions for the PVA Multi-Agreement Activity object
- Select Save.
- Navigate to the Tabs tab and select Edit.
- Add View permissions for the Multi-Agreement Activities object sub-tab.
- Select Save.