Note Beginning with 23R3 content and for all subsequent releases, Vault Release Notes is the official site for Vault Safety release notes.
Vault Safety template revisions include changes to vault configuration for general usability improvements. Template revisions are not automatically rolled out to existing customers.
New vaults created in 21R2 or later will have the following settings by default. Vaults created in an earlier release can optionally be updated to match these changes. The sections on this page provide the instructions to enable these changes.
This page does not cover how to update your template to support new features. The 21R2 New Features page outlines which features require configuration upgrades, and provides links to enablement instructions for each feature.
Safety
Updates to Localized Case Configuration
Significant configuration updates have been made to the 21R2 template for Localized Cases and translation support. These configuration changes are documented on the following localized case enablement instructions:
- Enable Localized Submissions and Translation Support
- Enable Local Fields for PMPA (Japan)
- Enable Local Fields for MFDS (Korea)
- Enable Local Fields for NMPA (China)
Updates to Pregnancy Case and Parent-Child Data Collection Configuration
Significant configuration updates have been made to the 21R2 template for Pregnancy Cases and parent-child data collection.
These configuration changes are documented on the Pregnancy and Parent-Child Case Data Collection enablement instructions, prepended with “Post-21R1.”
Update Layout Rule for Case Cause of Death
This enhancement now shows the death-related fields if there is either a Date of Death or Seriousness “Results in Death”.
- Go to Admin > Configuration > Objects > Case.
- On the Page Layouts tab, select Case Page Layout.
- Select Layout Rules and then select Death.
- Update the Layout Rule Expression to:
And(Not(Includes(seriousness__v, 'results_in_death__v')), IsBlank(dod_idate__v))
Death Page Layout Rule
Template Updates for Case and Case Narrative Lifecycles
Add Entry Actions on Case Lifecycle
This enhancement ensures the narrative document’s lifecycle state matches the Case. This allows support for security of the narrative document based on the Case state.
- Go to Configuration > Object Lifecycles > Case Lifecycle.
- Select the Approved state to open it.
- Select Edit from the Entry Actions section, then select Create Entry Action at the bottom of the page.
- Select Perform with Conditions.
- Beside If, select Version Control in the first drop-down menu.
- Select Includes in the second drop-down menu.
- Select Major (Approved) and Minor in the third drop-down menu.
- Under perform actions, complete the fields:
- Select Change related document lifecycle state from the drop-down menu.
- Document Reference Field: Case Narrative
- State Type: Document Workflow: Approved
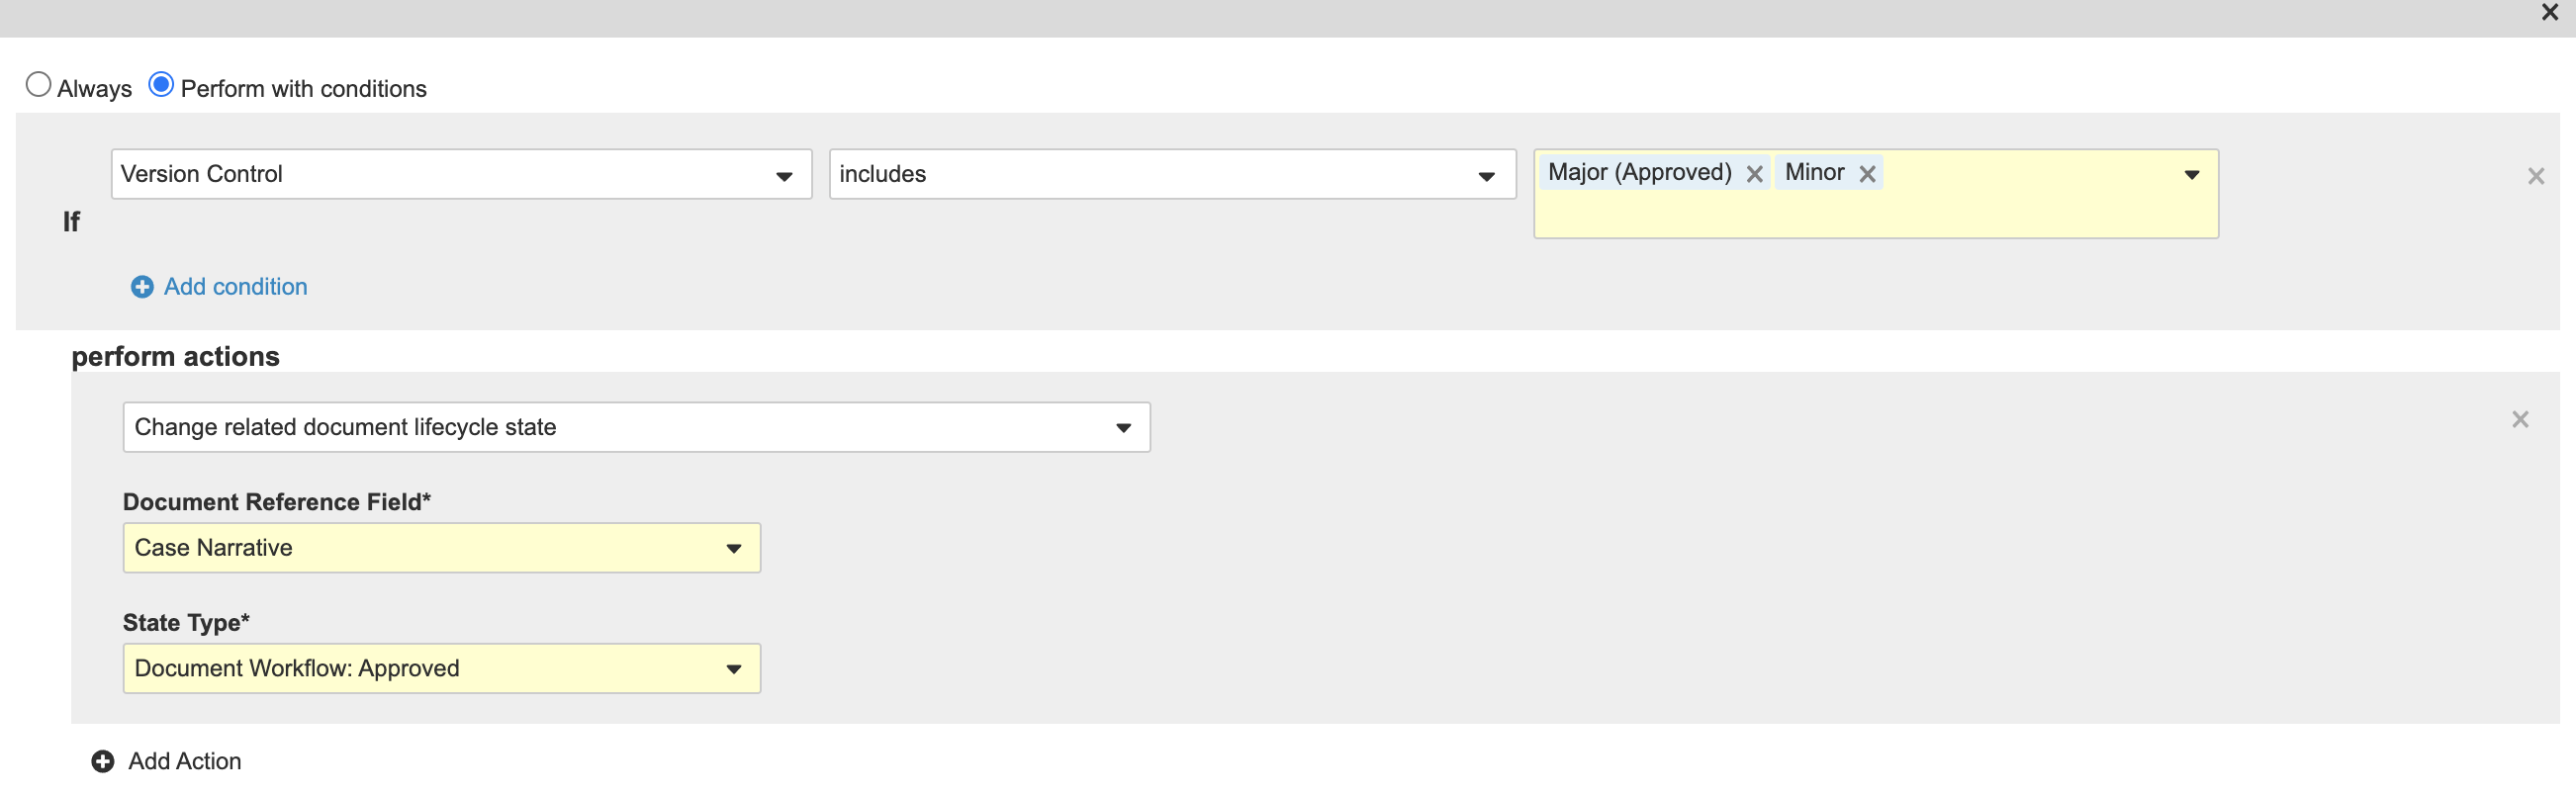
New Case Approved State Entry Acton - Select Save.
- Repeat steps 3-5 for the following states:
- Revision
- Select Change related document lifecycle state.
- Document Reference Field: Case Narrative
- State Type: Starting State
- Triage
- Select Change related document lifecycle state.
- Document Reference Field: Case Narrative
- State Type: Starting State
- Medical Review
- Select Change related document lifecycle state.
- Document Reference Field: Case Narrative
- State Type: In Review
- Revision
Remove Permissions in Approved and Closed States on the Narrative Lifecycle
Remove permissions that allow users to edit the Case Narrative document in the Approved and Closed state to prevent edits to approved narratives.
- Go to Configuration > Document Lifecycles > Narrative Lifecycle.
- On the States tab, select Approved (approved__v).
- Go to the Security Settings tab and select Edit.
- Unselect all the checkboxes under Edit Document.
- Select Save.
- Repeat steps 3-5 for the Closed (closed__v) state.
Update Search Settings for Cases, Products, and Studies
This configuration enhancement allows users to take advantage of Search Collections to search for cases by multiple adverse events, products, and other case children.
- In Admin, go to Settings > Search Settings.
- Under Search Collections, select Create.
- Select Edit and complete the following fields:
- Label: Cases
- Name: cases__c
- Under Collection, select Add Object to create the search groups for Cases.
- Complete the following fields using the image below:
- Objects: Select the object from the picklist
- Object Types: Select the object types from the picklist
- Include Collection on Tab: There are two options for this selection.
- Yes: Select the Allow expanded searches on this collection when searching in the cases tab checkbox.
- No: Do not select the checkbox
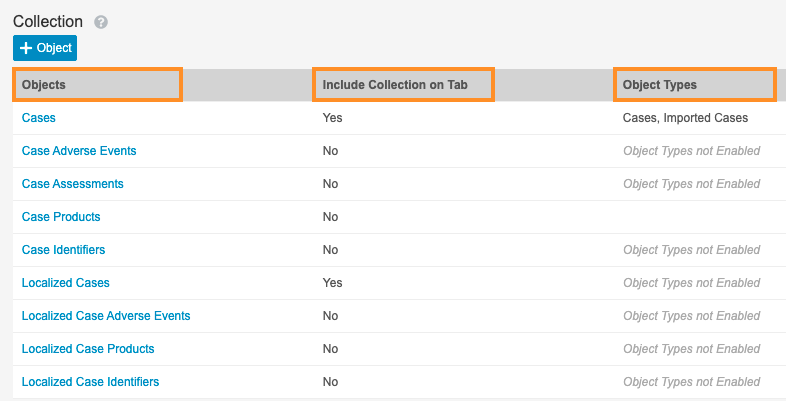
Search Groups for Cases - Select Save.
- Go back to Settings > Search Settings. Repeat steps 2-6 using the images below for:
- Products
- Label: Products
- Name: products__c
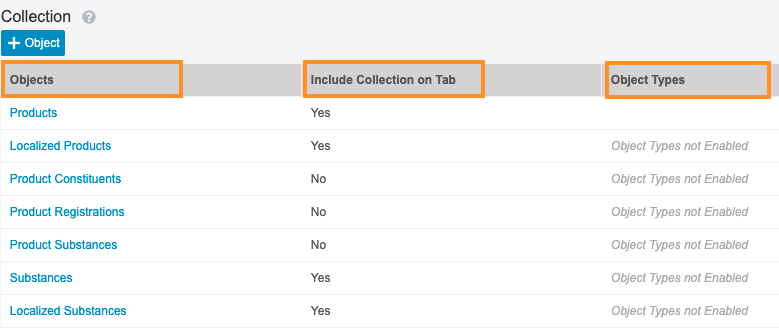
Search Groups for Products - Studies
- Label: Studies
- Name: studies__c
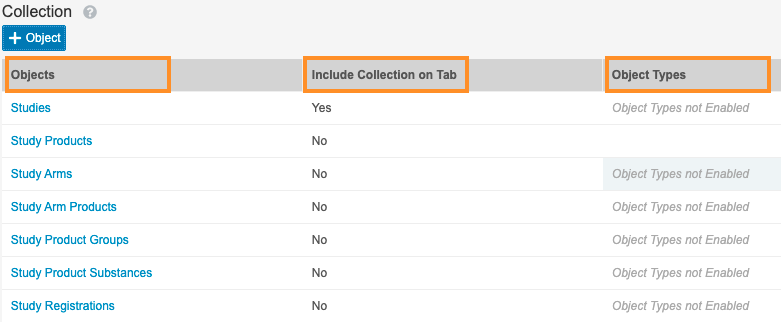
Search Groups for Studies
- Products
Update the AER Records Page Layout
Add Related Object Sections to AER Detail Page Layout
Sections have been added to the AER Detail Page Layout to bring the AER Page Layout in line with the Case Page Layout for E2B Imported AERs. We recommend preventing record creation for the new sections.
- Go to Configuration > Objects > Case.
- On the Page Layouts tab, select AER Detail Page Layout.
- To add a related objects field, select Related Object from the Add Section drop-down menu.
- Complete the fields:
- Related Object: Case Assessment
- Section Label: Assessments
- Section Name: case_assessments__c
- Creation Option: Prevent record creation
- Repeat steps 3 and 4 for the following related objects:
- Medical History & Concurrent Conditions
- Related Object: Case Assessment
- Section Label: Assessments
- Section Name: case_assessments__c
- Creation Option: Prevent record creation
- Drug History
- Related Object: Case Drug History
- Section Label: Drug History
- Section Name: case_drug_history__c
- Creation Option: Prevent record creation
- Test Result
- Related Object: Case Test Result
- Section Label: Test Results
- Section Name: case_test_results__c
- Creation Option: Prevent record creation
- Reference
- Related Object: Case Identifier
- Section Label: Reference Numbers
- Section Name: case_identifiers__c
- Creation Option: Prevent record creation
- Medical History & Concurrent Conditions
Add the Hide if Manual AER Layout Rule
- Go to AER Detail Page Layout, select Layout Rules.
- Select Hide if Manual AER.
- Update the fields:
- Hide the following Page Layout Items
- Type: Sections
- Values: Assessments, Medical History & Concurrent Conditions, Drug History, Test Results, Reference Numbers
- Add the Layout Rule Expression:
IsBlank(source_meddra_version__v)
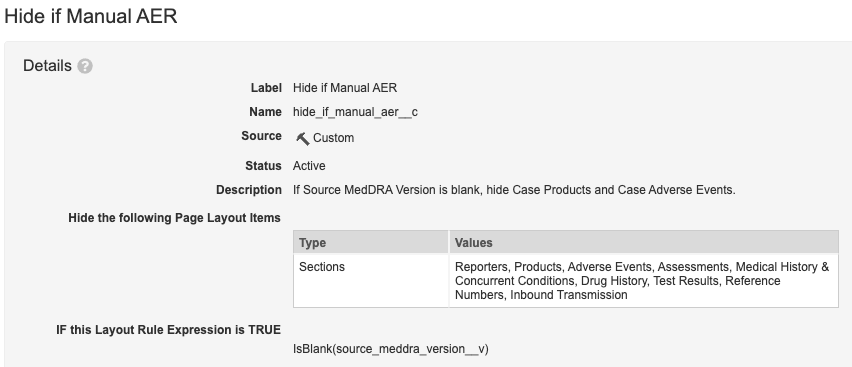
Hide if Manual AER Layout Rule - Hide the following Page Layout Items
Template Updates for Transmission Profile
Fields have been split into multiple sections on Transmission Profiles to make administration easier.
Update the System Gateway and AS2 Gateway Records Page Layout
- Go to Configuration > Objects > Transmission Profile.
- In the Page Layouts tab, select the System Gateway Detail Page Layout.
- Select Detail Form from the Add Section drop-down menu.
- Complete the Add Detail Section form with the following details:
- Section Label: Outbound Settings
- Section Name: outbound_settings__c
- Select Done.
- Add the following fields to the Outbound Settings section:
- Format
- Sender User
- Auto-Submit
- Create another Add Detail Section form with the following details:
- Section Label: Inbound Settings
- Section Name: inbound_settings__c
- Select Done.
- Add the following fields to the Inbound Settings section:
- Inbound Format
- Back Reporting
- Check that the Details section contains the following fields:
- Name
- Origin
- Destination
- Gateway Type
- Organization
- Origin ID
- Destination ID
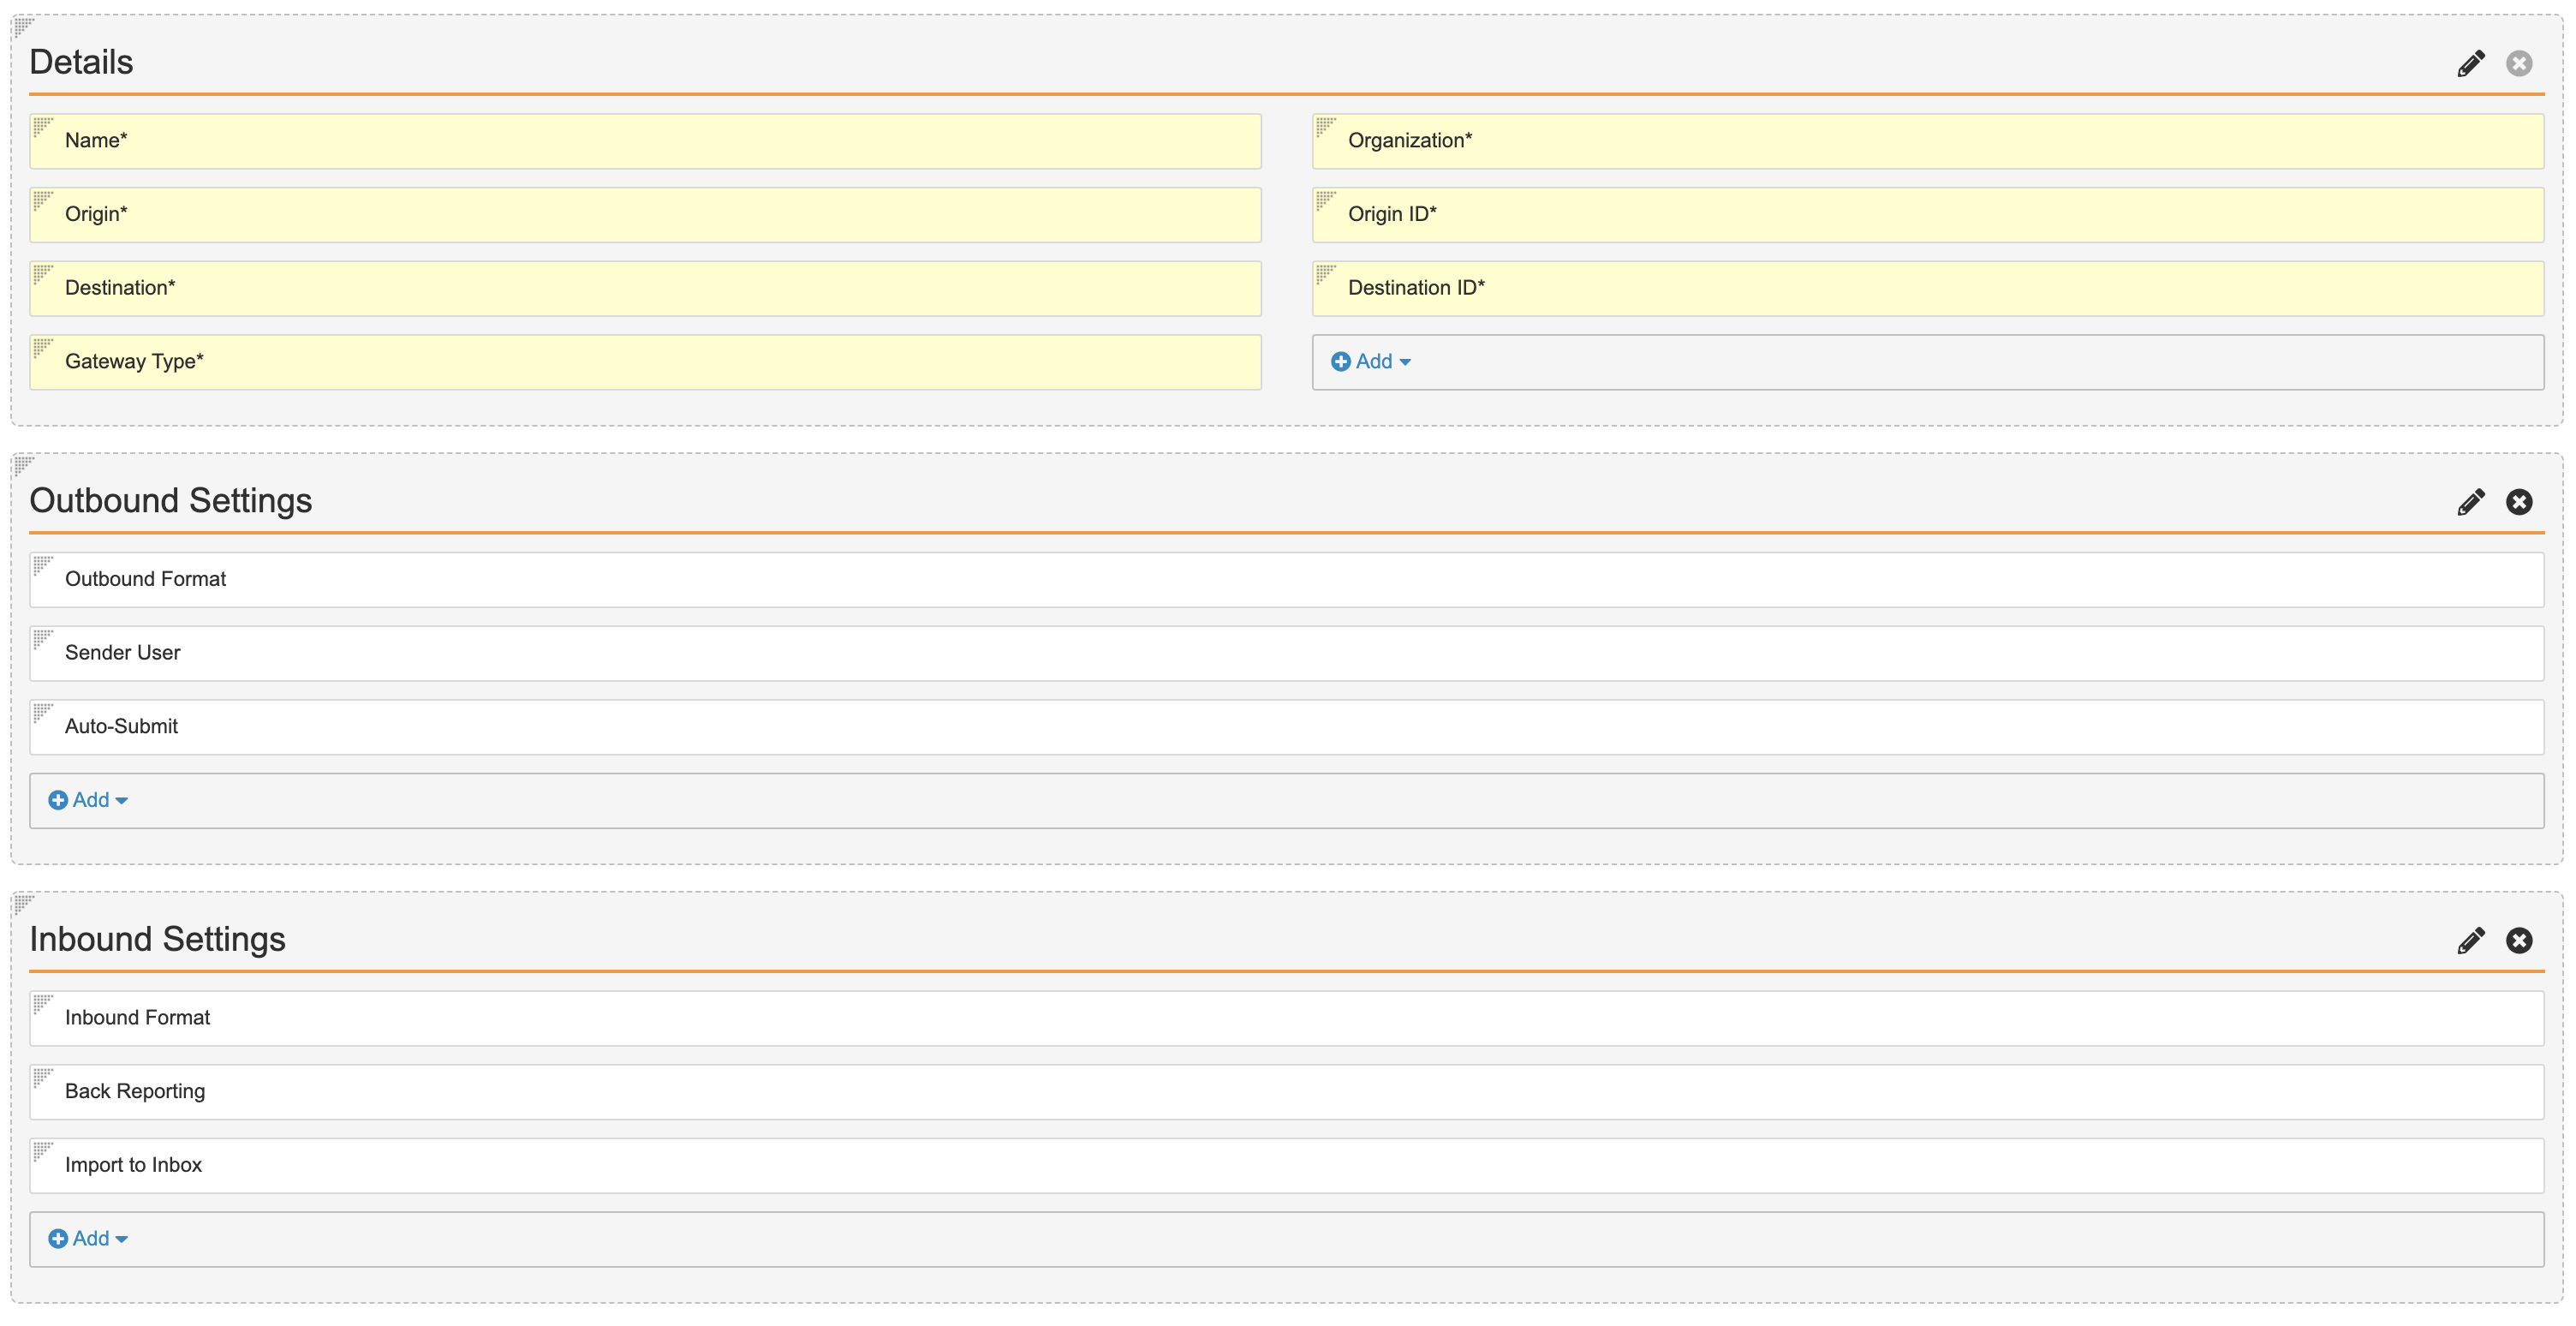
Updated System Gateway Detail Page Layout - Select Save.
In the Page Layouts tab, select the AS2 Gateway Detail Page Layout. Repeat the above steps.
Update the Manual Records Page Layout
- On the Page Layouts tab, select the Manual Detail Page Layout.
- Select Detail Form from the Add Section drop-down menu.
- Complete the form with the following details:
- Section Label: Outbound Settings
- Section Name: outbound_settings__c
- Select Done.
- Add the following fields to the Outbound Settings section:
- Format
- Sender User
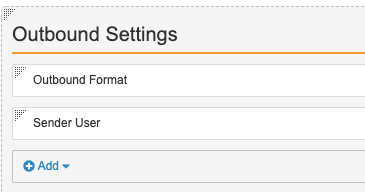
Outbound Settings Section on Manual Detail Page Layout - Check that the Details section contains the following fields:
- Name
- Origin
- Origin ID
- Destination
- Destination ID
- Organization
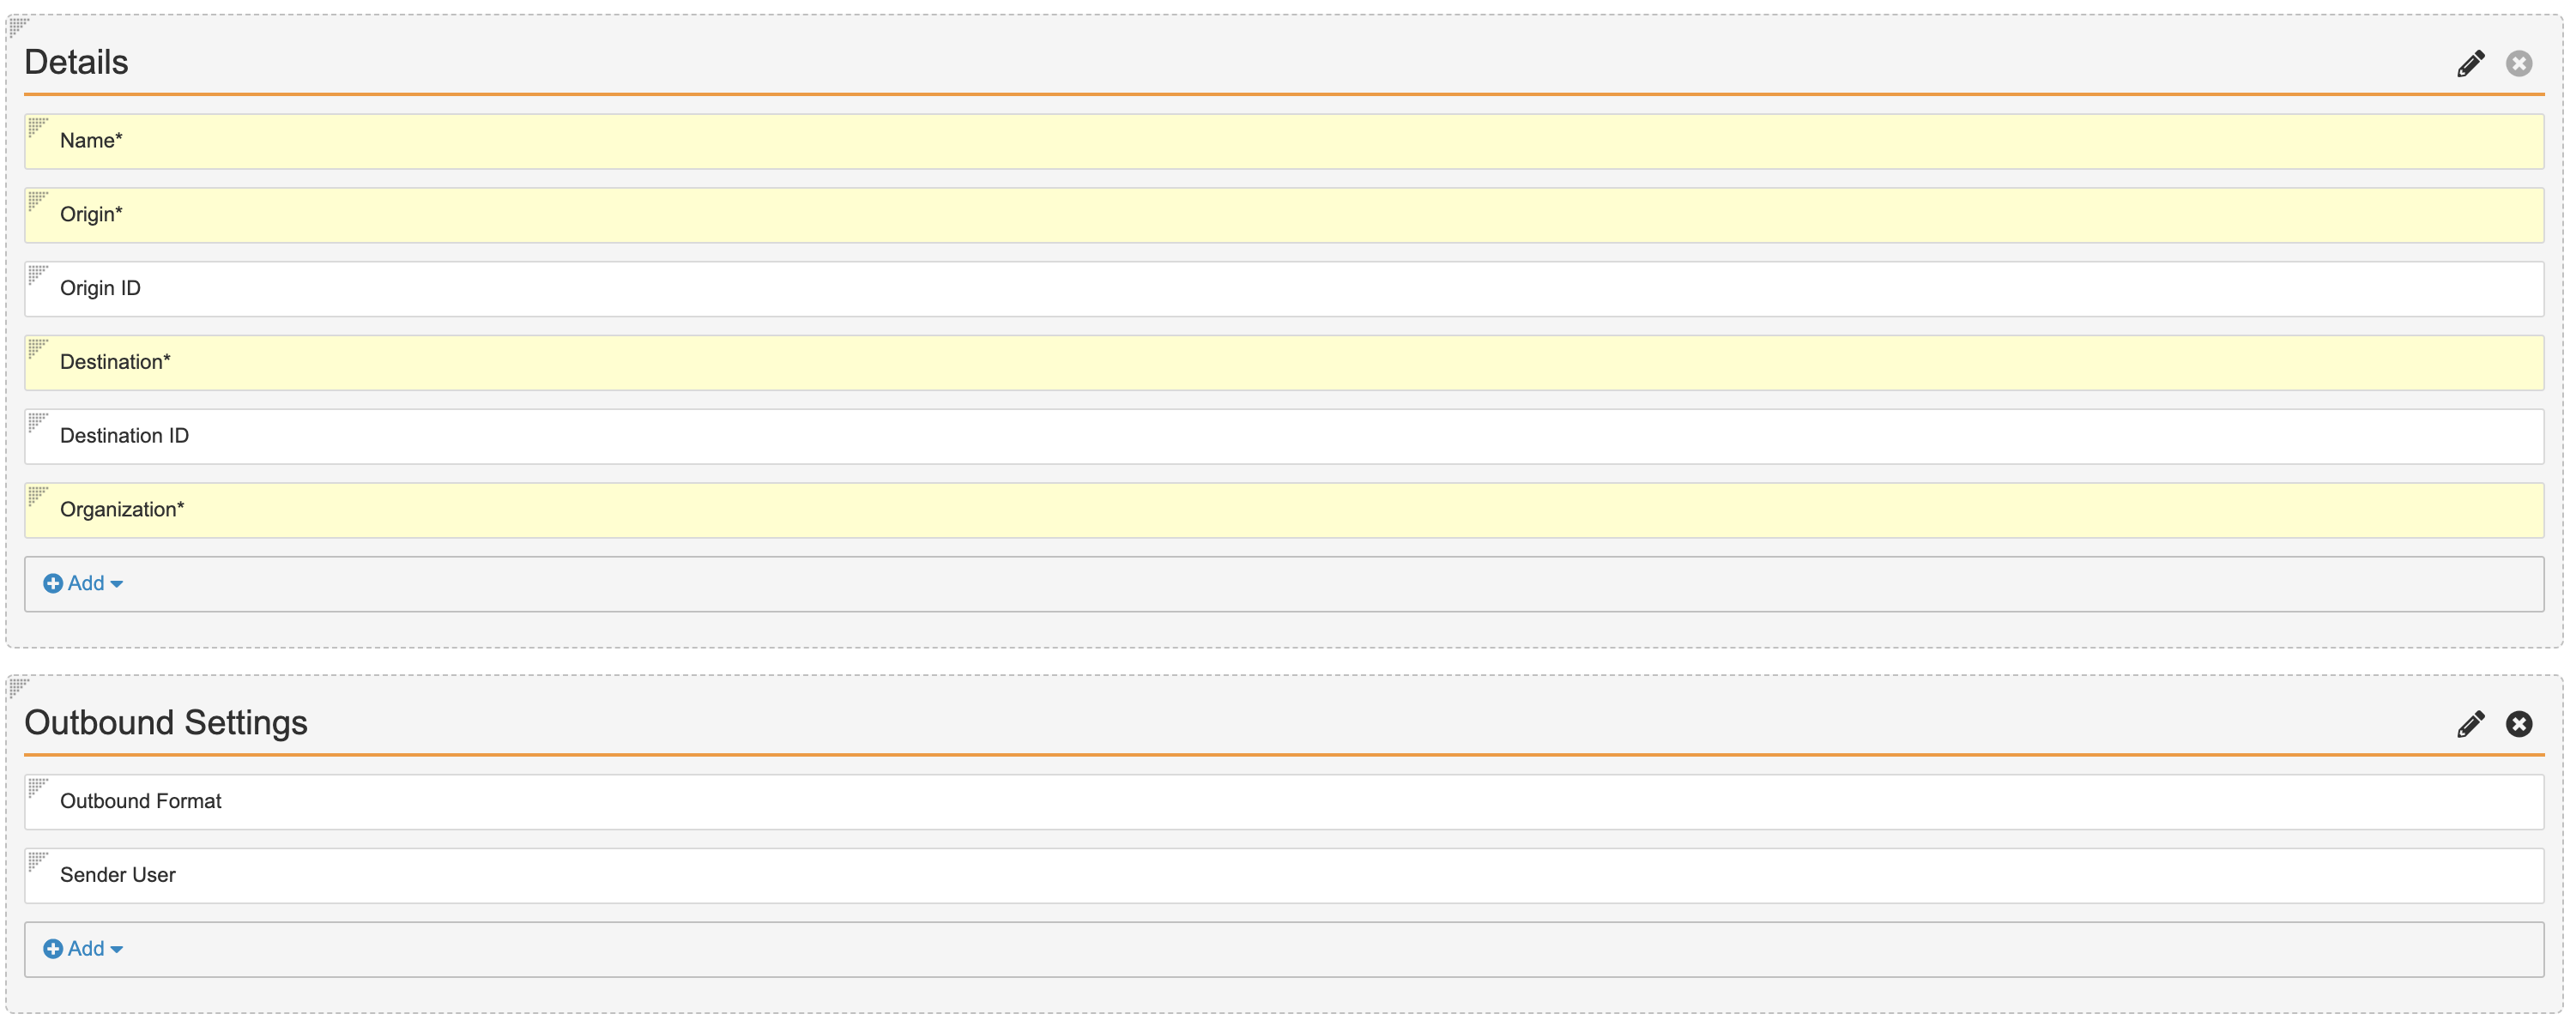
Updated Manual Detail Page Layout - Select Save.
Update the Format field Label to Outbound Format
- In the Transmission Profile object, go to the Fields tab.
- Select Format.
- Select Edit and rename the Label field as “Outbound Format”.
- Select Save.
Update the Head of Safety Application Role to ICSR Approver
To better reflect the organizational structure of larger PV organizations, the Head of Safety role has been renamed to ICSR Approver.
Update Label of Application Role
- Go to Business Admin > Application Roles.
- Select Head of Safety.
- Select
 and update the Label field with “ICSR Approver”.
 - Select Save.
Update the Head of Safety Participant to ICSR Approver in Case Workflows
- Go to Configuration > Workflows > Case Entry.
- Select Edit.
- Select the Start workflow step and select Edit.
- In the Control 3 section, update the Participant Label field to "ICSR Approver".
- Select Save.
- Select Make configuration active.
In Configuration > Workflows, repeat the above steps for the following workflows:
- Case Review
- Case Revision
- Case Unblinding
Create New Document Field Section for Case-Related Fields
A new document field section has been introduced for Case-related fields to improve usability and organization.
- Go to Configuration > Field Layout.
- Select Create.
- In the Section Label field, enter Case Information.
- Go to Configuration > Document Fields.
- Select Shared Fields.
- On the following shared fields, select Case Information from the Display Section:
- Blind Protection
- Case
- Inbox Item
- Localized Case
- Product
- Receipt Date
- Report Type
- Retransmit
- Study
- Transmission
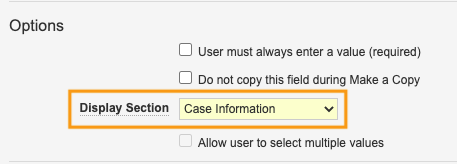
Display Case Information Section on Shared Fields
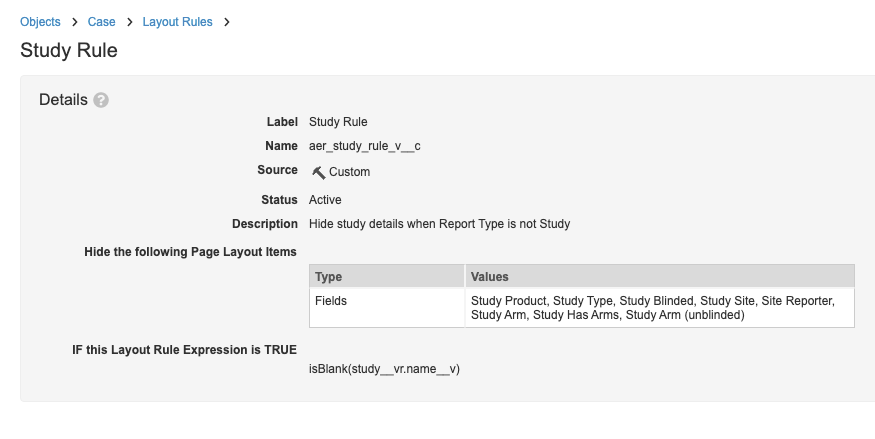
Update the AER Records Page Layout Rules
This enhancement allows Study to be selected for non-study report types to better reflect additional types of studies and report sources.
- Go to Configuration > Object > Case.
- In the Page Layouts tab, select AER Detail Page Layout.
- Select Layout Rules.
- Select Study Rule and make the following changes:
- Description (optional): Enter “Hide study details when Study is blank”.
- Hide the following Page Layout Items: remove Study from the hidden field values
- Update the Layout Rule Expression to:
isBlank(study__vr.name__v)
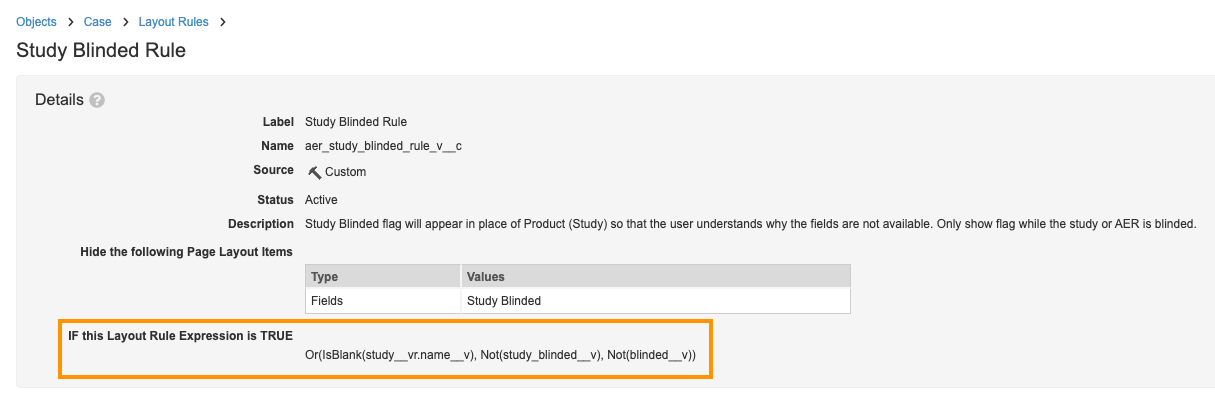
Study Layout Rule - Go back to the Layout Rules page and select Study Blinded Rule.
- Make the following change:
- Update the Layout Rule Expression to:
Or(IsBlank(study__vr.name__v), Not(study_blinded__v), Not(blinded__v))
Study Blinded Layout Rule - Update the Layout Rule Expression to:
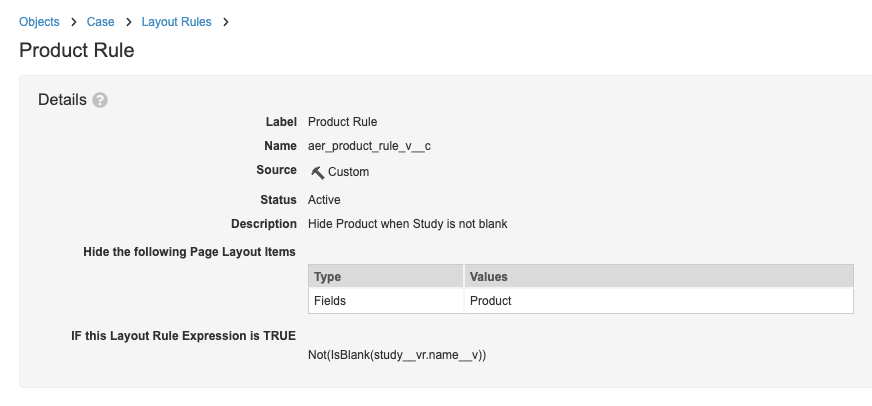
- On the Layout Rules page, select Product Rule and make the following changes:
- Description (optional): Hide Product when Study is not blank
- Update the Layout Rule Expression to:
Not(IsBlank(study__vr.name__v))
Product Layout Rule - On the Layout Rules page, select Product (Study) Rule v2 and make the following changes:
- Description (optional): Enter "Hide Study Product field if Study is blank or if Study has arms or if Study is blinded".
- Update the Layout Rule Expression to:
Or(IsBlank(study__vr.name__v), Or(study_has_arms__v=true, If(IsBlank(blinded__v), study_blinded__v,And(study_blinded__v, blinded__v)) ) )
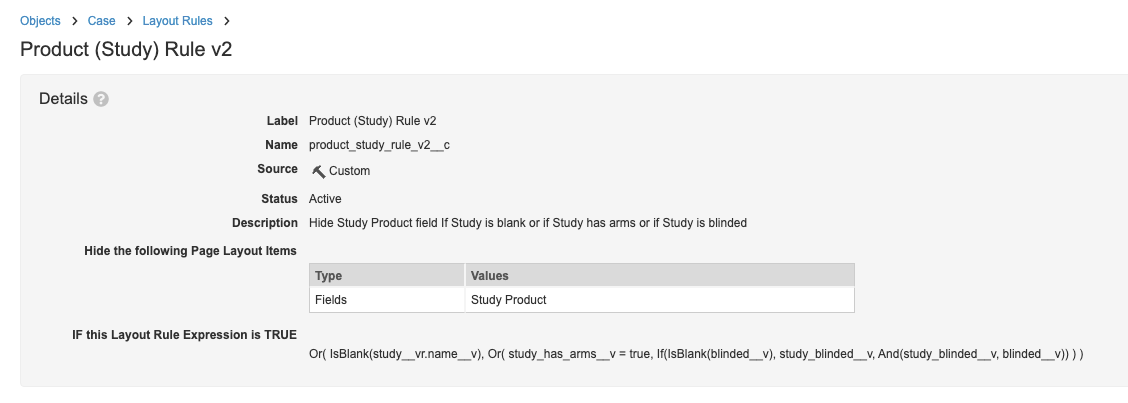
Product (Study) v2 Layout Rule
Add User Action Conditions to New State in Case Lifecycle
Add the following user action conditions to restrict AER-specific actions to AERs only. We recommend this configuration for all Vaults.
- Go to Configuration > Object Lifecycles > Case Lifecycle.
- In the States section, select New.
- Select Edit from the User Actions section.
- Make the following changes to the actions Awaiting more information and Reject:
- Select Perform with conditions.
- Beside If, select Case Type in the first drop-down menu.
- Select equals in the second drop-down menu.
- Select AER in the third drop-down menu.
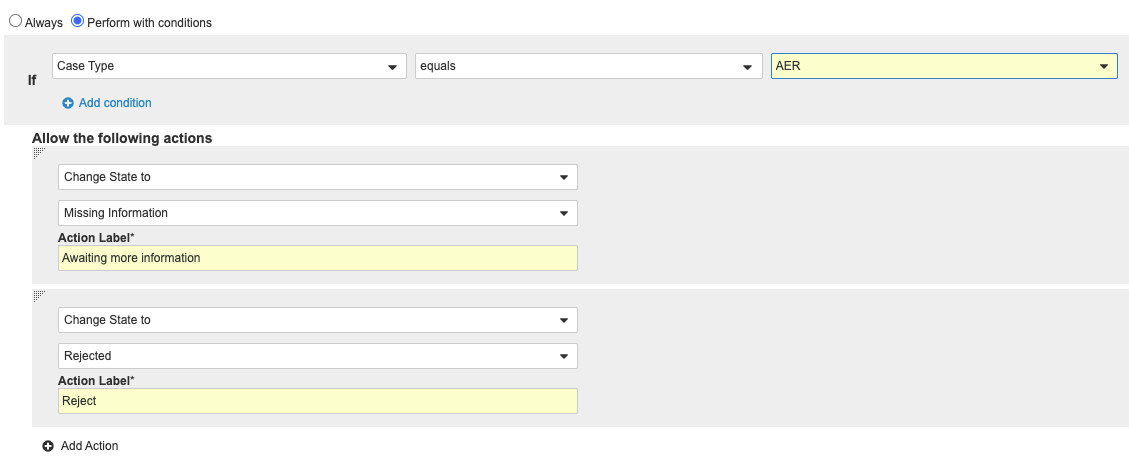
Case New State User Action Condition
Update the Record Field Entry Action Formula for Closed State on Case Lifecycle
This configuration ensures that major versions always end in X.0 even if there are multiple revisions to a previous version.
Follow the configuration steps to update how the Case version is set for closed cases:
- Go to Configuration > Object Lifecycles > Case Lifecycle.
- Select Closed from the States section.
- Select Edit from the Entry Actions section.
- Make the following change to the Update Record Field action:
- Set to value:
floor(version__v + 1)
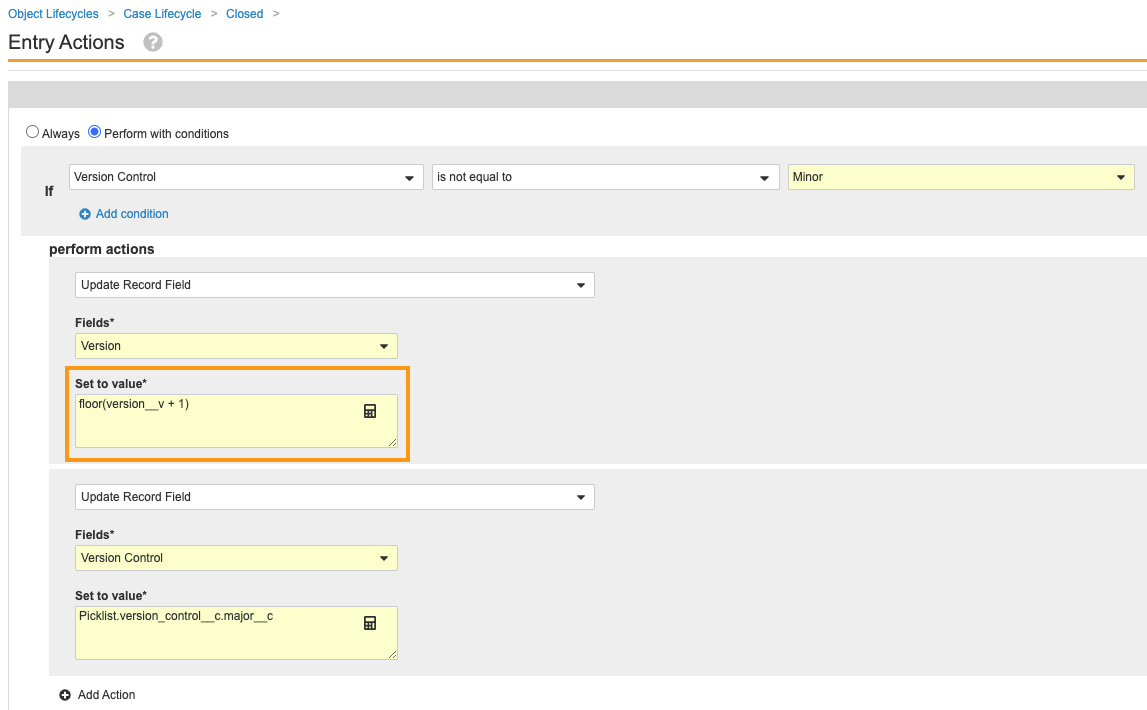
Update Record Field Entry Action Formula - Set to value:
- Select Save.
Set Blinded Field for Double-Blind Cases
This change ensures that the Study Blinded field is only used for double-blind studies as setting it for open-label studies can have unintended consequences. We recommend that you make this change in all Vaults, regardless of study types in use.
Your vault may have already been configured to display this change.
- Go to Configuration > Objects > Study.
- On the Validation Rules tab, select Blinded Field.
- Select Edit.
- Update the Validation Expression:
If(masking__v != 'doubleblind__v' , IsBlank(blinded__v), Not(IsBlank(blinded__v))) - Select Save.
Add Quality Control (QC) Steps to Case Revision Workflow
This configuration addresses an issue in the Case Revision Workflow where it was not possible to return a case to QC.
Follow these steps on the Case Revision workflow to update the Complete? decision step and add the State Change: QC, Workflow Task QC, and Decision: QC Complete? steps.
Update the Complete? Workflow Step
- Go to Configuration > Workflows > Case Revision.
- Select the Complete? decision workflow step.
- Select Edit.
- Update the following fields:
- Rule 1
- Beside If, select at least one label equals in the third drop-down menu.
- Select Requires QC in the fourth drop-down menu.
- Beside then, select Create Step.
- Enter State Change: QC under Step Name.
- Select OK.
- Else Rule 2
- Beside If, select at least one label equals in the third drop-down menu.
- Select Requires Medical Review in the fourth drop-down menu.
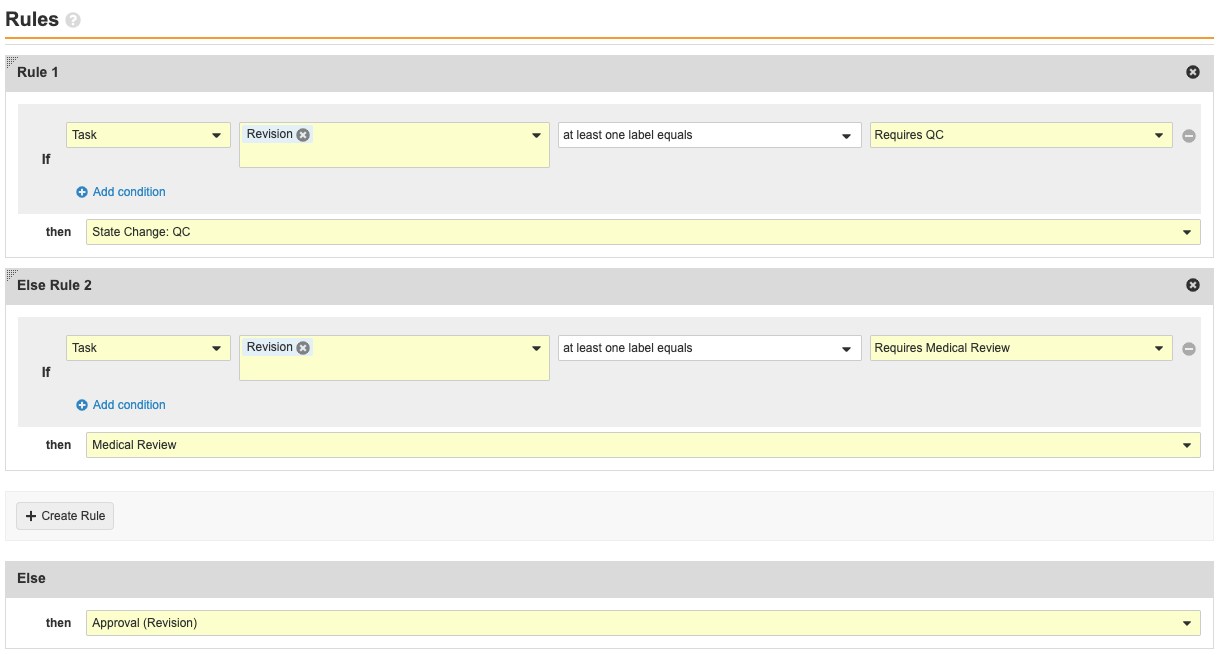
Complete? Workflow Step Details
- Rule 1
- Select Save.
Add Details to the State Change: QC Workflow Step
- Go back to the Case Revision workflow and select the State Change: QC step.
- Select Edit.
- Complete the following details:
- Type: State Change
- Next Steps: Select Create Step
- Step Name: QC
- Select OK.
- Next State: QC
- Select Save.
Add Details to the QC Workflow Step
- On the Case Revision workflow page, select the QC step.
- Select Edit.
- Complete the following details:
- Type: Workflow Task
- Next Steps: Select Create Step
- Step Name: QC Complete?
- Select OK.
- Complete the following details as shown in the following images:
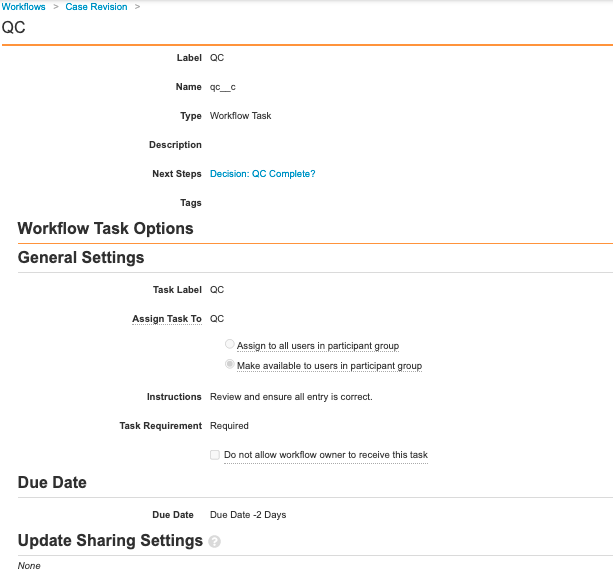
QC Workflow Task Details 
QC Workflow Task Details (cont’d)
- Select Save.
Add Details to the Decision: QC Complete? Workflow Step
- On the Case Revision workflow page, select the Decision: QC Complete? step.
- Select Edit.
- Complete the following details:
- Type: Decision Additional fields appear after selecting Workflow Task.
- Complete the following details as shown in the image:
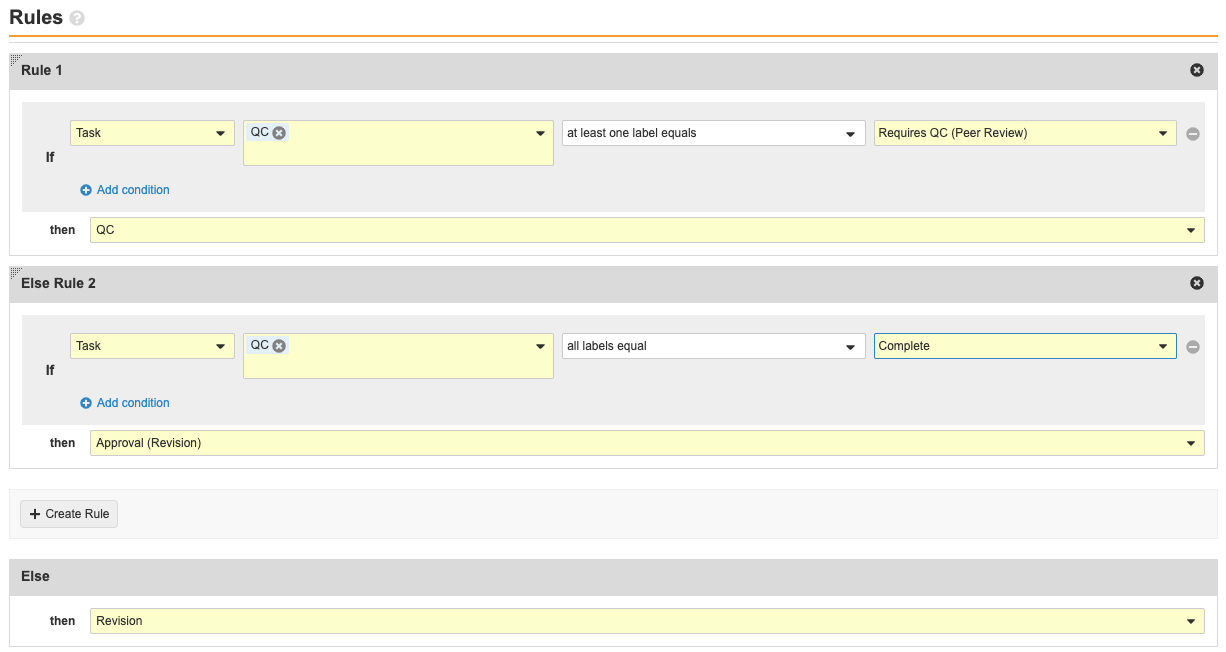
Decision: QC Complete? Workflow Step Details
- Select Save.
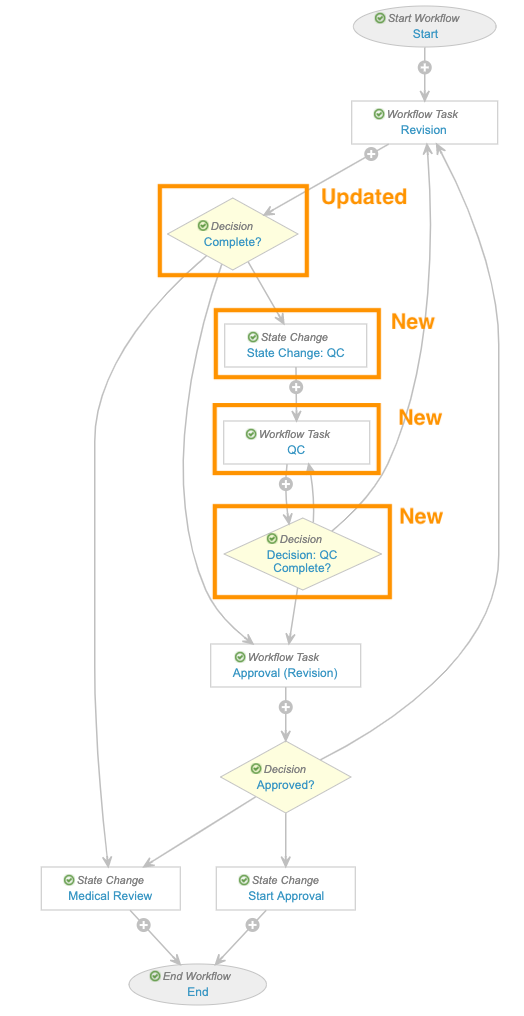
Check that your workflow resembles the image below. When you’re done, select Make configuration active.
Add Assign Due Date Entry Action to Revision State on Case Lifecycle
This configuration ensures that due dates are calculated for Follow-Up Cases on promotion.
- In Admin, go to Configuration > Object Lifecycles > Case Lifecycle.
- Select Revision from the States section.
- Select Edit from the Entry Actions section.
- Select Create Entry Action at the bottom of the page.
- Complete the following details:
- Select Always
- Under perform actions, select Assign Due Date.
- Select Save.
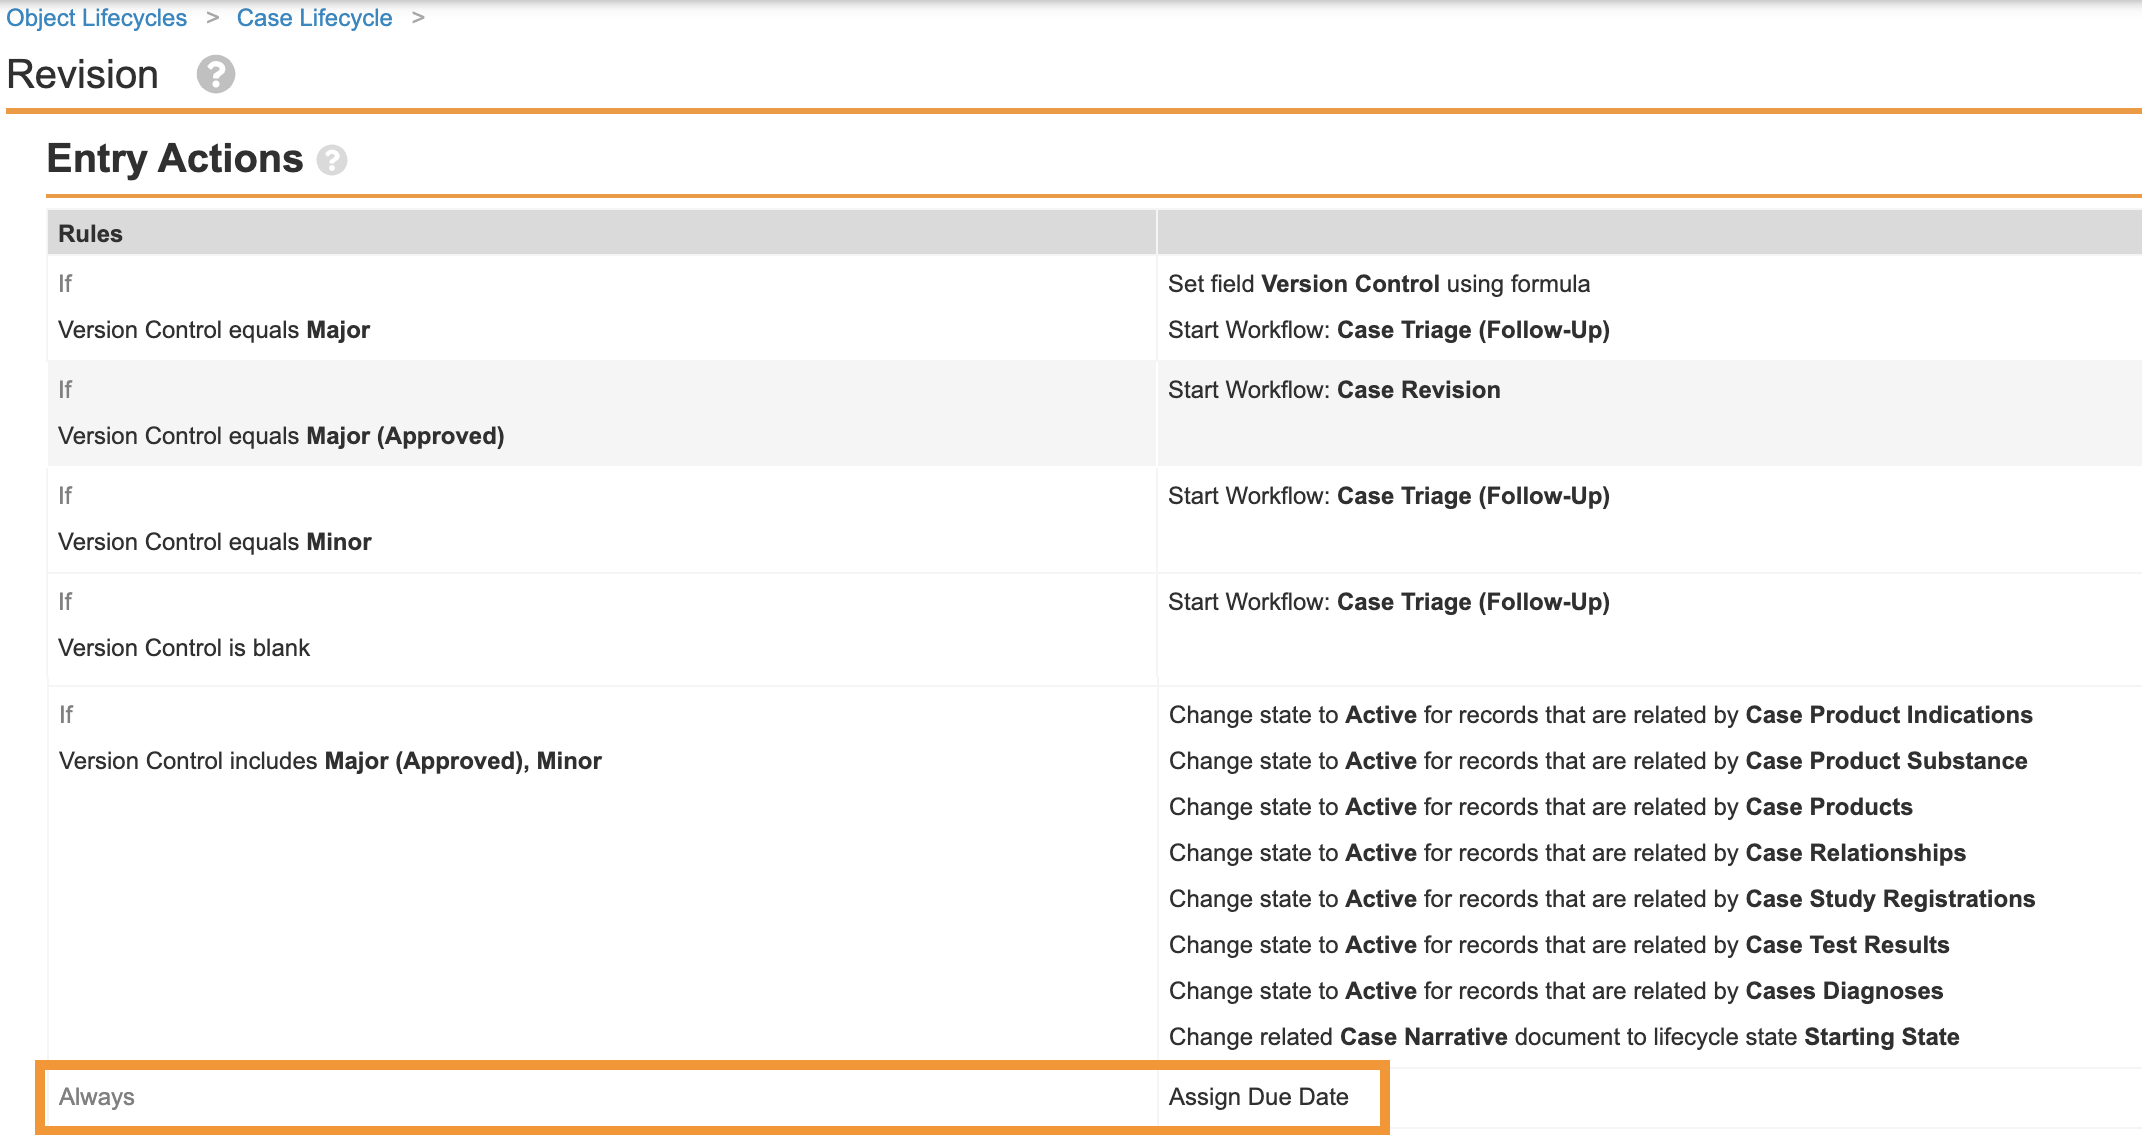
New Entry Action on Case Lifecycle Revision State